
Example 6: ZTNA application gateway with SAML as SP
- Complete the initial setup by following the instructions in Configure ZTNA HTTPS access proxy.
- Create a new SAML user/server on FortiGate GUI:
- On the FortiGate, click User & Authentication > Single Sign-On.
- Click Create New.
Set Address to
webserver.ztnademo.com:9443.Note: The Entity ID, Assertion consumer service URL, and Single logout service URL will be updated.
- Take note of the aforementioned updates, for you will be prompted to enter them into FIC.
Enable Certificate, and select the certificate used for the client.
In this example, the ztna-wildcard certificate is a local certificate that is used to sign SAML messages that are exchanged between the client and the FortiGate SP.
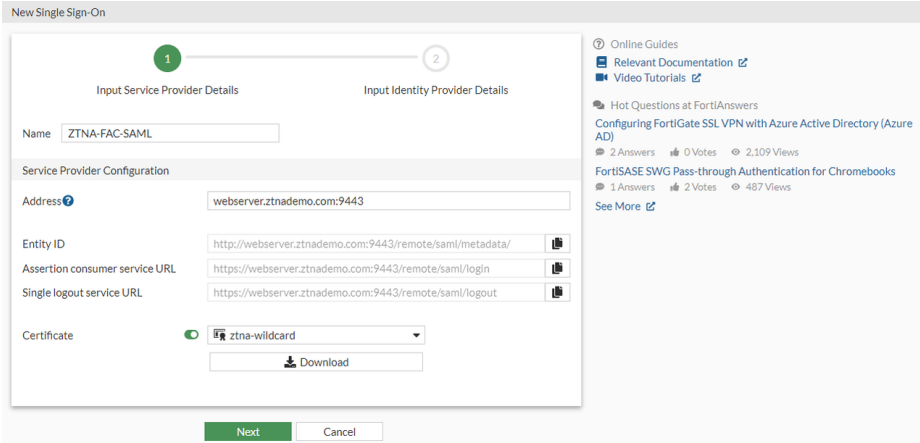
Click Next.
Use the settings from FIC to fill the custom Identity Provider Details. On FIC, go to Applications > SSO > Add SSO Application, and get the IdP Metadata details from the page:
Where the REMOTE_Cert_1 certificate is a remote certificate that is used to identify the IdP. You’ll want to use the certificate you get from after you create the FIC SSO application if you click the tool icon, select Details , and click to download the Signing Certificate.
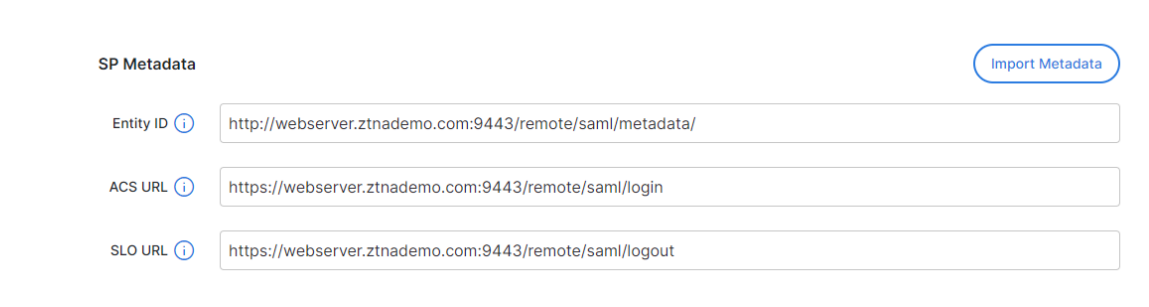
In the meantime, on FIC fill out the SP Metadata section with the Entity ID, Assertion consumer service URL and Single logout service URL:
Set Attribute used to identify users to username. (Note: Attributes to identify users and groups are case-sensitive.)
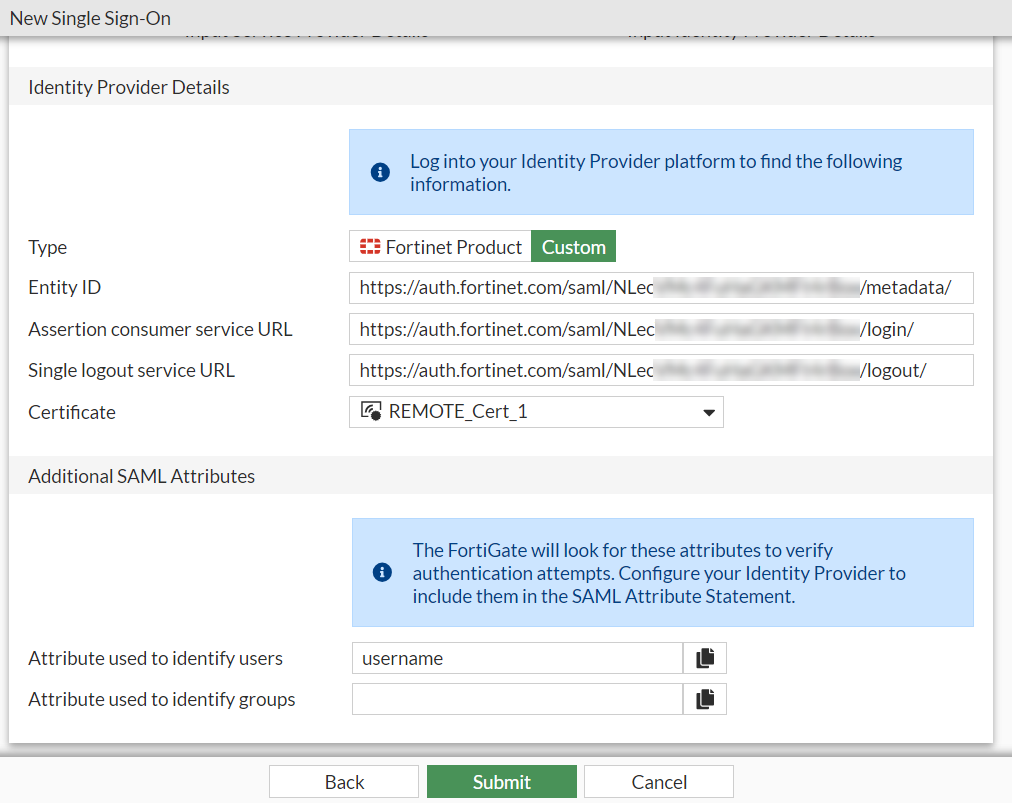
- Click Submit to save the settings.
- Create a user group for the SAML user object:
- Click User & Authentication > User Groups > Create New.
- Set Name to ztna-saml-users.
- Under Remote Groups, click Add.
- For Remote Server, select ZTNA-FAC-SAML.
- Click OK.
- Click OK again to save the settings.
- Apply the SAML sever to proxy authentication:
- Go to Policy & Objects > Authentication Rules.
- Click Create New > Authentication Scheme.
- Set Name to ZTNA-SAML-scheme.
- Set Method to SAML.
- Set SAML SSO server to ZTNA-FAC-SAML.
- Click OK.
- Go to Policy & Objects > Authentication Rules.
- Click Create New > Authentication Rule.
- Set Name to ZTNA-SAML-rule.
- Set Source Address to all.
- Set Incoming Interface to port3.
- Set Protocol to HTTP.
- Enable Authentication Scheme and select ZTNA-SAML-scheme.
- Set IP-based Authentication to Disable.
- Click OK.
- Configure the active authentication scheme and captive portal:
- Go to User Authentication > Authentication Settings.
- Enable Authentication scheme.
- Select ZTNA-SAML-scheme.
- Set Captive portal type to FQDN.
- Enable Captive Portal.
- Select the firewall address webserver.ztnademo.com. (Note: Choose this firewall address if you have not already done so.)
- Click Apply to save the configuration.
- Configure a ZTNA application gateway to allow SAML authentication requests to the SP:
- Configure the ZTNA server:
- Go to Policy & Objects > ZTNA > ZTNA Servers > Create New.
Configure the following:
Parameter
Description
Name ZTNA-access Interface Any IP 10.0.3.10 Port 9443 SAML Enabled SAML SSO Server ZTNA-FAC-SAML Default certificate ztna-wildcard
Click OK.
- Define the full ZTNA policy to allow access tto the ZTNA server:
- Go to Policy & Objects > Proxy policy > Create New.
Configure the following:
Parameter Description Name ZTNA-Rule Type ZTNA Incoming Interface port3 Source (Address) all Source (User) ztna-saml-users Destination all ZTNA Server
ZTNA-access
Action
Accept
Log Allowed Traffic
All Sessions
Click OK.
Once all of the aforementioned configurations are completed on your FGT and the SAML application and User Source(s) are set up on FIC, end-users should be able to start going through the FIC SAML login process when trying to access web servers through ZTNA.
- Configure the ZTNA server: