
LDAP authentication with TCP as transport
EAP-TTLS for LDAP based user authentication in IKEv2
When configuring IPsec VPNs, the user authentication mechanism used depends on the IKE version in use:
-
IKE version 1 uses XAUTH (Extended Authentication) for user authentication.
-
IKE version 2 uses EAP (Extensible Authentication Protocol) for user authentication.
XAUTH in IKEv1 natively supports LDAP based user authentication. In IKEv2, LDAP based user authentication is not directly supported through all EAP methods. To authenticate users against an LDAP server in IKEv2, you must use EAP-TTLS (Tunneled Transport Layer Security). EAP-TTLS allows credentials to be securely transmitted between FortiClient and FortiGate over a TLS tunnel, ensuring secure user authentication.
EAP-TTLS configuration is supported on FortiClient EMS and FortiClient version 7.4.3 and later, see EAP-TTLS support for IPsec VPN.
Both FortiClient and FortiClient EMS must be running compatible versions to enable this functionality, see EMS Compatibility chart.
Transport options: UDP, TCP or Auto mode
Different options can be selected between transport methods such as UDP, TCP, or Auto mode for IKE negotiation and encapsulation of ESP packets.
Traditionally, dial-up IPsec VPNs use UDP as the transport protocol for IKE negotiations and encrypted traffic. IPsec VPNs can now operate over TCP, providing greater flexibility and compatibility in restrictive network environments. Using TCP as transport is beneficial in scenarios where ISPs, firewalls, or proxy servers only allow inbound and outbound TCP traffic and block UDP traffic. You can also specify a custom TCP port for IPsec communication for both FortiGate and FortiClient. For details on configuring a custom TCP port on FortiClient, see IPsec VPN over TCP. For details on configuring a custom TCP port on FortiGate, see Dialup IPsec VPN using custom TCP port.
Requirements for using TCP as transport:
-
IKE version 2
-
FortiClient version 7.4.1 or later, that supports TCP as transport
VPN over TCP can be enabled on a per-VDOM basis. When configured, a dialup VPN tunnel defaults to Auto mode. In Auto mode, IKE initially uses UDP encapsulation. If the UDP connection fails to establish within the defined time threshold, it uses TCP encapsulation as fallback.
To configure the transport mode in the GUI:
-
Go to VPN > VPN Tunnels > Settings.
-
Enable Allow VPN negotiation over TCP.
Use TLS is supported with FortiGate as a client. It is not currently supported by FortiClient in 7.4.
-
Change TCP port for IKE/IPsec traffic as needed.
To configure the transport mode in the CLI:
config system settings
    set ike-tcp-service enable
    set ike-tcp-port <port>
end
On FortiClient EMS, you can configure the transport method using the FortiClient EMS GUI (see Example) or the XML tag <transport_mode>.
Example
This example demonstrates how to configure an IPsec VPN tunnel using IKEv2 with Auto transport protocol and LDAP for user authentication.
On FortiGate, an LDAP server named LDAP-Server is pre-configured to connect to LDAP directory server and is referenced in user group named LDAP-Group. For configuration steps, see Configuring an LDAP server and User groups.
The Group Name option is configured to match users who belong to the Domain Users group on the LDAP server. As a result, only members of the Domain Users group are permitted to connect to the IPsec VPN. For more information on group-based user matching, see Tracking users in each Active Directory LDAP group.
FortiClient is managed by FortiClient EMS. To enable support for both TCP transport and EAP-TTLS (required for secure LDAP authentication with IKEv2), ensure that both FortiClient and FortiClient EMS are running version 7.4.3 or later.

To configure dialup IPsec VPN using IKE version 2 and TCP as transport using GUI:
-
Enable VPN over TCP:
-
Go to VPN > VPN Tunnels > Settings.
-
Enable Allow VPN negotiation over TCP.
-
Optionally, change the TCP port.
-
Click Apply.
-
-
Go to VPN > VPN Wizard.
-
Enter a name for the VPN in the Tunnel name field. In this example, it is dialup_vpn.
-
Set Select a template to Remote Access.
-
Click Begin.
-
Configure the VPN tunnel settings:
Field
Value
VPN client type
FortiClient
FortiClient Management Type
EMS
Authentication method
Pre-shared key
Pre-shared key
Enter a suitable key.
The same pre-shared key is configured on FortiClient EMS to connect to this IPsec tunnel.
IKE
Version 2
NAT traversal
Enable
Keepalive frequency
10
EAP peer identification
EAP identity request
User authentication method
Phase 1 interface
Select LDAP-Group from the dropdown list.
Optionally, if you have multiple user groups configured, select Inherit from policy and then specify the groups. See Using single or multiple user groups for user authentication for details.
DNS Server
Use System DNS
-
Click Next.
-
Configure the Remote Endpoint settings:
Field
Value
Addresses to assign to connected endpoints
10.10.2.1-10.10.2.200
Subnet for connected endpoints
255.255.255.255
Security posture gateway matching
Disable
EMS SN verification
Disable
Save password
Enable
Auto Connect
Disable
Always up (keep alive)
Disable
-
Click Next.
-
Configure the Local FortiGate settings:
Field
Value
Incoming interface that binds to tunnel
port3
Create and add interface to zone
Disable
Local interface
port2
Local Address
local_network
Click + to create a new address object with Type set to Subnet and IP/Netmask set to 10.88.0.0/24, if not already configured.
-
Click Next.
-
Review the configuration and click Submit.
To configure dialup IPsec VPN using IKE version 2 and TCP as transport using CLI:
-
Configure a LDAP server on FortiGate:
config user ldap edit "ldaps-server" set server "10.88.0.1" set server-identity-check disable set cnid "sAMAccountName" set dn "dc=fortiad,dc=info" set type regular set username "fortiad\\Administrator" set password ENC ********** set secure ldaps set ca-cert "LDAPS-CA" set port 636 next end -
Configure a user group that uses the LDAP server along with group matching (
group-name):config user group edit "LDAP-Group" set member "ldaps-server" config match edit 1 set server-name "ldaps-server" set group-name "CN=Administrators,CN=Builtin,DC=fortiad,DC=info" next end next end -
Configure the internal interface:
config system interface edit "port2" set vdom "root" set ip 10.88.0.254 255.255.255.0 next end config firewall address edit "local_subnet_1" set subnet 10.88.0.0 255.255.255.0 next end config firewall addrgrp edit "local_network" set member "local_subnet_1" next end -
Configure the WAN interface.
The WAN interface is the interface connected to the ISP. It can be configured in static mode (as shown here), DHCP, or PPPoE mode. It is recommended to configure it with a static IP address to ensure that the IPsec VPN configuration on the FortiClient stays unchanged if the WAN IP changes on the FortiGate. The IPsec tunnel is established over the WAN interface.
config system interface edit "port3" set vdom "root" set ip 203.0.113.249 255.255.255.0 next end -
Configure the client address pool.
You must create a firewall address to assign an IP address to a client from the address pool.
config firewall address edit "client_range" set type iprange set start-ip 10.10.2.1 set end-ip 10.10.2.200 next end -
Enable VPN over TCP. Optionally change the TCP port:
config system settings
    set ike-tcp-service enable
    set ike-tcp-port <port>
end
When using TCP port 443 for IKE/IPsec traffic, GUI access can be affected for interfaces that are bound to an IPsec tunnel when the GUI admin port is also using port 443. To ensure continued functionality, change either the IKE/IPsec port or the administrative access port.
To change the administrative access port:
config system global
    set admin-sport <port>
end
Command
Description
admin-sport
 <port>
Set the administrative access port for HTTPS (1 - 65535, default = 443).
For port conflicts with ZTNA and SSL VPN, ZTNA and SSL VPN will take precedence. To avoid any port conflicts with other services, review the FortiOS Ports guide for other incoming ports used on the FortiGate.
-
Configure the IPsec phase 1 interface:
config vpn ipsec phase1-interface edit "dialup_vpn" set type dynamic set interface "port3" set ike-version 2 set peertype any set net-device disable set mode-cfg enable set proposal aes128-sha256 aes256-sha256 aes128gcm-prfsha256 aes256gcm-prfsha384 chacha20poly1305-prfsha256 set dhgrp 20 21 set eap enable set eap-identity send-request set authusrgrp "LDAP-Group" set assign-ip-from name set ipv4-name "client range" set dns-mode auto set ipv4-split-include "local_network" set save-password enable set psksecret ****** next end -
Configure the IPsec phase 2 interface:
config vpn ipsec phase2-interface edit "dialup_vpn" set phase1name "dialup_vpn" set proposal aes128-sha256 aes256-sha256 aes128gcm aes256gcm chacha20poly1305 set dhgrp 20 21 next end -
Configure a firewall policy to allow client traffic flow over the IPsec VPN tunnel to the FortiGate’s LAN (port2) interface:
config firewall policy
    edit 1
        set name "inbound"
        set srcintf "dialup_vpn"
        set dstintf "port2"
        set srcaddr "client_range"
        set dstaddr "local_network"
        set action accept
        set schedule "always"
        set service "ALL"
    next
end
One or more user groups for user authentication can be configured under a single IPsec VPN tunnel. See Using single or multiple user groups for user authentication for details.
To configure the Remote Access profile to use EAP-TTLS with IKEv2 on FortiClient EMS:
-
On FortiClient EMS, navigate to Endpoint Profiles > Remote Access and click Edit on the Default endpoint profile.
-
Under VPN Tunnels, click Add Tunnel.
-
Set VPN type as Manual.
-
Click Next.
-
Under Basic Settings, enter the following:
Field
Value
Name
IPsec-IKEv2
Remote Gateway
203.0.113.249
Authentication Method
Pre-shared Key
Pre-Shared Key
Enter pre-shared key that was configured on FortiGate’s dialup VPN configuration.
Prompt for Username
Enabled
-
Click VPN Settings, enter the following:
Field
Value
IKE
Version 2
Address Assignment
Mode Config
Encapsulation
Auto
(Optional) To use TCP mode only, set to IPsec over TCP. Otherwise Auto will attempt UDP first, and fallback to TCP.
IKE TCP Port
443
IKE UDP Port
500
-
Click Phase 1, enter the following details:
Field
Value
IKE Proposal
Encryption, Authentication
AES128, SHA256
Encryption, Authentication
AES256, SHA256
DH Groups
20, 21
Key Life
86400
EAP Authentication Method
EAP-TTLS
This setting is available in the GUI of FortiClient 7.4.4 and later.
Dead Peer Detection
Enable
NAT Traversal
Enable
-
Click Phase 2, enter the following details:
Field
Value
IKE Proposal
Encryption, Authentication
AES128, SHA256
Encryption, Authentication
AES256, SHA256
DH Groups
20
Key Life
43200
Enable Replay Detection
Enable
Enable Perfect Forward Secrecy (PFS)
Enable
-
Click Save to save the VPN Tunnel configuration.
-
Click Save to save Remote Access endpoint profile.
To connect and fallback to TCP:
In this example, UDP is blocked by the ISP. FortiClient will detect that connection over TCP fails, so it will connect over TCP.
-
On FortiClient endpoint that received the configuration, in the Remote Access tab, find the tunnel IPsec-IKEv2 and click Connect.
The client will first initiate the connection over UDP. After some time, it will fallback to TCP.
-
Once the VPN connection is initiated over TCP, user is prompted for their LDAP credentials. Do not wait too long to enter the username and password or the connection will timeout.
Once the correct credentials are entered, the connection will establish.
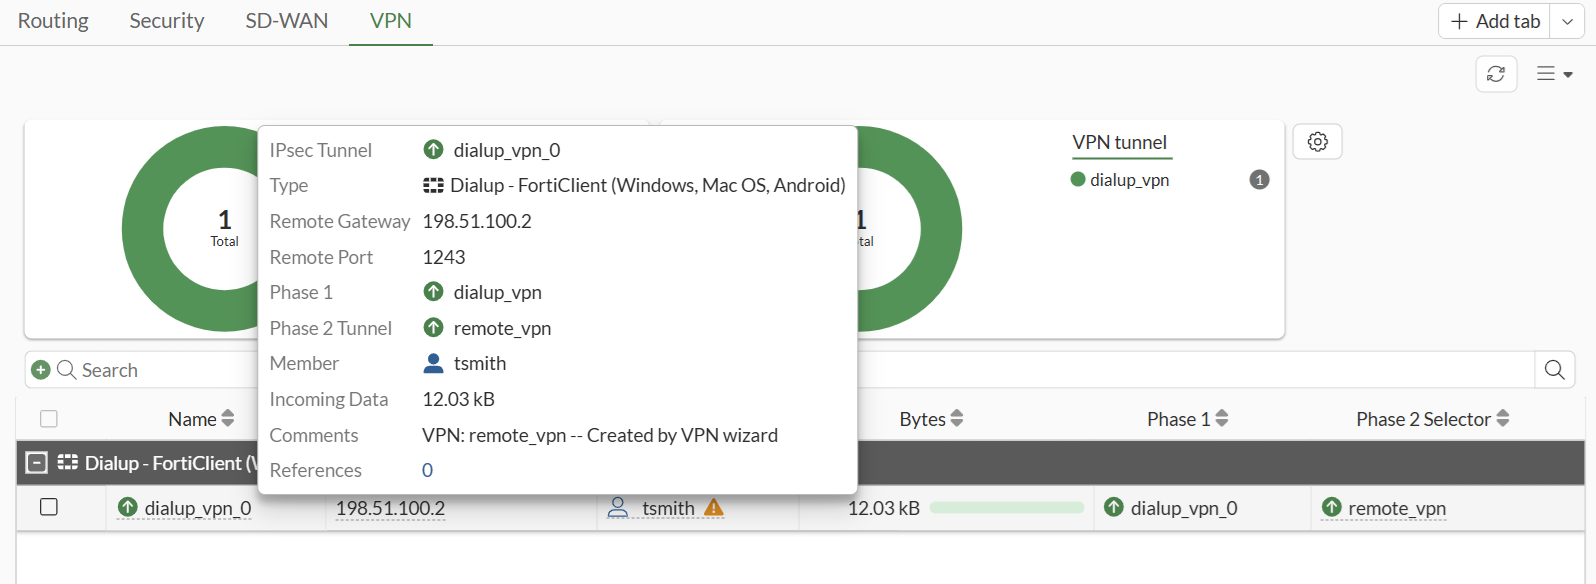
To verify VPN tunnel status using FortiGate GUI:
-
On the FortiGate, go to Dashboard > Network Monitor > VPN.
-
Find the new tunnel, dialup_vpn_0 in this example, and check the statuses of the Phase 1 and Phase 2 selectors.
Successfully established dialup IPsec VPN tunnels are displayed using a parent name followed by an index, creating a structured and organized association with the parent tunnel. For example, the parent name dialup_vpn results in tunnel names such as dialup_vpn_0, dialup_vpn_1, and so on.
-
Hover the cursor over the tunnel name to see additional details.
To verify VPN tunnel status:
-
Verify the IPsec Phase 1 tunnel status on the FortiGate, either using the CLI or the Command palette (CTRL+P) > CLI diagnostics:
# diagnose vpn ike gateway list name dialup_vpn_0

vd: root/0
name: dialup_vpn_0
version: 2
interface: port3 5
addr: 203.0.113.249:443 -> 198.51.100.2:1243
tun_id: 10.10.2.1/::10.0.0.8
remote_location: 0.0.0.0
network-id: 0
transport: TCP
tcp-tx-1m-rate : 0 kbps
tcp-tx-5m-rate : 0 kbps
tcp-tx-drop    : 0
tcp-rx-1m-rate : 0 kbps
tcp-rx-5m-rate : 0 kbps
tcp-rx-drop    : 0
created: 276s ago
eap-user: tsmith
2FA: no
peer-id: 198.51.100.2
peer-id-auth: no
FortiClient UID: 9A016B5A6E914B42AD4168C066EB04CA
assigned IPv4 address: 10.10.2.1/255.255.255.255
nat: me peer
pending-queue: 0
PPK: no
IKE SA: created 1/1  established 1/1  time 15390/15390/15390 ms
IPsec SA: created 1/1  established 1/1  time 20/20/20 ms

  id/spi: 22915 7d15b5fbc22c6251/41ed29e125e71ad3
  direction: responder
  status: established 276-261s ago = 15390ms
  proposal: aes128-sha256
  child: no
  SK_ei: c8bde5a7fb91c50c-b2e8f23654b5f4e7
  SK_er: e9a54853408a154f-9e2221740b993822
  SK_ai: 70eec5f71fa1c630-307098f3d8d3c88e-1ce71f56708aecde-29d779709f7f59cf
  SK_ar: c7cf4ea6936ac970-c45518b44b3b4820-6e0ed1e34b3f140e-37e24a58cf868a29
  PPK: no
  message-id sent/recv: 0/37
  QKD: no
  PQC-KEM (IKE): no
  PQC-KEM (all IPsec): no
  lifetime/rekey: 86400/85868
Note that FortiGate acts as the responder, establishes the IPsec tunnel with remote FortiClient user with IP 198.51.100.2 over TCP port 443 on its port3 interface, and dynamically assigns a VPN IP of 10.10.2.1 to FortiClient endpoint. The authenticated username is also displayed in eap-user field.
-
Verify the IPsec Phase 2 tunnel status on the FortiGate:
# diagnose vpn tunnel list name dialup_vpn_0

list all ipsec tunnel in vd 0
------------------------------------------------------
name=dialup_vpn_0 ver=2 serial=d 203.0.113.249:443->198.51.100.2:1243 nexthop= tun_id=10.10.2.1 tun_id6=::10.0.0.8 status=up dst_mtu=0 weight=1 country=ZZ
bound_if=5 real_if=0 lgwy=static/1 tun=intf mode=dial_inst/3 encap=none options[0x23a8]=npu rgwy-chg rport-chg frag-rfc  run_state=0 role=primary accept_traffic=1 overlay_id=0

parent=dialup_vpn index=0
proxyid_num=1 child_num=0 refcnt=6 ilast=27 olast=44096403 ad=/0
stat: rxp=404 txp=0 rxb=32239 txb=0
dpd: mode=on-demand on=1 status=ok idle=20000ms retry=3 count=0 seqno=0
natt: mode=none draft=0 interval=0 remote_port=0
proxyid=remote_vpn proto=0 sa=1 ref=2 serial=1 add-route
  src: 0:0.0.0.0-255.255.255.255:0
  dst: 0:10.10.2.1-10.10.2.1:0
  SA:  ref=3 options=20682 type=00 soft=0 mtu=1280 expire=42697/0B replaywin=2048
       seqno=1 esn=0 replaywin_lastseq=00000194 qat=0 rekey=0 hash_search_len=1
  life: type=01 bytes=0/0 timeout=43186/43200
  dec: spi=0cbfd916 esp=aes key=16 8b28c31eb8705e1f9ccce460dc38c0bd
       ah=sha256 key=32 deaabb9a355830bcad14a28a8ed46932cf52ea8b4eec0dc381714d90c7173931
  enc: spi=215028aa esp=aes key=16 f4f6b1d4bde88bda7b98bd1210e298e6
       ah=sha256 key=32 d4da5de14ef9b6270540e5a3f75b69b229b0506c6fc7ecc4dc1816e2c15d861a
  dec:pkts/bytes=404/32239, enc:pkts/bytes=0/0
  npu_flag=00 npu_rgwy=0.0.0.0:0 npu_lgwy=0.0.0.0:0 npu_selid=0
  dec_npuid=0 enc_npuid=0 dec_engid=-1 enc_engid=-1 dec_saidx=-1 enc_saidx=-1
Note the decryption, encryption, and authentication keys negotiated in Phase 2 to protect subnets under the
srcanddstfields. FortiOS also automatically adds the dynamically assigned VPN IP of 10.10.2.1 to its traffic selectors for dialup tunnel dialup_vpn_0.
To verify traffic through the IPsec tunnel:
-
On the remote FortiClient user with IP address 198.51.100.2, initiate ICMP traffic to a machine in the 10.88.0.0/24 network and verify that traffic goes through:
# ping 10.88.0.7
Pinging 10.88.0.7 with 32 bytes of data:
Reply from 10.88.0.7: bytes=32 time=2ms TTL=63
Reply from 10.88.0.7: bytes=32 time=2ms TTL=63
-
On FortiGate, run a sniffer trace for ICMP packets destined to 10.10.111.3:
# diagnose sniffer packet any 'host 10.10.111.3’ 4 0 l

Using Original Sniffing Mode
interfaces=[any]
filters=[host 10.88.0.7 and icmp]
2026-04-13 21:06:46.543624 dialup_vpn in 10.10.2.1 -> 10.88.0.7: icmp: echo request
2026-04-13 21:06:46.543694 port2 out 10.88.0.254 -> 10.88.0.7: icmp: echo request
2026-04-13 21:06:46.544223 port2 in 10.88.0.7 -> 10.88.0.254: icmp: echo reply
2026-04-13 21:06:46.544247 dialup_vpn out 10.88.0.7 -> 10.10.2.1: icmp: echo reply
The ICMP request packets are received on dialup_vpn_0 tunnel interface and routed to the port2 interface. ICMP reply packets are received on the port2 interface and routed back out on dialup_vpn_0 tunnel interface.
For more information, see Performing a sniffer trace or packet capture.
-
Optionally, run real time IKE debug using appropriate filters for troubleshooting if the IPsec tunnel does not come up:
# diagnose vpn ike log filter rem-addr4 198.51.100.2
# diagnose debug application ike -1
# diagnose debug enable
For more information, see VPN IPsec troubleshooting.
To verify LDAP authentication using EAP-TTLS on FortiClient:
-
Ensure that the logging level is set to Debug on FortiClient.
-
After the VPN tunnel establishes on FortiClient, go to the folder located under C:\%ProgramFiles%\Fortinet\FortiClient\logs\trace\ and open the file FortiIKE_1.log. The following shows expected log output for this feature:
[7868:11132] [FortiIKE  524    info] IPsec daemon start ipsec.exe -s FC_{73EFB30F-1CAD-4a7a-AE2E-150282B6CE25}_000002 -i 2 -g 198.51.100.2 IPsec-IKEv2

[7868:11132] [FortiIKE  419   debug] EAP-TTLS method loaded
[7868:11132] [FortiIKE  427   debug] EAP-GTC method loaded

[7868:11132] [FortiIKE  4939   debug] 0:IPsec-IKEv2:0: initiator received EAP msg
[7868:11132] [FortiIKE  400   debug] EAP: Initialize selected EAP method: vendor 0 method 21 (TTLS)

[7868:11132] [FortiIKE  145   debug] EAP-TTLS: Phase2 type: PAP
[7868:11132] [FortiIKE  4779   debug] 0:IPsec-IKEv2:0: authentication succeeded