
HA with redundant interfaces
You can combine two or more physical interfaces into a single redundant interface. Unlike aggregate interfaces (LACP), redundant interfaces do not increase throughput; instead, they provide a pure active-backup failover mechanism. Traffic is processed by a single port at a time, failing over to the next available member only if the active link goes down.
In an HA cluster, HA monitoring treats the redundant interface as a single logical entity. A cluster failover is triggered only if all physical ports within the redundant interface fail. The redundant interface uses a virtual MAC address derived from the first physical port added to its configuration.
While redundant interfaces provide physical link failover, they do not offer the load-balancing benefits of 802.3ad aggregation. See HA with 802.3ad aggregate interfaces for more information. Redundant interfaces are best suited for environments where switches do not support LACP or when simple link‑level redundancy is the primary requirement.
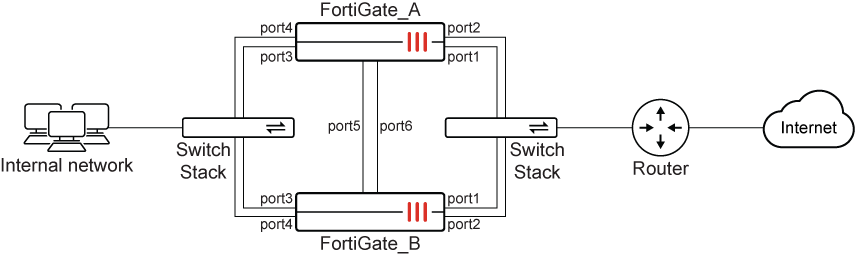
In this example, two FortiGate units are configured in an HA cluster. Port 5 and Port 6 are used as heartbeat links. Redundant interfaces are used to connect to the internet (Port 1 and Port 2) and the internal network (Port 3 and Port 4). This ensures that if a cable or switch port fails on either unit, the redundant link takes over immediately without requiring a full cluster failover.
To configure the FortiGates for HA operation in the GUI:
-
On both FortiGates, go to System > HA and configure the following:
Option
Value
Mode
Active-Passive
Group Name
Pochiya
Password
***********
Heartbeat interfaces
port5
port6
Heartbeat Interface Priority
port5: 50
port6: 50
-
Click OK.
To configure the redundant interfaces in the GUI:
-
Go to Network > Static Routes and temporarily delete any routes using member ports (port1 to port4).
-
Go to Network > Interfaces and click Create new > Interface.
-
Configure the WAN redundant interface:
Option
Value
Name
WAN_Redundant
Type
Redundant Interface
Interface Members
port1
port2
IP/Netmask
172.20.120.141/24
-
Click OK.
-
Click Create new > Interface again to create the internal redundant interface:
Option
Value
Name
Internal_Redundant
Type
Redundant Interface
Interface Members
port3
port4
IP/Netmask
10.11.101.100/24
-
Click OK.
To configure static routing in the GUI:
-
Go to Network > Static Routes and click Create new.
-
Configure the following:
Option
Value
Destination
0.0.0.0/0.0.0.0
Gateway Address
172.20.120.2
Interface
WAN_Redundant
-
Click OK.
To configure HA port monitoring in the GUI:
-
Go to System > HA.
-
Edit the primary unit in the Cluster Members list.
-
Set Monitor Interfaces to WAN_Redundant and Internal_Redundant.
-
Click OK.
To configure HA with redundant interfaces in the CLI:
-
Configure HA on both units:
config system ha set mode a-p set group-name Pochiya set password ********* set hbdev port5 50 port6 50 end -
Create redundant interfaces:
config system interface edit "WAN_Redundant" set type redundant set member port1 port2 set ip 172.20.120.141 255.255.255.0 next edit "Internal_Redundant" set type redundant set member port3 port4 set ip 10.11.101.100 255.255.255.0 next end -
Configure static routing:
config router static edit 1 set gateway 172.20.120.2 set device "WAN_Redundant" next end -
Configure HA monitoring:
config system ha
    set monitor "WAN_Redundant" "Internal_Redundant"
end