Basic ZTNA configuration
To deploy a ZTNA application gateway, configure the following components on the FortiGate:
This feature is not supported on FortiGate models with 2 GB RAM or less. See Proxy-related features not supported on FortiGate 2 GB RAM models for more information.
To configure ZTNA in the GUI, go to System > Feature Visibility and enable Zero Trust Network Access.
Configure a FortiClient EMS connector
To add an on-premise FortiClient EMS server in the GUI:
-
Go to Security Fabric > Fabric Connectors and double-click the FortiClient EMS card.
-
Set the Status to Enabled for one of the EMS servers.
-
Enter a name for the connector and the IP address or FQDN of the EMS.
-
Click OK.
-
A window appears to verify the EMS server certificate. Click Accept.
See FortiClient EMS for more information.
To add an on-premise FortiClient EMS server in the CLI:
config endpoint-control fctems
    edit <ems-id>
        set status enable
        set name <name>
        set server <server IP or domain>
        set verifying-ca <certificate>
    next
end
To add FortiClient EMS Cloud in the GUI:
-
Go to Security Fabric > Fabric Connectors and double-click the FortiClient EMS card.
-
Set the Status to Enabled for one of the EMS servers.
-
Set the Type to FortiClient EMS Cloud.
-
Enter a name for the connector.
-
Click OK. A window appears to verify the EMS server certificate.
-
Click Accept.
See FortiClient EMS for more information.
To add FortiClient EMS Cloud in the CLI:
config endpoint-control fctems
    edit <ems-id>
        set status enable
        set name <name>
        set fortinetone-cloud-authentication enable
        set certificate <string>
    next
end
Security posture tags
After the FortiGate connects to the FortiClient EMS, it automatically synchronizes security posture tags. Security posture tags are generated from tagging rules configured on the FortiClient EMS. These tagging rules are based on various posture checks that can be applied on the endpoints. See Endpoint Posture Check Reference.
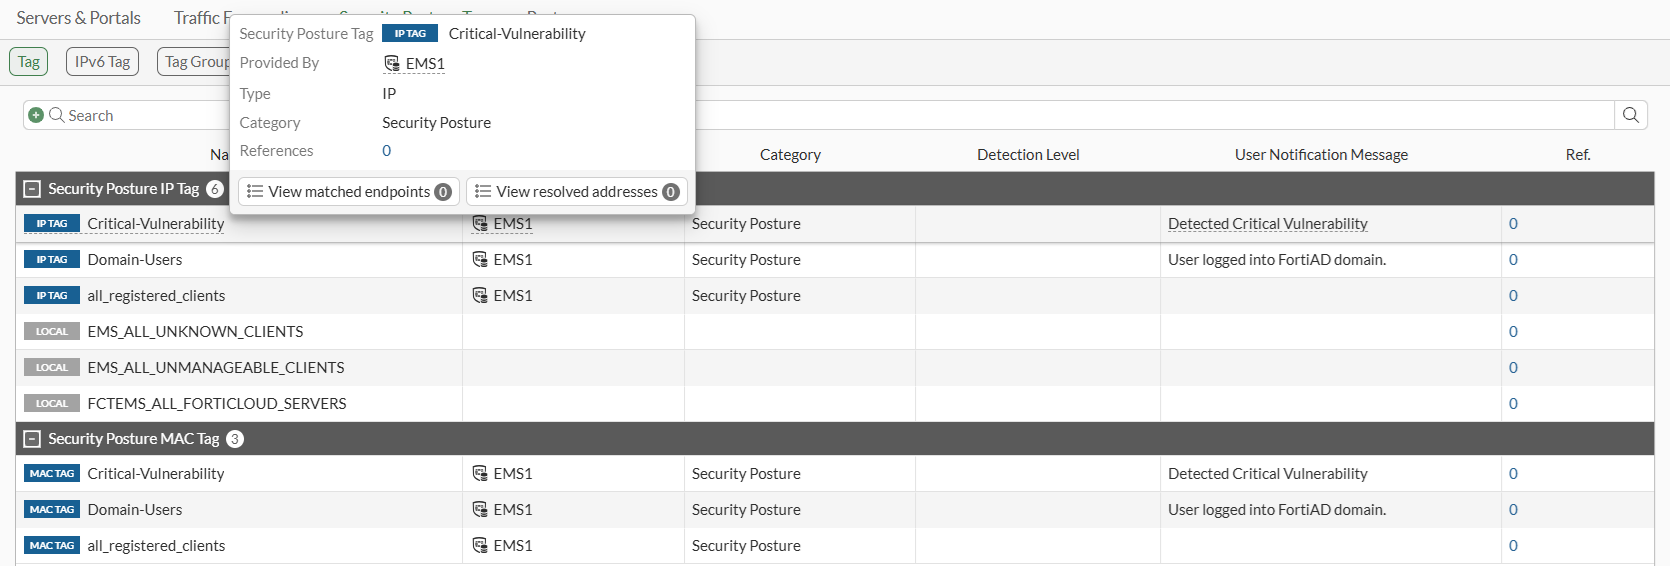
To view the synchronized security posture tags in the GUI:
-
Go to Policy & Objects > ZTNA and select the Security Posture Tag tab.
-
Hover the cursor over a tag name to view more information about the tag, such as its resolved addresses.
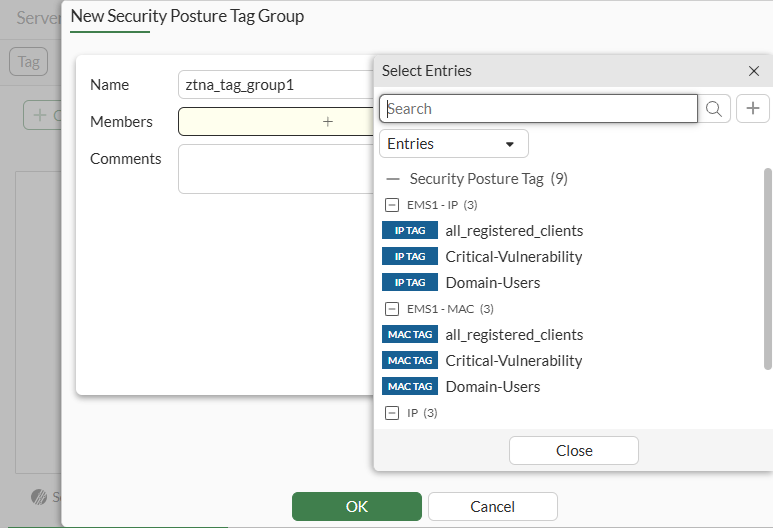
To create a security posture tag group in the GUI:
-
Go to Policy & Objects > ZTNA > Security Posture Tags and select the Tag Group sub-menu.
-
Click Create New.
-
Enter a name for the group and select the group members.
-
Click OK.
To view the synchronized security posture tags in the CLI:
# diagnose firewall dynamic address
# diagnose firewall dynamic list
To create a security posture tag group in the CLI:
config firewall addrgrp
    edit <group name>
        set category ztna-ems-tag
        set member <members>
    next
end
Configure a ZTNA port
The ZTNA port (formerly access proxy VIP) is the FortiGate ZTNA gateway that clients make HTTPS connections to. Starting in 8.0, the ZTNA port can be configured separately before being mapped to a server. This allows the ZTNA port to be decoupled from the ZTNA real-server(s) and be referenced by more than one set of servers.
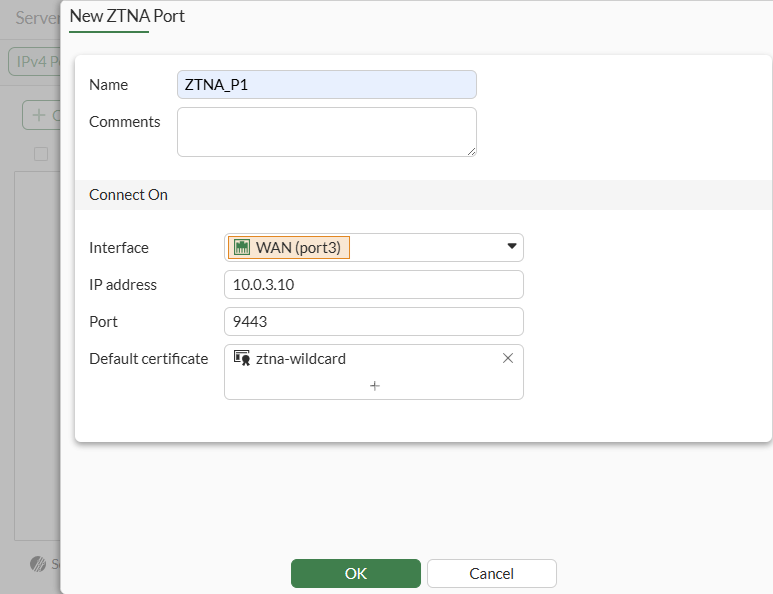
To create a ZTNA port in the GUI:
-
Go to ZTNA > Ports, and select IPv4 Ports or IPv6 Ports (visible when IPv6 is enabled in feature visibility).
-
Click Create New.
-
Enter a name for the ZTNA port.
-
Select an Interface.
-
Enter an IP address.
-
Enter the port to connect to.
Verify that the IP address and port do not conflict with management access to the interface. Otherwise, change the IP address to another address on that subnet.
You may specify the IP address as 0.0.0.0 if an interface other than Any is selected. The ZTNA Application Gateway IP address will dynamically use the primary and secondary IPv4 address of the interface as its external IP address.
-
Select the Default certificate. Clients will be presented with this certificate when they connect to the access proxy VIP.
-
Click OK.
To create a ZTNA port in the CLI:
config firewall vip
    edit <name>
        set type access-proxy
        set server-type https
        set extip <external IP>
        set extintf <external interface>
        set extport <external port>
        set empty-cert-action {accept | block | accept-unmanageable}
        set user-agent-detect {enable | disable}
        set client-cert {enable | disable}
        set ssl-certificate <certificate>
    next
end
Configure a ZTNA server
To configure a ZTNA server, map a ZTNA port to the real servers that clients will connect to. If a ZTNA port is not defined, you can also create a new one directly on the ZTNA server definition page.
A ZTNA server can be either a Web server or a traffic forwarding server. In the following example, we will create a ZTNA web server.
In the GUI, the web proxy server can be configured using basic or advanced configuration mode:
-
Basic mode (default): use this mode when you need to configure a single destination that is tied to this Web server object and virtual host.
-
Advanced mode: use this mode when you need to configure multiple destinations tied to this Web server object and virtual host. For example, you plan to specify different paths for various destinations. You will also be able to customize the port for the server, which by default is 443.
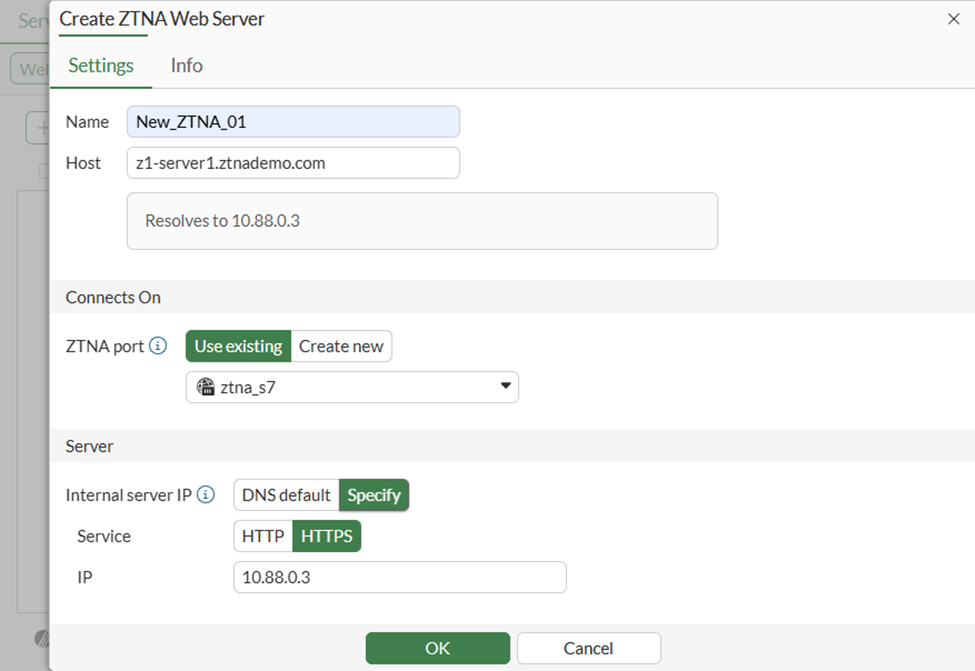
To create a ZTNA web server for using the basic method in the GUI:
-
Go to Policy & Objects > ZTNA > Servers & Portals.
-
Go to Web Server sub-menu and click Create New.
-
Configure the following:
Setting
Description
Name
Name of the web server object.
IP version
Select IPv4 or IPv6. This option only appears if IPv6 is enabled on Feature Select.
Host*
Name of the virtual host that your end users are accessing.
ZTNA port
-
Use existing: Select a previously configured ZTNA port.
-
Create new: Input settings for a new ZTNA port.
Internal server IP
-
DNS default: Automatically resolves the virtual host and configure the real server to be the IP of the resolved host.
-
Specify: Configure the real server manually. Select Service (HTTP/HTTPS) and IP. By default, the port will be 443. To change the port, use Advanced mode.
* Host (aka Virtual Host) fields are mandatory, since multiple entries can be paired with the same ZTNA port. To differentiate between different servers, the virtual host field is used for matching.
When a host is not specified, any request that resolves to the ZTNA port will be mapped to this ZTNA server. For instance, if both www.example1.com and www.example2.com resolve to the ZTNA port, then both requests are mapped to your real servers of this ZTNA server.
Note that only one ZTNA server entry can have an empty host, and it can only be configured from CLI.
On the other hand, when you enter a name or IP address in the host field, then the request must match this host. For example, if www.example1.com is entered as the host, then only requests to www.example1.com will match this ZTNA server.
As a best practice, an external DNS should be used by remote clients to resolve the virtual-host to the ZTNA port.
Example using DNS default for Internal server IP

Manually specify Internal server IP
-
-
Click OK to save.
This method automatically configures a virtual host object in the CLI and references it in the ZTNA web-proxy object.
config firewall access-proxy-virtual-host
    edit "web-proxy_vh_mggshssu"
        set ssl-certificate "ztna-wildcard"
        set host "z1-server1.ztnademo.com"
    next
end
config ztna web-proxy
    edit "New_ZTNA_01"
        set vip "ztna_s7"
        set host "web-proxy_vh_mggshssu"
        config api-gateway
            edit 1
                config realservers
                    edit 1
                        set ip 10.88.0.3
                    next
                end
            next
        end
    next
end
For other advanced virtual host settings, use the CLI:
config firewall access-proxy-virtual-host
    edit <host>
        set host-type { substring | fqdn* | wildcard }
        set empty-cert-action { accept | block* | accept-unmanageable }
        set client-cert { enable* | disable }
    next
end
When using host-type fqdn, the host will only match when the subdomain matches the host. For example, the host test.com will match vhost1.test.com, but will not match test.com.vhost. On the other hand, host-type substring will match both.
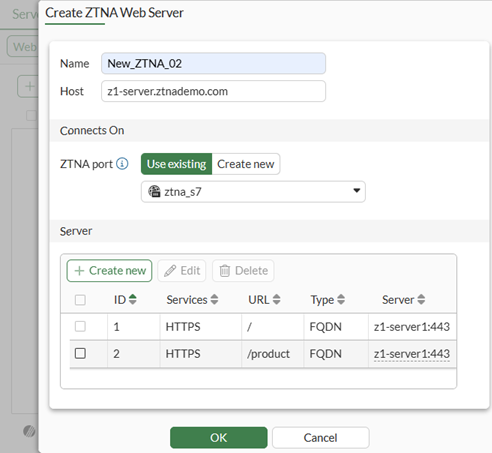
To create a ZTNA web server using the advanced method in the GUI:
-
Go to Policy & Objects > ZTNA > Servers & Portals.
-
Go to the Web Server sub-menu and click Create New.
-
Enable Advanced configuration mode.
-
Enter the Name, IP version, Host, and ZTNA port settings as in the Basic method.
-
In the Server table, click Create new to add a new real server.
Setting
Description
Service
HTTP or HTTPS
Path*
Optional. Specify a specific path for matching. When creating more than one real server, the paths must be distinct.
Address Type
-
IP: Input the IP and port of the real server.
-
FQDN: The address of the real server can be chosen from pre-configured FQDN addresses.
*The path can be matched by substring, wildcard, or regular expression when configured from the CLI. In the GUI, the default is substring. For example, if the virtual host is specified as www.example1.com, and the path substring is map1, then www.example1.com/map1 will be matched to this real server.
-
-
Click OK to save.
This method also automatically configures a virtual host object in the CLI and references it in the ZTNA web-proxy object:
config firewall access-proxy-virtual-host
        edit "web-proxy_vh_mggsn6e5"
        set ssl-certificate "ztna-wildcard"
        set host "z1-server.ztnademo.com"
    next
end
config ztna web-proxy
    edit "New_ZTNA_02"
        set vip "ztna_s7"
        set host "web-proxy_vh_mggsn6e5"
        config api-gateway
            edit 1
                config realservers
                    edit 1
                        set addr-type fqdn
                        set address "z1-server1"
                    next
                end
            next
            edit 2
                set url-map "/product"
                config realservers
                    edit 1
                        set addr-type fqdn
                        set address "z1-server1"
                    next
                end
            next
        end
    next
end
Starting in FortiOS 7.6.4, certificate verification of the real server is enabled by default. You can manually adjust the setting using the following CLI command:
config ztna web-proxy
    edit <server>
        config api-gateway
            edit 1
                config realservers
                    edit 0
                        set ip <real server 2 address>
                        set port <real server 2 port>
                        set verify-cert {enable | disable}
                    next
                end
            next
        end
    next
end
Configure a ZTNA policy
A ZTNA policy is used to enforce zero trust role based access control by using security posture tags or tag groups to verify a device’s security posture. A ZTNA policy can also utilize security profiles to protect this traffic.
There are two ways to configure ZTNA rules in the GUI by using a full or simple ZTNA policy:
-
Full ZTNA policy: The method uses ZTNA type proxy policies. You can granularly define destination addresses beyond the ZTNA server and destination you are allowing.
-
Simple ZTNA policy: A simplified method for configuring a ZTNA policy using firewall policies. This method covers most functionality of a Full ZTNA policy, except it cannot control access based on destination interface or real server’s destination address.
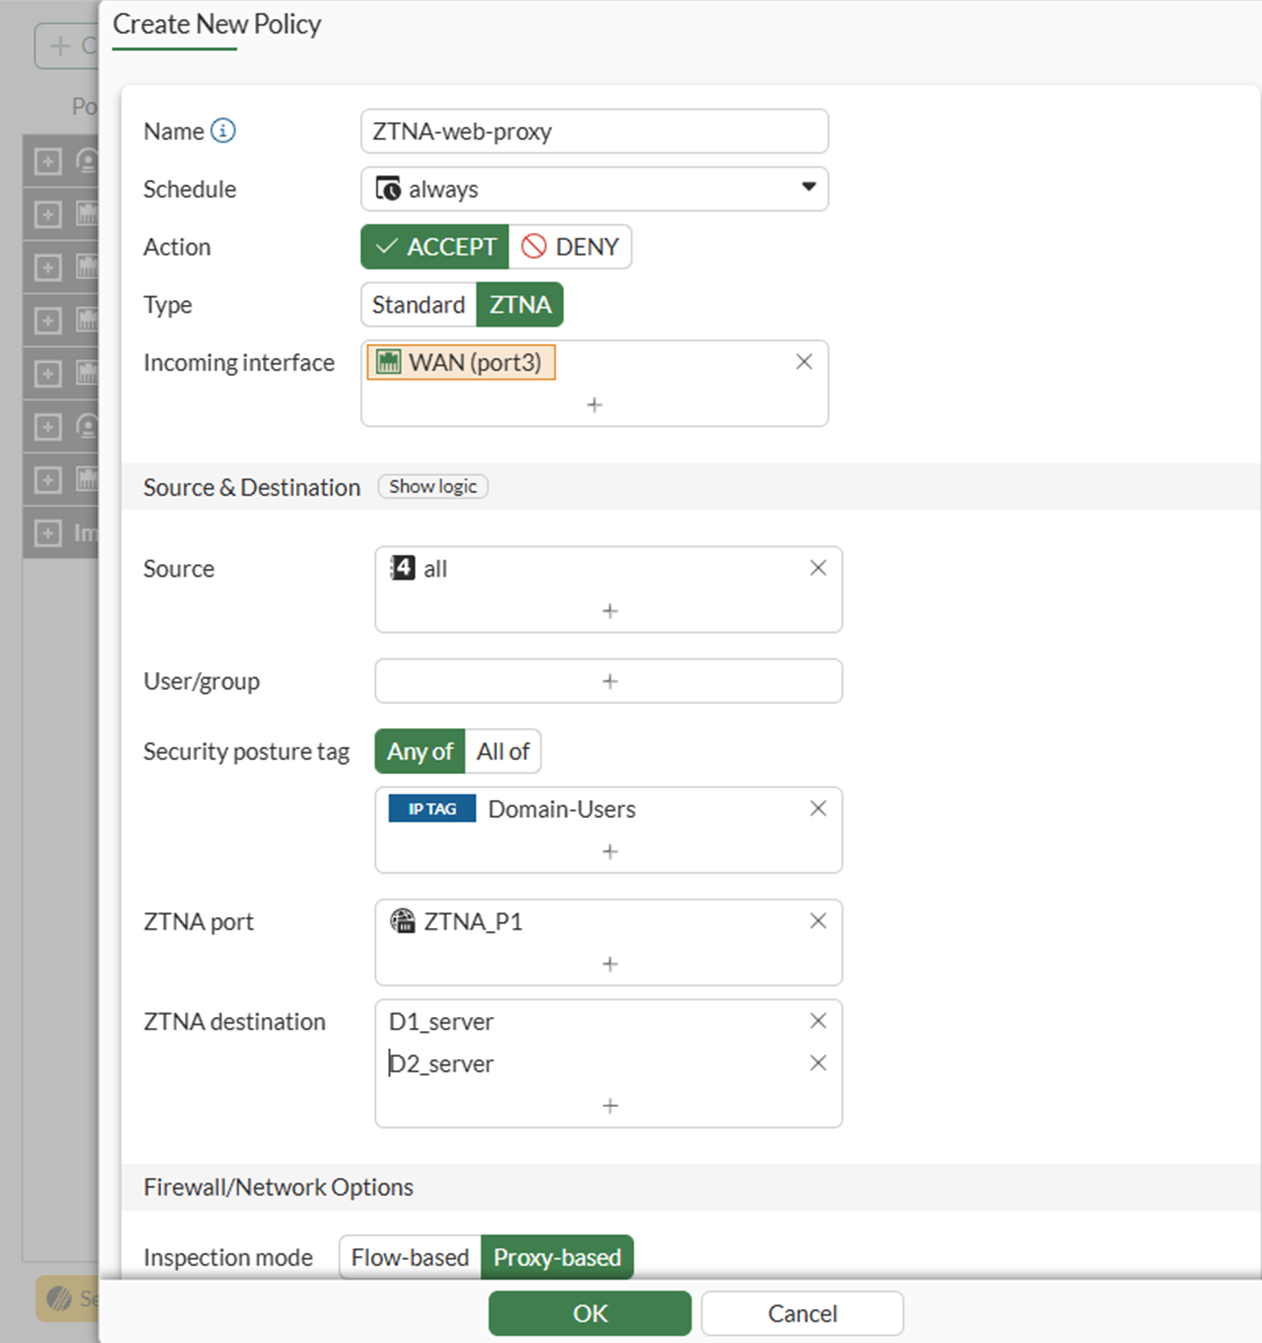
To configure a simple ZTNA policy in the GUI:
-
Go to Policy & Objects > Firewall Policy.
-
Click Create New.
-
Enter a name for the ZTNA policy.
-
Select the Schedule.
-
Select the Action.
-
Set Type to ZTNA.
-
Select an Incoming Interface.
-
Set the Source.
-
Add the security posture tags or tag groups that are allowed access. If multiple tags are included, the matching method is set to Any by default.
-
Select the ZTNA port. By selecting the ZTNA port, all ZTNA servers associated with it become accessible.
-
10.11. If traffic forwarding destinations are configured, select the destinations.
-
Configure the remaining options as needed.
-
Click OK.
To configure a simple ZTNA policy in the CLI:
cconfig firewall policy
    edit 1
        set name <ZTNA policy name>
        set srcintf <interface>
        set dstintf "any"
        set action accept
        set srcaddr "all"
        set dstaddr "ZTNA port"
        set ztna-ems-tag <security posture tags>
		set ztna-destination <destination 1> <destination 2> …
        set schedule "always"
        set nat enable
    next
end
The dstintf command cannot be modified.
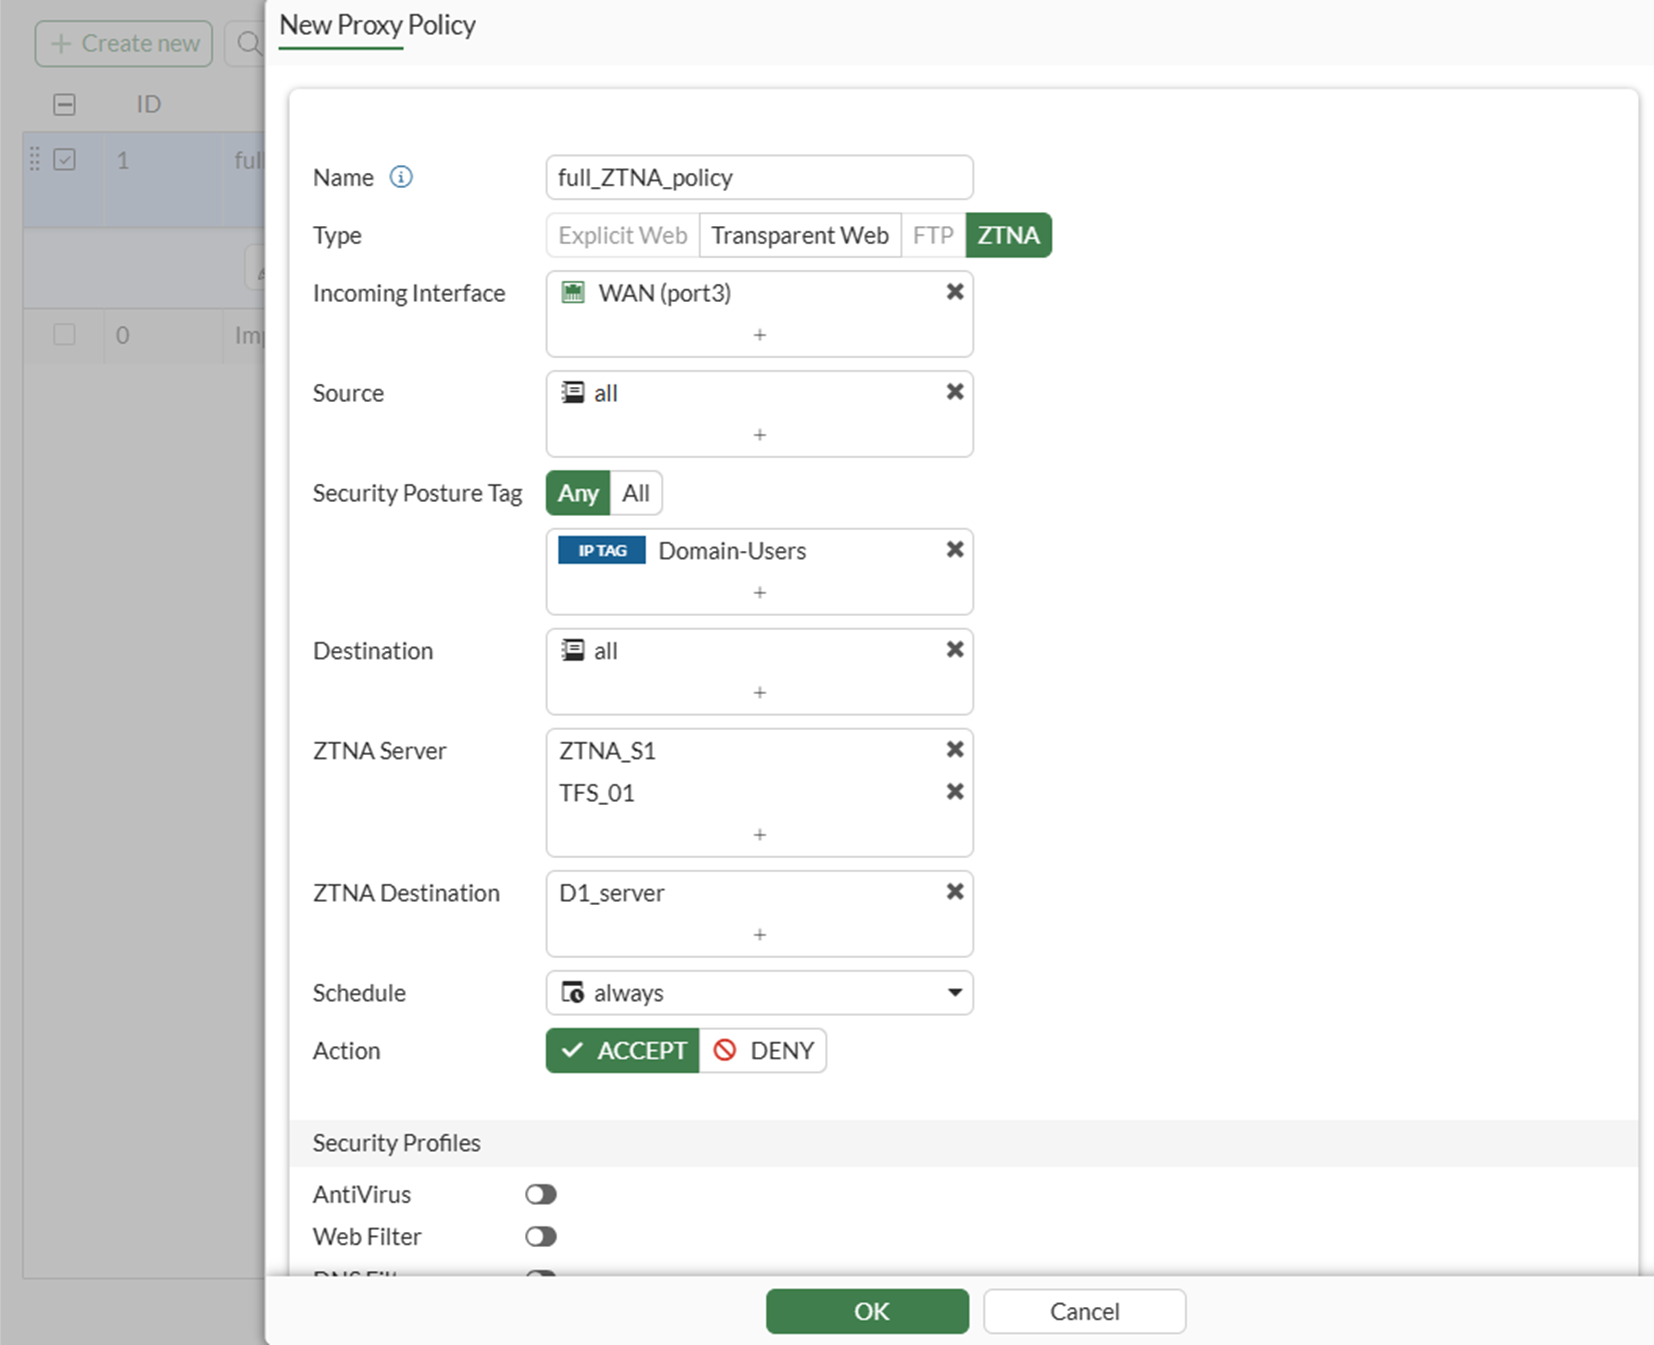
To configure a full ZTNA policy in the GUI:
-
Go to System > Feature Visibility.
-
Under Security Features, enable Explicit Proxy.
-
Click Apply.
-
Go to Policy & Objects > Proxy Policy.
-
Click Create New.
-
Enter a name for the rule.
-
Change Type to ZTNA.
-
Select an Incoming Interface and Source.
-
Add the security posture tags or tag groups that are allowed access. If multiple tags are included, the matching method is set to Any by default.
-
Select the Destination.
-
Select the ZTNA Server.
-
If a Traffic Forwarding Server is selected, then select a ZTNA Destination as well.
-
Select the Action.
-
Configure the remaining options as needed.
-
Click OK.
To configure a full ZTNA policy in the CLI:
config firewall proxy-policy
    edit 1
        set name <ZTNA policy name>
        set proxy ztna-proxy
        set ztna-proxy <proxy server 1> <proxy server 2> …
        set ztna-destination <destination 1> <destination 2> …
        set srcintf <interface>
        set srcaddr "all"
        set dstaddr "all"
        set ztna-ems-tag <security posture tag(s)>
        set action accept
        set schedule "always"
        set logtraffic all
    next
end
Optional authentication
To configure authentication to the ZTNA application gateway, you must configure an authentication scheme and authentication rule in the GUI or CLI. They are used to authenticate proxy-based policies, similar to configuring authentication for explicit and transparent proxy.
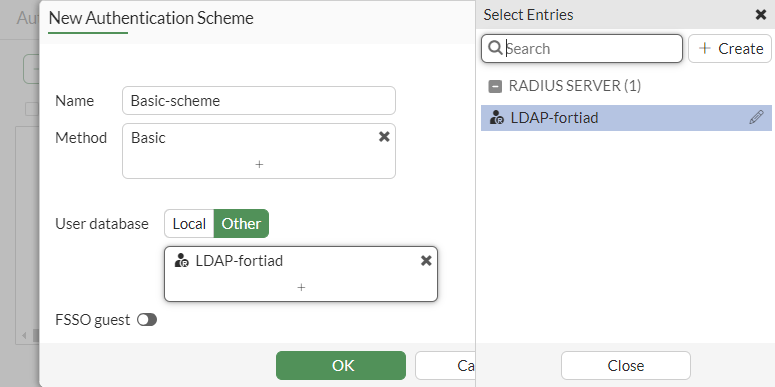
The authentication scheme defines the method of authentication that is applied. For ZTNA, basic HTTP and SAML methods are supported. Each method has additional settings to define the data source to check against. For example, with basic HTTP authentication, a user database can reference an LDAP server, RADIUS server, local database, or other supported authentication servers that the user is authenticated against.
The authentication rule defines the proxy sources and destinations that require authentication, and which authentication scheme to apply. For ZTNA, active authentication method is supported. The active authentication method references a scheme where users are actively prompted for authentication, like with basic authentication.
After the authentication rule triggers the method to authenticate the user, a successful authentication returns the groups that the user belongs to. In the ZTNA policy you can define a user or user group as the allowed source. Only users that match that user or group are allowed through the proxy policy.
To configure a basic authentication scheme in the GUI:
-
Go to Policy & Objects > Authentication.
-
Go to the Authentication Schemes tab.
-
Click Create New.
-
Enter a name for the scheme.
-
Set the Method as Basic.
-
Select the User database as required.
-
Click OK.
To configure a basic authentication scheme in the CLI:
config authentication scheme
    edit <name>
        set method basic
        set user-database <auth server>
    next
end
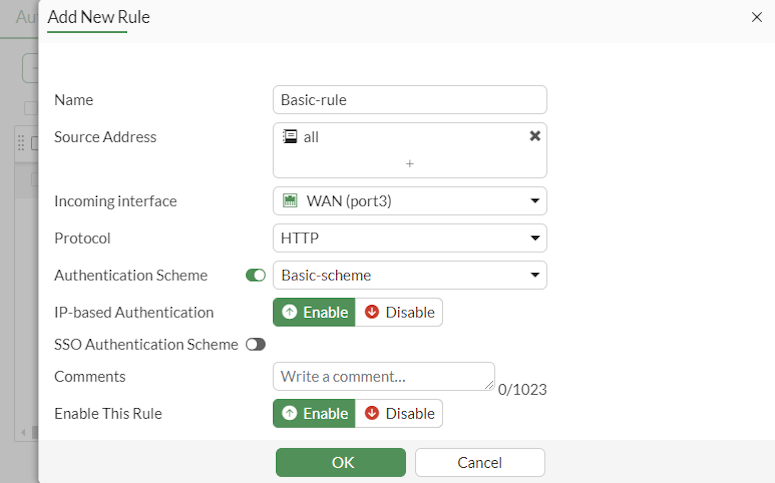
To configure an authentication rule in the GUI:
-
Go to Policy & Objects > Authentication.
-
Click Create New.
-
Enter a name for the rule.
-
Select the Source Address.
-
Select the Incoming interface.
-
Select the Authentication Scheme.
-
Click OK.
To configure an authentication rule in the CLI:
config authentication rule
    edit <name>
        set status enable
        set protocol http
        set srcintf <interface>
        set srcaddr <address>
        set dstaddr <address>
        set ip-based enable
        set active-auth-method <active auth scheme>
    next
end
To apply a user group to a full ZTNA policy in the GUI:
-
Go to Policy & Objects > Proxy Policy.
-
Edit an existing rule, or click Create New to create a new rule.
-
Click in the Source field, select the User tab, and select the users and user groups that will be allowed access.
-
Configure the remaining settings as required.
-
Click OK.
To apply a user group to a full ZTNA policy in the CLI:
config firewall proxy-policy
    edit 1
        set name <ZTNA policy name>
        set proxy ztna-proxy
        set ztna-proxy <proxy server 1> <proxy server 2> …
        set ztna-destination <destination 1> <destination 2> …
        set srcintf <interface>
        set srcaddr "all"
        set dstaddr "all"
        set ztna-ems-tag <security posture tag(s)>
        set action accept
        set schedule "always"
        set logtraffic all
        set groups <user group(s)>
    next
end
The authentication rule and scheme defines the method used to authenticate users. With basic HTTP authentication, a sign in prompt is shown after the client certificate prompt. After the authentication passes, the returned groups that the user is a member of are checked against the user groups that are defined in the ZTNA policy. If a group matches, then the user is allowed access after passing a posture check.
For basic setup information, see ZTNA web proxy with basic authentication example.
For advanced setup information, see ZTNA application gateway with SAML authentication example and ZTNA application gateway with SAML and MFA using FortiAuthenticator example.
Optional HA configurations
User information and TLS sessions are synchronized between HA members for ZTNA proxy sessions. When a failover occurs, the new primary unit will continue allowing sessions from the logged in users without asking for the client certificate and re-authentication again.
There are no special configurations for HA. Refer to HA active-passive cluster setup and HA active-active cluster setup to configure your HA cluster.
ZTNA web proxy vs traffic forwarding access proxy
In a ZTNA web proxy connection, there is no configurations needed on the client endpoint. Users can simply access the HTTP website on a browser by entering its URL. For traffic forwarding proxy (TFP), a ZTNA rule must be configured on the FortiClient endpoint. This rule instructs FortiClient to listen to traffic to the destination address and port and redirects the traffic to the FortiGate ZTNA application gateway over HTTPS.
When deciding between using ZTNA web proxy or TFP for accessing web applications, consider the following.
-
Use ZTNA web proxy when the protected web application address can be resolved by the remote users publicly.
-
Use TFP when the protected application address can only be resolved on the internal network. TCP forwarding rules allow the FortiClient to intercept the request to the destination address and forward them to the application gateway.
For more information, see ZTNA traffic forwarding proxy example.