


Transparent conditional DNS forwarder
The transparent conditional DNS forwarder allows the FortiGate to intercept and reroute DNS queries for specific domains to a specific DNS server. For example, when a client’s DNS is located in a distant location, in order to resolve destination addresses (such as SaaS applications) to the closest application server, the FortiGate can intercept and reroute the requests to a local DNS to resolve.
This is done by parsing entries and creating a list of filters based on the domain names of zones. When a DNS request matches one of these filters, the DNS proxy will retrieve the zone's data. The DNS request will then be handled based on the zone's forwarder settings and whether a local answer is available. It may be forwarded to the original destination address, the forwarder address, or not forwarded at all if a local answer is available.
This provides greater control over DNS requests, especially when the administrator is not managing the DNS server configuration of the client devices. This can improve network efficiency and performance by resolving IPs local to the client's PCs rather than IPs local to the central DNS server.
Example
In this example, FortiGates at various locations are connected to a central site by VPN tunnels where the corporate DNS server is located. Typically, DNS queries from different sites are sent to the central DNS server and resolved to an IP local to the central site, which might cause latency and performance issues for certain destinations, such as SaaS applications.
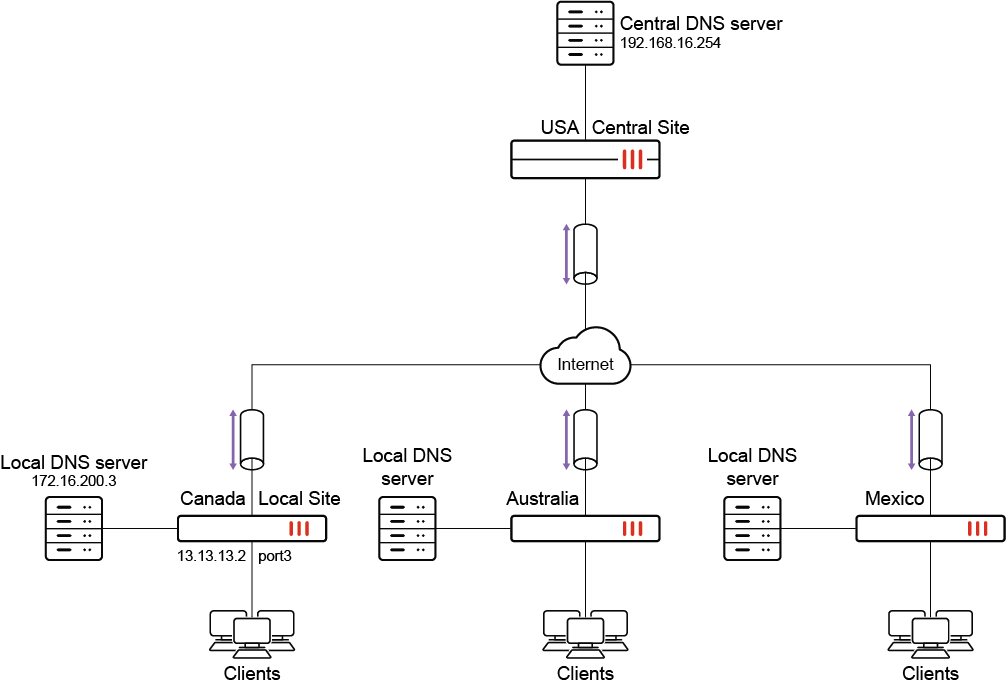
The Local Site FortiGate is configured with the Microsoft domain and a local DNS entry. Traffic matching the Microsoft domain is either forwarded to the local DNS server or resolved by the FortiGate, which resolves it to an IP local to the Local Site, thus improving performance.
This example assumes the following have been configured:
-
A successfully operational site-to-site VPN between the Local Site and the Central Site FortiGates (see Site-to-site VPN for more information).
-
Appropriate routing and network interfaces.
-
The client PCs are configured to use the Central DNS Server.
|
|
The transparent conditional DNS forwarder feature only works with a proxy-based firewall policy. |
|
|
By default, DNS server options are not available in the GUI. |
To enable DNS server options in the GUI:
-
Go to System > Feature Visibility.
-
In the Additional Features section, enable DNS Database.
-
Click Apply.
To configure the DNS zone and local DNS entries on the Local Site FortiGate in the GUI:
-
Go to Network > DNS Servers.
-
In the DNS Database table, click Create New.
-
Enter a DNS Zone name (SaaS_applications).
-
Enter a Domain Name (microsoft.com).
-
Disable the Authoritative setting.
-
In the DNS Forwarder field, click the + and enter the DNS Forwarder address (172.16.200.3).
-
Configure the DNS entry:
-
In the DNS Entries table, click Create New.
-
Set the Type to Address (A).
-
Enter a Hostname (office).
-
Configure the remaining settings as needed. The options vary depending on the selected Type.
-
Click OK.
-
Optionally, add more DNS entries if needed.
-
-
In the CLI, configure the source IP:
config system dns-database
    edit "SaaS_applications"
        set source-ip 13.13.13.2
    next
end
If the DNS server is accessed over a VPN, it may be necessary to specify a source IP for the FortiGate to reach the DNS server. See How to let the FortiGate access internal DNS through site-to-site IPsec VPN for more information.
Site-to-site VPN is not a mandatory requirement for this feature to work and is only applicable to this example.
To configure the DNS zone and local DNS entries on the Local Site FortiGate in the CLI:
config system dns-database
    edit "SaaS_applications"
        set domain "microsoft.com"
        set authoritative disable
        set forwarder "172.16.200.3"
        set source-ip 13.13.13.2
        config dns-entry
            edit 1
                set hostname "office"
                set ip 172.16.200.55
            next
        end
    next
end
To add the DNS database to a DNS filter profile:
config dnsfilter profile
    edit "SaaS"
        set transparent-dns-database "SaaS_applications"
    next
end
|
|
Multiple DNS databases can be selected for After selecting a DNS database, users are not permitted to modify the domain name of the zone. Before making any changes to the domain name, remove the reference from the |
To apply the DNS filter profile in a firewall policy in the GUI:
-
Go to Policy & Objects > Firewall Policy and edit the outbound policy towards the IPsec VPN tunnel.
-
Set the Inspection Mode to Proxy-based.
-
In the Security Profiles section, enable DNS Filter and select the profile created in the previous procedure (SaaS).
-
In the Logging Options section, enable Log Allowed Traffic.
-
Configure the remaining settings as needed.
-
Click OK.
To apply the DNS filter profile to the outbound policy towards the IPsec VPN tunnel in the CLI:
config firewall policy
    edit 1
        set name "outbound_VPN"
        ...
        set inspection-mode proxy
        set dnsfilter-profile "SaaS"
        set logtraffic enable
        ...
    next
end
To verify the configuration:
From one of the Windows client desktops, use the nslookup command to send various DNS queries.
-
Send a DNS query for a DNS entry configured locally on the Local Site FortiGate:
C:\Users\demo>nslookup office.microsoft.com
Server:  Unknown
Address:  192.168.16.254
Non-authoritative answer:
Name:     osiprod-wus-pineapple-100.westus.cloudapp.azure.com
Address:  172.16.200.55
The query is resolved to the IP address configured on the Local Site FortiGate.
-
Send a DNS query for the domain configured on the Local Site FortiGate:
C:\Users\demo>nslookup teams.microsoft.com
Server:  Unknown
Address:  192.168.16.254
Non-authoritative answer:
Name:     s-0005.s-msedge.net
Address:  172.16.200.254
The query is resolved by the local DNS server.
-
Send a DNS query for a domain that is not configured on the Local Site FortiGate:
C:\Users\demo>nslookup facebook.com
Server:  Unknown
Address:  192.168.16.254
Non-authoritative answer:
Name:    facebook.com
Addresses:  157.240.249.35
The query is resolved by the central DNS server.
IPv6 support for conditional DNS forwarder
The configuration for IPv6 is similar to an IPv4 conditional DNS forwarder. When configuring the DNS forwarder address, the IPv6 address must be specified.
To configure a DNS forwarder:
config system dns-database
    edit <name>
        set source-ip6 <IPv6_address>
        set forwarder6 <IPv6_address>
    next
end
|
|
If the DNS server is accessed over a VPN, it may be necessary to specify a source IP for the FortiGate to reach the DNS server. See How to let the FortiGate access internal DNS through site-to-site IPsec VPN for more information. |