
Configuring central management
The Central Management Fabric connector card on the root FortiGate is used to configure the FortiManager settings, which includes on-premises FortiManager, FortiGate Cloud, and FortiManager Cloud. After the Central Management connector is configured, it automatically synchronizes with any connected downstream devices.
This topic covers the following central management aspects:
Configuring FortiManager
Once the Central Management Fabric connector is configured, the root FortiGate pushes this configuration to downstream FortiGates. FortiManager provides remote management of FortiGate devices over TCP port 541. The FortiManager must have internet access for it to join the Security Fabric.
Once configured, the FortiGate can receive antivirus and IPS updates, and allows remote management through FortiManager or the FortiGate Cloud service. The FortiGate management option must be enabled so that the FortiGate can accept management updates to its firmware and FortiGuard services.
Adding a FortiManager device to the Security Fabric requires the following steps in FortiOS, which can be completed in the GUI or CLI:
- Specify the FortiManager IP address or domain name.
- Approve the FortiManager serial number returned by the FortiManager server certificate. This ensures that the administrator is connecting the FortiGate to the desired FortiManager.
After completing the steps in FortiOS, go to FortiManager to complete the process by authorizing the FortiGate.
To add a FortiManager to the Security Fabric in the GUI:
- On the root FortiGate, go to Security Fabric > Fabric Connectors and double-click the Central Management card.
- In the Settings tab, set the Status to Enabled.
- Set the Type to On-Premises.
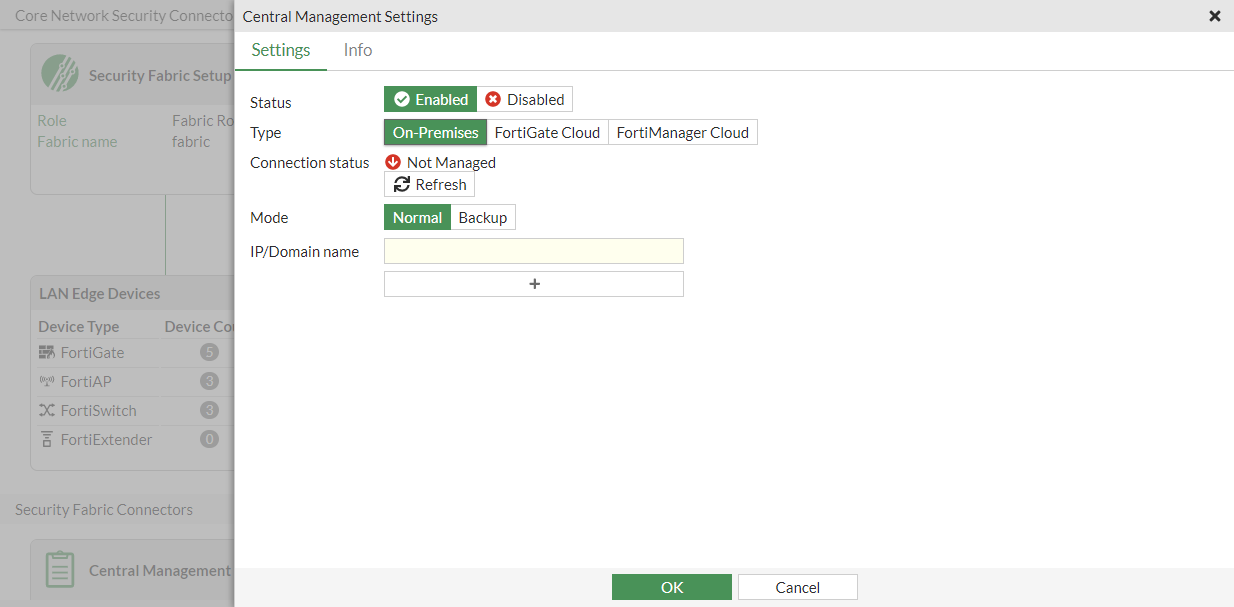
- Enter the IP/Domain Name of the FortiManager.
- Click OK.
The Verify FortiManager Serial Number pane appears.
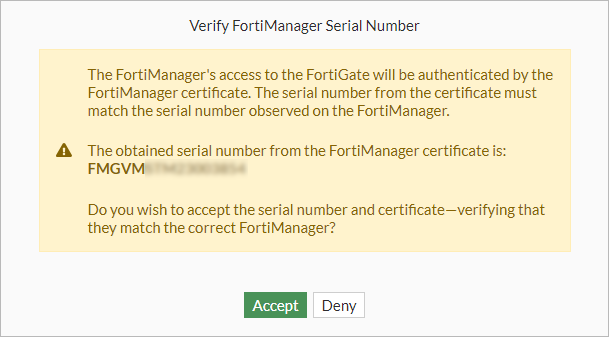
- Review the serial number, and click Accept.
The Request Sent & Received pane appears, indicating the FortiGate must be authorized on FortiManager.
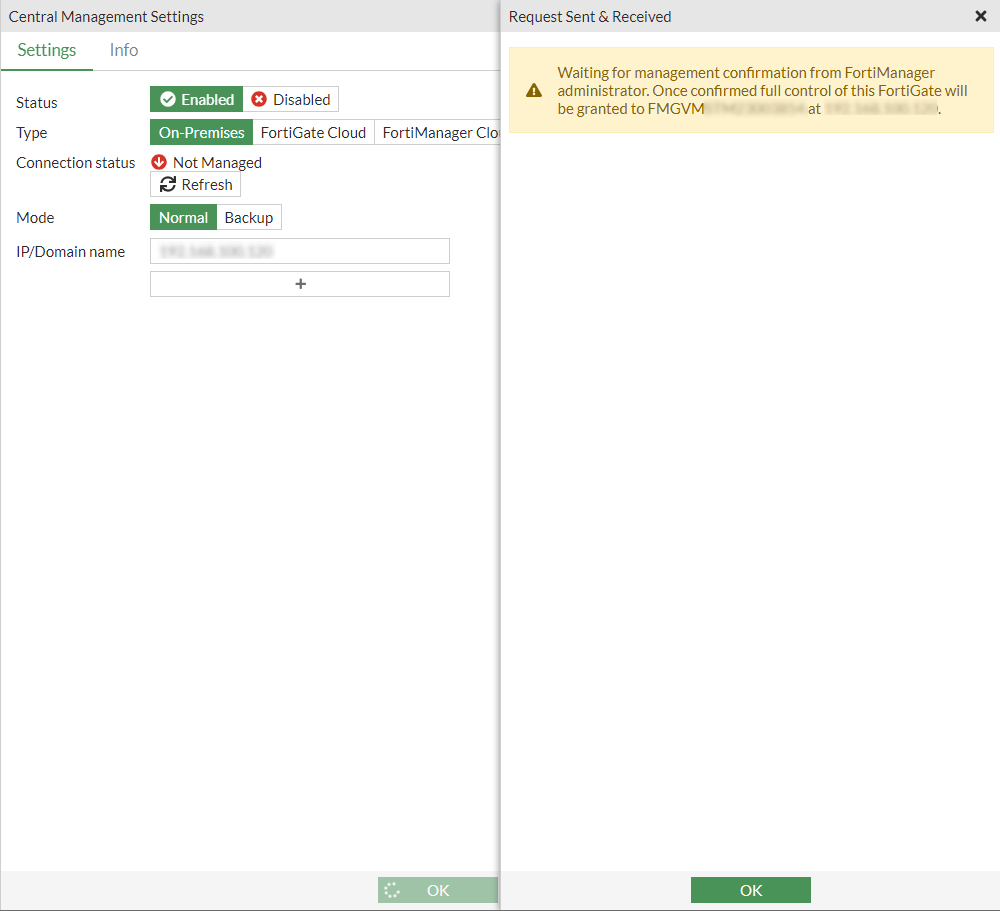
- Click OK.
- Go to FortiManager and authorize the FortiGate. See Authorizing the FortiGate in FortiManager.
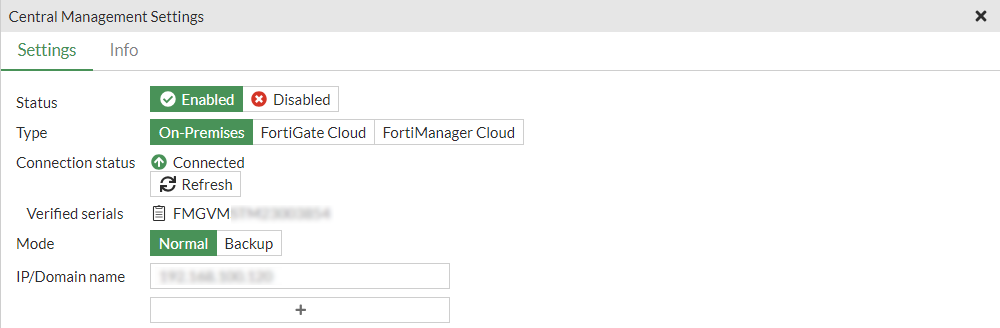
- After the FortiGate is registered, log in to FortiGate again as either read-only or read/write.
- Go to Security Fabric > Fabric Connectors and double-click the Central Management card. The Connection Status is updated to Connected.
To add FortiManager to the Security Fabric in the CLI:
- Enter the FortiManager connection information, and approve the returned FortiManager serial number:
config system central-management set type fortimanager set fmg {<IP_address> | <Domain name>} end The Serial Number for FortiManager is not entered. In order to verify identity of FortiManager serial number is needed. If serial number is not set, connection will be set as unverified. FortiGate can establish a connection to obtain the serial number now.Do you want to try to connect now? (y/n)y Obtained serial number from FortiManager 172.16.200.1 is: FMGVMSTM2300xxxx Do you confirm that this is the correct serial number? (y/n)y Successfully registered to FortiManager. This device may need to be authorized on FortiManager. Auto firmware upgrade in system.fortiguard has been paused since this FortiGate is now managed by FortiManager. The upgrade will resume automatically when this FortiGate is released from FortiManager. The upgrade status may be viewed using the following command diagnose test application forticldd 13. Any pending automatic patch-level firmware upgrade has been removed - Go to FortiManager and authorize the FortiGate. See Authorizing the FortiGate in FortiManager.
- If necessary on FortiGate, use the
diagnose fdsm central-mgmt-statuscommand to diagnose the connection.- If the connection is not yet successful because the FortiManager serial number is not verified, the following information is displayed:
# diagnose fdsm central-mgmt-status
Connection status: Handshake
Registration status: Unknown
Serial: FMGVMSTM2300xxxx
If the connection is up, but the FortiGate has not been authorized by FortiManager, the following information is displayed:
# diagnose fdsm central-mgmt-status
Connection status: Up
Registration status: Unregistered
Serial: FMGVMSTM2300xxxx
If the connection is up, and the FortiGate has been authorized, the following information is displayed:
# diagnose fdsm central-mgmt-status
Connection status: Up
Registration status: Registered
Serial: FMGVMSTM2300xxxx
- If the connection is not yet successful because the FortiManager serial number is not verified, the following information is displayed:
Authorizing the FortiGate in FortiManager
After completing the GUI or CLI steps in FortiOS, go to FortiManager to authorize the FortiGate to complete the process.
To authorize the FortiGate in FortiManager:
- On FortiManager, go to Device Manager and find the FortiGate in the Unauthorized Devices list.
The unauthorized device list is located in the root ADOM, regardless of the firmware version of the root ADOM or FortiOS.
- Select the FortiGate device or devices, and click Authorize in the toolbar.
- In the Authorize Device pop-up, adjust the device names as needed, select the appropriate ADOM (if applicable), and click OK.
For more information about using FortiManager, see the FortiManager Administration Guide.
Configuring FortiManager Cloud
This cloud-based SaaS management service is available through FortiManager. This service is included in FortiCloud accounts with a FortiManager Cloud account level subscription (ALCI).
Configuring a per-device license
Once the FortiGate has acquired a contract named FortiManager Cloud, FortiCloud creates a cloud-based FortiManager instance under the user account. You can launch the portal for the cloud-based FortiManager from FortiCloud, and its URL starts with the User ID.
You can use a FortiGate with a contract for FortiManager Cloud to configure central management by using the FQDN of fortimanager.forticloud.com. A FortiGate-FortiManager tunnel is established between FortiGate and the FortiManager instance.
After the tunnel is established, you can execute FortiManager functions from the cloud-based FortiManager portal.
To configure FortiManager Cloud central management:
- Enable FortiManager Cloud.
- Go to Security Fabric > Fabric Connectors and double-click the Central Management card.
- In the Settings tab, set the Status to Enabled.
- Set the Type to FortiManager Cloud.
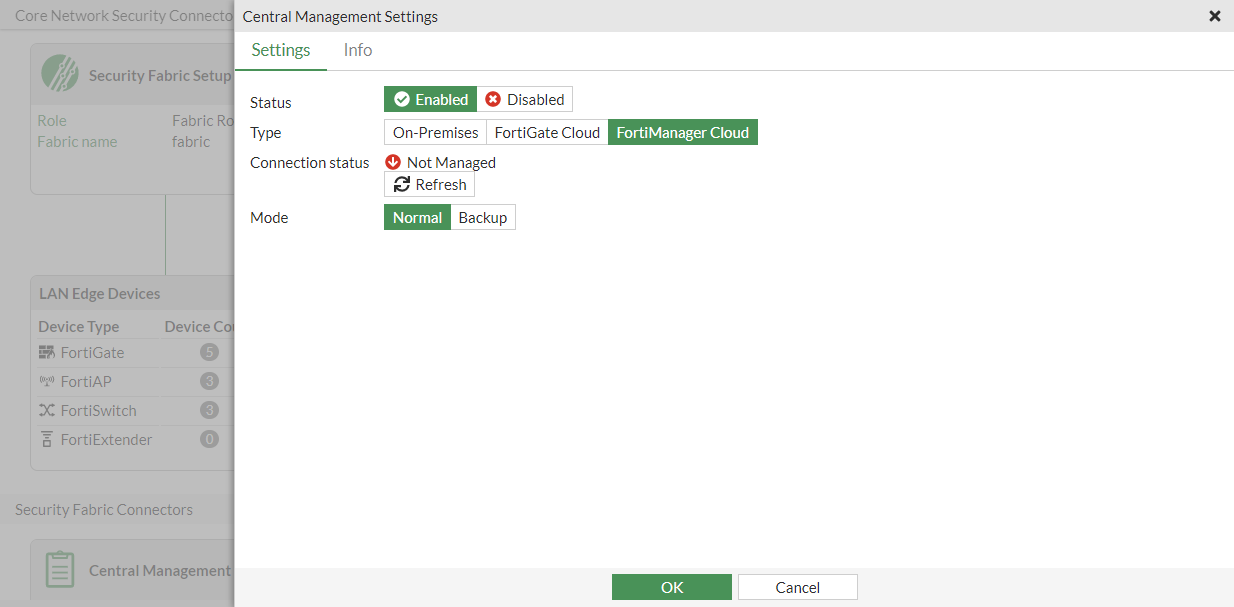
- Click OK.

The FortiManager Cloud button can only be selected if you have a FortiManager Cloud product entitlement.
- In the FortiManager Cloud instance, go to Device Manager and authorize the FortiGate. See Authorizing devices for more information.
When using the FortiGate to enable FortiManager Cloud, the FortiGate appears as an unauthorized device. After authorizing the FortiGate, it becomes a managed device.

In FortiOS, the Security Fabric > Fabric Connectors page now displays green arrow in the Central Management card because FortiManager Cloud is registered.
Diagnostics
To verify the contract information:
# diagnose test update info contract
...
System contracts:
    ...
Account contracts:
    FMGC,Thu Dec  2 16:00:00 2021
...
To verify the FortiManager Cloud instance has launched and the FortiGate is registered:
# diagnose fdsm central-mgmt-status
Connection status: Up
Registration status: Registered
Serial: FMGVMSTM2300xxxx