
ZTNA HTTPS access proxy with basic authentication example
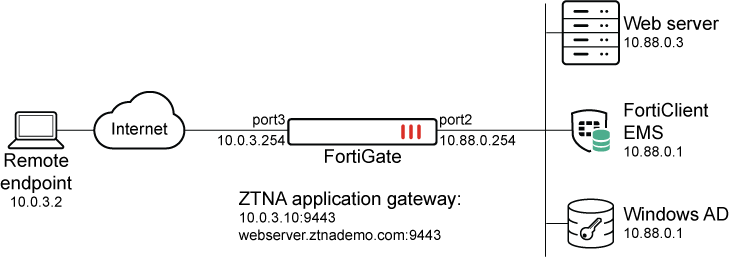
This example expands on the previous example (ZTNA HTTPS access proxy example), adding LDAP authentication to the ZTNA rule. Users are allowed based on passing the client certificate authentication check, user authentication, and security posture check.
Users that are in the AD security group ALLOWED-VPN are allowed access to the access proxy. Users that are not part of this security group are not allowed access.
This example assumes that the FortiGate EMS fabric connector is already successfully connected.
LDAP/Active Directory Users and Groups:
-
Domain: fortiad.info
-
Users (Groups):
-
tsmith (Domain Users, Remote-Allowed)
-
lhansen (Domain Users)
-
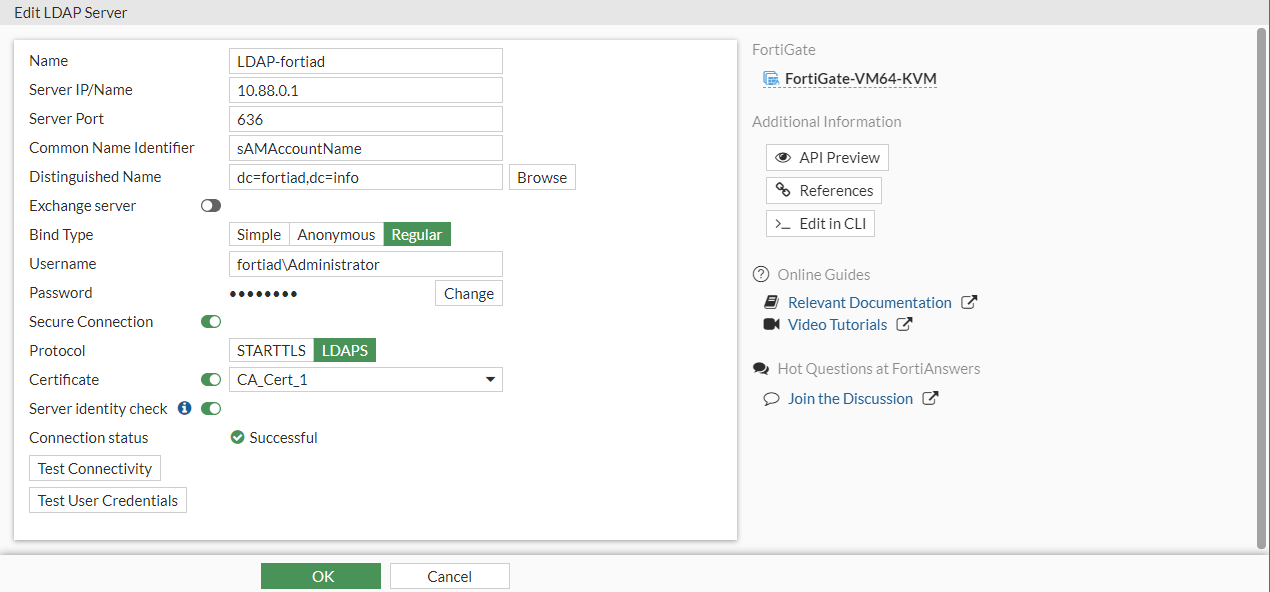
To configure a secure connection to the LDAP server in the GUI:
-
Go to User & Authentication > LDAP Servers and click Create New.
-
Configure the following settings:
Name
LDAP-fortiad
Server IP/Name
10.88.0.1
Server Port
636
Common Name Identifier
sAMAccountName
Distinguished Name
dc=fortiad,dc=info
Exchange server
Disabled
Bind Type
Regular
Enter the Username and Password for LDAP binding and lookup.
Secure Connection
Enabled
-
Set Protocol to LDAPS
-
Enable Certificate and select the CA certificate to validate the server certificate.
Server identity check
Optionally, enable to verify the domain name or IP address against the server certificate.
-
-
Click Test Connectivity to verify the connection to the server.
-
Click OK.
To configure a secure connection to the LDAP server in the CLI:
config user ldap
    edit "LDAP-fortiad"
        set server "10.88.0.1"
        set cnid "sAMAccountName"
        set dn "dc=fortiad,dc=info"
        set type regular
        set username "fortiad\\Administrator"
        set password <password>
        set secure ldaps
        set ca-cert "CA_Cert_1"
        set port 636
    next
end
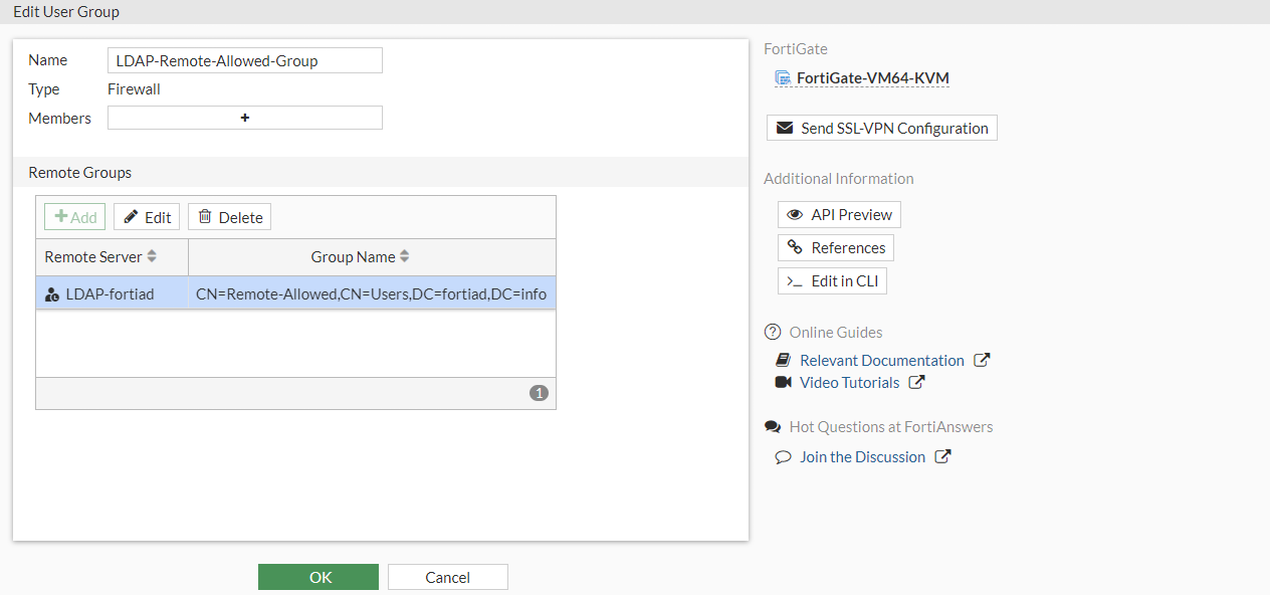
To configure a remote user group from the LDAP server in the GUI:
-
Go to User & Authentication > User Groups and click Create New.
-
Set the name to LDAP-Remote-Allowed-Group.
-
Set Type to Firewall.
-
In the Remote Groups table click Add:
-
Set Remote Server to LDAP-fortiad.
-
Locate the Remote-Allowed group, right-click on it, and click Add Selected.
-
Click OK.
-
-
Click OK.
To configure a remote user group from the LDAP server in the CLI:
config user group
    edit "LDAP-Remote-Allowed-Group"
        set member "LDAP-fortiad"
        config match
            edit 1
                set server-name "LDAP-fortiad"
                set group-name "CN=Remote-Allowed,CN=Users,DC=fortiad,DC=info"
            next
        end
    next
end
Authentication scheme and rules
After the LDAP server and user group have been configured, an authentication scheme and rule must be configured.
|
|
To configure authentication schemes and rules in the GUI, go to System > Feature Visibility and enable Explicit Proxy. |
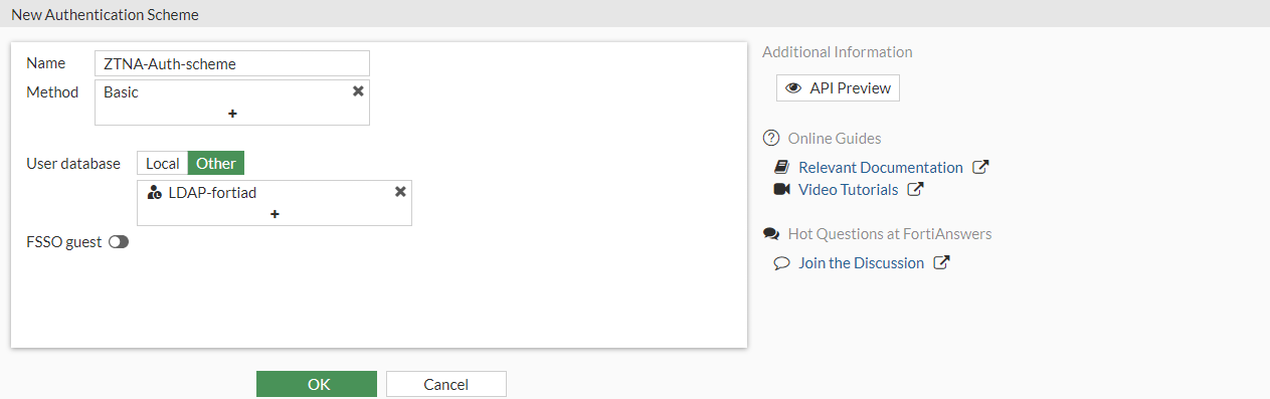
Authentication scheme
The authentication scheme defines the method of authentication that is applied. In this example, basic HTTP authentication is used so that users are prompted for a username and password the first time that they connect to a website through the HTTPS access proxy.
To configure an authentication scheme in the GUI:
-
Go to Policy & Objects > Authentication Rules and click Create New > Authentication Scheme.
-
Set the name to ZTNA-Auth-scheme.
-
Set Method to Basic.
-
Set User database to Other and select LDAP-fortiad as the LDAP server.
-
Click OK.
To configure an authentication scheme in the CLI:
config authentication scheme
    edit "ZTNA-Auth-scheme"
        set method basic
        set user-database "LDAP-fortiad"
    next
end
Authentication rule
The authentication rule defines the proxy sources and destination that require authentication, and what authentication scheme is applied. In this example, active authentication through the basic HTTP prompt is used and applied to all sources.
To configure an authentication rule in the GUI:
-
Go to Policy & Objects > Authentication Rules and click Create New > Authentication Rule.
-
Set the name to ZTNA-Auth-rule.
-
Set Source Address to all.
-
Set Protocol to HTTP.
-
Enable Authentication Scheme and select ZTNA-Auth-scheme.
-
Click OK.
To configure an authentication rule in the CLI:
config authentication rule
    edit "ZTNA-Auth-rule"
        set srcaddr "all"
        set active-auth-method "ZTNA-Auth-scheme"
    next
end
Applying the user group to a ZTNA policy
A user or user group must be applied to the ZTNA policy that you need to control user access to. The authenticated user from the authentication scheme and rule must match the user or user group in the ZTNA policy.
In this example, the user group is applied to the two simple ZTNA policies that were configured in ZTNA HTTPS access proxy example.
To apply a user group to the simple ZTNA policies in the GUI:
-
Go to Policy & Objects > Firewall Policy.
-
Edit the ZTNA-Deny-malicious rule.
-
Click in the Source field, select the User tab, select the LDAP-Remote-Allowed-Group group, then click Close.
-
Click OK.
-
Edit the ZTNA-Allow-Simple rule.
-
Click in the Source field, select the User tab, select the LDAP-Remote-ALlowed-Group group, then click Close.
-
Click OK.
To apply a user group to the simple ZTNA policies in the CLI:
config firewall policy
     edit 9
        set name "ZTNA-Deny-Malicious"
        set srcintf "port3"
        set dstintf "any"
        set srcaddr "all"
        set dstaddr "ZTNA-webserver"
        set ztna-ems-tag "EMS1_ZTNA_Malicious-File-Detected"
        set schedule "always"
        set logtraffic all
        set groups "LDAP-Remote-Allowed-Group"
    next
    edit 10
        set name "ZTNA-Allow-Simple"
        set srcintf "port3"
        set dstintf "any"
        set action accept
        set srcaddr "all"
        set dstaddr "ZTNA-webserver"
        set ztna-ems-tag "EMS1_CLASS_Low"
        set schedule "always"
        set logtraffic all
        set nat enable
        set groups "LDAP-Remote-Allowed-Group"
    next
end
For configuration examples using full ZTNA policy, see Configure a ZTNA policy.
Testing remote access to the HTTPS access proxy with user authentication
Scenario 1: access allowed - user tsmith
-
On a remote Windows PC, open the FortiClient app, select the Zero Trust Telemetry tab, and confirm that you are connected to the EMS server.

It is not necessary to configure a ZTNA Destination on the FortiClient for the HTTPS access proxy use case. In fact, configuring a ZTNA Destination rule for the website may interfere with its operation.
-
In a browser, enter the address of the server and the access port.
If entering an FQDN, make sure that DNS can resolve the address to the IP address of the FortiGate. In this example, webserver.ztnademo.com resolves to 10.0.3.10.
-
When the browser asks for the client certificate to use, select the EMS signed certificate, then click OK.
The client certificate is verified by the FortiGate to authenticate your identity.
-
When prompted, enter the username tsmith and the password, and click Sign in.
As tsmith is a member of the Remote-Allowed-Group group in Active Directory, it will match the LDAP-Remote-Allowed-Group user group. After the user authentication passes, the FortiGate performs a posture check on the ZTNA group. When that passes, you are allowed access to the website.
Verifying the results
#  diagnose firewall auth list

10.0.3.2, tsmith
        type: fw, id: 0, duration: 12, idled: 12
        expire: 288, allow-idle: 300
        packets: in 0 out 0, bytes: in 0 out 0
        group_id: 3
        group_name: LDAP-Remote-Allowed-Group
# diagnose test app fcnacd 7
Entry #1:
 - UID: 9A016B5A6E914B42AD4168C066EB04CA
 - EMS Fabric ID: FCTEMS8822001975:00000000000000000000000000000000
 - Sys upd time: 2023-05-03 22:34:31.2279124
 - Tag upd time: 2023-05-03 23:43:09.6251663
lls_idx_mask = 0x00000001
#ID:0
UID:     9A016B5A6E914B42AD4168C066EB04CA
State:   sysinfo:1, tag:1, tagsz:1, out-of-sync:0
Owner:
Cert SN: 2B8D4FF0E71FE7E064288FE1B4F87E25232092D0
online:  Yes
Route IP:0.0.0.0
vfid:    0
has more:No
Tags:
idx:0, ttdl:1   name:Domain-Users
idx:1, ttdl:1   name:Remote-Allowed
idx:2, ttdl:1   name:Group-Membership-Domain-Users
idx:3, ttdl:2   name:Low
idx:5, ttdl:2   name:Remote
idx:6, ttdl:1   name:all_registered_clients
|
|
The |
# execute log filter category 0
# execute log filter field subtype ztna
# execute log display
1: date=2023-05-03 time=16:49:37 eventtime=1683157776498494503 tz="-0700" logid="0005000024" type="traffic" subtype="ztna" level="notice" vd="root" srcip=10.0.3.2 srcport=48054 srcintf="port3" srcintfrole="wan" dstcountry="Reserved" srccountry="Reserved" dstip=10.88.0.3 dstport=9443 dstintf="port2" dstintfrole="dmz" sessionid=19221 srcuuid="b458a65a-f759-51ea-d7df-ef2e750026d1" service="tcp/9443" proxyapptype="http" proto=6 action="accept" policyid=10 policytype="policy" poluuid="92d54e0e-e949-51ed-5dba-7b4724d33d52" policyname="ZTNA-Allow-Simple" duration=149 user="tsmith" group="LDAP-Remote-Allowed-Group" authserver="LDAP-fortiad" gatewayid=1 realserverid=1 vip="ZTNA-webserver" accessproxy="ZTNA-webserver" clientdeviceid="9A016B5A6E914B42AD4168C066EB04CA" clientdevicemanageable="manageable" clientdevicetags="EMS1_ZTNA_all_registered_clients/EMS1_CLASS_Remote" emsconnection="online" wanin=301802 rcvdbyte=301802 wanout=3340 lanin=2876 sentbyte=2876 lanout=337447 fctuid="9A016B5A6E914B42AD4168C066EB04CA" appcat="unscanned"
Scenario 2: access denied – user lhansen
-
If scenario 1 has just been tested, log in to the FortiGate and deauthenticate the user:
-
Go to Dashboard > Assets & Identities and expand the Firewall Users widget.
-
Right-click on the user tsmith and select deauthenticate.
-
-
On a remote Windows PC, open the FortiClient app, select the Zero Trust Telemetry tab, and confirm that you are connected to the EMS server.
-
In a browser, enter the address webserver.ztnademo.com.
-
When the browser asks for the client certificate to use, select the EMS signed certificate, then click OK. This option might not appear if you have already selected the certificate when testing scenario 1.
The client certificate is verified by the FortiGate to authenticate your identity.
-
When prompted, enter the username lhansen and the password, and click Sign in.
As lhansen is not a member of the Remote-Allowed group in Active Directory, it will not match the LDAP-Remote-Allowed-Group user group. Because no other policies are matched, this user is implicitly denied
Verifying the results
Go to Dashboard > Assets & Identities, expand the Firewall Users widget, and confirm that user lhansen is listed, but no applicable user group is returned.
# execute log display

1: date=2023-05-03 time=16:56:46 eventtime=1683158205537262334 tz="-0700" logid="0005000024" type="traffic" subtype="ztna" level="notice" vd="root" srcip=10.0.3.2 srcport=48243 srcintf="port3" srcintfrole="wan" dstcountry="Reserved" srccountry="Reserved" dstip=10.0.3.10 dstport=9443 dstintf="root" dstintfrole="undefined" sessionid=19434 srcuuid="b458a65a-f759-51ea-d7df-ef2e750026d1" dstuuid="96e98cb0-e937-51ed-3e8b-9ee64af51512" service="tcp/9443" proxyapptype="http" proto=6 action="deny" policyid=0 policytype="proxy-policy" duration=10 user="lhansen" authserver="LDAP-fortiad" vip="ZTNA-webserver" accessproxy="ZTNA-webserver" clientdeviceid="9A016B5A6E914B42AD4168C066EB04CA" clientdevicemanageable="manageable" clientdevicetags="EMS1_ZTNA_all_registered_clients/EMS1_CLASS_Remote" emsconnection="online" msg="Traffic denied because of failed to match a proxy-policy" wanin=0 rcvdbyte=0 wanout=0 lanin=2689 sentbyte=2689 lanout=72739 fctuid="9A016B5A6E914B42AD4168C066EB04CA" appcat="unscanned" crscore=30 craction=131072 crlevel="high"