Fortinet white logo
Fortinet white logo

Cookbook

L2TP IPsec VPN on FortiGate

L2TP IPsec VPN on FortiGate

In this recipe, you will learn how to create an L2TP IPsec tunnel that allows remote users running the Windows 7 L2TP client to securely connect to a private network.

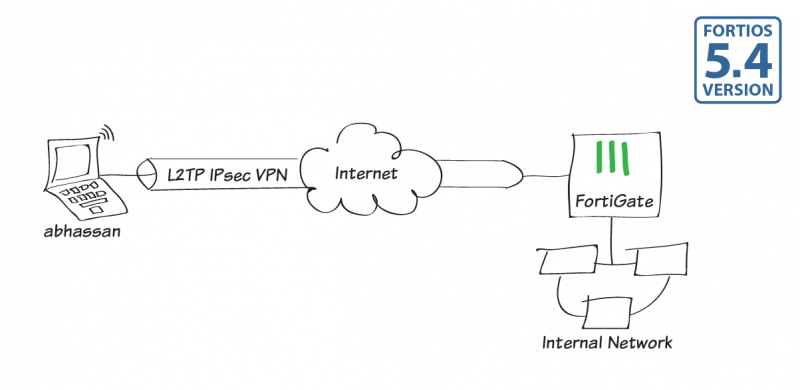
The FortiGate implementation of L2TP enables a remote user to establish an L2TP IPsec tunnel with the FortiGate. For the tunnel to work you configure a remote client (abhassan) to connect using an L2TP IPsec VPN connection.

This recipe assumes that the FortiGate unit is operating in NAT/Route mode and that it has a static public IP address. This recipe is designed as a policy-based IPsec VPN, not route-based.

Most of the configuration occurs in the CLI Console, as L2TP settings are not configurable in the GUI. You can access the FortiGate CLI Console from the FortiGate GUI using the administration menu or from the CLI Console Dashboard widget.
1. Creating an L2TP user and user group

Go to User & Device > User Definition and create a new L2TP user via the creation wizard (abhassan).

Next go to User & Device > User Groups and create a new user group for L2TP users (L2TP-group), and add abhassan to the group.

2. Enabling L2TP in the CLI Console

Enter the following CLI command to set up an L2TP tunnel that includes the user group just created and defines the L2TP client IP address range (start IP (sip) to end IP (eip)):

config vpn l2tp
    set sip 10.20.100.1
    set eip 10.20.100.101
    set status enable
    set usrgrp L2TP-group
end

3. Configuring the L2TP/IPsec phases

Enter the following CLI command to configure Phase 1 (named l2tp-p1 below):

config vpn ipsec phase1
    edit l2tp-p1
        set type dynamic
        set interface wan1
        set dhgrp 2
        set keylife 86400
        set peertype dialup
        set dpd disable
        set proposal 3des-sha1 aes192-sha1 aes256-md5
        set usrgrp L2TP-group
        set psksecret <preshared_key>
    next
end

Enter the following CLI command to configure Phase 2 (named l2tp-p2 below):

config vpn ipsec phase2
    edit l2tp-p2
        set phase1name l2tp-p1
        set l2tp enable
        set proposal 3des-sha1 aes192-sha1 aes256-md5
        set pfs disable
        set encapsulation transport-mode
        set keylifeseconds 86400
    next
end

4. Creating a firewall address for L2TP clients

Go to Policy & Objects > Addresses and create a new firewall address.

Enter a Name, set Type to IP Range, and enter the same IP range as configured earlier when enabling L2TP in the CLI Console.

5. Creating Security Policy for access to the internal network and the Internet

Go to System > Feature Select, enable Policy-based IPsec VPN, and select Apply.

Next go to Policy & Objects > IPv4 Policy, and create an IPsec VPN security policy that allows inbound and outbound traffic.

Set Incoming Interface to the internal network and Source Address to all.

Set Outgoing Interface to wan1, Destination Address to all, Service to ALL, and Action to IPsec.

Under VPN Tunnel, select Use Existing and select the name of the Phase 1 configuration that you created (l2tp-p1).

6. Configuring a remote Windows 7 L2TP client

On a PC, open the Start menu, search for VPN, and select Set up a virtual private network (VPN) connection.

Enter the FortiGate's IP address, enter a Destination name, and make sure to select the Don't connect now… checkbox. Then select Next.

Enter the same User name and Password as configured earlier on the FortiGate and select Create.

The connection is now ready to use. Select Close.

Next, go to Start > Control Panel > Network and Sharing Center and select Connect to a network.

Open the L2TP VPN configured earlier.

Enter the L2TP IPsec VPN's user credentials and select Connect.

You will then be connected to the VPN.

7. Results

On the FortiGate, go to Monitor > IPsec Monitor. The tunnel shows a Status of Up, with incoming and outgoing data.

You can also go to Log & Report > VPN Events, where you can select an entry and view more details. The user has been assigned an IP address from within the L2TP client range.

L2TP IPsec VPN on FortiGate

L2TP IPsec VPN on FortiGate

In this recipe, you will learn how to create an L2TP IPsec tunnel that allows remote users running the Windows 7 L2TP client to securely connect to a private network.

The FortiGate implementation of L2TP enables a remote user to establish an L2TP IPsec tunnel with the FortiGate. For the tunnel to work you configure a remote client (abhassan) to connect using an L2TP IPsec VPN connection.

This recipe assumes that the FortiGate unit is operating in NAT/Route mode and that it has a static public IP address. This recipe is designed as a policy-based IPsec VPN, not route-based.

Most of the configuration occurs in the CLI Console, as L2TP settings are not configurable in the GUI. You can access the FortiGate CLI Console from the FortiGate GUI using the administration menu or from the CLI Console Dashboard widget.

1. Creating an L2TP user and user group

Go to User & Device > User Definition and create a new L2TP user via the creation wizard (abhassan).

Next go to User & Device > User Groups and create a new user group for L2TP users (L2TP-group), and add abhassan to the group.

2. Enabling L2TP in the CLI Console

Enter the following CLI command to set up an L2TP tunnel that includes the user group just created and defines the L2TP client IP address range (start IP (sip) to end IP (eip)):

config vpn l2tp
    set sip 10.20.100.1
    set eip 10.20.100.101
    set status enable
    set usrgrp L2TP-group
end

3. Configuring the L2TP/IPsec phases

Enter the following CLI command to configure Phase 1 (named l2tp-p1 below):

config vpn ipsec phase1
    edit l2tp-p1
        set type dynamic
        set interface wan1
        set dhgrp 2
        set keylife 86400
        set peertype dialup
        set dpd disable
        set proposal 3des-sha1 aes192-sha1 aes256-md5
        set usrgrp L2TP-group
        set psksecret <preshared_key>
    next
end

Enter the following CLI command to configure Phase 2 (named l2tp-p2 below):

config vpn ipsec phase2
    edit l2tp-p2
        set phase1name l2tp-p1
        set l2tp enable
        set proposal 3des-sha1 aes192-sha1 aes256-md5
        set pfs disable
        set encapsulation transport-mode
        set keylifeseconds 86400
    next
end

4. Creating a firewall address for L2TP clients

Go to Policy & Objects > Addresses and create a new firewall address.

Enter a Name, set Type to IP Range, and enter the same IP range as configured earlier when enabling L2TP in the CLI Console.

5. Creating Security Policy for access to the internal network and the Internet

Go to System > Feature Select, enable Policy-based IPsec VPN, and select Apply.

Next go to Policy & Objects > IPv4 Policy, and create an IPsec VPN security policy that allows inbound and outbound traffic.

Set Incoming Interface to the internal network and Source Address to all.

Set Outgoing Interface to wan1, Destination Address to all, Service to ALL, and Action to IPsec.

Under VPN Tunnel, select Use Existing and select the name of the Phase 1 configuration that you created (l2tp-p1).

6. Configuring a remote Windows 7 L2TP client

On a PC, open the Start menu, search for VPN, and select Set up a virtual private network (VPN) connection.

Enter the FortiGate's IP address, enter a Destination name, and make sure to select the Don't connect now… checkbox. Then select Next.

Enter the same User name and Password as configured earlier on the FortiGate and select Create.

The connection is now ready to use. Select Close.

Next, go to Start > Control Panel > Network and Sharing Center and select Connect to a network.

Open the L2TP VPN configured earlier.

Enter the L2TP IPsec VPN's user credentials and select Connect.

You will then be connected to the VPN.

7. Results

On the FortiGate, go to Monitor > IPsec Monitor. The tunnel shows a Status of Up, with incoming and outgoing data.

You can also go to Log & Report > VPN Events, where you can select an entry and view more details. The user has been assigned an IP address from within the L2TP client range.