Fortinet white logo
Fortinet white logo

Cookbook

Setting up a WiFi Bridge with a FortiAP

Setting up a WiFi Bridge with a FortiAP

In this example you will set up a WiFi network with a FortiGate managing a FortiAP in Bridge mode.

You can configure a FortiAP unit in either Tunnel or Bridge mode. When a FortiAP is in Bridge mode, the Ethernet and WiFi interfaces are connected (or bridged), allowing wired and wireless networks to be on the same subnet. Tunnel mode is the default mode for a FortiAP. A FortiAP in Tunnel mode uses a wireless-only subnet for wireless traffic.

For information about using a FortiAP in Tunnel mode, see Setting up WiFi with a FortiAP.

1. Connecting and authorizing the FortiAP unit

Connect the FortiAP to the lan interface.

Go to WiFi & Switch Controller > Managed FortiAPs. The FortiAP is listed. It may take a few minutes for the FortiAP to appear. The device is not yet authorized, as indicated by the in the State column.

By default, the FortiGate adds newly discovered FortiAPs to the Managed FortiAPs list but does not authorize them. You can disable this in the CLI. See Deploying Wireless Networks.

Highlight the FortiAP unit on the list and select Authorize.

After a few minutes, hit the Refresh button and will appear to tell you that the device is authorized.

2. Creating an SSID

Go to WiFi & Switch Controller > SSID and create a new SSID.

Set Traffic Mode to Local bridge with FortiAP's Interface.

Configure the WiFi Settings as you would for a regular wireless network and set a secure Pre-shared Key.

3. Creating a custom FortiAP profile

Go to WiFi & Switch Controller > FortiAP Profiles and create a new profile.

Set Platform to the FortiAP model you are using (FAP11C).

Set SSID to use the new SSID. Set LAN Port mode to bridge to the new SSID.

Go to WiFi & Switch Controller > Managed FortiAPs and edit the FortiAP. Set FortiAP Profile to the new profile.

You have the option to enter a name for the FortiAP (MyFortiAP in this example). If you don't, the FortiAP will be identified by its serial number.

4. Results

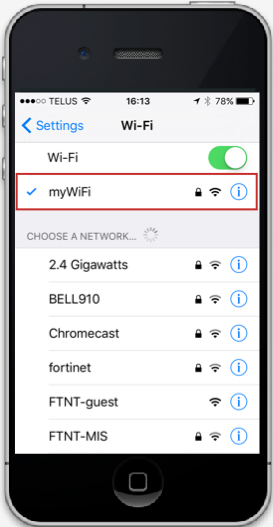
Connect to the SSID with a wireless device. After a connection is established, you can browse the Internet using the wireless network configured in this recipe.
Go to FortiView > All Sessions and observe the wireless activity. Hover over the Device column to see details.

For further reading, check out Deploying Wireless Networks in the FortiOS 5.4 Handbook.

Related Videos

sidebar video

FortiAP in Bridge Mode

  • 30,729 views
  • 7 years ago

Setting up a WiFi Bridge with a FortiAP

Setting up a WiFi Bridge with a FortiAP

In this example you will set up a WiFi network with a FortiGate managing a FortiAP in Bridge mode.

You can configure a FortiAP unit in either Tunnel or Bridge mode. When a FortiAP is in Bridge mode, the Ethernet and WiFi interfaces are connected (or bridged), allowing wired and wireless networks to be on the same subnet. Tunnel mode is the default mode for a FortiAP. A FortiAP in Tunnel mode uses a wireless-only subnet for wireless traffic.

For information about using a FortiAP in Tunnel mode, see Setting up WiFi with a FortiAP.

1. Connecting and authorizing the FortiAP unit

Connect the FortiAP to the lan interface.

Go to WiFi & Switch Controller > Managed FortiAPs. The FortiAP is listed. It may take a few minutes for the FortiAP to appear. The device is not yet authorized, as indicated by the in the State column.

By default, the FortiGate adds newly discovered FortiAPs to the Managed FortiAPs list but does not authorize them. You can disable this in the CLI. See Deploying Wireless Networks.

Highlight the FortiAP unit on the list and select Authorize.

After a few minutes, hit the Refresh button and will appear to tell you that the device is authorized.

2. Creating an SSID

Go to WiFi & Switch Controller > SSID and create a new SSID.

Set Traffic Mode to Local bridge with FortiAP's Interface.

Configure the WiFi Settings as you would for a regular wireless network and set a secure Pre-shared Key.

3. Creating a custom FortiAP profile

Go to WiFi & Switch Controller > FortiAP Profiles and create a new profile.

Set Platform to the FortiAP model you are using (FAP11C).

Set SSID to use the new SSID. Set LAN Port mode to bridge to the new SSID.

Go to WiFi & Switch Controller > Managed FortiAPs and edit the FortiAP. Set FortiAP Profile to the new profile.

You have the option to enter a name for the FortiAP (MyFortiAP in this example). If you don't, the FortiAP will be identified by its serial number.

4. Results

Connect to the SSID with a wireless device. After a connection is established, you can browse the Internet using the wireless network configured in this recipe.

Go to FortiView > All Sessions and observe the wireless activity. Hover over the Device column to see details.

For further reading, check out Deploying Wireless Networks in the FortiOS 5.4 Handbook.