
Kubernetes
You can migrate existing EMS 7.2.10 or 7.2.12 configurations to EMS 7.4.5 on Kubernetes (see Deploying EMS on Kubernetes).
To generate a public key and retrieve all the required DB information for migration:
-
If you have not enabled or installed PowerShell on the Windows Server, follow the steps in Get started with OpenSSH for Windows to install OpenSSH.
- Generate a public key pair in PowerShell by entering
ssh-keygen.exe -t rsa -b 4096.For all subsequent prompts, press the
Enterkey. As the migration tool does not support encrypted private key files, leave the prompt empty and pressEnterwhen you are prompted for a passphrase. A key pair is generated and saved toC:\Users\Administrator\.ssh. -
Copy the contents of the public SSH key file (
C:\Users\Administrator\.ssh\id_rsa.pubin this example) and save it in a handy location as it will be used in later steps. -
On the Linux environment where EMS containers are running, create a user with access to the container tools:
sudo useradd -m -s /bin/bash <username>
sudo usermod -aG microk8s <username>
-
Create script to map
kubectltomicrok8s.kubectl:sudo cat <<'EOF' | sudo tee /usr/local/bin/kubectl > /dev/null #!/bin/bash exec microk8s kubectl "$@" EOF
-
4. Add execution permission to the script file:
sudo chmod +x /usr/local/bin/kubectl
-
Paste the EMS windows SSH public key (that you copied in step 3) to the authorized keys of the user in
/home/<username>/.ssh/authorized_keys.
If the
/home/<username>/.sshfolder does not exist yet, create it using the following commands:sudo mkdir /home/<username>/.ssh && sudo chown <username>:<username> /home/<username>/.ssh && sudo chmod 700 /home/<username>/.ssh
-
Create a new yaml file (eg:
db_access.yaml) with following content:apiVersion: v1 kind: Service metadata: name: db-mig annotations: metallb.universe.tf/address-pool: "" metallb.universe.tf/loadBalancerIPs: "" spec: type: LoadBalancer selector: app: db ports: - name: db protocol: TCP port: 5432 targetPort: 5432
-
Run the following command to allow remote access for EMS DB during migration process:
kubectl apply -f <path to yaml file> -n <your namespace>
To retrieve the namespace, run
kubectl get namespace. -
Run the following command to retrieve the DB password and save it in a handy location as you will need it when specifying migration configuration on the Windows machine in later steps:
kmicrok8s.kubectl exec -ti <pod> -n <namespace> -- env | grep POSTGRES
To retrieve the pod name, run
kubectl get pods -n <namespace>. -
Run the following command to retrieve the DB IP address and save it in a handy location as you will need it when specifying migration configuration on the Windows machine in later steps:
kmicrok8s.kubectl get svc -n <namespace>
To configure the Windows Server machine with the EMS instance to migrate:
The Windows Server machine must have TLS 1.2 enabled for Client. In Registry Editor, confirm that the registry key [HKEY_LOCAL_MACHINE\SYSTEM\CurrentControlSet\Control\SecurityProviders\SCHANNEL\Protocols\TLS 1.2\Client] is set to 1 or does not exist at all. Being enabled is the default behavior.
- Create a user in SQL Server with the sysadmin role. You use this user to export the tables that contain EMS data:
- Log in to SQL Server Management Studio using Windows authentication. You may need to enable Trust server certificate.
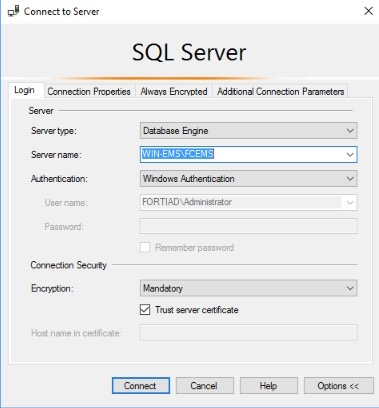
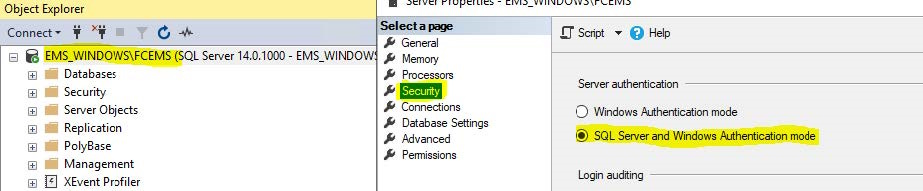
- In Object Explorer, right-click FCEMS and select Properties. Click Security and select SQL Server and Windows Authentication mode.
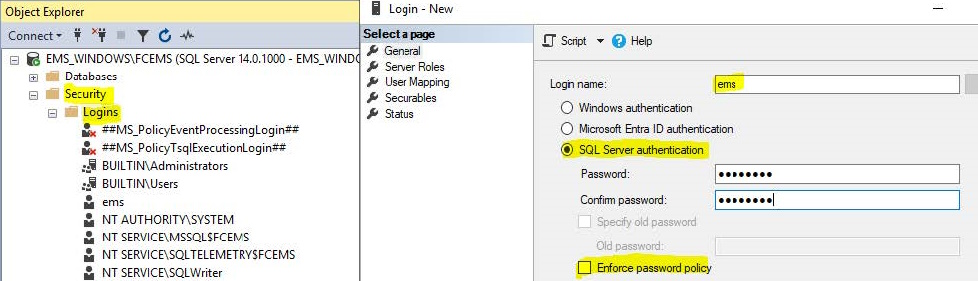
- In Object Explorer, go to Security > Logins. Right-click and select New login > General.
- In the Login name field, enter the desired login name. In this example, the login name is ems.
- Select SQL Server authentication.
- In the Password and Confirm password fields, enter the desired password.
- Disable Enforce password policy. Save.
- Go to Server Roles. Select sysadmin. Save.
- Restart the SQL Server (FCEMS) service. The service name may differ. Check the given name during your remote SQL install.
- Log in to SQL Server Management Studio using Windows authentication. You may need to enable Trust server certificate.
- Download the migration tool from the Fortinet Support site and extract the files. The migration tool consists of an executable and a config file.
- Open the config file in a text editor and specify the following parameters:
Parameter
Value to configure
[sqlserver]
host
SQL Server IP address. If you are using a local database (DB), enter 127.0.0.1.
port
Microsoft SQL Server port. user
User in SQL Server with sysadmin role. For an EMS with a local DB, you can leave this field blank. password
Password for SQL user. For an EMS with a local DB, you can leave this field blank. [postgresql]
host
EMS Linux server IP address, which you should have retrieved in step 11 in To generate a public key and retrieve all the required DB information for migration:. In this example the DB and EMS will be on the same Linux server.
port
Postgres port, which is 5432 as defined in the yaml file.
user
Postgres default username, which is postgres.
password
Postgres user password, which you should have retrieved in step 10 in To generate a public key and retrieve all the required DB information for migration:.
db_prefix
Target database prefix. This is used when the target database has any prefix. For example, if the target database includes db1001FCM and db1001FCM_Default databases, you could enter db1001 as the
db_prefixvalue.Leave this field blank.
[linux_server]
host
IP address of the host where docker is running.
ssh_port
SSH port open in EMS Linux, which is 22.
user
EMS Linux Server user, which you created in step 4 in To generate a public key and retrieve all the required DB information for migration:.
key_file
Key file location in EMS Windows Server. For example, C:\Users\Administrator\.ssh\id_rsa.[site_migration]
k8s_namespace
Kubernetes namespace where EMS has been deployed.
k8s_pod
Name of the pod that runs the deploy container:
- When EMS is deployed on Kubernetes in singlepod mode (default), the pod with the prefix
ems-aiois used. - When deployed in multipod mode, the pod with the prefix
daemons-lowis used.
The following shows an example:
[sqlserver]
host =172.16.1.3
port =1433
user =ems
password =Test123!
[postgresql]
host =172.16.1.22
port =5432
user =postgres
password =Test123!
db_prefix =
[linux_server]
host =172.16.1.22
ssh_port =22
user =test
key_file =C:\Users\Administrator\.ssh\id_rsa
k8s_namespace = ems
k8s_pod = ems-aio-86495ff465-dffxc
[site_migration]
# Update this section only if multiple source single-tenant EMS instances need to be migrated into a single EMS Linux instance.
# To enable site migration, set 'enable = true' and specify the target site name on the destination EMS where the site should be migrated.
enable = false
target_site =
# if running EMS on docker compose, use the `docker_compose` key below to specify the full qualified path to the docker compose file
# the location of the file can be obtained by running `docker compose ls` on the host where the docker compose is running
# docker_compose = '/home/user/docker-compose.yaml'
# if instead of pure docker, you're using podman, `docker_compose` is still required but the podman flag below needs to be set to 1
# podman = 0
# if running EMS on K8S, use the `k8s_namespace` and `k8s_pod` below to specify the k8s namespace and the pod where the `deploy` service
# is running with EMS. For single pod deployments, the pod name will always start with `ems-aio`. For multi pod deployments, the pod name
# starts with `daemons-low`.
# k8s_namespace = ems
# k8s_pod = ems-aio-86495ff465-dffxc [files]
# Copy a single file or a directory recursively to the remote server
# follow the pattern: file_or_folder_key = {'source' : '<file_souce>', 'target' : <file_target>'}
# multiple entries are allowed, file_or_folder_key is just a placeholder
# Examples:
# 1 - copying the installer directory recursively:
# installer_dir =
# {'source' : 'C:\\Program Files (x86)\\Fortinet\\FortiClientEMS\\Installers',
# 'target' : '/opt/forticlientems/data'}
# 2 - copying a specific file:
# signatures_file =
# {'source' : 'C:\\Program Files (x86)\\Fortinet\\FortiClientEMS\\signatures\\emsaval\\emsaval.dll',
# 'target' : '/opt/forticlientems/data/signatures/emsaval/emsaval.dll'}
- When EMS is deployed on Kubernetes in singlepod mode (default), the pod with the prefix
- Open an elevated PowerShell prompt inside the EMS Windows server and go to the directory where you extracted the migration tool. Run
migration.exe:.\migration.exe
Wait for the migration to complete. If there are issues, check the migration log in the same folder as the migration tool.
-
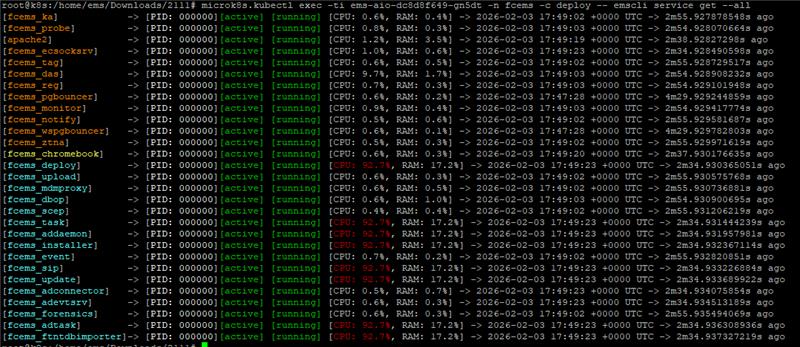
Check that all EMS services are running using the following command:
microk8s.kubectl exec -ti <pod name> -n <namespace> -c deploy -- emscli service get –all
-
Access the EMS GUI on the Linux server and verify that all configurations and data from the EMS Windows Server were migrated.
To migrate FortiClient endpoints to Linux EMS:
After EMS migration completes, do one of the following to migrate FortiClient endpoints to Linux EMS:
|
Method |
Description |
|---|---|
|
Update DNS record with Linux EMS IP address (recommended) |
On the DNS server, update the DNS record for EMS with the Linux EMS IP address. FortiClient endpoints that were previously connected to Windows Server EMS resolve the new IP address to the EMS FQDN and connect to the Linux EMS. This is the recommended method to migrate FortiClient endpoints to Linux EMS. The endpoint automatically connects to Linux EMS. Even if user verification is enabled, the migration is seamless and the user does not notice any changes on the endpoint. |
|
Switch EMS |
|
|
Configure EMS server list on Windows Server EMS |
This method only works if user verification is not enforced and FortiClient connects to EMS using an FQDN or IP address.
|
After migration, the license remains active on Windows Server EMS.