Receiving quarantined source IP addresses from FortiGate
FortiGate can maintain a list of source IPs that it prevents from interacting with the network and protected systems. You can configure FortiWeb to receive this list of IP addresses at intervals you specify. You can then configure an inline protection profile to detect the IP addresses in the list and take an appropriate action.
This feature is available only if the operating mode is Reverse Proxy or True Transparent Proxy.
The IP Quarantine feature can be configured through two places:
-
Security Fabric > Fabric Connectors. See To enable IP Quarantine feature through Security Fabric > Fabric Connectors.
-
System > Config > FortiGate Integration. See To enable IP Quarantine feature through System > Config > FortiGate Integration.
Please note that the System > Config > FortiGate Integration page will soon be discontinued. We advise transitioning to Security Fabric for Quarantine IPs retrieval configurations.
Configuring IP Quarantine in both places is not supported; you must choose one.
To enable IP Quarantine feature through Security Fabric > Fabric Connectors
- Log in to FortiGate.
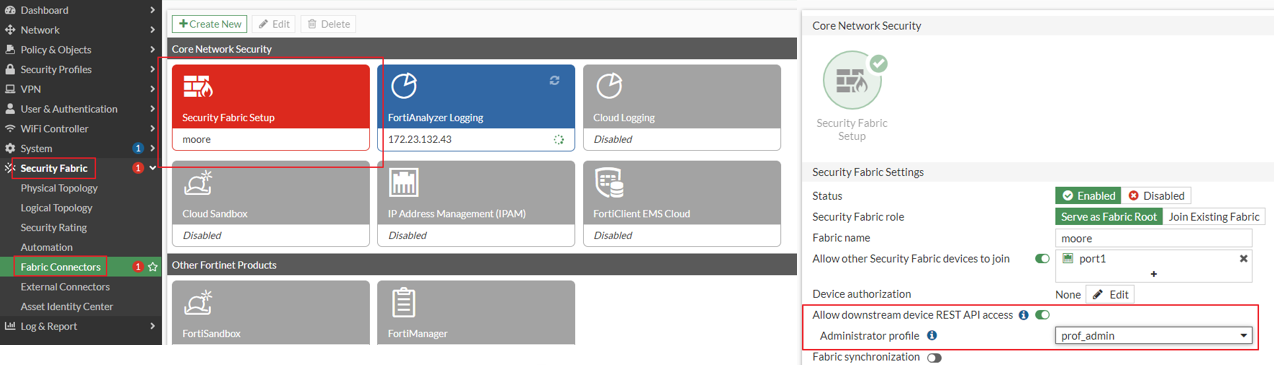
- Enable Allow downstream device REST API access in Security Fabric > Fabric Connectors > Security Fabric Setup.
- Log in to FortiWeb.
- Go to Security Fabric > Fabric Connectors.
- Click FortiGate, then click Edit.
- Select Join Existing Fabric for Security Fabric Role.
- Configure the following settings. At this point, the Connection Status shows Unauthorized.
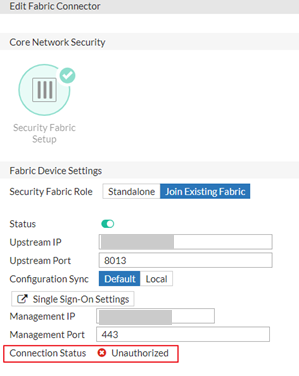
Status Enable it. Upstream IP The FortiGate IP. If you have multiple FortiGate appliances and they are deployed as Fabric net, enter the IP address of the Fabric root.
This IP would be the IP of the interface that is selected in the Allow other Security Fabric devices to join field on the FortiGate.
Upstream Port Use the default 8013. Configuration Sync Set it to default.
Default means when Fabric connection with FortiGate is established, the Single Sign-On mode would be enabled automatically and FortiGate would enable synchronizing SAML Single-Sign-On related settings to the FortiWeb device.
Local means when Fabric connection with the FortiGate is established, you need to manually enable Single Sign-On mode and manually configure the SAML Single-Sign-On settings.
It's recommended to set it as Default.
Management IP Enter FortiWeb GUI management IP. Management Port Enter FortiWeb GUI management HTTPS port. This must be the same as the setting of the HTTPS in System > Admin > Settings in FortiWeb. - Log in to FortiGate.
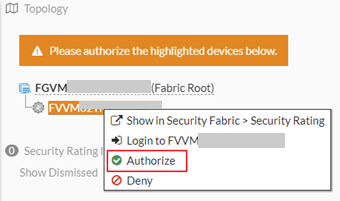
- Authorize the FortiWeb.
- Log in to FortiWeb.
- You will see the Connection Status is now Authorized.
- Switch on the Status.
- Set the interval for the Quarantine IP retrieval.
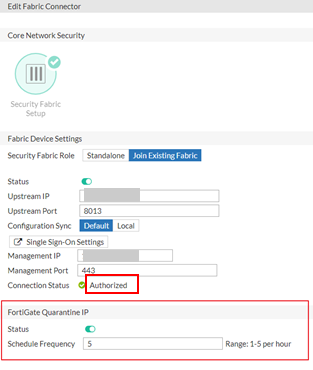
- Click OK.
To enable IP Quarantine feature through System > Config > FortiGate Integration
Before you can begin configuring FortiGate integration, you have to enable it first.
- Go to System > Config > Feature Visibility.
To access this part of the web UI, your administrator's account access profile must have Read and Write permission to items in the System Configuration category. For details, see "Permissions" on page 1. - Locate Security Features.
- Enable FortiGate Integration.
- Click Apply.
- Go to System > Config > FortiGate Integration.
- Configure these settings:
- Click Apply to save your changes.
- To configure FortiWeb to detect the quarantined IP addresses and take the appropriate action, configure the FortiGate Quarantined IPs settings in an inline protection profile. For details, see Configuring a protection profile for inline topologies.
| Enable | Select to enable transmission of quarantined source IP address information from the specified FortiGate. |
| FortiGate IP/Domain Name | Specify the FortiGate IP address or domain name that is used for administrative access. |
| FortiGatePort | Specify the port that the FortiGate uses for administrative access via HTTPS. In most cases, this is port 443. |
| Protocol | Specify whether the FortiGate and FortiWeb communicate securely using HTTPS. |
|
Server Verification |
Enable this option to verify the TLS certificates used for the HTTPS connection between FortiWeb and FortiGate. Available only if HTTPS is selected for Protocol. |
|
CA |
Select the certificate for the HTTPS connection between FortiWeb and FortiGate. It should be uploaded in System > Admin > Certificates > Admin Cert CA. |
| Administrator Name | Specify the name of the administrator account that FortiWeb uses to connect to the FortiGate. |
| Administrator Password | Specify the password for the FortiGate administrator account that FortiWeb uses. |
| Schedule Frequency | Specify how often FortiWeb checks the FortiGate for an updated list of banned source IP addresses per hour, for example, once or twice per hour. The valid range is 1 to 5. |