
Example: FortiToken two-factor authentication with RADIUS on a FortiAuthenticator
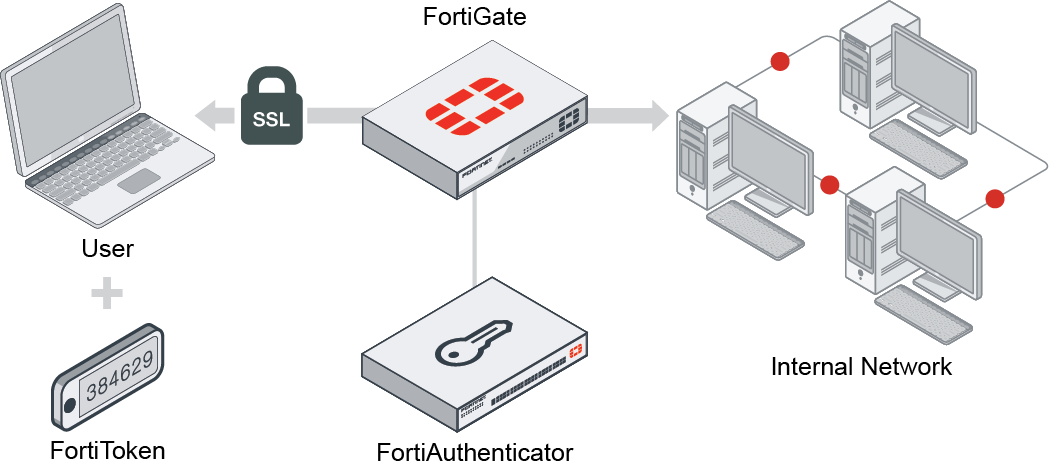
In this scenario, you will set up FortiAuthenticator to function as a RADIUS server to allow SSL VPN users to authenticate with a FortiToken 210 device.
This scenario assumes that you have already added the FortiToken, assigned it to the user, and added the user to a group for FortiToken users on FortiAuthenticator.
You will configure a user, FortiToken 210, the RADIUS client on FortiAuthenticator, and FortiGate to use FortiAuthenticator as a RADIUS server. You will then create the SSL VPN tunnel.
You can view a video of this configuration here.
-
Add FortiToken to FortiAuthenticator:
-
In FortiAuthenticator, go to Authentication > User Management > FortiTokens, and click Create New.
-
Set Token type to FortiToken Hardware and enter the FortiToken serial number into the Serial numbers field. The serial number, located on the back of the FortiToken device, is case sensitive. Note that the token can only be registered to one device.
-
-
2. Add the FortiToken user to FortiAuthenticator:
-
In FortiAuthenticator, go to Authentication > User Management > Local Users and click Create New.
-
Enter a Username (
gthreepwood), enter and confirm a password, and enable Allow RADIUS authentication. -
Click OK to access additional settings.
-
Enable One-Time Password (OTP) authentication, set Deliver token codes from to FortiAuthenticator, set Deliver token code by to FortiToken, select the FortiToken added earlier from the Token field, and then click OK to save.
-
Go to Authentication > User Management > User Groups, create a user group (
RemoteFortiTokenUsers), and addgthreepwoodto the group.
-
-
3. Create the RADIUS Client on FortiAuthenticator:
-
In FortiAuthenticator, go to Authentication > RADIUS Service > Clients and click Create New.
-
Enter a name (
OfficeServer), set Client address to IP/Hostname and enter the IP address of the FortiGate, and enter a Secret. The secret is a pre-shared, secure password that FortiGate will use to authenticate with FortiAuthenticator. -
Go to Authentication > RADIUS Service > Policies and click Create New.
-
Enter a Policy name and choose the FortiGate client in the RADIUS clients field. Click Next to continue.
-
In the RADIUS attribute criteria section, click Next to continue.
-
In Authentication Type, select Password/OTP authentication.
-
In Realms, set Realm to local | Local users and enable Filter. Note the Username input format. This is the format that the user must use to enter their username in the web portal.
-
Edit the filter, choose the user group created earlier, click OK, then click Next to continue.
-
Click Next and then click Save and exit to save the policy.
-
-
4. Connect FortiGate to the RADIUS Server:
-
In FortiGate, go to User & Authentication > RADIUS Servers, and click Create New.
-
Enter a Name (
OfficeRADIUS), set Primary Server > IP/Name to the IP of the FortiAuthenticator, and enter the Secret created earlier.Use the Test Connectivity and Test User Credentials buttons to verify the connection. Click OK to save the RADIUS server.
The FortiGate can now log into the RADIUS client added earlier in FortiAuthenticator.
-
Go to User & Authentication > User Groups, and click Create New.
-
Enter a Name (
SSLVPNGroup), set Type to RADIUS Single Sign-On (RSSO), enter the RADIUS user group name (RemoteFortiTokenUsers) in the RADIUS Attribute Value field, then click OK.
-
-
5. Configure the SSL VPN on FortiGate:
-
In FortiGate, go to VPN > SSL-VPN Portals, and edit the full-access portal. Set Split Tunneling to Disabled.
-
Go to VPN > SSL-VPN Settings.
-
In Connection Settings, set Listen on Port to
10443. -
In Tunnel Mode Client Settings, select Specify custom IP ranges and set it to
SSLVPN_TUNNEL_ADDR1. -
In Authentication/Portal Mapping, click Create New. In Users/Groups, select the SSLVPNGroup, in Portal, select full-access, and click OK.
-
In Authentication/Portal Mapping, select All Other Users/Groups and click Edit. Set Portal to web-access and click OK. This grants all other users access to the web portal only.
-
Go to Policy & Objects > Firewall Policy and click Create New.
-
Set Incoming Interface to SSL-VPN tunnel interface and set Outgoing Interface to the internet-facing interface.
-
Set Source to the SSLVPNGroup user group and set Destination to all.
-
Set Schedule to always, Service to ALL, and enable NAT.
-
Click OK to save the new policy.
-
-
6. Check your results:
-
From a remote device, open a web browser and navigate to the SSL-VPN web portal (https://FortiGate-IP:10443).Enter the user's credentials and click Login. Note that the username has to be entered in the format
realm\username, as per the client configuration in FortiAuthenticator (in this example,local\gthreepwood). -
The user is prompted to enter their FortiToken code.
-
Once the code is successfully entered,
gthreepwoodis successfully logged in to the SSL-VPN portal. -
In FortiGate, go to Monitor > SSL-VPN Monitor to confirm the user's connection.
-