


Deploying FortiTester-VM on GCP Compute Engine
Obtaining the Deployment Image
- Go to the Fortinet support site (https://support.fortinet.com) and log in.
- Navigate to Download > Firmware Images.
- Under Select Product, select FortiTester, then select the firmware version directory.
- Download the image file FTS_VM_GCP_BYOL-vxxx-buildxxxx-FORTINET.out.gcp.tar.gz, where vxxxx is the major version number, and buildxxxx is the build number.
Uploading the FortiTester Deployment Image to Google Cloud
- Log in to Google Cloud.
- Go to Storage > Browser.
Create a new bucket or navigate to an existing bucket. Here, we take Create a bucket for example.
- Click CREATE BUCKET.
Enter a name for your bucket; choose the location to store your data, and the storage class; choose the access control to objects; or configure advanced settings if needed.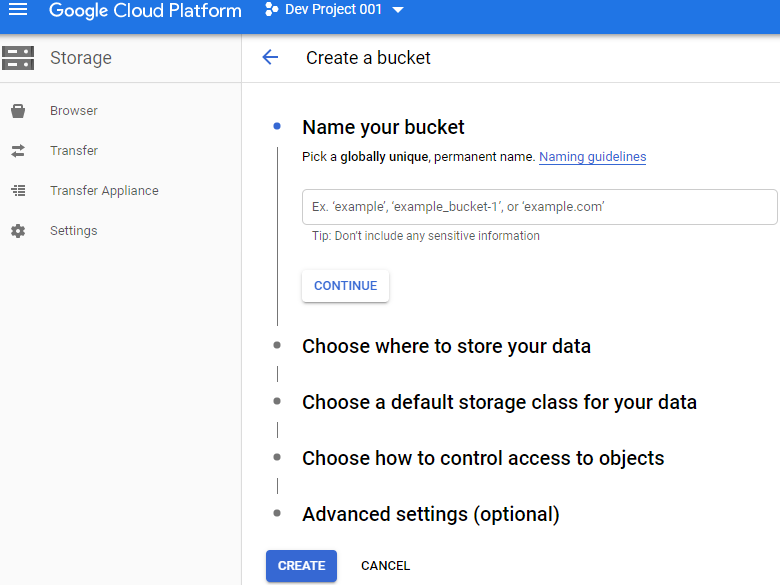
- Click Create, and it automatically goes to Bucket details page.
- Click Upload files to upload the newly downloaded image file.

- Click Upload files to upload FortiTester shell script for setting network interface muti-queue. (Download the set_multiqueue script from here).

- Click the image file name, you can see the details page. The URI is to be used in step below.

Creating the FortiTester Deployment Image
- Create the image with gcloud command by clicking the icon below.

- Input the commands below.
gcloud beta compute images create fortitester1-image --source-uri ga://fts_bucket_1/FTS_VM_GCP_BYOL_v371_build3719-FORTINET.out.gcp.tar.gz --guest-os-features MULTI_IP_SUBNETGenerally, the URL is
gs://[bucket]/[file], wherein,bucketis the bucket name;fileis the image URL;--guest-os-features MULTI_IP_SUBNETis to fix the bug that the image created by Google GUI does not support other masks except IP class /32.
[]-image is the image name, you can name it by yourself.
Creating FortiTester Deployment VPC Network (mgmt port)
- Navigate to VPC network > VPC networks.

- Click CREATE VPC NETWORK.

- On Create a VPC network, enter a name for the VPC network, for example, fts-mgmt;
For Subnets, configure it like below: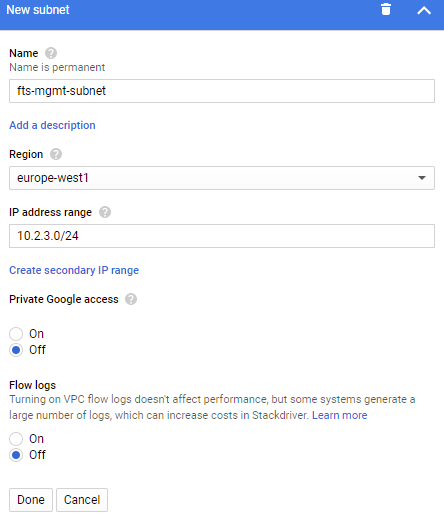
Click Done.
For other fields, just keep the default ones.
- Click Create.
- Find the VPC network fts-mgmt you have created, and click it.
- On the Firewall rules tab, click Add firewall rule to allow TCP 80/443/22 access.
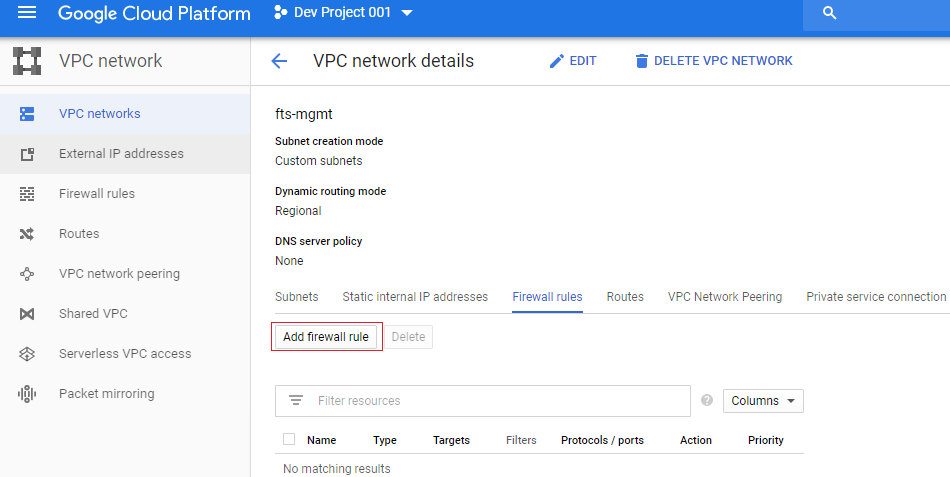
- On Create a firewall rule, enter a name for the firewall rule.
For Targets, select All instances in the network;
For Source IP ranges, enter0.0.0.0/0;
For Protocols and ports, enter 80, 443, and 22 for tcp field;
For other fields, just keep the default ones.
- Click Create.

Creating FortiTester Deployment VPC Network (traffic port1)
- Navigate to VPC network > VPC networks.
- Click CREATE VPC NETWORK.
- On Create a VPC network, enter a name for the VPC network, for example, fts-traffic-port1;
For Subnets, configure it like below: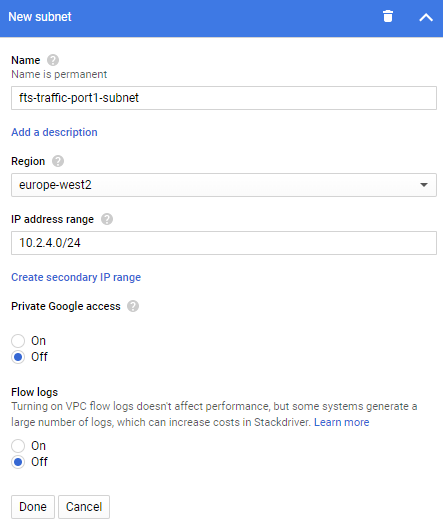
Click Done.
For other fields, just keep the default ones.
- Click Create.
- Find the VPC network fts-traffic-port1 you have created, and click it.
- On the Firewall rules tab, click Add firewall rule to allow all traffic.

- On Create a firewall rule, enter a name for the firewall rule.
For Targets, select All instances in the network;
For Source IP ranges, enter0.0.0.0/0;
For Protocols and ports, select Allow all;
For other fields, just keep the default ones.
- Click Create.

|
|
Each network interface configured in a single instance must be attached to a different VPC network, and each interface must belong to a subnet whose IP range does not overlap with the subnets of any other interfaces. |
Creating FortiTester Deployment VPC Network (traffic port2)
Follow steps in Creating Deployment VPC Network (traffic port1) to create a VPC network for traffic port2, fts-traffic-port2.
For Subnets, configure it like below: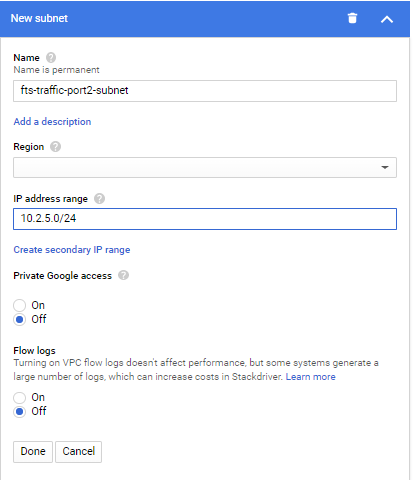
Deploying the FortiTester-VM Instance
- Go to Compute Engine > VM Instances. Click CREATE INSTANCE.

- In the Name field, enter a name for the VM. Select the desired region and zone.
For Machine family, select General-purpose;
For Series, select N1.
For Machine type, select n1-standard-4, n1-standard-8, n1-standard-16, or n1-standard-32; - For Boot disk, click Change; on the Custom images tab, select the newly created FortiTester image. The boot disk size is 2GB for FortiTester image.
- For Management, enter
startup-script-urlas the metadata key; in the value box, enter a URL to the startup script file, either ings://[BUCKET]/[FILE]orhttps://storage.googleapis.com/[BUCKET]/[FILE]format as in bucket details.
- Select Disks tab, configure the log disk.
Click Add new disk. For Deletion rule, check Delete dick. For others, keep the default ones.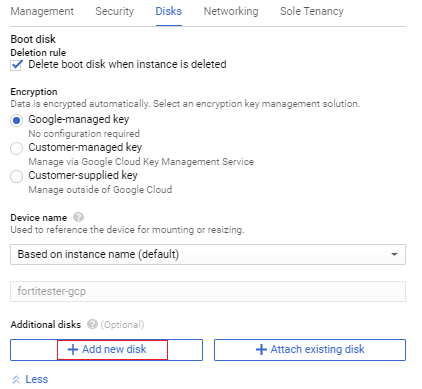
- Select Networking tab, add the three network interfaces created.
The number of interfaces allowed depends on the instance's machine type and the number of vCPUs).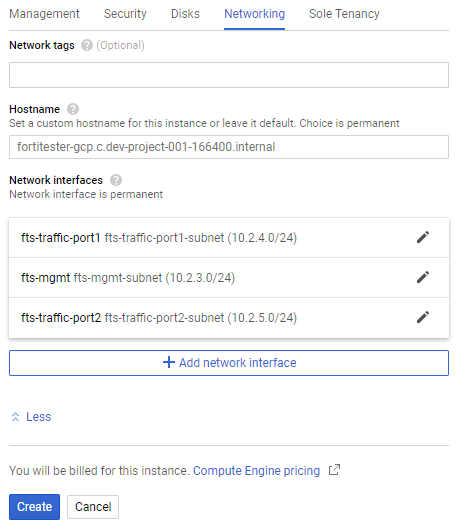
For Primary internal IP, choose External (Automatic); for fts-mgmt, choose External IP-Ephemeral, do switch on IP forwarding; for the other two, choose External IP-None.
You can also choose to customize the internal IP. If you want to add more internal IPs, click Show alias IP range to configure it. - After you have configured related fields, click Create.
- After around 2 minutes, the instance shall be up and running.