


Administrators
You can use the default “admin” account to configure administrator accounts, adjust system settings, upgrade firmware, create backup files, and configure security features.
This section covers the following topics:
- Setting the administrator password
- Setting the password retries and lockout time
- Using PKI
- Adding administrators
- Administrators
Setting the administrator password
By default, your system has an administrator account set up with the user name admin and no password. On your first login to the GUI or CLI of a new FortiSwitch unit, you must create an admin password. You are also forced to create an admin password after resetting the FortiSwitch configuration to the factory default settings with the execute factory reset or execute factoryresetfull command.
To set the admin password in the GUI:
- From the admin menu in the page banner, select Change Password.
- Enter the new password in the Password and Confirm Password fields. Passwords can be up to 64 characters in length.
- Select Change.

Specifying the hash algorithm
Starting in FortiSwitchOS 7.4.0, you can specify which hash algorithm is used to encode passwords for new administrator accounts. You can select the PBKDF2, SHA1, or SHA256 hash algorithm. By default, the SHA256 hash algorithm is used.
To specify the hash algorithm:
config system global
set admin-password-hash {pbkdf2 | pbkdf2-high | sha1 | sha256}
end
|
Variable |
Description |
| pbkdf2 | PBKDF2 hash algorithm with a lower iteration count. |
| pbkdf2-high | PBKDF2 hash algorithm with a higher iteration count. |
| sha1 | SHA1 hash algorithm. |
| sha256 | SHA256 hash algorithm. |
Downgrading your FortiSwitchOS version
Before downgrading to a FortiSwitchOS version earlier than 7.0.0, you need to ensure that the administrator password is in SHA1 format. Use the execute system admin account-convert-sha1 command to convert the administrator password to SHA1 encryption.
Before downgrading to FortiSwitchOS 7.0.0 or later, you need to ensure that the administrator password is in SHA1 or SHA256 format.
-
Use the
execute system admin account-convert-sha1command to convert the administrator password to SHA1 encryption. -
Use the
execute system admin account-convert-sha256command to convert the password for a system administrator account to SHA256 encryption.
|
|
If you do not convert the admin password before downgrading, the admin password will not work after the switch reboots with the earlier FortiSwitchOS version. |
To convert the format of the admin password to SHA1 format:
- Enter the following CLI command to convert the admin password to SHA1 encryption:
execute system admin account-convert-sha1 <admin_name>
- Downgrade your firmware.
To convert the format of the admin password to SHA256 format:
- Enter the following CLI command to convert the admin password to SHA256 encryption:
execute system admin account-convert-sha256 <admin_name>
- Downgrade your firmware.
Setting the password retries and lockout time
By default, the system includes a set number of three password retries, allowing the administrator a maximum of three attempts to log into their account before they are locked out for a set amount of time (by default, 60 seconds).
The number of attempts can be set to an alternate value, as well as the default wait time before the administrator can try to enter a password again. You can also change this value to make it more difficult to hack. Both settings are must be configured with the CLI
To configure the lockout options:
config system global
set admin-lockout-threshold <failed_attempts>
set admin-lockout-duration <seconds>
end
For example, to set the lockout threshold to one attempt and the duration before the administrator can try again to log in to five minutes, enter these commands:
config system global
set admin-lockout-threshold 1
set admin-lockout-duration 300
end
Using PKI
You can use Public Key Infrastructure (PKI) to require administrators to provide a valid certificate when logging in with HTTPS.
Use the following steps to configure PKI:
- Configure a peer user.
- Add the peer user to a user group.
- Configure the administrator account.
- Configure the global settings.
To configure a peer user:
config user peer
edit <peer_name>
set ca <name_of_certificate_authority>
next
end
For example:
config user peer
edit pki_peer_1
set ca Fortinet_CA
next
end
To add the peer user to a user group:
config user group
edit <group_name>
set member <peer_name>
next
end
For example:
config user group
edit pki_group_1
set member pki_peer_1
next
end
To configure the administrator account:
config system admin
edit <admin_name>
set peer-auth enable
set peer-group <group_name>
next
end
For example:
config system admin
edit pki_admin_1
set peer-auth enable
set peer-group pki_group_1
next
end
To configure the global settings:
config system global
set clt-cert-req enable
end
config system web
set https-pki-required enable
end
Adding administrators
Only the default “admin” account can create a new administrator account. If required, you can add an additional account with read-write access control to add new administrator accounts.
If you log in with an administrator account that does not have the super_admin admin profile, the administrators list will show only the administrators for the current virtual domain.
When adding administrators, you are setting up the administrator’s user account. An administrator account comprises an administrator’s basic settings as well as their access profile. The access profile is a definition of what the administrator is capable of viewing and editing.
You can add regular or remote administrators in both the CLI and GUI.
Adding a regular administrator
Using the GUI:
- Go to System > Admin > Administrators.
- Click Add Administrator.
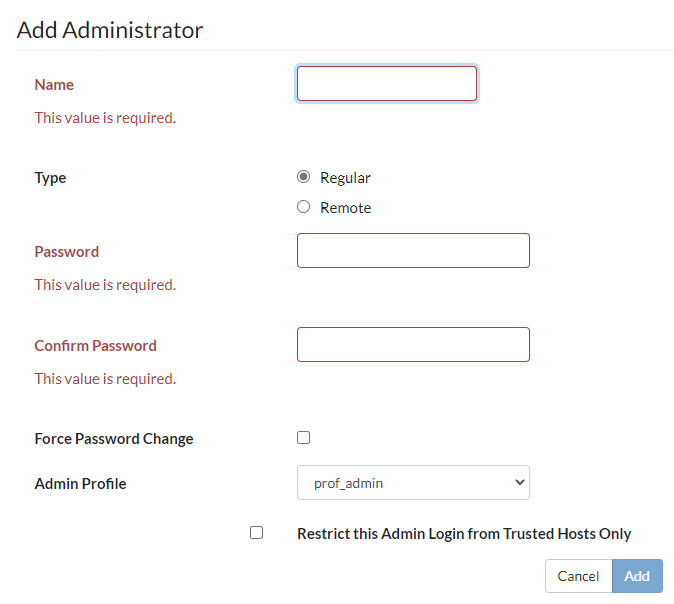
- In the Name field, enter the administrator name.
- Click Regular for the type of administrator.
- In the Password field and the Confirm Password field, enter the password for the administrator.
Passwords can be up to 64 characters in length.
- Select the Force Password Change checkbox to force the administrator to change the password when next logging in.
- Select an admin profile from the Admin Profile dropdown list.
Admin profiles control administrator access to FortiSwitch features. To create an admin profile, see Profiles.
-
Select the Restrict this Admin Login from Trusted Hosts Only checkbox if you want to specify which hosts that the administrator can use to connect to the system.
You can specify up to 10 IPv4 addresses or subnet addresses and netmasks in the Trusted Host fields. If you want the administrator to be able to access the system from any address, set the trusted hosts to 0.0.0.0 and the netmask to 0.0.0.0.
- Click Add.
Using the CLI:
config system admin
edit <admin_name>
set remote-auth disable
set password <admin_password>
set force-password-change{enable | disable}
set accprofile <profile-name>
set {trusthost1 | trusthost2 | trusthost3 | trusthost4 |
trusthost5 | trusthost6 | trusthost7 | trusthost8 | trusthost9
| trusthost10} <address_ipv4mask>
next
end
Adding a remote administrator
You can configure the RADIUS server to set the access profile. This process uses RADIUS vendor-specific attributes (VSAs) passed to the FortiSwitch unit for authorization. The RADIUS access profile override is mainly used for administrative logins.
Starting in FortiSwitchOS 7.4.0, you can add multiple remote administrators with wildcards in their names. When there is a wildcard in the administrator name, FortiSwitchOS examines possible matches based on their order in the Configuration Management Database (CMDB) and allows the first match to log in.
Starting in FortiSwitchOS 7.4.0, you can enable wildcard-fallback when set remote-auth is enabled and set wildcard is disabled. When wildcard-fallback is enabled, FortiSwitchOS first tries to match the login name; if the login name matches the system administratorʼs credentials, the login is successful. If FortiSwitchOS cannot match the login name with the system administratorʼs credentials, it will try to match the login name with wildcard system administrator names based on their order in the CMDB and allows the first match to log in.
Using the GUI:
- Go to System > Admin > Administrators.
- Click Add Administrator.
- Click Remote for the type of administrator. .
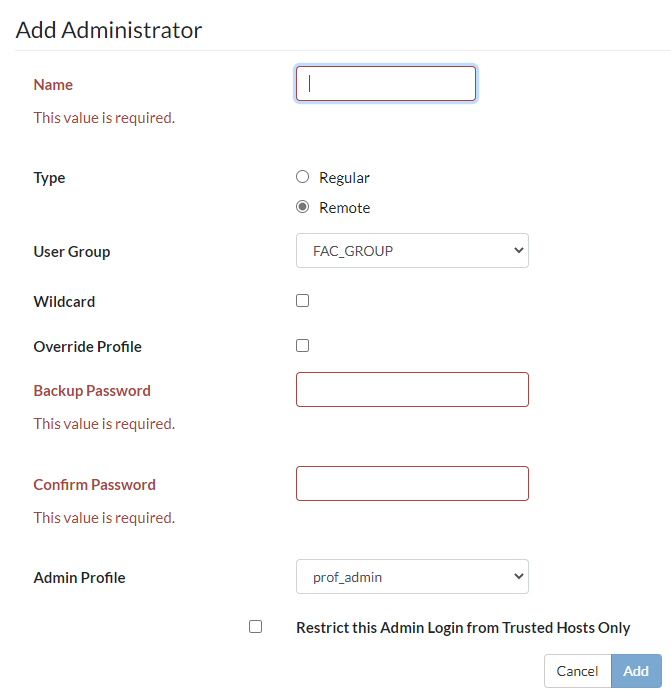
- In the Name field, enter a name for the RADIUS system administrator.
- Select the user group from the User Group dropdown list.
To add a user group to the list, see User groups.
- Select the Wildcard checkbox if you want to use wildcard characters in the name of the RADIUS system administrator.
- Click the Accprofile Override checkbox if you want the remote authentication server to be able to override the access profile.
- In the Backup Password field and the Confirm Password field, enter the password for the administrator.
Passwords can be up to 64 characters in length.
- Select an admin profile from the Admin Profile dropdown list.
Admin profiles control administrator access to FortiSwitch features. To create an admin profile, see Profiles.
-
Select the Restrict this Admin Login from Trusted Hosts Only checkbox if you want to specify which hosts that the administrator can use to connect to the system.
You can specify up to 10 IPv4 addresses or subnet addresses and netmasks in the Trusted Host fields. If you want the administrator to be able to access the system from any address, set the trusted hosts to 0.0.0.0 and the netmask to 0.0.0.0.
- Click Add.
Using the CLI:
config system admin
edit <admin_name>
set remote-auth enable
set remote-group <name>
set wildcard {enable | disable}
set wildcard-fallback {enable | disable}
set accprofile-override {enable | disable}
set password <admin_password>
set accprofile <profile-name>
set {trusthost1 | trusthost2 | trusthost3 | trusthost4 |
trusthost5 | trusthost6 | trusthost7 | trusthost8 | trusthost9
| trusthost10} <address_ipv4mask>
next
end
For example, the following commands create a RADIUS-system admin group with accprofile-override enabled:
config system admin
edit "RADIUS_Admins"
set remote-auth enable
set accprofile no_access
set wildcard enable
set remote-group "RADIUS_Admins"
set accprofile-override enable
next
end
Ensure that the RADIUS server is configured to send the appropriate VSA.
To send an appropriate group membership and access profile, set VSA 1 and VSA 6, as in the following example:
VENDOR fortinet 12356
ATTRIBUTE Fortinet-Group-Name 1 <admin profile>
ATTRIBUTE Fortinet-Access-Profile 6 <access profile>
The value of VSA 1 must match the remote group, and VSA 6 must match a valid access profile.