
Fortinet white logo
Fortinet white logo

Administration Guide

Pre-Processing Rules

Pre-Processing Rules

Playbooks were previously used to detect duplicate records; however, the lack of precision in playbook design often leads to an influx of redundant alerts in a SOAR system, resulting in an abundance of records and increased workflow load. To address this issue, FortiSOAR has implemented a rule-based pre-processing feature that gets triggered before an incoming record is stored in the database, providing the flexibility to make decisions such as dropping records based on predefined criteria.

Additionally, the implementation of a post-processing rule adds efficiency to record management, by linking similar records based on specified similarity criteria. This post-processing rule facilitates intelligent linking of records, reduces reliance on resource-intensive playbooks and optimizes system performance. In summary, these rule-based pre- and post-processing features enhance the control and efficiency of the SOAR platform. For information on the API for pre-processing rules, see the API Methods chapter in the "API Guide." Starting from release 7.6.0, a new pre-processing rule called "Enforcing File Attachments for File Indicators" is included by default. This rule ensures that indicators of type 'file' are only created when a file is attached.

Some advantages of adding pre-processing rules include:

  • Ability to configure different types of rules for identifying duplicate records
  • Avoid the need to create custom playbooks for removing duplicate records.
  • Avoid the execution of playbooks for records with similar attributes.
Note

To view the 'Pre-Processing Rules' page, you must be assigned Read permission on the Preprocessing Rules module and Update permission on the Application module. Similarly, to perform actions such as adding new pre-processing rules, editing these rules, changing their status, etc, you must be assigned appropriate CRUD permissions on the Preprocessing Rules module.

Processing of rules

  • Pre-processing of rules does not apply to bulk operations.
  • If multiple rules are matched for a record, the processing occurs as follows:
    • Once a single rule is matched for a record, the processing stops and exits; none of the other rules are evaluated.
    • Rules are sorted first by their 'Priority', with the highest priority rules evaluated first, starting with P1 as the highest and P5 as the lowest, and then by their 'Created' date.
Note

You can export and import your pre-processing rules using the Export and Import Wizards.

Adding a new 'Drop' type pre-processing rule

Users can add pre-processing rules to act as a gatekeeper that help FortiSOAR detect duplicate records getting ingested into the system, thereby filtering incoming records and preventing the unnecessary accumulation of redundant alerts. The pre-processing rule can also prevent execution of playbooks for the same records, leading to a reduction of the load on the system. For example, users can define a pre-processing rule that prevents records associated with internal security campaigns from being created, offering a preemptive measure to prevent unnecessary entries into the SOAR platform.

You can choose to 'Drop' or 'Update' incoming records based on the defined pre-processing rule.

Note

In MSSP environments, replicated records are not evaluated by the 'Drop' rule. However, update rules are still evaluated on replicated records. To prevent this, add the 'tenant=self' condition to each update rule on both the master and tenant nodes.

To add a pre-processing rule that drops incoming records associated with internal security campaigns or those that have a specific source IP address, follow these steps:

  1. Click Settings and in the Application Editor section, click Pre-Processing Rules.
  2. On the Pre-Processing Rules page, click + Add Pre-Processing Rule to display the Create New Pre-processing Rule wizard and define the rule:
    1. In the Rule Details dialog, enter details for the rule:
      1. Toggle the Active button to set the state of the rule as 'Active' (default) or 'Inactive'.
      2. In the Rule Name field, enter a name to identify the rule.
        NOTE: Rule names must be unique within the system.
      3. (Optional) In the Description field, enter a brief description of the rule.
      4. (Optional) In the Tags field, add keywords that you can use to reference the rule.
      5. From the Rule Type drop-down list, select the action that requires to be performed on similar incoming records. You can choose between Drop or Update. For our example, select Drop.
      6. From the Module drop-down list, select the module on whose records you want to run the pre-processing rule. For our example, select 'Alerts'.
        NOTE: System modules such as 'People', 'Appliances', 'Agent', etc., will not be included in the Module drop-down list as rules cannot be configured for these modules.
      7. From the Priority drop-down list, select the priority of the rule, which determines the order of rule execution.
      8. (Optional) In the Set Rule Expiry Date field, select the date when this rule will expire and no longer be used to detect duplicate records being ingested into the system. For example, if you have created an internal security campaign for a month, you can set the expiration date to be the same.
        Once you have entered all the details, click Continue.
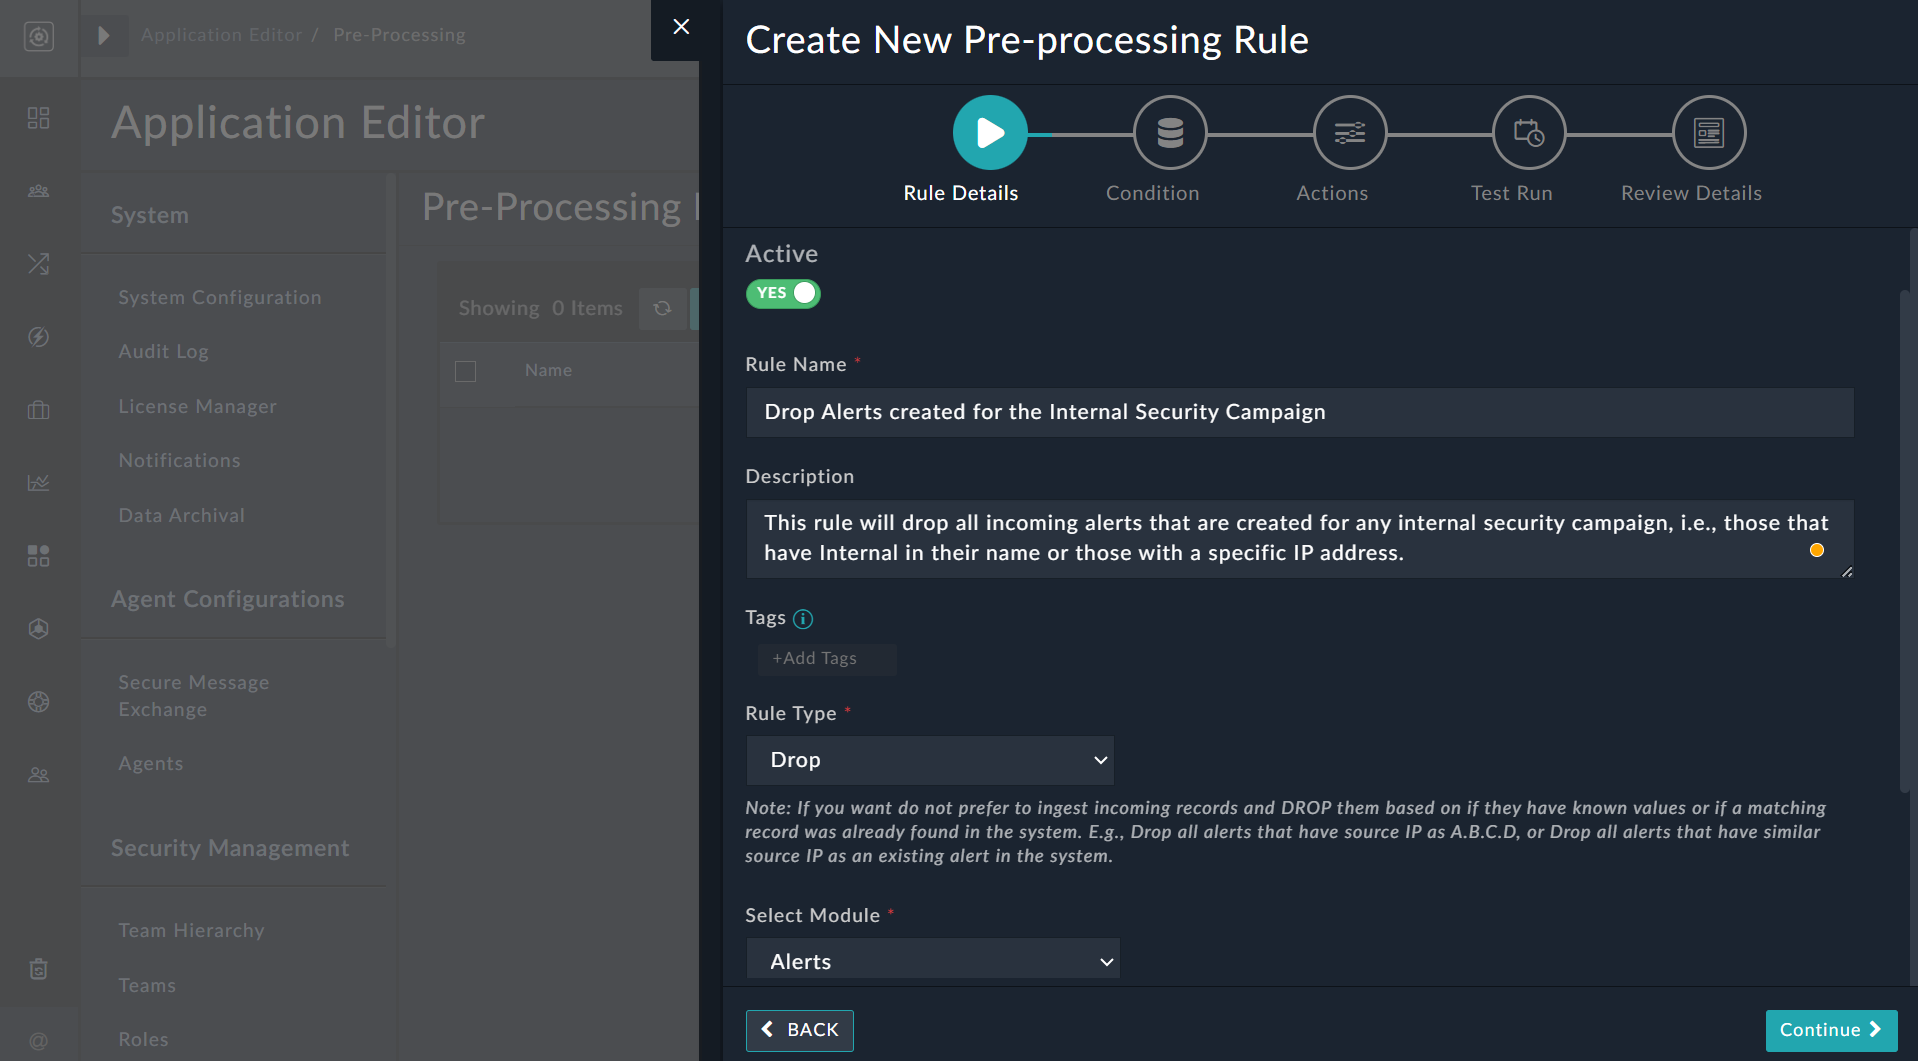
        Pre-processing Rule Wizard - Rule Details for rule type drop
    2. In the Condition dialog, specify the condition to filter incoming records.
      1. If you have selected the 'Drop' action, you can evaluate the criteria based on the following conditions:
        Select the Take decision based on known values in the incoming record option to take the decision to drop the incoming record based on the values of the record that is being ingested into the system.
        OR
        Select the Compare incoming record with an existing system record option to take the decision to drop the incoming record after comparing its values with existing records in the system.
        If you select this option, then from the Created Within Last drop-down list, select the number of days within which the existing records were created and that need to be compared with the incoming record. You can choose between 1 to 7 days.
        For example, if you choose 03 days, the incoming record's values will be compared with the values of records created in the system in the last 3 days.
      2. In the Evaluate Following Condition On Existing Records section, define the condition for comparing the values of the incoming records. For our example, define the condition as Source IP Equals 192.1.1.1 OR Name Contains Internal.
        NOTE: Negative operators such as 'Not Equals', 'Does Not Contain', 'Does Not Match', 'Is Not In List', etc. cannot be selected in the conditions defined for evaluating existing records in the case of the 'Drop' rule type. This is due to the possibility that numerous records could be dropped when using negative operators.
        Also note that if you have selected the Compare incoming record with an existing system record option, you can select the 'Already Exists' operator to compare the values of incoming records with existing records for condition evaluation.
        Once you have defined the condition, click Continue.
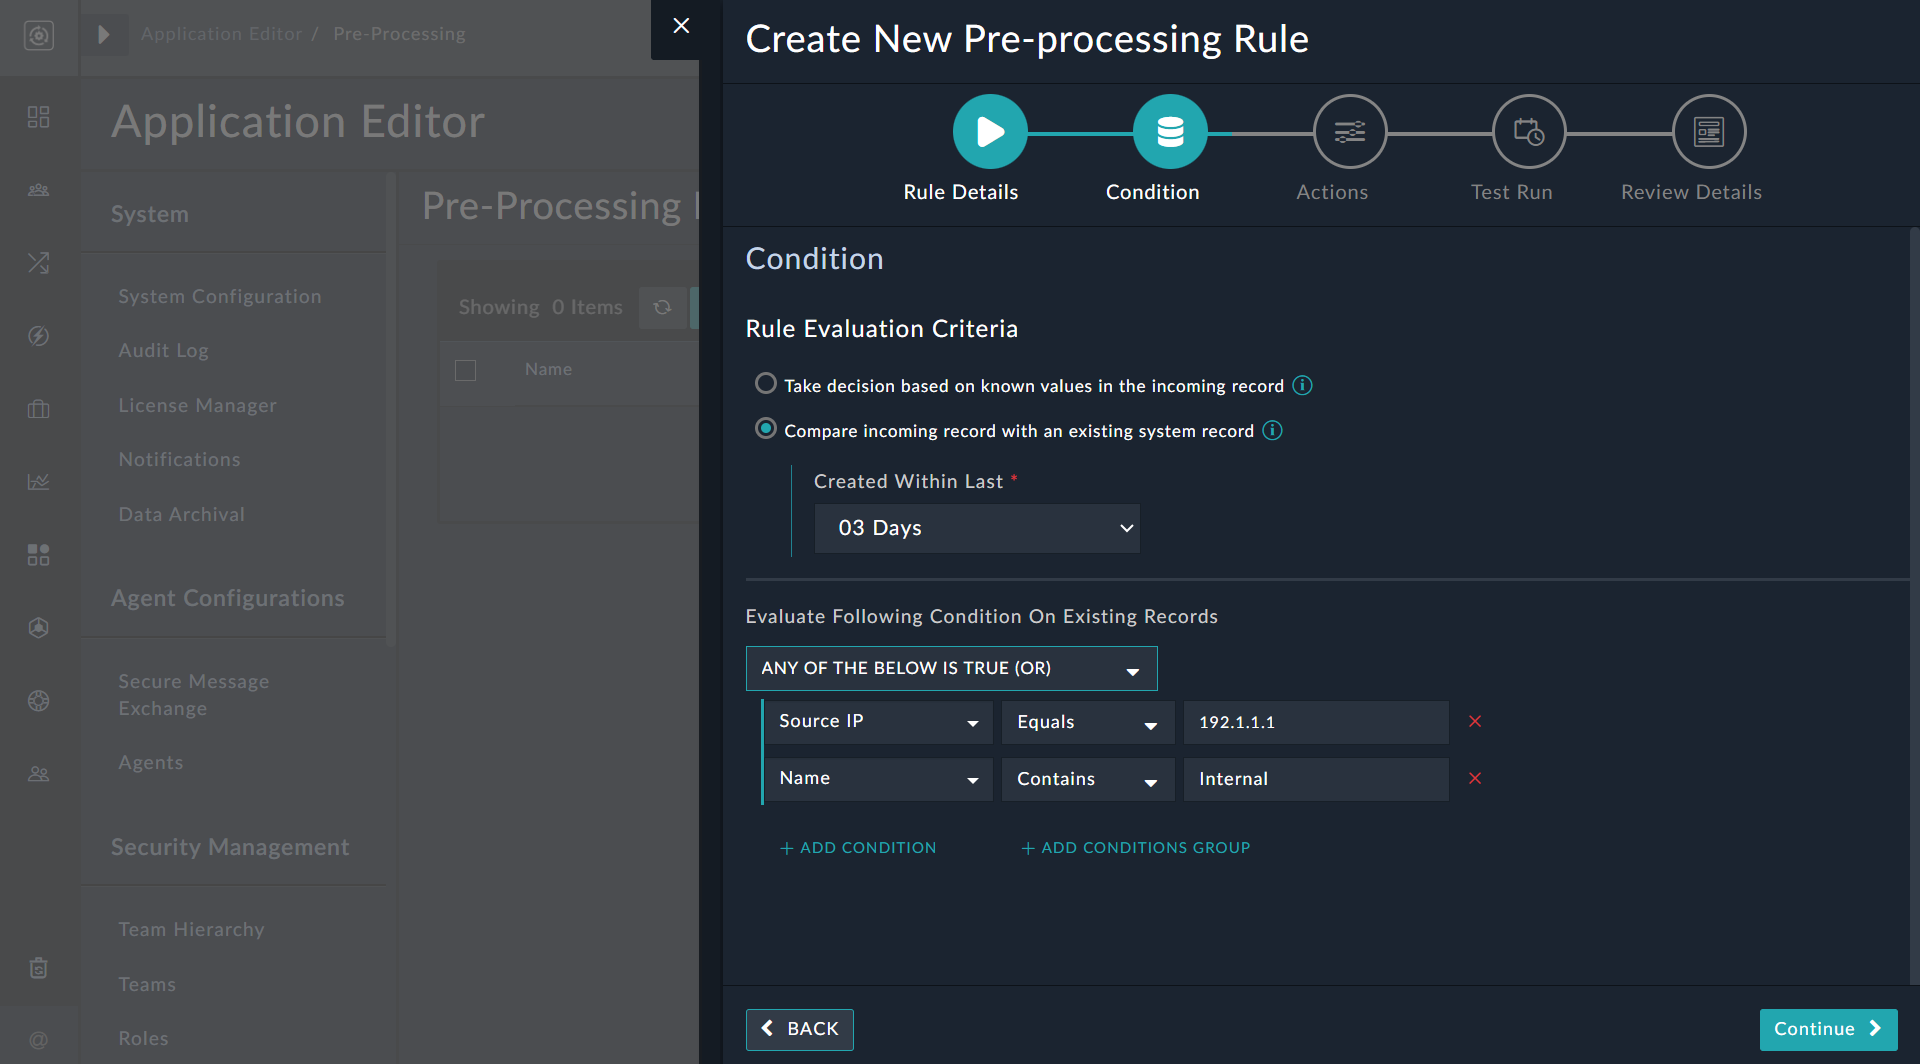
        Pre-processing wizard - Defining condition to drop records
    3. On the Actions dialog, click Continue.
      NOTE: Since this example is a rule of type 'Drop', no actions need to be defined.
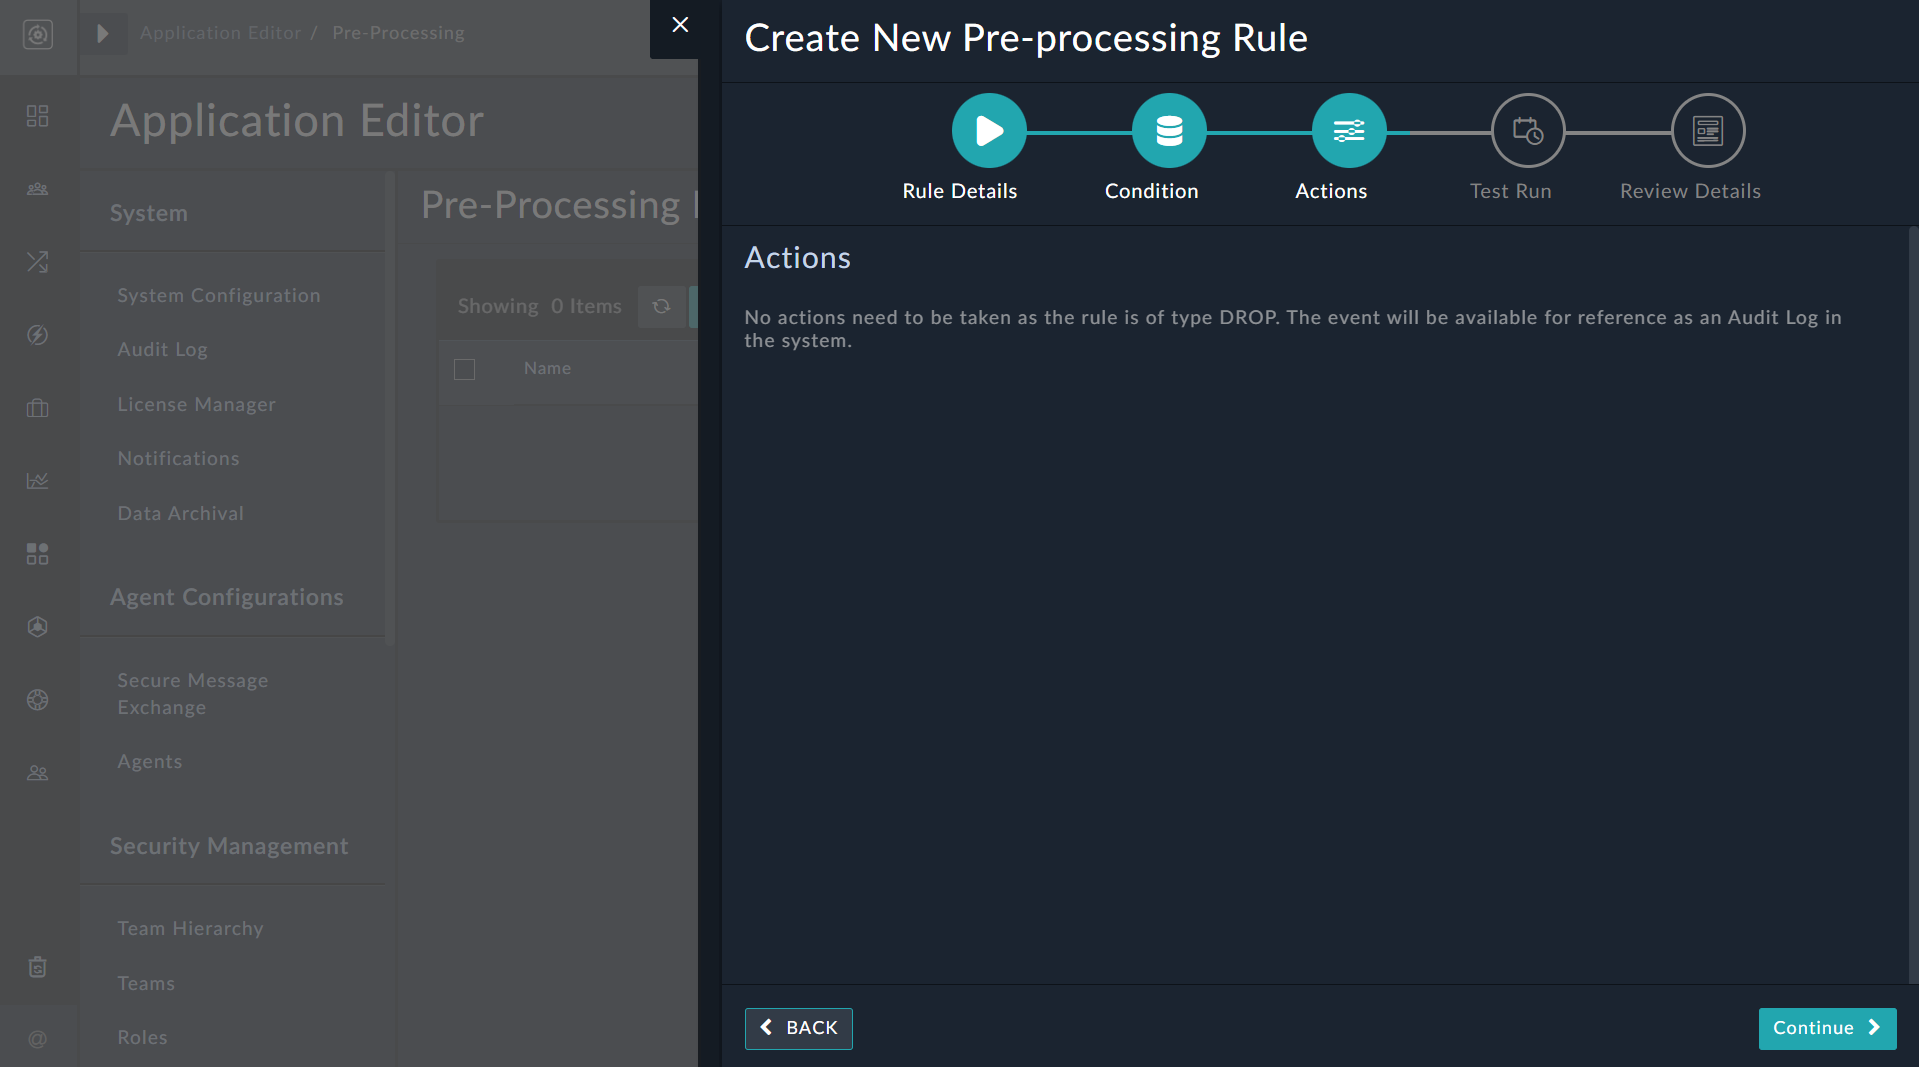
      Pre-processing wizard - Actions dialog
    4. On the Test Run dialog, test the created pre-processing rule.
      IMPORTANT: In case you choose the 'Already Exists' operator while specifying the condition for the 'Drop' rule, the test result will consistently show as 'Not Dropped'. This is because no database query is made by the test functionality to evaluate the 'Already Exists' condition.
      1. From the Select Record drop-down list, select a record that will act as the incoming record.
        Once a record is selected, the JSON format of that record will populate the Input Data field.
      2. Click the Test Pre-Processing Rule button to evaluate this record according to the defined pre-process rule.
        The Output field will display the result of the evaluation.
        Since we have selected a record that contains internal in its name, the output displays the result as "Alert will be dropped".
        Once you are satisfied with the test, click Continue.
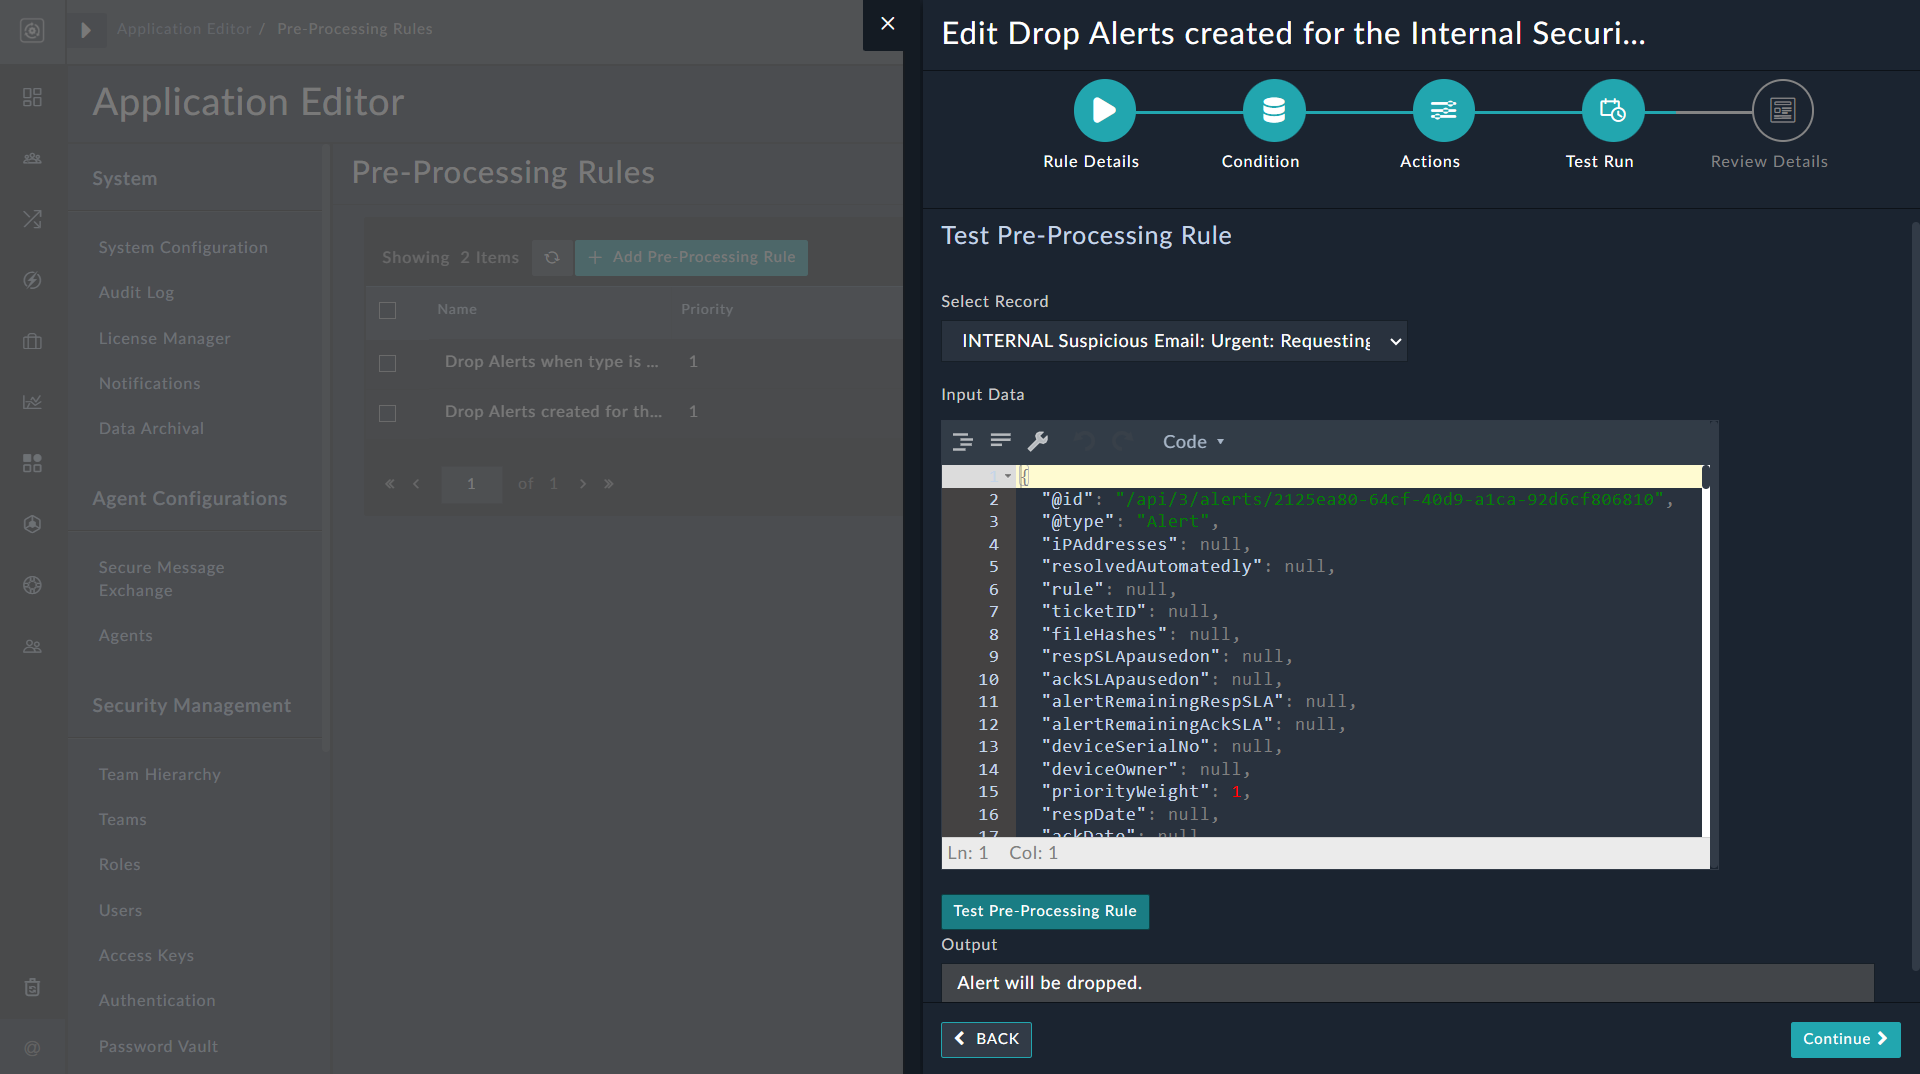
        Pre-processing wizard - Test rule dialog
    5. On the Review Details dialog, review the details of the rule. If your are satisfied, click Save to save this rule.
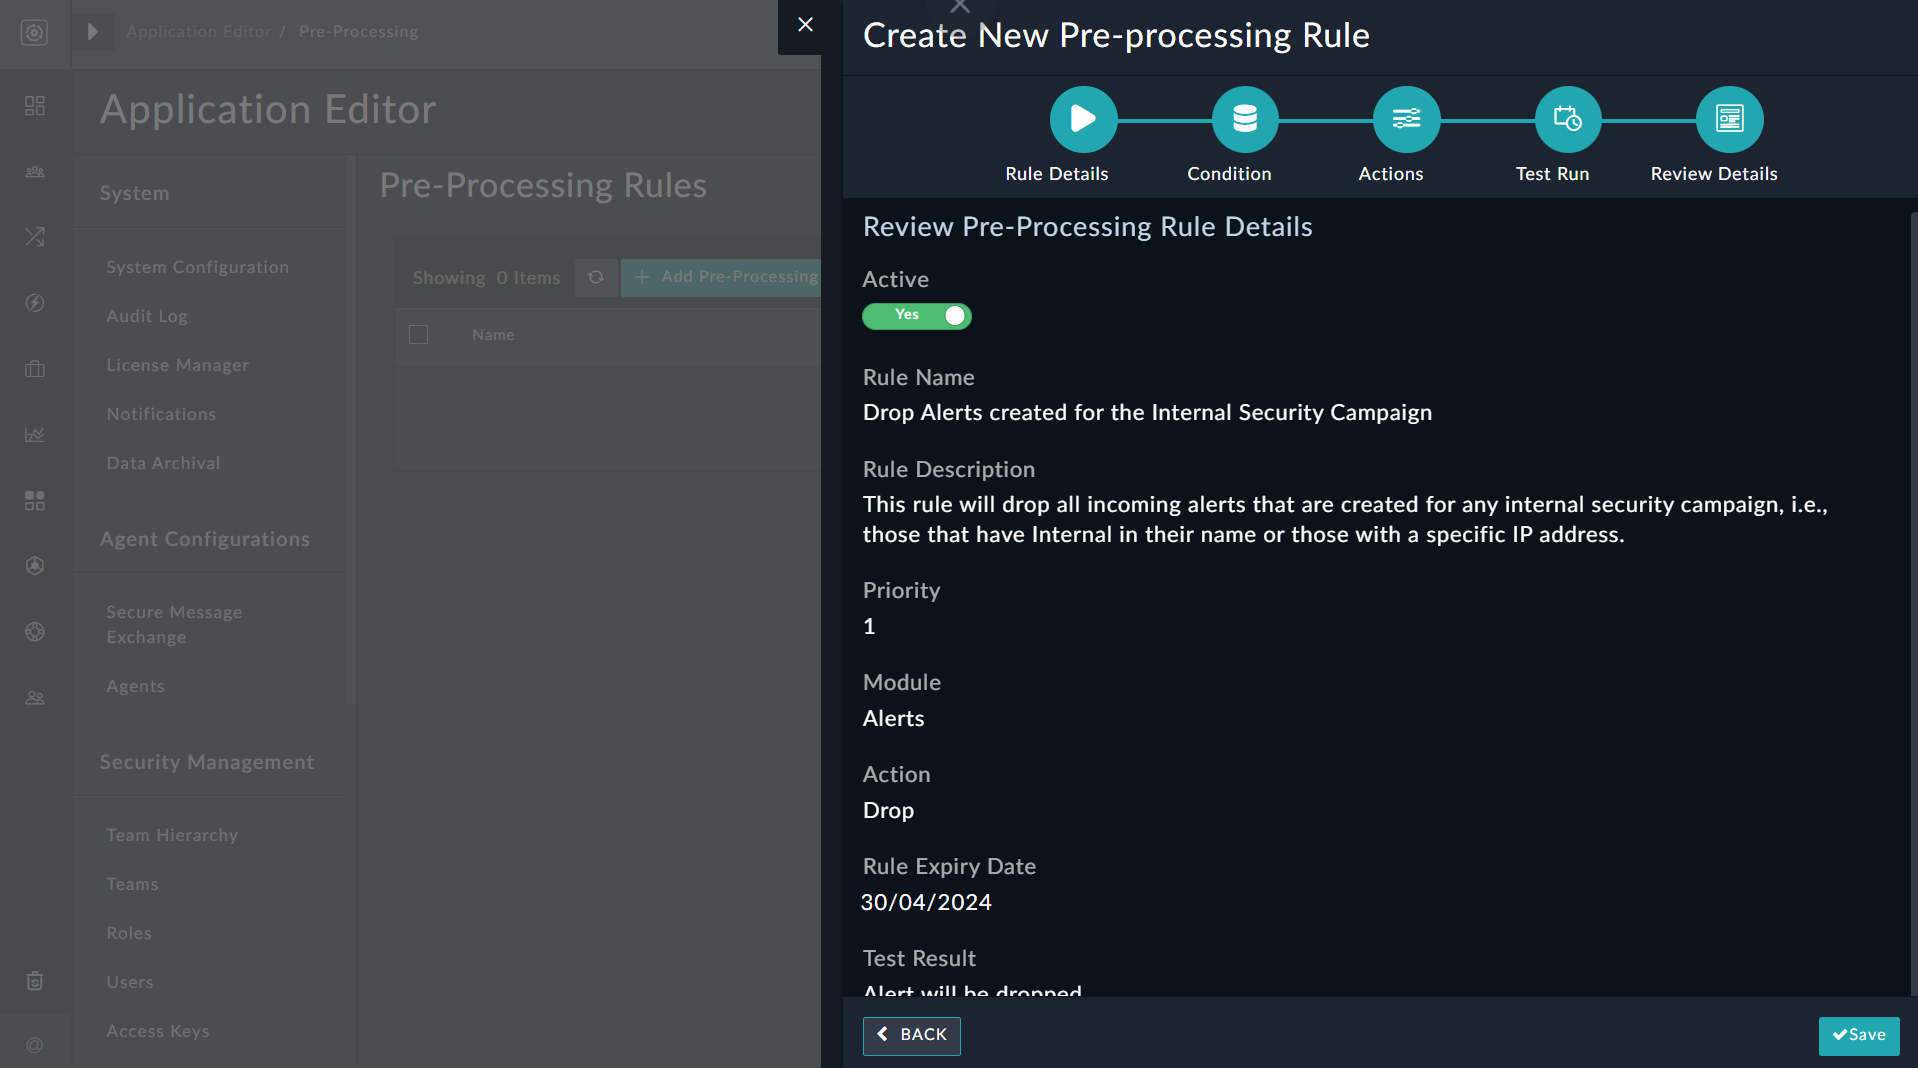
      Pre-processing wizard - Review Details dialog

Adding a new 'Update' type pre-processing rule

To add a pre-processing rule that ingests incoming records and updates them based on the defined rule, such as linking incoming records to matching existing records, skipping playbook execution on the incoming records, and updating the fields of the incoming records, such as updating the State of the incoming record to 'Similar Alerts Correlated' and marking its Status as 'Closed', follow these steps:

  1. Click Settings and in the Application Editor section, click Pre-Processing Rules.
  2. On the Pre-Processing Rules page, click + Add Pre-Processing Rule to display the Create New Pre-processing Rule wizard and define the rule:
    1. In the Rule Details dialog, enter details for the rule:
      1. Toggle the Active button to set the state of the rule as 'Active' (default) or 'Inactive'.
      2. In the Rule Name field, enter a name to identify the rule.
        NOTE: Rule names must be unique within the system.
      3. (Optional) In the Description field, enter a brief description of the rule.
      4. (Optional) In the Tags field, add keywords that you can use to reference the rule.
      5. From the Rule Type drop-down list, select the action that requires to be performed on similar incoming records. You can choose between Drop or Update. For our example, select Update.
      6. From the Module drop-down list, select the module on whose records you want to run the pre-processing rule. For our example, select 'Alerts'.
        NOTE: System modules such as 'People', 'Appliances', 'Agent', etc., will not be included in the Module drop-down list as rules cannot be configured for these modules.
      7. From the Priority drop-down list, select the priority of the rule, which determines the order of rule execution.
      8. (Optional) In the Set Rule Expiry Date field, select the date when this rule will expire and no longer be used to detect duplicate records being ingested.
        Once you have entered all the details, click Continue.
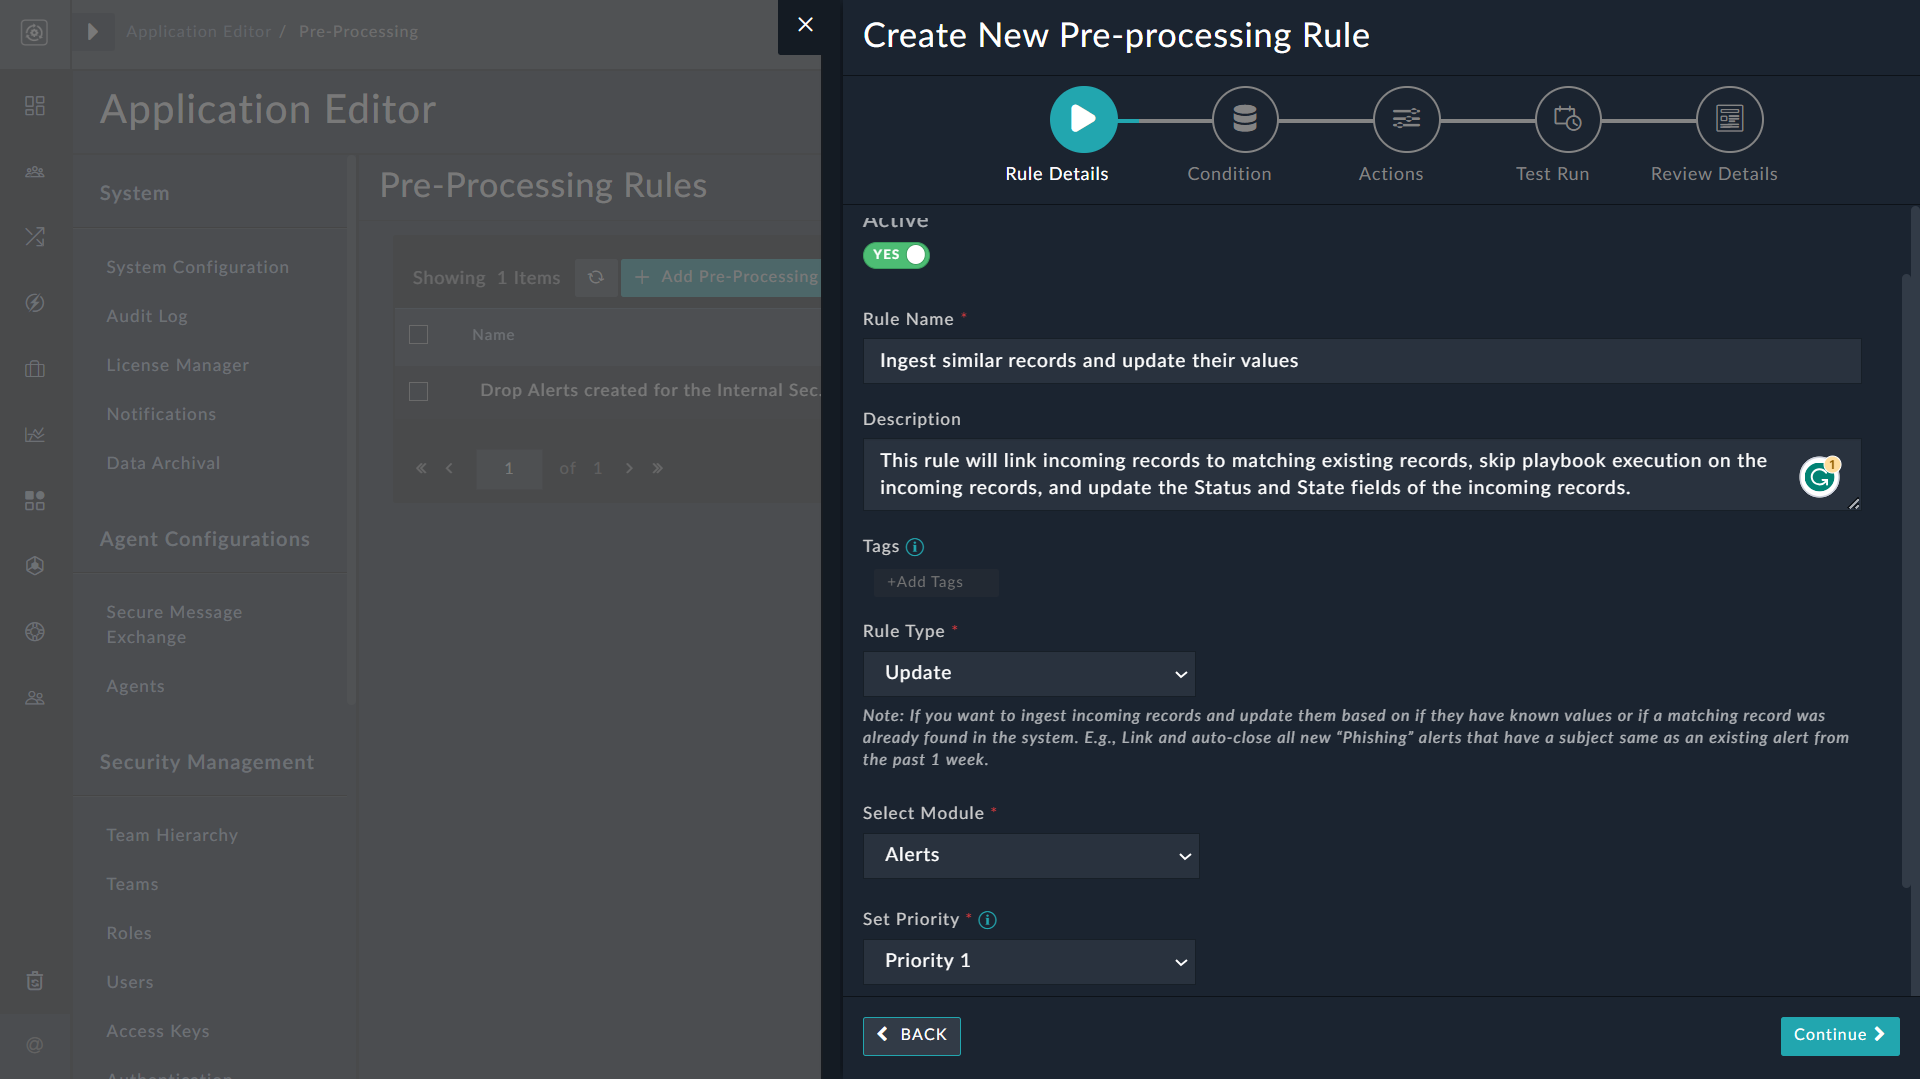
        Pre-processing Rule Wizard - Rule Details for rule type update
    2. In the Condition dialog, specify the condition to filter incoming records.
      1. If you have selected the 'Update' action, then you can filter incoming records using the Compare incoming record with an existing system record condition. The decision to update the incoming record is taken after comparing its values with existing records in the system. Additionally, from the Created Within Last drop-down list, you must select the number of days within which the existing records were created and that need to be compared with the incoming record. You can choose between 1 to 7 days. For example, if you choose 03 days, the incoming record's values will be compared with the values of records created in the system in the last 3 days.
      2. In the Evaluate Following Condition On Existing Records section, define the condition for comparing the values of the incoming records. For our example, define the condition as Type Equals Phishing.
        Once you have defined the condition, click Continue.
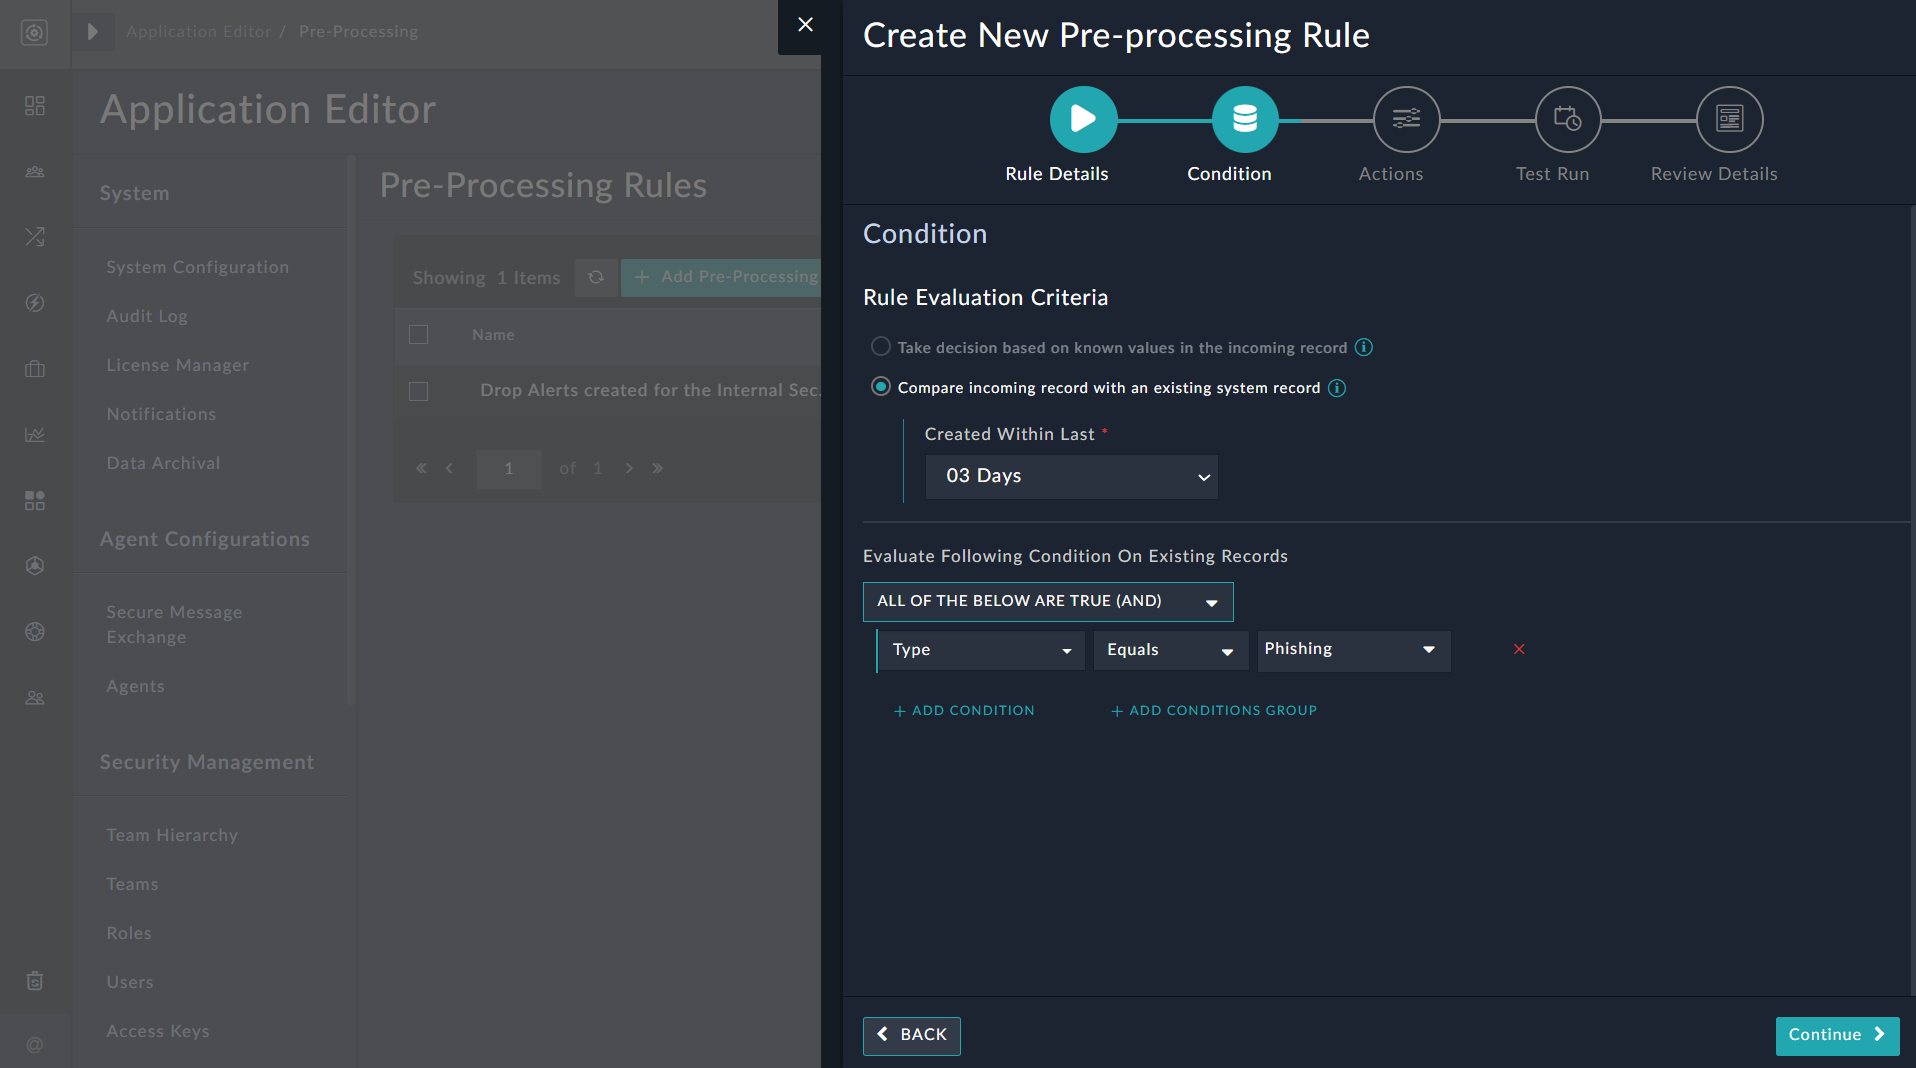
        Pre-processing wizard - Defining condition to update records
    3. On the Actions dialog, select how you want to update similar incoming records with the following options:
      • Select the Link incoming record to the matching existing record based on the conditions specified option to link the similar incoming record to the matching existing records.
        NOTE: This type of linking will work only on modules that support many-to-many relationships on fields within the same module. For example, it is possible to link an alert to another alert or an incident to another incident; however, it is not possible to link a people record to another people record.
      • Select the Skip playbook execution on incoming record creation option to prevent playbooks, such as the 'On Create' playbooks from being executed on the incoming record.
      • Select the Update fields of the incoming record option to display a list of the primary fields of the selected module and update the values of the incoming records fields based on the specified values.
        You can use the Update Fields search box to search through the list of fields.
        For our example, update the State field to Similar Alerts Correlated and the Status field to Closed.
        Once you have defined the update actions, click Continue.
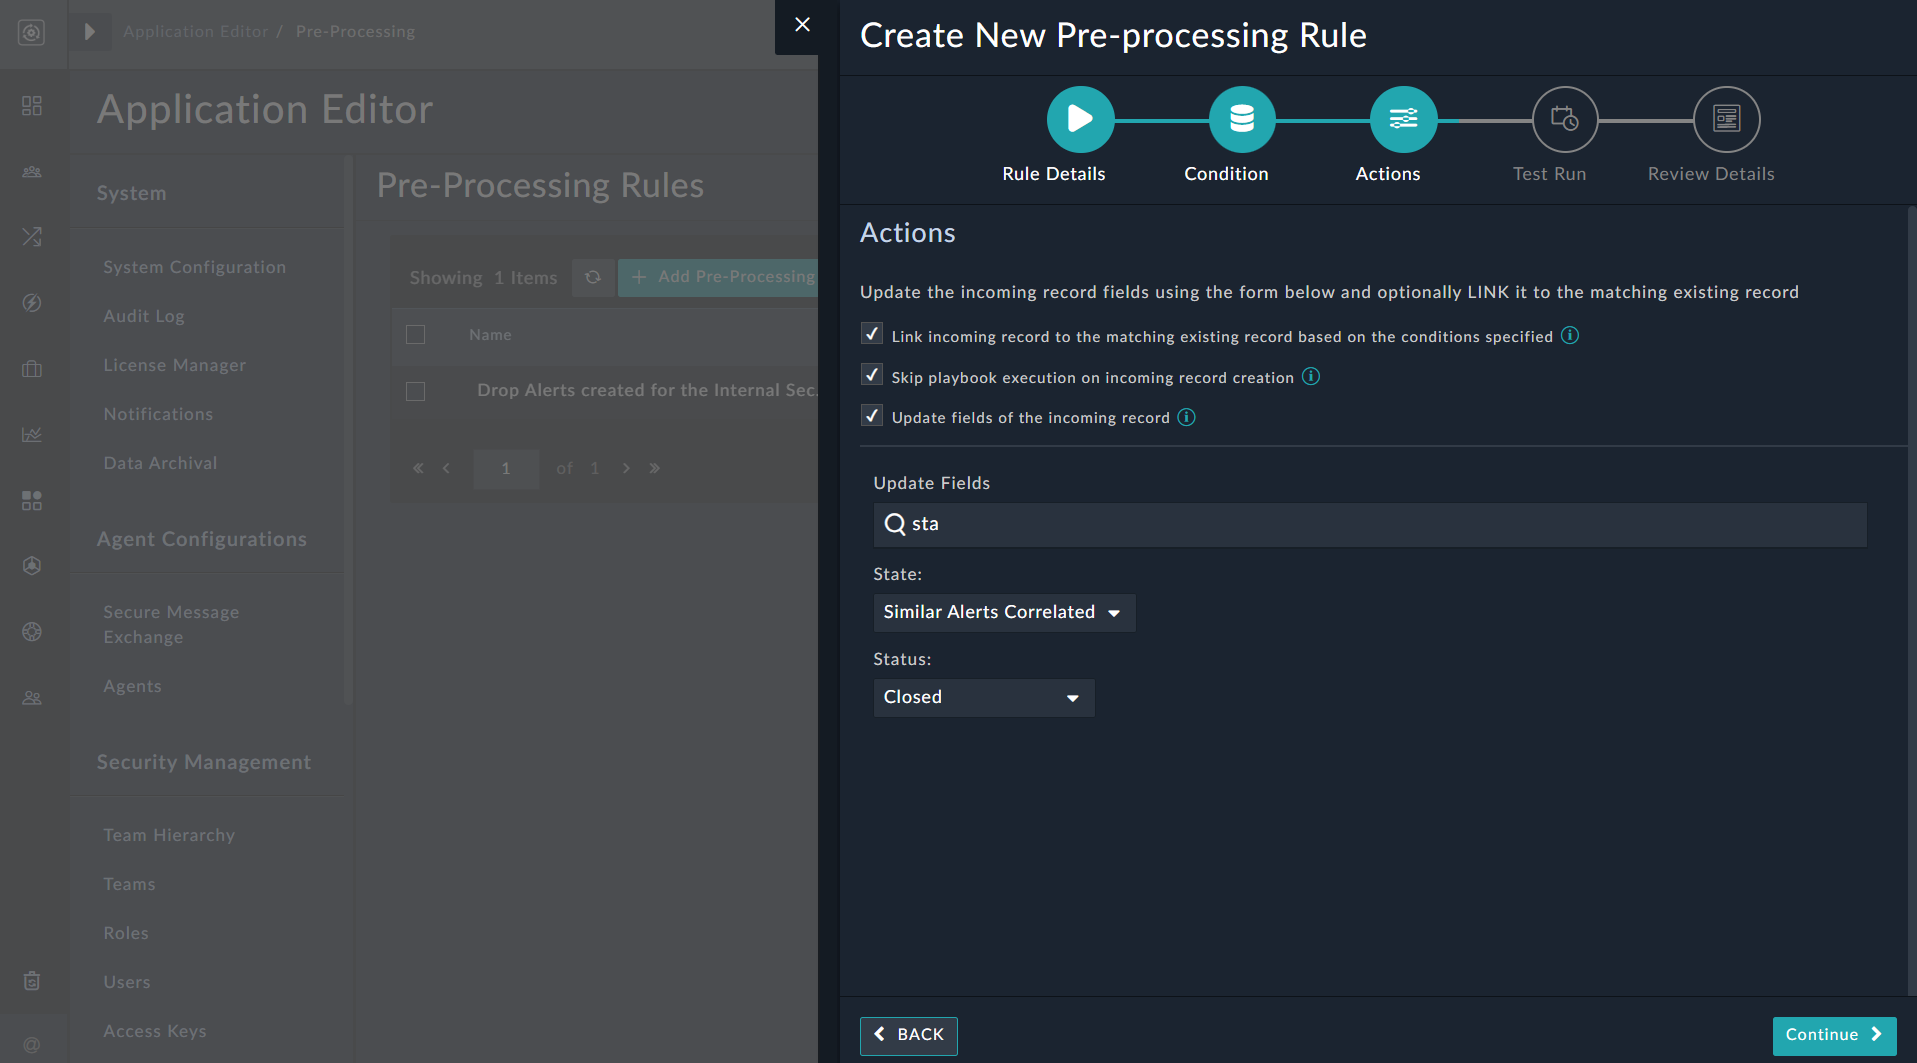
        Pre-processing wizard - Actions dialog for Update type rule
    4. On the Test Run dialog, click Continue.
      NOTE: Since this example is a rule of type 'Update', no test run is required.
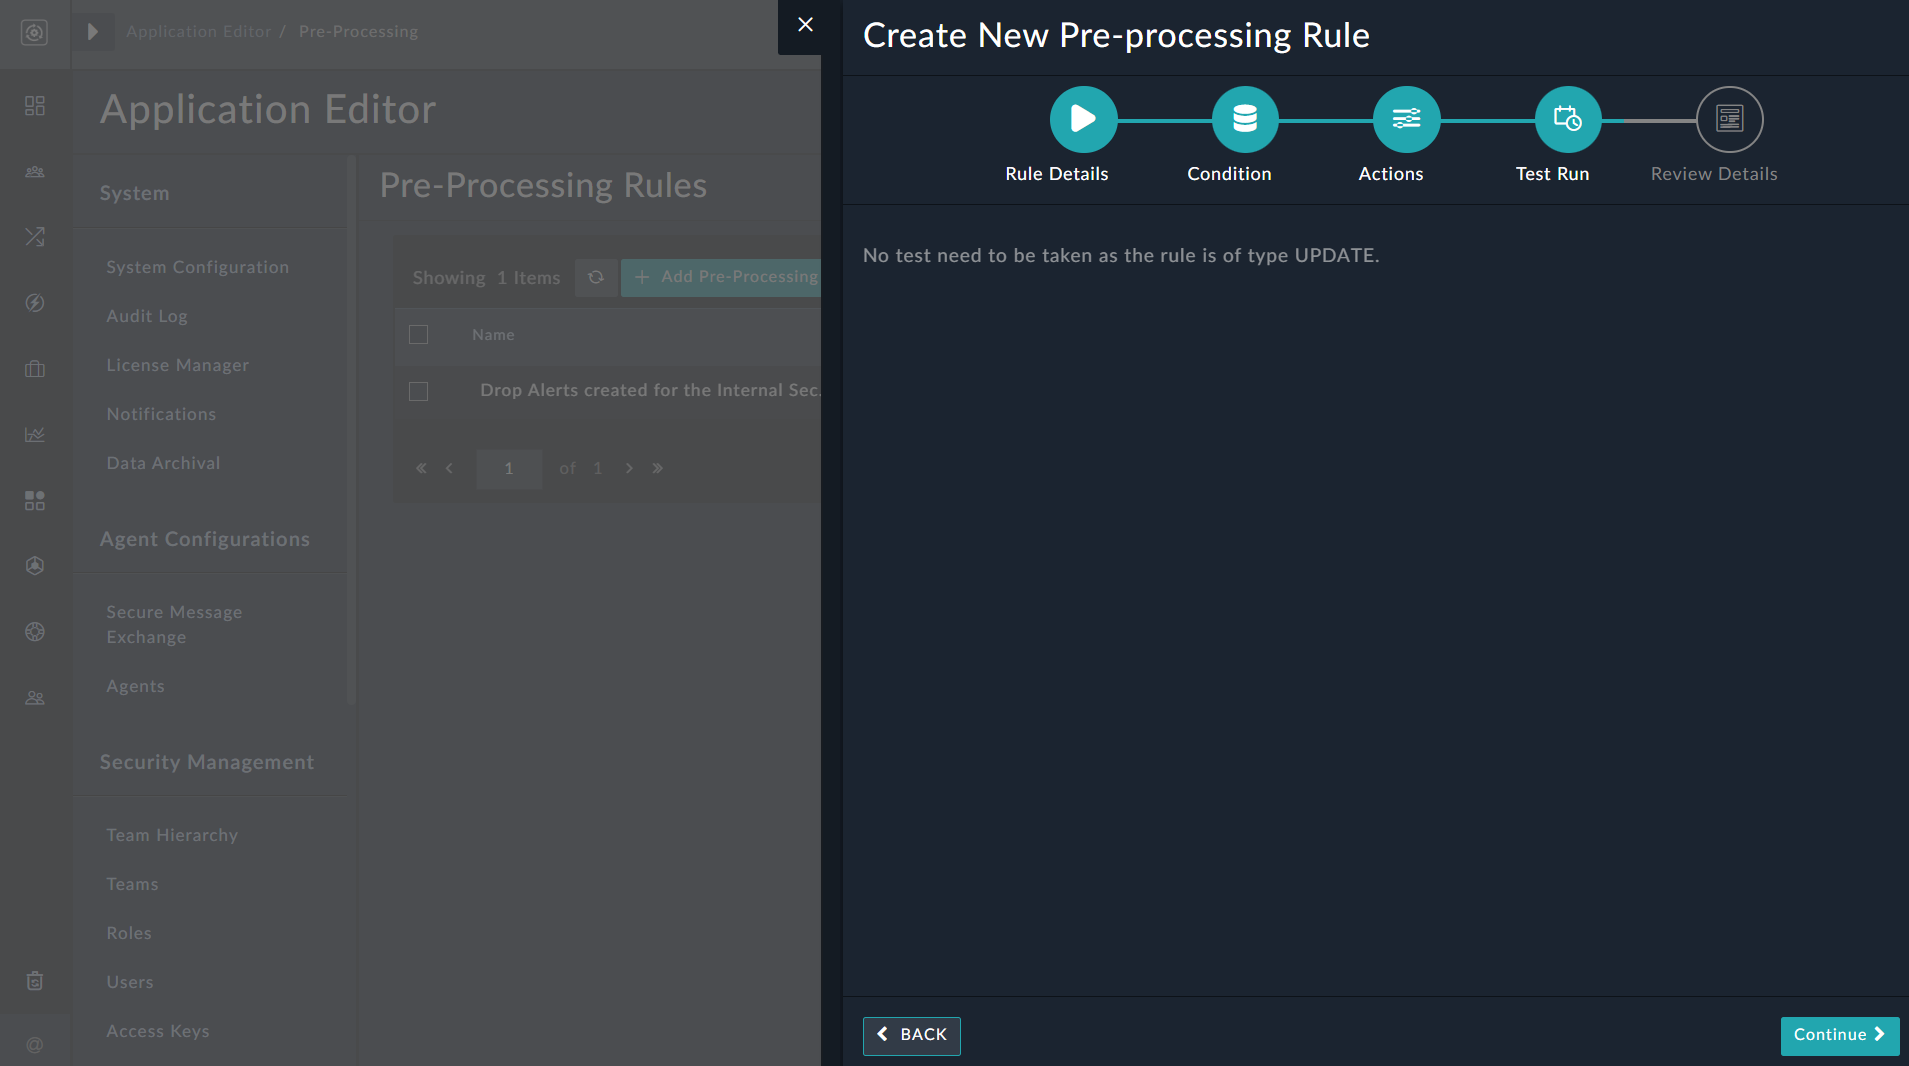
      Pre-processing wizard - Test rule dialog for Update type rule
    5. On the Review Details dialog, review the details of the rule. If satisfied, click Save to save this rule.
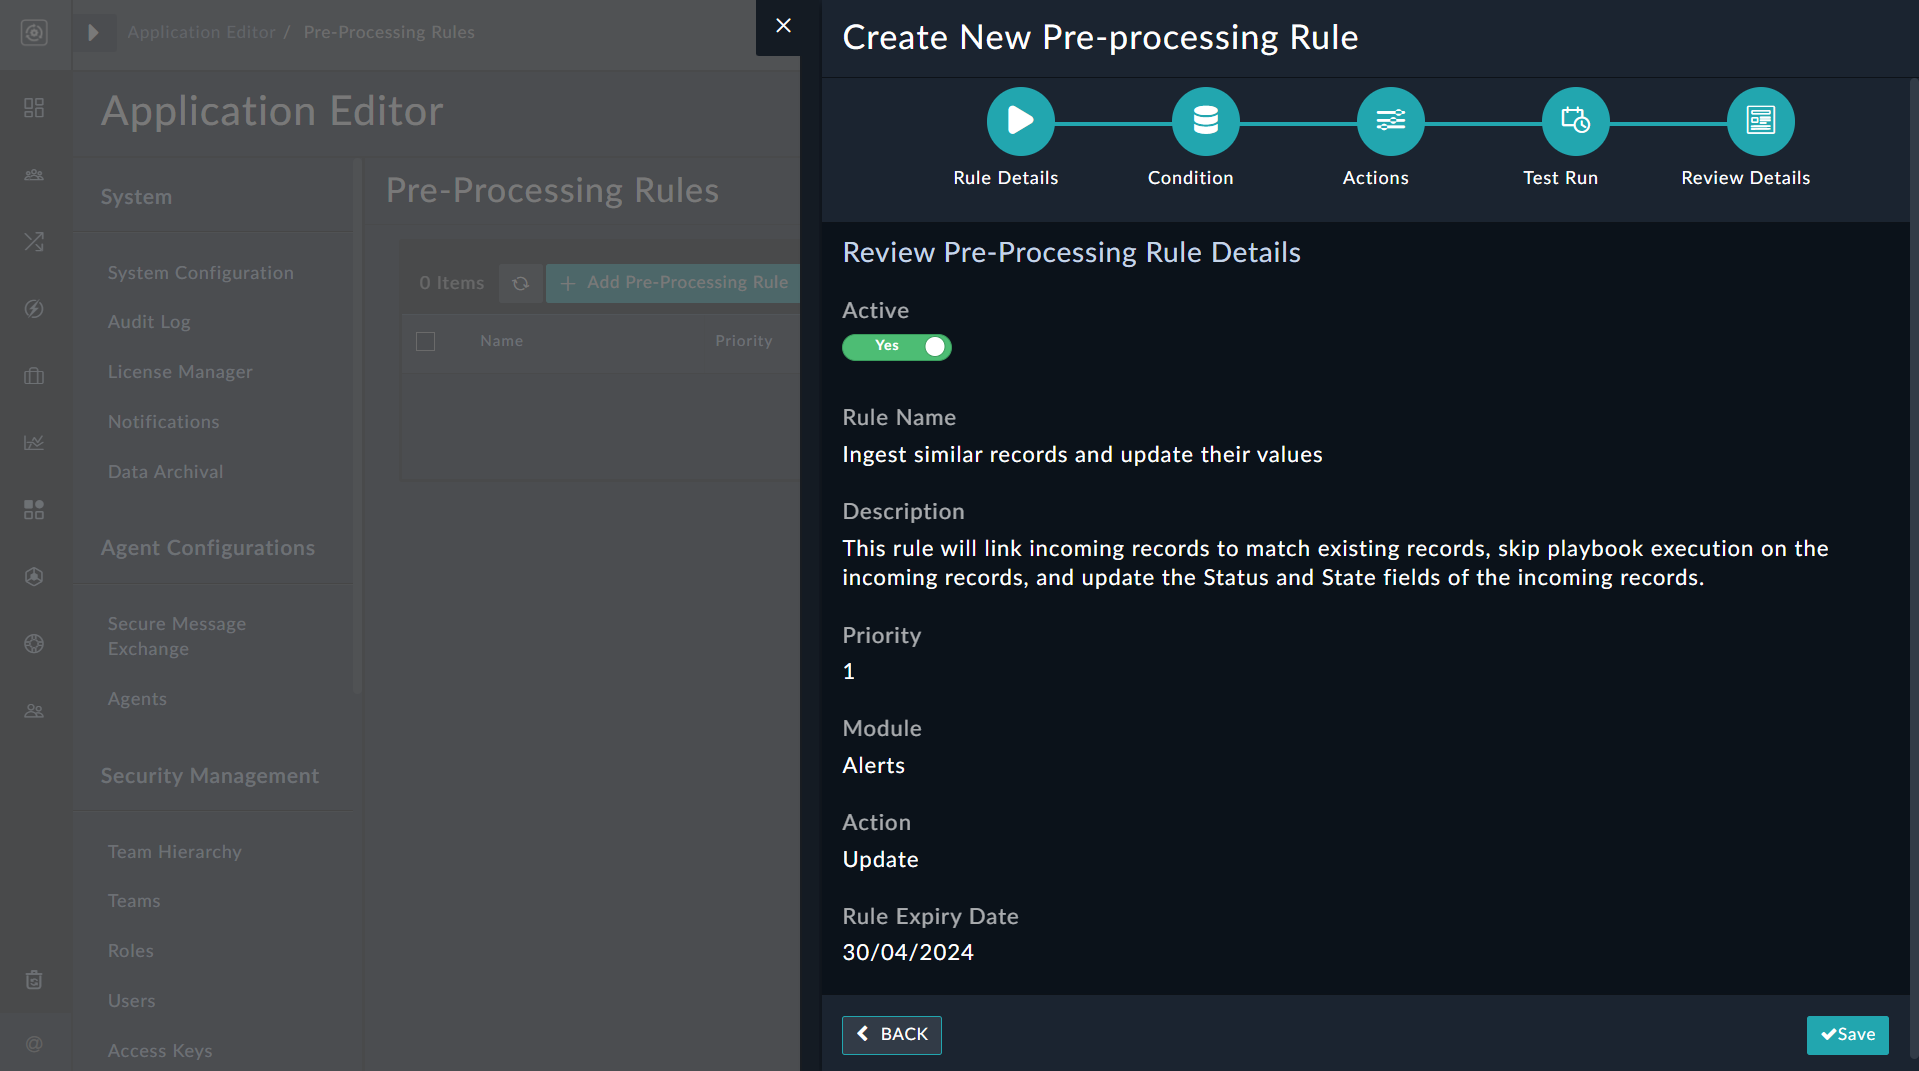
      Pre-processing wizard - Review Details dialog for Update type rule

Supported Operations on the Pre-Processing Rules Page

Click Settings > Pre-Processing Rules in the Application Editor section to open the Pre-Processing Rules page. On the Pre-Processing Rules page, you can search for rules by name, entity type, etc, and filter them by priority, status, action type, etc. Additionally, you can select the rules to perform the following operations:

  • Click Activate to make specific rules 'Active'
  • Click Deactivate to make specific rules 'Inactive'
  • Click Delete to remove specific rules.
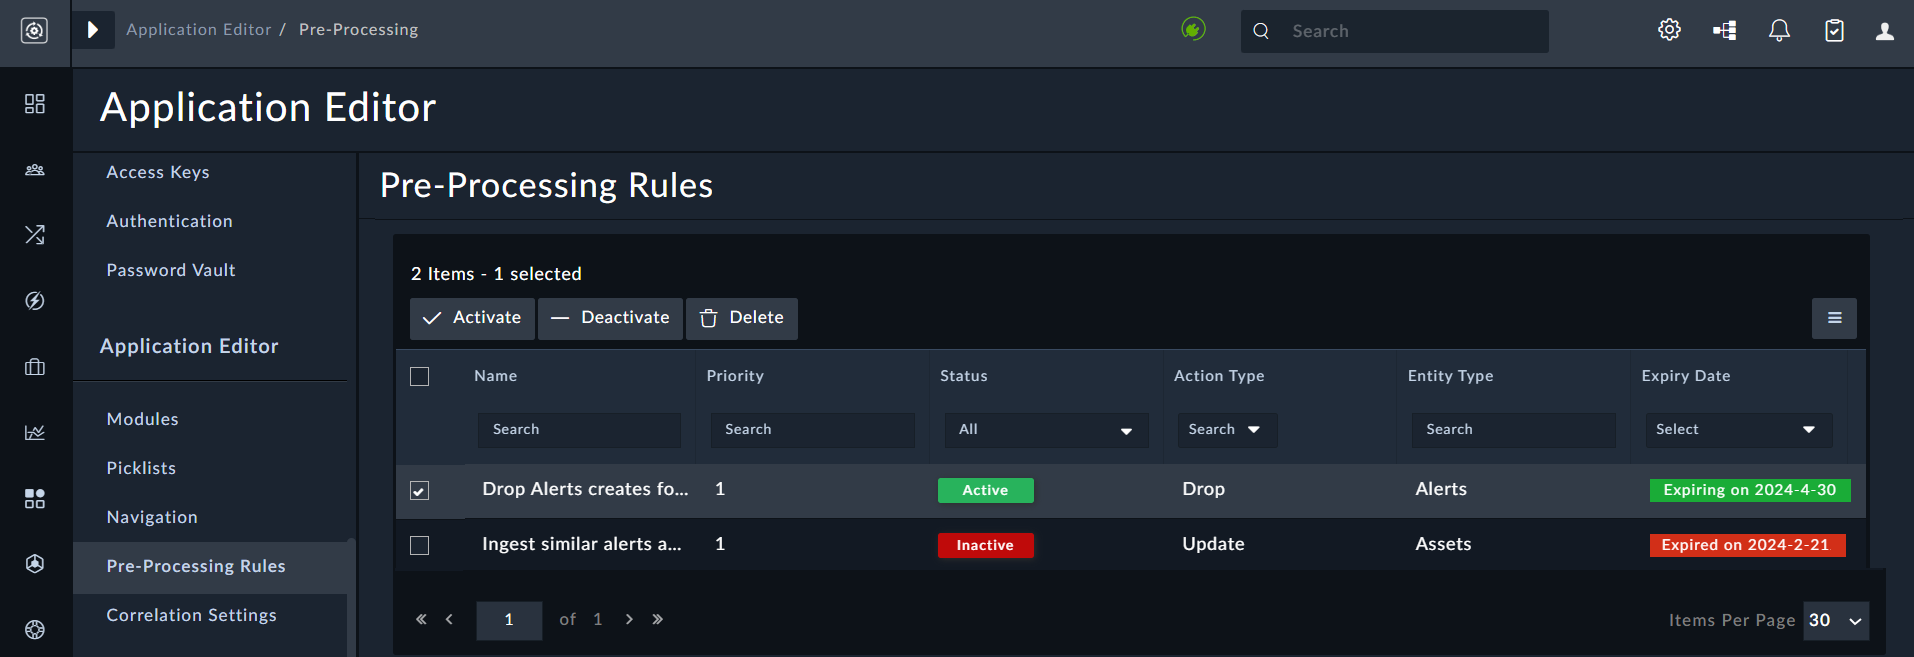
    Pre-Processing Rules page

To edit a specific pre-processing rule, click its row on the Pre-Processing Rules page. This opens the Update <Rule Name> wizard, where you can modify the rule as needed:
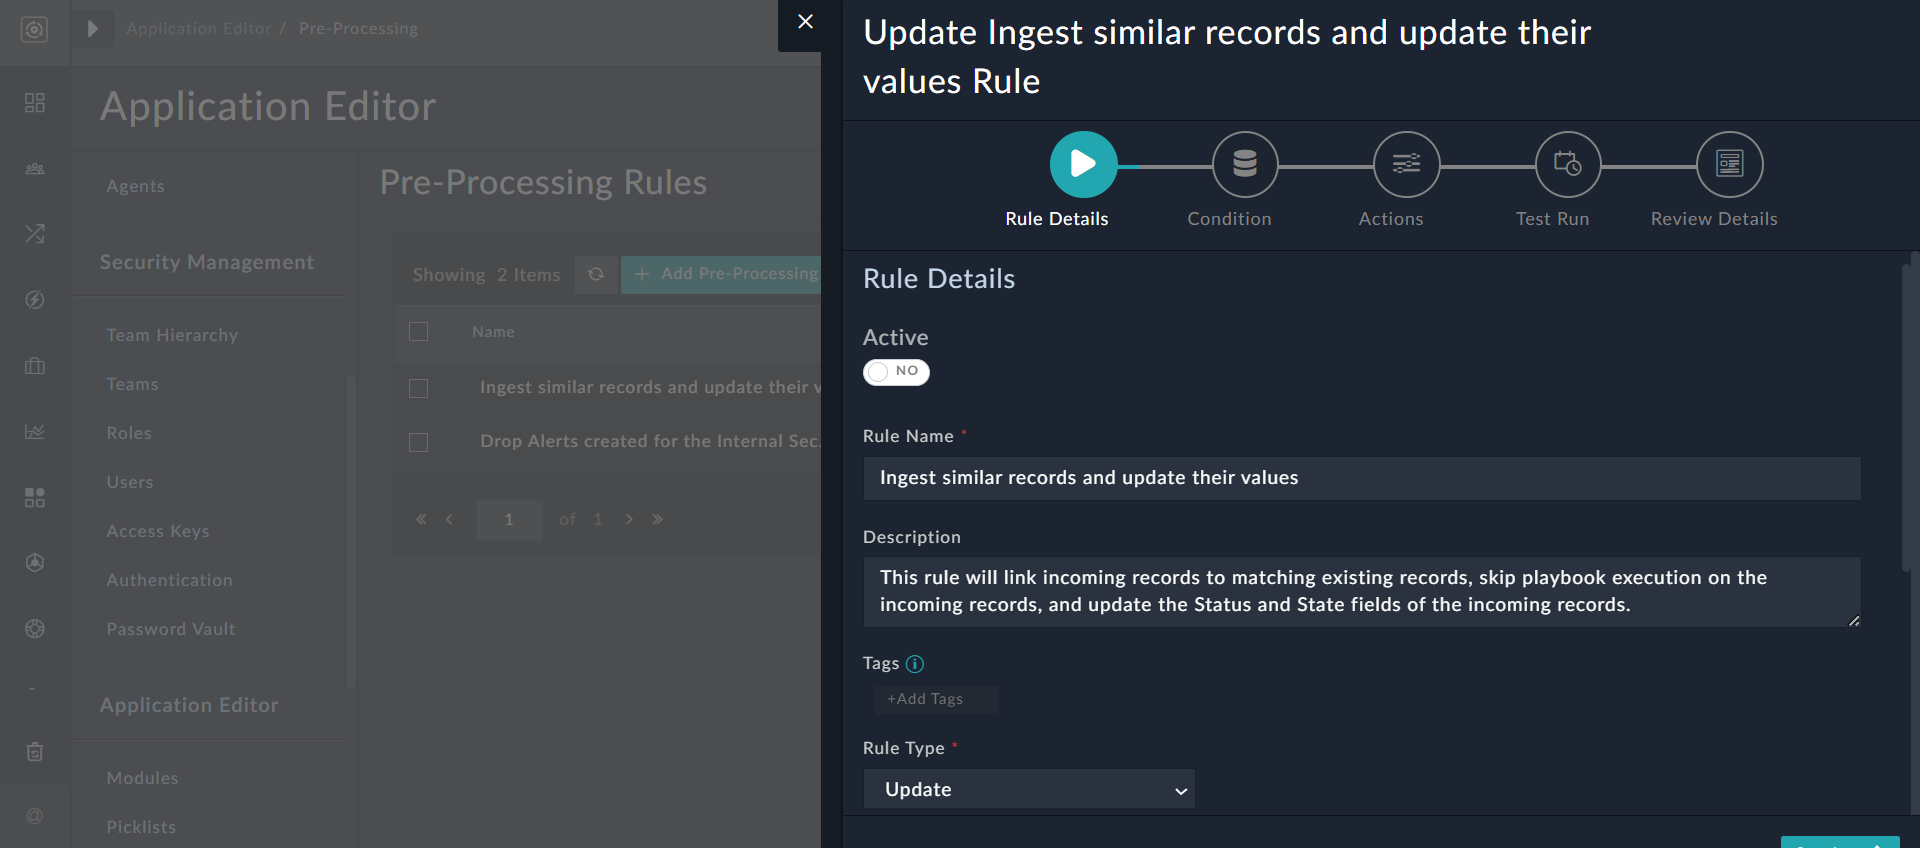
Update pre-processing rule wizard

Pre-Processing Rules

Pre-Processing Rules

Playbooks were previously used to detect duplicate records; however, the lack of precision in playbook design often leads to an influx of redundant alerts in a SOAR system, resulting in an abundance of records and increased workflow load. To address this issue, FortiSOAR has implemented a rule-based pre-processing feature that gets triggered before an incoming record is stored in the database, providing the flexibility to make decisions such as dropping records based on predefined criteria.

Additionally, the implementation of a post-processing rule adds efficiency to record management, by linking similar records based on specified similarity criteria. This post-processing rule facilitates intelligent linking of records, reduces reliance on resource-intensive playbooks and optimizes system performance. In summary, these rule-based pre- and post-processing features enhance the control and efficiency of the SOAR platform. For information on the API for pre-processing rules, see the API Methods chapter in the "API Guide." Starting from release 7.6.0, a new pre-processing rule called "Enforcing File Attachments for File Indicators" is included by default. This rule ensures that indicators of type 'file' are only created when a file is attached.

Some advantages of adding pre-processing rules include:

  • Ability to configure different types of rules for identifying duplicate records
  • Avoid the need to create custom playbooks for removing duplicate records.
  • Avoid the execution of playbooks for records with similar attributes.
Note

To view the 'Pre-Processing Rules' page, you must be assigned Read permission on the Preprocessing Rules module and Update permission on the Application module. Similarly, to perform actions such as adding new pre-processing rules, editing these rules, changing their status, etc, you must be assigned appropriate CRUD permissions on the Preprocessing Rules module.

Processing of rules

  • Pre-processing of rules does not apply to bulk operations.
  • If multiple rules are matched for a record, the processing occurs as follows:
    • Once a single rule is matched for a record, the processing stops and exits; none of the other rules are evaluated.
    • Rules are sorted first by their 'Priority', with the highest priority rules evaluated first, starting with P1 as the highest and P5 as the lowest, and then by their 'Created' date.
Note

You can export and import your pre-processing rules using the Export and Import Wizards.

Adding a new 'Drop' type pre-processing rule

Users can add pre-processing rules to act as a gatekeeper that help FortiSOAR detect duplicate records getting ingested into the system, thereby filtering incoming records and preventing the unnecessary accumulation of redundant alerts. The pre-processing rule can also prevent execution of playbooks for the same records, leading to a reduction of the load on the system. For example, users can define a pre-processing rule that prevents records associated with internal security campaigns from being created, offering a preemptive measure to prevent unnecessary entries into the SOAR platform.

You can choose to 'Drop' or 'Update' incoming records based on the defined pre-processing rule.

Note

In MSSP environments, replicated records are not evaluated by the 'Drop' rule. However, update rules are still evaluated on replicated records. To prevent this, add the 'tenant=self' condition to each update rule on both the master and tenant nodes.

To add a pre-processing rule that drops incoming records associated with internal security campaigns or those that have a specific source IP address, follow these steps:

  1. Click Settings and in the Application Editor section, click Pre-Processing Rules.
  2. On the Pre-Processing Rules page, click + Add Pre-Processing Rule to display the Create New Pre-processing Rule wizard and define the rule:
    1. In the Rule Details dialog, enter details for the rule:
      1. Toggle the Active button to set the state of the rule as 'Active' (default) or 'Inactive'.
      2. In the Rule Name field, enter a name to identify the rule.
        NOTE: Rule names must be unique within the system.
      3. (Optional) In the Description field, enter a brief description of the rule.
      4. (Optional) In the Tags field, add keywords that you can use to reference the rule.
      5. From the Rule Type drop-down list, select the action that requires to be performed on similar incoming records. You can choose between Drop or Update. For our example, select Drop.
      6. From the Module drop-down list, select the module on whose records you want to run the pre-processing rule. For our example, select 'Alerts'.
        NOTE: System modules such as 'People', 'Appliances', 'Agent', etc., will not be included in the Module drop-down list as rules cannot be configured for these modules.
      7. From the Priority drop-down list, select the priority of the rule, which determines the order of rule execution.
      8. (Optional) In the Set Rule Expiry Date field, select the date when this rule will expire and no longer be used to detect duplicate records being ingested into the system. For example, if you have created an internal security campaign for a month, you can set the expiration date to be the same.
        Once you have entered all the details, click Continue.
        Pre-processing Rule Wizard - Rule Details for rule type drop
    2. In the Condition dialog, specify the condition to filter incoming records.
      1. If you have selected the 'Drop' action, you can evaluate the criteria based on the following conditions:
        Select the Take decision based on known values in the incoming record option to take the decision to drop the incoming record based on the values of the record that is being ingested into the system.
        OR
        Select the Compare incoming record with an existing system record option to take the decision to drop the incoming record after comparing its values with existing records in the system.
        If you select this option, then from the Created Within Last drop-down list, select the number of days within which the existing records were created and that need to be compared with the incoming record. You can choose between 1 to 7 days.
        For example, if you choose 03 days, the incoming record's values will be compared with the values of records created in the system in the last 3 days.
      2. In the Evaluate Following Condition On Existing Records section, define the condition for comparing the values of the incoming records. For our example, define the condition as Source IP Equals 192.1.1.1 OR Name Contains Internal.
        NOTE: Negative operators such as 'Not Equals', 'Does Not Contain', 'Does Not Match', 'Is Not In List', etc. cannot be selected in the conditions defined for evaluating existing records in the case of the 'Drop' rule type. This is due to the possibility that numerous records could be dropped when using negative operators.
        Also note that if you have selected the Compare incoming record with an existing system record option, you can select the 'Already Exists' operator to compare the values of incoming records with existing records for condition evaluation.
        Once you have defined the condition, click Continue.
        Pre-processing wizard - Defining condition to drop records
    3. On the Actions dialog, click Continue.
      NOTE: Since this example is a rule of type 'Drop', no actions need to be defined.
      Pre-processing wizard - Actions dialog
    4. On the Test Run dialog, test the created pre-processing rule.
      IMPORTANT: In case you choose the 'Already Exists' operator while specifying the condition for the 'Drop' rule, the test result will consistently show as 'Not Dropped'. This is because no database query is made by the test functionality to evaluate the 'Already Exists' condition.
      1. From the Select Record drop-down list, select a record that will act as the incoming record.
        Once a record is selected, the JSON format of that record will populate the Input Data field.
      2. Click the Test Pre-Processing Rule button to evaluate this record according to the defined pre-process rule.
        The Output field will display the result of the evaluation.
        Since we have selected a record that contains internal in its name, the output displays the result as "Alert will be dropped".
        Once you are satisfied with the test, click Continue.
        Pre-processing wizard - Test rule dialog
    5. On the Review Details dialog, review the details of the rule. If your are satisfied, click Save to save this rule.
      Pre-processing wizard - Review Details dialog

Adding a new 'Update' type pre-processing rule

To add a pre-processing rule that ingests incoming records and updates them based on the defined rule, such as linking incoming records to matching existing records, skipping playbook execution on the incoming records, and updating the fields of the incoming records, such as updating the State of the incoming record to 'Similar Alerts Correlated' and marking its Status as 'Closed', follow these steps:

  1. Click Settings and in the Application Editor section, click Pre-Processing Rules.
  2. On the Pre-Processing Rules page, click + Add Pre-Processing Rule to display the Create New Pre-processing Rule wizard and define the rule:
    1. In the Rule Details dialog, enter details for the rule:
      1. Toggle the Active button to set the state of the rule as 'Active' (default) or 'Inactive'.
      2. In the Rule Name field, enter a name to identify the rule.
        NOTE: Rule names must be unique within the system.
      3. (Optional) In the Description field, enter a brief description of the rule.
      4. (Optional) In the Tags field, add keywords that you can use to reference the rule.
      5. From the Rule Type drop-down list, select the action that requires to be performed on similar incoming records. You can choose between Drop or Update. For our example, select Update.
      6. From the Module drop-down list, select the module on whose records you want to run the pre-processing rule. For our example, select 'Alerts'.
        NOTE: System modules such as 'People', 'Appliances', 'Agent', etc., will not be included in the Module drop-down list as rules cannot be configured for these modules.
      7. From the Priority drop-down list, select the priority of the rule, which determines the order of rule execution.
      8. (Optional) In the Set Rule Expiry Date field, select the date when this rule will expire and no longer be used to detect duplicate records being ingested.
        Once you have entered all the details, click Continue.
        Pre-processing Rule Wizard - Rule Details for rule type update
    2. In the Condition dialog, specify the condition to filter incoming records.
      1. If you have selected the 'Update' action, then you can filter incoming records using the Compare incoming record with an existing system record condition. The decision to update the incoming record is taken after comparing its values with existing records in the system. Additionally, from the Created Within Last drop-down list, you must select the number of days within which the existing records were created and that need to be compared with the incoming record. You can choose between 1 to 7 days. For example, if you choose 03 days, the incoming record's values will be compared with the values of records created in the system in the last 3 days.
      2. In the Evaluate Following Condition On Existing Records section, define the condition for comparing the values of the incoming records. For our example, define the condition as Type Equals Phishing.
        Once you have defined the condition, click Continue.
        Pre-processing wizard - Defining condition to update records
    3. On the Actions dialog, select how you want to update similar incoming records with the following options:
      • Select the Link incoming record to the matching existing record based on the conditions specified option to link the similar incoming record to the matching existing records.
        NOTE: This type of linking will work only on modules that support many-to-many relationships on fields within the same module. For example, it is possible to link an alert to another alert or an incident to another incident; however, it is not possible to link a people record to another people record.
      • Select the Skip playbook execution on incoming record creation option to prevent playbooks, such as the 'On Create' playbooks from being executed on the incoming record.
      • Select the Update fields of the incoming record option to display a list of the primary fields of the selected module and update the values of the incoming records fields based on the specified values.
        You can use the Update Fields search box to search through the list of fields.
        For our example, update the State field to Similar Alerts Correlated and the Status field to Closed.
        Once you have defined the update actions, click Continue.
        Pre-processing wizard - Actions dialog for Update type rule
    4. On the Test Run dialog, click Continue.
      NOTE: Since this example is a rule of type 'Update', no test run is required.
      Pre-processing wizard - Test rule dialog for Update type rule
    5. On the Review Details dialog, review the details of the rule. If satisfied, click Save to save this rule.
      Pre-processing wizard - Review Details dialog for Update type rule

Supported Operations on the Pre-Processing Rules Page

Click Settings > Pre-Processing Rules in the Application Editor section to open the Pre-Processing Rules page. On the Pre-Processing Rules page, you can search for rules by name, entity type, etc, and filter them by priority, status, action type, etc. Additionally, you can select the rules to perform the following operations:

  • Click Activate to make specific rules 'Active'
  • Click Deactivate to make specific rules 'Inactive'
  • Click Delete to remove specific rules.
    Pre-Processing Rules page

To edit a specific pre-processing rule, click its row on the Pre-Processing Rules page. This opens the Update <Rule Name> wizard, where you can modify the rule as needed:
Update pre-processing rule wizard