


Dynamic Values
Overview
Use Dynamic Values to generate Jinja dynamically within the Playbook Designer. To make your playbook dynamic use Jinja templates to define various conditions within steps in a playbook. However, you must have some knowledge of Jinja (see Jinja Documentation), and must understand the workflow of the playbook steps in the JSON format to create Jinja templates.
Using the Jinja editor, you can apply a Jinja template to a JSON input and then render the output, thereby checking the validity of the Jinja and the output before you add the Jinja to the Playbook.
Using Dynamic Values, you can dynamically add Jinja to steps within a Playbook. Click a step, within the playbook that takes Jinja as an input and Dynamic Values is displayed. Choose from the options presented to add Jinja to the step. In FortiSOAR release 7.4.0, the Dynamic Values window has been redesigned for ease of usability and searchability. Ease of usability includes displaying of 'keys' instead of the complete Jinja expression in fields that use the Dynamic Values options by introducing a 'Simplified Expression View' setting. This setting renders a tag-based simplified expression in the playbook designer instead of the complete Jinja expression. However, if your administrator disables this setting, then complete Jinja expressions are displayed in the playbook designer. Note that this chapter aims in giving examples of usage of Jinja Expressions in playbooks, and therefore, complete Jinja expressions are displayed in the playbook steps. For information on the 'Simplified Expression View' and some examples of tag-based simplified expressions, see the Introduction to Playbooks chapter.
|
|
Variable names can contain letters, numbers, and underscores only. |
FortiSOAR simplifies the process of building playbooks without requiring to have in-depth Jinja or Python knowledge. Use the "Functions" tab on Dynamic Values to build playbooks with medium-level complexity without a lot of programming experience, with the option to use Jinja or Code Snippets to build playbooks that are very complex. For more information, see Functions.
Restriction on Jinja templates from accessing private members
From FortiSOAR release 7.4.0 onwards, Jinja templates are blocked from accessing private functions, modules, and classes. This restriction is imposed to prevent unwanted usage, such as the using malicious Jinja templates in playbooks. The following Jinja, for instance, is restricted:{{ self.__init__.__globals__.__builtins__.__import__('os').popen('<sensitive file>').read() }}
Because of this, playbooks containing Jinja that try to access private members such as, __setitem__ cause playbooks to fail with the “CS-WF-7: Invalid Jinja template: 'access to attribute '__setitem__' of 'dict' object is unsafe.' template :: …” error. Therefore, it is recommended to modify such private references in playbooks. For example, __setitem__(key, value) can be changed to update({key: value})
Alternatively, if you want existing playbooks (created prior to 7.4.0) to work and want to allow Jinja templates to access private members, which is NOT Recommended, then you can remove the restrictions by adding USE_SANDBOX_ENV: false to the [application] section in the /opt/cyops-workflow/sealab/sealab/config.ini file.
Jinja Editor
Use the Jinja editor to apply a Jinja template to a JSON input and then render the output. You can thereby check the validity of the Jinja and the output before you add the Jinja to the Playbook.
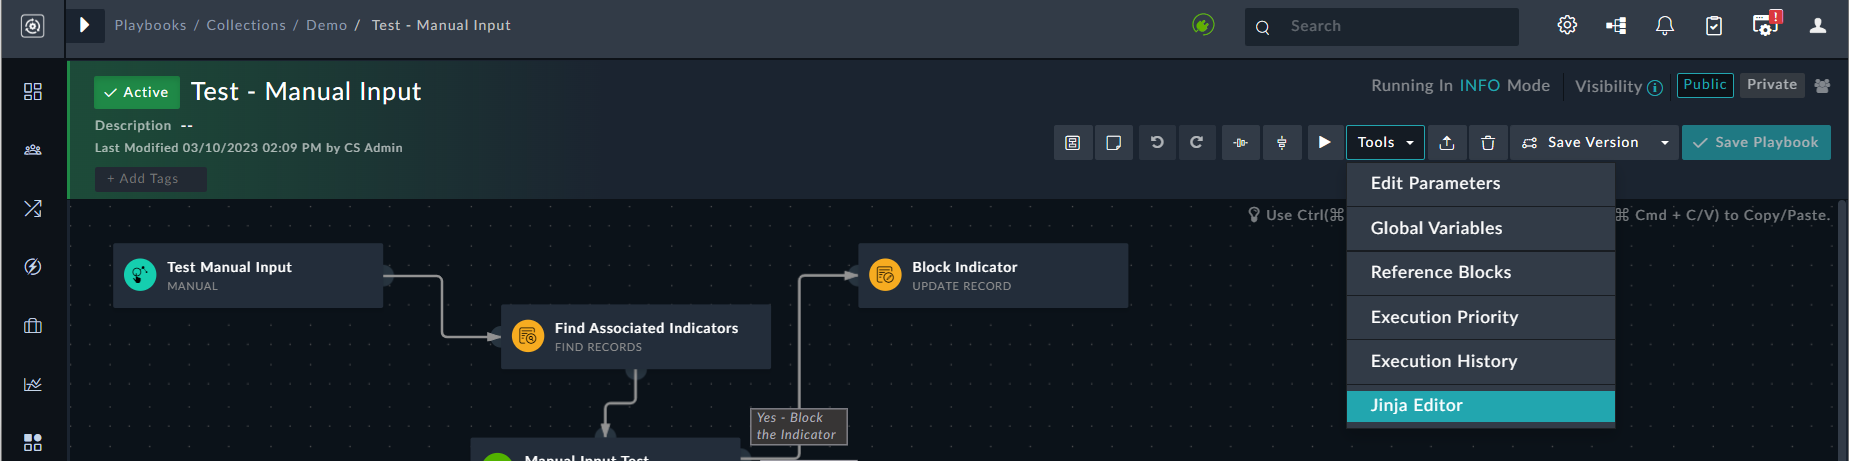
To open the Jinja Editor, in the Playbook Designer, click Tools > Jinja Editor.
The Jinja Editor has three areas: Template, JSON, and Output.
- Jinja Template: Use the
Jinja Templatearea to specify the Jinja in curly brackets. - JSON: Use the
JSONarea to specify the JSON input. JSON is always in the format of"Key":"Value"pair. If there are syntax errors in the JSON you have written, the Jinja editor displays a "Bad String" prompt. You can also specify nested key-value pairs.
Once you have entered the Jinja and JSON, click Render to display the output. - Output: The
Outputarea displays the output that would be generated by the combination of the entered Jinja and the JSON.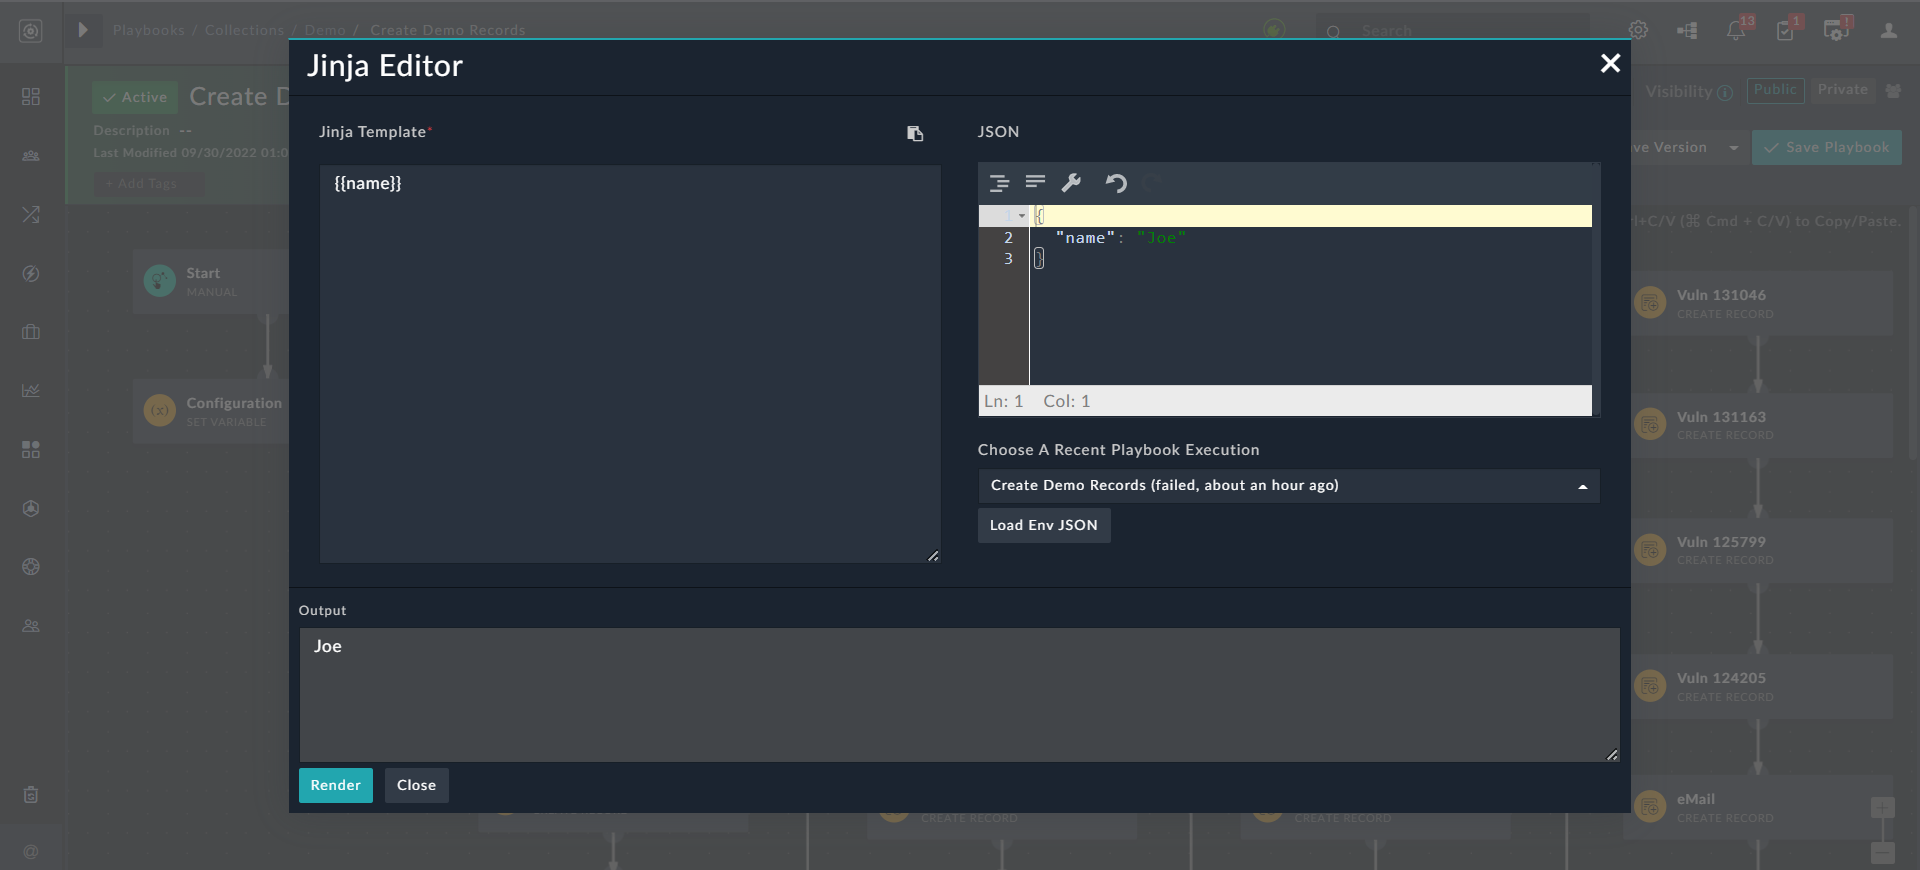
When an object is returned as the result, then the Jinja Editor will display the output as an object instead of a text area.
If the playbook has at any time been run in the 'DEBUG' mode (see the Setting the logging levels for playbooks topic in the Introduction to Playbooks chapter for information on changing the modes), then you also see a Choose A Recent Playbook Execution drop-down list, which lists the latest 30 executions for that playbook:
You can also choose a playbook execution from that drop-down list and click Load Env JSON to view the environment JSON for that execution of the selected playbook. This helps in debugging playbooks: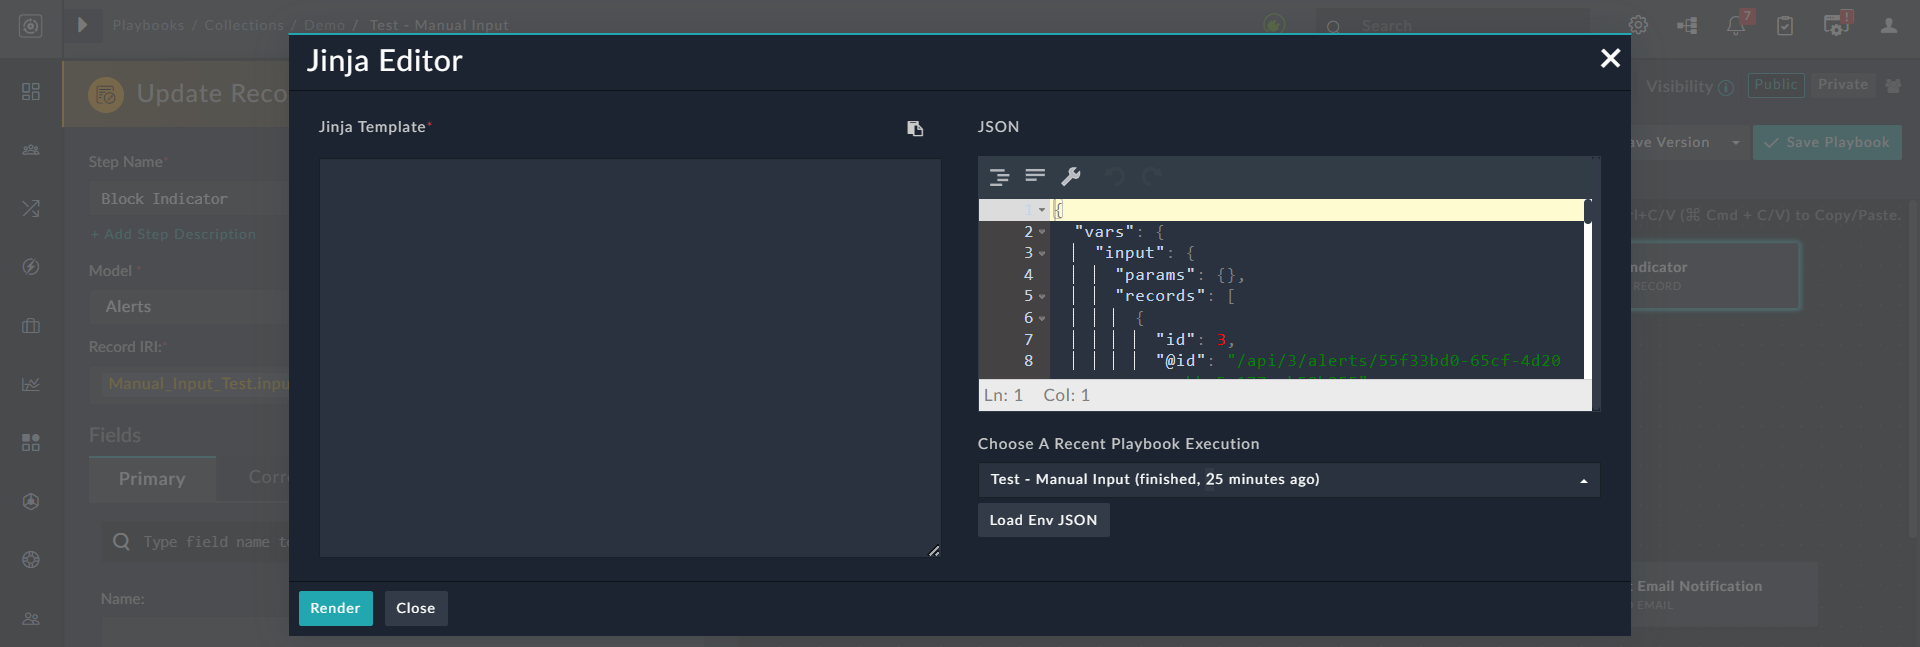
You can also filter the list of executions by module, status, and record ID (if the playbook has been triggered on a particular record). Use the Trigger Module drop-down list and the Status drop-down list to filter the playbook executions by module and status, respectively. From release 7.3.0 onwards, you can filter the playbook executions for a particular record by entering the ID of the record in the Record ID field, allowing you to retrieve playbook logs based on that particular record. Click Apply to apply the filters, and click Clear to remove the filters: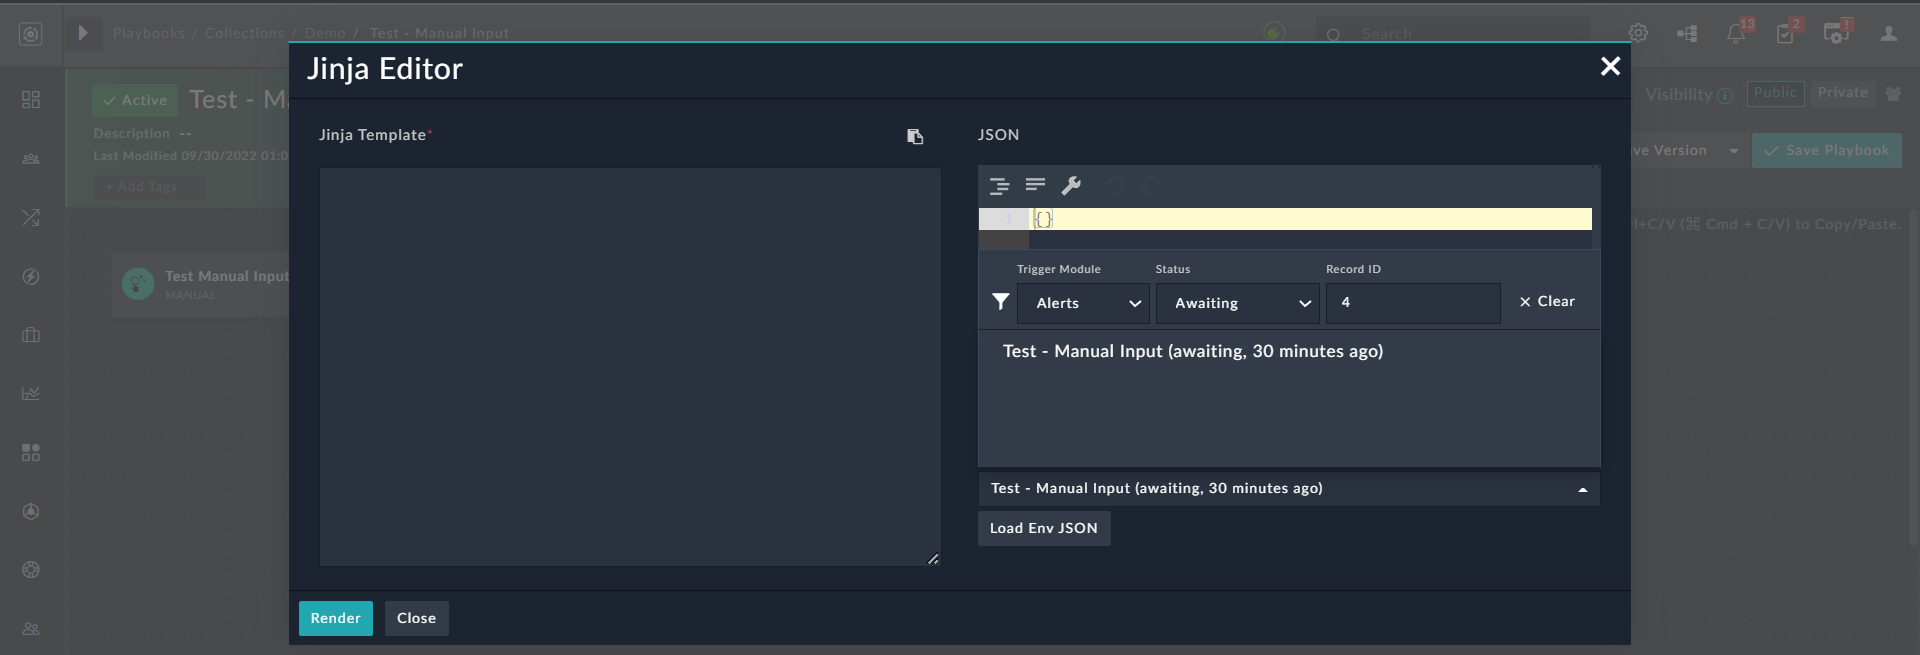
Notes for filtering playbook executions:
- The Jinja Editor displays the latest 30 filtered playbook executions only.
- If the playbook trigger step has set its Execution Behavior to Does not require a record input to run, then such a playbook execution cannot be searched by using a record ID, and therefore the Record ID field is not available. For more information on playbook triggers, see the Triggers & Steps chapter.
- If the playbook trigger is set to 'Referenced' or 'Custom API Endpoint', then such playbook executions can be filtered by their 'Status' only.
Dynamic Values Window Usage
Dynamic Values is used within the Playbook Designer. Use the Dynamic Values directly within steps of your playbook to dynamically add Jinja to those steps. Click a step within the playbook that takes Jinja as an input and Dynamic Values is displayed. Choose from the options presented to add Jinja to the step.
Dynamic Values is visible for input fields such as text fields, rich text, date/time fields, picklists, checkboxes, etc. You can use the Add Custom Expression button to toggle fields, such as drop-down lists and checkboxes, and add custom jinja expressions for fields such as picklists, Lookups, File selectors, rich text, text fields, etc. Clicking the Dynamic Values button also displays the Dynamic Values window using which also you can add expressions to these fields. The ability to add Jinja expressions to these fields enables you to customize your playbooks further.
|
|
In release 7.0.0, FortiSOAR has updated the arrow library due to which the |

You can also use Dynamic Values within a Text field type that has a subtype of either Rich Text (Markdown), which is the default, or Rich Text (HTML). To display Dynamic Values within a Rich Text type field, click the Dynamic Values ( ) icon in the formatting toolbar as shown in the following image:

The Dynamic Values Window displays the following tabs:
- Input/Output
- Custom Variables
- Input
- Step Utilities (introduced in release 7.4.1)
- Step Results
- Functions, including IRI Lookup
- Global Variables
|
|
Before you delete or modify any global variable or variable(s) ensure that you have removed or updated the variable in the Playbook to ensure that the change does not affect the functionality of the playbook. |
Use the “Functions” tab on Dynamic Values to build medium-level complexity playbooks based on your requirements without a lot of programming experience. For more information, see Functions.
Input/Output Tab
Use the Input/Output tab to effectively build your playbook using various available options for content, variables, parameters, previous step results (output), etc.
The Input/Output tab contains the following options:
- Custom Variables
- Input
- Step Utilities (introduced in release 7.4.1)
- Step Results

You can search for 'Custom Variables' and 'Input Record' fields, using the search box present in the Input/Output tab. In the case of 'Step Results', search works individually for each step, i.e., you can search for fields within each individual step.
Custom Variables
Custom variables are variables that can be used only in the playbook in which it is defined. Therefore, the scope of a variable is local. To create a custom variable, in the Playbook Designer, click the Set Variable step and add the variable name in the Name field and the jinja expression that represents the variable in the Value field, and then click Save:
You can add multiple 'Set Variables' in a playbook to define multiple custom variables that can be used in the steps of the playbook and all of them are listed using their 'keys' in the Custom Variables section: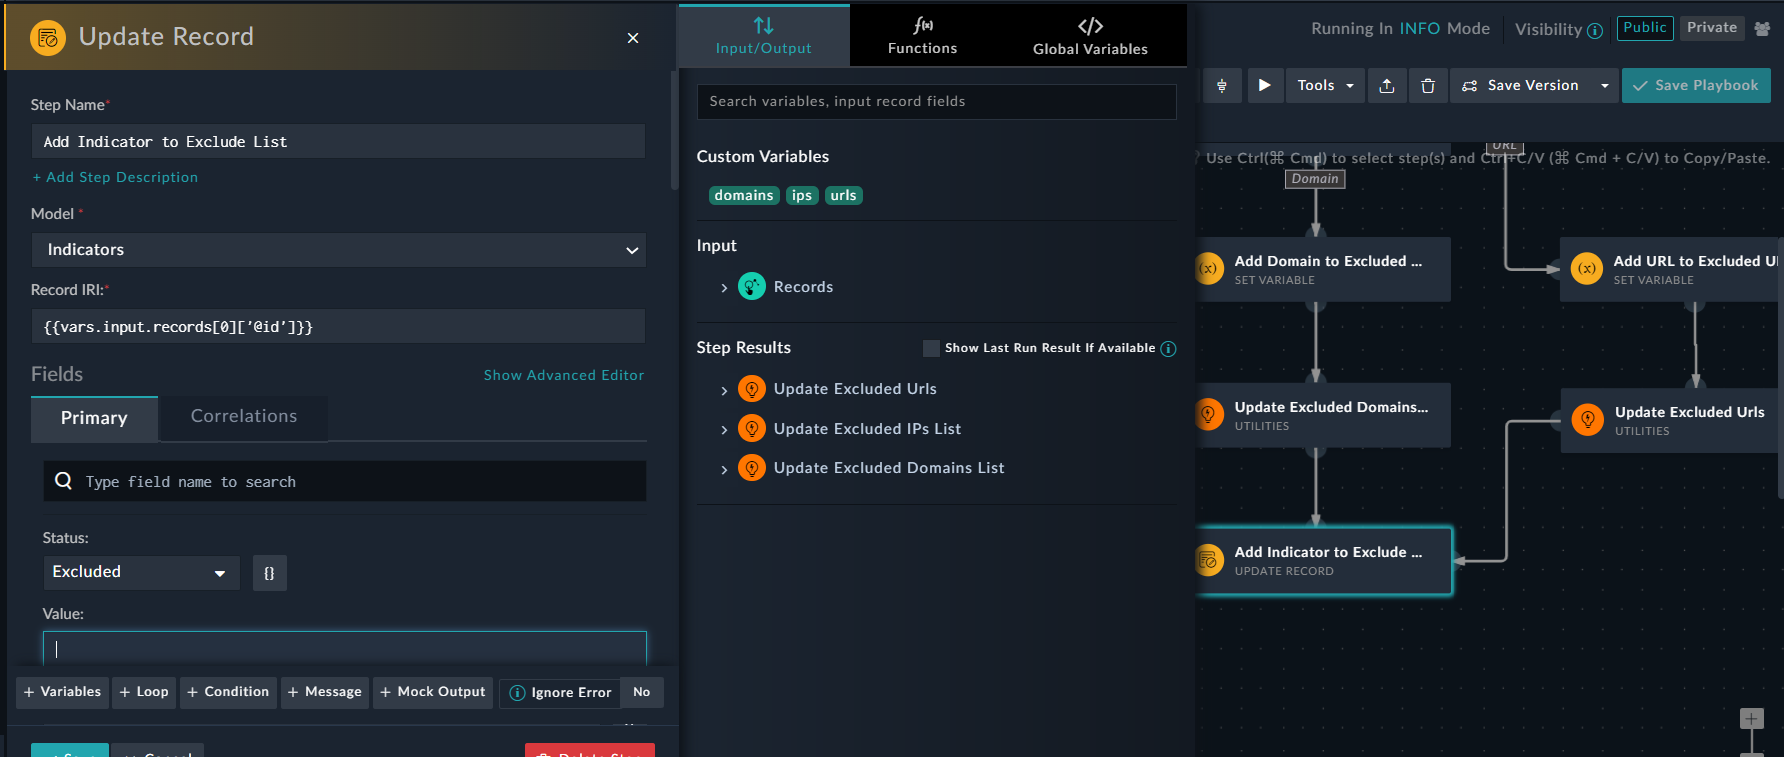
Custom Variables can be used like Global Variables, except that custom variables can be used only in the remaining steps of the playbook in which they have been defined or in any child playbook, regardless of how many levels deep the child playbooks are called.
If there are no variables defined, the Input/Output tab displays the following message: No custom variables available.
Input
The Input section in the Input/Output tab provides you with content and parameters that you can use in your current step. The content and parameters are represented using their 'keys', such as 'Assignee', 'Created On', etc:
The Input section has the following options:
- Records:
Trigger step data has been added as part of the Inputs so that you can use the variables and data from the module on which trigger has been added. Data of the trigger step appears when you click Records. - Parameters:
- Parameters that you have defined using Tools > Edit Parameters in the playbook designer, appear when you click Parameters in the Inputs section.
- Data of the trigger step, in case of
Custom API Endpoint Trigger, appear when you click Parameters > api_body in the Inputs section.
|
|
While importing playbooks that were created using an older version of FortiSOAR, before you use the "Input" option in any step, ensure that you open and save the trigger step and then save the playbook. |
Step Utilities
The Step Utilities option enables you to use the values of list items if the step contains a loop. This option makes it easier to use the values of the items that are part of a list in the playbook step. Dynamic Values displays a 'Looped item' section in Step Utilities, where each item is displayed in the vars.item format: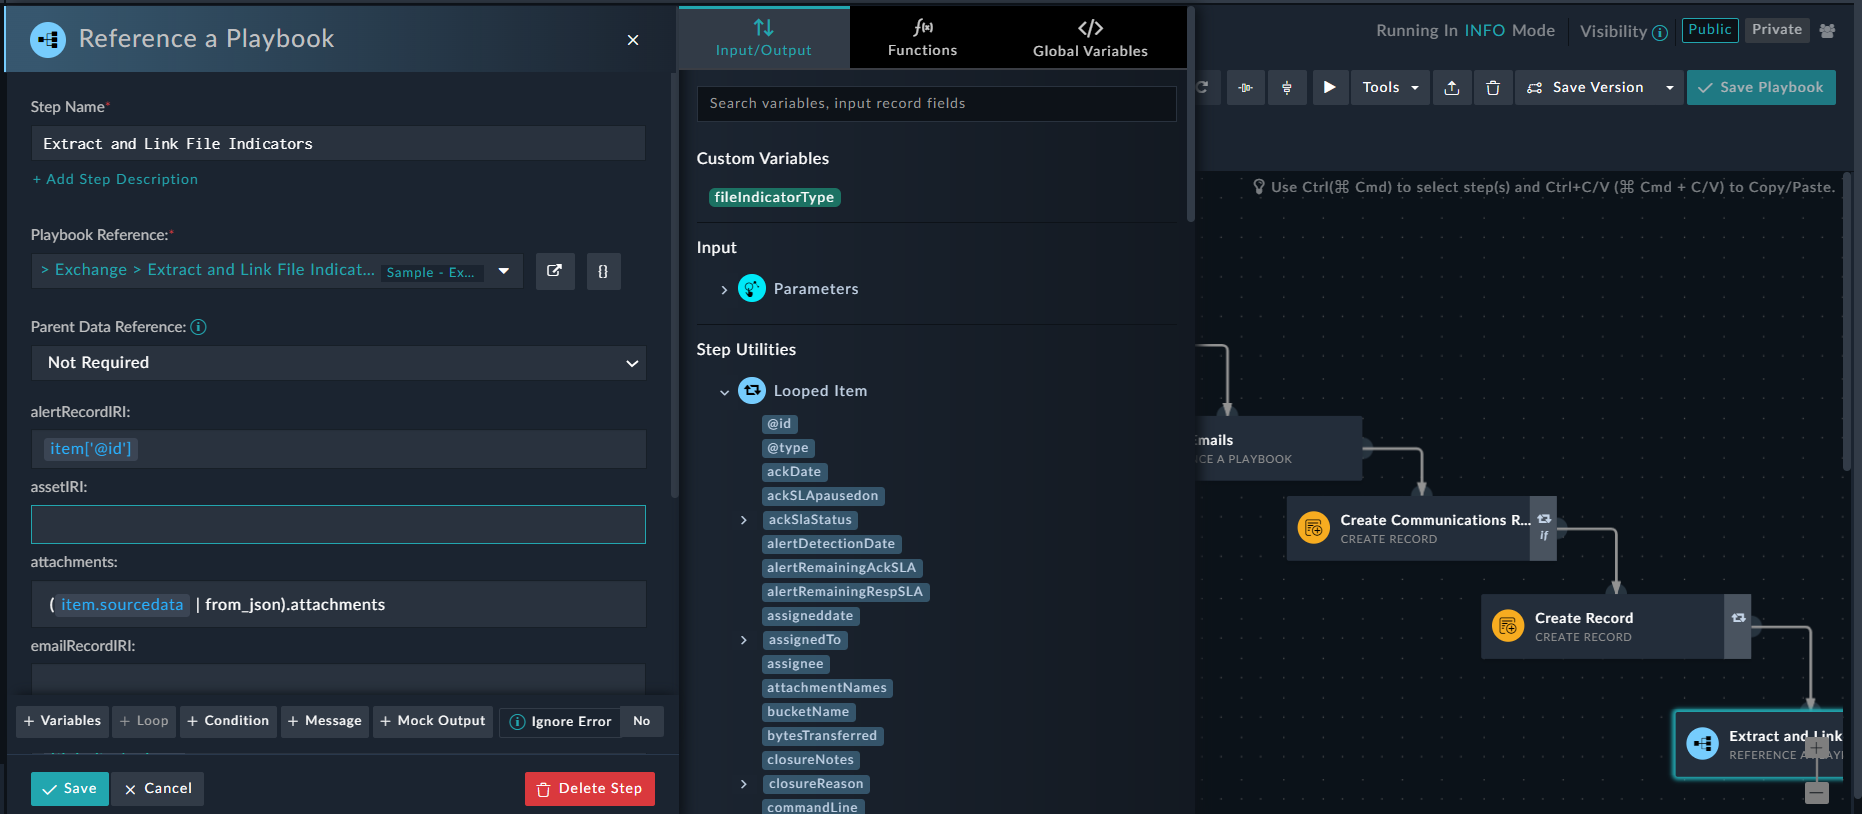
|
|
Be cautious while using variables from Input > Recordswhile using a 'for each' loop. When users add any specific item from |
Step Results
The Step Results option enables you to use the output of the steps that have been executed, in the current step. Selecting the Show Last Run Result if Available option dynamically pulls the last available execution data to create a reference schema compared to the pre-defined output schema. This enhances the usability of 'Step Results' as you can use the data generated during the previous run of the playbook:
|
|
The data generated during the previous run of the playbook is available only if you run the playbook in the 'DEBUG' mode. For more information on the how to set a playbook to run in the DEBUG mode, see the "Setting the logging levels for playbooks" topic in the Introduction to Playbooks chapter. |
To use the output of the steps that have been executed, click the step in which you want to the use the executed steps' output, which then displays the Dynamic Values window. The output schema, with all its attributes, for all the executed steps are visible in the Step Results section. You can then use the output schema and attributes of any of the executed steps as an input to the current step based on the logic or functionality of the current step. You can also search the output schema of the step using the search box: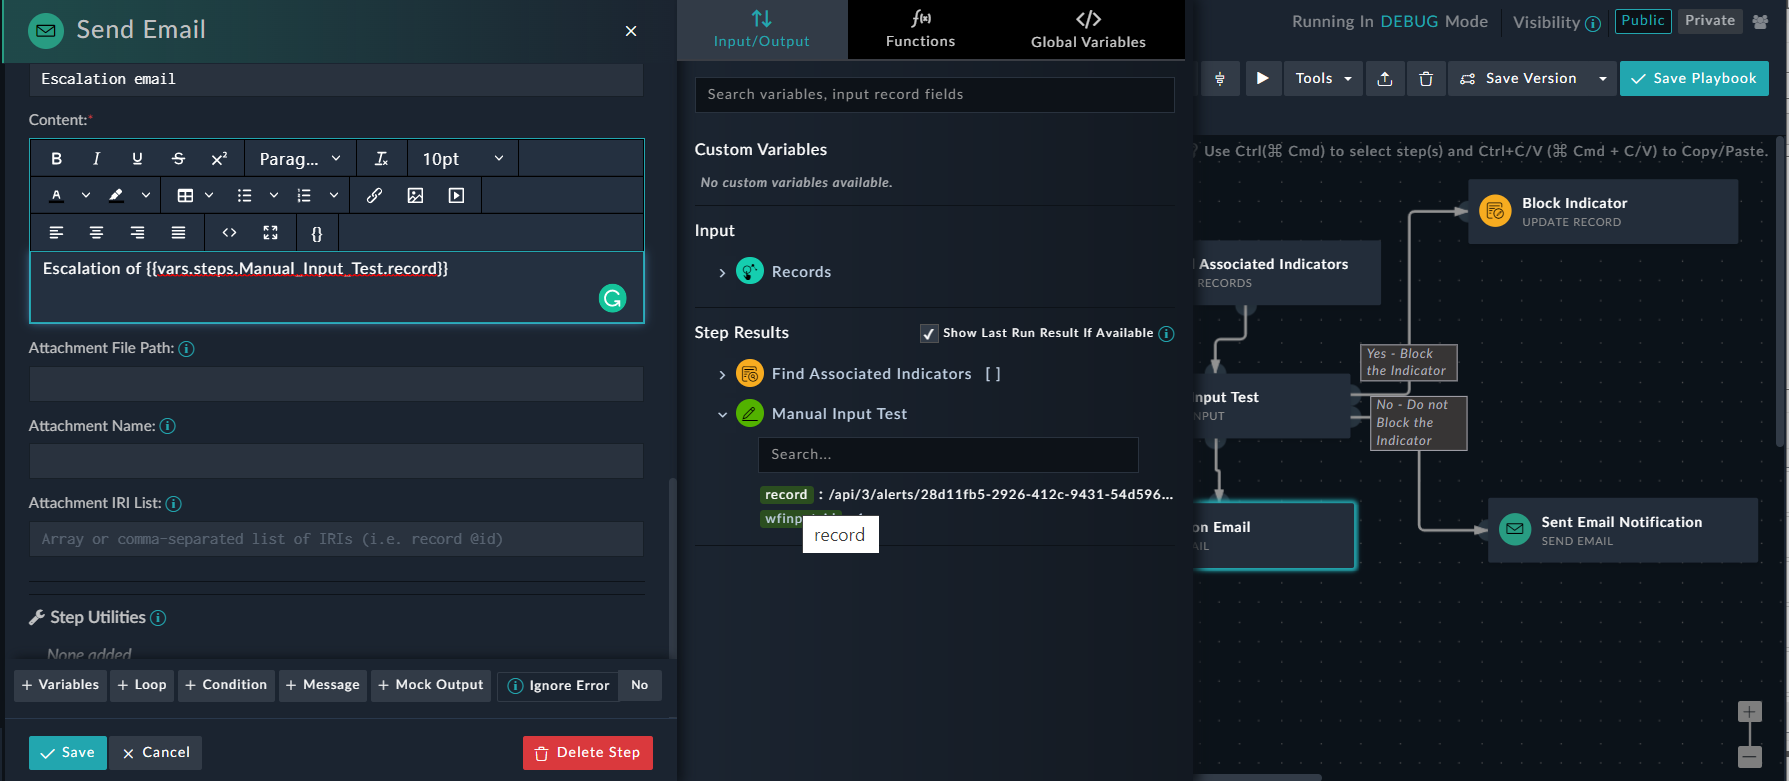
Step result output schemas are represented using 'keys', for example 'record'. The Jinja value of the 'keys translate to {{vars.steps.<step_name>.keyname}}, for example, {{vars.steps.Manual_Input_Test.record}}.
To use an array element in an executed steps' output, then you must specify the position of the element (index [i]) in the Jinja that is generated. The index value of an array starts from zero [0]. For example, if you want to fetch the name property from the Find_all_Open_Alerts [] array from the executed steps' output, then the Jinja that is generated is as follows: {{vars.steps.Find_all_Open_Alerts[0].name}}.
Therefore, before you run the playbook and require to fetch any element other than the first element in the array, you must provide the position of the element. For example, if you want to fetch the name property of the 4th element of the Find_all_Open_Alerts [] array then your Jinja must be written as {{vars.steps.Find_all_Open_Alerts[3].name}}.
If there is no step output available or if you are at the first step in the Playbook or if the step is not connected to another step, then the Jinja generator displays the following message: There are no input defined.
Functions
Use the "Functions" tab in Dynamic Values to build playbooks based on your requirements and without programming knowledge, and add various operations and expressions to playbooks. The Functions tab contains easy-to-understand operations that cover most aspects of playbook development. The operations are grouped logically as per their functionality, for example, if you want to convert datetime into a specific format or to a different time zone then these operations will be listed in the 'Date Time Operations' list. Similarly, if you want to replace text in a string with a regex, then these operations will be listed in the 'Regex Operations' list. By default, the first logical group of functions, i.e., Utility, is expanded:
You can search for functions using the search box in the Functions tab. On search of a result, all functions across the logical groups get listed, for example if you search for HTML, functions within the 'Utility' group and also within the 'String' group get listed:
Each function has an information icon that you can hover over to view more information about that particular operation.

An example of using an expression would be requiring to extract artifacts from the source data of an alert that has been created in FortiSOAR from a SIEM and update that record with the extracted artifacts. You can use Utility Operation > Extract artifacts from a string function to extract artifacts from the source data.
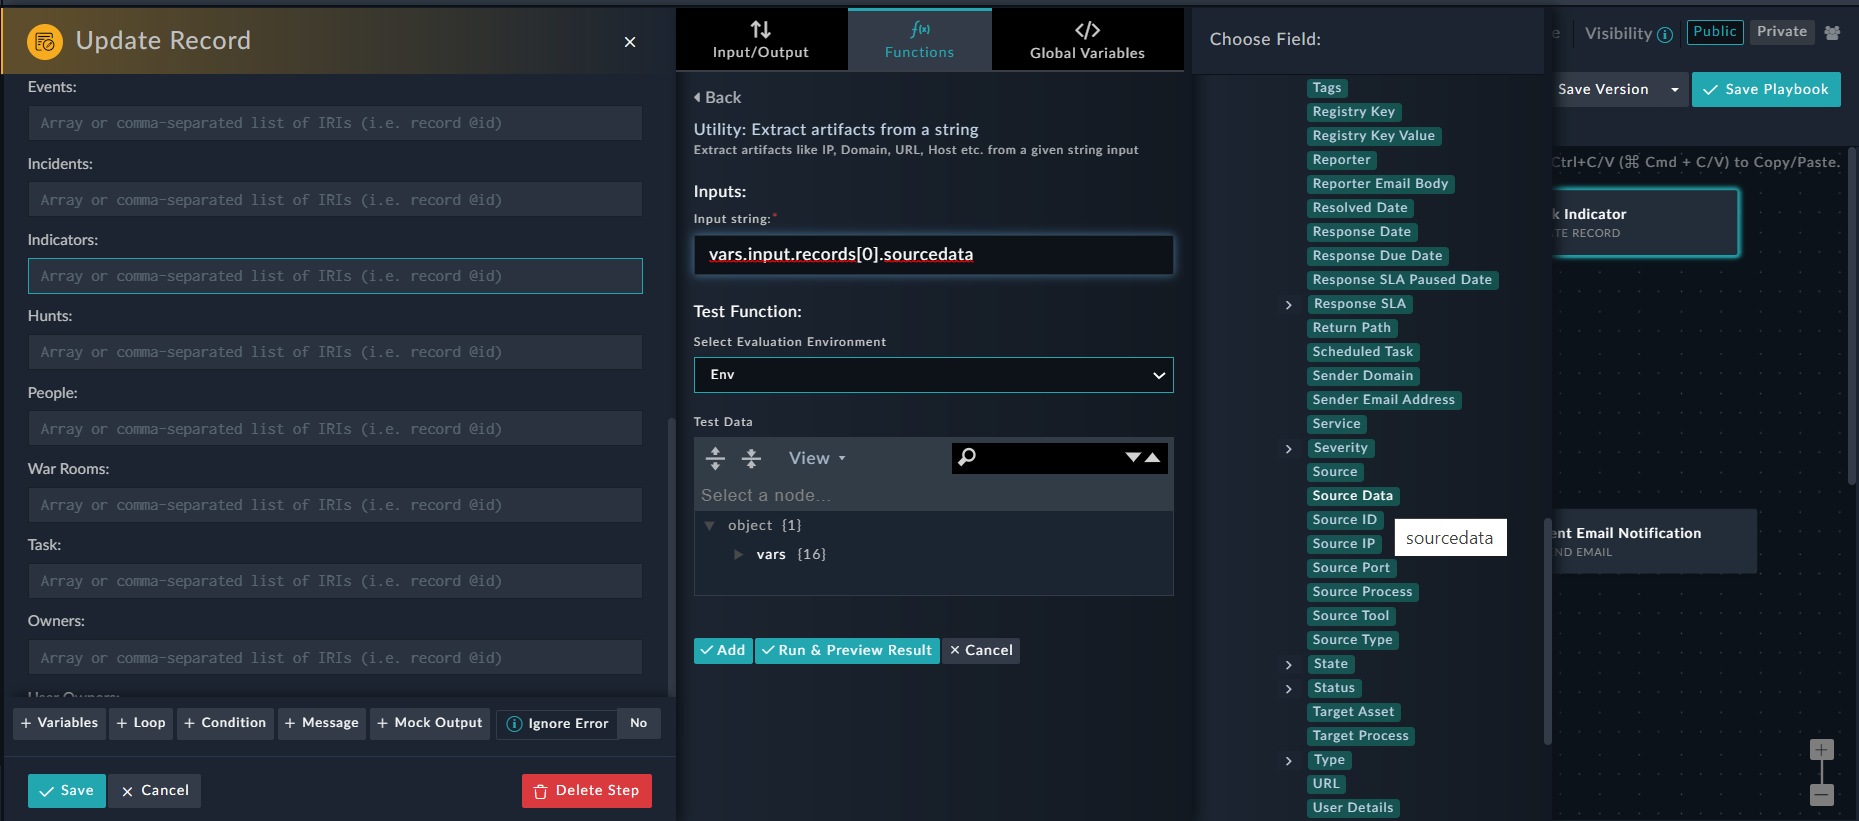
To use the Extract artifacts from a string function, in the "Update Record" step, click a field in which you want to use the function. For example, the Indicators field in the Correlations tab of an alert record, which displays the Dynamic Values window. Click the Functions tab and then click the Utility Operations list:

Click the Extract artifacts from a string function, which in turn displays an Inputs string text box. From the Choose Field list, you can select Source Data by clicking Input > Records > modules > Alerts and clicking the Source Data field, which adds the corresponding Jinja value in the Input string field:
Clicking Add adds the corresponding Jinja expressions in the Indicators field:
You can also choose to test the added expression and preview the result before you add the expression to your playbook. To test the expression, you can choose an Environment from the Select Evaluation Environment list such as, the complete environment (Env) or any of the steps of the playbook, and click Run & Preview Result to preview the result of adding this Jinja to the selected Indicator field:
Click Save to save the Update Record step and then save the playbook. Now, when you run this playbook for an alert that contains source data, this step will extract artifacts from the source data and update the indicators associated with the alert record with the extracted artifacts.
|
|
Whenever FortiSOAR is upgraded, the files located in the |
Another example of testing an added expression and preview the result before you add the expression to your playbook would be to test an expression where you want to get convert an epoch timestamp to represent datetime, open Dynamic Values and click Functions > DateTime Operations and select Convert a timestamp into datetime representation, then select the evaluation environment, can select 'Env' or any of the previous steps and then clicking Run & Preview Result. You will be able to view the result of the expression in Result Preview:
IRI Lookup
All foreign key references use International Resource Identifiers (IRIs) to reference records within the system. IRIs are generated automatically when FortiSOAR inserts records. FortiSOAR uses IRI values in multiple places for referencing picklists, playbooks, attachments, etc. Use the IRI Lookup option in the Functions tab to efficiently use the IRI values of picklists, attachments, or playbooks configured in your system.
To use the IRI lookup, click the step in which you want to insert an IRI value, which then displays the Dynamic Values window. Click the Functions tab and click the IRI Lookup option. Click IRI Lookup and from the Choose Entity Type drop-down menu, choose the entity, either a Picklist, Attachment, or Playbook. For example, if you choose Picklist, then from the Provide Entity To Lookup IRI for drop-down menu, select the Picklist whose IRI value you want to add to the step. In our example, we want to add the IRI value for the picklist that retrieves the types of alerts. Therefore, from the Provide Entity To Lookup IRI for drop-down menu, select AlertType, and then in the Click to Add IRI Value section, select the alert type that you want to add, for example, Phishing, as shown in the following image:
Once you click Phishing, the IRI value (jinja) of 'Phishing' alert type is added to the playbook as a 'key', whose Jinja translates to {{("picklistName" | picklist("itemvalue of picklist","@id")}}, for example {{"AlertType" | picklist("Phishing", "@id")}}
Adding your own functions
You can also create your own functions or use existing Jinja2 filters (https://docs.ansible.com/ansible/latest/user_guide/playbooks_filters.html), and then add them to the "Functions" tab in Dynamic Values. To add your own functions, use the steps mentioned in the Building your own connector chapter in the "Connectors Guide" for adding functions or exposing an action as a function to Dynamic Values.
Useful Functions
- Title: Get Related Indicators
Expression:find_indicators
Description: Gets a list of related indicators that are linked to the given alert or incident based on the type and reputation specified. Returns the IRI, type, value, and reputation fields for the linked indicators.
Example:
Input:
Record iri = /api/3/alerts/aaaa0a52-340f-4412-bc79-94d6c4b08365
Indicator Type = IP Address
Indicator Reputation = Malicious
Output:
This function will fetch all indicators with type 'IP Address' and reputation 'Malicious' that are linked to the given record (alert or incident) IRI. Users can choose not to apply 'Type' and 'Reputation' filters by keeping these fields blank. - Title: Check if a string is null or empty
Expression:{{not (vars.input.records[0].description and vars.input.records[0].description.strip())}}
Description: Validates if the given input string is null or empty. - Title: Check if a key present in a JSON
Expression:{{vars.input.records[0].emailBody[vars.input.records[0].domain] is defined}}
Description: Returns 'true' if the given key exists in the specified JSON object. - Title: Check if a key is present in a JSON and its value is not null
Expression:{{(vars.input.records[0].emailBody[vars.input.records[0].domain] is defined) and (vars.input.records[0].emailBody[vars.input.records[0].domain] != None)}}
Description: Returns 'true' if the given key exists, and if its value is 'not null', in the specified JSON object. - Title: Check if a key is not present in a JSON, or if its value is null
Expression:{{(vars.input.records[0].emailBody[vars.input.records[0].domain] is undefined) or (vars.input.records[0].emailBody[vars.input.records[0].domain] == None)}}
Description: Returns 'true' if the given key does not exists, or if its value is 'null', in the specified JSON object. - Title: Find all elements from a list matching a given condition
Expression:{{vars.steps.find_alert_indicator | selectattr("name", "eq", "alert-name") | list}}
Description: Returns a filtered list of items that match the given condition.
Global Variables
Global Variables are variables that can be used across playbooks. You can declare a global variable once and then use it across all playbooks, instead of having to redefine the variable every time in each playbook. You can create global variables only in the Playbook Designer. FortiSOAR includes some pre-defined global variables.
To create a global variable, in the Playbook Designer, click Tools > Global Variable. Click New Global Variable and enter appropriate content in the Variable Name and Field Value fields for the variable and click Submit to create a global variable. You can optionally also add the default value for the variable in the Default Value field.
|
|
Variable Names must always begin with a character when you are creating global variables and the name can contain only alphabets and numerals. Special characters and spaces are not allowed. |

To ensure that the correct hostname is displayed in links contained in emails sent by System Playbooks, you must update the Server_fqhn global variable in Global Variables. Click the Edit icon in the Server_fqhn global variable, and in the Field Value field add the appropriate hostname value, and then click Submit. If you have not specified the hostname in global variables, then the hostname that you had specified or that was present when you installed FortiSOAR will be the default hostname and this will be added in the email. In this case, ensure that you have used the Server_fqhn global variable in the Send Email step in the playbook that is sending the email.
Example of using a global variable: In the Set Variable step, you need to set a name and value. When you click the Value field, the Dynamic Values window is displayed. Click the Global Variables tab, and you will see a list of global variables that have been created; you can also search for a global variable in the search box. Click the global variable that you require, for example 'Current Date' to add the Jinja value of the global variable in the Value field: