


Triggers & Steps
Triggers
Triggers define when a Playbook is to be executed. Triggers are always the first step in a playbook. Once a playbook has been triggered, it flows through the remaining defined steps as defined by the routes on the canvas using the trigger as the starting point.
Trigger Types
There are six different trigger types defined in the Playbook Engine. Most triggers are based upon actions that you can perform on models in the FortiSOAR database. The parameters of each are defined below.
Once you add a playbook, the playbook gets created with a placeholder Trigger step as shown in the following image. Then specify the required parameters for the trigger and then click Save to add the first step to the playbook. The procedure for creating playbooks is mentioned in the Playbooks Overview section.

You can add Step Utilities, i.e., Variables and Messages for all triggers. Add variables for all trigger by clicking the Variables link that appears in the playbook step footer to add input variables. Input variables are the inputs that are required to be provided by the user at the time of playbook execution. Required variables are made available in the environment based on the given name. Required variables can be of any standard field format within the UI, including text, picklist values, lookup, and checkboxes. See Variables for more information. You can also add a custom message for each playbook step to describe its behavior. See Message for more information.
On Create Triggers
On Create triggers are intended for asynchronous execution, meaning they are non-blocking on the triggering data operation. For example, you can define a playbook that gets triggered when an Incident is created.
This trigger starts the execution of a playbook immediately after a record of the selected model type is created or ingested. Click On Create Trigger in the Playbook Designer, type the name of the step in the Step Name field and then select the module on whose creation you want to trigger the playbook, from the Resource drop-down list, for example, Incidents, and click Save.
You can also add conditions based on which you can trigger this playbook. For more information, see Condition-based triggers.
Nested filters are also supported on the "On Create" and "On Update" triggers. Support has also been added for Less Than (Before in case of Date/Time fields), Lesser Than or Equal To (On or Before in case of Date/Time fields), Greater Than (After in case of Date/Time fields), Greater Than or Equal To (On or after in case of Date/Time fields), and Matches Pattern operators in filters. For more information about nested filters and operators, see the Dashboards, Templates, and Widgets chapter in the "User Guide."
|
|
Playbooks with the 'On Create' trigger will not work in the case records are ingested using the 'Ingest Bulk Feed' playbook step. |
On Update Triggers
This trigger starts the execution of a playbook immediately after a record of the selected model type is updated. You can create an On Update trigger on almost all models, and can add an On Update trigger in the same way you add an On Create trigger. An update could be made to any field within the model, including linking or changing one or more new relationships.
When you add the On Update trigger to run on a Is Changed condition when relation fields are changed, such as indicators for alerts, then the On Update trigger will trigger the playbook only when the related record is linked from the same side. For example, while linking an indicator to an alert, the relation can be formed both ways – by updating the indicator record and linking the alert; or by updating the alert record and linking the indicator.

However, an On Update trigger on an alert when indicator 'Is Changed' will only be triggered if the indicator was linked by updating the alert record. It will not be triggered when the relation is established while creating or updating an indicator record.
The single update action defines the trigger, so linking multiple records or updating multiple fields simultaneously does not trigger the playbook multiple times. However, multiple inline edits trigger the playbook multiple times. A bulk edit action triggers the Playbook only once.
You can also add conditions based on which you can trigger this playbook. For more information, see Condition-based triggers.
|
|
Playbooks with the 'On Update' trigger will not work in the case records are ingested using the 'Ingest Bulk Feed' playbook step. |
On Delete
This trigger starts the execution of a playbook immediately after a record of the selected model type is deleted. You can create an On Delete trigger on almost all models, and can add an On Delete trigger in the same way you add an On Create trigger.
You can also add conditions based on which you can trigger this playbook. For more information, see Condition-based triggers.
Condition-based triggers
You can define a condition or nested conditions to trigger a playbook only if the specified filter criteria are met. This streamlines playbook calls and prevents the excessive calling of playbooks.
|
|
You cannot apply filters on encrypted fields. |
Open the playbook designer and click on On Create, On Update, or On Delete trigger. For example, click On Update trigger and then select the module, which when updated will trigger the playbook, from the Resource drop-down list, for example, Alerts. Once you select the resource, a Trigger Condition drop-down list appears. To define the condition based on which the decision to trigger the playbook will be taken, perform the following steps:
- From the Trigger Condition drop-down list, select the logical condition, All of the below are True (AND), or Any of the below is True (OR) to trigger the playbook.
In case of the AND condition the playbook gets triggered only if all the conditions specified are met. In case of the OR condition the playbook gets triggered if any of the conditions specified are met. The AND or OR conditions are mutually exclusive, i.e., you can only choose one of them to apply to conditions. - Click the Add Condition link and then build your condition.
Note: There is an additional operator Is Changed added for the trigger condition. If you select the Is Changed operator for a field, then the playbook will be triggered whenever the specified field is changed.
For example, if you want to assign Critical alerts that are in the Open state to a specific user, saycsadmin, then you can select the Severity field and choose the operator as Equals and specify Critical.
Click Add Condition to define other conditions such as selecting the Status field and choosing the operator as Equals and specifying Open, and then also adding tags, as shown in the following image:
Once you complete adding the conditions, click Save to save the playbook.
In this case, once the condition is met, the On Update playbook will be triggered, and based on the steps that you have defined, for example, theUpdate Recordstep, the alert will be updated and assigned tocsadmin.
Important: You can also useTagsas a condition to trigger the On Create, On Update, or On Delete playbooks. You can add special characters and spaces in tags; however, the following special characters are not supported in tags:',,,",#,?, and/. The operators that you can use with Tags in the On Create and On Delete triggers areContains. The operators that you can use with the On Update trigger areContains All,Added, orIs Changed.
If you want to add a group of conditions, then click the Add Conditions Group link. For example, if you wanted to create a condition where the alerts have been created in the last calendar month and whose severity is critical and whose status is open or investigating, in such a case you could create a condition group for the status condition. For more information about nested filters and operators that can be used in conditions, see the Dashboards, Templates, and Widgets chapter in the "User Guide."
Custom API Endpoint
Custom API Endpoint Triggers allow you to specify an arbitrary endpoint that can be used to externally start a playbook using a REST API POST action from another system. All playbooks are triggered using an API on a technical level with the microservices architecture used by the application, but conceptually, this trigger allows for the creation of an endpoint explicitly for use in API-based operations.
The chief aim of the Custom API Endpoint Trigger option is to allow for easy ingestion of data. A RESTful POST method explicitly defined by the authentication method is allowed to trigger a playbook to the defined endpoint. The endpoints of the Custom API Endpoint trigger are not discoverable, unlike the standard API routes within the JSON-LD / Hydra definition. You must know the endpoint name explicitly, and it currently only allows the POST method.
The endpoint name can be any valid name using alphanumeric characters. You should not use special characters in naming the endpoint, or the endpoint might not function correctly.
The following three types of authentication are currently supported:
- Token-Based (default) - the default API method for signing any API request.
Note: For token-based (HMAC) authentication the timestamp must be in UTC format. - Basic Authentication - a Base64 encoded version of the
username:passwordpresent in the header. This requires the username and password of a user without 2-Factor Authentication turned on to properly function. Note that this method also uses a separate endpoint. - No Authentication (Not recommended) - no authentication method is applied to the endpoint, and any RESTful POST method will trigger the playbook. This is chiefly aimed at applications where the only option for exporting data is by using a webhook, but this method is not recommended for routine usage due to the lack of security.
You can manually create your own security method with this trigger by defining a specific criterion to be used in a Decision Step verifying information in the full Request blob.
To add an Custom API Endpoint trigger, click Custom API Endpoint trigger in the Playbook Designer, type the name of the step and the API route in the Step Name and Route fields respectively, and then select the Authentication Method from the ones specified earlier and click Save.
Referenced
The Referenced trigger is intended for playbooks that are exclusively called from a Reference a Playbook step, which is discussed in a later section. Bear in mind that any dynamic data requirements must be made available from the Parent (s) playbooks to be used during the execution of a Child playbook.
To add Referenced step, click Referenced in the Playbook Designer, type the name of the step in the Step Name field and click Save.
Manual Trigger
The Manual Trigger allows you to call a specific playbook from within any module in the system, i.e., these are for click-to-start playbooks. You can then execute any desired operations within that playbook on demand.
To add a Manual trigger, click Manual Trigger in the Playbook Designer, type the name of the step in the Step Name field. In the Trigger Label Button field, type the name that will be displayed in the selected module (s) to trigger this playbook. The name that you specified in this field is what the user will see in the Execute drop-down list on the module list.
The Manual Trigger step provides you with options to specify whether the execution behavior of the playbook, i.e., you can decide whether the playbook requires a record to be executed or if it does not require a record to be executed. If the playbook requires a record to be executed, then select the Requires record input to run option and then select the run mode, i.e., if the action must be executed once, then select the Run once for all selected records option or if the action must be executed separately for each selected record then select the Run separately for each selected Record. By default, the Run once for all selected records option is selected. This makes it more effective to handle multiple selections since you do not require to write two playbooks and map the second playbook in the first playbook.
|
|
In the case of a "Manual Trigger" step that has the Run separately for each selected records option selected, and in which you have selected multiple records and triggered a playbook from the designer for debugging purposes, you will observe that only a single playbook will be triggered on a single record to simulate the output. For information on triggering playbooks from the playbook designer for debugging, see the Playbook Debugging - Triggering and testing playbooks from the Designer topic in the Introduction to Playbooks chapter. |
If you want the playbook to run without having to select a record, then select the Does not require a record input to run option. This acts as a module-based trigger, i.e., you can trigger a playbook based on a selected module without having to select a record in the specified module. An example of this could be a manual trigger to check for new alerts from a SIEM tool could be run globally on the Alerts module.
In either of the cases, from the Choose record modules on which the playbook would be available on select one or more modules on which you want to register this trigger and execute the playbook. For example, you can choose Alerts and Incidents. When you select this Manual Trigger from the Execute drop-down list, the playbook gets executed, and at the time of execution, the record (s) of the registered module (s) are passed into the playbook environment with the trigger.

The playbook that you create with the Does not require a record input to run option will appear in the Execute drop-down list in the module, or you can also create a specific button for this action, by updating the module template. In case of our example, when you open the Alerts module, you will see the Check New Alerts From SIEM option in the Execute drop-down list in the module (when you do not select any record), as shown in the following image:

However, if you select a record in the Alerts module, then you will observe that the Check New Alerts From SIEM option will not present in the Execute drop-down list.
When you choose Run once for all selected records in the Execution Behaviour section, then a single playbook is run with the input set as vars.input.params.records, which is an array containing a list of all selected records that acts as an input to the playbook. When you choose Run separately for each selected record in the Execution Behaviour section, then one instance of the playbook is run per selected record with the input to the playbook set as vars.input.params.records.
You can also build a customized user prompt form by adding multiple types of input fields of standard field format within the UI such as Text, Picklist, Lookup in the User Prompt section. For more information on building user prompts, see the Building a User Prompt topic.
Once you have completed providing all the above parameters, click Save to save the Manual Trigger.
When you want to execute a playbook action, click the module (s) on which you have registered the Manual Trigger. This would be a module you have specified in the Choose record modules on which the playbook would be available on field. In the grid view of this module, click one or more records to display the Execute drop-down list (if you have selected the Requires record input to run option). Pressing the down arrow provides a list of available actions. The name of the action displayed is based on the name that you have specified in the Trigger Label Button field, for example, if you have entered Investigate Phishing eMails in the Trigger Label Button field, then Investigate Phishing eMail is an option in the Execute drop-down list as shown in the following image:

An example of a Manual Trigger that is included by default in the Alerts module in the form of an 'Action' button is the Escalate action. Select a record in the Alerts module and click Escalate to automatically create a new incident based on the inputs you provide in the Escalate dialog and also link the alert(s) to this newly created incident.

When you initiate an action with an associated required input variable, such as the Escalate action, you will be prompted to enter that information in an input dialog as shown in the following image:

Enter the required information and click Execute to execute the Escalate playbook.
In release 7.2.0 there is a change for polling playbook execution results for a playbook triggered using an SVT (Actions) button, for example Escalate. By default, FortiSOAR does not wait for any playbook execution results, and displays a "Triggered Successfully" toaster message, once you click the Action button. If you want the playbook to wait it completes its execution and then display the toaster message, then you must add the SystemWaitForExecution tag:
You can also define visibility conditions for those playbooks that require record input to run. You can define conditions on records, such as the specific record type or severity or status; thereby enabling users to see only those actions (playbooks) that apply to records that match the defined condition. For example, a Submit Malware Sample playbook should be visible for a "Malicious Code" incident, but it should not be visible for an “Unauthorized Access” incident.
In the Execution Behaviour section, if you have selected the Requires record input to run option, click the Configure Visibility Conditions link to add the visibility conditions as shown in the following image:

You can define distinct conditions for each selected module in the playbook, as separate sections for each selected module is displayed; thereby allowing you to apply different display conditions (filters) for each selected module as shown in the following image:

In the above image Alerts and Incidents modules are selected in the Choose record modules on which the playbook would be available on list, and therefore the Display Conditions section contains trigger conditions for both the Alerts and Incidents modules. If you do not specify any display conditions, then all playbooks that you have defined for the modules can be viewed when you select or open a record in the Execute list. An example of a condition based on which a playbook is displayed when a user selects a record would be a playbook that is defined to be run only on "alerts or incidents of type phishing." In this case, in the manual trigger step, in the Trigger Button Label field you could type Investigate Phishing eMail, and in the Display Conditions section, you would define a Trigger ConditionType Equals Phishing for both the Alerts and the Incidents modules as shown in the above image.
|
|
If you add a filter in a |
Once you define this condition, then users will see this playbook only when the alert record is of type phishing. For example, you have alert records: Alert 10 whose type is set to Phishing, and Alert 11 whose type is set to Policy Violation. When you click the Alert 10 alert record to view its details, in the Execute list you can see the Investigate Phishing eMail playbook listed, as showing in the following image:

However, when you click the Alert 11 alert record to view its details, in the Execute list you will not be able to see the Investigate Phishing eMail playbook as seen in the following image:

Building a User Prompt
You can build a customized user prompt form by adding multiple types of input fields of standard field format within the UI such as Text, Picklist, Lookup, File, Phone, Integer, Decimal, Date/Time, Dynamic list, Checkbox, Email Field, and Email Template Field. If you select the field format as Text, you can also define its Sub-type such as Text Field, Domain, Rich Text, etc. Click Add Field in the User Prompt section, to add an input field to build your user prompt. The User Prompt enables you to create a customized user prompt.
You can now configure the following in the User Prompt:
- Specify field titles and variable names, instead of having the field title being built automatically.
- Add tooltips for fields.
- Change the action button name to a name of your choice; the default is
Execute. - Display a pre-populated form field in the input form for review or modification, before executing any action. One benefit of this feature is the ability to review certain fields that will be used in the playbook, such as a source IP address or closure notes.
|
|
You can build the user prompt using custom fields and fields from input record, if you have selected a single module, (e.g., Alerts) and not when you have selected multiple modules. If you select multiple modules, then you can build the user prompt using only custom fields. |
The User Prompt section also contains an additional field where you can specify default values. The values entered in this field would be displayed when the User Prompt is shown to a user. You can either specify any custom value (if your input type is selected as Custom) or any default record field (if your input type is selected as Record Field). The listing of record fields will be based on the module that you have selected in the Choose record modules on which the playbook would be available on field. Once you select the record field, then the data of this field will be loaded from the specified input record and displayed to the user in the User Prompt.
|
|
The default values will not update the record; they are only used to display content in the User Prompt |
An example of building a user prompt in FortiSOAR will be if you want to reassign a number of alert records to another user after specifying a note. This example will also demonstrate how you can use custom field titles and variables and customizing the Execute button name. This example assumes that you have selected Alerts from the Choose record modules on which the playbook would be available on field.
Steps to create this example user prompt is as follows:
- In the
User Promptsection, click the down arrow, and then click Add Field. - To reassign the alert record to another user by using an input record (Assigned To) do the following:
- From the Input Type drop-down list, select Record Field.
Note: If you have selected multiple modules in the Choose record modules on which the playbook would be available on field, you cannot select Record Field from the Field Type drop-down list and you can create the User Prompt using custom fields only. - From the Choose Record Field drop-down list, select the field that will be set by default.
The field listing in the Choose Record Field drop-down list is dependent on the module you have selected in the Choose record modules on which the playbook would be available on field. For our example, we have chosen Alerts.
For our example, select Assigned To. - You can choose to select whether this field will be mandatory or not in the user prompt, by selecting or clearing the Mark as Required Field In Prompt checkbox.
- In the Field Label field, type the label of the field that will be displayed in the User Prompt.
For example,User Assignment.
The Variable Name field type gets auto-populated with the variable name, for example,userAssignment. You can edit the variable name if you want.
Important: If you are using Dynamic Values in the next step of the playbook note that Dynamic Values will display custom parameters in the Input > Parameters option, and Input Record Fields, such asAssignedToin the Input > Records option. - (Optional) If you want to provide more information about the field, then click the Add Tooltip link and enter the description in the Tooltip field.

- From the Input Type drop-down list, select Record Field.
- To create a custom field for providing a reason or notes for the reassignment, do the following:
- Click the Add Field link.
- From the Input Type drop-down list, select Custom.
- From the Field Type drop-down list, select Text. From release 7.3.0 onwards, you can also select Email Template Field, as a field Type. For more information, see User Input Prompt - Using the 'Email Template' Field topic.
Note: If you select the field type as "Text", you can also choose its Sub-type, such as Rich Text, Text Area, IP, etc. Also, if you select the field type as "Picklist" then you must select the corresponding picklist, and if you select "Lookup", then you can specify the related module. - You can choose to select whether this field will be mandatory or not in the user prompt, by selecting or clearing the Mark as Required Field In Prompt checkbox.
For our example, we will click the Mark as Required Field In Prompt checkbox, to ensure that the record cannot be reassigned to another user without adding a note. - In Field Label field, type the label of the field that will be displayed in the User Prompt.
For example,Notes for Reassignment.
The Variable Name field type gets auto populated with the variable name, for example,notesForReassignment. You can edit the variable name if you want. - (Optional) In the Default Value field, you can enter the default value for the custom field.
Note: You can specify either a "Static" date/time or a "Custom" date/time as a default value, if your custom field is of type "Date/Time". If you select Static, click the Select Date icon to display the Calendar and select the required date/time. If you select Custom, then you can specify a date/time relative to the current date/time such as 1 hour from now, or 3 hours ago. - (Optional) If you want to provide more information about the field, then click the Add Tooltip link and enter the description in the Tooltip field.
- To change the name of the action button, which by default appears as Execute, update the Submit Button Text field, and type, for example,
Reassign.
TheInput Promptsection with all these changes will appear as shown in the following image:
Now, when you execute this playbook after selecting alert records and clicking Execute > Reassign with Notes, then the Reassign with Notes dialog is displayed. The Reassign with Notes dialog will contain the Assigned To drop-down list, with a list of users to whom this record can be reassigned, a rich text area where the user must add the reassignment notes, and the Reassign button which will execute this playbook, as shown in the following image:

User Input Prompt - Visibility Conditions
From version 7.0.0 onwards, you can add visibility conditions to the fields displayed in the user input form, i.e., fields in the user form would be visible based on the conditions you specify. You can define visibility conditions in user prompts both when you trigger the playbook using the Manual Trigger option and also during the execution of the playbook using the Manual Input step (Custom Input Form prompt).
For example, when you trigger a playbook on an alert record, you could ask users to specify the type of alert, and you could define additional fields that would be visible if a particular type of alert is selected. For example, if the user selects the 'Phishing' as the alert type, then another field named 'Phishing Type' would be displayed, if the user selects 'Ransomware' as the alert type, then a field named 'Ransomware Type' would be displayed and so on. Based on the user selection, you can further define the playbook execution.
To add visibility conditions as the one described in the example, i.e., display an additional field based on the type of alert, in a User Prompt, do the following:
-
In the
User Promptsection, click the down arrow, and then click Add Field. - To prompt the user to set the 'Type' for the alert, select the Input Type as Record Field . From the Choose Record Field drop-down list select Type, click the Mark as Required Field In Prompt checkbox, and in the Field Label field, enter
Type. - Click Add Field to create additional fields based on the Type of alert the user selects. For example, to create a 'Phishing Type' field, from the Input Type drop-down list, select Custom, from the Field Type drop-down list, select Text, and from the Sub Type select Text Field. If you have created a picklist with the different Phishing Types, you can specify Picklist and choose the appropriate picklist. Next, click the Mark as Required Field In Prompt checkbox, and in the Field Label field, enter
Phishing Type.
Note: If you add a field as required, for which a visibility condition is defined, then that field is required only when its visibility condition is met, i.e., when the field is visible. For example, in the above step, the Phishing Type field is a required field, however, this field will be required only if the Type of alert is 'Phishing'.
You can similarly add fields for various types of alerts, such as Ransomware, or Brute Force Attack, etc. - Add the visibility condition for the
Phishing Typefield by clicking Add Visibility Conditions and specifying the Visibility Condition as "Type Equals Phishing":
Similarly, you can other visibility conditions for various steps. To define a visibility condition there must be at least two steps in the user prompt. - Click Save to save your changes to the step, and then click Save Playbook.
When you run the playbook on a record, you will observe that if you select 'Phishing' as the type, the 'Phishing Type' field is displayed. If you select any other type, you will observe that no additional field is displayed.
User Input Prompt - Dynamic Lists
From version 7.0.2 onwards, Dynamic List is supported as a 'Custom' input type in both the Manual Trigger step and the Manual Input step. A 'Dynamic list' is a list with dynamic values that is set using a playbook, i.e., the options of the list are defined using JSON or comma-separated values, set using Jinja and gets displayed as a list in a user input prompt. You could use dynamic lists in cases such as:
- Independent Playbooks: You might need to create a list for the manual trigger or manual input that can be automatically included as part with the exported playbook, i.e., the playbook step holds the logic of the items and therefore does not require a custom picklist to be exported.
- Unauthenticated Picklists: Picklists cannot be loaded in case of unauthenticated inputs. In such cases, pre-defined JSON lists can be used to present multiple options to users for their selection.
- Constantly Changing Picklists: There could be picklists such as picklists based on MITRE threat hunting categories, which are ever changing. In such cases you can prompt users to categorize the threat based on the loaded list of categories. Then, based on the selected threat, you can automatically show the sub list for selecting techniques.
-
Filtered Record List: You can present a filtered lists of records in a manual input to users for selection. The filter would vary depending on logic in the playbook.
For example, if you want to a MITRE techniques dynamic list, in which you can define the various MITRE tactics and then based on the users' selection, display the various techniques associated with the tactic. To add such a dynamic list to a User Prompt of a manual trigger or manual input, do the following:
- In the
User Promptsection, click the down arrow, and then click Add Field. - Select the Input Type as Custom and from the Field Type drop-down list, select Dynamic List.
- If you want users to select an options from a list of options, then using the List mode, you can add various options to the dynamic list using comma-separated values, i.e., add the various options in the Options box in
List Optionssection. However, if you want to present the users with multi-level options, as per our example, then you need to use the JSON mode. To display multi-level options, use an object with a string"value"and list"options"for sub-options as shown in the following image:
- In the Field Label field, add an appropriate title for the user prompt, such as
Choose the Mitre Technique, then click Save to save your changes to the step, and then click Save Playbook.
When you run the playbook on a record, you will see that the Dynamic list will appear in the User prompt as shown in the following image:

User Input Prompt - Custom date/time field usage notes
When you add a custom Date/Time field as an input parameter in an Input Prompt, then that Date/Time appears correctly in the Input Prompt, however any create record or update record that uses this custom date/time field will display the created/updated record as 01/01/1970.
For example, in a Manual Trigger set on the Alerts module, when you add a custom Due Date field of type Date/Time Field, whose due date is set as Current Date +1 Day, and the step following the Manual Trigger step is a Create/Update Record step to create/update an alert record that uses the custom due date, then the alert record get created/updated with the Due Date set as 01/01/1970. This happens since the create/update record step requires the date/time in the epoch time, which is not the format in which currently the create record step is receiving the date/time. To fix this, in the create record step, in the Due Date field, add the following: {{arrow.get(vars.input.params.dueDate.int_timestamp}}. The {{arrow.get(jinja varibale).int_timestamp}} converts the value of the date/time field into the epoch date/time.
User Input Prompt - Using the 'Email Template' Field
You can use the 'Email Template Field' as a 'Custom' input field type in the 'Manual Trigger' and 'Manual Input' steps only. The ability to include an email template makes it easier for SOC teams to respond to routine operations. For example, sending emails to users when they have forgotten their password. In this case, SOC teams create a template response to be sent to users, which can be included when you select the Email Template Field as a Custom Input.
In the User Prompt section, perform the following steps to use an email template as a field in a custom input prompt:
- From the Input Type drop-down list, select Custom.
- From the Text drop-down list, select Email Template Field.
- Add the required parameters, such as specifying an appropriate title for the field, marking the field as a required field, etc.
- In the
Default Valuesection, from the Select Email Template drop-down list, select the appropriate email template.
Once you select the email template, the fields of an email, such as Subject, Content, etc., get pre-populated with default data from records, previous steps, etc.
- Change the default content, as per your requirements, in the Subject and Content fields. For example, you can change the signature in the Content field to your organization's signature from FortiSOAR Admin; and this updated subject and content is displayed to the user in the input form.
Note: This change made in the email template in the playbook does not reflect in the email templates that are included by default in your FortiSOAR instance, i.e., the email templates present in Settings > System Configuration > System Fixtures do not get updated. - Once you have completed adding and updating all the parameters, click Save to save the step.
Triggers
Trigger Data
Within the context of dynamic variables, the trigger step allows access to all data within the inbound transaction using the Dynamic Value prefix within the Jinja2 template formatting, for example, {{vars}}.
See the Dynamic Variables and Dynamic Values chapters for more information on using Dynamic Variables within a Playbook environment.
Standard information that is packaged includes, but is not limited to, the following:
| Key | Information Type | Applies To |
|---|---|---|
auth_info
|
This displays the type of authentication invoked by the user who triggered the playbook. It can be no authentication, basic authentication, or CS HMAC authentication. | All |
currentUser
|
The IRI of the current user who triggered the playbook. | All |
last_run_at
|
The last date of execution for a playbook that is run on a periodic basis. | Scheduled |
request.base_uri
|
The root of the host URI on which the playbook is executing, for example, https://fortisoar.sampleurl.com |
All |
request.uri
|
The full URI route of the API endpoint used to invoke the playbook. | All |
input.records
|
An array of records under the operation. For post-create, post-update, and manual triggers that have a single records, the array contains only one record that can be accessed using input.records[0]. |
Manual trigger, Post-Create, and Post-Update triggers |
input.params[‘api_body’]
|
The payload of the request in case of the custom API endpoint trigger. | API trigger only |
input.params.<param_name>
|
Inputs that are specified using the Input Parameters option in a playbook. |
All |
request.headers
|
All the headers sent with the request that invoked the playbook. | All |
request.headers[‘X-RUNBYUSER’]
|
The IRI of the current user who triggered the playbook. | All |
previous
|
Specific to the Update trigger. It shows the original version of the record data before being changed. |
Update trigger only |
resource
|
The module targeted by the playbook. | Database triggers |
request
|
The full request object that initiated the playbook. | All |
request.data
|
The cleaned data, if in JSON format, associated with the request.body. |
All |
request.method
|
The RESTful method by which the playbook was triggered, only POST or PUT. |
All |
Database Triggers (On Create, On Update, and On Delete)
In the case of a database trigger, such as On Create, the record which triggered the playbook is included within the API request and is accessible. The format of the record data will be identical to the format accessible within the standard Module endpoint for that record type.
Sample Data
Standard keys for data available within the vars.input.records[0] includes the following when it comes from an internal trigger, such as a On Create. The % indicates a placeholder for data that would be present in a real request in the general format.
{
	"auth_info": {
		"auth_method": "CS HMAC"
		},
	"currentUser": "%CURRENT_USER%",
	"last_run_at": null,
		{
		"input": {
		"records": []
		},
	"request": {
	"method": "PUT",
	"body": "%RAW DATA INCLUDED IN THE BODY OF THE REQUEST",
	"query": [],
	"data": {
		"%CLEANED DATA OBJECT FOR RECORD IF IN JSON%"
		},
	"baseUri": "https://fortisoar.sampleurl.com",
	"uri": "https://fortisoar.sampleurl.com/api/3/%MODULE%/%UUID%",
	"headers": {
		"connection": "keep-alive",
		"x-php-ob-level": 1,
		"origin": "https://forisoar.sampleurl.com",
		"authorization": "Bearer %token%",
		"user-agent": "%AGENT%",
		"cookie": "%COOKIE%",
		"accept": "application/json, text/plain, */*",
		"content-length": "%%",
		"referer": "https://fortisoar.sampleurl.com/modules/%MODULE%/%UUID%",
		"content-type": "application/json;charset=UTF-8",
		"accept-encoding": "gzip, deflate, sdch, br",
		"host": "fortisoar.sampleurl.com",
		"accept-language": "en-US,en;q=0.8"
		}
	},
	"previous": {
		"data": {
		"%DATA OBJECT FOR PRIOR RECORD%"
		}
	},
	"resource": "%MODULE%",
}|
|
As part of consolidating inputs for various types of triggers, all request parameters for all the different types of triggers have been consolidated under |
Manual Triggers
The Manual trigger payloads have a similar structure to the database triggers, and the payloads of both manual and database triggers are accessible using vars.input.records. The records array is an array of JSON objects, one object for each record that was passed in as a part of the request.
For instance, if you click the Execute button on the grid by selecting five record checkboxes, the data from all five records will be included in the records array in their raw format.
The Manual Trigger step also provides you with options to specify whether the action must be Executed Once or For Each Record. This enhancement makes it more effective to handle multiple selections since now you do not require to write two playbooks and map the second playbook in the first playbook. For more information, see Manual Trigger.
Custom API Endpoint Triggers
Internal triggers will always have a JSON format, but Custom API Endpoint triggers are initiated from external systems and might not always come in JSON format. Currently, custom Custom API Endpoint triggers can accept any format of the inbound body data, but this data might not be accessible within the environment in a structured way.
As an example, an XML request is not available in the environment until it has been parsed by a separate step. This can be done any time after the trigger step but must be done before referencing any variables that would be expected out of the XML structure.
|
|
XML can have a more sophisticated data structure than JSON and therefore, might require custom parsing for correct handling of XML data. A custom parsing step to convert XML to a dictionary format is present in the Utilities connector, "Convert XML to Dictionary". |
Referenced Trigger
The Referenced Trigger step will always be called from another playbook. Therefore, it can get the environment using input.params.<param_name>.
Bear in mind that chaining multiple playbooks can overwrite the variables in your environment, such as the request object. Use the Set Variable step to give unique names to prevent this from happening. You can use the Set Variable step, to create an input parameter with a unique name that will be available in the parent (calling) playbook. To add an input parameter, in the playbook designer, click the Tools menu and select Edit Parameters.
Data Inheritance
See the References section to understand how data inheritance works in FortiSOAR.
Playbook Steps
At the core of Playbooks are Steps. Steps represent discrete elements of data processing during the course of the Playbook.
|
|
|
Steps can be linked together in sequences to determine the flow of the Playbook, starting from the Trigger.
The Playbook Designer displays Playbook Steps only after you have added a Playbook Trigger.
Use dynamic values or variables in playbooks to access values of objects or perform lookups. Dynamic values can be passed to playbook steps as arguments directly, or they may be embedded in a larger string, where they will act more as global variables, getting replaced by a string representation of themselves. For more information, see the Dynamic Variables chapter. You can also use Dynamic Values to generate jinja templates, which can dynamically define various conditions within steps in a playbook. For more information, see the Dynamic Values chapter.
|
|
In case of any playbook step, if the input value for any field is in the JSON format, then you must enter the data in single quotes for example, |
To update a picklist using a playbook, you can directly add the jinja for the picklist in the {{"picklist name"|picklist("itemvalue of picklist")}} format, for example, {{"AlertStatus"|picklist("Open")}}. The IRI Lookup option in the Dynamic Values dialog also allows you to select a picklist. For more information, see the Dynamic Values chapter.
Click the Dynamic Values ( ) button to toggle fields such as, Date/Time, Rich Text, File Selector, Picklist, Lookup, and Checkbox fields and add custom (jinja) expressions to these fields. Ability to add jinja expressions to these fields enables you to write advanced playbooks. Once you click the Dynamic Values button, you can also use the Dynamic Values dialog to add expressions to these fields. For more information on the Dynamic Values dialog, see the Dynamic Values chapter.

Once you have saved the step, a graphic representing the step displays on the designed canvas in the upper left corner. You can create a link between the trigger and the step, for more information, see the Introduction to Playbooks chapter.
Double-clicking on the step reopens it and allows the user to edit the step or delete the step entirely by clicking Delete Step.
You can add variables, loops, conditions, and custom messages directly in the playbook step itself, and they get added in the Step Utilities section. You can also add a sample output (mock output) for cases where you do not want to execute a step but mock the output so that the playbook can move forward. You can also click the Yes/No button beside the Ignore Error checkbox to allow the playbook to continue executing even if the playbook step fails. These actions that you can use to extend a playbook step are present in the footer of the playbook step as shown in the following image:

Playbook actions used for extending playbook steps
Condition
To add a condition to a step, click the Condition link that is present in the footer of the playbook step. Clicking the Condition link adds the When textbox, in which you add the expression (condition) based on which the decision to execute the playbook step is taken. If the condition is met, then the playbook step is executed. If the condition is not met, then the playbook step is skipped.
If you use when without the for each loop, then it applies to the step level and determines whether the playbook step will be executed or not and it is the first thing that is evaluated for the step. If you use when with the for each loop, then it applies inside the for loop for each item.

Variables
To add a variable to a step, click the Variables link that is present in the footer of the playbook step or add the variable in the Variables section of the step. Using Variables you can store the output of the step directly in the step itself. Therefore, instead of having to use the Set Variable step frequently within a playbook to collect specific response data and provide a contextual name to the output, you can use Variables in the step itself. You can also store custom expressions in variables, which can be accessed within the playbook.
|
|
Do not use reserved words, which are listed in the List of reserved keywords section as the variable name. |

Click the Open Code Editor in Fullscreen button to open a code text editor making the experience of adding and editing the code more user-friendly. Clicking the Open Code Editor in Fullscreen button opens the code editor in the full-screen mode. To exit the full screen, press ESC or click Exit Fullscreen.
Use Dynamic Values to add or store the output of the current step directly in the step itself as shown in the following image:

For more information on Dynamic Values, see the Dynamic Values chapter.
Loop
To iterate the playbook step, click the Loop link that is present in the footer of the playbook step. There are two types of loops that you can add to a playbook step: the for each loop and the do until loop.
The for each loop can be added only once in a playbook step. The input for the for each loop is an array of objects and the for each loop iterates for the length of the array. To access the object of an array use the reserved keyword item. An example of an array of alerts objects is [{"name":"Alert Name1"},{"name":"Alert Nam2"},{"name":"Alert Name3"}] and to access an object of an array, use vars.item.name. You can optionally add a condition to the for each loop, based on which the loop will be executed.
The Loop option has three modes: Bulk, Sequential, or Parallel.

The Bulk mode creates all records in a single API request and is the most optimal and recommended method of creating or upserting records in bulk. This is also the default mode when you add a new "Create Record" or "Update Record" step in a loop. If you are inserting larger number of records that causes the API call to time out, then you can insert records in batches. For more information, see the Batching large datasets when using the 'Bulk' option section.
The Sequential modes sends the API records separately for individual records, and one after another. So, the playbook step can abort at the first failure, without proceeding to create further records. The Parallel modes sends separate API requests for each record creation but using multiple threads to do so.
You can choose whether you want to execute the playbook step in parallel or in a sequence for the given items. Sequential execution of the loop works on one item at a time in a serial manner, whereas parallel execution utilizes multiple parallel threads to work on the items, resulting in better performance. You can choose your option using the Execution toggle as shown in the following image:

The workflow engine can execute multiple independent paths in parallel threads. Parallel branch execution means that two or more paths execute the independent paths in parallel. This enhancement is transparent to the end-user, but in some cases, this could lead to a change in the behavior of certain playbooks compared to the old sequential behavior as the step execution order might change. If any of your existing playbooks fail due to a previous step result not found, or similar reasons, you can run a test to find out the cause of the failure by turning off the parallel execution feature.
You can enable or disable parallel execution by changing the value (true/false) of the PARALLEL_PATH variable in the [Application] section in the /opt/cyops-workflow/sealab/sealab/config.ini file. By default, the PARALLEL_PATH variable set as true.
You can also tune the thread pool size and other settings for parallel execution. For more information about settings that you can set for optimizing your playbooks, see the Debugging and Optimizing Playbooks chapter.
You can also execute the referenced playbook asynchronously from the parent playbook by clicking the Run Asynchronously checkbox. In this case, the reference playbook can be triggered asynchronously and parent playbook continues to execute the remaining workflow, without waiting for the referenced playbook to finish.

|
|
If you select a child playbook to be executed as asynchronously, then you will be unable to use the output of the child playbook in the parent playbook. Therefore, you must be cautious while using asynchronous mode, and should only use this mode when you want to execute child playbooks independently. For example, in the case where you want to ingest the records and not perform any action on the output. |
The do until loop will execute the step at least one time and will continue to run until the condition specified is met, or the number of retries is reached. You can configure the number of retries the playbook step will execute to meet the condition and also the delay in seconds before the step gets re-executed in a loop. By default, the number of retries is set to 3 and delay is set to 5 seconds.
In a do until loop, you can access the result of the current step with the vars.result notation. For example, to keep trying to run a connector action until it is successful, you can set the condition to vars.result.message == 'Success'. You would also need to check the Ignore Errors box to ensure the playbook does not stop if that step fails.
|
|
Do not use |

Message
You can add a custom message for each playbook step to describe its behavior. You can also use Dynamic Values to add jinja values to the messages. Dynamic Values also displays the output of the current step in the Message step. For more information on Dynamic Values, see the Dynamic Values chapter.
These messages appear in playbook logs and are also displayed as part of the collaboration panel. The Message content can be rendered in HTML or Markdown, depending on the whether you have set the Contents field in the "Comments" module to Rich Text (Markdown), which is the default or as Rich Text (HTML). The following image displays the Message content in the default Markdown editor:

You can also add the custom message to another record(s), by clicking the Add above message to specified record(s) check box. If the Add above message to specified record(s) check box is selected and you have provided the IRI of the record(s) to whose collaboration panel the message requires to be added, then the message is added to collaboration panel of those record(s). If the Add above message to specified record(s) check box is selected and you have not provided the IRI of the record(s) to whose collaboration panel the message requires to be added, or you have not selected this check box, then the message is added to collaboration panel of record that triggered the playbook.
In case of multi-tenant configurations, if a playbook that contains steps with "Messages" is added to the record that triggers the playbook on the master node, you can choose to replicate the comments that are linked to the record on the tenant node, so that a user on the tenant node can follow the investigation that is being conducted on the record. To replicate comments on the tenant node, click the Also send this message to specified tenant checkbox, and from the Select Tenant drop-down list, select the tenant node on which you want to replicate the comments or click {} to specify tenant IRIs in this field.
Mock Output
You can mock a step output in cases where you do not want to execute the playbook step but ensure that the playbook can move forward using the mock output. This can be useful when you want to debug playbooks. You can also use Dynamic Values in the Mock Output step.

|
|
If you want to use mock output for your playbook steps, then you must add a variable named 'useMockOutput' and set its value to 'true,' using the Variables option in the trigger step. If you do not declare this variable or set the value of this variable to 'false,' then the playbook will use the actual step outputs for execution. Also, ensure that you write |
Ignore Error
You can click the Yes/No button besides Ignore Error to allow the playbook to continue executing even if the playbook step fails.
However, in the playbook log, the status of this step will be Finished with Error. Open the playbook log by clicking the Executed Playbook Logs icon ( ) that appears on the top-right corner of the FortiSOAR screen. Click the step whose log you want to view, and in the
 Step View section, the status of the playbook is displayed in the status item, and the error is described in the result item.
The following sections explain the various steps used in playbooks.
Core
Create Record
Use the Create Record step to create almost any record type in the system. All required fields must be entered to match the model metadata for that specific record type. To create a record, select the module in which you want to create the record from the Model drop-down menu, which displays the Create Record form (Form Editor). Note that the fields displayed are specific to the entity type selected, and any conditional data requirements will be activated the same way as if the record was being added using the entity's model itself.
In the Create Record, Update Record and Ingest Bulk Feed steps, fields are divided into 2 tabs - The Primary tab, which lists all the primary fields and the Correlations tab, which lists all the correlated fields. Each tab has their own search box to search for fields. Search will be work on all the fields in the module and not on just fields displayed in the step. 
To enhance the performance of these steps, only the first 30 fields are loaded in both the Primary and Correlations tabs, after which you will see a Load More Fields button. Clicking the Load More Fields button loads the next 30 fields, and this continues till all the primary fields in the modules are listed.
Note: If there are required fields in the module, then all the required fields are listed. If required fields are more than 30 then the initial field limit of 30 will be ignored, and all the required fields are listed; post-that if there are more fields left then the Load More Fields button is displayed. Also, once you reopen the Create Record, Update Record, or Ingest Bulk Feed steps, the fields that contain values after the required fields are displayed, followed by the Load More Fields button (if there are more than 30 fields).
If the data entity needs to reflect data specific to the entity that triggered the playbook, then use dynamic values in the fields.
|
|
To set the name of the incident name of the triggering entity, put the following in the Name field: |
Module editor supports the "JSON" field type. You can also convert data of a field of type text to JSON, using the toJSON Jinja filter. For example, {{ vars.result.data | toJSON }}.
If the fields of the record being entered will always have the same data, enter the text in the corresponding fields and click Save.
If in the Create Record step, you are specifying any Date/Time field in the jinja format, then that date/time field must be in the epoch format. To convert the input date/time field to the epoch time, you can either add the following Jinja value: {{arrow.get(jinja variable).timestamp}} or use the DateTime Expression library to enter the data directly in the JSON format by clicking the Dynamic Values () button button. Clicking Dynamic Values ( ) button displays
 Dynamic Values, which displays the fields that you can directly edit either in the format of an attribute map (Tree view) or code (Code View).
Important: In version 7.0.0, FortiSOAR has updated the arrow library due to which the timestamp attribute has been changed into int_timestamp for DateTime jinja expressions. New playbooks must use the int_timestamp for any DateTime jinja expressions. For more information see the Dynamic Variables chapter.
You can also specify the date by clicking the Select Date link, which displays the Calendar from which you can choose the date/time.
From version 7.0.0 onwards, in case of the 'Create Record' and 'Update Record' steps, if your administrator has enabled any 'Lookup' or 'Picklist' type of field to accept the values generated from the recommendation engine, then you will see an Auto populate checkbox appearing beside this field.
|
|
To auto populate values in related (many-to-many) fields, in the 'Create Record' and 'Update Record' steps, ensure that the input provided in the playbook is the 'array' (list) format, and not 'comma-separated values'. For example, if you want the Indicators multi select picklist to be auto populated with common indicators in alerts records, then you must ensure that the indicators list that you provide in the playbook that contains the 'Create Record' or 'Update Record' step is in the 'array' (list) format. |
A example of a field that has been enabled for recommendation is the 'Type' field in the following image:

If you select the Auto populate checkbox, and users have not specified any values for such fields, then the value of such fields get auto-populated with the values from the recommendation engine that is based on learning from past similar records.
It is possible to relate records with any valid relationships in the system. You can link the record that you are creating to a record in a related module. The Create Record step now displays a list of modules, in the Correlations field to which you can link the record that you are creating. For example, if you want to create an alert and therefore you have selected Alerts from the Model drop-down menu, the Create Record form will display related linking module fields, such as Incidents, Indicators, Assets, and Attachments. The Create Record step (for the upsert cases) and the Update Record step, the Correlations field, displays the records that are already linked to the created record. You can choose to overwrite the older relationships that are added to the created record, by clicking the Overwrite option in the Correlations field or append the new relationships to the relationships that are already added to the created record, by clicking the Append option in the Corrleations field.
To link the newly created record, in the linking module field, add the IRI of the record to which you want to link the newly created record or add the respective jinja values. You can link multiple records using multiple comma-separated IRIs. For example, to link an alert that you are creating to an incident record, select Alerts from the Model drop-down menu and in the Incidents linking module field, add the IRI of the incident record, such as /api/3/incidents/9a1142d2-adbf-4faf-a477-d8ff54419808 or add the jinja value or the incident record, such as: {{vars.input.records[0]['@id']}}. You can also use the array format to specify the IRI, ["/api/3/incidents/9a1142d2-adbf-4faf-a477-d8ff54419808"], or also add the jinja value in the array format, ["{{vars.input.data.records[0]['@id']}}"]. To get the IRI for a record by navigating to the related module (Incidents in our example), for example, Incident Response > Incidents and select the record that you want to link. In the address bar, you will see the complete URL for that record. For example, https://{{Your_FortiSOAR_IP}}/modules/view-panel/incidents{{UUID}}
https://{{Your_FortiSOAR_IP}}/modules/view-panel/incidents/9a1142d2-adbf-4faf-a477-d8ff54419808.
|
|
It is recommended that you do not link more than 99 records in a single call. If you need to link more than 99 records, then run the update step in a loop with batches of 99 records. |
The behavior of linking records relationships has changed in version 7.0.0 because if there is a record that is linked to thousands of other records, an update to such records causes constant high CPU usage. An example of such a record would be indicators like org name that get extracted as part of every alert and get linked to thousands of alerts. Therefore, it is recommended that you link a maximum of 99 records in a single call. This is because, if there are less than 99 records linked then the framework checks if the record being linked is already present in existing relations and if the same record is linked again and again, post-update triggers on relation "isChanged" is not triggered, also the linking is not audited again every time. However, from the 100th linked record, the framework only looks at the __link, __unlink keys, and hence, if the same record is linked again and again, post-update triggers on relation "isChanged" will get triggered, and also the linking gets audited again every time.
When you are creating a record using a playbook you can also enforce record uniqueness by defining unique constraints on the records of a module. For information on how to define record uniqueness using the Module Editor, see the Application Editor chapter in the "Administration Guide."
For modules that have unique constraints defined, the option that you choose in the Unique conflict settings section determines the behavior of the playbook:
- Stop the create process: This is the default behavior. The playbook fails if a duplicate record is found.
- Do not create a new record (keep the existing intact): The playbook does not make any changes to the existing record and the existing record is returned as is as a result of execution of this step. The subsequent steps of the playbook work on the existing record if they refer to this step result.
- Update existing record (all fields): The playbook updates the existing record with the new values that you have specified in this step.
- Selectively update some fields of the existing record: The playbook updates selective fields and/or correlations of the existing record with their updated values. Select this option if you don't want to replace all the fields of an existing record. For example, if an indicator does not exist, then you would want to create an indicator record with its reputation set to 'TBD'; however, if the indicator record exists, then you would want to only increase its sightings, i.e., update its reputation.
You can specify the fields that you want to update in the Select Field box:
For example, if Source ID is specified as a unique constraint on an "Alert" module, then you cannot create a record having the same source ID. However, if you have selected the Update existing record (all fields) or the Selectively update some fields of the existing record option, then either the complete existing record is replaced with the updated values or selective fields of the existing record are replaced with their updated values.
You can also update the correlations if you select the Selectively update some fields of the existing record option, For example, if you have created an alert and then extracted an indicator, for example, gumblar.cn with its status and reputation set as 'TBD'. Then enrichment playbooks are run which update the reputation to 'malicious', and investigation playbooks are run which update the status to 'blocked'. Now, another alert with the same indicator gumblar.cn get extracted with its status and reputation set as 'TBD'. Now, you have the option to update only selective fields in the correlation like reputation or last seen for the indicator.
Note: If you have imported playbooks into your FortiSOAR system or have upgraded your FortiSOAR system, and you have playbooks that contain the 'Create Record step with the Upsert' option, i.e., you have selected the Update existing record (all fields) option, then such playbooks will update only those fields that are selected by users for upgrade, the remaining fields are ignored.
|
|
Upsert behavior for uniqueness will not work for fields that are marked as encrypted. |
You can add tags in the Create Record and Update Record steps. You can add tags to the record that you are creating using the Tags field. Special characters and spaces are also supported in tags; however, the following special characters are not supported in tags: ', , , ", #, ?, and /. Tags are useful in searching and filtering records. When you are updating a record, the Tags field, displays the tags that are already added to the created record. In the Create Record step (for the upsert cases) and the Update Record step, you can choose to overwrite the older tags that are added to the created record, by clicking the Overwrite option in the Tags field or append the new tags to the tags that are already added to the created record, by clicking the Append option in the Tags field.
Once you create the Create Record step, the playbook is automatically prompted to create a data record as specified in the step with either specific static text or record-relevant data using dynamic values.
When a record is created from a playbook, then that record's ownership includes the teams that are part of the "Playbook Appliance" including the admin team (SOC team). So, the record will be visible to all members of the teams that are part of the "Playbook Appliance", and their siblings and parents in the team hierarchy. If you want to change the ownership of the record, in the playbook, after the step to insert the record, add the immediate next step that will assign the desired team or user as the owner of the record.
Create or Upsert Records in Bulk
You can also create or upsert records in bulk by using the Bulk option in the for each loop for "Create Records" and "Update Records." To create multiple records in a single request, for example, while ingesting from a data source, select the Loop option in the "Create Record" step. The Loop option has three modes: Bulk, Sequential, or Parallel. Provide the list of JSON inputs containing the sourcedata as the input to the loop and refer to each element as {{ vars.item }} in the step. For example, if you can provide the following JSON as input to the Loop option in the Create Record step to create alerts in FortiSOAR:
[{"name": "Name 1", "source": "FortiSIEM"}, {"name": "Name 2", "source": "FortiSIEM"}]
You can ensure that the two alerts created in FortiSOAR have the corresponding names by using {{ vars.item.name }} against the Name field in the step.

The Bulk mode creates all records in a single API request and is the most optimal and recommended method of creating or upserting records in bulk. This is also the default mode when you add a new Create Record step in a loop. The Sequential modes sends the API records separately for individual records, and one after another. So, the playbook step can abort at the first failure, without proceeding to create further records. The Parallel modes sends separate API requests for each record creation but using multiple threads to do so.
Batching large datasets when using the 'Bulk' option
A single batch can handle 100 to 200 records depending on the record size. If you are inserting larger number of records that causes the API call to time out, then you can insert records in batches.
From version 7.0.0 onwards, the 'Bulk' option has been enhanced to support batching of large number of records, by default, in the Create/Update record steps. To support this, the 'Batch Size' option for the Bulk execution type has been added making it easy to bulk insert, upsert, or update large number of records. By default, the batch size is set to 100 records. You can increase or decrease this batch size depending on the record size. The following image shows a sample 'Create Record' step that is inserting a batch of 100 records:

Update Record
Use the Update Record step to update a record in a module within FortiSOAR.
In the Playbook Designer, click the Update Record step and add the step name in the Step Name field, add the field to be updated in the resource field, add the module name and UUID of the record to be updated in the collection field (for example, you want to update the Alerts module, you will enter api/3/alerts/{{uuid}}), and then click Save.
The UI of the Update Record step displays an Update Record form that contains fields depending on the module you select in the Model drop-down menu, like the Create Record Step.
You must add the UUID or IRI of the Record you want to update in the Record ID field. In the Record ID field add either the IRI of the record that you want to update or add the jinja value of the record.
You can add details and field values to the "Update Record" step similar to the "Create Record" step.
If in the Update Record step, you are specifying any Date/Time field in the jinja format, then that date/time field must in the epoch format similar to the "Create Record" step. You can use the methods described in the "Create Record" step to convert the input date/time field to the epoch time. However, there is a difference between the "Create Record" step and the "Update Record" step, if you choose to enter the data directly in the JSON format by clicking the Dynamic Values button, which displays Dynamic Values. Dynamic Values appears empty in the case of Update Record (unlike the Create Record step, which displays fields according to the module you have selected) since you require to add only those fields in the JSON format that you want to update and do not require to see all the fields.
Once you add the record ID, you can update any of the fields of that record in the Update Record form directly and click Save. Once you click save, the data in the record that you specify by the record ID gets updated based on the changes you have made.
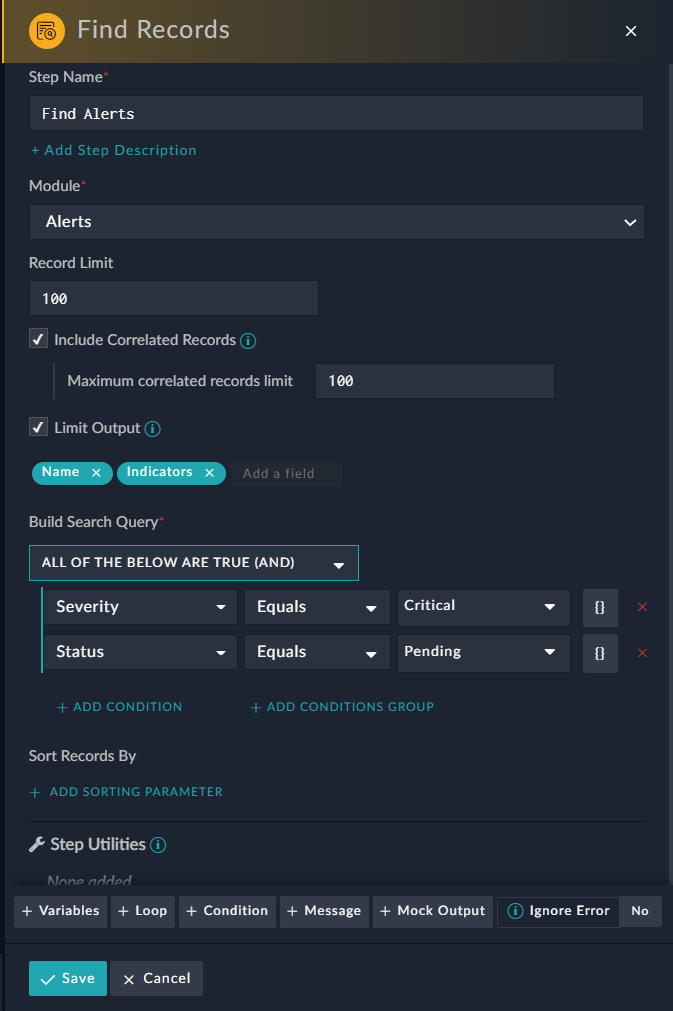
Find Records
Use the Find Records step to find a record in a module within FortiSOAR, using a query or search criteria.
In the Playbook Designer, click the Find Records step, and add the step name in the Step Name field, and then select the module in which you want to search for the record in the Module field.
The Find Records step by default fetches only 30 records, if you want to change the number of records to be fetched, then enter the number of records to be fetched in the Record Limit field. For example, in the following image above we have entered 100 in the Record Limit field, which means that up to 100 records will be fetched.
|
|
From version 7.0.0 onward, the number of records that can be fetched using the 'Find Record' step has been limited to 5000. To override this default number, which is Not Recommended, you need to follow the steps mentioned in the Increasing the number of records that can be fetched using the 'Find Record' step topic. |
To include records that are correlated with the records that are being fetched using the 'Find Records' step. If you want to include correlated records, then select the Include Correlated Records checkbox. By default, the Include Correlated Records option is cleared for performance efficiencies. Once you select the Include Correlated Records checkbox, you can specify the maximum number of correlated records that you want to fetch in the Maximum correlated records limit field. Specifying the maximum number of correlated records to be fetched can help in avoiding the playbook timeout issue. The number that you can specify in the Maximum correlated records limit field must be a positive number and must be greater than '1'. By default, the number of correlated records to be fetched is limited to '100' correlated records.
Note: If Include Correlated Records option is cleared, then you can select only fields of the selected module. Therefore, to be able to choose related records such as indicators tasks, etc., you must ensure that you select the Include Correlated Records option.
You can select the Limit Output checkbox, to limit and refine your search results to only those fields that you require allowing for better usability and performance. For example, if you want to limit the output to display only the "name of the record" and "related indicators", then you should select the Limit Output checkbox and in the selection box that follows the Limit Output checkbox, select name, and indicators.
From the Module drop-down list, select a module in which you want to search for records. Once you select the module, the Nested filters component appears in the Build Search Query section using which you can build the search query to find records and the click Save.
You can use Nested filters to filter records using a complex set of conditions. Nested filters group conditions at varying levels and use AND and OR logical operators so that you can filter down to the exact records you require.
|
|
If you assign a "Custom" filter to a datetime field, such as Assigned Date, then the date considered will be in the "UTC" time and not your system time. |
For more information on nested filters, see the Nested Filters topic in Dashboards, Templates, and Widgets in the "User Guide."
|
|
You cannot search or filter encrypted fields. |
You can also write Jinja to build your search query in the Nested filters component in the Build Search Query section. You can either write you own Jinja or use the Dynamic Values dialog to add jinja to the field. See the Dynamic Values chapter for more information. You can also toggle between the Jinja and the original field type, for example in the image above; the Severity field displays the field as a drop-down list (which is the original field type). Click the icon to enter Jinja for this field. Similarly, the Status field displays the Jinja that has been entered in the field. Click the  icon to toggle back to the original field type, which is a drop-down list.
You can also search records using a UUID. To search using UUID, in the Nested filters component in the Build Search Query section, select UUID from the Select a field drop-down list, select the operator such as Equals from the Select Operator drop-down list, then click the filter field to display the Dynamic Values dialog. Click the Expressions tab and then click the IRI to UUID expression:

In the Utility Operations: IRI to UUID popup, enter a valid FortiSOAR IRI and click Add:

You can either add the IRI value directly or again use Dynamic Values to enter a jinja expression for the IRI. For more information, see the Dynamic Values chapter. The Utility Operations: IRI to UUID converts a valid IRI to a UUID using which you can search for records.
You can also sort the fetched records easily by clicking the Add Sorting Parameter link and choose the field based on which you want to sort the records in the Sort Records by section. You can also specify whether you want to sort the records in the Ascending or Descending order. For more information on sorting records, see the Default Sort topic in Dashboards, Templates, and Widgets in the "User Guide."
Increasing the number of records that can be fetched using the 'Find Record' step
From version 7.0.0 onward, the number of records that can be fetched using the 'Find Record' step has been limited to 5000. It is not recommended to change the value to a higher number and instead, you should use pagination by making an API call and navigate to the next page in a loop. However, if you yet want to override this default and increase the number of records to be fetched, do the following:
- Edit the
/opt/cyops-api/config/parameters_prod.yamlfile to add the following code:api_platform:collection:pagination:maximum_items_per_page: 5000
Change the value of themaximum_items_per_pageparameter from '5000' to the desired number.
Important: The above code must be added at the same level as 'parameters' in theparameters_prod.yamlfile. - Restart php-fpm and run cache clear:
# systemctl restart php-fpmsudo -u nginx php /opt/cyops-api/bin/console cache:clear
Ingest Bulk Feed
Use the specialized Ingest Bulk Feed step to insert and update large volumes of records, primarily used while ingesting from Threat Intel Feeds, or others such as Vulnerabilities and Assets.
The step is significantly faster than the "Create Record" step. Currently, however, only primary fields, tags, lookups, and picklists are supported in the Ingest Bulk Feed step. You cannot add many-to-many relationships while adding records through this step.
Some specifics about this step:
- A single audit entry is created for a batch of records inserted and not a per record audit.
- Records created using this step are not peer replicable (master or tenant nodes in a multi-tenancy environment).
|
|
Playbooks with the 'On Create' or 'On Update' trigger will not work in the case records are ingested using the 'Ingest Bulk Feed' playbook step. |
Set Variable
Use the Set Variable step to record a specific variable or variables for future use. Enter the variable name in alphanumeric characters and then define the value. The value may be a dynamic value itself. The scope of the variable created using Set Variable is local.
To create a variable, in the Playbook Designer, click the Set Variable step and add the Name and Value for the variable and then click Save. You can define multiple set variables in a playbook. To add dynamic values (Jinja) or variables, or access values of objects, or perform lookups, click the Dynamic Values button to display the 'Dynamic Values' popup. For more information, see the Dynamic Values chapter.
You can also click the Open Code Editor in Fullscreen button to open a code text editor making the experience of adding and editing the code more user-friendly. Clicking the Open Code Editor in Fullscreen button opens the code editor in the full-screen mode. To exit the full screen, press ESC or click Exit Fullscreen.
|
|
Do not use reserved words, which are listed in the List of reserved keywords section as the variable name. |
Once defined, the variable can be referenced in any remaining steps or in any child playbook, regardless of how many levels deep, the child playbooks are called.
The format for calling a variable is {{vars.%name%}}.
|
|
You can declare variables directly in the step, using the Variables option. See Variables for more information. |
Evaluate
Decision
The Decision step serves as conditional validation within the playbook. You can specify "if this, then that" criteria that directs the playbook to execute specific steps based on the results of a specific condition. Many organizational processes differ depending on particular criteria, and to accomplish this; you can use the Decision step.
Use the Decision step to allow the playbook to specify, "If criteria = x, then do this next step." However, you can configure the Decision step with a variety of operators (equals, does not equal, <, >, etc.) and you can even chain logical conditions with AND/OR logic, allowing the organization's playbooks to define granular specifications for executing a specific sequence of steps.
To add a decision step to a playbook, click the Decision step. Initially, the Playbook Designer displays only the Step Name field, with no conditions. Type the step name and click Save. You can either create a Decision step with just the Step Name specified for now or create the possible conditions first then create the Decision step and then identify the condition once the Decision step and the potential outcome steps are connected. You can also define the entire step setting, or workflow, for the decision step, even if the connecting step is unavailable, allowing you to write the complete logic of the decision and then plug in the steps later.
The decision step functions in such a way that it evaluates multiple (alternative) conditions until any of them is fulfilled. This means that when the Decision step finds one condition that is fulfilled, then it skips the other conditions. If none of the conditions are fulfilled, then the default condition or route is defined.
You can define a default route that the playbook should take if none of the defined conditions are fulfilled. You can also add a description to describe the various routes that can be taken by the playbook.
Example
A playbook execution route is based on the severity of the alert that gets created in the system at the hands of a third-party integration. If the alert that is created is not assigned any severity or a severity that does not match the severity that is defined in any of the conditions, i.e., Low or Minimal in our example, then it follows a default assignment, which is that the alert record assignment is updated to a Tier1 Analyst. This would be Step A Alert Assigned to Tier1 Analyst. If the alert is created with Critical severity, then that alert gets assigned to an Administrator (CS Admin). This would be Step B Alert Assigned to CS Admin. If the alert is created with High or Medium severity, then that alert gets assigned to a Tier2 Analyst. This would be Step C Alert Assigned to Tier2 Analyst.
The steps to create a playbook based on the above example are as follows:
- Create a playbook, for example,
Alert AssignmentPlaybook.
FortiSOAR displays the Playbook Designer. The procedure for creating playbooks is mentioned in the Playbooks Overview section. - Add a On Create trigger, by clicking On Create Trigger in the
Playbook Designer, type the name of the step in the Step Name field, for example,Alert Creationand then from the Resource drop-down list select the module on whose creation you want to trigger the playbook, for our example selectAlertsand then click Save. - Drag-and-drop a connector point to connect to another playbook step. FortiSOAR adds a placeholder step on the playbook designer page and opens the
Stepstab which displays all the available playbook steps. Click the Decision step and type the step name asAssignment Based on Severityand click Save. - Drag-and-drop connector points from the
Assignment Based on Severitydecision step and create the routes that the user can follow, i.e., create Step A, B, and C - Create Step A, where the alert is created with no severity, as follows:
- Click Update Record.
- Type the name of the step in the Step Name field, for example,
Step A Alert Assigned to Tier1 Analyst. - From the Model drop-down list, select Alerts.
- In the Record IRI field, use the Dynamic Values dialog and select the current record,
Input > Records > module > alerts > @id. - From the Assigned To drop-down list, select Tier1 Analyst, and click Save.
Note: The DateTime field in a playbook step, for example, in a condition step, does not have the "Is Null" option in the Select Operator drop-down list.
- Create Step B, where the alert is created with Severity Equal to Critical, as follows:
- Click Update Record.
- Type the name of the step in the Step Name field, for example,
Step B Alert Assigned to CS Admin. - From the Model drop-down list, select Alerts.
- In the Record IRI field, use the Dynamic Values dialog and select the current record,
Input > Records > module > alerts > @id. - From the Assigned To drop-down list, select CS Admin, and click Save.
- Create Step C, where the alert is created with Severity Equal to High, as follows:
- Click Update Record.
- Type the name of the step in the Step Name field, for example,
Step C Alert Assigned to Tier2 Analyst. - From the Model drop-down list, select Alerts.
- In the Record IRI field, use the Dynamic Values dialog and select the current record,
Input > Records > module > alerts > @id. - From the Assigned To drop-down list, select Tier2 Analyst, and click Save.
- Add conditions to the Decision step as follows:
- For the Default Step:
- Click Add Default Condition.
If you want to use jinja to add advanced expressions and create complex conditions, you can click the Show Advanced link and add jinja in the condition text box. By switching to the 'Advanced' mode, you have complete flexibility to write Jinja-based conditionals, such as:- Checking if a key exists in the json:
"x" in vars.variable - Comparisons:
vars.variable == 5
vars.variable >= 5
vars.variable != 5
vars.variable != []
- Checking if a key exists in the json:
- From the Select A Step to Execute, select Step A Alert Assigned to Tier1 Analyst.
You can optionally also add a tooltip, that describes the route this step or condition will take.
- Click Add Default Condition.
- For the alternative steps:
- Click Add Condition.
- In the
Condition 2section, use the Condition Builder to build the Severity Equals Critical condition as follows: From the Select a field drop-down list, select Severity, from the Operator drop-down list, select Equals, and from the Select drop-down list, select Critical.
Click the Show Advanced link and add jinja in the condition text box to add jinja-based conditionals. - From the Select A Step to Execute, select Step B Alert Assigned to CS Admin.
You can optionally also add a tooltip, that describes the route this step or condition will take. - Click Add Condition.
- In the
Condition 3section, use the Condition Builder to build the Severity Equals High or Medium condition as follows: From the Select a field drop-down list, select Severity, from the Operator drop-down list, select Equals, and from the Select drop-down list, select High, and from the Select Logical drop-down list select Or, and then select Severity, from the Operator drop-down list, select Equals, and from the Select drop-down list, select Medium. - From the Select A Step to Execute, select Step C Alert Assigned to Tier2 Analyst.
You can optionally also add a tooltip, that describes the route this step or condition will take.
- For the Default Step:
|
|
In case of the No Trigger step for the Condition Builder you must add advanced jinja expressions in the Condition field. In the case of the Manual Trigger, if you have selected multiple modules, then for the Condition Builder you must add advanced jinja expressions in the Condition field. |
Wait
Use the Wait step to specify the time, or the condition to be met, before a playbook resumes executing its steps. It helps define the specific time that the playbook has to wait, or conditions to be met, for an action to occur in an external system or to allow for SLAs to elapse before continuing with the course of the playbook. For example, investigation playbooks have to wait for indicator enrichment to complete before beginning the subsequent investigation.
To configure the Wait step, click the Wait step. In the Step Name field, type the name of the step, and optionally add a description of the step in the Description field.
In the Configuration section, choose For Specified (Default) or Until a Condition is Met as the wait type.
If you choose For Specified, enter the values in the Weeks, Days, and H:M:S (Hours, Minutes, and Seconds) fields in the Playbook will resume after section. This option specifies the time the playbook waits before executing the remaining steps:
You can also add custom Jinja expressions in the fields by clicking the Dynamic Values () icon. Click Save to save the Wait step.
If you choose Until a Condition is Met, specify the condition that needs to be met before the playbook executes its remaining steps in the Playbook will resume after condition meets section. For example, in the case of a playbook that requires to wait till indicators associated with alerts are extracted, you can add the condition as follows:
Additionally, you can also configure a time-based escalation for cases where the wait condition is not satisfied. Click Save to save the Wait step.
Once you have saved the step and the Wait step appears on the Playbook Designer canvas, place the Wait step between steps that require to wait for a specific time or the fulfillment of a specific condition.
|
|
If a child playbook contains a "Wait" step, then it runs synchronously with the parent playbook, i.e., the parent playbook will wait for the child step to complete and only then resume its workflow. Earlier, if a child playbook contained a wait step, it would run asynchronously from the parent playbook, i.e., the parent playbook would continue its workflow independent of the child playbook and without waiting for the child playbook to complete its workflow. |
Approval
Use the Approval step to halt the execution of Playbook steps until the approval is received from the person or team that you have specified as an approver. Only once the approval is received will the Playbook move ahead with the workflow as per the specified sequence. Until the approval is not received, the Execution Playbook Logs will display the Playbook status as awaiting. Once you complete adding an approval step, which includes adding the approver, the approver gets a notification for approval and the approver either accepts or rejects the approval request. Once an approval request is complete, the original playbook that contains the approval step resumes the execution of the remaining playbook steps. You can select only a single team or user as an approver.
The approval step includes Email as a mode of approval, apart from the default, which is system notification.
Permissions Required
- To view Approval notifications and provide approvals, you must be assigned a role that has a minimum of
ReadandUpdatepermissions on theApprovalsmodule andCreateandReadpermissions on thePlaybooksmodule. - To create a playbook and add an approval step or any other step, you must be assigned a role that has a minimum of
Create,ReadandUpdatepermissions on thePlaybooksmodule, and a minimum ofReadpermissions on thePeopleandSecuritymodules. - To add an approval step or any other step to an already existing playbook, you must be assigned a role that has a minimum of
ReadandUpdatepermissions on thePlaybooksmodule, and a minimum ofReadpermissions on thePeopleandSecuritymodules.
Examples of usage of an approval step:
- A case for when you can use an approval step could be when you have sent a URL to a third-party URL authenticator to identify whether the URL is malicious or not. If you get a report from the third-party URL authenticator that the URL is malicious, then you want to block that URL. However, before you block that URL, you require approval from the manager of your SOC, and therefore here you would use an approval step.
- Another example would be when you want an Incident to be deleted from the system. However, before the deletion, you require approval from an Incident Lead, and therefore here you would use an approval step.
Adding an approval step for System notification
- Open FortiSOAR and click Automation > Playbooks in the left navigation bar.
- On the
Playbook Collectionspage, click on an existing playbook collection.
This opens thePlaybookpage, click on the playbook in which you want to add an approval step.
This opens the playbook in thePlaybook Designer. - Click the Approval step in the
Evaluatesection. - For the Approval step, in the Step Name field, add the name of the step.
- From the Choose Approver drop-down list, choose Team or User, which displays a Select link. Clicking the Select link displays a
TeamorUserpop-up based on the approver type you have chosen.
The Team or User pop-up lists all the existing teams or users. Select the team or user who can provide approval. If you select Team, then any member of that team can provide the approval.
- In the Approval Description field, add the description of the approval request, can include the reason for the approval request.
The approvers can view this description in the approval notification. - (Optional) To add system or email as a mode of approval from the Choose Additional Approval Method drop-down list, choose System or Email.
If you do not choose anything from this drop-down list, then the approval notification appears only in the Pending Tasks panel. If you choose System, then the approval notification appears in both the Notifications and Pending Task panels. If you choose Email, you will receive a notification email for the approval and the approval notification will appears in the Pending Tasks panel.
- Click Save to save the approval step.
Playbook status for Approvals
Click the Executed Playbook Logs icon in the upper-right corner of FortiSOAR to view the logs and results of your executed playbook. Clicking the Executed Playbook Logs icon displays the Executed Playbook Logs dialog as shown in the following image:
- Until the approval is not received, the Execution Playbook Logs will display the Playbook status as
awaiting. - If the approval is rejected or granted, the Execution Playbook Logs the playbook continues to execute remaining steps, as defined for approval rejection or acceptance, and if the playbook completes executing all the steps, the Execution Playbook Logs will display the Playbook status as
finished.
For information on Execution History, see the Debugging and Optimizing Playbooks chapter.
Approval notification using the System mode
Once you complete adding an approval step which includes adding the approvers, the approvers get a notification for approval. Users who have the appropriate permissions for approval receive the notification. You can view the notifications for approvals in the Notifications and Pending Tasks panel. The Notifications and Pending Tasks icon is present on the top-right corner in FortiSOAR, and whenever a user gets an approval request the number present on these icons increases by '1'. Click the Pending Tasks icon to open the 'Pending Tasks' panel, where you can perform actions required for approval and to see detailed information on the same. Click the Approvals tab, to open the list of pending approvals. The approvals contain a link to the playbook and the description for the approval request. Clicking the approval displays the Approval Request dialog:
The approver can click Approve or Reject to approve or reject the request. The approver can also optionally add comments in the Comments field that explain the reason for the approval or rejection of the request.
|
|
When a user logs into FortiSOAR and uses the system method to approve a request, FortiSOAR displays 'Unauthorized access', though the original playbook resumes the execution of the remaining playbook steps and moves to the 'finished' state (if there are no further errors in the playbook). This is because the 'Approval' module inserts an approval record using a playbook the ownership of that record always remains with the SOC team (admin team) irrespective of the team or user who triggered the playbook. To solve this issue, you must add the team(s) who will provide approval to be part of 'Playbook Appliance.' For more information about Appliances, see the Security Management chapter in the "Administration" Guide. |
Once an approver completes an approval request, the notification dialog displays the approval request as approved using a green check symbol, and the notification is removed from the notification window.
Approval notification using the Email mode
If you have chosen Email in addition to the system as a mode of approval, an email will be sent to the email ID that has been configured for the users in their profile. See Security Management in the "Administration" guide for more information on configuring user profiles.
If you have selected a team to provide approval in the approval step, then the email notification is sent to all the team members, who have appropriate permissions, and any of the team members can provide approval.
The approval email notification contains a link to an Approval Request dialog, which contains the name of the playbook from which the request has been sent and also the description of the approval required. Once an approver clicks on the link in the email the Approval Request dialog is displayed, and the approver can click Approve or Reject to approve or reject the approval request. The approver can add comments in the Comments field that explain the reason for the approval or rejection of the request.
|
|
Users can choose to approve the request using the system mode as well since apart from the email notification; a system notification is also sent for the request. If a user uses the system method to approve a request, then FortiSOAR displays 'Unauthorized access', though the original playbook resumes the execution of the remaining playbook steps and moves to the 'finished' state. This is because when the approval record is inserted using a playbook, then the ownership of that record always remains with the SOC team (admin team) irrespective of the team or user who triggered the playbook. To solve this issue, you must add the team(s) who will provide approval to be part of 'Appliance.' For more information about Appliances, see the 'Security' chapter in the "Administration" Guide. |
Once an approver completes an approval request, using any mode of approval, the notification dialog displays the approval request as approved using a green check symbol, and the notification is removed from the notification window.
Viewing details of an approval record
Once you trigger a playbook a record for the same is created in the Approvals module, and you can view and edit the details of the approval in this record as shown in the following image:

The Approvals module is not included as part of the default modules. Therefore, you must add the Approval module using the Navigation Editor if you want the Approvals module to appear in the FortiSOAR left navigation. For information on how to add modules to the FortiSOAR left navigation, see the Navigation Editor topic in the "Administration Guide."
You can edit details of approval add or edit the description of the approval or update the approval or rejection message. You can also reassign the task of approval to another user in cases such as the user to whom the approval was originally assigned is unavailable.
|
|
When you reassign the approval to another user that user will not get the notification of that assignment unless you have chosen Email as the additional method of approval while configuring the Approval step. If you have only configured the System method of approval, then the reassigned user will not get an approval request notification. |
Viewing details of the approval playbooks
You can view the details of the approval by clicking the Execution History tab to view the logs and results of your executed playbook. For more information on Playbook Execution History, see the Debugging and Optimizing Playbooks chapter.
Using the output of the Approval step in other playbook steps
To use the output of the approval step in other playbook steps or to display the result of the approval step in the Step Results option in Dynamic Values, you must add the following jinja to the step that requires to use the output of the Approval step:
- To get result of the approval, i.e. true or False:
{{vars.steps.<nameOfTheApprovalStep>.approved}} - To get the comment or message associated with the approval:
{{vars.steps.<nameOfTheApprovalStep>.message}} - To get the user who is the approver:
{{vars.steps.<nameOfTheApprovalStep>.user}}
Manual Task
Use the Manual Task step to pause the execution of the playbook till you complete a manual task such as a manual shutdown of a server, or starting or stopping a firewall, that is part of an automated workflow.
Once you click the Manual Task step, a form containing the fields from the Task module is displayed. Enter content for the fields in the Task module, such as the name of the task, person to whom the task is assigned, the status of the task, and the date by when the task is to be completed. Once you click Save, this record is added in the Task module, and a FortiSOAR system-playbook begins to run in the background, which keeps checking the status of this task.
Once a user changes the Status of the added manual task in the Task module, to either Skipped or Completed, then the system-playbook gets notified about the status change and in turn the system playbook resumes the execution of the original playbook that had requested the manual task.
Note: You can change the condition for when the manual task should resume, for example, you can specify that the manual task should resume only when the user changes the Status of the manual task to Completed. You must update the System playbooks if you want to configure the manual task conditions. You can view system playbooks by clicking the Settings icon, then clicking the System Configuration option, and then clicking the System Fixtures tab. On the System Fixtures page, in the Playbooks section, click Approval/Manual Task Playbooks.
Using the output of the Manual Task step in other playbook steps
To use the output of the manual task step in other playbook steps or to display the result of the manual task step in the Step Results option in Dynamic Values, you must add the following jinja to the step that requires to use the output of the Manual Task step:
- To get the ID of the manual task:
{{vars.steps.<nameOfManualTaskStep>['task_data']['@id']}} - To get status of the manual task:
{{vars.steps.<nameOfManualTaskStep>.status}}
Manual Input
Use the Manual Input step to display a customized pop-up either for a quick confirmation (Simple Yes/No/Ok decisions) or for input prompts with custom form fields (Custom Input Form) anywhere in the flow of the playbook. Based on the input or decision provided by the user, the playbook chooses one of the paths from the paths that you have defined in the playbook and continues to execute the playbook as per the specified automated workflow.
|
|
To execute a manual input playbook, you must be assigned a role with a minimum of |
The manual input step can be used with all types of playbook triggers, including Custom API Endpoint trigger and Referenced trigger.
In the case of a Custom API Endpoint trigger, a Referenced trigger, or a Manual trigger that has been created with the Run Without Selecting Any Record option selected, you must specify the module on which the action has to be taken. The module specified will also be used to populate the "People" lookup and assign ownership to specific users or teams, as well as the record fields that require inputs.
The Manual Input step provides you with the ability to configure two types of input prompts: Simple Yes/No/Ok decisions or Custom Input Form.
An example of a Custom Input Form prompt would be the enrichment of indicators associated with an alert record in FortiSOAR that has been generated from a SIEM. Enrichment of indicators would be done using threat intelligence tools, for example, VirusTotal. The results from VirusTotal state that there are 3 indicators, 2 of which are marked as suspicious based on their score received from VirusTotal and 1 is marked as malicious based on their score received from VirusTotal. The Manual Input step would list these 3 indicators and prompt SOC analysts for an evaluation of the indicators and select the ones that they think should be marked as malicious. Based on the analyst's evaluation, further action will be taken on the alert record and the associated indicators. From version 7.0.0 onwards, you can add visibility conditions to the fields displayed in the user input form, i.e., fields in the user form are visible based on the specified conditions. For an example of using the visibility conditions in a user prompt, see the User Input Prompt - Visibility Conditions section.
From release 7.0.2 onwards, Dynamic list is supported as a 'Custom' input type in both the Manual Trigger step and the Manual Input step. A 'Dynamic list' is a list with dynamic values that are set using a playbook, i.e., the options of the list are defined using JSON or comma-separated values, set using Jinja, and then displayed as a list. For an example of how to use dynamic lists in a user prompt, see the User Input Prompt - Dynamic Lists section.
From release 7.3.0 onwards, you can also select Email Template Field, as a field Type. For more information, see User Input Prompt - Using the 'Email Template' Field topic.
An example of a Simple Yes/No/Ok Decisions prompt would be similar to the above except that there would generally be a question in the prompt based on which the SOC analyst would be required to make a decision. For example, 'Is the following Indicator Malicious?' The analyst then just has to choose either "Yes - Block the Indicator" or "No - Do not block the indicator". Based on the SOC analyst's decision, further action will be taken on the alert record and the associated indicators. You can also retrieve the reputation of the indicator from various threat intelligence tools such as VirusTotal using the Connector step and display this information to the analysts to enable them to make a more informed decision.
Building a Simple Yes/No/Ok Decisions input prompt
Perform the following steps to create a playbook with a Manual Input playbook based on prompting SOC analysts for an evaluation of indicators that are associated with an alert generated in FortiSOAR and confirm whether they are malicious or not. Based on the analysts' evaluation, further action is taken on the alert record.
- Open FortiSOAR and click Automation > Playbooks in the left navigation bar.
- On the
Playbook Collectionspage, click on an existing playbook collection.
This opens thePlaybookpage. Click on the playbook in which you want to add the Manual Input step, or add a new playbook, which opens the playbook in thePlaybook Designer. For our example, create a new playbook namedTest - Manual Inputand ensure that the Active checkbox is clicked, then click Create.
This opens the Test - Manual Input playbook in the Playbook Designer. - In the Trigger step, select Manual Trigger and define the following parameters:
- In the Step Name field, enter the name of the playbook. For example,
Test Manual Input. - In the Trigger Button Label field, type the playbook name as
Indicator Evaluation. - Ensure that the Run once for all selected records option is selected.
- In the Choose record modules on which the playbook would be available on field select the Alerts module.
- Click Save.
- In the Step Name field, enter the name of the playbook. For example,
- To get the indicators associated with the record, you can add a Find Records step with the Indicator module selected, and in the
Build Search Querysection, select Alerts in the Related Module, and then using Dynamic Values, add the condition asID Equals {{vars.input.records[0].id}}and click Save to save the step. - Add the steps that you want to add as the response actions to evaluate the inputs provided by the analysts. For our example, configure the Block Indicator and Send Email Notification steps as per your requirements.
- Select Manual Input from the
Evaluatesection, and define the following parameters:- In the Step Name field, enter the name of the playbook. For example,
Manual Input Test. - From release 7.2.0 onwards, you can choose the type of manual input you want to create. Choose the Record Independent option to create a Global Manual Input (introduced in release 7.2.0), i.e., this type of manual input does not depend on any record. Choose the Record linked option if you need the task to be completed in the context of a specific record. For our example, we will retain the selection of Record linked with its default options for module and triggered record IRI:

From release 7.2.0 onwards, you can choose to display the manual input in a record that is different from the record that triggered the manual input playbook. For example, if a manual input playbook is triggered on a related task module in an alert record, you can still choose to display the manual alert on the alert record. To do this, select the module on which you want to run the manual input playbook from the Select Module drop-down list and update the triggered record IRI value in the Record IRI field of the record on which the manual input will be prompted, as shown in the following image:
- In the
Input Prompt Configurationsection, select the Simple Yes/No/Ok Decisions option from the Type of Input Prompt drop-down list.
You can choose to request decisions or other inputs from non-FortiSOAR users. To allow non-FortiSOAR users to provide decisions and inputs, click the Create a link for users outside FortiSOAR checkbox. For more information, see the Running unauthenticated manual inputs in segmented networks using FSR agents topic.
You can define the following parameters for the Simple Yes/No/Ok Decisions prompt:- In the Title field, enter the title for the prompt. For example,
Indicator_Malicious or not. - In the Description field, enter the description for the input prompt. For example,
Should the indicator be blocked?and add then add the jinja to retrieve the indicators associated with the alert in the format:{{vars.steps.<nameOfFindRecodsStep[0].value}}. For example,{{vars.steps.Find_Associated_Indicators[0].value}}
To add Jinja in playbooks, use Dynamic Values . For more information, see the Dynamic Values chapter. - Click Save to save the step.
- In the Title field, enter the title for the prompt. For example,
- In the
Response Mappingsection, you add the custom response options that the user can choose from when presented with the decision. You should map each custom response option to a corresponding playbook step.
You can add the custom response for the decision first so that you can define the complete workflow and then create the corresponding playbook steps.
For our example, in theResponse to Step Mappingsection, click the Add More link and in the Response field, typeYes - Block the Indicatorand corresponding to this response, in the Choose Step field, select the Block Indicator step to block the indicator. Then click Add More and typeNo - Do not Block the Indicatorand corresponding to this response, in the Choose Step field, select the Send Email Notification step to send a notification to the SOC team (admin team) so that they can be informed that this indicator is not blocked and they can take further steps if required.
You can also select the response that you want to consider as a primary response by selecting the Primary checkbox. Selecting a response as primary will add a distinct visual style to that option button, making it more prominent when compared to the other buttons. In our example, we have marked the No - Do not Block the Indicator option as the primary response.
- If you have not selected the Create a link for users outside FortiSOAR checkbox, then you will see the
Ownershipsection, or else you will see theEmail Recipientssection.- In the
Ownershipsection, you must select one of the following options to determine who is responsible for responding to the input prompt:- Analyst working on the record: The manual input is visible and actionable by the analyst who is working on the record. In this case, select the field that is used to assign the user corresponding to the specific module, i.e., the
Peoplelookup for that module. For our example, since we are working with theAlertsmodule, select Assigned To. You can also choose the Created By or Modified By options.
The record assignee is defined as the user mapped to the assignment field in the record, at the time of playbook execution. The manual input stays assigned to this user, even if the record assignee is changed at a later time. - Specific Users: The manual input is visible and actionable by users, other than the user who is assigned to the record, who need to provide the input. When you select this option, then the People multi-select list appears from which you can select users who require to take the decision. You can also add a custom expression in this field.
- Specific Team: The manual input is visible and actionable by team(s) who requires to provide the input. This means that any user who is part of the selected team(s) will be able to provide the input. When you select this option, then the Team multi-select list appears from which you can select specific teams(s) that can provide their input. You can also add a custom expression in this field.
- All record owners: The manual input is visible and actionable by all the owners of the record, i.e., users who have permissions on the record, at the time of execution of the playbook.
- No specific assignee: The manual input is visible and actionable to everyone in the FortiSOAR instance.

Note: The teams or users who are specified as owners, i.e., to whom this task is assigned, must have access to the record and appropriate permissions to perform the steps required to complete the task.
- Analyst working on the record: The manual input is visible and actionable by the analyst who is working on the record. In this case, select the field that is used to assign the user corresponding to the specific module, i.e., the
- If you have selected the Create a link for users outside FortiSOAR checkbox and you require non-FortiSOAR users to provide decisions or inputs, then in the
Email Recipientssection, add a list of email addresses of non-FortiSOAR users, who should provide the required inputs or decisions using emails.
Note: If the server address for the manual input endpoints sent in the email is incorrect, then see theCorrecting the server address for the manual input endpoints sent in emailstopic in the Debugging and Optimizing Playbooks chapter.
- In the
- In the Step Name field, enter the name of the playbook. For example,
- In the
Escalationsection, you can choose to define actions that should be taken in case a decision is not taken within the specified time frame.
If you choose No, then there is no time-based escalation.
If you choose Yes, then you must specify the following:- The time within which the action (input or decision) must be taken, in the If the decision is not provided within field. You can specify the time in Days, Hours, or Minutes (from version 7.0.1). The minutes option has been added for cases where responses from analysts are quickly required, such as 15-20 minutes.
- The Escalation step must be selected from the Choose a step to continue to field. For example, if you want to send an email notification to the managers, then you can define that step as
Escalation Emailand connect it to the Manual Input step and choose that option from the Choose a step to continue to field:
If you are requesting decisions or inputs from non-FortiSOAR users via email, then you can use the escalation settings to define when the links provided in the email will expire. For example, if you select Yes, and specify 4 hours in the If the decision is not provided within field, this would mean that the links in the email that has been sent for the decision or input would expire in 4 hours.
Note: FortiSOAR runs a system schedule to resume the workflows that have timed out, such as running the escalation step when the decision is not taken within the specified time. This schedule, by default, is set to run every minute. The cron expression for this system schedule is present in the/opt/cyops-workflow/sealab/sealab/config.inifile, and is as follows:MANUAL_INPUT_ESCALATION_SCHEDULE: {'minute': '*', 'hour': '*', 'day_of_week': '*', 'day_of_month': '*', 'month_of_year': '*'}
You can update this cron expression if you want to change the default schedule timing window of 1 minute, and then run the following command:$ sudo -u nginx /opt/cyops-workflow/.env/bin/python /opt/cyops-workflow/sealab/manage.py default_schedules
Also, note that if thecelerybeatdservice is down then the system schedule to resume the manual input in case of an escalation step will not run. You can check the status of the celerybeatd services using thecsadm services --statuscommand, or by viewing the System Health Dashboard.
- (Optional) If you want to add the Manual Input dialog link in the Pending Tasks Panel, then click the Message link that is present in the footer of the playbook step that displays the
Messagetext box. In theMessagetext box, add the following inline code:
Inline Code Snippet:<p><a data-comment-collaboration-pendingdecision='true' data-pendingdecision-id='{{vars.result.wfinput_id}}'>Manual Input Link</a></p>
Important: The format of the inline code that you require to add for adding the link to the Manual Input dialog in the Pending Tasks Panel has changed in version 6.4.0. Therefore, if you have upgraded to a 6.4.0 or later version from a version earlier than 6.4.0, you will need to change the format of the older code snippet to match that of the new code snippet.
You can type the text that you want to display as the link text in the Collaboration Panel, which by default is set to Manual Input Link within<a data..></a>.
For example:
Inline Code Snippet:<p><a data-comment-collaboration-pendingdecision='true' data-pendingdecision-id='{{vars.result.wfinput_id}}'>Are the Indicators Malicious?</a></p>
Click Ok to save your changes.
- Click Save to save the step, and click Save Playbook to save the playbook:

You can also build Custom Input Form prompt like a Simple Yes/No/Ok Decisions prompt and you can build a prompt in the Build Prompt - Add & define section of the manual input step similar to the steps described in the Manual Trigger section - Building a User Prompt.
Running unauthenticated manual inputs in segmented networks using FSR agents
Prior to FortiSOAR release 7.3.0, when inputs were required from users who were outside your FortiSOAR network, an email containing a link to provide inputs was sent to the user. The URL link created for the manual input was from the originating instance, i.e., the instance where the playbook is running. Due to this organizations were required to add their FortiSOAR instance for external IP’s to their 'allowlist' of their firewall or proxy servers, which could have some implications for organization policies. To overcome these issues, FortiSOAR release 7.3.0 introduces the ability to run unauthenticated manual inputs in segmented networks using FSR agents.
|
|
To run manual inputs using FSR agents, ensure that FortiSOAR Agent role is assigned the 'Execute' permission on the 'Playbook' module. |
When you select the Create a input link for users outside FortiSOAR to provide input option in the Manual Input step, FortiSOAR temporarily hosts the input form on a page, and then sends an email containing the link to the input form page to external users. The input page can be hosted on the same network (Self) or on an agent's (if applicable) depending on where you want the page to be available. It is recommended that if you require inputs from users in your FortiSOAR network, you select the Self option, and for users outside your FortiSOAR network, you select the Agent option. If Self is selected, then the user input page is hosted on the same network and an email containing a link to the host IP of the FortiSOAR node is sent to the email addresses of the external users specified in the playbook, and the corresponding user actions are as described in the User actions when non-FortiSOAR users are providing inputs using an email topic.
To select the Agent option, click Agent, then from the Select Agent drop-down list, select the agent on whose network you want the input prompt page to be available. 
The Select Agent drop-down list displays only those agents that are configured and reachable from the FortiSOAR node, and also have their 'Agent Input Bridge' enabled. For more information on agents, see the Segmented Network Support chapter in the "Administration Guide", and for steps on enabling the agent input bridge, see the FSR Agent Communication Bridge connector document.
Once you have configured the FSR Agent Communication Bridge connector and you trigger a FortiSOAR playbook that contains a manual input, which requires inputs from users outside of your FortiSOAR network and therefore requires the custom input page to be hosted on the agent's network, the following events occur:
- An email containing a link with the host IP of the agent is sent to the email addresses of the external users specified in the playbook.
- When users click on the link, the request goes to the agent, and then the agent populates the required manual input form that requires input from the user.
Note: When manual inputs are executed using an FSR agent configuration, then the manual input form does not support fields of type 'Richtext' and 'Markdown/HTML'. - The input provided by the users is forwarded to the FortiSOAR node, which resumes the playbook based on the user input.
User Actions corresponding to Manual Input
The Manual input playbook gets triggered based on the type of trigger and trigger conditions defined in the playbook. For our example, we have created the 'Indicator Evaluation' playbook to be triggered on the Alerts module. Navigate to the Alerts module, and then click the record for which you want to run the Indicator Evaluation playbook, and then from the Execute drop-down list, select the Indicator Evaluation action to trigger the Indicator Evaluation playbook as shown in the following image:

Once you trigger the Indicator Evaluation playbook, FortiSOAR displays a message such as Triggered action "Indicator Evaluation" on 1 record and halts the further execution of the Test - Manual Input Playbook. You can open the Executed Playbook Logs by clicking the Executed Playbook Logs icon in the upper right corner of the FortiSOAR. You will see that the status of the Test - Manual Input Playbook is set to Awaiting as shown in the following image:
User actions when users are providing inputs using system notifications
When the decision or inputs are required to be provided by a user using system notifications, then users have to do the following:
- Click the Pending Tasks icon that appears on the top-right corner in FortiSOAR when an action is pending. The Pending Tasks icon contains a number in red color that mentions the number of pending tasks, both approvals and manual inputs.
Note: Prior to release 7.3.0, you could also click the Notifications icon, and provide input in the manual input item in the Notifications panel. If your system is a fresh installation on release 7.3.0 or later, then manual inputs are present only on the Pending Tasks panel. If you have an upgraded 7.3.0 or later system, then you have to disable theNotify On Pending Manual Inputrule, if you do not want to receive the manual input notifications in the Notifications Panel. For more information, see theNotificationstopic in the System Configuration chapter of the "Administration Guide."
Clicking the Pending Tasks icon displays the 'Pending Tasks' panel:
In the Pending Tasks, click the item on which you want to provide input. This will open the record that is associated with the manual input as well as thePending Taskspopup that the users can use to provide their input, which would then resume the playbook workflow. You can also click on the Pending Decision icon in the detailed view of the record to open thePending Taskspopup that the users can use to provide their input, which would then resume the playbook workflow, which has been described later in this topic.
The manual input prompt of the Pending Tasks panel contains a Pending Tasks list which displays details such as created date, the person or team the decision is assigned to, the title of the manual input step, type of record on which the action is pending, for example, theAlertrecord, as shown in the above image, and due date till when the decision should be taken are displayed. Users can also sort the pending tasks by Recent, i.e., based on its created date or on the Due By, which is the date by which a decision requires to be given. You can filter the list of pending tasks by All, which displays all the pending items, Me, which displays the pending tasks that have been assigned to the current user, or My Teams, which displays the pending tasks that have been assigned to the team(s) of the current user.
In the Pending Tasks List, click the item on which you want to provide input. This opens the Pending Tasks popup that users can use to provide their input, which would then resume the playbook workflow, which has been described later in this section.
For example, click the Pending Tasks icon and in the Pending Tasks List, click the item to provide the input, which opens the record that is associated with the manual input as well as thePending Taskspopup (as shown in the following image) in which users can add their input:
If you click the View Detailed Playbook Execution Flow link, a new window opens that displays the execution of the playbook based on the input or decision received. Also, as displayed in the above image, since in the playbook selected No - Do not Block the Indicator has been specified as the Primary action, that option gets highlighted in the popup.
Users can use the Delete This Manual Input link to discard the manual input and remove this input from playbook workflows or queues. This is required to discard manual inputs without references. For example, in a playbook that contains a manual input, a manual task, or an approval step, and a step after the manual input, manual task, or approval step fails, then the complete playbook is marked as failed; however, the manual inputs are still open for user action even after the awaiting steps are terminated. Therefore, you can use Delete This Manual Input to completely discard the manual input. Other examples would be in cases where an executed log entry is removed without addressing the open manual input requests or the deletion of a record that requires manual input.
Note: Users must use the Message action to add a message to their playbook to add a link to the 'Manual Input' dialog as described in the Building a decision-based input prompt procedure.
For more information on the user tasks associated with the Notifications panel and Pending Tasks panel, see theViewing Notifications and Pending Taskstopic in the "User Guide." - You can also see the Pending Decisions icon in the detail view of the alert on which the playbook is triggered and depending on the ownership you have defined in the playbook. For example, if you have provided the ownership of Analyst working on the record, and if you are not assigned to that record, then you will not see the Pending Decisions button. The details of the Pending Decisions list are the same as the details displayed in the Pending Tasks list at the global level) :

Clicking the item in the Pending Decisions list displays thePending Tasksdecision box as explained earlier. - If, for example, the user selects the No - Do not Block the Indicator option in the
Pending Tasksdecision box, then FortiSOAR displays a message such asAwaiting playbook resumed successfully, and then, based on the user's decision, FortiSOAR continues the execution of the playbook. For our example, the 'Block Indicators' step will be run, which will block the indicator. Users can open the Executed Playbook Logs by clicking the Executed Playbook Logs icon in the upper right corner of the FortiSOAR, and there they will see that the status of the "Test - Manual Input Playbook" is set to Finished, the Send Email step is executed, and the Escalation Email and Block Indicator steps are skipped, as shown in the following image:
An analyst or user on whom the action is awaiting can also provide the input from the Executed Playbook Logs. Click the Executed Playbook Logs icon in the upper right corner of the FortiSOAR to open the Executed Playbook Logs and click the playbook whose status is Awaiting. Clicking the awaiting playbook opens the Test - Manual Input playbook > Pending Inputs tab on the right side of theExecuted Playbook Logsdialog in which you can add and submit your inputs as shown in the following image:
User actions when non-FortiSOAR users are providing inputs using an email
If the decisions or inputs are required to be provided by a non-FortiSOAR using an email, then users have to do the following:
- Once the playbook is triggered and the playbook is set to Awaiting, an email gets sent to the email addresses mentioned in the playbook. The email body contains text such as, "
A FortiSOAR Playbook is requesting your input..."and a link such as,"Open input form".
You can customize the text of the email body by editing the delivery rules on the Notifications page. In this case, you have to edit the "Notify on Pending External Manual Input Notification" rule. For more information, see the 'Notifications' topic in the System Configuration chapter of the "Administration Guide." Also, if you have upgraded your system to release 7.2.0 or later, and you have used customized email templates for external manual inputs, then you must update the "Notify on Pending External Manual Input Notification" rule. For more information, see the 'Notifications' topic in the System Configuration chapter of the "Administration Guide."
By default, email notifications are sent using SMTP. However, you can choose to send email notifications using a different email server, such as Exchange. To do this, you can either update the 'Email Notification' channel or create a new custom channel and use this channel in the "Notify on Pending External Manual Input Notification" rule. For more information, see the System Configuration chapter in the "Administration Guide." - Clicking the link opens the browser and displays a page in which users are required to provide their inputs (either in the custom input form or decision. The contents of this page depend on the title and description that you have added in the playbook, along with the two buttons for acceptance or rejection of the decision, if it is a decision-based prompt. In the case of our example, the user will see "Should the indicator be blocked?" followed by the indicator value and then two buttons: "Yes - Block the indicator", or "No - Do not block the indicator".
If the prompt is a Custom Input Form, then users will see an 'Input Form' containing fields that have been defined in the playbook. Users should provide the necessary inputs and then submit the form. Once the form is submitted, it cannot be re-opened and its contents cannot be changed.
Once the user provides the required inputs and submits their action, the playbook continues its execution as per the defined workflow.
Global Manual Input
From release 7.2.0 onwards, you can create a manual input that is independent of records, and which could be acted on by users anywhere in FortiSOAR. Global Manual inputs are suitable if the tasks to be performed are generic, and which do not require the context of a record for its completion.
An example, of a global manual input, could be a requirement of sending an email to an administrator in case of a "Critical Alert of type 'Phishing'". For this example, you can create a manual trigger playbook named "Send Email to Administrator", and then in which you can add visibility conditions as follows:
Next, add the Manual Input step to create a Global Manual input, in which you should select the Record Independent option in the Choose type of manual input you want to create section:
You can then configure the manual input as per your requirements. For more information on setting up manual inputs, see the Manual Input topic.
Once you have created and saved the playbook, navigate to the Alerts page, and select a Critical alert whose type is Phishing. Click Execute and select the Send Email to Administrator playbook, FortiSOAR will display the Global Manual popup on the UI from the module on which it is triggered. In our example, this manual input was triggered from the Alerts module, and therefore it is displayed on the Alerts page as follows:
If users are not on the Alerts module when this manual input is triggered, then users have to use the Notifications panel or the Pending Tasks panel to view the Global manual inputs. For more information on the Notification and Pending Tasks panel, see the User Actions corresponding to Manual Input topic.
Users can add additional notes in the popup dialog and then click the Yes or No to resume the designed playbook workflow.
Execute
Connector
Use the Connector step to add connectors, including FortiSOAR Built-in connectors, to your playbook. Third-Party Connectors, such as connectors for Elastic, VirusTotal, or Splunk, can retrieve data from custom sources and perform automated operations. FortiSOAR Built-in connectors, such as the Database connector, the IMAP connector, and the SMTP, are all pre-installed connectors or built-ins that you can use within FortiSOAR playbook and perform automated operations. For more information on FortiSOAR Built-in connectors, see the "FortiSOAR Built-in connectors" article.
Use the By Connector Name tab to first choose a specific connector and then choose the operation that you want that connector to perform or use the By Actions tab to first choose the action (annotation) that you want to perform and then choose the connector that you want to use to perform the selected action.
Once you click the Connectors step, the Connectors step page is displayed that contains the connectors (By Connector Names tab) that are configured in your system and the automated actions that you can perform (By Actions tab).

By Connector Names tab
After selecting the Connector step in the playbook designer, the By Connector Names tab is displayed. The By Connector Names tab displays all the connectors that are configured in your system. Use this tab if you want to use a particular connector to perform a particular action.
Use the Search Connectors section to search for connectors by name.
Click the connector that you want to include in your playbook, for example, VirusTotal v1.0.1 and then type the Step Name. You can also specify whether you want to run the action on the current FortiSOAR node or remotely on the agent node by clicking the Self or Agent buttons besides Target. By default, Self is selected, which means that the action will run on the current FortiSOAR node, then you must select the configuration by clicking the Configurations drop-down list using which you want to run the action since the FortiSOAR node can have multiple configurations. Configurations are based on the configuration names that you specify when you are configuring the connector (see notes below). If you click Agent, then you can select the agent on which you want to run the action and you must also select the configuration using which you want to run the action since agents can have multiple configurations. For more information on agents and how to run remote actions using agents, see the Segmented Network support in FortiSOAR chapter in the "Administration Guide." You can also specify the connector configuration by clicking the {} icon and either typing the connector configuration name or specifying a Jinja variable that contains the connector configuration name. If you have only one configuration for the connector or have specified a default configuration, then that configuration automatically gets selected.
|
|
Users can see only those connector configurations to which they have access. For example, if a VirusTotal connector is configured with configuration name as 'Demo1' and with visibility set to 'Private' with assignment given to 'Team 1' (for more information on playbook ownership, see Introduction to Playbooks chapter), then the 'Demo 1' configuration is not visible to users belonging to teams other than 'Team 1', though they can execute playbooks created by 'Team 1' users. |
Next, from the Action drop-down list, select the action that you want the connector to perform and then in the Inputs section, specify the inputs required. Click Save to add the connector as a playbook step.

Notes:
- You can install different versions of a connector, and while adding a connector operation, you can specify a specific version of a connector within a playbook. For example, you can have VirusTotal connector versions 1.0.0 and 1.0.1. The version of the connector must be in the x.y.z format, for example, 1.0.0. Version must consist of valid integers, for example, "1.15.125" is a valid version.
In case you have installed multiple connectors, and if the version of the connector specified in the playbook is not found, then the playbook by default uses the latest version. FortiSOAR checks for the latest version of the of the connector in the format "major version.minor version.patch version". For example, version 2.0.1 is a later version than 1.0.1. - Upgraded versions of your connector are displayed on the Connectors page and you can upgrade the version of your connector. The upgrade process replaces your existing connector version with the upgraded version. For more information, see the Introduction to connectors chapter in the "Connectors Guide."
- You can install different versions of a connector, enabling you to reference a specific version of a connector from a playbook. If you want to replace all previous versions of the connector, ensure that you click the Delete all existing versions checkbox while importing the new version of the connector. If you do not click the Delete all existing versions checkbox, then a new version of the connector is added. You must ensure that your playbooks reference a correct and existing version of the connector.
- You can add multiple configurations for your connector if you have more than one instance of your third-party server in your environment. You must, therefore, add a unique
Namefor each configuration.
If you have previous versions of a connector and you are configuring a newer version of that connector with the same configuration parameters, then FortiSOAR fetches the configuration and input parameters of the latest available version of that connector. For example, if you have 1.0.0 and 1.0.1 versions of the VirusTotal connector and you are configuring the 1.0.1 version of the VirusTotal connector, then while configuring the 1.0.1 version, FortiSOAR will fetch the configuration and input parameters from the 1.0.0 version of the VirusTotal connector. You can review the configuration and input parameters, and then decide to change them or leave them unchanged. - You can check the Mark As Default Configuration option to make the selected configuration, the default configuration of this connector, on the particular FortiSOAR instance. This connector will point to this configuration by default.
- The
passwordtype fields include encryption and decryption. All configuration fields of typepasswordare encrypted before they are saved in the database.
By Actions tab
After selecting the Connector step in the playbook designer, if you want to see the available connectors configured in your system for a particular action, then click the By Actions tab. Click the down arrow to view which connector is providing that action and the description of the action. The By Action tab displays the connectors grouped by actions.

Use the Filter By Category section to filter the actions on the basis of the type of operation they will perform. The types of operations are currently categorized into Investigation, Remediation, Containment, Utilities, and Miscellaneous categories.
To search for a specific action that you want to perform, type the search keyword in the Search Annotations search box.

Click the name of the action that you want to perform. For example, if you want to submit a sample for analysis to a website or a sandbox click the Submit Sample action. Once you select the action, then a list of configured connectors that can perform that operation is displayed as shown in the following image:

An annotation can have multiple connectors configured to perform that action, and if more than one connector can perform the same action, then a list of connectors will be displayed when you click the name of the action. As in our example, we want to submit a sample for analysis click the Get Sample action, and you will see that multiple connectors, such as VirusTotal and Anomali ThreatStream are tagged with this annotation.
Select the connector and the exact operation that you want to perform and then type the Step Name. Next, in the Inputs section specify the necessary input parameters to run the operation. Click Save to add the connector as a playbook step.
For example, to submit a sample for analysis click the Submit Sample action and you will see the connectors associated with this action. Select the connector, for example, the Anomali Threatstream connector, and you will see multiple functions, such as Submit Observables and Submit URLs or Files to Sandbox, associated with the desired action as shown in the above image. Click the exact operation that you want to perform, for example, if you want to submit files or URLs to a specific ThreatStream-hosted sandbox, then click Submit URLs or Files to Sandbox. Next, type the Step Name, and in the Inputs section, enter the input parameters, such as the sandbox name and sample type that you want to submit for analysis to Threatstream, and then click Save to add the connector as a playbook step.

In case of connector actions that have the Datetime field whose sub type is set as Date, you can use the Date picker to choose the date (such fields do not have the time picker. For Datetime field whose sub type is set as Date/Time, you can use the Date and Time picker to choose the date and time as shown in the following image:

You can also add custom expressions in the jinja format in the Datetime field. Click the icon to enter Jinja for this field. Click the icon to toggle back to the original Datetime field.
Utilities
Use the Utilities step to run various utility functions and scripts that come built-in with FortiSOAR.
Utility functions include functions such as, the Utils: Make REST API Call option to make a RESTful API call to any valid URL endpoint, the FSR: Create Record option to insert a new record in FortiSOAR, and the File: Zip option to zip and password protect a file.
Example of using the FSR: Upsert Record option in the Utilities step
The FSR: Upsert Record step either updates an existing record, if any record matches the unique list of fields you have specified, in the database, or inserts a new record in the database based on the parameters you have specified.
|
|
Upsert behavior for uniqueness will not work for fields that are marked as encrypted. |
In the Playbook Designer, click the Utilities step and add the step name in the Step Name field. From the Action drop-down list, select FSR: Upsert Record. In the IRI field add the name of the module in which you want to upsert data in the format api/3/alerts. In the Body field, add the fields that you want to add or update in the database in the dynamic values (Jinja variables) format. For example, { "name" : "alert1", "description" : "Test for Upsert", "status" : "{{"AlertStatus" | picklist("Open", "@id")}}"}. In the Fields field, add the list of fields to check for uniqueness. For example, if you want to check for records in the database based on the Name of the record in the database, add ['name'] in the Fields field. If you want to search the database based on multiple items, you can add more than one item in the Fields field, for example, ['name', 'status']. The Ignore Missing Fields field is used to determine whether or not to raise an exception if you specify a field in the Fields field that is not in the record. The Ignore Missing Fields defaults to False, which means that an exception will be raised if you specify a field in the Fields field that is not in the record. Click Save to save the step.

Once the step is run, the database record will either be updated with the parameter you have specified, if any record matches the list of fields you have specified in the Fields field, or a new record will be inserted in the database based on the parameters you have specified.
Code Snippet
Use the Code Snippet step to add and run custom python scripts within a playbook.
Select the Code Snippet step and in the Execute Python Code action, enter the python function that you want to run as part of the playbook, and click Save to save the step.
The Python Function field's interface that is part of the Execute Python Code action is enhanced to a code text editor making the experience of adding and editing the code more user-friendly:
You can also perform the following operations on the code editor interface:
- To lint your code automatically and make the code more human-readable and error-free (programming and programming errors), select the entire code in the editor and click the Format button.
- To get a better working view and make the editor go full-screen, click the Fullscreen button. To exit the full screen, press
ESC. - To add dynamic values (Jinja) or variables, or access values of objects, or perform lookups, click the Dynamic Values button to display the 'Dynamic Values' popup. For more information, see the Dynamic Values chapter.
The Python Function field used to be a text box, which is still available if you select the Execute Python Code (Deprecated) action. It is not recommended to use this action.
This step uses the Code Snippet connector as its base, for more information on FortiSOAR Built-in connectors, including the Code Snippet connector, see the "FortiSOAR Built-in connectors" article.
References
Reference a Playbook
Use the Reference a Playbook step to call any playbook within the system, whether Active or Inactive, by name. A child playbook can reference all environment data from its parent playbook, meaning if a child playbook requires a particular dynamic value, the child playbook can reference that variable and used it just as it is being used in the parent playbook. Also, if you want the record inputs as available under vars.input.records of the parent playbook to be available to the referenced playbook, then select the Pass Parent Input Record checkbox. To prevent the record inputs to be passed to the referenced playbook, for example, in cases where the referenced step loops on lot of items creating unnecessary data in memory while is running, and also in the database if the playbook is run in the debug mode, you can leave the Pass Parent Input Record checkbox unchecked (default).
To add a reference to a playbook, click the Reference a Playbook step and in the Step Name field, type the name of the step. The Playbook Reference field displays a list of all the available playbooks across the playbook collections from which you can select the playbook that you want to reference. Therefore, from the Playbook Reference drop-down list, search for and select the playbook you want to reference. You can also click the Dynamic Values () button beside the Select Playbook Reference to specify the Jinja variable that contains the IRI value of the playbook you want to reference. Once you have specified the IRI value or selected the playbook you want to reference, you can click the Playbook in new tab button to open the referenced playbook in a new tab.
You can use the Loop option to iterate a playbook step as per your requirements.
|
|
If you have migrated a Map Playbook to a Reference a Playbook (using Loop), you observe a change in behavior. In the case of Map Playbook, any changes done to the environment variables by the Map Playbook were reflected in the Main Playbook directly. However, in the case of Reference a Playbook, you must explicitly set the returned values from the referenced (child) playbooks in its last step. This ensures that the child playbook does not change the behavior of the main playbook in an unexpected manner. |
The output of the reference playbook steps varies depending on the called playbook parameters. You can define parameters using Tools > Edit Parameters in the playbook designer

|
|
If you update any of the parameters in a child playbook, then you must review and make the necessary updates in the Reference a Playbook step in the parent playbook. For example, if you have deleted a parameter from a child playbook, the parameter will yet pass from the parent playbook to the child playbook since the input values are saved in the reference playbook step. These inputs are cleared only when you open and save the Reference a Playbook step in the parent playbook. |
If you want to use a variable from a playbook that you are referencing (A) in the calling playbook (B), then defined that parameter in the referenced playbook (A) using Tools > Edit Parameters. This is the recommended method of passing environment variables from the referencing (parent) playbook to the referenced (child) playbook. It is not recommended to directly use the environment variable (since the parent environment is available in the child workflow as well) without explicitly defining child playbook input. You can turn this feature (passing of parent environment variables) on or off by updating the following entry in the celeryd section of the /opt/cyops-workflow/sealab/sealab/config.ini file:COPY_ENV_FOR_REFERENCE_WORKFLOW : false
Restart the FortiSOAR services once you have updated the entry in the config.ini file.
By default, the COPY_ENV_FOR_REFERENCE_WORKFLOW is set to false.
Send Email
Use the Send Email step to create a step that will prompt the executed playbook to automatically send an email to the user(s) identified in the step with either specific static criteria or record-relevant data using dynamic values.
If the email needs to reflect data specific to the entity that triggered the playbook, then use dynamic values in the fields.
Following are some examples of how you can send an email with jinja content In case of On Create or On Update triggers:
- To send an email to the user who is assigned to a Task, enter the following in the TO field:
{{vars.input.records[0].assignedTo.email}}. - To set the email subject line as the name of the Task/Incident, enter the following in the Subject field:
{{vars.input.records[0].name}}
If the email will always have the same recipient/content/etc., then enter the text in the corresponding fields and click Save.
|
|
If you have stored a comma-separated list of multiple email addresses in any 'Set Variable' step and you use that jinja variable in the 'TO' field in the 'Send Email' playbook step then the email is not sent to all the email addresses. If you require to send the email to multiple email addresses, you must use the FortiSOAR provided SMTP built-in connector to add multiple email addresses in the 'TO' field. The SMTP connector has a |
The Send Email step uses the SMTP Built-in connector and you can send emails to existing FortiSOAR teams or users by selecting teams or users from pre-populated multi-select fields. For more information on FortiSOAR Built-in connectors, including the SMTP connector, see the "FortiSOAR Built-in connectors" article.
The Send Email step has renamed to Send Email (Advanced). Use the Send Email (Advanced) step to send a rich text email with jinja and email template support. Use the Send Email step to send a rich text email with Dynamic Values support but no support for email templates:

The Send Email(Advanced) step provides user with the ability to pass an existing email template as an input for the email subject and body (content), thereby, enabling users to leverage an existing template and build upon it, and therefore, avoid re-work and ensuring consistency. The Send Email (Advanced) step contains a Body Type drop-down list from which you can choose whether you want to send a plain text email (Plain Text), rich text email (Rich Text), or an email based on a template (Email Template):

If you select Rich Text from the Body Type drop-down list, then in the Content field, you can add formatted content, images, and even custom jinja expressions using Dynamic Values.
If you select Email Template from the Body Type drop-down list, the Email Template drop-down list gets displayed, using which you can select the template that you want to use to send the email:

Authentication
Set API Keys
You can change the context of the user, i.e., override the default appliance keys using the Set API Keys step. For a particular playbook if you wish to run the API steps with less or more privileges than that of the default Playbook appliance, you can do so by adding the Set API Key step before the concerned steps in the playbook. In this case the privileges of the specified API key will be used; and this will apply to all steps in the playbook after the Set API Key step.
You can also use the Set API Keys step to create a playbook using the no authentication webhook (No Authentication trigger) in case of the Custom API Endpoint Trigger. In such a case, to successfully perform any operation, such as creating a record in FortiSOAR, you will require to use the Set API Keys step and provide the appliance keys for authentication.
To use the Set API Keys step, open the playbook and click the Set API Keys step and in the Step Name field, type the name of the step. Next, enter the Public Key and Private Key values and click Save. For details on generating a public and private key, or retrieving the details of a public key, see the Appliances topic in the "Security Management" chapter in the "Administration Guide."
|
|
The owner of the records created or updated by this playbook are the teams who own the appliance whose keys are specified in the playbook. |
List of reserved keywords
Following is the list of reserved words that must not be used as variable names:
- '
items' - '
result' - '
input' - '
request - '
values' - '
keys' - '
files' - '
env' - '
message' - '
resources' - '
step_variables' - '
do_until' - '
ignore_errors' - '
when' - '
for_each' - '
cyops_playbook_iri' - '
cyops_playbook_name' - '
collaborationNote' - '
inputVariables' - '
displayConditions'.
Deprecated Playbook steps and triggers
If you are using a deprecated step or trigger in a playbook, in cases where you have upgraded from an older version of FortiSOAR, then that playbook will continue to work, and you can edit the deprecated step. In case of deprecated steps, FortiSOAR displays a message such as "This step is deprecated....."
|
|
If you are using deprecated steps or triggers in your playbook, it is highly recommended that you replace those steps and triggers because over time these steps and triggers will become obsolete, and FortiSOAR will not be able to support or respond to them. You can replace the deprecated steps with the Utilities step or by using the FortiSOAR Built-in connectors. For more information on FortiSOAR Built-in connectors, see the "FortiSOAR Built-in connectors" article. |
Deprecated Playbook Triggers
Pre-Data Operation Triggers
Pre-data operations have been deprecated and they are intended for synchronous operations, where the data operations might potentially block or affect the final data updates to the database. Therefore, pre-data operation triggers perform some action before the data operation is completed in the database.
Example of a pre-data operation trigger: Suppose your organization has an allowlist database and you want to ensure that before an alert is created its IP address is checked against the database. If the IP address is part of the allowlist database, you do not want an alert to be created.
The following table lists the types of Pre-Data Operations triggers that have been deprecated:
| Deprecated Playbook Trigger Name | Brief description of the trigger |
|---|---|
| Pre-Create | This trigger starts the execution of a playbook immediately before inserting the selected model type to the database. You can create a Pre-Create trigger on almost all models, which includes Modules. |
| Pre-Update | This trigger starts the execution of a playbook immediately before updating the selected model type to the database. You can create a Pre-Update trigger on almost all models, which includes Modules. You add a Pre-Update trigger in the same way you added a Pre-Create trigger. |
| Pre-Delete | This trigger starts the execution of a playbook immediately before deleting the selected model type to the database. You can create a Pre-Delete trigger on almost all models, which includes Modules. You add a Pre-Delete trigger in the same way you added a Pre-Create trigger. |
Deprecated Playbook Steps
The following playbook steps have been deprecated from version 4.11 and later since most of them have been added to the Utilities step and as part of FortiSOAR Built-in connectors.
|
|
If you are using deprecated steps in your playbook, it is highly recommended that you replace those steps with the Utilities step or by using the FortiSOAR Built-in connectors since over time these steps will become obsolete and FortiSOAR will not support them. |
The following table lists the steps that have been depreciated and the step or connector that you can use instead of the deprecated step:
| Deprecated Step Name | Step or connector that replaces the deprecated step | Brief description of the step |
|---|---|---|
| Add Database Connector | Database Connector | To connect to a particular database. |
| Run Script | Utilities Connector | To run various scripts. |
| Database Query | Database Connector | To query a database to which you have established a connection. |
| Remote Command | SSH Connector | To connect to a remote machine and execute the required commands. |
| SFTP | Utilities Connector: uploadfile url operation |
To connect to a particular SFTP URL. |
| Make API Call | Utilities Connector | To make a RESTful API call to any valid URL endpoint. |
| Fetch Email | IMAP Connector | To retrieve an email from a specified host. |
| Create File from String | Utilities Connector: create file from string operation |
To create a file from a string input. |
| Download File from URL | Utilities Connector: download file from URL operation |
To download a file from a particular URL. |
| Create Attachment from File | Utilities Connector: create attachment from file operation |
To add a file to the Attachments module within FortiSOAR. |
| Map Playbook | Reference a Playbook step | To call any playbook within the system using the IRI of the playbook |
| Run Utility Functions | Utilities Connector | To run various utility functions. |
| Pause | Wait | To pause the execution of a playbook step. Note: The support for the Pause step has been completely removed. You must use the Wait step. |
| Manual Decision | Manual Input | To pause the execution of the playbook until the user or analyst who is assigned to make the decision provides the choice. to pause the execution of the playbook until the user or analyst who is assigned to make the decision provides the choice. |