
Distributed Tenancy Support
FortiSOAR introduced a distributed, multi-tenant deployment model especially tailored for Managed Security Service Providers and organizations with Globally Distributed SOC teams. In the case of the distributed tenancy model, tenants are remote, i.e., the master and each of the tenants have their own FortiSOAR instance.
Benefits of the FortiSOAR Distributed Multi-Tenancy Model
- Autonomous Tenant Nodes: Tenant nodes work independently.
- Secured Communication: Data and actions are exchanged securely.
- Privacy and Integrity of Data: Tenant's data remains in their environment, and they control how much data they want to share with the master node. All sensitive information stays with the tenant node. Since the actual workflow execution happens at the tenant node itself, the master node requires only the summary of information to help identify what investigations are to be run.
- Diversity Handling: Multiple tenants' having their unique procedures, and SLAs can be handled.
- Simplified Remediation: Use standard playbooks to triage or remediate incidents on the tenant node from the master node, and the procedures look simplified and manageable at the master node.
For example, if you have a Phishing Email Alert, the analyst at the master node just invokes a generic “Investigate Phishing” workflow. This automatically resolves and executes the procedure at the tenant node the alert came from. Hence, the workflow run aligns with the tools and procedures on every tenant. - Scalability: As data primarily resides at the tenant nodes, and the computations also happen at the tenant, a single console at the master node can easily handle multiple customers.
- No overhead on Network Infrastructure: The FortiSOAR distributed managed security service provider model does not need a VPN setup between the customer and service provider environment. Both tenants, as well as master node only, need an outbound TCP connectivity to the secure message exchange. Hence the extra network setup overhead and switching of VPNs is avoided.
Deploying and configuring FortiSOAR in a multi-tenancy environment

- Deploy and configure the Secure Message Exchange.
- Deploy and configure the Master Node.
- Deploy the master node.
- Add license: See the Licensing for Multi-Tenancy section in the Overview chapter.
- Add Secure Message Exchange.
- Onboarding Tenant Nodes.
- Deploy the tenant node.
- Add license: See the Licensing for Multi-Tenancy section in the Overview chapter.
- Add a tenant node on master.
- Configure the secure message exchange on a tenant to establish a secure connection between the master node and the tenant node.
- Data Replication.
- Push playbooks from the master node for remote execution.
- Execute remote playbooks at the tenant node from the master node.
Deploying and configuring the FortiSOAR Secure Message Exchange
A secure message exchange establishes a secure channel using which you can relay information to your agent or tenant nodes.
Contact FortiSOAR Support to provide you with secure message exchange appliance that must be installed in addition to the FortiSOAR OVA on a different Virtual Machine (VM) from your FortiSOAR VM.
|
|
You do not require any additional licensing for the FortiSOAR secure message exchange. |
From version 7.0.2 onwards, you can use client certificate based authentication to create connections between the distributed tenants and the secure message exchange. Prior to the 7.0.2 release, basic authentication using username and password was used to create connections between distributed tenants and secure message exchange. Going forward, you can configure the following types of authentication to connect distributed tenants and secure message exchange:
- Basic Authentication: Uses username and password to create connections between distributed tenants and secure message exchange.
- Basic Authentication with Peer Verification: Uses username and password to create connections between distributed tenants and secure message exchange, and also performs 'Certificate Verification'. This process will verify that the clients which are attempting to connect can be trusted by presenting a certificate that is signed by a CA and trusted by the server; thereby ensuring that only trusted clients can connect to the secure message exchange.
- Client Certificate Authentication: Presents a certificate to the server which is signed by a trusted CA, and which uses the Common Name (CN) as the username when an agent or tenant tries to connect with the secure message exchange. It is recommended that you create the certificate with the common name as the name of your agent or tenant. This provides enhanced security as this gives the facility to connect only to trusted clients.
To enable client certificate authentication, you can specify the authentication type as 'Certificate Auth' while adding a distributed tenant.
To enforce client certificate verification, you must provide a pair of exchange event listener client certificates and exchange event listener client key when you are adding a secure message exchange. Client verification ensures that whenever any client wants to connect to secure message exchange that client must present the client certificate to the secure message exchange for verification. You must also provide the pair of exchange event listener client certificates and exchange event listener client key if you have enabled mutual TLS (mTLS). Use the csadm mq mtls command to enable or disable mTLS. For more information on csadm, see the FortiSOAR Admin CLI chapter in the "Administration Guide.
Deploying the FortiSOAR Secure Message Exchange
- Deploy the FortiSOAR Secure Message Exchange, which is the same as deploying a FortiSOAR Virtual Appliance. See the Deploying FortiSOAR chapter in the "Deployment Guide" for detailed information on how to deploy the FortiSOAR Virtual Appliance. Steps are as follows:
- Review and ensure that you meet the recommended resources required to deploy the FortiSOAR secure message exchange (same as FortiSOAR Virtual Appliance).
- Import the FortiSOAR secure message exchange (same as FortiSOAR Virtual Appliance).
- Deploy the FortiSOAR secure message exchange using vSphere/vCenter or AWS (same as FortiSOAR Virtual Appliance).
Configuring the Secure Message Exchange
After you have completed deploying the secure message exchange appliance, and when you log in to the secure message exchange appliance using ssh for the first time, the FortiSOAR Secure Message Exchange Configuration Wizard is displayed. The wizard guides you through the RabbitMQ configuration process with appropriate instructions so that you can efficiently perform the configuration required for RabbitMQ.
The wizard performs the following configuration steps:
- Hostname Change (Optional): You can change the hostname for your RabbitMQ VM. The wizard checks if the hostname is valid or not; and throws an error in case of an invalid hostname.
You must change the hostname to a resolvable hostname using which the master and tenant nodes can connect to the secure message exchange. - Add DNS Name or IP Address (Optional): You can change the DNS Name or IP address for your RabbitMQ VM.
- Add Username (Optional): Username that you will use to connect to the RabbitMQ management console. If you do not specify any username, then by default, the username is set as
admin. - Add Password: Password that you will use to connect to the RabbitMQ management console. You must mandatorily specify the password.
Note: Ensure you retain a copy of this password. FortiSOAR does not save the password in any file on the secure message exchange for security reasons. Therefore, this password cannot be recovered. - Add SSL port (Optional): Specify an SSL port between
49152and65535for RabbitMQ management console. By default, this port is set as15671. - Add TCP port (Optional): Specify the management TCP port between
49152and65535. By default, this port is set as5671.
Once you specify the above parameters, the FortiSOAR Secure Message Exchange Configuration wizard gets ready to configure your secure message exchange, which includes generating Self-Signed Certificates for RabbitMQ.
Important: You get logged out after the FortiSOAR Secure Message Exchange is configured so that the changes can take effect. Therefore, you are required tosshagain to the FortiSOAR Secure Message Exchange VM.
Note: The configuration log for FortiSOAR Secure Message Exchange is located at/var/log/cyops/install/config_vm_<timestamp>.
For example,/var/log/cyops/install/config-vm-30_Oct_2018_12h_50m_38s.log`
The FortiSOAR Secure Message Exchange Configuration Wizard also displays the path of the Secure Message Exchange configuration log.
Replacing the self-signed certificates on the secure message exchange with signed certificates
It is highly recommended that the certificates used for encrypted communication between the FortiSOAR nodes and the secure message exchange should be signed from the Certificate Authority.
To replace the self-signed certificates on the secure message exchange with signed certificates, do the following:
- Replace the following files on your FortiSOAR secure message exchange with the corresponding signed files from the Certificate Authority:
- CA Certificate:
/opt/cyops/configs/rabbitmq/ssl/cyopsca/cacert.pem - Server Certificate:
/opt/cyops/configs/rabbitmq/ssl/server/cert.pem - Service Private Key:
/opt/cyops/configs/rabbitmq/ssl/server/key.pem
Note: A.keyfile has the path to a PEM encoded file containing the private key. A.pemfile has the path to a PEM encoded file containing the certificate (or certificate chain) that will be presented when requested.
- CA Certificate:
- Restart the RabbitMQ server and all its related services using the following command:
# systemctl restart rabbitmq-server.
Deploying the Master Node
See the Deploying FortiSOAR chapter in the "Deployment Guide" for detailed information on how to deploy the FortiSOAR Virtual Appliance. Steps included in deploying the master node:
- Review and ensure that you meet the recommended resources required to deploy the FortiSOAR Virtual Appliance.
- Import and deploy the FortiSOAR Virtual Appliance using vSphere/vCenter or AWS.
- FortiSOAR Configuration Wizard
FortiSOAR Configuration Wizard runs automatically on the firstsshlogin by thecsadminuser and performs the initial configuration steps that are required for FortiSOAR and performs tasks as is the case with the FortiSOAR enterprise OVA. It generates a Device UUID for your FortiSOAR instance. Use this Device UUID to generate the FortiSOAR license in FortiCare so that you can begin using FortiSOAR. Ensure that you generate a license that has its edition set to "MT".
Adding the secure message exchange on the master node
|
|
Only if your FortiSOAR license has been enabled for multi-tenancy you will see a Multi Tenancy section on your |
To add the secure message exchange on the master node, do the following:
- Log on to FortiSOAR as an administrator.
- Click the Settings (
 ) icon to open the
 Systempage. - On the
Systempage, you will see theAgent Configurationssection. Click the Secure Message Exchange item in the left menu, to configure the secure message exchange on the master node.
- Add a secure message exchange to the master node and add the reference of this secure message exchange in the tenant or agent node(s) to create a dedicated secure channel of communication.
You can have more than secure message exchange in the configuration. You can distribute tenants across secure message exchanges based on the geographical locations, scale, or compliance policies of the respective customers.
Note: You should have already configured the secure message exchange using the steps mentioned in Configuring the Secure Message Exchange.
To add a secure message exchange, click Add on theSecure Message Exchangespage.
Important: To add a secure message exchange and configure tenants, you must have a role that has a minimum ofCreate,Read, andUpdatepermissions on the Secure Message Exchange and Tenants modules.
To edit the configuration of an existing secure message exchange, click the secure message exchange row whose configuration you want to update. This displays theEdit Secure Message Exchangedialog. Update the configuration parameters, as required, in the dialog and click Update. - In the
Add New Secure Message Exchangedialog, configure the following parameters:- In the Name field, enter the name of the secure message exchange that you have configured to act as a secure channel of data replication between the master and tenant nodes.
- In the Address field, enter the FQHN (Fully Qualified Host Name) of the secure message exchange.
Important: Ensure that the FQHN matches the Certificate Name (CN) or the Subject Alternative Name (SAN) provided in the SSL certificate used to configure the secure message exchange. - In the Username field, enter the username you will use to login to your secure message exchange as an administrator.
By default, it is set asadmin. - In the Password field, enter the password you will use to login to your secure message exchange as an administrator.
- In the Server Name Indication field, enter the Server Name Indication (SNI) address for the Secure Message Exchange. You must specify the SNI address when the Secure Message Exchange is behind a reverse proxy or in a cluster behind a load balancer such as FortiADC.
- In the API Port field, enter the RabbitMQ Management port number that you had specified while configuring the secure message exchange, and ensure that the master node has outbound connectivity to the secure message exchange at this port.
By default, it is set as15671. - In the TCP Port field, enter the TCP port number that you had specified while configuring the secure message exchange, and ensure that the master node has outbound connectivity to the secure message exchange at this port.
By default, it is set as5671. - In the CA Certificate field, copy-paste the certificate text of the Certificate Authority (CA) that has signed the secure message exchange certificate in the
pemformat. If it is a chain, then the complete chain must be provided.
By default, the CA certificate for the FortiSOAR self-signed certificate is present at the following location:/opt/cyops/configs/rabbitmq/ssl/cyopsca/cacert.pem.
Important: If in the future, your secure message exchange certificate expires, and you need to deploy a new certificate, then the new certificate must be copied back to the master node as well as the tenant's router entry. - (Optional) If you have enabled mTLS, i.e., you require that clients that want to connect to secure message exchange must present the client certificate to the secure message exchange for verification, then you must also provide a pair of exchange event listener client certificates and exchange event listener client key, as follows:
- In the Exchange Event Listener Client Cert field, copy-paste the client certificate text or you can also upload the client certificate file.
- In the Exchange Event Listener Client Key field, copy-paste the client key text or you can also upload the client key file.
Note: If you have enabled mTLS on secure message exchange, and you have added the secure message exchange client certificate and key after the tenant is added or if you have updated the secure message exchange client certificate and key after they have expired, then you require to first disable and again enable the agent to re-trigger the event listener and update agent status correctly.
- To save the configuration for the secure message exchange on the master node, click Create.
|
|
A default "Self" entry is created for every master node and you can directly link agents to the master node. For more information on agents, see the Segmented Network support in FortiSOAR chapter in the "Administration Guide." |
Onboarding tenant nodes
From version 6.4.1 onwards, a default agent is automatically created and added to a dedicated tenant as part of the tenant creation process. For more information on agents, see the Segmented Network support in FortiSOAR chapter in the "Administration Guide." You can add multiple agents to a tenant, therefore, tenants become a wrapper that can contain various agents that can connect to various disparate networks and execute actions remotely.
Deploying tenant nodes
Deploy tenants as required. See the Deploying FortiSOAR chapter in the "Deployment Guide" for detailed information on how to deploy the FortiSOAR Virtual Appliance. Steps included in deploying a tenant node:
- Review and ensure that you meet the recommended resources required to deploy the FortiSOAR Virtual Appliance.
- Import and deploy the FortiSOAR Virtual Appliance using vSphere/vCenter or AWS.
- FortiSOAR Configuration Wizard
FortiSOAR Configuration Wizard runs automatically on the firstsshlogin by thecsadminuser and performs the initial configuration steps that are required for FortiSOAR and performs tasks as is the case with the FortiSOAR enterprise OVA. It generates a Device UUID for your FortiSOAR instance. Use this Device UUID to generate the FortiSOAR license in FortiCare so that you can begin using FortiSOAR. Ensure that you generate a license that has its edition set to "MT_Tenant" or "MT_RegionalSOC".
Adding a tenant node on the master
On the top of the Tenants page, you will see the tenant ID of the master node, and also see Licensed as Master node text. You must use the tenant ID of the master when you are adding details of the master node on the tenants' node.
- Log on to your FortiSOAR master node as an administrator and click the Settings icon to open the
Systempage. - To add tenants associated with a master node, in the
Multi Tenancysection, click Tenants in the left menu and on theTenantspage, click Add.
To edit the configuration of an existing tenant, click the tenant whose configuration you want to update, which opens the agent record in the detail view. Update the configuration parameters as required, and click Save.
If you no longer require an existing tenant you can deboard that tenant. Deboarding a tenant is an irreversible operation which also deletes all data related to that tenant from the master node. For more information see the Deboarding Tenants section in the Shared Tenancy chapter.
You can deactivate agents associated with the tenants. To deactivate an agent, open the agent record, and clear the Enabled checkbox in that record. - In the
Add Tenantdialog, configure the following parameters:- From the Choose Tenant Type field choose the type of tenant you want to add.
In this case, select Dedicated to add this tenant as a remote or dedicated tenant. Remote or Dedicated tenants have their own FortiSOAR instance and do not share the current FortiSOAR instance with the Master. - In the Tenant ID field, enter the ID of the tenant, which is the Device UUID of the tenant's FortiSOAR instance.
- In the Tenant Name field, enter the name of the tenant.
- (Optional) In the Description field, enter the description of the tenant.
- From version 6.4.1 onwards, a default agent is automatically created and added to a dedicated tenant as part of the tenant creation process. For more information on agents, see the Segmented Network support in FortiSOAR chapter in the "Administration Guide."
- From the Secure Message Exchange drop-down list, choose the secure message exchange that you have configured as the secure channel using which you can relay information to your agent or tenant nodes.
- From the Auth Type drop-down list, select the type of authentication you want to enforce for tenants or clients to connect to the secure message exchange
- If you have selected Certificate Auth from the Auth Type drop-down list, then in the Client Certificate field, copy-paste the client certificate text of the Certificate Authority (CA) that has signed the secure message exchange certificate in the
pemformat. You can also upload the client certificate file.
If you want to enforce client certificate verification with Basic Auth then also you must provide client certificate in this field, so that the secure message exchange will verify the certificate before allowing connection to any client.
Note: If you are using CA signed certificates, you must add these certificates to the truststore. For more information, see the FortiSOAR Admin CLI chapter in the "Administration Guide." - Similarly, in the Client Key field, copy-paste the client key text or you can also upload the client key file.
- From the Owners drop-down list, select the teams that you want to add as owners of the agent and of the records coming from this tenant and click Link Team. The teams that you have selected will be associated as owners of any record created for that tenant.
As shown in the following image, the SOC Team and the Tenant L-01 team will be assigned to any record that comes from this tenant.
- From the Choose Tenant Type field choose the type of tenant you want to add.
- To complete adding a new tenant associated with the master node, click Save.
As tenants as just a wrapper, there will be no configuration state associated with a tenant. However, in case of dedicated tenants, a default agent is automatically created and added to a dedicated tenant as part of the tenant creation process. Therefore, you can expand the row of the tenant and check the connection between the agent and the master node using secure message exchange. Once the connection is established from the master node to the agent, the Status field displays "Remote Node Connected". To know more about the statuses, see the List of Statuses section in the Shared Tenancy chapter.
You can export the configuration of an agent in theJSONformat using the Export Config link, in the agent row that represents the dedicated node and therefore contains the configuration of the tenant. ThisJSONfile containing the configuration of the tenant can then be imported on theMaster Configurationpage of the tenant node on which you are configuring the secure message exchange, by clicking the Import Master Config link.
From FortiSOAR version 6.4.4 onwards, you might also see a Warning symbol in theAgents Actioncolumn, if the master node cannot remotely execute or manage connector actions on the agent node.
From version 7.0.2 onwards, the tenant's agent grid will also contain a Certificate Expiry column, which displays when the client certificate will expire in case of Certificate Authentication or Basic Authentication with Peer Verification. Whereas it will display a blank in case of Basic Authentication.
You can add multiple agents to a tenant by linking the respective agents to the tenant by opening the detail view record of the tenant and in the Owners section, click the Agents tab, and click Link to open the Link Agents dialog that contains a list of configured agents. Select the agent that you want to associate with the tenant and click Save Relationship. Note that the linking of agents to tenants is just representational, and RBAC is governed by the "Owners" that you specify for the agent.
Configuring the secure message exchange on a tenant to establish a secure connection between the master node and the tenant node
- Log on to your FortiSOAR tenant node as an administrator and click the Settings icon to open the
Systempage. - On the
Systempage, you will see theMulti Tenancysection. Click the Master Configuration item on the left menu, to configure your tenant node.
On theMaster Configurationpage, you will see the tenant ID of the tenant. You must use the Tenant ID of the tenant when you are adding details of the tenant node on the master node. You will also see the text such as:Licensed as Tenant node: Master's Tenant ID <ID value>.Tenant IDis the Device UUID of the tenant.Master's Tenant IDis the Device UUID of the master's FortiSOAR instance.
Important: To configure the master node, you must have a role that has a minimum ofCreate,Read, andUpdatepermissions on the Secure Message Exchange and Tenants modules.
TheConfigure Mastersection displays the master and secure message exchange configuration details, and the status of configuration. You can see the following labels, in theStatusfield and in the image that displays the connection between the master and the secure message exchange. These labels signify the connection status between the master and secure message exchange:- Not Configured: Secure Message Exchange has not been configured.
This will display Inactive in the image displaying the connection between master and secure message exchange. - Configuration In Progress: Configuration of the secure message exchange is in process.
This will display Inactive in the image displaying the connection between master and secure message exchange. - Configured: Connection between the master and secure message exchange is established without errors.
This will display as Connected - Data Replication ON in the image if data replication is on from this tenant node to the master node.
This will display as Connected - Data Replication OFF in the image if data replication is turned off from this tenant node to the master node. - Configuration Failed: Connection between the master and secure message exchange is not established, due to either, wrong configuration or network failure.
This will display Disconnected in the image displaying the connection between master and secure message exchange.
- Not Configured: Secure Message Exchange has not been configured.
- (Optional) To stop communication and replication of data, from this tenant to the master, click the YES button appearing beside Enabled. Disabling stops the master from receiving any data from this tenant and now the master cannot remotely manage modules and connectors of this tenant and you will see NO in the Enabled field, as shown in the following image:

This global enable/disable button stops the communication from the tenant to the secure message exchange, and the tenant can no longer send data. However, data coming from the master is yet available at the secure message exchange, and once the tenant node resumes communication, the data from the master is available for consumption by the tenant. The tenant node continues to receive data from the master if sharing of data is enabled from the master node to the tenant node. You can use this option to suspend external communication from the tenant to the secure message exchange/master in cases such as, a planned downtime for regular maintenance. Once such activity is completed the tenant node can enable the communication again and replay the stored messages. - (Optional) To disallow the master to push picklists and make changes to its (the tenant's) model metadata (MMD) and push those changes to the tenant node, i.e., to disallow the master to make changes to the tenant's mmd, click the YES button appearing beside Allow Module Management, which turns this button to NO.
- (Optional) To disallow the master the ability and permissions to remotely execute and manage the connector actions at the tenant node, click the YES button appearing beside Allow Connector Management, which turns this button to NO. For more information, see the Managing connectors of distributed tenants section.
- (Optional) To delete the configuration of the master node from a tenant node, click Remove.
Note: To remove configurations of the master from the tenant node, you must haveReadandDeletepermissions on theSecure Message Exchangemodule. - To configure the secure message exchange on the tenant and establish a secure connection with the master, click Edit Configuration in the
Configure Mastersection, and choose one of the following methods to complete the configuration:- Export the configuration of the tenant in the
JSONformat, from your master node, by clicking the Export Config link in the agent row. The agent that has the Export Config link represents the dedicated node, and therefore contains the configuration of the tenant and itsAgent Typewill be set as "FSR Node". You can view the agents added to the tenant by expanding the tenant row. If the tenant has multiple agents associated with it, then only the dedicated node will have the Export Config link, all remaining agents will have the Download Installer link and theirAgent Typewill be set as "FSR Agent".
You can then import this JSON file on theMaster Configurationpage of the tenant node on which you are configuring the secure message exchange, by clicking the Import Master Config link.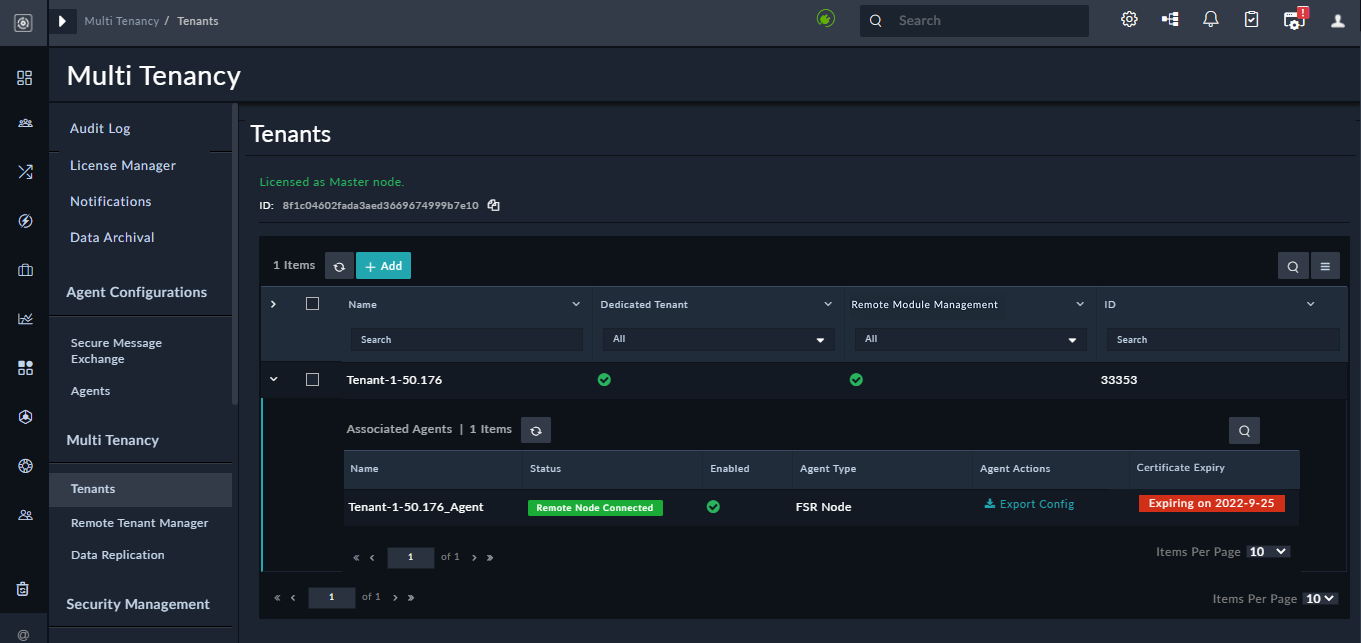
OR - Add the details manually:
- To add a secure message exchange, click Add Master on the
Master Configurationpage.
To edit an existing secure message exchange configuration, click Edit Configuration in theConfigure Mastersection. - In the Configure Master dialog, configure the following parameters:
Note: The Master ID is a read-only field that displays the Device UUID of the master's FortiSOAR instance.- In the Address field, enter the IP address of the secure message exchange, which should match the IP address that you have specified when configuring the secure message exchange.
- In the TCP Port field, enter the TCP port number that you had specified when configuring the secure message exchange for this tenant. By default, it is set as
5671. - In the CA Certificate field, copy-paste the certificate text of the Certificate Authority (CA) that has signed the secure message exchange certificate in the
pemformat. If it is a chain, then the complete chain must be provided.
By default, the CA certificate for the FortiSOAR self-signed certificate is present at the following location on the secure message exchange:/opt/cyops/configs/rabbitmq/ssl/cyopsca/cacert.pem.
Important: If in the future, your secure message exchange certificate expires, and you need to deploy a new certificate, then the new certificate must be copied back to the master node as well as the tenant's router entry. - From the Owners drop-down list, select the teams that you want to add as an owner to the records coming from this tenant, and click Link Team. The teams that you have selected will be associated as owners of any record created for that tenant on the master, either manually or using an Custom API Endpoint trigger.
Note: If a record is created on the master manually, then the teams that are selected in the Owners drop-down list will be associated as owners of that record. Similarly, if any record is created using an Custom API Endpoint trigger, then that record will also be owned by the teams selected in this Owners drop-down list, irrespective of whether these are the teams assigned to the appliance (Settings > Appliances > Team and Role).
- To save the configuration for the master node on a tenant node, click Save.
Once you click save, FortiSOAR checks the connection between the master and secure message exchange, and if a connection can be established without errors, the status is displayed as Connected.
- To add a secure message exchange, click Add Master on the
- Export the configuration of the tenant in the
|
|
If you have your master and secure message exchange that are in one network and the tenants on another network, then you must ensure that both the master and tenant must be able to resolve the secure message exchange hostname using either a Public or Private IP. |
Replicating data between the master and the tenant nodes
To leverage bidirectional synchronization of data for updates between the master and the tenant node, you must enable data replication of modules on both the master and the tenant nodes. Tenants can configure and control the data that is shared with the master node.
From version 7.0.0 support has been added for file replication between the master and tenant nodes. Therefore, records containing the "file" type fields or records with correlations that map to modules containing "file" type fields also get replicated. For example, now you can replicate 'Alert' records that contain 'Attachments' correlations.
|
|
In case a conflict is observed between the master copy and the tenant copy for record(s), the tenant copy of the data will be retained. |
On the Data Replication page, you will see the list of modules. You can control the data that you want to share at the module level and also at the field level, enabling you to maintain data security and ensuring that you do not share sensitive data.
Notes on data replication:
- On the tenant node, you can configure and control what data should be shared with the master node. Using field controls, you can choose the fields that you want to share with the master node, thereby ensuring the security of your sensitive data. On the Tenant node, by default, the
Alerts,Emails,Incidents, andIndicatorsmodules and all its fields are marked as replicable. - On the master node, you can configure and control what data should flow from the tenant nodes. Records from only those modules that are marked for data replication are replicated from the tenant nodes. On the Master node, post-initial license deployment, all existing modules along with all their fields are marked as replicable, except for the
Peoplemodule. - You can mark any module as replicable on their peers by selecting the module and clicking the Data Replication checkbox on the
Modulespage (Application Editor > Modules).
Considerations for Recycle Bin
FortiSOAR version 7.2.0 adds a 'Recycle Bin' to support soft delete of workflow and module records; so that in the case of accidental deletion of playbook collections, playbooks or module records these records can be restored. For more information on the Recycle Bin, see the "Administration Guide."
|
|
In the case of MSSP environments, if any module is enabled for the Recycle Bin, then it is recommended that it should be enabled on both the master and tenant systems. |
In the case of MSSP environments, if both the master and tenant systems have enabled recycle bin on a specific module, then any record that is moved to the recycle bin on the master node also gets moved to the recycle bin on the tenant nodes. However, if only the master or any tenant enables the recycle bin and not vice-versa, and if a record is deleted from the master (who has enabled the recycle bin) then that record gets permanently deleted from the tenants (who have not enabled the recycle bin. Similarly, if a record is restored on the master, then the record also gets replicated back on the tenant nodes; however, the record gets created as a new record on the tenant side.
On the tenant node
- Log on to your FortiSOAR tenant node as an administrator and click the Settings icon to open the
Systempage. - In the
Multi Tenancysection, click Data Replication in the left menu to display theData Replicationpage.
Use theData Replicationpage to configure the following:- To share records of a module, in that particular module's row, select the checkbox in the Data Replication column.
This sets up data replication between the tenant node and the master node for the particular module.
- To specify the fields that should be replicated between the tenant node and the master node, click the Edit icon in the Field Level Data Replication Control column to display the Field Data Replication dialog.
Note: By default, all fields of a module are set up as replicable.
TheField Data Replicationdialog contains a list of fields that are part of the selected module. To remove data replication for a particular field, clear the checkbox that appears in the Replicable column in the field's row.
Important: Ensure that you do not switch off the replication of the “required” record fields, as that will lead to the failure of record creation on the master node.
- To share records of a module, in that particular module's row, select the checkbox in the Data Replication column.
- To save your changes, click Save.
Custom Module Considerations
When you create a custom module on a tenant node, you must consider the following points:
On the Tenant Node
- By default, replication is turned off (for both master and tenant) for any custom module you create on the tenant node. Therefore, if you want to replicate the fields of the tenant node to the master node, you can enable replication of that module by setting data replication to true at the module level. You can set data replication to true by selecting the module and clicking the Data Replication checkbox on the
Modulespage (Application Editor > Modules).
On the Master node
- Ensure that the custom module that has been created on the tenant node is present on the master node, with data replication enabled for all the required fields. You can achieve this by exporting the custom module from the tenant node and importing the same into the master node. You must ensure that all the relationships of the custom module are kept intact during the export-import process.
- Ensure that the custom picklists are exported and imported correctly into the master node.
Posting of comments from the master node to the tenant node
Comments get pushed from the tenant node to the master node by default. However, if you add a comment on the master node in a tenant record, which you want to push onto the tenant node, then click the Also Post On Tenant Record checkbox in the collaboration panel of the record on the master node. Once you click the Also Post On Tenant Record checkbox, then the comment appears with a shared icon on the master node:

On the tenant node the pushed comment appears with the "Master" label:

From version 7.0.0 onwards, you can add attachments (files) to comments and those comments along with the associated files get replicated between the respective master and tenant nodes.
|
|
Users with appropriate permissions can edit or delete comments and the same will be reflected on the respective master or tenant nodes, i.e., if a comment is edited on a master node, the same will be reflected on the tenant node. For more information on editing comments, see the Working with Modules - Alerts & Incidents chapter in the "User Guide." |
If you have a playbook containing steps with "Messages" being added to the record that triggers the playbook on the master node, you can choose to replicate the comments that are linked to the record on the tenant node, so that a user on the tenant node can follow the investigation that is being conducted on the record. To replicate comments on the tenant node, click the Also send this message to specified tenant checkbox, and from the Select Tenant drop-down list, select the tenant node on which you want to replicate the comments or click {} to specify tenant IRIs in this field.

On the Master node:
Ensure that the modules that require to be replicated and synchronized bidirectionally are enabled for replication on the master node. By default, all modules are marked as replicable on the master node. If you want to change this configuration follow the same steps on the master node, as mentioned above for the tenant node.
On the master node, users can identify records using the UUID of the record, which is common for both master and tenants' records. You can get the UUID of the record by clicking the record, and the UUID will be shown on the URL bar in the format: /view-panel/<moduleName>/UUID?. Also, on the master node, in the Grid or Listing view, each module that is replicable will have Tenant as a column, by default, as shown in the following image:

If no tenant is assigned while adding the alert, i.e., if the alert is created on the master, then that record is created as a "Self" record, i.e., Self will appear in the Tenant column. Note that from version 7.0.2, if the value of the tenant associated with a record is set to "Self", then you are allowed a one-time edit of the tenant field.
|
|
For modules that are being replicated, it is important that assignments, SLA computations, and other On Create or On Update playbooks are active only on one of the nodes (either master or tenant). Not doing so can lead to unnecessary data traffic and conflict on the records due to simultaneous updates on both the nodes, since updates on each record are synced bidirectionally. |
When a record is replicated from a tenant node onto the master node, in the detail view of the record, a new field named Tenant Record ID is added and populated with the ID of the record on the tenant node. When a record is replicated from a tenant node to the master node, its ID differs on both the nodes. Therefore, knowing the ID of the record on the tenant node makes it easier to identify the replicated record.
For example, in the following image, the ID of the alert on the master node is Alert-44, and the ID of the record on the tenant node is 44 and the tenant is Tenant-01, thus making it easier to identify the alert record:

Similarly, in the grid view of the alert module on the master node, you will see a Tenant Record ID column that lists the IDs of the tenant records:

Required permissions for data replication
The FortiSOAR Routing Service hosted at each of the nodes uses an Appliance User for applying updates coming from the remote node. This Appliance User is displayed as the Master User on a tenant node and as the Tenant user on the master node. For all records updated from one node to the other, this appliance user should have the necessary permission on the replicated modules to create and update the records.

Default Ownership of records replicated from the tenant nodes to the master
For records replicated from a tenant node to the master node, the record would have the same ownership as that for the tenant by default. Therefore, to define which team should have visibility of alerts coming in from a particular tenant, assign the specific team as the owner of the particular tenant. In addition, the records will be visible to the agent appliance teams. You can assign owners of the records belonging to the tenant directly when you are adding tenants on the master node, see the Adding a tenant node on the master section.
Resolving of conflict of data between the master and tenant nodes
Post creation of a record, only the changed or updated attributes of the record are synced bidirectionally. However, when a record is updated simultaneously at both the nodes, it could lead to conflicts and override the updates at the respective nodes. If there is such a conflict, then the tenant copy of the data will be retained.
To address such scenarios, when an update to a record, which is updated at the master node, arrives at the corresponding tenant node, the routing service compares the modified time of the record at the remote node against the last modified time of the record at the local node. If the local modified time is found to be greater, the update from the master node is rejected, and the record is marked for conflict. Subsequently, a complete sync of the latest copy of the record at the tenant node is automatically sent to the master node.
|
|
Since the modified time of the records at the distributed nodes are compared, it is important that the time at the nodes are in sync with a common NTP server. For example, time.apple.com. |
Handling of network outages or loss of connectivity between a node and the secure message exchange
When a node loses connectivity to the secure message exchange, all outbound messages are stored locally by the routing service hosted on the node. This replicator log is automatically replayed once the connectivity is restored.
All inbound messages from other nodes to the said node are persisted at the secure message exchange. These messages get automatically delivered once the connectivity is restored.
For more information, see the Troubleshooting chapter.
Handling a mismatch in the module metadata of replicated modules
When a module, say the Alert module, is configured for replication from the tenant node to the master node, the module replication would work seamlessly, if the metadata at both the nodes is identical. However, if there is an MMD (module metadata) difference or in case of custom picklists, the following must be ensured:
- If there is a difference in the module metadata at the two nodes, or if some fields are excluded from replication, these must be fields that are "not-required" for record creation. Else, record replication to the target node will fail due to missing required fields.
- For custom picklists added to a module being replicated, the picklist item IDs should be the same at both the nodes. You can ensure this by exporting picklists from one node and importing them to the other node using the
Configuration Manager. For more information, see the Application Editor chapter in the "Administration Guide."
Creating the picklists manually at each node would result in a difference in the IDs. Since the record replication works on record IDs, the picklist values would not be correctly replicated, if there is a mismatch in the IDs.
Whenever a record replication fails to get applied at the target node due to the reasons mentioned above, an entry will be created in the Audit Logs with the type Replication Failure. These audit entries can also be seen on the respective records if any update from a remote node fails to be applied due to any metadata changes done later.
Managing connectors of distributed tenants
Prior to version 6.4.4., all the connector installations or configurations done at the distributed tenant node replicated back to master, by default. To disallow the master from remotely executing connector actions on the tenant, the ENABLE_REMOTE_CONNECTOR_OPERATION parameter required to be set to false in the agent's (associated with the tenant) rpm config.ini file (/opt/cyops-integrations/integrations/configs/config.ini). The ENABLE_REMOTE_CONNECTOR_OPERATION parameter is set to true by default. However, in this case, the master node did not get notified that its tenant had turned off this remote operation setting. Due to which if the master triggers any remote request then that would get ignored by the tenant since the remote operation had been disallowed. Therefore, from version 6.4.4 onwards, you can allow or disallow the master from managing and executing connector actions, including actions executed using remotely executable playbooks ("Reference Remote Playbooks") on the tenant node, using the FortiSOAR UI. Remote connector management is achieved using the Allow Connector Management button on the on the Master Configuration page of the tenant node. To remove the master's ability and permissions to remotely manage and execute connectors on the tenant node, toggle the Allow Connector Management button to NO.
|
|
To disallow the master from remotely executing connector actions on an agent, ensure that the agent's version must be 6.4.4 and later |
Once you set the Allow Connector Management button to NO, the master node is notified and the master node can no longer send remote connector requests to such tenants.
|
|
If you have upgraded a tenant node to version 6.4.4 and later from a version prior to 6.4.4, in which you had changed the value of the |
Managing Remote Tenants
The "Remote Tenant Manager" helps the master remotely manage playbooks, pushing and mapping playbooks and tenants' data, including picklist and modules. The master node can make changes to the tenants' model metadata (MMD) and push those changes on the tenant node.
Pushing playbooks from the master node for remote execution
The playbook mapping page displays a list of playbook aliases and their mappings to various tenants. A playbook alias makes it easier to reference tenant playbooks in the Remote Reference Playbook step in the playbook designer. For example, you might have a collection of "Remediation" playbooks, such as playbooks to block an IP address and a playbook to check the reputation of an IP address using a 3rd party threat intelligence tool such as Anomali ThreatStream. Or you might also have a number of "Investigate BFA" playbooks such as, Investigate BFA using Splunk, Investigate BFA using QRadar, or Investigate BFA using LogRhythm, which could map to different tenants having or using different SIEM products. You can use the Playbook Mapping page to push the playbook collection to any or all of your tenant nodes.
To create an alias, you must ensure that the Remote Executable setting for the playbook is enabled in the playbook designer. For more information, see the Executing remote playbooks at the tenant node from the master node section.
|
|
When a playbook is pushed from the master node to the tenant node, then if you have assigned a playbook step, for example, manual input step, to a specific user or team, then the ownership of that playbook step gets reset. |
To push playbook collections on the tenant nodes, do the following:
- Log on to your FortiSOAR master node as an administrator and click the Settings icon to open the
Systempage. - In the
Multi Tenancysection, click Remote Tenant Manager in the left menu. - Click the Push Playbooks tab.
ThePush Playbookspage displays a list of playbook alias and their mappings to various tenants. A playbook alias makes it easier to reference tenant playbooks in the Remote Reference Playbook step in the playbook designer. To create an alias, you must ensure that the Remote Executable setting for the playbook is enabled in the playbook designer. For more information, see the Executing remote playbooks at the tenant node from the master node section.
For example, you might have a collection of Remediation playbooks that you want to push to any or all of your tenants. - On the
Push Playbookspage, from Choose Playbook Collections, select the playbook collection(s) that you want to push on tenant nodes from the master node. - From Choose Tenant(s), select the tenant(s) to whom you want to push the playbooks and click the TO arrow.
The Choose Tenant(s) list lists only those tenants that are active and whose connections are verified.
You can also search for playbook collections and tenants using the search functionality.
- By default, the Replace existing collections with same name checkbox is selected, which signifies that if there is an existing playbook collection with the same name (ID) on the tenant node, then that playbook collection will get replaced on the tenant node.
In case you want to keep the existing playbook collection on the tenant node, then you must clear the Replace existing collections with same name checkbox. In this case, the existing playbook collection is not replaced on the tenant node. - To push the mapped playbooks on the tenant nodes, click Push Playbooks.
The pushed playbook collections are maintained on the master node, and they are cloned and mapped on the tenant node, i.e., the Push action creates a copy of playbook on the tenant node. Therefore, the playbook on the master and the tenant copy is maintained separately on the respective nodes.
If any changes are required to the playbooks, then playbook(s) can be updated in the following ways:
Changes can be made on the master node and then pushed again to the tenant node. Ensure that you select the Replace existing collections with same name checkbox in this case.
Changes can be made on the tenant node itself. The updated playbook on the tenant node will not replace the playbook on the master node.
Managing Playbook Mappings
You can manage your playbook mappings by adding alias names that facilitates referencing of a tenant playbook or you can also remap an existing alias.
- Log on to your FortiSOAR master node as an administrator and click the Settings icon to open the
Systempage. - In the
Multi Tenancysection, click Remote Tenant Manager in the left menu. - Click the Manage Playbook Mappings tab.
- To add a new alias name, click Add Alias and click Create.
Alias names are used in the Reference Remote Playbook step.
- If you want to remap an existing alias to a different alias, expand Rename Alias, and then click the Re-map To Different Alias link. This displays a
Remap Playbookdialog, using which you can select (map) the appropriate playbook:
Pushing picklists from the master node to the tenant node(s)
You can push picklists from the master node to the selected tenant node(s). This operation will replace the picklists that are present in the selected tenant node(s) with the picklists from the master node.
- Log on to your FortiSOAR master node as an administrator and click the Settings icon to open the
Systempage. - In the
Multi Tenancysection, click Remote Tenant Manager in the left menu. - Click the Push Picklists tab.
- From the Choose Picklist list select the picklists that you want to push from the master node to the tenant node(s).
- From the Choose Tenant(s) list select the tenant(s) to which you want to push the picklists and click the TO arrow.
The Choose Tenant(s) list lists only those tenants that are active and whose connections are verified, and those who granted permissions to the master to modify their mmd.
You can also search for picklists and tenants using the search functionality.
- Click Push Picklists.
Important: Clicking Push Picklists completely replaces the picklists at the tenants' picklists (none of the existing picklists will be retained at the tenants' node) with the master's picklists.
Editing the tenant's model metadata at the master and then pushing the model metadata to remote tenants
The master node can make changes to the tenants' model metadata (MMD) and push those module changes, and can also push picklists, to the tenant node. Similarly, if tenants make any changes to their mmd, those changes will also reflect on the master.
To allow the master node to remotely edit the tenant's modules and push picklists, the tenant requires to allow the master to control its mmd. This is managed by the Allow Module Management button on the on the Master Configuration page of the tenant node. To allow the master node to control the mmd of the tenant's node, ensure that the Allow Module Management button is set to YES.
On the master node do the following to update tenants' mmd:
- Log on to your FortiSOAR master node as an administrator and click the Settings icon to open the
Systempage. - In the
Multi Tenancysection, click Remote Tenant Manager in the left menu. - Click the Manage Modules tab.
By default, the Edit Tenant Modules button will be highlighted. - At the top-right of the
Edit Tenant Modulespage, from the Select a Tenant drop-down list, choose the tenant's whose mmd you want to modify. - From the Select a module to edit or create a new module drop-down list, either create a new module or choose the module that you want to modify for the selected tenant.
Note: The picklists that appear in the Fields Editor tab for the selected tenant are the picklists of the master node. Therefore, you must ensure that the picklists between the master and tenant nodes are synchronized for successful modification of a tenant MMD.
For example, if you are adding a new module, then you must ensure that you have added any picklist that is associated with the new module at the master node, then using the Push Picklist tab you should push the picklist to the tenant nodes that require that picklist. This ensures that the picklists are synchronized between the master and the tenant nodes.
- Add or modify fields or attributes that you want to change in the tenant's MMD and click Save.
This puts the changes in the Staging state for both the master and the tenant. - To update the database and make the changes permanent in both the master and tenant environments, click Publish All Modules.
Important: Once you click Publish, the publishing operation begins on the tenant environment. At this time FortiSOAR displays a message stating the same and until the publishing operation is completed, users are unable to work in FortiSOAR. Therefore, it is recommended that you should send a prior notification to all users of a publish.
Also, note that if on the master node a module is marked to be enabled for the recycle bin, and the master pushes this module to the tenants, then that module gets enabled for the recycle bin also at the tenants' end.
Tenants might be required to edit their system view templates (SVTs) to view the fields that are added to records based on the changes made in the MMD. An example of how to modify an SVT is given in the Setting up a customer who has multiple sites topic, in Step 2: Extend the Tenants Module and then edit the required SVTs section. Step 2 demonstrates adding a custom field.
You can also push all modules from the master node, i.e., replicates the module structure of the master on the selected tenant node(s). The ability to replicate the module structure makes onboarding new tenants from the master node effective.
This operation will completely replace the tenant's module structure with the module structure (including all the picklists) of the master node.
In case you want to replace the complete tenant MMD with the master's MMD, do the following on the Manage Tenant Modules page:
- Click the Replicate All Modules button.
- From the Choose Tenant(s) list, select the tenant(s) whose MMD you want to replace with the master's MMD.
The Choose Tenant(s) list lists only those tenants that are active and whose connections are verified, and those who granted permissions to the master to modify their mmd.
You can also search for tenants using the search functionality.
- Click Push & Publish All Modules on Selected Tenants.
Warning: Clicking Push & Publish All Modules on Selected Tenants completely replaces the selected tenants' module structures (none of the existing module structures will be retained at the tenants' node) with the master's module structures.
Executing remote playbooks at the tenant node from the master node
To allow remote execution of a playbook, i.e., to allow a FortiSOAR master node to execute a playbook on FortiSOAR tenant nodes, do the following on the master node:
Set the Remote Executable flag:
Enable the Remote Executable flag on the playbooks that you want to enable for remote execution from the master node.
In the Playbook Designer, open the playbook that you want to execute remotely, and click to enable the Remote Executable box.

Alternatively, you can also enable the Remote Executable box in the playbook on the tenant node.
A Remote Executable column is also added to the Grid view of the Playbooks Collection page. This column displays whether the playbook is enabled for remote execution from the master node. If the playbook can be remotely executed, then the Remote Executable column displays a tick in a green circle. If the playbook cannot be remotely executed, then the Remote Executable column is blank.
Add a Reference Remote Playbook step
Add a Reference Remote Playbook step in the playbook that you want to trigger from the master node and remotely execute and retrieve details from the tenant node.
In the Playbook Designer, open the playbook to which you want to add the Reference Remote Playbook step, so that the master node can remotely execute/trigger the playbook on the tenant nodes.
To add a remote reference to a playbook, click the Reference Remote Playbook step and in the Step Name field, type the name of the step. The Alias Playbook field displays a list of all the available playbooks for which you have defined alias names and from which you can select the playbook master node can remotely execute/trigger the playbook on the tenant nodes. Therefore, from the Alias Playbook drop-down list, search for and select the appropriate alias name for the playbook that can be remotely executed. This playbook will be mapped to the alias name, and this mapping will be displayed in the Playbook Mapping page in the master node.

You can also click the Dynamic Values ( ) button beside the Select Remote Playbook Reference to specify the Jinja variable that contains the alias value of the remote reference playbook. Once you have specified the IRI value or selected the playbook you want to reference, you can click the Playbook in new tab button to open the remote referenced playbook in a new tab.
The Tenant drop-down list displays the tenants on which you can execute this playbook. By default, the selected tenant is the one who was assigned to the record that triggered the playbook, i.e., the Tenant Assigned To Input Record option. You can use the Tenant drop-down list to select a different tenant on which to run the playbook. You can also add a tenantId, which is a unique property of a tenant node, using a dynamic expression.
|
|
The Loop variable has been removed from the Remote Reference Playbook step. If you want to loop through records, see Use case of how to loop through records. |
Ensure that you push the appropriate playbooks to the tenant node. See the Pushing playbooks from the master node for remote execution section.
Use case of executing remote playbooks
Consider a scenario where there is a master node and two tenant nodes, Tenant 1 has VirusTotal as its threat intelligence tool, and Tenant 2 has IBM xForce as its threat intelligence tool.
This use case demonstrates how a remote playbook is executed from the master node to a tenant node, and the result of the playbook is passed back to the master node. In this case, the master node executes a playbook, using the Tenant 1 record, that has a reference remote playbook step, with an alias mapped to Tenant 1, which in turn executes the alias playbook on tenant 1, and returns the result of the playbook to the master node.
On the master node create a playbook as follows:
- Trigger step: Manual Trigger. This playbook will be triggered when you select records and execute this playbook. Also, ensure that you select the Run Separately For Each Selected Record option in this step
- Set Variable step: Set the variables that should be passed from the master node to the tenant node. You should add this step just before the "Reference Remote Playbook" step.
For example, to extract the IP address from the record, addipAddras a variable, whose value will be{{vars.input.params.ipAddress}}. - Reference Remote Playbook step: In this step ensure that you have mapped the Alias playbook correctly and select the appropriate tenant on which you want to execute the playbook. By default, the selected tenant is the one who was assigned to the record that triggered the playbook, i.e., the Tenant Assigned To Input Record option. You can use the Tenant drop-down list to select a different tenant on which to run the playbook. You can also add a
tenantId, which is a unique property of a tenant node, using a dynamic expression. - Set Variable step: Set a variable to consume the result from the tenant node. For example, add
execution_resultas a variable, whose value will be{{vars.result}}. - Further based on the execution result, you can create additional steps, such as adding a note or comment to the input record.

On the Tenant node, you can either create a playbook using the following steps or push the created (using the following steps) playbook from the master node to the tenant node. You must ensure that the Remote Executable flag is enabled for this playbook.
- Trigger step: Referenced, since the master node will trigger this playbook.
- Set Variable step: Set this variable to consume the input sent from the master node. For example to consume the IP address sent from the master node, add
ipAddras a variable, whose value will be{{vars.ipAddr}}. - Connector step: Add the VirusTotal connector step (since Tenant 1 has the VirusTotal threat intelligence tool) to analyze the IP address received from the previous Set Variable step and send its result to the next step.
- Set Variable step: Set a variable so that the master node can consume the result from the tenant node. For example, add
execution_resultas a variable, whose value will be{{vars.result}}.
Use case of how to loop through records
Consider a scenario where on the master node there are 5 records, belonging to different tenants, on which you want to run an Investigative playbook. To achieve looping through records, do the following:
- In the Investigate playbook add a "Reference A Playbook" step that contains the looping logic and, which calls another playbook that contains the Reference Remote Playbook step, as shown in the following image:

- In the called playbook, i.e., the playbook with the "Reference Remote Playbook" step, you must specify the
tenantIdin the Tenant field.
Importing and exporting of tenant, agent, and router details
You can use the Export and Import Wizards and Import Wizard to export and import tenant, agent, and router schemas along with records from MSSP systems so that you can recreate a near-exact replica of a FortiSOAR environment. For more information of the Export Wizard and Import Wizard, see the Application Editor chapter in the "Administration Guide." Steps, in brief, for data import and export are as follows:
- Configure the MSSP setup.
- Using the Export Wizard, export the tenant, agent, and router schemas, along with the records from the master machine in the MSSP setup.
- Using the Import Wizard, import the exported schemas and records data to a new master node.
- Enable a tenant on the new master node and update the master configuration on the tenant node, i.e., the tenant node should point to the new master node.
- Delete the tenant configuration from the old master node.
This is needed, since after importing the configuration the tenant node is reachable from both the old and the new master node which should not be the case, and ideally the tenant should be remotely connected only to the new master node. Therefore, you should delete the tenant configuration from the old master machine.
Extending the Tenants module
The Tenants module (included by default in FortiSOAR) is now extendable, i.e., you can add fields that you require to the tenant's module. The steps you can follow to extend the Tenants module are mentioned in Step 2: Extend the Tenants Module and then edit the required SVTs section that is part of the Setting up a customer who has multiple sites section.
Additional Configurations
Changing the hostname
The FortiSOAR Configuration Wizard is available only on the first ssh login. If at a later stage, you require to change the hostname of your FortiSOAR secure message exchange, then you can use the FortiSOAR Admin CLI (csadm). For more information on csadm, see the FortiSOAR Admin CLI chapter in the "Administration Guide."
|
|
You must run |
To change the hostname, ensure that the hostname is resolvable and then do the following:
- SSH to your FortiSOAR VM and login as a root user.
- To change your hostname of your FortiSOAR secure message exchange, type the following command:
# csadm hostname --set[<hostname>]
This command changes your current hostname to the new hostname that you have specified, sets up the message broker, regenerates certificates, and restarts FortiSOAR services.
|
|
When you run the |
Important: When you change the hostname for your Secure Message Exchange VM, you must ensure that the certificate the secure message exchange uses for communication with the FortiSOAR nodes has the same Common Name (aka CN) or is a wildcard certificate for the domain.
If you get the following error, when you are changing the hostname on your secure message exchange:
unable to connect to epmd (port 4369) on rabbitmqserver: nxdomain (non-existing domain)
Then you must terminate the current session, open a new session, and then run the # rabbitmqctl status command.
|
|
After the hostname has been reset, when users execute playbooks with an external manual input link, it is observed that the link that is generated in the email contains the original FQDN (hostname) rather than the one that has been updated. Therefore, users who are required to provide the input, have to manually update the FQDN (hostname) in the manual input link present in the email. |
Monitoring and administering your multi-tenancy environment
Setting up High Availability in case of a multi-tenancy environment
If you are planning to configure high availability for your master or tenant nodes, you must first configure high availability then add the master or tenant configurations. For information about High Availability in FortiSOAR, see the High Availability support in FortiSOAR chapter in "Administration Guide."
Setting up High Availability of the Secure Message Exchange
In case of a failure of the secure message exchange, an alternate secure message exchange can be set up, and the secure message exchange details at the master and tenant nodes can be updated to point to the IP address, Certificate, etc., of the new secure message exchange. The master node would handle reconfiguring the queues and exchanges at the new secure message exchange seamlessly. This, however, would mean downtime of the secure message exchange till the new secure message exchange is provisioned. Also, any messages that were yet residing on the secure message exchange and which were not delivered yet to the tenant would require to be re-sent. If a downtime of the secure message exchange is not desired, the secure message exchange can be set up for an Active-Passive or an Active-Active High Availability configuration.
The secure message exchange internally uses RabbitMQ for the persistence and routing of messages across the FortiSOAR nodes. Therefore, you can achieve High Availability for the secure message exchange by using any of the standard RabbitMQ high availability methods. The secure message exchange can be made to work in an active/passive setup by using a reliable shared storage such as NAS or SAN for the RabbitMQ data directory, /var/lib/rabbitmq, between the two nodes and using monitoring and management tools such as Pacemaker to perform the failover as explained in the High availability with Pacemaker and DRBD article.
RabbitMQ also supports clustering, that in conjunction with Queue Mirroring can be used for an Active-Active configuration as explained in the Clustering Guide and in the Highly Available (Mirrored) Queues article, which includes steps on how to set up the clusters and monitor queues. The clustered instances should be fronted by a TCP Load Balancer such as HAProxy, and clients should connect to the cluster using the address of the proxy. For information about High Availability in FortiSOAR, see the High Availability support in FortiSOAR chapter in "Administration Guide."
Using the RabbitMQ documentation mentioned above, the following sequence of steps and commands can help you set up clustering of two secure message exchanges with queue mirroring:
- Deploy and configure the first secure message exchange. See the Deploy and configure the secure message exchange section.
- Deploy and configure the second secure message exchange. See the Deploy and configure the secure message exchange section.
- Ensure that the two nodes are resolvable from each other using DNS entries or using the
/etc/hostsentry. - Copy the
erlangcookie from the following file on the first secure message exchange:/var/lib/rabbitmq/.erlang.cookieonto the same file on the second secure message exchange. - Run
# firewall-cmd --zone=public --add-port=4369/tcp --permanenton both the secure message exchanges and ensure that these ports are open for each other from any security groups, etc. - Run
# firewall-cmd --zone=public --add-port=25672/tcp --permanenton both the secure message exchanges. - Run
# firewall-cmd --reloadon both the secure message exchanges.
Read https://www.rabbitmq.com/clustering.html#ports for using alternate ports for steps 5 and 6. - On the second secure message exchange, run the following commands:
# rabbitmqctl stop_app# rabbitmqctl join_cluster rabbit@<nodenamesecuremessageexchange1># rabbitmqctl start_app
rabbitmqctl cluster_statuson both the nodes should show two nodes in the cluster. For exampleCluster status of node rabbit@awsrouter2...[{nodes,[{disc,['rabbit@awsrouter2',rabbit@awsrouter1]}]},{running_nodes,[rabbit@awsrouter1,'rabbit@awsrouter2']},{cluster_name,<<"rabbit@awsrouter1">>},{partitions,[]},{alarms,[{rabbit@awsrouter1,[]},{'rabbit@awsrouter2',[]}]}]- Enabling Queue Mirroring by setting the following policy on secure message exchange 1:
# rabbitmqctl set_policy tenants-qa-ha "^queue.postman\."'{"ha-mode":"exactly","ha-params":2,"ha-sync-mode":"automatic"}' - If you have set up a secure message exchange cluster, then you must enable mTLS on each secure message exchange individually using the '
csadm mq mtls enable' command. Ensure that you use the same SSL certificates on all nodes. For more information, see the Adding the secure message exchange on the master node section and for more information oncsadm, see the FortiSOAR Admin CLI chapter in the "Administration Guide.
Setting up HAProxy as a TCP load balancer fronting the two clustered nodes
The following steps list out the steps to install "HAProxy" as a load balancer on a Virtual Machine:
# yum install haproxy- In the
/etc/haproxy/haproxy.cfgfile and add the policy as shown in the following image:
- Restart
haproxyusing the following command:# systemctl restart haproxy - Use the bind address (instead of the IP address of the node in the cluster) for accessing the FortiSOAR UI.
You must also ensure that the CA certificates on both the nodes are the certificates that were provided for secure message exchange configuration.
Monitoring the connectivity of the different nodes at the secure message exchange
Once you deploy and configure a secure message exchange, its remote management UI is enabled. The connectivity of the different nodes, messages pending on the data, action and instructions queues, and the message flow rate can be monitored using the remote management UI.
Open https://<secure message exchange_address>:<management_port> and connect using your administration credentials. The management port and administration credentials are configurable and specified at the time of configuring the secure message exchange. See the Configuring the Secure Message Exchange section.

All vhosts, exchanges, and queues associated with the node are created with the respective tenant ID.

Backing up and Restoring your FortiSOAR systems
Use the FortiSOAR Admin CLI (csadm) to regularly perform backups on master and tenant nodes and to restore the data seamlessly to a new FortiSOAR environment. To perform backup and restore, you must have root access on your FortiSOAR system.
For detailed information on backing up and restoring your FortiSOAR system, see the Backing up and Restoring your FortiSOAR system chapter in the "Administration Guide."
|
|
In case of a multi-tenant configuration, after you have completed restoring your master node or tenant node, you must restart the |
Use Cases
Setting up a customer who has multiple sites
This use case describes the additional steps you need to perform, if the multi-tenant configuration has a customer with multiple sites (tenant). Each site (tenant) in this case has their own FortiSOAR instance.
All these steps must be performed on the Master node.
Step 1: Create a custom "Customers" Module
You must create a new "Customers" module in FortiSOAR by clicking the Setting icon on the top-right of the FortiSOAR UI. In the Application Editor section, click Modules and then click +Create new module to create a new module.
You can add whatever fields you require to this module, however, you must add a Tenants field that has a Many to One to customer.

Once you create the Customers module, you must ensure that you assign the administrator's role appropriate permissions on this newly-created Customers module, so that you can add customers and associate tenants with customers.
Step 2: Extend the Tenants Module and then edit the required SVTs
Open the Tenants module (included by default in FortiSOAR) in the Application Editor and extend this module by adding the Customer field. Add the Customer field which has the field type set as Lookup (One to Many or One to one).

Once you have created the Customers module and set up the relationship between the Customers and Tenants modules, you must now edit the system view template (SVT) for the Tenants module. Edit the SVT for the Tenants module to include the Customer field:

The Tenants module will now appear as shown in the following image:

You should also edit the SVT of the Add Tenant form to include the Customer field, so that when you add a new tenant, you can select the Customer to whom the tenant belongs.

Step 3: Configuring the tenants on the Master Node
Now, you can configure the tenants on the master node (see Deploying tenant nodes). However, in this case you must ensure that you select the Customer to whom the tenant belongs to create the association between tenants and the customer.
