


Setting up a local FortiSOAR offline repository and deploying FortiSOAR using the offline repository
This chapter describes the steps that you need to follow to set up a local FortiSOAR offline YUM repository and then use those repositories to deploy FortiSOAR.
Prerequisites
- Virtual machine with CentOS 7.0.0 or RHEL 7.0.0 with minimal install option.
- Access to update.cybersponse.com.
- Minimum disk size: 500 GB.
-
Ensure that the SSL certificates that you are using for the offline repository are authorized by a Certificate Authority (CA). If however, you are using custom certificates such as open-source certificates, then you must ensure that you add these SSL certificates to the truststore of FortiSOAR and offline repository using the following command:
cp <SSL_certificate>.crt /etc/pki/ca-trust/source/anchors/update-ca-trust update
Initial Configuration of the Offline YUM Repository VM
Installing Packages
- Login as a root user:
[user@localhost ~]# sudo su - Check whether update.cybersponse.com is reachable.

- Install packages httpd, wget, rsync, and screen:
[root@localhost ~]# yum install httpd
[root@localhost ~]# yum install wget
[root@localhost ~]# yum install rsync
[root@localhost ~]# yum install screen
Configuring the 'httpd' service
- Create a directory named 'repos' in the “/” directory using the following command:
[root@localhost ~]# mkdir /repos
- Make the following edits in the
/etc/httpd/conf/httpd.conffile:[root@localhost ~]# vi /etc/httpd/conf/httpd.conf- Add the ‘/repos’ directory as DocumentRoot.
- Comment the “/var/www/html” line in DocumentRoot.

- Add the ‘/repos’ directory and required permissions in
httpd.confand comment or delete the existing “/var/www/” directory fromhttpd.confas follows:
- Move “
/etc/httpd/conf.d/welcome.conf” to the home directory:[root@localhost ~]# mv /etc/httpd/conf.d/welcome.conf /home/ - Change the SELinux security context to point to ‘/repos’:
[root@localhost ~]# chcon -R -t httpd_sys_content_t ‘/repos’ - Add firewall exception:
[root@localhost ~]# sudo firewall-cmd --zone=public --permanent --add-service=https[root@localhost ~]# sudo firewall-cmd --reload
- Restart the 'httpd' service using the following command :
[root@localhost ~]# systemctl restart httpd
Enabling SSL on httpd Service in Offline Repository
To enable SSL on Apache, do the following:
- Install the 'mod_ssl' module for the Apache HTTP Server
[root@localhost ~]# yum install mod_ssl
- To enable SSL on the 'httpd' service, add the following lines to the
/etc/httpd/conf.d/ssl.conffile:#Enabling SSL on httpd Service for offline repoLoadModule ssl_module modules/mod_ssl.so
- Check the default server certificate and server private key in the
/etc/httpd/conf.d/ssl.conffile, and if required replace them.# Section Server CertificateSSLCertificateFile "/<path_to_cert>/<ssl_Certificate>.crt"# Section Server Private KeySSLCertificateKeyFile "/<path_to_cert>/<ssl_Certificate>.key"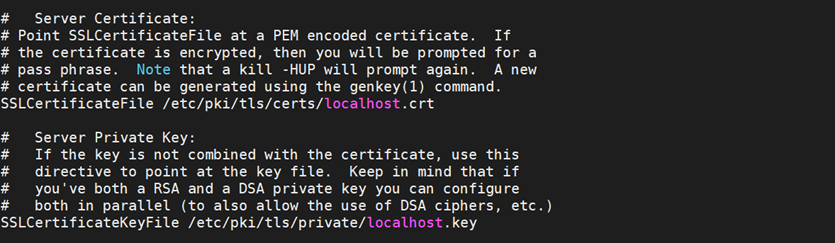
- Restart and enable the 'httpd' service:
[root@localhost ~]# systemctl restart httpd[root@localhost ~]# systemctl enable httpd
Setting up the Offline Repository
- To ensure that your ssh session does not timeout, run the
screencommand:[root@localhost ~]# screen –S repo - Download the
setup-cyops-offline-yum-repo.shscript:wget --no-check-certificatehttps://update.cybersponse.com/downloads/scripts/setup-cyops-offline-yum-repo.sh
- Run the
setup-cyops-offline-yum-repo.shscript as follows, where therelease_versionis FortiSOAR version that you want to syncronize:[root@localhost ~]# sh /root/setup-cyops-offline-yum-repo.sh <release_version>
For example, to synchronize FortiSOAR version 7.0.2 use the following command:[root@localhost ~]# sh /root/setup-cyops-offline-yum-repo.sh 7.0.2
Note: Thesetup-cyops-offline-yum-repo.shscript creates a user whose ID and password are set toyum. This ID is used to assign ownership to the content in the '/repos' directory. - Once the
setup-cyops-offline-yum-repo.shscript completes its execution successfully, add an entry for update.cybersponse.com in the/etc/hostsfile on the 'YUM' server (Offline Repository):
- Add the ‘/repos/connectors/info’ directory to
/etc/httpd/conf/httpd.conf.
- The
setup-cyops-offline-yum-repo.sh scriptsynchronizes the repo. Therefore, if you want to resynchronize the repo, you must rerun the script. If you do not want to rerun the script manually, you can set up a cron job to perform this task. Use the following script to setup a cron job that will run daily at 00:00 hrsand synchronize the repo:#!/bin/sh
#write out current crontab
crontab -l > mycron
#echo new cron into cron file
echo "0 0 * * * sh /root/setup-cyops-offline-yum-repo.sh 7.0.2" >> mycron
#install new cron file
crontab mycron
rm mycron
Note: You can change the time of running the cron job as per your convenience.
Deploying FortiSOAR using the Offline Repository
- Ensure that the offline repository host is accessible from the FortiSOAR appliance and ensure that your ssh session does not timeout, run the
screencommand:[root@localhost ~]# screen –S repo - From version 7.0.2 onwards, if you are using your private repository to install or upgrade FortiSOAR, then use the following command to export the "custom_yum_url" variable before running the fresh install or upgrade script:
export custom_yum_url=<"custom_yum_url_name">
For example,export custom_yum_url="offline-repo.fortisoar.in"
- Download the installer for FortiSOAR 7.0.2 using the following command:
[root@localhost ~]# wget https://<offline repo>/7.0.2/install-fortisoar-7.0.2.bin
- To install FortiSOAR 7.0.2, run the following command as a root user:
[root@localhost ~]# sh install-fortisoar-7.0.2.bin - Login as the 'csadmin' user to the FortiSOAR CLI and continue to configure FortiSOAR or Secure Message Exchange (SME) and add your FortiSOAR license. For more information, see the Deploying FortiSOAR chapter.
Upgrading FortiSOAR using the Offline Repository
- Ensure that the offline repository host is accessible from the FortiSOAR appliance and ensure that your ssh session does not timeout, run the
screencommand:[root@localhost ~]# screen –S repo - From version 7.0.2 onwards, if you are using your private repository to install or upgrade FortiSOAR, then use the following command to export the "custom_yum_url" variable before running the fresh install or upgrade script:
export custom_yum_url=<"custom_yum_url_name">
- Download the upgrade installer for FortiSOAR 7.0.2 using the following command:
[root@localhost ~]# wget https://<offline repo>/7.0.2/upgrade-fortisoar-7.0.2.bin - To upgrade to FortiSOAR 7.0.2, run the following command as a root user:
[root@localhost ~]# sh upgrade-fortisoar-7.0.2.bin
Troubleshooting
The 'httpd' service does not come up post configuration and after restart
If you have configured the 'httpd' service, and it does not come up during restart, then check whether the parameters specified are correct (Check Syntax) and do the following:
Resolution:
- Check the status of the 'httpd' service using the following command:
[root@localhost ~]# systemctl status httpd -l
- Check the line number specified in the error logs that get displayed once you run the status check for the 'httpd' service, and correct it any syntactical errors:
Error 'cannot access '/repos' directory: No such file or directory is displayed while trying to change the SELinux security context
If you face the following error when you are trying to change the SELinux security context to point to the 'repos' directory while Configuring the 'httpd' service.
Resolution:
- Create the 'repos' directory:
- Run the following command to change the SELinux security context to point to 'repos':
[root@localhost ~]# chcon -R -t httpd_sys_content_t ‘/repos’