
ConnectWise Integration
- Adding a Client ID for ConnectWise Integration
- Configuring ConnectWise for FortiSIEM Integration
- ConnectWise Incident Outbound Integration
- ConnectWise Incident Inbound Integration
- ConnectWise CMDB Outbound Integration
Adding a Client ID for ConnectWise Integration
ConnectWise has recently changed their policy and requires that vendors create a client ID in order to integrate with FortiSIEM. Due to this change and restriction from ConnectWise, Fortinet has published a public client ID in order to allow clients to integrate with ConnectWise. This Client ID is 1a7ed749-47a1-4d3e-94b0-696288a1140f.
Note: A ConnectWise working account is required before integration can occur.
To add this client ID for ConnectWise, take the following steps.
- Go to Admin > Settings >General > External Integration.
- Click + to create a new Integration Policy or select an existing Integration Policy and click the Edit (
 ) icon to edit it.
 - From the Vendor drop-down list, select ConnectWise.
- In the Client ID field, paste the following Client ID:
1a7ed749-47a1-4d3e-94b0-696288a1140f - Make any necessary configuration changes.
- Click Save.
Configuring ConnectWise for FortiSIEM Integration
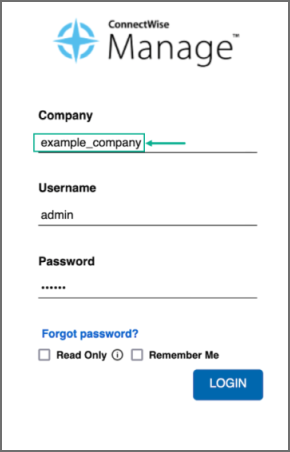
- Log in to ConnectWise MANAGE.
- Go to Setup Tables > Integrator Login List.
- Create a new Integrator Login for FortiSIEM:
- Enter Username.
- Enter Password.
- Set Access Level to Records created by integrator.
- Enable Service Ticket API for Incident Integration.
- Enable Configure API for CMDB Integration.
- For Service Provider Configurations, create Companies by creating:
- Company Name
- Company ID
ConnectWise Incident Outbound Integration
Step 1: Create an Integration
- Log into your Supervisor node with administrator credentials.
- Go to Admin > Settings > General > External Integration.
- Click +.
- For Type, select Incident.
- For Direction, select Outbound.
- For Vendor, select the vendor of the system you want to connect to. ConnectWise is supported out of the box.
When you select the Vendor:- An Instance is created - this is the unique name for this policy. For example if you had two ConnectWise installations, each would have different Instance names.
- Choose whether the Plugin Type is SOAP or REST.
Note: The SOAP method is deprecated, so you should select REST. - A default Plugin Name is populated - this is the Java code that implements the integration including connecting to the external help desk systems and synching the CMDB elements. The plugin is automatically populated for ConnectWise. For other vendors, you must create your own plugin and enter the plugin name here.
- For Host/URL, enter the host name or URL of the external system. For ConnectWise, enter the login URL of the ConnectWise instance. Make sure to include the https:// prefix.
Example:https://my.login.test - For Company, enter the company name that you use when logging in to ConnectWise Manage. Do not use the company name from within ConnectWise.
- If you chose SOAP as Plugin Type, enter a User Name, Password, and Client ID that the system can use to authenticate with the external system. For ConnectWise, select the credentials created in Configuring ConnectWise for FortiSIEM Integration, Step 3. If you chose REST, enter the Public Key and the Private Key and Client ID.
Note: The Client ID is 1a7ed749-47a1-4d3e-94b0-696288a1140f. See Adding a Client ID for ConnectWise Integration for more information.
To get your Public Key and Private Key from ConnectWise, login and take the following steps.- In the upper right part of the window, click your account name to open a drop-down list, and select My Account.
- Click the API Keys tab, and create your private and public keys, keeping a record of what they are so you can enter them in the FortiSIEM configuration in the Private Key and Public Key fields.
- For Incidents Comments Template, specify the formatting using the incident fields.
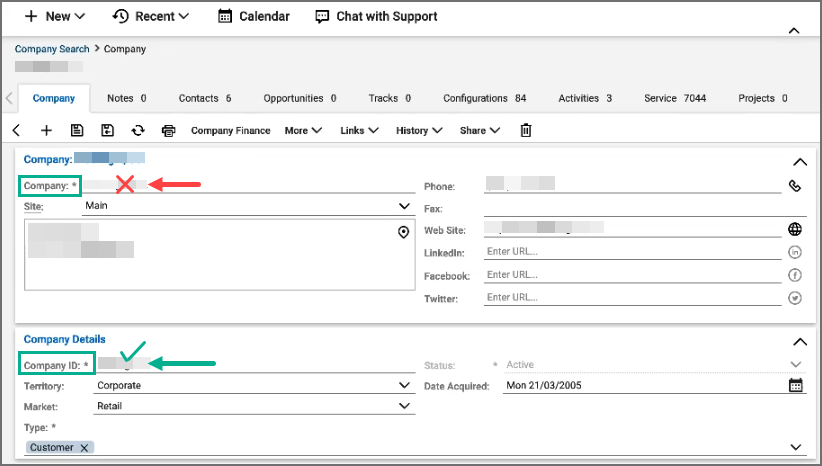
- For Organization Mapping, click Edit to create mappings between the organizations in your FortiSIEM deployment and the names of the organization in the external system. In ConnectWise, locate and use the Company ID field under Company Details in ConnectWise for the FortiSIEM Organization Mapping, NOT the company name.
- For Run For, choose the organizations for whom tickets will be created.
- Enter the Max Incidents to be recorded.
Note: The default number for Max Incidents is 50. When running this the first time with the default number, you may encounter a 502 proxy error due to the initial volume of incidents being requested. In this situation, you can change the Max Incidents value to 5 or 10 initially, then change it after running the ConnectWise integration once. - Click Save.
Step 2: Link Integration to an Automation Policy
You need to link the integration to an automation policy, so that the integration runs when the automation policy triggers.
Take the following steps.
- Go to Admin > Settings > General > Automation Policy.
- Click + to create a new policy or click the Edit () icon to edit an existing policy.
- In the Automation Policy dialog box, select Action > Invoke an Integration Policy, then select the edit icon.
- Choose a specific integration from the drop-down list.
- Click Save.
ConnectWise Incident Inbound Integration
This updates the FortiSIEM incident state and clears the incident when the incident is cleared in the external help desk system. Built-in integrations are available for ConnectWise.
The steps are:
- Create an Incident Inbound integration schedule.
- Create a schedule for automatically running the Incident Inbound integration.
This will update the FortiSIEM incident inbound integration schedule and clears the incident when the incident is cleared in the external help desk system.
Step 1: Create an Incident Inbound integration
- Log into your Supervisor node with administrator credentials.
- Go to Admin > Settings > General > External Integration.
- Click +.
- For Type, select Incident.
- For Direction, select Inbound.
- For Vendor, select the vendor of the system you want to connect to. ConnectWise is supported out of the box.
When you select the Vendor:- An Instance is created - this is the unique name for this policy. For example if you had two ConnectWise installations, each would have different Instance names.
- Choose whether the Plugin Type is SOAP or REST.
- A default Plugin Name is populated. This is the Java code that implements the integration including connecting to the external help desk systems and synching the CMDB elements. The plugin is automatically populated for ConnectWise. For other vendors, you must create your own plugin and enter the plugin name here.
- For Host/URL, enter the host name or URL of the external system (see section Configuring external helpdesk systems). For ConnectWise, select the login URL.
- If you chose SOAP as Plugin Type, enter a User Name, Password, and Client ID that the system can use to authenticate with the external system. For ConnectWise, select the credentials created in Configuring ConnectWise for FortiSIEM Integration, Step 3. If you chose REST, enter the Public Key, the Private Key, and Client ID.
- For Time Window, select the number of hours for which incident states will be synched. For example, if time windows is set to 10 hours, the states of incidents that occurred in the last 10 hours will be synched.
- Click Save.
Step 2: Create an Incident Inbound integration schedule
This will update FortiSIEM following incident fields when ticket state is updated in the external ticketing system.
- External Ticket State
- Ticket State
- External Cleared Time
- External Resolve Time
Note: FortiSIEM does not support custom mapping, only "new" and "closed", and the incident resolution is not updated.
Follow these steps.
- Log into your FortiSIEM Supervisor with administrator credentials.
- Go to Admin > Settings > General > External Integration.
- Click the Schedule (
 ) icon and then click +.
- Select the integration policy.
- Select a schedule.
ConnectWise CMDB Outbound Integration
CMDB Outbound Integration populates an external CMDB from FortiSIEM’s own CMDB. Built in integrations are available for ServiceNow, ConnectWise and Salesforce.
Step 1: Create a CMDB Outbound Integration
- Log into your Supervisor node with administrator credentials.
- Go to Admin > Settings > General > External Integration.
- Click +.
- For Type, select Device.
- For Direction, select Outbound.
- For Vendor, select the vendor of the system you want to connect to. ConnectWise is supported out of the box.
When you select the Vendor:- An Instance is created - this is the unique name for this policy. For example if you had two ConnectWise installations, each would have different Instance names.
- Choose whether the Plugin Type is SOAP or REST.
- A default Plugin Name is populated - this is the Java code that implements the integration including connecting to the external help desk systems and synching the CMDB elements. The plugin is automatically populated for ConnectWise. For other vendors, you have to create your own plugin and type in the plugin name here.
- For Host/URL, enter the host name or URL of the external system. For ConnectWise, select the login URL.
- If you chose SOAP as Plugin Type, enter a User Name, Password, and Client ID that the system can use to authenticate with the external system. For ConnectWise, select the credentials created in Configuring ConnectWise for FortiSIEM Integration, Step 3. If you chose REST, enter the Public Key and the Private Key in addition to the User Name, Password, and Client ID.
- For Organization Mapping, click Edit to create mappings between the organizations in your FortiSIEM deployment and the names of the organization in the external system. For ConnectWise, select the Company name in Configuring ConnectWise for FortiSIEM Integration, Step 4.
- For Run For, choose the organizations for whom tickets will be created.
- For ConnectWise, it is possible to define a Content Mapping.
- Enter Column Mapping values:
- To add a new mapping, click the + button.
- Choose FortiSIEM CMDB attribute as the Source Column.
- Enter external (ConnectWise) attribute as the Destination Column.
- Specify Default Mapped Value as the value assigned to the Destination Column if the Source Column is not found in Data Mapping definitions.
- Select Put to a Question is the Destination Column is a custom column in ConnectWise.
- Enter Data Mapping values:
- Choose the (Destination) Column Name.
- Enter From as the value in FortiSIEM.
- Enter To as the value in ConnectWise.
- Enter Column Mapping values:
- For Groups, select the FortiSIEM CMDB Groups whose member devices would be synched to external CMDB.
- Select Run after Discovery if you want this export to take place after you have run discovery in your system. This is the only way to push automatic changes from FortiSIEM to the external system.
- Enter the Max Devices: the number of devices to send to the external system.
- Click Save.
Step 2: Create a CMDB Outbound Integration Schedule
Updating external CMDB automatically after FortiSIEM discovery:
- Create an integration policy.
- Make sure Run after Discovery is checked.
- Click Save.
Updating external CMDB on a schedule:
- Log into your FortiSIEM Supervisor with administrator credentials.
- Go to Admin > Settings > General > External Integration.
- Click the Schedule () icon and then click +.
- Select the integration policies.
- Select a schedule.
Updating external CMDB on-demand (one-time):
- Log into your FortiSIEM Supervisor with administrator credentials.
- Go to Admin > Settings > General > External Integration.
- Select a specific integration policy and click Run.