
Cluster Config
This section specifies various Cluster configurations.
- Supervisor / Load Balancer Configuration
- Event Upload Workers Configuration
- Collector High Availability Configuration
- DB Cluster Configuration
Supervisor / Load Balancer Configuration
For Supervisors or Load Balancer configuration, take the following steps:
- Navigate to ADMIN > Settings > System > Cluster Config.
- Under Supervisors, in the Address field, enter the Supervisor or Load Balancer Host Name or IP address.
- (Optional) Click + to add a Supervisor, or - to remove one, and repeat step 2 to configure any additional Supervisor or Load Balancer.
- Click Save when done.
Event Upload Workers Configuration
Collectors upload events and configurations to Worker nodes. This section specifies how to configure Event Upload destinations for Collectors.
There are three cases:
-
Case 1: Explicit list of Worker IP addresses or FQDN: Collector forwards to this list in a round robin manner.
-
Case 2: Supervisor IP or FQDN: If you are not using Workers and using only a Supervisor and Collector(s) – specify the Supervisor IP addresses or host name. The Collectors will upload directly to the Supervisor node.
-
Case 3: Load Balancer FQDN: Collector forwards events to the load balancer which must be configured to distribute events to the workers.
Any FQDN specified in the Worker Upload must be resolvable by the Collector and similarly, any specified IP addresses must have connectivity from the Collector. If you use host names instead of FQDN, then make sure host names are resolvable by the Collectors (e.g. by configuring /etc/hosts file). Host names are not recommended.
Complete these steps to configure Worker upload settings:
- Navigate to ADMIN > Settings > System > Cluster Config.
- Under Event Upload Workers, in the Address field, enter the Worker FQDN or IP address.
- (Optional) Click + to add a Worker, or - to remove one, and repeat step 2 to configure any additional Workers.
- Click Save when done.
Collector High Availability Configuration
A FortiSIEM Collector plays the critical role of communicating with the end devices and Cloud Services for collecting logs and performance monitoring metrics, configurations, and other data. You can configure multiple Collectors in a High Availability Group so that Collector functions can continue even if a Collector goes offline.
Follow the appropriate configuration for your environment:
- On-Premise Collector Deployments
- AWS/EC2 Collector Deployments
- GCP Collector Deployments
- Azure Collector Deployments
On-Premise Collector Deployments
This Case covers the situation where your Collectors are deployed on On-premise hypervisors, or as hardware appliances. High Availability (HA) is enabled via Virtual Router Redundancy Protocol (VRRP). A Collector HA Cluster needs to be created with one Leader and one or more Followers and a Virtual IP (VIP) that is always owned by the Leader.
During normal operations:
- Logs sent to the VIP are handled by the Leader Collector (which owns the VIP).
- FortiSIEM Supervisor node distributes event pulling and performance monitoring jobs among all Collectors in the Cluster.
If the Leader Collector goes down:
- The Follower node with highest priority will become the Leader and own the VIP.
- Logs previously sent to the (failed) Leader Collector will automatically reach the new Leader Collector.
- FortiSIEM Supervisor node will automatically re-distribute event pulling and performance monitoring jobs previously assigned to the failed Leader Collector, to other Collectors in the HA Cluster.
If a Follower Collector goes down:
- App Server will distribute event pulling and performance monitoring jobs assigned to the failed Collector to other Collectors in the HA Cluster.
- If a failed Collector comes back up, then it will stay a Follower, but the event pulling jobs will be re-distributed among all the working Collectors in the HA Cluster.
Step 1 - Configure Collectors
Configure Collectors as normal.
Step 2 - Configure Collector HA Group Via VRRP
To create a new Collector High Availability configuration, take the following steps:
|
|
Ensure that the VIP and Collectors in a Collector HA group are on the same network. This is required for High Availability to work. |
- Navigate to Admin > Settings > System > Cluster Config.
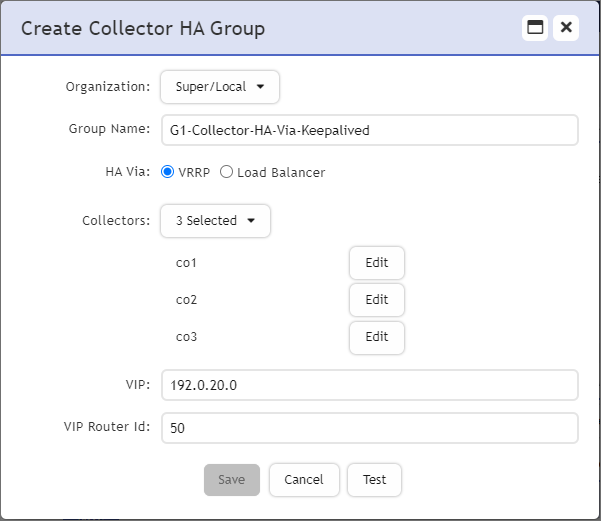
- Under Collector High Availability, click New. The Create Collector HA Group window appears. Take the following steps.
- From the Organization drop-down list, select your Organization with your collectors.
- In the Group Name field, enter the name of your Collector group.
- From HA Via, select VRRP.
- From the Collectors drop-down list, select the Collectors to include in the group.
Note: The available Collectors displayed are those from the same Organization selected earlier. - In the VIP field, enter the Virtual Internet Protocol address.
Note: This VIP can be internal. - In the VIP Router ID field, enter the VIP Router ID number (1-255).
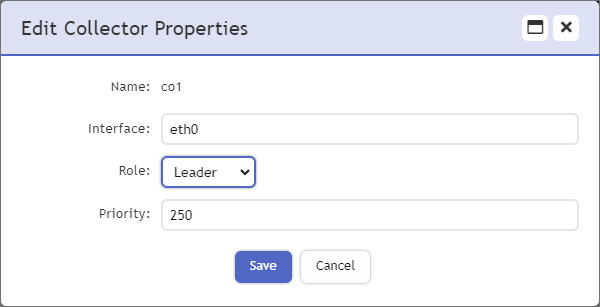
- For each collector, click Edit, and take the following steps.
- In the Interface field, enter the name of the interface. For example, eth0.
- From the Role drop-down list, select the Collector’s role (Leader, Follower).
Note: Only one collector from the HA group can be assigned as a Leader. - In the Priority field, enter the numeric priority of the Collector, with the high number being the greater priority (1-254).
Note: The Collector Leader Priority should be higher than all of its Followers. - Click Save.
- Repeat step 3a-e for each Collector. When done, proceed to step 4.
- Click Test. If the test succeeds, proceed to step 5. If it fails, check your earlier configurations.
- Click Save.
Troubleshooting
FortiSIEM creates the network for the Collector HA Group with the configuration provided. You can verify if the network has been set up correctly by checking the following.
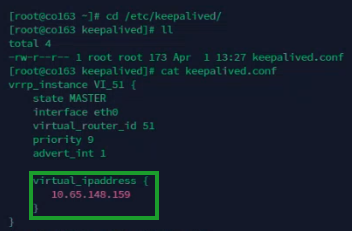
- Check for the VIP address by executing an SSH to the Collector Leader, and run the following commands:
cd /etc/keepalivedcat keepalived.conf
A virtual_ipaddress should appear.Example
...
virtual_ipaddress {
10.65.148.159
}
...
- Run
ifconfigto check your physical IP address.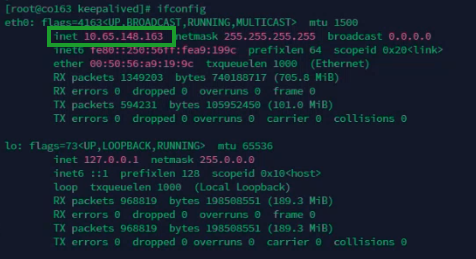
- Next, run
ip ato confirm that the physical IP address and virtual IP address are bound to your interface.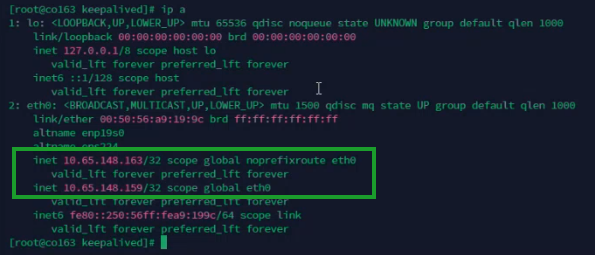
AWS/EC2 Collector Deployments
This Case covers the situation where your Collectors are deployed on AWS/EC2.
To configure Collector HA on AWS/EC2, you will need to configure your collectors as normal. Each Collector will need to have a specifically configured IAM Role. Next, you will locate an unused VIP, and finally configure Collector HA on FortiSIEM using that VIP. The Collector HA Cluster needs to be created with one Leader and one or more Followers and a Virtual IP (VIP) that is always owned by the Leader. High Availability (HA) is then enabled via Virtual Router Redundancy Protocol (VRRP).
During normal operations:
- Logs sent to the VIP are handled by the Leader Collector (which owns the VIP).
- FortiSIEM Supervisor node distributes event pulling and performance monitoring jobs among all Collectors in the Cluster.
If the Leader Collector goes down:
- The Follower node with highest priority will become the Leader and own the VIP.
- Logs previously sent to the (failed) Leader Collector will automatically reach the new Leader Collector.
- FortiSIEM Supervisor node will automatically re-distribute event pulling and performance monitoring jobs previously assigned to the failed Leader Collector, to other Collectors in the HA Cluster.
If a Follower Collector goes down:
- App Server will distribute event pulling and performance monitoring jobs assigned to the failed Collector to other Collectors in the HA Cluster.
- If a failed Collector comes back up, then it will stay a Follower, but the event pulling jobs will be re-distributed among all the working Collectors in the HA Cluster.
- Step 1 - Configure Collectors
- Step 2 - Create IAM Policy
- Step 3 - Create IAM Role
- Step 4 - Associate IAM Role to all Collectors
- Step 5 - Locate Unused VIP
- Step 6 - Configure Collector HA Group Via VRRP
Step 1 - Configure Collectors
Configure Collectors as normal.
Step 2 - Create IAM Policy
To create an IAM policy, take the following steps.
Note: For more information, see https://docs.aws.amazon.com/IAM/latest/UserGuide/access_policies_create-console.html#access_policies_create-json-editor
- Sign in to https://console.aws.amazon.com/iam/
- From the left pane, select Policies.
- Click Create policy.
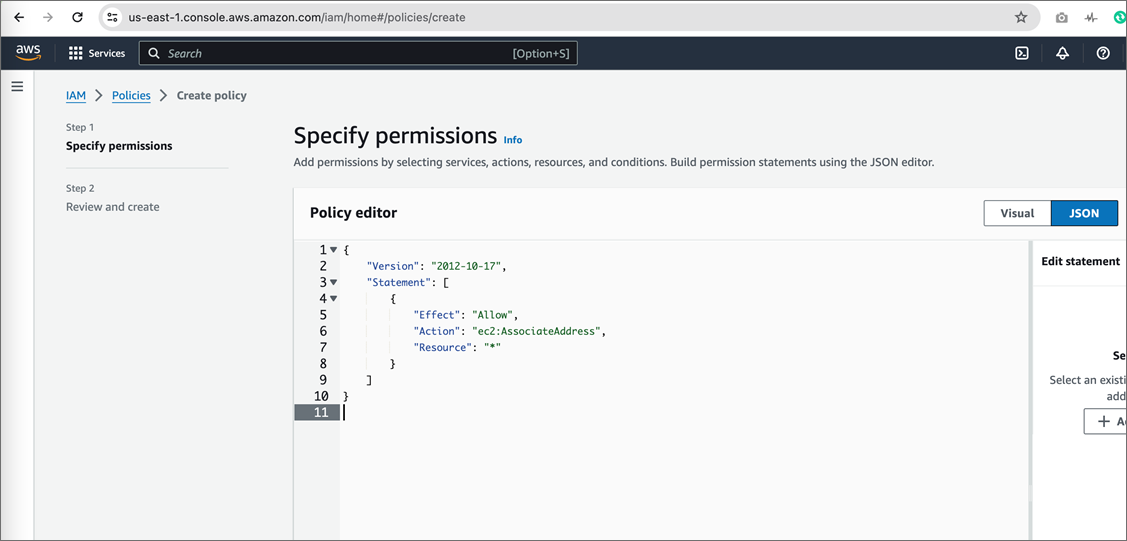
- From the Policy editor section, select JSON.
- In the Policy editor pane, paste the following information:
{
    "Version": "2012-10-17",
    "Statement": [
        {
            "Effect": "Allow",
            "Action": "ec2:AssociateAddress",
            "Resource": "*"
        }
    ]
}
- Click Next.
- Under Policy name, enter a name for the policy, such as "AssociateAddress".
- Click Create Policy.
Step 3 - Create IAM Role
To create an IAM role, take the following steps.
- Sign in to https://console.aws.amazon.com/iam/.
- From the left pane, select Roles.
- Click Create role.
- Under Trusted entity type, select AWS service.
- From the Service or use case drop-down list, select EC2.
- Under Use case, select EC2.

- Click Next.
- In the search field under Permissions policies, enter the name of the policy you created in Create IAM Policy.
- Add a checkmark to the checkbox to attach that policy to the role we're creating.
- Click Next.
- Under the Role name field, enter a name for this role, such as "AssociateAddress".
- (Optional) In the Role description field, enter an explanation of this role, such as "Allows EC2 instances to call AWS services on your behalf."
- Click Create role.
Step 4 - Associate IAM Role to all Collectors
For each collector to be part of the Collector HA group, take the following steps.
- Sign in to the EC2 Dashboard (https://console.aws.amazon.com/ec2/v2/home).
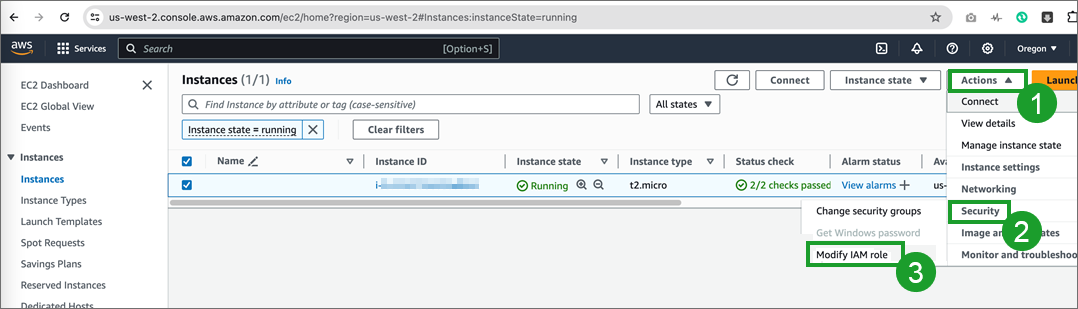
- From the left pane, select Instances.
- Select Collector.
- Open the Actions drop-down list, and select Security > Modify IAM role.
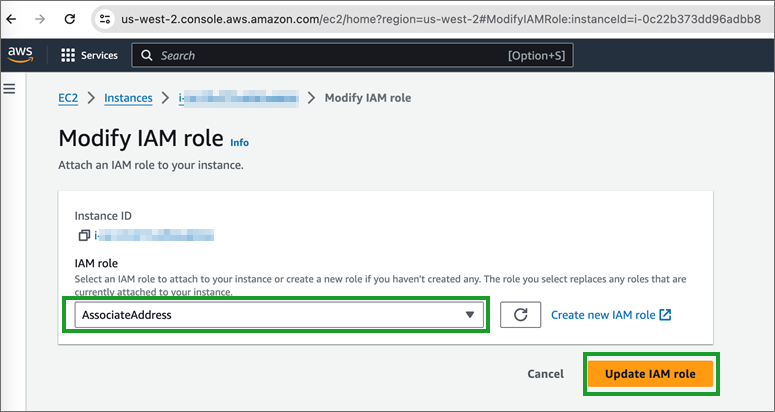
- Under IAM role, select the role you created in Create IAM Role, and click Update IAM role.
- Repeat steps 3-5 for any remaining collectors you with to include as part of the Collector HA group.
Step 5 - Locate Unused VIP
A public IP address is required to configure a Collector HA group. To locate a public IP address to use, take the following steps.
- Sign in to the EC2 Dashboard (https://console.aws.amazon.com/ec2/v2/home).
- From the left pane, expand Network & Security, and select Elastic IPs.
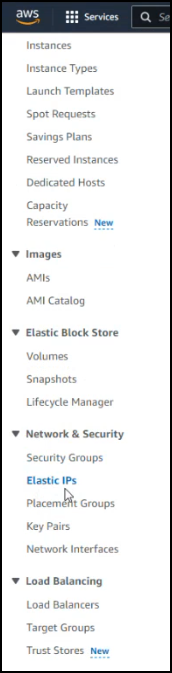
- Under Elastic IP addresses, look for an available IP address that is Type Public IP and its Associated instance ID, Private IP address, and Association ID are all empty.
- Ping the IP address. If it is not pingable, then it can be used as a VIP, as it confirms that the VIP is not in use. Record this VIP address. You will need it later, and need to input this into the VIP field in Step 6 - Configure Collector HA group Via VRRP.
Step 6 - Configure Collector HA Group Via VRRP
To create a new Collector High Availability configuration, take the following steps:
|
|
Ensure that the VIP and Collectors in a Collector HA group are on the same network. This is required for High Availability to work. |
- Navigate to Admin > Settings > System > Cluster Config.
- Under Collector High Availability, click New. The Create Collector HA Group window appears. Take the following steps.
- From the Organization drop-down list, select your Organization with your collectors.
- In the Group Name field, enter the name of your Collector group.
- From HA Via, select VRRP.
- From the Collectors drop-down list, select the Collectors to include in the group.
Note: The available Collectors displayed are those from the same Organization selected earlier. - In the VIP field, enter the Virtual Internet Protocol address.
Note: This VIP can be internal. - In the VIP Router ID field, enter the VIP Router ID number (1-255).
- For each collector, click Edit, and take the following steps.
- In the Interface field, enter the name of the interface. For example, eth0.
- From the Role drop-down list, select the Collector’s role (Leader, Follower).
Note: Only one collector from the HA group can be assigned as a Leader. - In the Priority field, enter the numeric priority of the Collector, with the high number being the greater priority (1-254).
Note: The Collector Leader Priority should be higher than all of its Followers. - Click Save.
- Repeat step 3a-e for each Collector. When done, proceed to step 4.
- Click Test. If the test succeeds, proceed to step 5. If it fails, check your earlier configurations.
- Click Save.
GCP Collector Deployments
This Case covers the situation where your Collectors are deployed on GCP.
To use the Collector HA feature with GCP, after configuring your collectors, you will need to create an instance group, create a load balancer, and apply the instance group, check and configure the load balancer so FortiSIEM can monitor and report the load balancer's health status. The final step is to add the load balancer to your FortiSIEM configuration so High Availability is achieved via load balancing mechanisms.
During normal operations:
-
Logs sent to the Load Balancer are distributed among the Collectors in the Cluster.
-
FortiSIEM Supervisor node distributes event pulling and performance monitoring jobs among all Collectors in the Cluster.
-
Job distribution is handled via Round Robin.
If a Collector goes down, then:
-
Load Balancer will skip the failed Collector and distribute logs among other Collectors.
-
FortiSIEM Supervisor node will automatically re-distribute event pulling and performance monitoring jobs previously assigned to the failed Collector, to other Collectors in the Cluster.
- Step 1 - Configure Collectors
- Step 2 - Create Instance Group
- Step 3 - Create Load Balancer
- Step 4 - Check Load Balancer
- Step 5 - Configure Load Balancer to Report Health Status
- Step 6 - Configure Collector HA Group Via Load Balancer
Step 1 - Configure Collectors
Configure Collectors as normal.
Step 2 - Create Instance Group
- Go to the Instance Group page - https://console.cloud.google.com/compute/instanceGroups?_ga=2.213011796.1727950196.1712175609-895679178.1667947390
- Click CREATE INSTANCE GROUP.
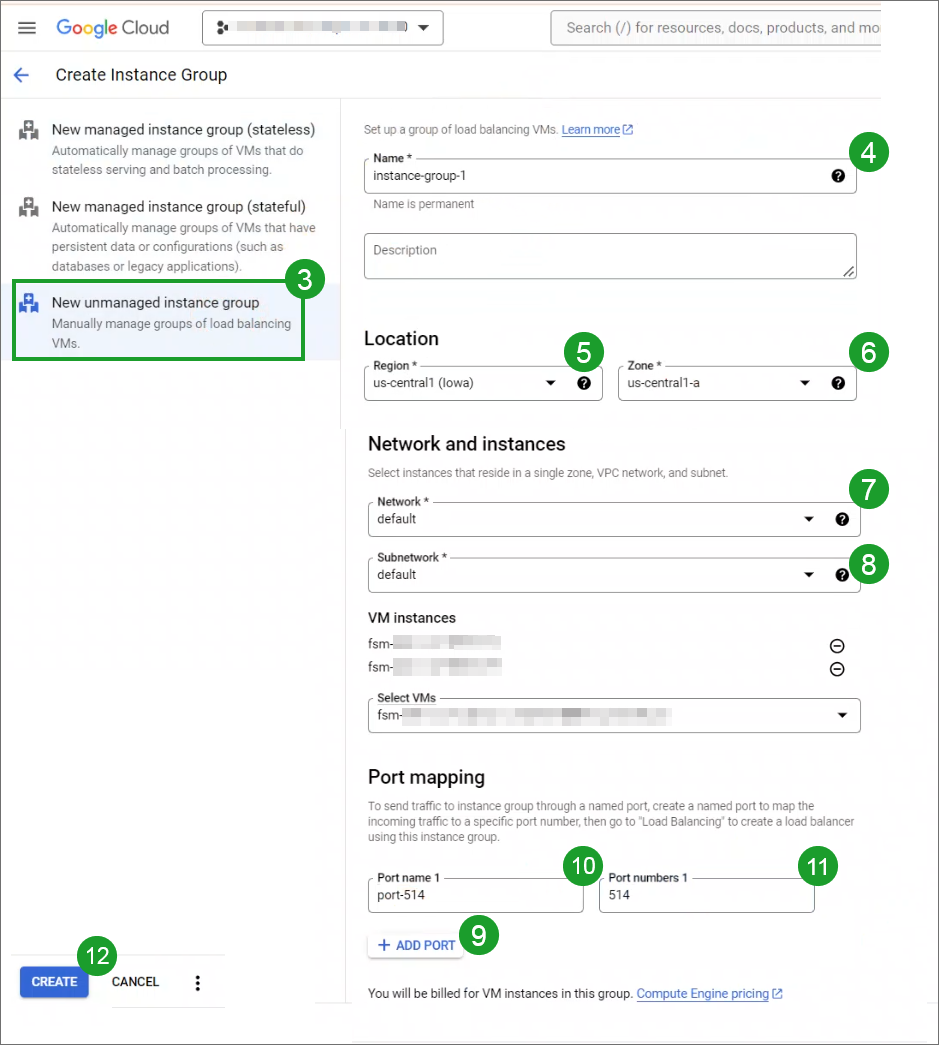
- In the left pane, select New unmanaged instance group.
- In the Name field, enter a name for the instance group.
- From the Location drop-down list, select a region.
- From the Zone drop-down list, select a zone.
- From the Network drop-down list, select default.
- From the Subnetwork drop-down list, select default.
- From the VM instances drop-down list, select the collectors you wish to include as part of your Collector HA group.
- Under Port mapping, click + ADD PORT.
- In the Port name 1 field, enter a name for the port.
- In the Port numbers 1 field, confirm "514" appears. If it isn't, input 514.
- Click CREATE.
Your Instance Group is now created, and you can go to the next step to create a load balancer.
Step 3 - Create Load Balancer
Reference: https://cloud.google.com/load-balancing/docs/https/ext-https-lb-simple#load-balancer
To create a load balancer, take the following steps.
- Use https://console.cloud.google.com/net-services/loadbalancing/list?_ga=2.221907288.1727950196.1712175609-895679178.1667947390.
or
Navigate to Network services > Load balancing . - Click +CREATE LOAD BALANCER.
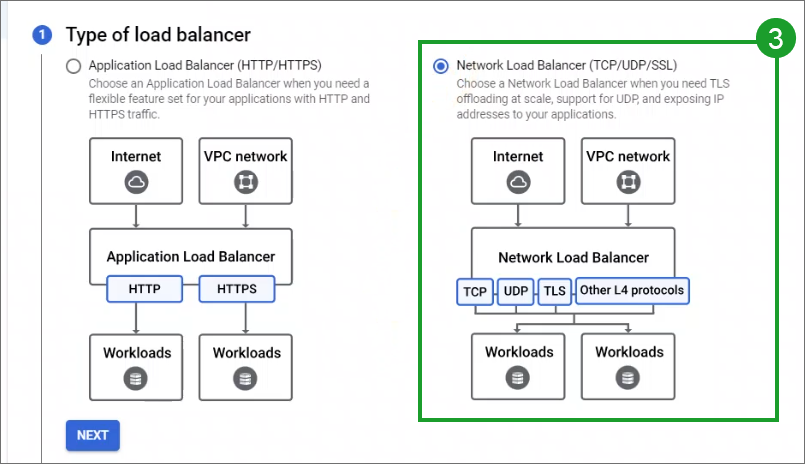
- Under Type of load balancer, select Network Load Balancer (TCP/UDP/SSL), then click NEXT.
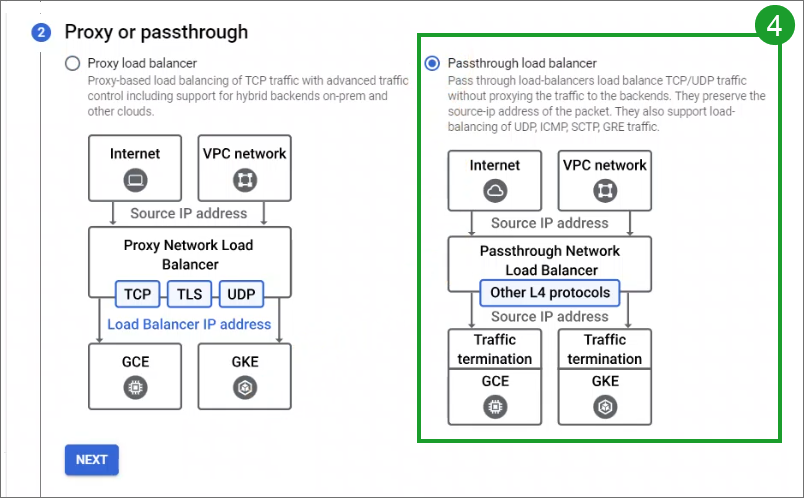
- Under Proxy or passthrough, select Passthrough load balancer, and click NEXT.
- Under Public facing or internal, select Public facing (external) and click NEXT.
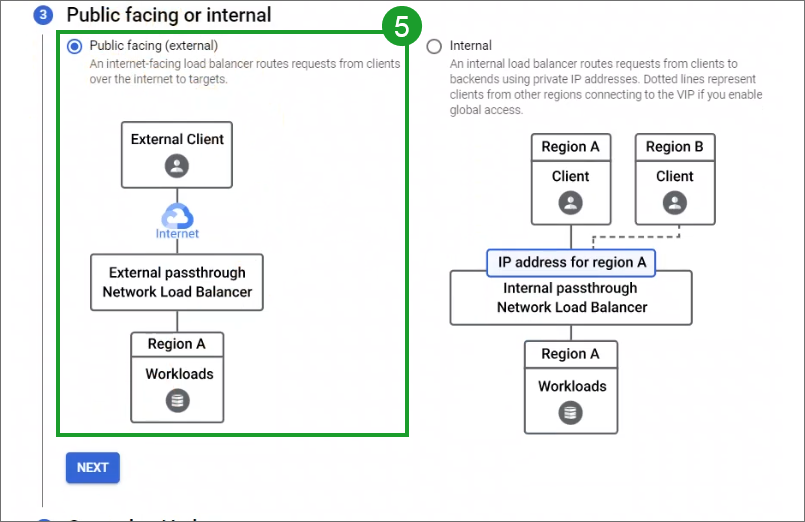
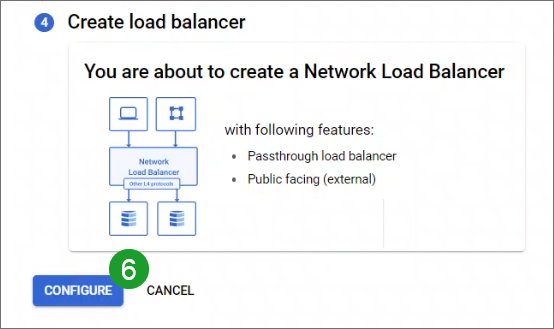
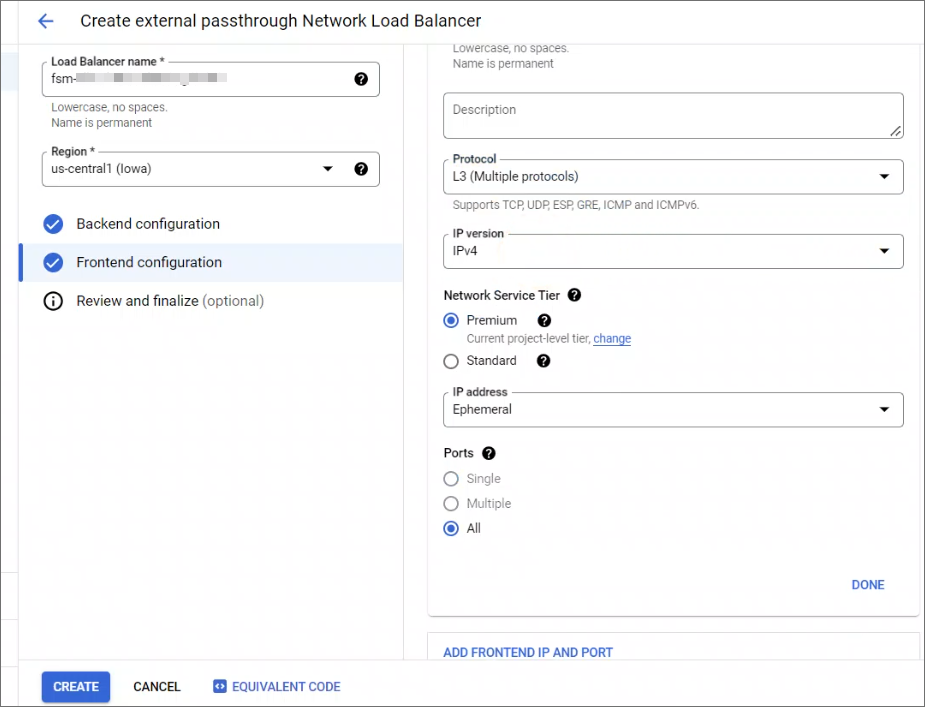
- Click CONFIGURE.
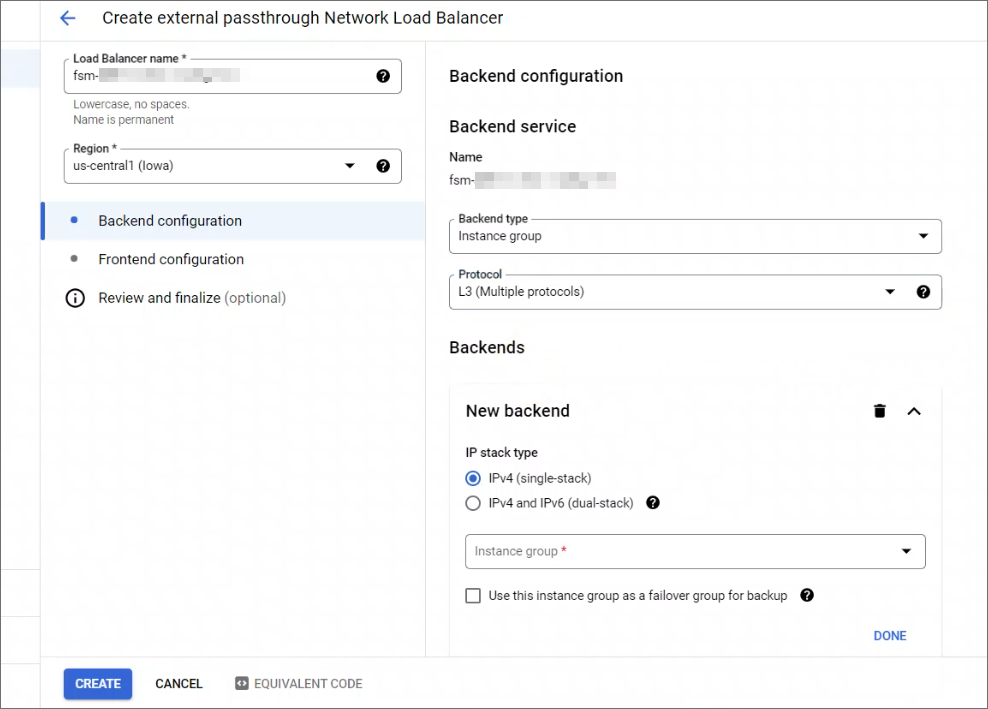
- In the Load Balancer name field, enter a name for the load balancer.
- From the Region drop-down list, select a region.
- From the Backend configuration column, take the following steps.
- From the Protocol drop-down list, select L3 (Multiple protocols).
- From the Instance group drop-down list, select the instance group you created in Create Instance Group, and click DONE.
- Click the Health check drop-down list.
- Click CREATE A HEALTH CHECK.
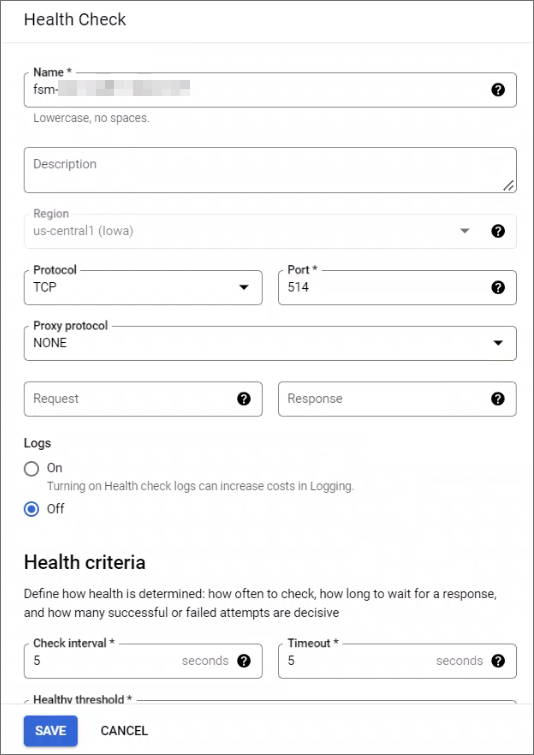
- From the Health Check window, take the following steps.
- In the Name field, enter a name for the health check.
- From the Protocol drop-down list, select TCP.
- In the Port field, enter "514".
- Click SAVE.
- Select Frontend configuration.
- From the Protocol drop-down list, select L3 (Multiple protocols).
- Click DONE.
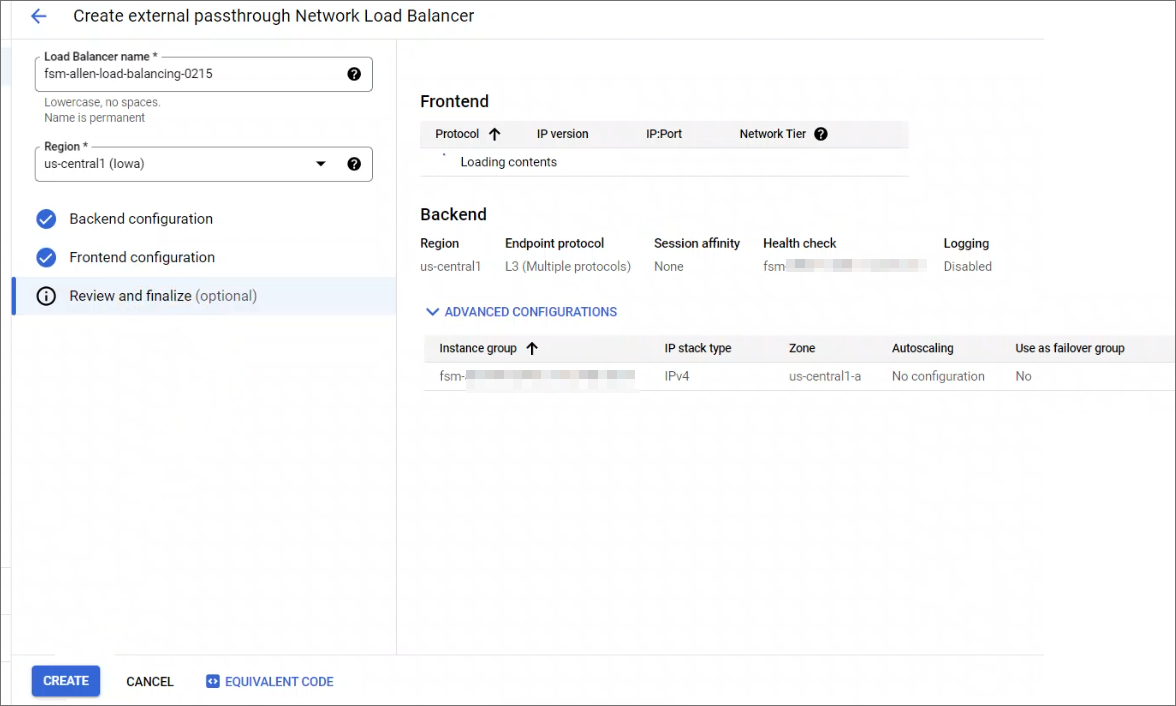
- Click Review and finalize. You can review your configuration.
- Click CREATE.
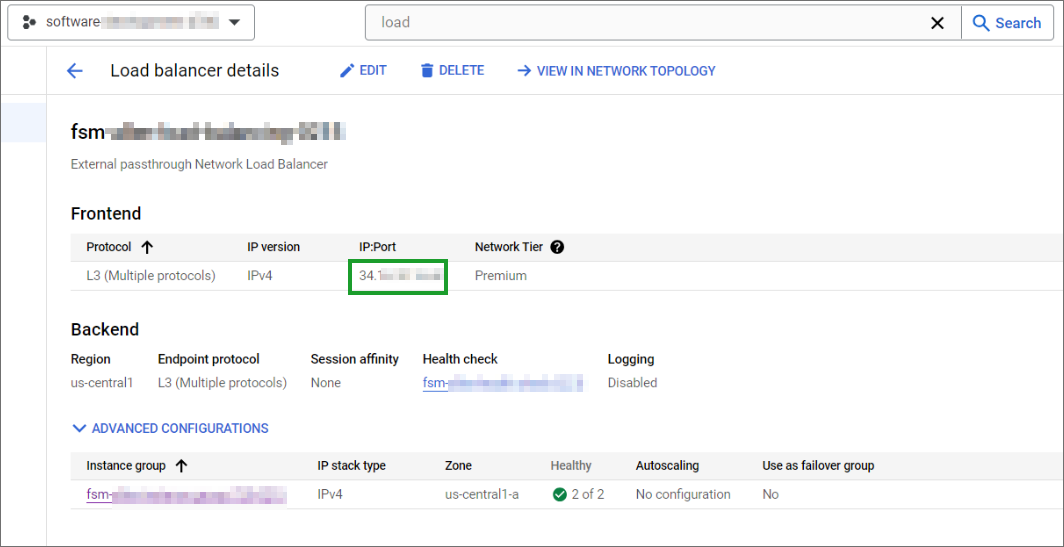
Step 4 - Check Load Balancer
Select your load balancer and confirm whether Collectors can receive data from Load balancer external IP. This IP address is displayed under the IP:Port column in the Frontend table. This is also the IP address you will need to use when configuring Collector HA in FortiSIEM.
Step 5 - Configure Load Balancer to Report Health Status
- Go to your VM instances, using https://console.cloud.google.com/compute/instances?_ga=2.191581290.1727950196.1712175609-895679178.1667947390/.
- Select a Collector instance that you intend to use as part of your HA Collector group.
- Shut down the instance, then click EDIT.
Note: The instance must be shut down in order to edit.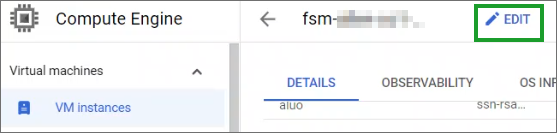
- Navigate to Access scopes, and locate Compute Engine.
- From the Compute Engine drop-down list, select Read Only.
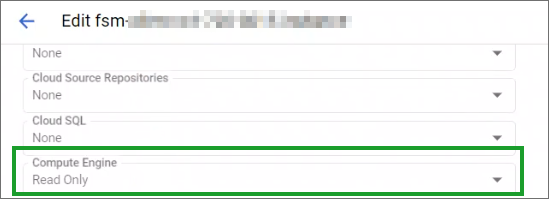
- Click SAVE.
- Repeat steps 2-6 for any additional collectors that are part of your load balancer.
After all your collectors have Compute Engine configured to Read Only, your load balancer is now ready to report its health status. - Go to Configure Collector HA Via Load Balancer for FortiSIEM configuration.
Step 6 - Configure Collector HA Group Via Load Balancer
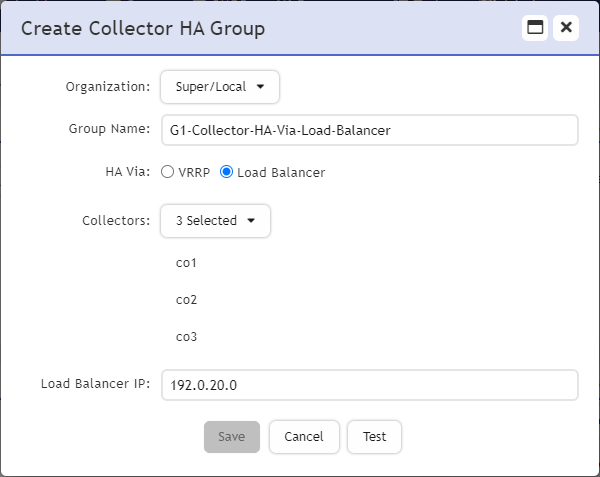
To create a new Collector High Availability configuration, take the following steps:
- Navigate to ADMIN > Settings > System > Cluster Config.
- Under Collector High Availability, click New. The Create Collector HA Group window appears. Take the following steps.
- From the Organization drop-down list, select your Organization.
- In the Group Name field, enter the name of your Collector group.
- From HA Via, select Load Balancer.
- From the Collectors drop-down list, select the Collectors to include in the group.
Note: The available Collectors displayed are those from the same Organization selected earlier. - In the Load Balancer IP field, enter the Load Balancer frontend IP address.
- Click Test to confirm it is working correctly. If it succeeds, proceed to the next step.
- Click Save.
Azure Collector Deployments
This Case covers the situation where your Collectors are deployed on Azure.
To use the Collector HA feature with Azure, you will need to configure your collectors, configure port rules for all your VM Collectors, create a load balancer, configure the load balancer so FortiSIEM can monitor and report the load balancer's health status, then add the load balancer to your FortiSIEM configuration. High Availability is then achieved via load balancing mechanisms.
During normal operations:
-
Logs sent to the Load Balancer are distributed among the Collectors in the Cluster.
-
FortiSIEM Supervisor node distributes event pulling and performance monitoring jobs among all Collectors in the Cluster.
-
Job distribution is handled via Round Robin.
If a Collector goes down, then:
-
Load Balancer will skip the failed Collector and distribute logs among other Collectors.
-
FortiSIEM Supervisor node will automatically re-distribute event pulling and performance monitoring jobs previously assigned to the failed Collector, to other Collectors in the Cluster.
- Step 1 - Configure Collectors
- Step 2 - Configure Port Rule
- Step 3 - Create Load Balancer
- Step 4 - Configure Load Balancer
- Step 5 - Configure Collector HA Group Via Load Balancer
Step 1 - Configure Collectors
Configure Collectors as normal.
Step 2 - Configure Port Rule
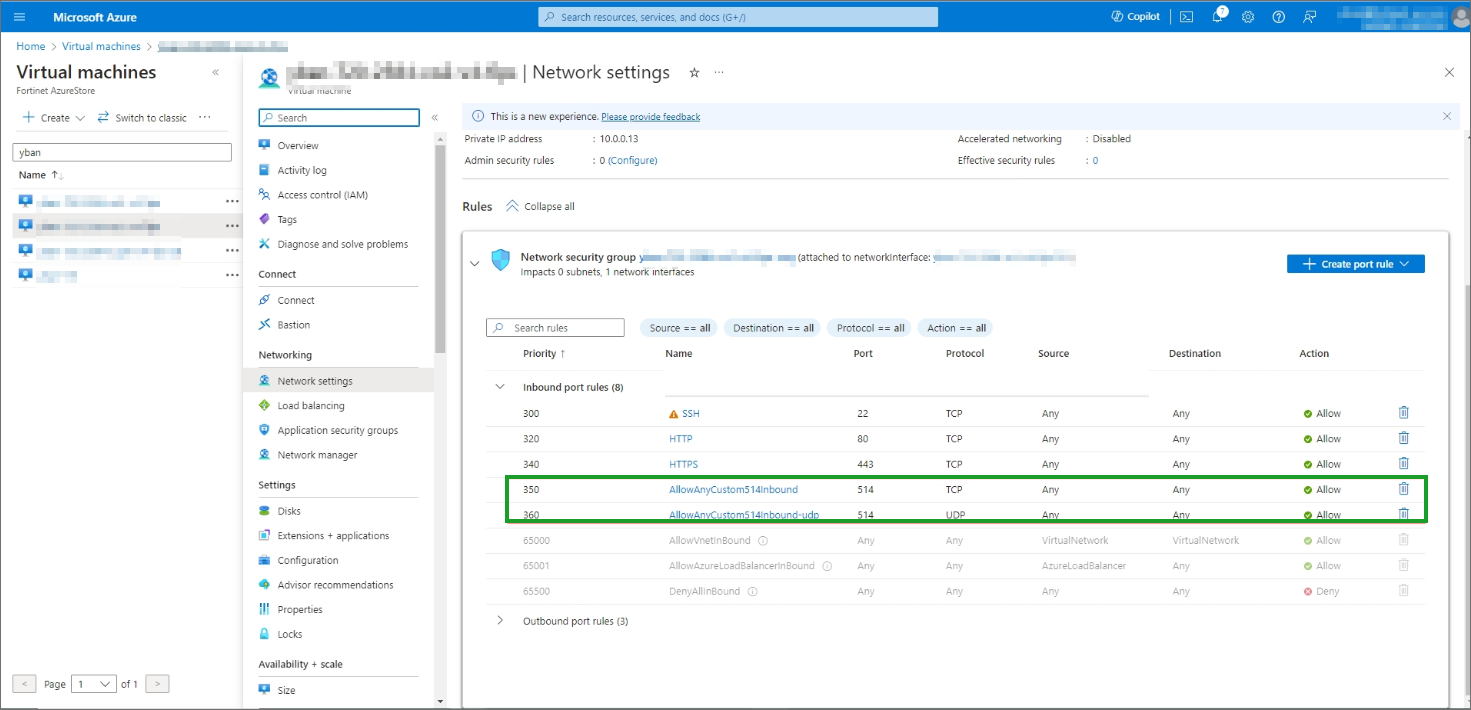
For each VM Collector, take the following steps to create a TCP and UDP port rule for your Azure collectors.
- Log into Microsoft Azure and go to Home > Virtual machine > <Collector VM>.
- From your VM page, go to Network Settings > Rules and click + Create port rule, then select Inbound port rule.
- In the Name field, enter the name of the port rule, such as "514-tcp-inbound".
- In the Destination port ranges field, enter "514".
- From the Protocol selection, select TCP.
- From the Action selection, select Allow.
- Click Save.
- Click + Create port rule, then select Inbound port rule.
- In the Name field, enter the name of the port rule, such as "514-udp-inbound".
- In the Destination port ranges field, enter "514".
- From the Protocol selection, select UDP.
- From the Action selection, select Allow.
- Click Save.
Repeat these steps for any additional Collectors you wish to include into your Collector HA group. When all Collectors have been configured with the port rules, continue with Step 3 - Create Load Balancer.
Step 3 - Create Load Balancer
To create a load balancer, take the following steps.
Note: Additional information on creating a load balancer on Azure is available at https://learn.microsoft.com/en-us/azure/load-balancer/quickstart-load-balancer-standard-public-portal.
- Log into Microsoft Azure.
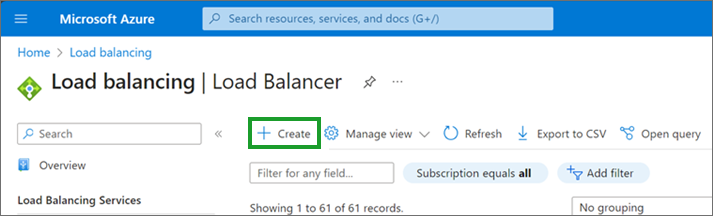
- From the search field, enter Load balancer, and select Load Balancer.
- Click + Create.
- Under Project details, take the following steps.
- From the Subscription drop-down list, select your Subscription.
- At Resource group, search and select the group that the Collector instances are in.
- Under Instance details, take the following steps.
- In the Name field, enter a name for the load balancer, like "load-balancer".
- For Region, select the region that the Collector instances are in.
- For SKU, leave as the default, Standard.
- For Type, select Public.
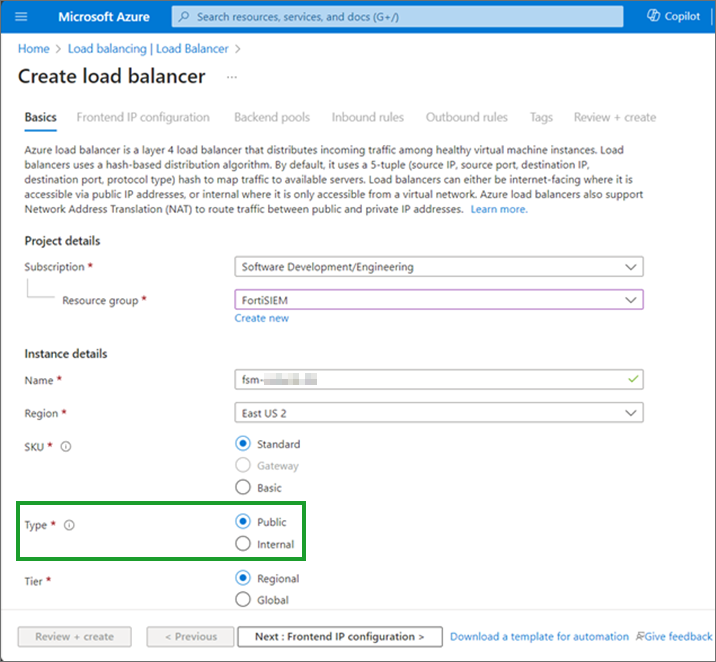
- For Tier, leave as the default, Regional.
- Click Next: Frontend IP configuration >.
- Under Frontend IP configuration, click + Add a frontend IP configuration.
- In the Name field, enter a name for the Frontend IP configuration.
- For IP version, select IPv4.
- For IP type, select IP address.
- Under Public IP address, use the drop-down list to select an available public IP address. This will be the IP address in your Collector HA configuration.
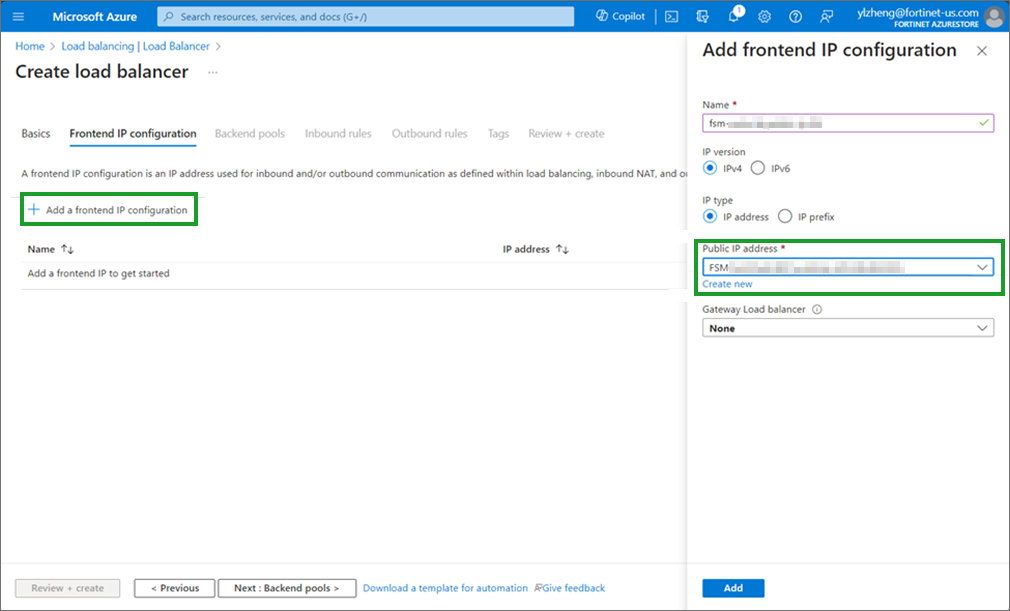
- Click Save.
- Click Next: Backend pools.
- From backend pools, click + Add a backend pool.
- In the Name field, enter a name for backend pool.
- From the Virtual network drop-down list , select a virtual network where the Collectors are.
- For Backend Pool Configuration, select IP address.
- From IP addresses, take the following steps.
- For each IP address drop-down list, enter/select a Collector IP address for each Collector you wish to add to the Collector HA group.
Note: To find your existing FortiSIEM Collector IP addresses, go to the FortiSIEM GUI, navigate to Admin > Health, click the Collector Health tab, look at the IP Address column, and check the private IP address of the Collectors.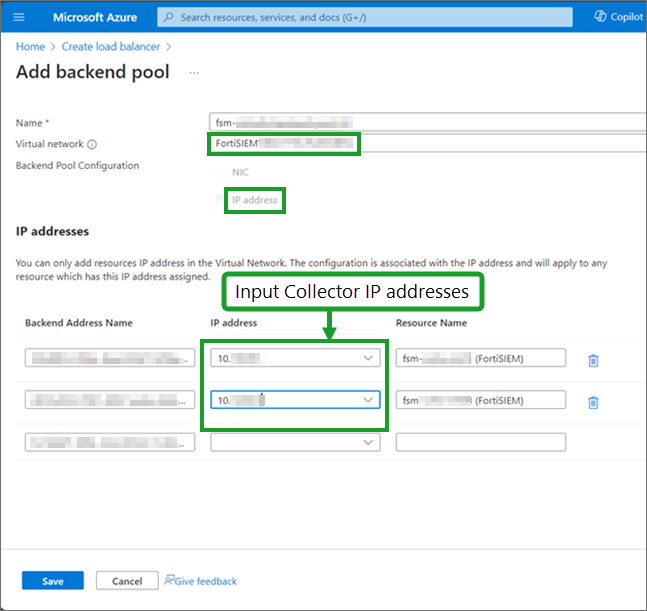
- When done, click Save.
- For each IP address drop-down list, enter/select a Collector IP address for each Collector you wish to add to the Collector HA group.
- Click Next: Inbound rules.
- From Load balancing rule, click + Add a load balancing rule, then under Add load balancing rule, take the following steps.
- In the Name field, enter a name for the load balancing rule.
- For IP Version, select IPv4.
- From the Frontend IP address drop-down list, select the Frontend IP address you created.
- From the Backend pool drop-down list, select the Backend pool that you created.
- For Protocol, select TCP.
- In the Port field, enter 514.
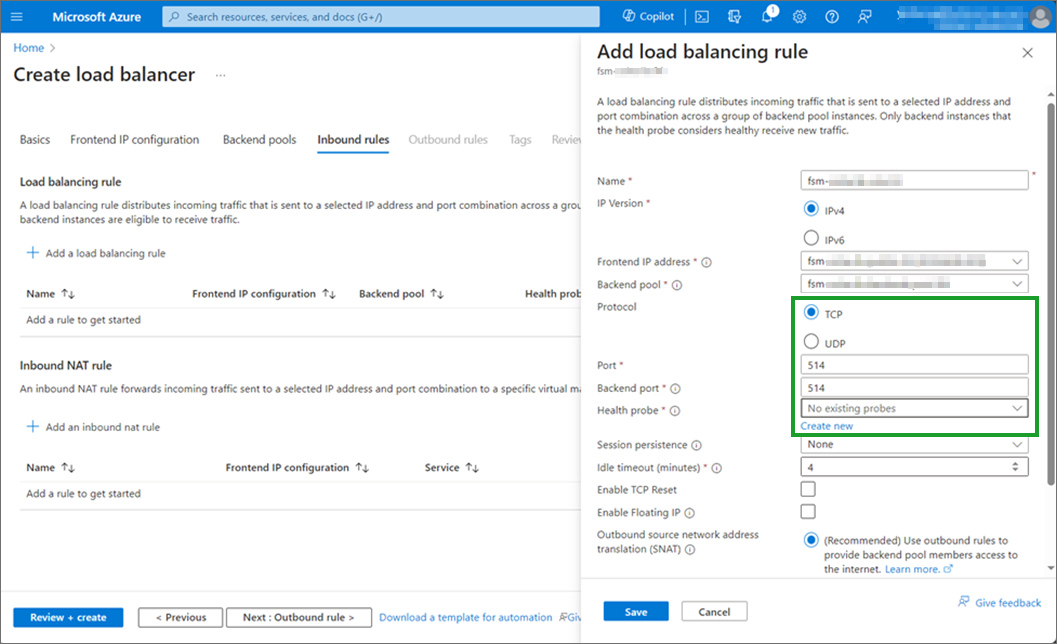
- In the Backend port field, enter 514.
- Under Health probe, click Create new.
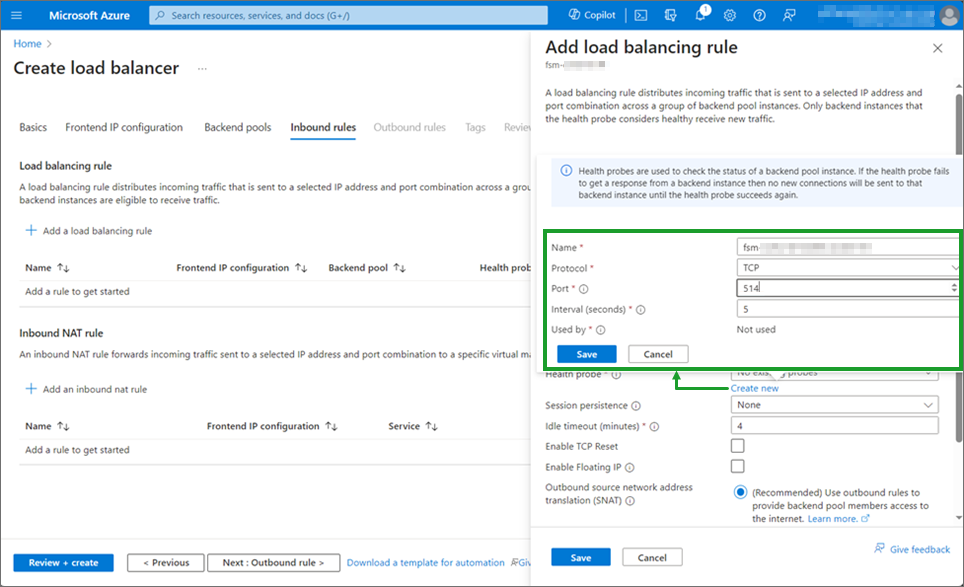
- In the Name field, enter a name for the health probe.
- From the Protocol drop-down list, select TCP.
- In the Port field, enter 514.
- Click Save.
- Click Save.
- From Load balancing rule, click + Add a load balancing rule, then under Add load balancing rule, take the following steps.
- In the Name field, enter a name.
- For IP Version, select IPv4.
- For Protocol, select UDP.
- In the Port field , enter 514.
- In the Backend port field, enter 514.
- Under Health probe, select the existing Health probe create in step 8.
- Click Save.
- Click Review + create.
- Click Create.
Proceed to Step 4 - Configure Load Balancer.
Step 4 - Configure Load Balancer
More information can be found at https://learn.microsoft.com/en-us/azure/deployment-environments/how-to-configure-managed-identity
- Log into Microsoft Azure.
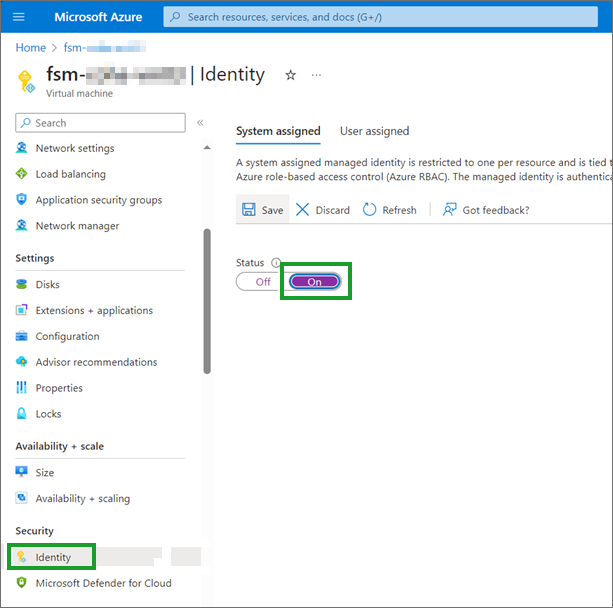
- Navigate to the VM being used as a collector.
- From the left pane, under Security, select Identity.
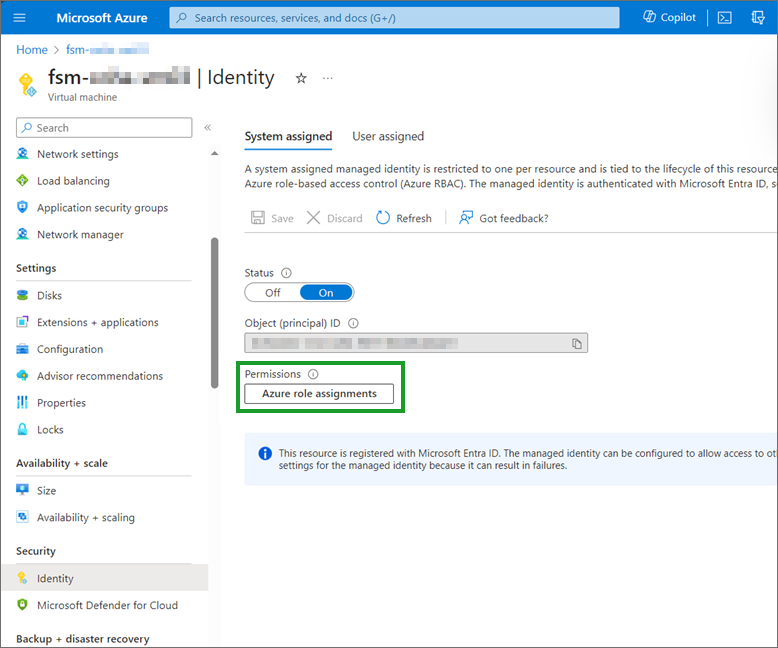
- Change Status toggle so it is On.
- Click Azure role assignments.
- Click + Add role assignment (Preview).
- In the Add role assignment (Preview) window, take the following steps. Under Azure role assignments, there should now be a role of Reader.
- From the Scope drop-down list, select Resource group.
- From the Role drop-down list, select Reader.
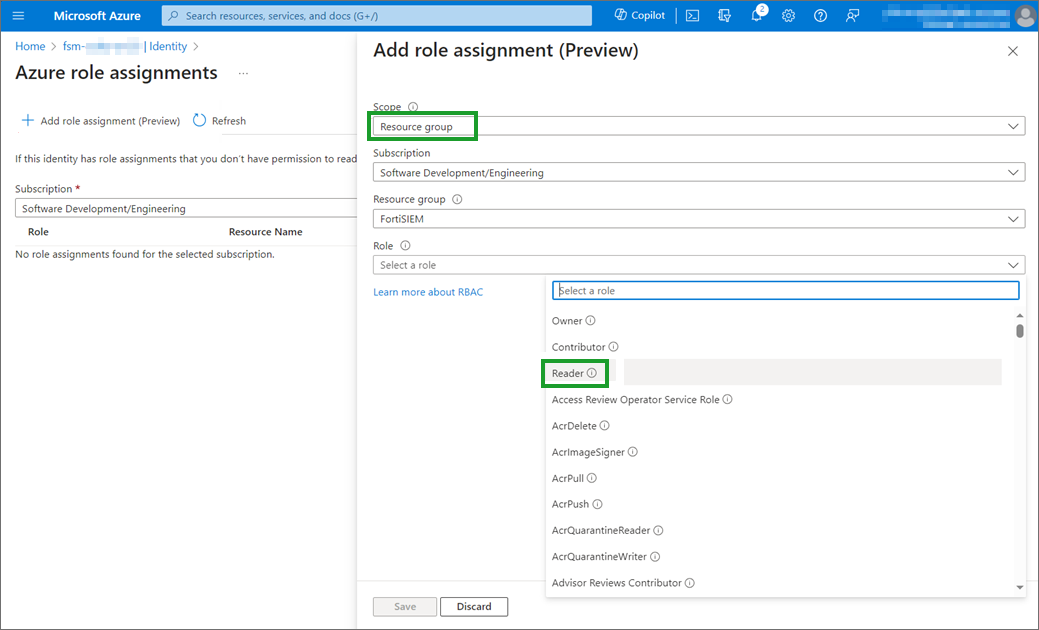
- Click Save.
- Go to Step 5 - Configure Collector HA Group Via Load Balancer for FortiSIEM configuration.
Step 5 - Configure Collector HA Group Via Load Balancer
To create a new Collector High Availability configuration, take the following steps:
- Navigate to ADMIN > Settings > System > Cluster Config.
- Under Collector High Availability, click New. The Create Collector HA Group window appears. Take the following steps.
- From the Organization drop-down list, select your Organization.
- In the Group Name field, enter the name of your Collector group.
- From HA Via, select Load Balancer.
- From the Collectors drop-down list, select the Collectors to include in the group.
Note: The available Collectors displayed are those from the same Organization selected earlier. - In the Load Balancer IP field, enter the Load Balancer frontend IP address.
- Click Test to confirm it is working correctly. If it succeeds, proceed to the next step.
- Click Save.
DB Cluster Configuration
For Supervisor High Availability, multiple Supervisor nodes need to form a DB Cluster. This section specifies how to configure this.
-
First Supervisor node is automatically selected as a DB Leader.
-
Select other Supervisor nodes to become DB Followers by clicking +.
-
After adding all Supervisor nodes, click Form Cluster to form the Cluster.
When your DB Cluster configuration is complete, enter the Virtual IP Address to use in the VIP field, then click Save.