
ServiceNow Integration
- Configuring ServiceNow for FortiSIEM Integration
- Incident Outbound Integration (Default)
- Incident Outbound Integration (Custom)
- Incident Inbound Integration (Default)
- Incident Inbound Integration (Custom)
- CMDB Outbound Integration (Default)
- Appendix
Configuring ServiceNow for FortiSIEM Integration
- Log in to ServiceNow.
- For Service Provider Configurations, create Companies by creating Company Name.
- For the integrations to work, FortiSIEM needs to modify certain ServiceNow database tables.
- If you are using default integration, make sure that the FortiSIEM user account has the permissions specified, see Required Permissions for ServiceNow SOAP Integration.
- if you are using custom integration, then make sure that the FortiSIEM user account has the read/write permissions on the specific ServiceNow tables and columns.
Incident Outbound Integration (Default)
In this integration, you can create tickets in ServiceNow when an Incident triggers in FortiSIEM. In the Default integration, FortiSIEM Incidents are written to the ServiceNow incident table. FortiSIEM incident attributes are mapped to ServiceNow incident table columns as follows.
|
FortiSIEM Incident Attribute |
ServiceNow Incident Table Column |
|---|---|
|
Incident Status |
work_notes |
|
Incident Name |
short_description |
|
Incident Comments (generated string containing few Incident attributes – see Step 1.4.k.) |
comments |
|
Organization Name |
company |
|
Incident Severity |
impact |
|
Incident Severity |
urgency |
Step 1: Create an Integration
- Log into your Supervisor node with administrator credentials.
- Navigate to ADMIN > Settings > General > External Integration.
- Click New.
- From the Integration Policy window, take the following steps.
- From the Type drop-down list, select Incident.
- From the Direction drop-down list, select Outbound.
- From the Vendor drop-down list, select ServiceNow. When you select a vendor, an instance is created, with a unique name for the policy. For example, if you had two ServiceNow installations, each would have different instance names.
- Set the Instance - This is the name of the integration. If you want matching inbound and outbound Incident integration for a specific vendor, then the instance name for the inbound and outbound integration must be the same. For example, ServiceNow Outbound and ServiceNow Inbound should have the same instance name, for example, ServiceNow1.
- For Plugin Name, a default Plugin Name is populated. Leave it as is. This is the Java code that implements the integration, including connecting to the external help desk systems and synching the CMDB elements.
- In the Host/URL field, enter the login URL, for example,
https://vendor123.service-now.com. - In the User Name field, enter the ServiceNow username login credential.
- In the Password field, enter the ServiceNow password login credential.
- Leave the ServiceNow Table Name attribute alone.
- In the Description field, enter a description as to what the integration does. This is for display purposes only.
- For Incident Comment, you can keep the default format shown in Step 1.k.i, or create your own, shown in Step 1.k.ii.
- Default format :
[FortiSIEM]Incident Id:<val>;First seen time:<val>;Target IP:<val>;Incident Details:<val>;Mitre TechniqueId:<val>;Mitre Tactics:<val>; Description:<Rule Name> - To create your own, click the Edit icon, and form a string by combining your own text and incident attributes by choosing from the Insert Content drop-down list. When done, click Save.
- Default format :
- For Organization Mapping, click the Edit icon to create mappings between the Organizations in your FortiSIEM deployment and Company names in ServiceNow (created in Configuring ServiceNow for FortiSIEM Integration, Step 2).
- For Run For, click the Edit icon, and choose the organizations for whom tickets will be created.
- In the Max Incidents field, enter the maximum number of incidents you want to record.
- Click Save.
Step 2: Link Integration to an Automation Policy
You need to link the integration to an automation policy, so that the integration runs when the automation policy triggers.
Take the following steps.
- Go to ADMIN > Settings > General > Automation Policy.
- Click New to create a new policy or Edit to edit an existing policy.
- In the Automation Settings dialog box, select Action > Invoke an Integration Policy, then select the edit icon.
- Choose a specific integration from the drop-down list.
- Click Save.
Incident Outbound Integration (Custom)
In this integration, you can create tickets in ServiceNow when an Incident triggers in FortiSIEM. You can choose your own ServiceNow table to map FortiSIEM Incidents to. Take the following steps to create a custom outbound integration.
Step 1: Create an Integration
- Log into your Supervisor node with administrator credentials.
- Navigate to ADMIN > Settings > General > External Integration.
- Click New.
- From the Integration Policy window, take the following steps.
- From the Type drop-down list, select Incident.
- From the Direction drop-down list, select Outbound.
- From the Vendor drop-down list, select ServiceNow. When you select a vendor, an instance is created, with a unique name for the policy. For example, if you had two ServiceNow installations, each would have different instance names.
- For Plugin Name, a default Plugin Name is populated. Leave it as is. This is the Java code that implements the integration, including connecting to the external help desk systems and synching the CMDB elements. For other vendors, you must create your own plugin and enter the plugin name here.
- In the Host/URL field, enter the login URL, for example,
https://vendor123.service-now.com. - In the User Name field, enter the ServiceNow username login credential.
- In the Password field, enter the ServiceNow password login credential.
- In the ServiceNow Table Name field, enter the custom ServiceNow table
- In the Description field, enter a description as to what the integration does. This is for display purposes only.
- For Incident Comment, you can keep the default format shown in Step 1.j.i, or create your own, shown in Step 1.j.ii.
- Default format :
[FortiSIEM]Incident Id:<val>;First seen time:<val>;Target IP:<val>;Incident Details:<val>;Mitre TechniqueId:<val>;Mitre Tactics:<val>; Description:<Rule Name> - To create your own, click the Edit icon, and form a string by combining your own text and incident attributes by choosing from the Insert Content drop-down list. When done, click Save.
- Default format :
- For Organization Mapping, click the Edit icon to create mappings between the Organizations in your FortiSIEM deployment and Company names in ServiceNow (created in Configuring ServiceNow for FortiSIEM Integration, Step 2).
- For Run For, click the Edit icon, and choose the organizations for whom tickets will be created.
- For Content Mapping, click the Edit icon to define mappings between FortiSIEM Incident fields and ServiceNow custom table columns.
- Select the Field Mappings dialog box and click +.
Note: To delete a Field Mapping, select the entry and click -. To edit a Field Mapping, click the Edit icon. - From the FortiSIEM Incident Field drop-down list, select a FortiSIEM Incident field.
- From the ServiceNow Field drop-down list, select a mapped ServiceNow field. Note that the menu is populated from the table in step 4.i.
- Select the Value Mappings dialog box and click + to enter Value Mappings if you want the values for a specific field to be transformed. A standard example is Severity, where FortiSIEM Incident Severity 1-> 4 may be mapped to Low, 5-8 as Medium and 9-10 as High.
- From Field, select the ServiceNow Field whose values need to be transformed.
- In the From field, select the value that FortiSIEM generates.
- In the To field, select the value that you want ServiceNow to store.
- When done, click Save.
- Select the Field Mappings dialog box and click +.
- In the Max Incidents field, enter the maximum number of incidents you want to record.
- Click Save.
Step 2: Link Integration to an Automation Policy
You need to link the integration to an automation policy, so that the integration runs when the automation policy triggers.
Note: In the default Outbound integration, Incident updates are recorded in the comments field. However, in the custom integration, Incident updates are not reflected in ServiceNow.
Take the following steps.
- Go to ADMIN > Settings > General > Automation Policy.
- Click New to create a new policy or Edit to edit an existing policy.
- In the Automation Policy dialog box, select Action > Invoke an Integration Policy, then select the edit icon.
- Choose a specific integration from the drop-down list.
- Click Save.
Incident Inbound Integration (Default)
Using this integration, a FortiSIEM Incident can be programmatically cleared when a user closes the corresponding ticket in ServiceNow. In the default integration, the following fields from ServiceNow incident table are mapped to FortiSIEM incident fields.
|
ServiceNow Incident Table Column |
FortiSIEM Incident Field |
|---|---|
|
incident_state |
Incident Status |
|
Closed_code |
Incident Resolution |
|
Closed_by |
External User |
|
number |
External Ticket Id |
|
incident_state |
External Ticket Status |
Step 1: Create an Incident Inbound Integration
- Log into your Supervisor node with administrator credentials.
- Navigate to ADMIN > Settings > General > External Integration.
- Click New.
- From the Integration Policy window, take the following steps.
- From the Type drop-down list, select Incident.
- From the Direction drop-down list, select Inbound.
- From the Vendor drop-down list, select ServiceNow. When you select a vendor, an instance is created, with a unique name for the policy. For example, if you had two ServiceNow installations, each would have different instance names.
- Set the Instance - This is the name of the integration. If you want matching inbound and outbound Incident integration for a specific vendor, then the instance name for the inbound and outbound integration must be the same. For example, ServiceNow Outbound and ServiceNow Inbound should have the same instance name, for example, ServiceNow1.
- For Plugin Name, a default Plugin Name is populated. Leave it as is. This is the Java code that implements the integration, including connecting to the external help desk systems and synching the CMDB elements.
- In the Host/URL field, enter the login URL, for example,
https://vendor123.service-now.com. - In the User Name field, enter the ServiceNow username login credential.
- In the Password field, enter the ServiceNow password login credential.
- Leave the ServiceNow Table Name attribute alone.
- In the Description field, enter a description as to what the integration does. This is for display purposes only.
- For Content Mapping, do not make any edits. Keep the system defined one.
- In the Time Window field, enter/select the number of hours for which incident states will be synched from ServiceNow. For example, if time window is set to 10 hours, then the states of incidents that occurred in the last 10 hours will be synched.
- When done, click Save.
Step 2: Create an Incident Inbound Integration Schedule
This determines the schedule on which the inbound integration policy defined in Step 1: Create an Incident Inbound Integration will be run.
- Log into your Supervisor node with administrator credentials.
- Navigate to ADMIN > Settings > General > External Integration.
- Click Schedule.
- Click + to open the Integration Policy Schedules window.
- From the Integration Policy column, select your integration policy and move it to the Selected column.
- Under Time Range, configure your schedule by taking the following steps.
- In the Start Time field, enter the start time of your schedule.
- From the Local/UTC Timeand Region drop-down lists, configure the start time of the schedule.
- Under Recurrence Pattern, configure the frequency.
- Select Once, Minutely, Hourly, Daily, Weekly, or Monthly for the schedule's recurrence pattern. Depending on what is selected, configure the related date/time schedule attributes.
- In the Start From field, enter the date which the schedule starts.
- When done, click Save.
Incident Inbound Integration (Custom)
In this integration, you can clear tickets in FortiSIEM when a user closes the corresponding ServiceNow ticket. You can choose your own ServiceNow table to update the following FortiSIEM Incident fields:
- External Ticket Id
- Incident Status
- Incident Resolution
- External User
- External Ticket State
Step 1: Create an Incident Inbound Integration
- Log into your Supervisor node with administrator credentials.
- Navigate to ADMIN > Settings > General > External Integration.
- Click New.
- From the Integration Policy window, take the following steps.
- From the Type drop-down list, select Incident.
- From the Direction drop-down list, select Inbound.
- From the Vendor drop-down list, select ServiceNow. When you select a vendor, an instance is created, with a unique name for the policy. For example, if you had two ServiceNow installations, each would have different instance names.
- For Plugin Name, a default Plugin Name is populated. Leave it as is. This is the Java code that implements the integration, including connecting to the external help desk systems and synching the CMDB elements.
- In the Host/URL field, enter the login URL, for example,
https://vendor123.service-now.com. - In the User Name field, enter the ServiceNow username login credential.
- In the Password field, enter the ServiceNow password login credential.
- For the ServiceNow Table Name, choose your custom ServiceNow table.
- In the Description field, enter a description as to what the integration does. This is for display purposes only.
- For Content Mapping, click the Edit icon to define mappings between FortiSIEM Incident fields and ServiceNow custom table columns.
- Select the Field Mappings dialog box and click +.
Note: To delete a Field Mapping, select the entry and click -. To edit a Field Mapping, click the Edit icon. - From the FortiSIEM Incident Field drop-down list, select a FortiSIEM Incident field.
- From the ServiceNow Field drop-down list, select a mapped ServiceNow field. Note that the menu is populated from the table in step 4.i.
- Select the Value Mappings dialog box and click + to enter Value Mappings if you want the values for a specific field to be transformed. For the Incident Inbound Integration to function, we need a mapping to the "Closed" value of FortiSIEM Incident Status field. This allows FortiSIEM to close an Incident.
- From Field, select the ServiceNow Field whose values need to be transformed.
- In the From field, select the value that FortiSIEM generates.
- In the To field, select the value that you want ServiceNow to store.
- When done, click Save.
- Select the Field Mappings dialog box and click +.
- In the Time Window field, enter/select the number of hours for which incident states will be synched from ServiceNow. For example, if time window is set to 10 hours, then the states of incidents that occurred in the last 10 hours will be synched.
- When done, click Save.
CMDB Outbound Integration (Default)
CMDB Outbound Integration populates an external CMDB from FortiSIEM’s own CMDB. Built in integrations are available for ServiceNow.
Step 1: Create a CMDB Outbound Integration
- Log into your Supervisor node with administrator credentials.
- Go to ADMIN > Settings > General > External Integration.
- Click New.
- For Type, select Device.
- For Direction, select Outbound.
- For Vendor, select the vendor of the system you want to connect to. ServiceNow is supported out of the box.
When you select the Vendor:- An Instance is created - this is the unique name for this policy. For example if you had 2 ServiceNow installations, each would have different Instance names.
- A default Plugin Name is populated - this is the Java code that implements the integration including connecting to the external help desk systems and synching the CMDB elements. The plugin is automatically populated for ServiceNow. For other vendors, you have to create your own plugin and type in the plugin name here.
- For Host/URL, enter the host name or URL of the external system. For ServiceNow, select the login URL
- For User Name and Password, enter a user name and password that the system can use to authenticate with the external system. For ServiceNow, select the login credentials.
- In Attribute Mapping, specify the mapping of attributes to resources.
- For Organization Mapping, click Edit to create mappings between the organizations in your FortiSIEM deployment and the names of the organization in the external system. For ServiceNow, select the Company names as in Configuring ServiceNow for FortiSIEM Integration, Step 2.
- For Run For, choose the organizations for whom tickets will be created.
- For Groups, select the FortiSIEM CMDB Groups whose member devices would be synched to external CMDB.
- Select Run after Discovery if you want this export to take place after you have run discovery in your system. This is the only way to push automatic changes from FortiSIEM to the external system.
- Enter the Maximum number of devices to send to the external system.
- Click Save.
Step 2: Create a CMDB Outbound Integration Schedule
Updating external CMDB automatically after FortiSIEM discovery:
- Create an integration policy.
- Make sure Run after Discovery is checked.
- Click Save.
Updating external CMDB on a schedule:
- Log into your FortiSIEM Supervisor with administrator credentials.
- Go to ADMIN > Settings > General > External Integration.
- Click Schedule and then click +.
- Select the integration policies.
- Select a schedule.
Updating external CMDB on-demand (one-time):
- Log into your FortiSIEM Supervisor with administrator credentials.
- Go to ADMIN > Settings > General > External Integration.
- Select a specific integration policy and click Run.
Appendix
- FortiSIEM Incident Schema
- Required Permissions for ServiceNow SOAP Integration
- Example Custom Integration
FortiSIEM Incident Schema
The following FortiSIEM Incident fields are available for integration.
|
FortiSIEM Incident Field |
Type |
Description |
Required for Custom Integration |
|---|---|---|---|
|
Incident ID |
64bit Integer |
Incident Id in FortiSIEM database. |
Optional for outbound |
|
Incident Title |
String |
Incident Title is a formatted string to capture Incident details and actors . |
Optional for outbound |
|
Rule Name |
String |
The name of the rule that triggered the Incident. |
Optional for outbound |
|
Rule Description |
String |
The description of the rule that triggered the Incident. |
Optional for outbound |
|
First Seen Time |
64bit Integer |
The first time an incident triggered in FortiSIEM. Format: Unix epoch timestamp (number of seconds that have elapsed since 00:00:00 UTC on 1 January 1970) |
Optional for outbound |
|
Last Seen Time |
64bit Integer |
The last time an incident triggered in FortiSIEM. Format: Unix epoch timestamp (number of seconds that have elapsed since 00:00:00 UTC on 1 January 1970) |
Optional for outbound |
|
Incident Severity |
32bit integer – values 1-10 |
Severity of the Incident. Severities are increasing meaning 1 is lowest and 10 is highest. |
Optional for outbound |
|
Incident Severity Category |
String – takes 3 values: LOW, MEDIUM, HIGH |
Incident severity categorized into 3 levels: LOW, MEDIUM, HIGH |
Optional for outbound |
|
Incident Source |
String |
Incident source attributes in comma separated attribute:Value format. Following attributes are included: srcIpAddr |
Optional for outbound |
|
Incident Target |
String |
Incident destination in comma separated attribute:Value format. Following attributes are included: destIpAddr, destName, hostIpAddr, hostname, user, targetUser |
Optional for outbound |
|
Incident Detail |
String |
Incident details in comma separated attribute:Value format. All attributes not included in Incident Source and Incident target are included in this attribute. |
Optional for outbound |
|
Triggering Attributes |
String |
List of attributes present in the incident. |
Optional for outbound |
|
Incident Count |
32bit integer |
Number of times the incident triggered. |
Optional for outbound |
|
Host Name |
String |
Host Name in incident. This is also present in Incident Target. |
Optional for outbound |
|
Incident Comment |
String |
Comments added by user or by a notification script. |
Optional for outbound |
|
Status |
32bit integer |
Incident Status: 0 means Active, 1 means System Cleared, 2 means User Cleared.
|
Optional for outbound |
|
Incident Resolution |
String |
Four values: Open, InProgress, TruePostive and FalsePositive |
Optional for outbound |
|
Rule Remediation Note |
String |
|
Optional for outbound |
|
External Ticket Id |
String |
ServiceNow Ticket Id |
Required for both Inbound and Outbound |
|
External Ticket State |
String |
ServiceNow Ticket State |
Required for Inbound and must have a value mapping for “Closed” |
|
External User |
String |
User who closed the Ticket in ServiceNow. |
Optional for outbound |
|
External Cleared Time |
String |
Time at which Incident cleared in ServiceNow. |
Required for Inbound |
There are two main requirements for a successful custom integration.
- Outbound and Inbound – must have a mapping for External Ticket Id.
- Inbound - External Ticket State must have value “Closed”.
- Inbound - must have a mapping for External Cleared Time.
Required Permissions for ServiceNow SOAP Integration
General Requirements
FortiSIEM uses ServiceNow Direct Web Service for integration. FortiSIEM communicates on SOAP port 80.
The following SOA APIs are used:
- Insert
- Update
- getKeys
- get
- getRecords
The following role types are required:
- soap_create
- soap_query
- soap_query_update
- soap_update
The following Table and Field permissions are provided.
- Required Table and Field Permissions for CMDB Outbound Integration
- Required Table and Field Permissions for Incident Outbound Integration
Required Table and Field Permissions for CMDB Outbound Integration
|
ServiceNow Table |
FortiSIEM Actions |
Required Permissions |
|---|---|---|
| configuration item [cmdb_ci] |
|
|
| Running Process [cmdb_running_process] |
|
|
| Software Instance [cmdb_software_instance] |
|
|
|
ServiceNow Table |
FortiSIEM Actions |
Required Permissions |
|---|---|---|
| cmdb_ci_linux_server |
|
|
| cmdb_ci_win_server |
|
|
| cmdb_ci_hpux_server |
|
|
| cmdb_ci_unix_server |
|
|
| cmdb_ci_aix_server |
|
|
| cmdb_ci_solaris_server |
|
|
| cmdb_ci_esx_server |
|
|
| cmdb_ci_web_server |
|
|
|
cmdb_ci_app_server_java |
|
|
|
cmdb_ci_app_server_tomcat |
|
|
|
cmdb_ci_app_server_weblogic |
|
|
|
cmdb_ci_app_server_websphere |
|
|
|
cmdb_ci_app_server_jboss |
|
|
|
cmdb_ci_netware_server |
|
|
|
cmdb_ci_database |
|
|
|
cmdb_ci_vpn |
|
|
|
cmdb_ci_ip_router |
|
|
|
cmdb_ci_netgear |
|
|
|
cmdb_ci_ups |
|
|
|
cmdb_ci_printer |
|
|
|
cmdb_ci_network_adapter |
|
|
|
cmdb_ci_storage_disk |
|
|
|
ServiceNow Table |
FortiSIEM Actions |
Required Permissions |
|---|---|---|
| Company [core_company] |
|
|
| Field | ServiceNow Table | Required Permissions | Need write_role |
|---|---|---|---|
| company | core_company |
|
Yes. The default role in ServiceNow is : admin |
Need Read/Write and write_role is not required.
Required Table and Field Permissions for Incident Outbound Integration
|
ServiceNow Table |
FortiSIEM Actions |
Required Permissions |
|---|---|---|
| Incident [incident] |
|
|
|
ServiceNow Table |
FortiSIEM Actions |
Required Permissions |
|---|---|---|
| Company [core_company] |
|
|
|
Field |
ServiceNow Table |
Required Permissions |
Need write_role |
|---|---|---|---|
| assigned_to | sys_user |
|
Yes. The default role in ServiceNow is : itil |
| company | core_company |
|
Yes. The default role in ServiceNow is: admin |
|
Field |
Required Permissions |
Need write_role |
|---|---|---|
| state |
|
Yes. The default role in ServiceNow is : itil |
|
comments |
|
Yes. The default role in ServiceNow is : itil |
|
closed_by |
|
Yes. The default role in ServiceNow is : itil |
|
short_description |
|
Yes. The default role in ServiceNow is : itil |
|
impact |
|
Yes. The default role in ServiceNow is : itil |
|
urgency |
|
Yes. The default role in ServiceNow is : itil |
|
closed_at |
|
Yes. The default role in ServiceNow is : admin |
|
work_notes |
|
Yes. The default role in ServiceNow is : itil |
|
Active |
|
No |
Example Custom Integration
This section provides a sample integration.
There are a few main requirements for a successful custom integration
- Outbound and Inbound – must have a mapping for External Ticket Id
- Inbound - External Ticket State must have value “Closed”
- Inbound - must have a mapping for External Cleared Time
Follow these steps:
Step 1. From ServiceNow, take the following steps to create a ServiceNow Table.
- Login to ServiceNow.
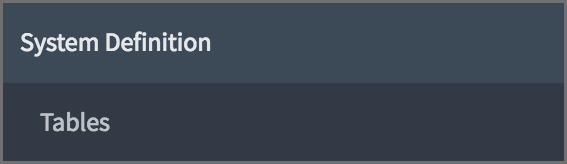
- From the left pane, navigate to System Definitions > Tables.
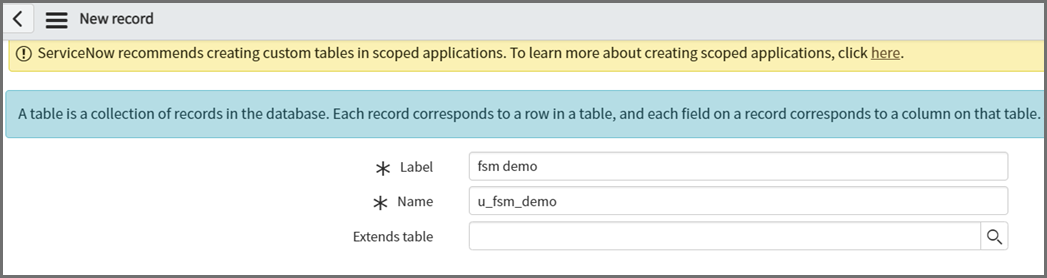
- Next to the heading Tables, click New to create a table.
- In the Label field, enter a label. Here, we can use "fsm demo". The Name field will be automatically populated. Keep this name recorded, as it will be needed later.
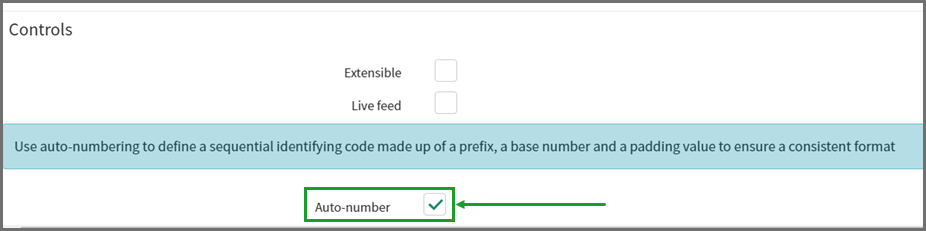
- Under Controls, check the Auto-number checkbox. This is required to map the External Ticket Id.
- Under Application Access, check the following checkboxes.
- Can read
- Can create
- Can update
- Can delete
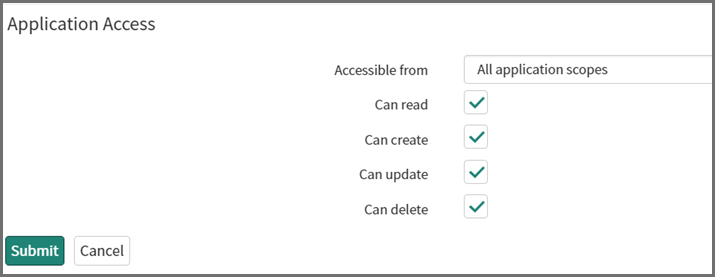
- Click Submit.
A ServiceNow table has now been created.
- In the Label field, enter a label. Here, we can use "fsm demo". The Name field will be automatically populated. Keep this name recorded, as it will be needed later.
- Next to the heading Table Columns, click New to create a table column.
- Create your column/mappings and ensure that Type is set correctly (See FortiSIEM Incident Schema for the correct Types). For this example, we use the following:
Type: String
Column label: ticketnumber
Note: For External Ticket ID
Max length: 256 - Type: String
Column label: externalcleartime
Note: For External Cleared Time
Max length: 256 - Type: String
Column label: incident_status
Note: For Ticket Status
Max length: 256 - Configure any additional mappings necessary for your ServiceNow table.
To create a drop-down list, navigate to Choice List Specification, and from the Choice drop-down list, make a selection. To configure what will appear in your drop-down list, click the Advanced view link, and under Choices, click New to add items to appear in your drop-down list.
- Create your column/mappings and ensure that Type is set correctly (See FortiSIEM Incident Schema for the correct Types). For this example, we use the following:
- When done, click Submit.
Step 2. From FortiSIEM, take the following steps to create Incident Outbound Integration Policy.
- Login to FortiSIEM.
- Navigate to ADMIN > Settings > General > External Integration.
- Click New to create an Integration Policy, and take the following steps.
- From the Type drop-down list, select Incident.
- From the Direction drop-down list, select Outbound.
- From the Vendor drop-down list, select ServiceNow.
- In the Host/URL field, enter the ServiceNow URL being used.
- In the User Name field, enter the ServiceNow username credential.
- In the Password and Confirm Password field, enter the password associated with the ServiceNow User Name account.
- In the ServiceNow Table Name field, enter the name of the ServiceNow table that was set up during the ServiceNow table creation.
- In the Content Mapping row, click the Edit icon.
In the Integration Policy > Incident Outbound Content Mapping window, take the following steps.
- From the FortiSIEM Incident Field drop-down list, select External Ticket Id.
- From the ServiceNow Field drop-down list, select the "ticketnumber" mapping.
- From the FortiSIEM Incident Field drop-down list, select External Ticket State.
- From the ServiceNow Field drop-down list, select the "externalcleartime" mapping.
A more complicated custom mapping is provided in the following screenshot.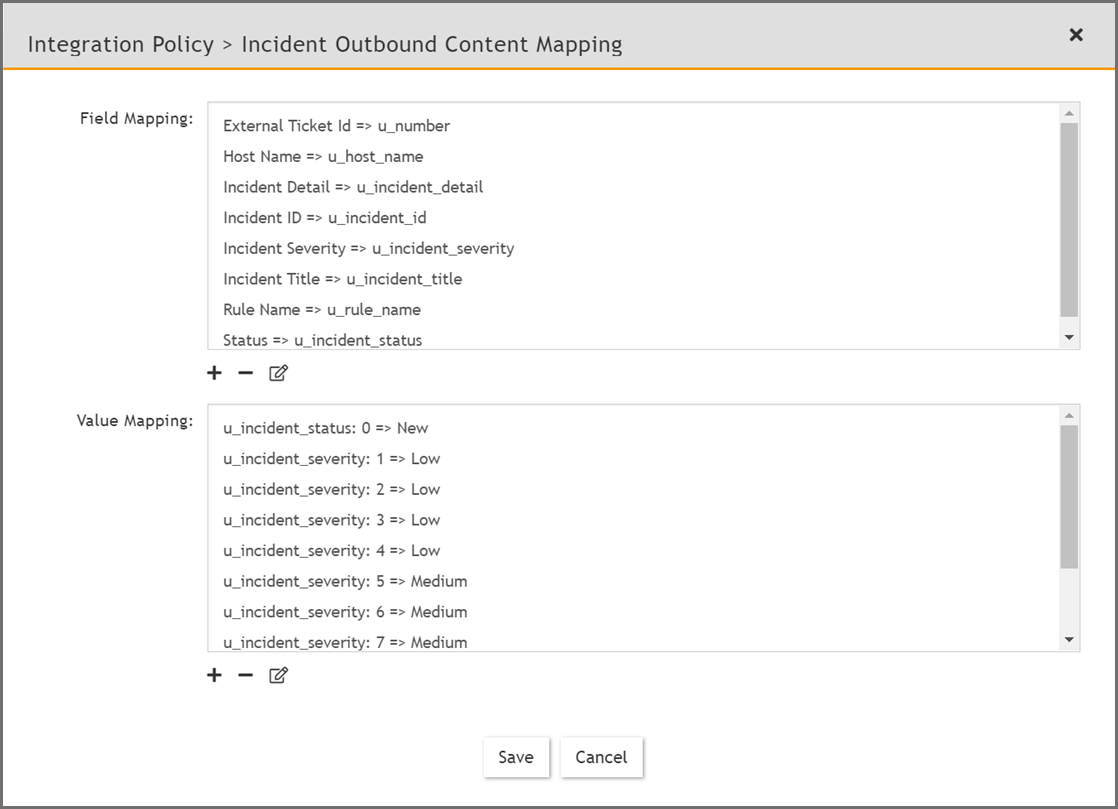
- Click Save.
- Click Save.
Your Outbound Integration Policy has been created.
Step 3. From FortiSIEM, take the following steps to create Incident Inbound Integration Policy.
- Click New to create an Integration Policy, and take the following steps.
- From the Type drop-down list, select Incident.
- From the Direction drop-down list, select Inbound.
- From the Vendor drop-down list, select ServiceNow.
- In the Host/URL field, enter the ServiceNow URL being used.
- In the User Name field, enter the ServiceNow username credential.
- In the Password and Confirm Password field, enter the password associated with the ServiceNow User Name account.
- In the ServiceNow Table Name field, enter the name of the ServiceNow table that was set up during the ServiceNow table creation.
- In the Content Mapping row, click the Edit icon.
- In the Integration Policy > Incident Outbound Content Mapping window, take the following steps.
- From the FortiSIEM Incident Field drop-down list, select from External Cleared Time, External Ticket Id, External Ticket State, External User, or Incident Resolution.
Note: External Ticket ID and External Ticket State are required. - From the ServiceNow Field drop-down list, select the corresponding column.
- Click Save.
- Repeat i.-iii. for any additional mappings. Proceed to v. when done with incident mapping.
- In Value Mapping, click + .
- In the Field drop-down list, select the ServiceNow "external ticket state".
- In the From field, enter "Closed".
The value mapping should appear similar to the following example:u_incident_status: Closed => closed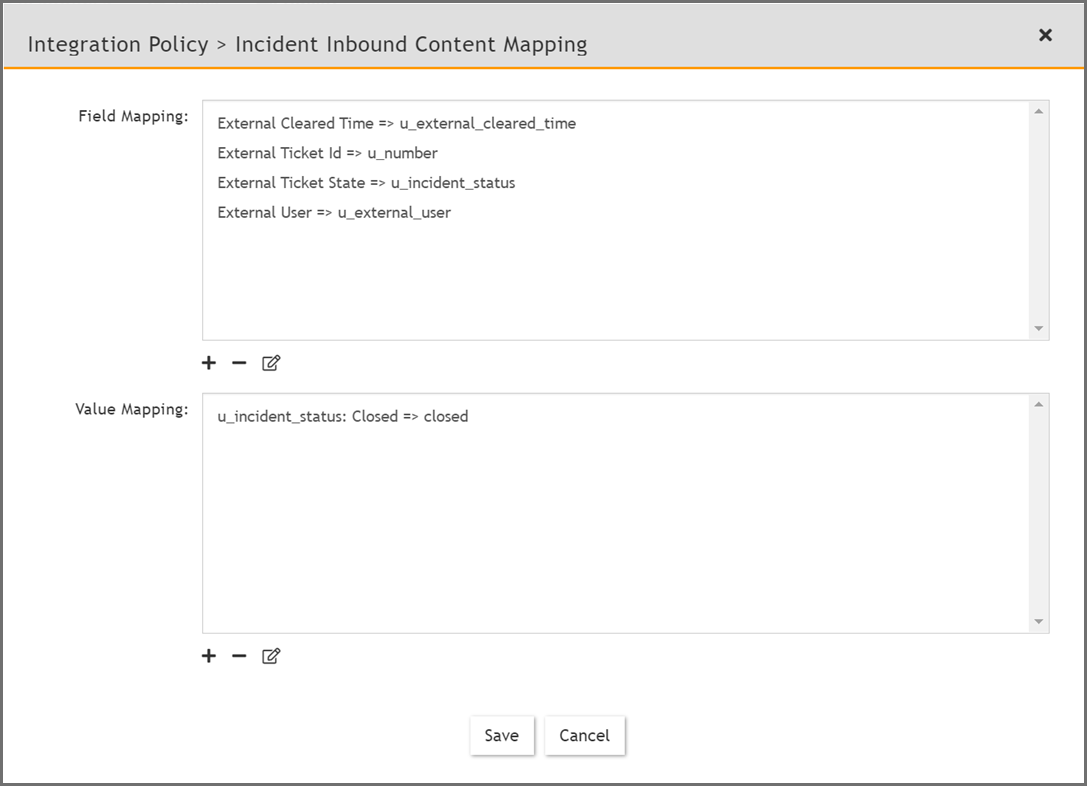
- Click Save.
- From the FortiSIEM Incident Field drop-down list, select from External Cleared Time, External Ticket Id, External Ticket State, External User, or Incident Resolution.
- Click Save.
Your Inbound Integration Policy has been created. Now, if you close an incident/ticket in ServiceNow, and run the inbound integration in FortiSIEM, the incident/ticket will also be closed.
Step 4. Run Outbound Integration
- Confirm you are on the External Integration page. (ADMIN > Settings > General > External Integration)
- Select the Outbound Integration you created.
- Click Run.
Note: The maximum number of incidents can be configured by changing the value of the Max Incidents field in your Outbound Integration Automation policy .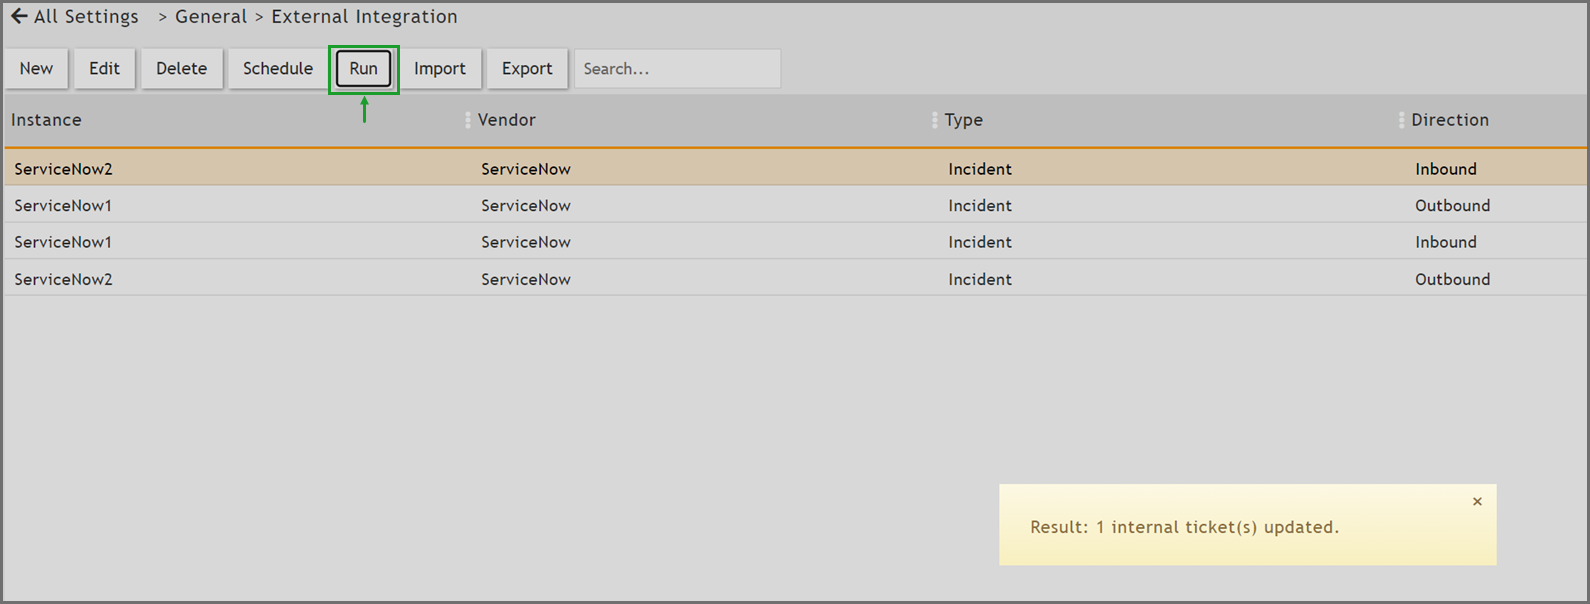
- Click Yes to confirm.
Step 5. Run Inbound Integration
- Confirm you are on the External Integration page. (ADMIN > Settings > General > External Integration)
- Select the Inbound Integration you created.
- Click Run.
Note: You can verify the closing of an incident/ticket by checking the External Ticket State column.