


Configuration
VDOMs can be configured in the GUI and the CLI.
The following topics provide information on general VDOM configurations:
To ensure that no VDOMs are accidentally configured in the CLI, prompts can be enabled. These prompts will display to ask for confirmation that the VDOM is meant to be configured in the CLI.
To configure confirmation prompts:
config system global
    set edit-vdom-prompt enable
end
Enable multi VDOM mode
To enable VDOMs in the GUI:
-
Go to System > Settings.
-
In the System Operation Settings sections, enable Virtual Domains.
-
Click OK.
You will be logged out of the device when VDOM mode is enabled.
To enable VDOMs in the CLI:
config system global
    set vdom-mode multi-vdom
end
You will be logged out of the device when VDOM mode is enabled.
Disable multi VDOM mode
All non-root VDOMs must be deleted before multi VDOM mode can be disabled.
To disable VDOMs in the GUI:
-
In the Global VDOM, go to System > Settings.
-
Disable Virtual Domains.
-
Click Apply.
To disable VDOMs in the CLI:
config global
    config system global
        set vdom-mode no-vdom
    end
end
Create VDOMs
To create VDOMs in the GUI:
-
In the Global VDOM, go to System > VDOM.
-
Click Create New.
-
In the Virtual Domain field, enter a name for the VDOM.
-
Optionally, enter a comment describing the VDOM.
-
Click OK.
To create VDOMs in the CLI:
config global
    config vdom
        edit <vdom_a>
        next
        edit <vdom_b>
        next
    end
end
Delete VDOMs
The root VDOM and VDOMs that are referenced in the current configuration cannot be deleted.
To delete a VDOM in the GUI:
-
In the Global VDOM, go to System > VDOM.
-
Select the VDOM that you need delete.
-
Click Delete.
-
Click OK.
To delete a VDOM in the CLI:
config vdom
    delete <vdom>
end
Create Global VDOM administrators
Global administrators have complete visibility and access because the scope of their role is to manage the entire physical FortiProxy device. When global administrators log into the GUI, from the VDOM: Global view they will see all pages for global settings shared between VDOMs, and VDOM-specific settings.
To create a global administrator that has access to all VDOMs and access to global settings, it must be created at the global level and must use the super_admin administrator profile.
To create a Global VDOM administrator in the GUI:
-
In the Global VDOM, go to System > Administrators and click Create New > Administrator.
-
Fill in the required information, setting the Type as Local User.
-
Set Administrator profile to super_admin or super_admin_readonly.
-
Click OK.
To create a Global VDOM administrator using the CLI:
config global
    config system admin
        edit <name>
            set accprofile "super_admin"
        next
    end
end
Create per-VDOM administrators
Per-VDOM administrators can be created that can access only the administrative or traffic VDOM. These administrators must use the prof_admin, admin_no_access, or a custom administrator profile.
To assign an administrator to multiple VDOMs, they must be created at the global level. When creating an administrator at the VDOM level, the super_admin administrator profile cannot be used.
To create a per-VDOM administrator in the GUI:
-
In the Global VDOM, go to System > Administrators and click Create New > Administrator.
-
Fill in the required information, setting the Type as Local User.
-
In the Virtual Domains field, add the VDOMs that the administrator will be assigned to.
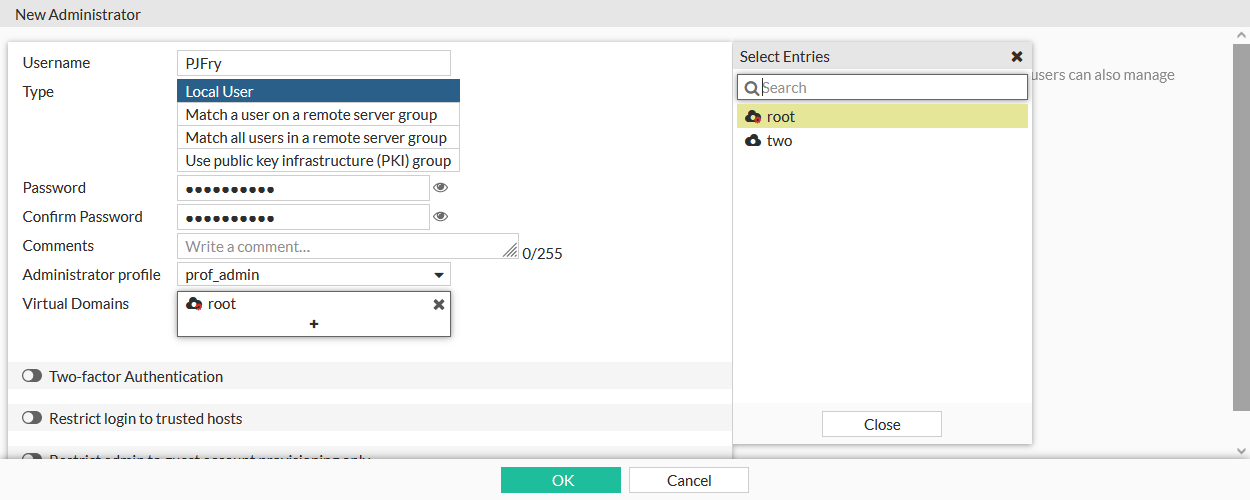
-
Click OK.
To create a per-VDOM administrator using the CLI:
config global
    config system admin
        edit <name>
            set accprofile <profile>
            set vdom <vdom(s)>
            ...
        next
    end
end
Assign interfaces to a VDOM
An interface can only be assigned to one of the VDOMs. An interface cannot be moved if it is referenced in an existing configuration. By default, all interfaces belong to the root VDOM.
|
|
In the GUI, the interface list Ref. column shows if the interface is referenced in an existing configuration, and allows you to quickly access and edit those references. |
To assign an interface to a VDOM in the GUI:
-
In the Global VDOM, go to Network > Interfaces.
-
Select the interface that will be assigned to a VDOM and click Edit.
-
Select the VDOM that the interface will be assigned to from the Virtual Domain list.

-
Click OK.
To assign an interface to a VDOM using the CLI:
config global
    config system interface
        edit <interface>
            set vdom <vdom>
        next
    end
end
Global and per-VDOM resources
Global resources apply to resources that are shared by the whole FortiProxy, while per-VDOM resources are specific to each VDOM.
To configure global resources in the GUI:
-
In the Global VDOM, go to System > Global Resources.
-
Enable the resource's override in the Override Maximum column, then enter the override value.

-
Click Apply.
To reset all of the override values, click Reset All.
To configure global resources in the CLI:
config global
    config system resource-limits
        set log-disk-quota <integer>
        set session <integer>
        set ipsec-phase1-interface <integer>
        set ipsec-phase2-interface <integer>
        set firewall-policy <integer>
        set firewall-address <integer>
        set firewall-addrgrp <integer>
        set custom-service <integer>
        set service-group <integer>
        set onetime-schedule <integer>
        set recurring-schedule <integer>
        set user <integer>
        set user-group <integer>
        set sslvpn <integer>
        set proxy <integer>
        set log-disk-quota <integer>
    end
end
To configure per-VDOM resources in the GUI:
-
In the Global VDOM, go to System > VDOM.
-
Select the VDOM whose resources need to be configured and click Edit.
-
Enable the resource's override in the Override Maximum column, then enter the override value.
-
Optionally, enter a value in the Guaranteed column.
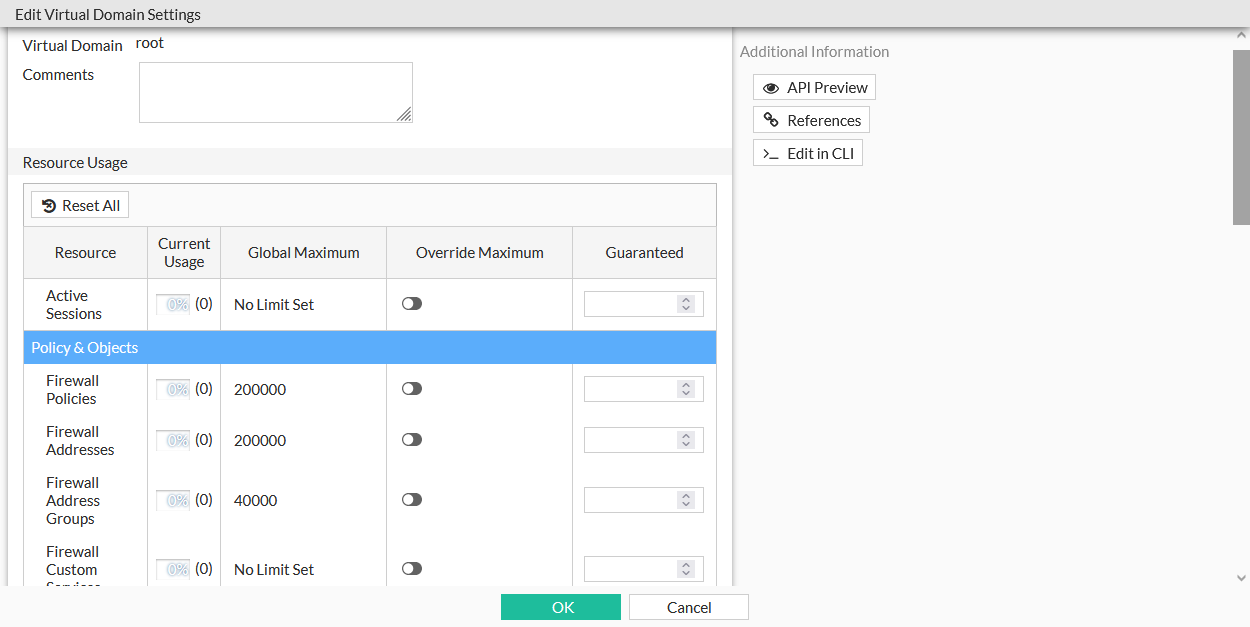
-
Click OK.
To reset all of the override values, click Reset All.
To configure per-VDOM resources in the CLI:
config vdom
    edit <vdom>
        config system vdom-property
            edit <vdom>
                set session <max-number> [guaranteed-number]
                set ipsec-phase1-interface <max-number> [guaranteed-number]
                set ipsec-phase2-interface <max-number> [guaranteed-number]
                set firewall-policy <max-number> [guaranteed-number]
                set firewall-address <max-number> [guaranteed-number]
                set firewall-addrgrp <max-number> [guaranteed-number]
                set custom-service <max-number> [guaranteed-number]
                set service-group <max-number> [guaranteed-number]
                set onetime-schedule <max-number> [guaranteed-number]
                set recurring-schedule <max-number> [guaranteed-number]
                set user <max-number> [guaranteed-number]
                set user-group <max-number> [guaranteed-number]
                set sslvpn <max-number> [guaranteed-number]
                set proxy <max-number> [guaranteed-number]
                set log-disk-quota <integer>
            next
        end
    next
end
Inter-VDOM routing
VDOM links allow VDOMs to communicate internally without using additional physical interfaces. VDOM link does not support traffic offload.
|
|
A VDOM link cannot share the same name as a VDOM. |
To configure a VDOM link in the CLI:
config global
    config system vdom-link
        edit "<vdom-link-name>"
            set type {ppp | ethernet}
        next
    end
    config system interface
        edit "<vdom-link-name0>"
            set vdom "<VDOM Name>"
            set type vdom-link
        next
        edit "<vdom-link-name1>"
            set vdom "<VDOM Name>"
            set type vdom-link
        next
    end
end
To delete a VDOM link in the CLI:
config global
    config system vdom-link
        delete <VDOM-LINK-Name>
    end
end