


Creating secret templates
To create a secret template:
- Go to Secret Settings > Templates.
- In the secret templates list, select Create.
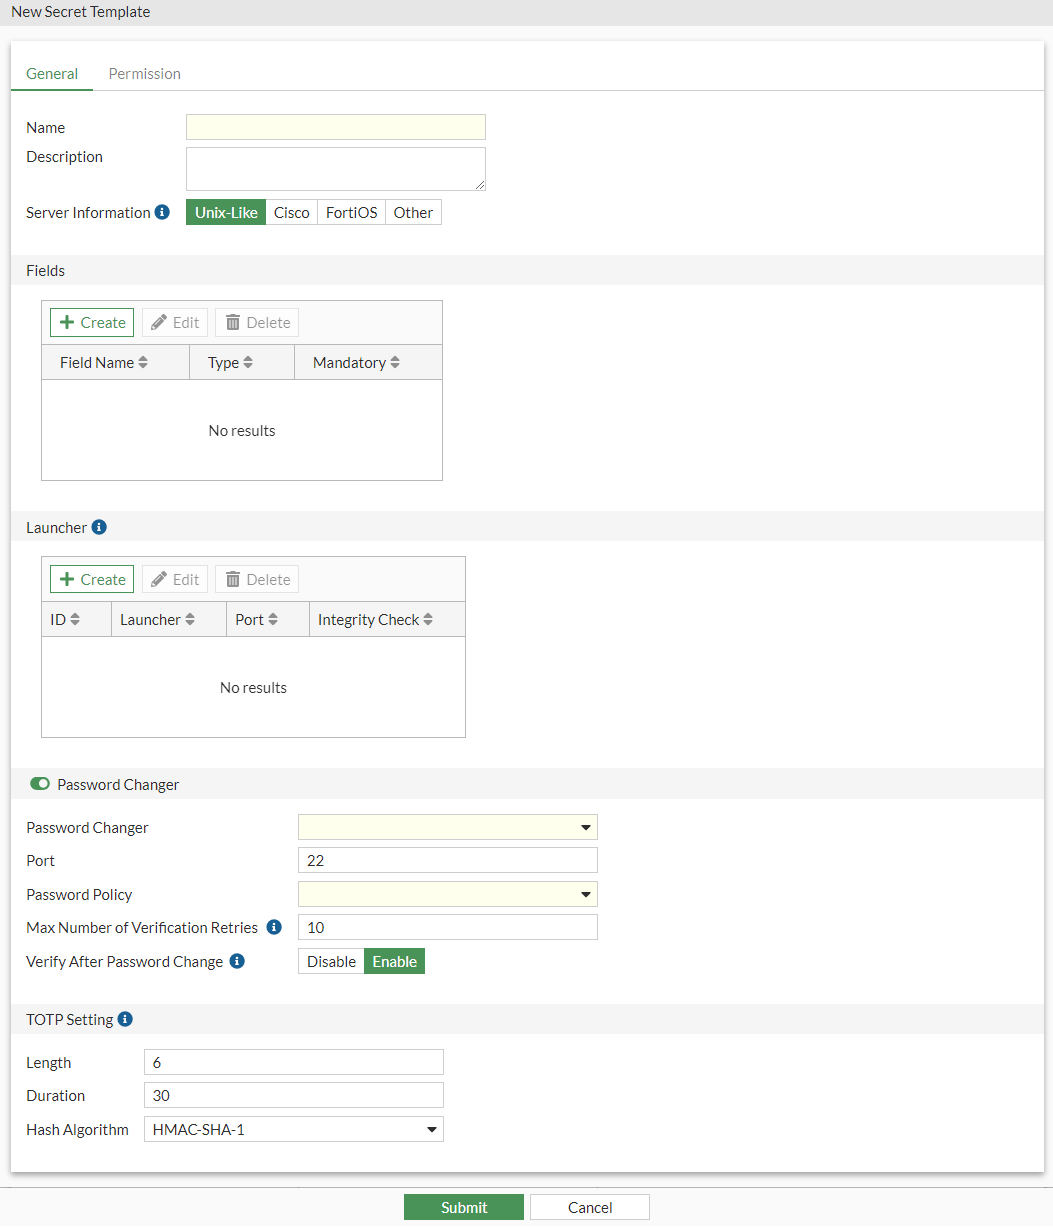
The General tab in the New Secret Template window opens.
- Select Permission from the top to switch to the Permission tab.

- Enter the following information:
General
Name
Name of the template.
Description
Optionally, enter a description.
Server Information
The general type of server to which the template is intended to connect:
Unix-Like
Cisco
FortiOS
Other
Fields
Secrets require fields to enter the secret related information.
To add new fields, select Create and then enter the following information, and click OK:
Field Name
The name of the field.
Type
From the dropdown, select a field type:
Domain: A domain field.
Passphrase: A passphrase fields.
Password: A password field.
Private-Key: A private-key field.
Public-Key: A public-key field.
Target-Address: A target address field.
Text: A text field.
URL: A URL field.
Username: A username field.
Mandatory
Enable to make this field mandatory or disable if this field will be optional.

From the list, select a field and then select Edit to edit the field.
From the list, select fields and then select Delete to delete the fields.
Launcher
Launcher helps you access a target server. See Launchers.
A launcher allows you to log in to a website or device without you needing to know the credentials.
To add a new launcher, select Create and then enter the following information, and click OK:

You can add up to a maximum of 20 launchers.
Launcher Name
From the dropdown, select a launcher.
Use the search bar to look up a launcher.
Use the pen icon to edit a custom launcher.
To create a new launcher, in the dropdown, select Create.
Enter the following information and click OK:
Name
The name of the launcher.
Type
From the dropdown, select a launcher type:
Other client: Other client launcher type.
Remote desktop: RDP client launcher type.
SSH client: SSH client launcher type.
VNC: VNC client launcher type.
Executable
The program file name, e.g.,
putty.exefor an SSH client.Ensure that the program path is already added to the environment variable path in Windows before launching the secret.
Note:
An absolute path is also supported, e.g.:
C:\Users\user1\Documents\putty.exeC:\Users\user1\Documents\New folder\putty.exeParameter
The command line parameters:
$DOMAIN$TARGET$HOST$USER$PASSWORD$VNCPASSWORD$PASSPHRASE$PUB_KEY$PRI_KEY$URL$PORT$TMPFILE
Example
For
putty.exeas the Executable,-l $USER -pw $PASSWORD $HOSTare the parameters.For
putty.exeas the Executable for SSH execution,-l $USER -pw $PASSWORD $HOST -m C:\Users\user1\Desktop\cmd.txtor
-l $USER -pw $PASSWORD $HOST -m "C:\Program Files\cmd.txt"are the parameters.Note:
When there is no space in the path, double quotes are not necessary:
-l $USER -pw $PASSWORD $HOST -m C:\Users\user1\Desktop\cmd.txtWhen there is space in the path, double quotes must be used with backslash:
-l $USER -pw $PASSWORD $HOST -m "C:\Program Files\cmd.txt"Initial Commands
Configure initializing the environment. See Creating a new launcher command.
Clean Commands
Configure cleaning the environment. See Creating a new launcher command.
Launcher Port The launcher port number.
The port number will be mapped to the launcher variable `
$PORT`.
The minimum allowed value is
1.Integrity Check
Enable/disable integrity check. For information on integrity check, see Integrity check.
The Integrity Check option can only be edited if you choose a launcher in the Launcher Name option with a client software entry enabled and selected.
Note: The option is disabled by default.
From the list, select a launcher and then select Edit to edit the launcher.
From the list, select launchers and then select Delete to delete the launchers.
Password Changer
A password changer can be configured for a custom secret template to change the password of a secret periodically and to check the health of a secret periodically.
Note: The option is enabled by default.
Password Changer
From the dropdown, select the password changer that will be used for this template or create a new password changer. See Creating a password changer.
Use the search for to look up a password changer.
Use the pen icon next to a password changer to edit it.
Port
The port used for the password changer (default = 22).
Password Policy
The password policy to use in the password changer.
From the dropdown, select a password policy or create a new password policy. See Creating a password policy.
Use the search for to look up a password policy.
Use the pen icon next to a password policy to edit it.
Max Number of Verification Retries
The maximum number of retries allowed after which the connection fails (default = 10).
Verify After Password Change
When enabled, whenever secrets with the template conducts a password change, a verification of the newly changed password is ran.
Note: The option is enabled by default.
TOTP Setting
TOTP (Time-based one-time password) settings.
The TOTP configuration from a secret template can be inherited by all the secrets using this template.
When configuring the secret, you can override the secret template TOTP configuration. See TOTP Setting in Creating a secret.
Length
The length of the TOTP (default = 6, 4 - 9).
Duration
The duration for which the TOTP is valid, in seconds (default = 30, 30 - 90).
Hash Algorithm
Select from the following hash algorithms for TOTP:
HMAC-SHA-1 (default)
HMAC-SHA-256
HMAC-SHA-512
Permission
Template access control settings.
Access
Template accessible to:
Everyone: All users have Read/Write permission for templates (default).
Customized: A user permission and a group permission table must be configured.
User Permission
The level of user access to the template. See User Permission.
The option is only available when Access is set to Customized.
For column settings, see Tables.
Group Permission
The level of user group access to the template. See Group Permission.
The option is only available when Access is set to Customized.
For column settings, see Tables.
- Click Submit.
User Permission
- In Step 3, when Creating secret templates, select Create in User Permission.
The New User Permission window opens.
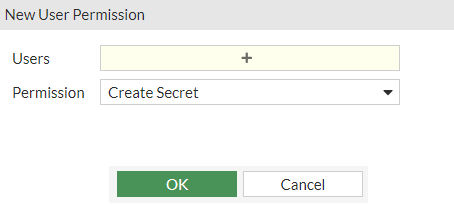
- Enter the following information:
Users
Select + and from the list, select users in the Select Entries window.
To add a new user:
- From the Select Entries window, select Create and then select +User Definition.
The New User Definition wizard opens.
- Follow the steps in Creating a user, starting step 2 to create a new user.
Use the search bar to look up a user.
Use the pen icon next to a user to edit it.
Permission
From the dropdown, select an option:
Create Secret: Ability to see and use the template to create secrets.
Owner: The highest possible permission level with the ability to create, edit, and delete templates.
Every template must have at least one owner.
- From the Select Entries window, select Create and then select +User Definition.
- Click OK.
From the list, select a user permission entry and then select Edit to edit it.
From the list, select user permission entries and then select Delete to delete them.
Group Permission
- In Step 3, when Creating secret templates, select Create in Group Permission.
The New Group Permission window opens.
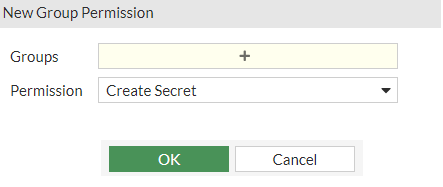
- Enter the following information:
Groups
Select + and from the list, select user groups in the Select Entries window.
To add a new user group:
- From the Select Entries window, select Create.
The Create New User Group window opens.
- Follow the steps in Creating user groups, starting step 3.
Use the search bar to look up a user group.
Use the pen icon next to a user group to edit it.
Permission
From the dropdown, select an option:
Create Secret: Ability to see and use the template to create secrets.
Owner: The highest possible permission level with the ability to create, edit, and delete templates.
Every template must have at least one owner.
- From the Select Entries window, select Create.
- Click OK.
From the list, select a user group permission entry and then select Edit to edit it.
From the list, select user group permission entries and then select Delete to delete them.
Configuring TOTP settings via the secret template CLI commands Example
To configure TOTP settings via the CLI:
- In the CLI console, enter the following commands:
config secret template
edit Unix\ Account\ (SSH\ Password)
config totp-setting
set totp-length 8
set totp-duration 30
set hash-type hmac-sha1
end
end
Limitations of TOTP on FortiPAM
- TOTP auto delivery only supports SSH target authentication.
- Password changer does not support public key + TOTP authentication.
- With TOTP, WebSSH only supports the keyboard-interactive authentication method.
- With a non-proxy or Web launcher, the TOTP code must be copied and entered manually.
- Do not enable the password changer for an SSH server with password + FortiToken authentication if the username, password, and FortiToken are from another LDAP server.