
Example Jinja scripts
Jinja language scripts are a powerful feature in FortiManager that enables administrators to create CLI scripts which also utilize Jinja variables, filters, and functions.
The following topic provides some example Jinja scripts.
Creating Jinja scripts
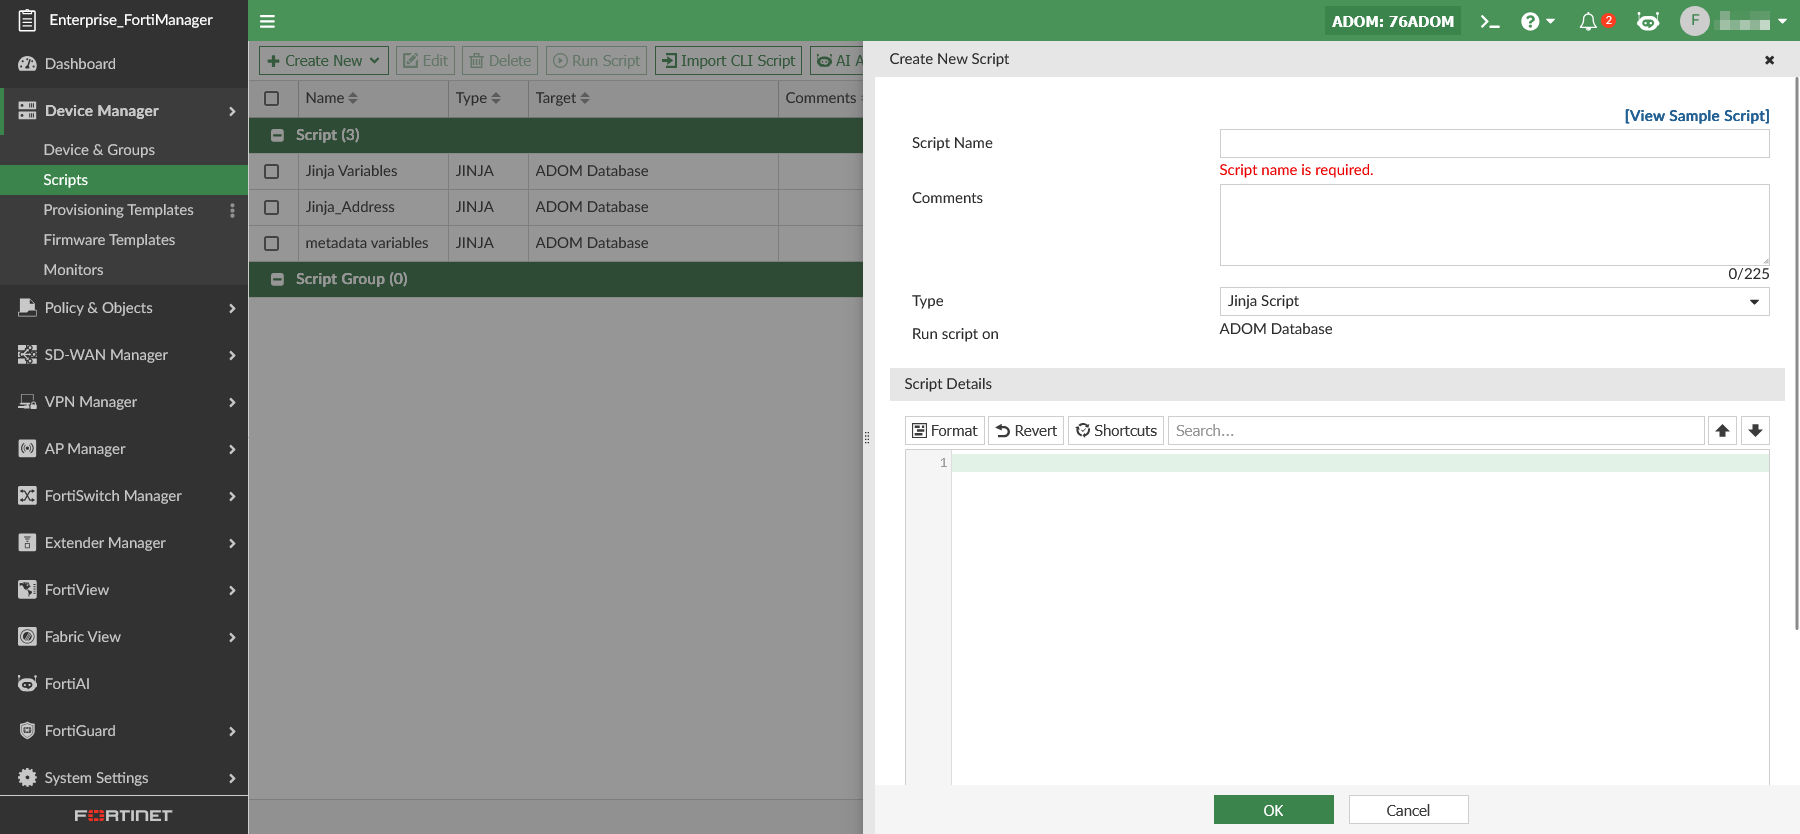
To create Jinja scripts on FortiManager:
-
Go to Device Manager > Scripts.
-
Click Create New > Script to create a new script.
-
Enter a name for the script and select Jinja Script as the type.
-
Enter the script details in the editor, and click OK.
-
Run the Jinja script on the ADOM database.
-
In the ADOM database, you can see the changes installed using the Jinja script.
Keeping Jinja variables in a script
You can create firewall address objects using a Jinja CLI script.
By using {% raw %} and {% endraw %}, Jinja variables will remain unchanged and are stored in the ADOM database exactly as written (for example, {{branch}}).
This is useful when you want to keep templates dynamic for future resolution or automation.
|
|
Not all objects support Jinja variables |
Example Script: Generate policy objects/provisioning templates
{% raw %}
config firewall address
  edit Addr_1
    set subnet 100.{{branch}}.1.0 255.255.255.0
  next
  edit Addr_2
    set subnet 200.{{branch}}.1.0 255.255.255.0
  next
end
{% endraw %}
In this example script, after running this Jinja script, the {{branch}} variable remains unchanged in the object that is created in the ADOM database.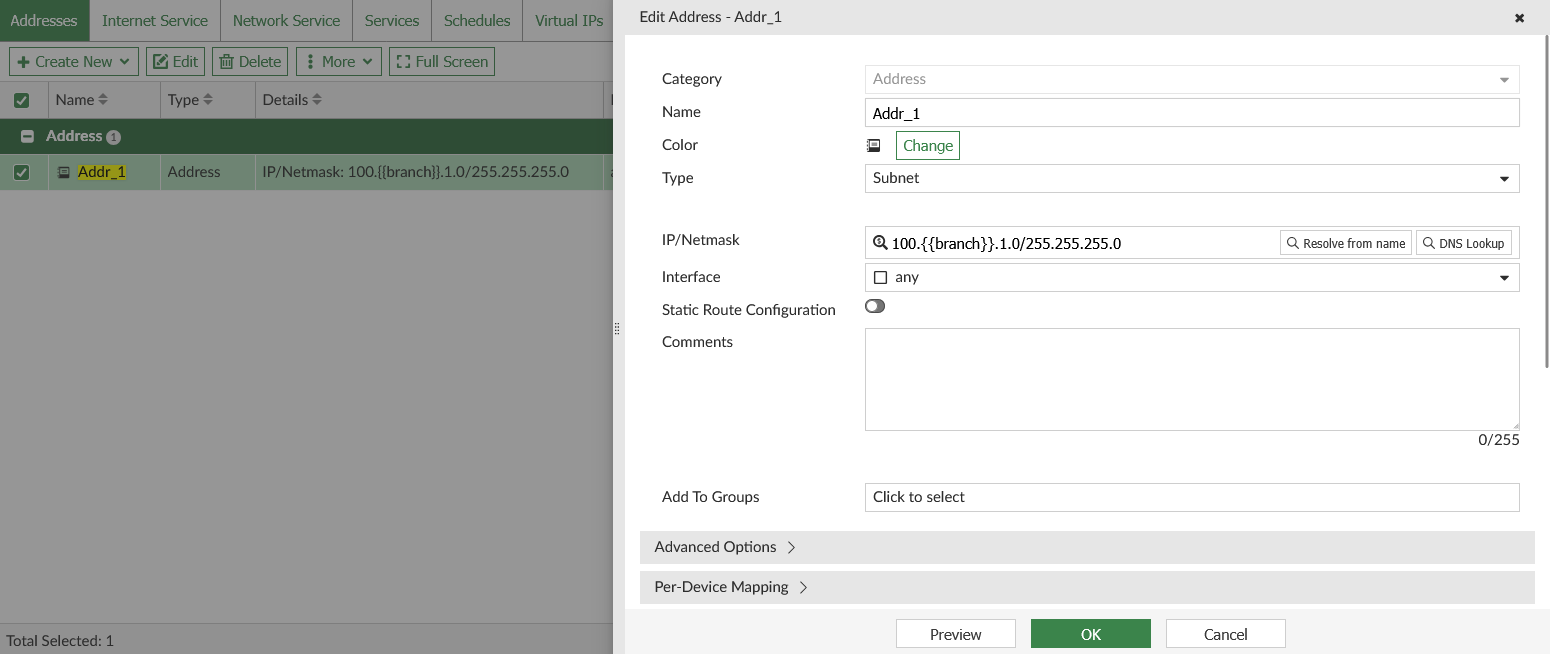
Using Jinja variables within a script
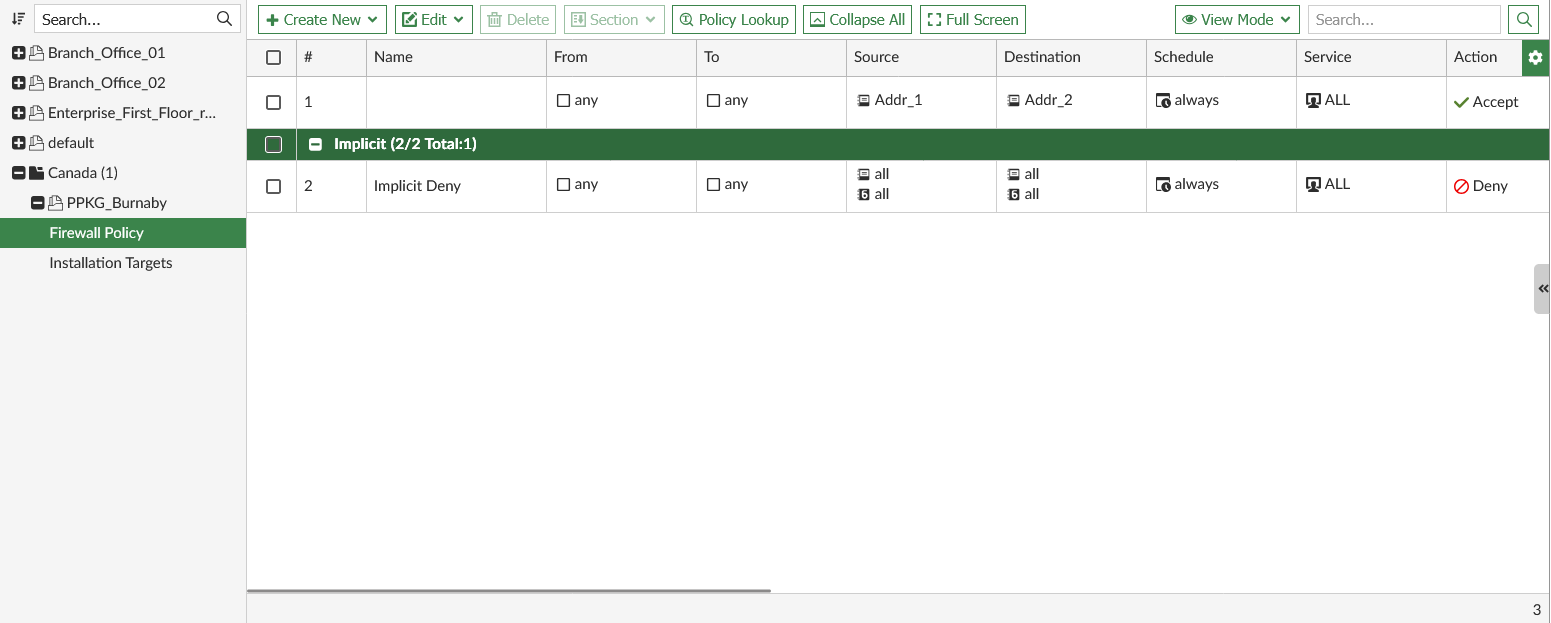
You can use Jinja variables directly within a script. When executed on the ADOM database, the variables are evaluated and replaced with their values.
Example: Using Jinja variables within a script
{% set country = 'Canada' %}
{% set city = 'Burnaby' %}
config adom/pkg/{{country}}/PPKG_{{city}}
config firewall policy
  edit 1
    set srcintf "any"
    set dstintf "any"
    set action accept
    set srcaddr "Addr_1"
    set dstaddr "Addr_2"
    set schedule "always"
    set service "ALL"
  next
end
end
Creating a Jinja script with FortiManager metadata variables
You can use FortiManager metadata variables in a Jinja script. Before creating the script, you must first create the required metadata variables. In this example the DeviceInterface, LocalID, InterfaceIP, and BranchID metadata variables.
Example: IPsec template with variables:
        config adom/template/_ipsec/spoke-ipsecvpn

        config vpn ipsec phase1-interface
            edit "HUB1-VPN1"
                set interface $(DeviceInterface)
                set ike-version 2
                set proposal aes256-sha256 aes256-sha1
                set peertype any
                set localid $(LocalID)
                set remote-gw $(InterfaceIP)
                set net-device disable
                set auto-discovery-receiver enable
                set psksecret qa123456
                set network-overlay enable
                set network-id $(BranchID)
                set transport auto
            next
        end


        config vpn ipsec phase2-interface
            edit "HUB1-VPN1"
                set phase1name "HUB1-VPN1"
                set proposal aes256-sha256 aes256-sha1
            next
        end
        end
Creating an SD-WAN overlay using a Jinja Script
In this example, the device (sdwan-managed) and spoke device groups are already set up, such as FGT-7,FGT-8, and branch_gr as shown in this script.
FGT-7 and FGT-8 are used as the HUB devices. The branch device group is named branch_gr.
All metadata variables used in the script must have default values defined in the ADOM database.
Example: Create an SD-WAN overlay using a Jinja script
-
Create policy packages used in the SD-WAN overlay.
config adom/pkg/hub
end
config adom/pkg/branch
end
-
Create an empty SD-WAN template used in the SD-WAN overlay;
config adom/wanprof/sdwan1
config system sdwan
set status enable
end
end
-
Create a static route template used in the SD-WAN overlay.
config adom/template/_router_static/branches
config router static
end
end
-
Create a template to create SD-WAN overlay and define the FortiGate HUB devices in the SD-WAN overlay. In this example, the HUB devices are FGT-7 and FGT-8.
config adom/template/_sdwan_overlay/sdo_bby
    config sdwan overlay
      set topology dual-active-hub
      set hub-number 2
      set loopback-ip 172.18.0.0 255.255.0.0
      set overlay-network 10.10.0.0 255.255.0.0
      set advpn version2
      set sdwan_template "sdwan1"
      set sdwan_members enable
      set sdwan_health_check enable
      set normalized-interface enable
      set hub-package-path "hub"
      set branch-package-path "branch"
      set auto-branch-id-assignment enable
      set authmethod psk
      set router_template "branches"
      set segmentation disable
      set bgp_on_loopback enable
      set dynamic_bgp disable
      set route_reflection disable
      config nodes
        edit 1
          set _scope "FGT-7"-"root"
          set role hub
          set hub-role primary
          set cost 0
          set advertisement connected
          config underlay
            edit 1
              set interface "port2"
              set private-link disable
              set override-ip disable
              set cost 0
              set transport-group 0
            next
          end
        next
        edit 2
          set _scope "FGT-8"-"root"
          set role hub
          set hub-role primary
          set cost 0
          set advertisement connected
          config underlay
            edit 1
              set interface "port2"
              set private-link disable
              set override-ip disable
              set cost 0
              set transport-group 0
            next
          end
        next
        edit 3
          set _scope "branch_gr"
          set role spoke
          set hub-role standalone
          set cost 0
          set advertisement connected
          config underlay
            edit 1
              set interface "port2"
              set private-link disable
              set override-ip disable
              set cost 0
              set transport-group 0
            next
            edit 2
              set interface "port3"
              set private-link disable
              set override-ip disable
              set cost 0
              set transport-group 0
            next
          end
        next
      end
    end
    end