
Fortinet white logo
Fortinet white logo

User Guide

Google Cloud Platform

Google Cloud Platform

Perform the following steps to deploy FortiGuest on Google Cloud.

  1. Obtain the file FortiGuest_VM64_GCP-v1.3.0-[build0xxx].zip from Fortinet and extract it to obtain FortiGuest_VM64_GCP-v1.3.0-[build0xxx].gcp.tar.gz.
  2. Install and setup gsutil to access Cloud storage from the CLI using HTTPS. To install gsutil, see Install gsutil.
  3. Alternatively, run the following command to download the Linux 64-bit archive file.
    curl -O https://dl.google.com/dl/cloudsdk/channels/rapid/downloads/google-cloud-cli-389.0.0-linux-x86_64.tar.gz
  4. Extract the contents of the file to any location on your file system (preferably your Home directory). To replace an existing installation, remove the existing google-cloud-sdk directory and then extract the archive to the same location - tar -xf google-cloud-cli-389.0.0-linux-x86.tar.gz.
  5. Run the script (from the root of the folder you extracted the file to) - ./google-cloud-sdk/install.sh.
  6. Run ./google-cloud-sdk/bin/gcloud init to initialize GCP CLI.
  7. Upload the file FortiGuest_VM64_GCP-v1.3.0-[build0xxx].gcp.tar.gz to the Cloud storage bucket in the GCP console.
    ./google-cloud-sdk/bin/gsutil FortiGuest_VM64_GCP-v1.3.0-[build0xxx].gcp.tar.gz gs://my-some-bucket
    ./import2gcpimg.sh fguest27 FortiGuest_VM64_GCP-v1.3.0-[build0xxx].gcp.tar.gz fortiguest_3

    Run the gcloud compute instances update IMAGE_NANE --shielded-secure-boot command to enable secure boot or enable it on the GUI prior to the instance starting.
  8. In the Compute Engine service interface, click the Actions menu and select Create instance for the uploaded image. For more information, see Create a VM.

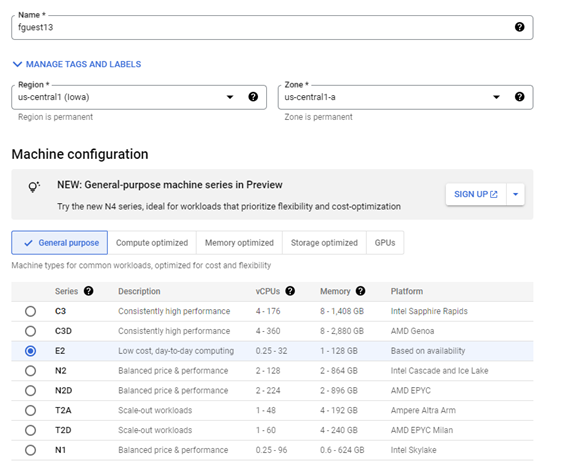
  9. Provide a unique instance name and configurations, such as, machine type, enabling HTTP firewall access, and select the network interface card.
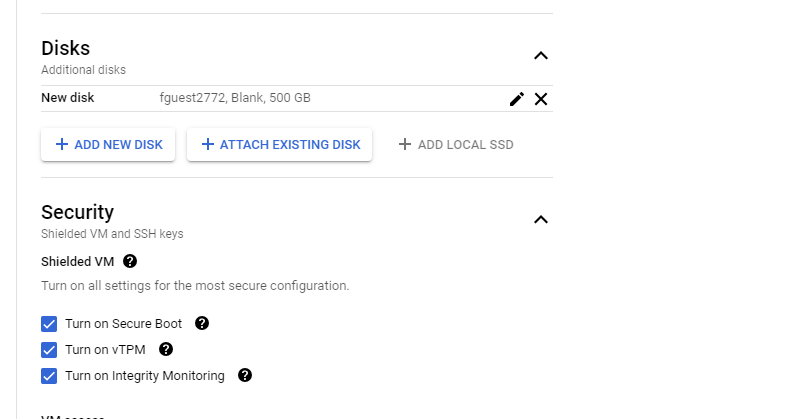
    Add a blank standard persistence disk of 500 GB and enable secure mode. Click Create instance.
  10. Connect the VM instance and login.
  • To connect via the Compute Engine console, click VM Instances and select the VM instance that you want to connect to. Click Connect to Serial Console. See Connect to the Serial Console. In the console interface, login with the user name admin. A password in not required.

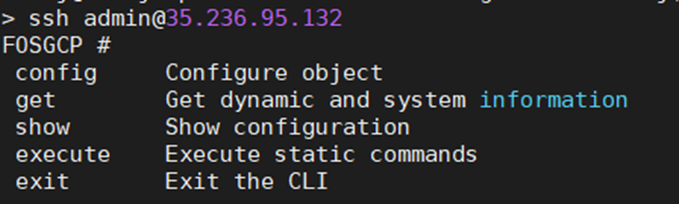
  • To connect via the SSH, obtain the public IP address from the VM Instances interface and connect via SSH.
Google Cloud Platform

Google Cloud Platform

Perform the following steps to deploy FortiGuest on Google Cloud.

  1. Obtain the file FortiGuest_VM64_GCP-v1.3.0-[build0xxx].zip from Fortinet and extract it to obtain FortiGuest_VM64_GCP-v1.3.0-[build0xxx].gcp.tar.gz.
  2. Install and setup gsutil to access Cloud storage from the CLI using HTTPS. To install gsutil, see Install gsutil.
  3. Alternatively, run the following command to download the Linux 64-bit archive file.
    curl -O https://dl.google.com/dl/cloudsdk/channels/rapid/downloads/google-cloud-cli-389.0.0-linux-x86_64.tar.gz
  4. Extract the contents of the file to any location on your file system (preferably your Home directory). To replace an existing installation, remove the existing google-cloud-sdk directory and then extract the archive to the same location - tar -xf google-cloud-cli-389.0.0-linux-x86.tar.gz.
  5. Run the script (from the root of the folder you extracted the file to) - ./google-cloud-sdk/install.sh.
  6. Run ./google-cloud-sdk/bin/gcloud init to initialize GCP CLI.
  7. Upload the file FortiGuest_VM64_GCP-v1.3.0-[build0xxx].gcp.tar.gz to the Cloud storage bucket in the GCP console.
    ./google-cloud-sdk/bin/gsutil FortiGuest_VM64_GCP-v1.3.0-[build0xxx].gcp.tar.gz gs://my-some-bucket
    ./import2gcpimg.sh fguest27 FortiGuest_VM64_GCP-v1.3.0-[build0xxx].gcp.tar.gz fortiguest_3

    Run the gcloud compute instances update IMAGE_NANE --shielded-secure-boot command to enable secure boot or enable it on the GUI prior to the instance starting.
  8. In the Compute Engine service interface, click the Actions menu and select Create instance for the uploaded image. For more information, see Create a VM.

  9. Provide a unique instance name and configurations, such as, machine type, enabling HTTP firewall access, and select the network interface card.

    Add a blank standard persistence disk of 500 GB and enable secure mode. Click Create instance.

  10. Connect the VM instance and login.
  • To connect via the Compute Engine console, click VM Instances and select the VM instance that you want to connect to. Click Connect to Serial Console. See Connect to the Serial Console. In the console interface, login with the user name admin. A password in not required.

  • To connect via the SSH, obtain the public IP address from the VM Instances interface and connect via SSH.