
ZTNA configuration simplification
FortiOS 8.0.0 introduces various configuration simplifications and modularization. Various objects are decoupled so they can be paired together in different combinations within the ZTNA policy.
CLI changes:
-
firewall.access-proxy configs now split into different objects:
-
ztna.traffic-forward-proxy
-
ztna.web-proxy
-
ztna.web-portal
-
-
firewall.proxy-policy now references a new ztna-proxy type referring to the 3 objects above
-
Introduction of the ztna.destination object for traffic forwarding destinations
-
Introduction of the firewall.vip.auth-portal setting to replace SAML SP access-proxy configuration
-
ZTNA firewall policy and proxy policy references the ztna.destination object directly for ZTNA traffic forwarding
GUI changes:
-
Configure ZTNA Ports (ZTNA VIPs) in the new ports page
-
Allow ZTNA Port to be shared by multiple servers
-
Configure ZTNA web proxy and traffic forwarding on different pages
-
Support ZTNA Agentless web-portal
Naming conventions:
-
A ZTNA HTTP/HTTPS access proxy is now a ZTNA web proxy
-
A ZTNA TCP Forwarding access proxy (TFAP) is now a ZTNA Traffic Forwarding proxy (TFP)
-
A ZTNA VIP object is now a ZTNA Port object
-
A ZTNA destination refers to a Traffic Forwarding server
No changes:
-
ZTNA Port CLI configurations
The changes are described in the following sections:
Detail changes
This section covers the following changes:
Configuring a ZTNA Port object
Previously, a ZTNA Port object is configured in the ZTNA > ZTNA Server page, which constrained one ZTNA Port object to one set of ZTNA real-servers within the same ZTNA server definition.
Now a ZTNA Port object is configured independently, and can be referenced in multiple different ZTNA server definitions.
Under ZTNA > Ports, configure your ZTNA Port object for IPv4 or IPv6:
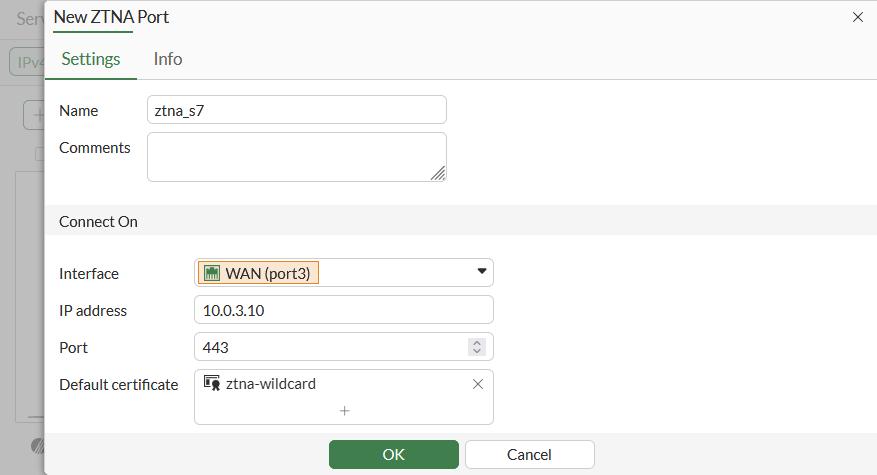
No changes are made to the config firewall vip CLI settings for ZTNA Port object:
config firewall vip
    edit "ztna_s7"
        set type access-proxy
        set server-type https
        set extip 10.0.3.10
        set extintf "port3"
        set extport 443
        set ssl-certificate "ztna-wildcard"
    next
end
A ZTNA Port can also be configured directly in a ZTNA Web server, Traffic Forwarding Server, or Web Portal definition in the GUI.
Configuring a ZTNA web proxy server
In the GUI, the web proxy server can be configured using basic or advanced configuration mode:
-
Basic mode (default): use this mode when you need to configure a single real-server that is tied to this Web server object and virtual host.
-
Advanced mode: use this mode when you need to configure multiple real-servers tied to this Web server object and virtual host. For example, you plan to specify different paths for various real-servers.
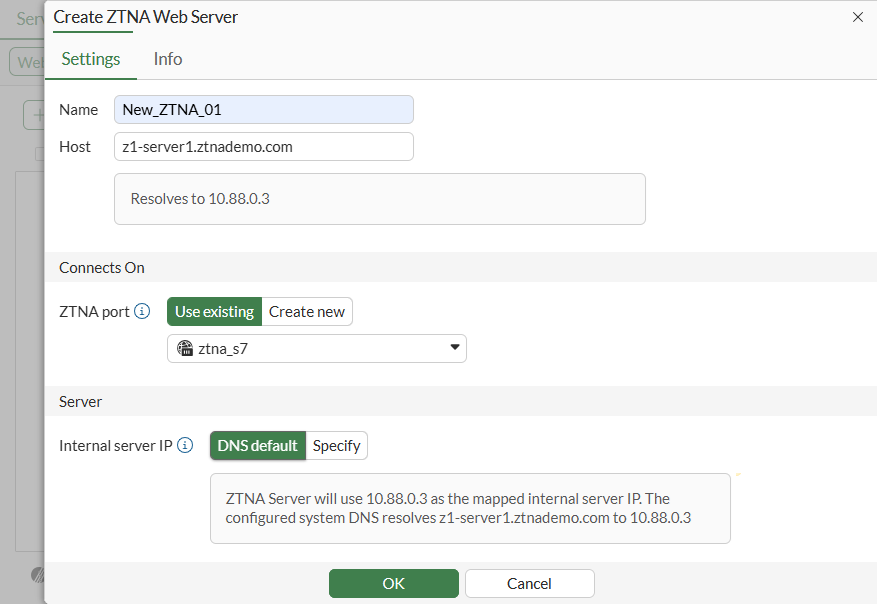
Using the basic method
-
Go to Policy & Objects > ZTNA > Servers & Portals.
-
Go to the Web Server sub-menu and click Create New.
-
Configure the following:
Setting
Description
Name
Name of the web server object.
IP version
Select IPv4 or IPv6. This option only appears if IPv6 is enabled on Feature Select.
Host*
Name or IP of the virtual host that your end users are accessing.
ZTNA port
-
Use existing: Select a previously configured ZTNA Port.
-
Create new: Input settings for a new ZTNA Port.
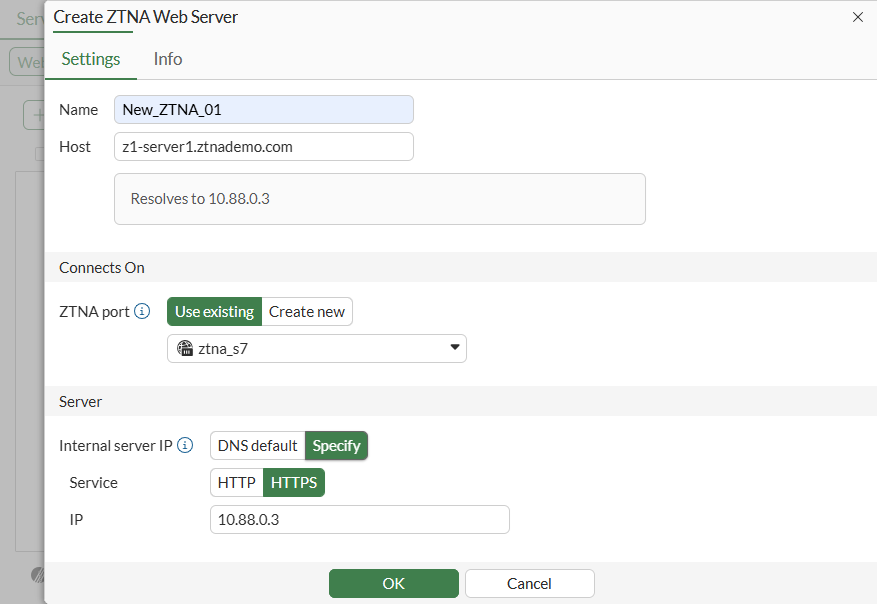
Internal server IP
-
DNS default: Automatically resolves the virtual host and configure the real server to be the IP of the resolved host.
-
Specify: Configure the real server manually. Select Service (HTTP/HTTPS) and IP. By default, the port will be 443. To change the port, use Advanced mode.
* Host (aka Virtual Host) fields are mandatory, since multiple entries can be paired with the same ZTNA Port. To differentiate between different servers, the virtual host field is used for matching.
From the CLI, only one ZTNA server entry can have an empty host.
As a best practice, an external DNS should be used by remote clients to resolve the virtual-host to the ZTNA Port.
Example using DNS default for Internal server IP
Manually specify Internal server IP
-
-
Click OK to save.
This method automatically configures a virtual host object in the CLI and references it in the ZTNA web-proxy object.
config firewall access-proxy-virtual-host
    edit "web-proxy_vh_mggshssu"
        set ssl-certificate "ztna-wildcard"
        set host "z1-server1.ztnademo.com"
    next
end
config ztna web-proxy
    edit "New_ZTNA_01"
        set vip "ztna_s7"
        set host "web-proxy_vh_mggshssu"
        config api-gateway
            edit 1
                config realservers
                    edit 1
                        set ip 10.88.0.3
                    next
                end
            next
        end
    next
end
For other advanced virtual host settings, use the CLI:
config firewall access-proxy-virtual-host
    edit <host>
        set host-type { substring | fqdn* | wildcard }
        set empty-cert-action { accept | block* | accept-unmanageable }
        set client-cert { enable* | disable }
    next
end
When using host-type fqdn, the host will only match when the subdomain matches the host. For example, the host test.com will match vhost1.test.com, but will not match test.com.vhost. On the other hand, host-type substring will match both.
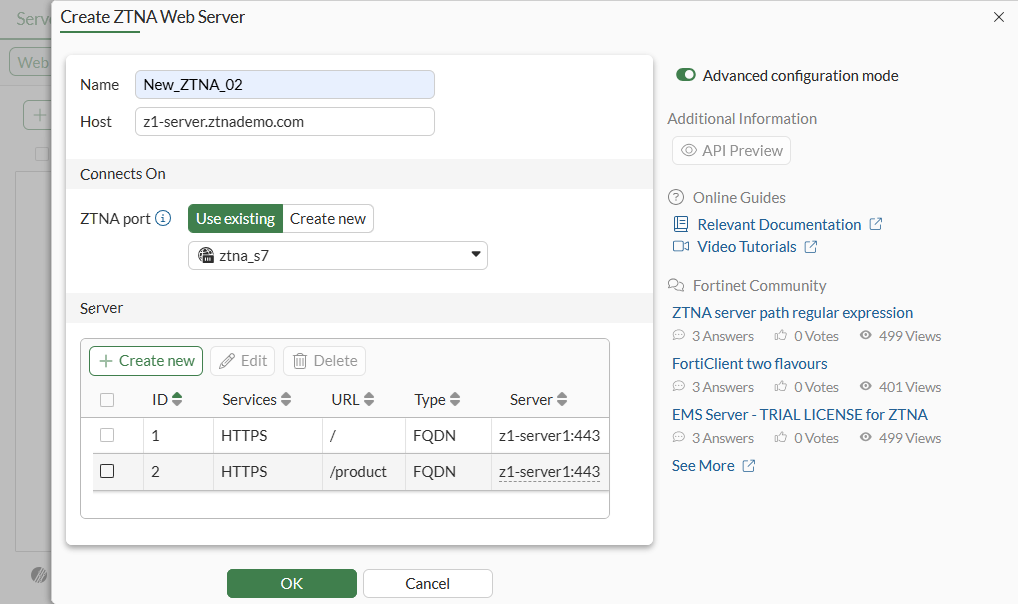
Using the Advanced method
-
Go to Policy & Objects > ZTNA > Servers & Portals.
-
Go to the Web Server sub-menu and click Create New.
-
Enable Advanced configuration mode.
-
Enter the Name, IP version, Host, and ZTNA port settings as in the Basic method.
-
In the Server table click Create new to add a new real server.
Setting
Description
Service
HTTP or HTTPS
Path
Optional. Specify a specific path for matching. When creating more than one real server, the paths must be distinct.
Address Type
-
IP: Input the Internal Server IP of the real server.
-
FQDN: The address of the real server can be chosen from pre-configured FQDN addresses.
Port
Specify the port used to connect to the real-server.
-
-
Click OK.
-
Click OK to save.
This method also automatically configures a virtual host object in the CLI and references it in the ZTNA web-proxy object:
config firewall access-proxy-virtual-host
        edit "web-proxy_vh_mggsn6e5"
        set ssl-certificate "ztna-wildcard"
        set host "z1-server.ztnademo.com"
    next
end
config ztna web-proxy
    edit "New_ZTNA_02"
        set vip "ztna_s7"
        set host "web-proxy_vh_mggsn6e5"
        config api-gateway
            edit 1
                config realservers
                    edit 1
                        set addr-type fqdn
                        set address "z1-server1"
                    next
                end
            next
            edit 2
                set url-map "/product"
                config realservers
                    edit 1
                        set addr-type fqdn
                        set address "z1-server1"
                    next
                end
            next
        end
    next
end
Configuring a Traffic forwarding server
Traffic forwarding (TCP and UDP) servers can now be configured on a separate tab. First, create the ZTNA destination, then add a traffic forwarding server.
-
Go to Policy & Objects > ZTNA > Traffic Forwarding.
-
Go to the Destination sub-menu and click Create New.
-
Configure the following:
Setting
Description
Name
Name of the destination
Type
-
On-premise: Typically internal servers behind the firewall. Specify Address and Port.
-
SaaS: Access to known SaaS services gmail, dropbox, ms-teams,and others. Select SaaS application from list.
Port
Specify a port or range of ports separated by ‘-‘ from 1-65535.
Protocol
Specify All, TCP, or UDP.
-
-
Click OK to complete.
-
Go to the Traffic Forwarding Server sub-menu and click Create New.
-
Configure the following:
Setting
Description
Name
Name of the traffic forwarding server
Host*
Name or IP of the virtual host that your end users are accessing. Typically, for a traffic forwarding server, this is the external IP of the ZTNA port.
ZTNA port
-
Use existing: Select a previously configured ZTNA VIP.
-
Create new: Input settings for a new ZTNA VIP.
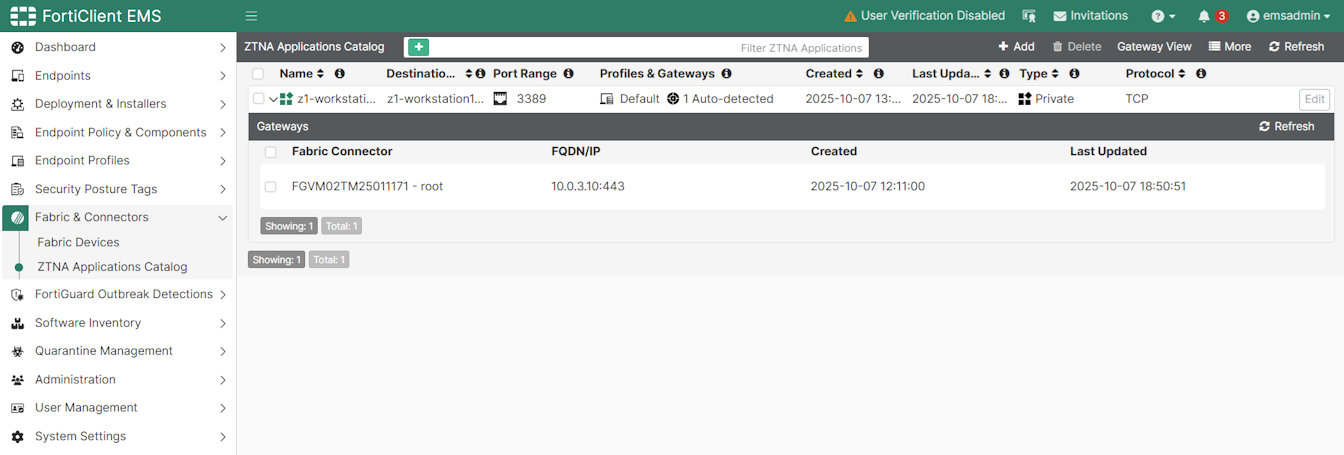
* When a traffic forwarding server and destination is applied in a ZTNA policy, this triggers FortiGate to share the information with EMS in order to create a ZTNA application catalog entry. This ZTNA application catalog entry uses the external IP of the ZTNA port object as the ZTNA gateway address. Hence, the Host/virtual host definition within the traffic forwarding server should use the External IP of the ZTNA port.
-
-
Click OK.
This automatically configures a virtual host object in the CLI and references it in the ZTNA traffic forwarding object.
config firewall access-proxy-virtual-host
    edit "traffic-forward-proxy_vh_mggvr66n"
        set ssl-certificate "ztna-wildcard"
        set host "10.0.3.10"
    next
end
config ztna traffic-forward-proxy
    edit "New_TFS_01"
        set vip "ztna_s7"
        set host " traffic-forward-proxy_vh_mggvr66n"
    next
end
config ztna destination
    edit "z1-ws1"
        set uuid dea9af22-a3ba-51f0-7972-9a5de8d89e37
        set address "z1-workstation1"
        set mappedport 3389
    next
end
Note that the Traffic Forwarding Destination will not be synchronized to EMS until the destination is used in a proxy-policy.
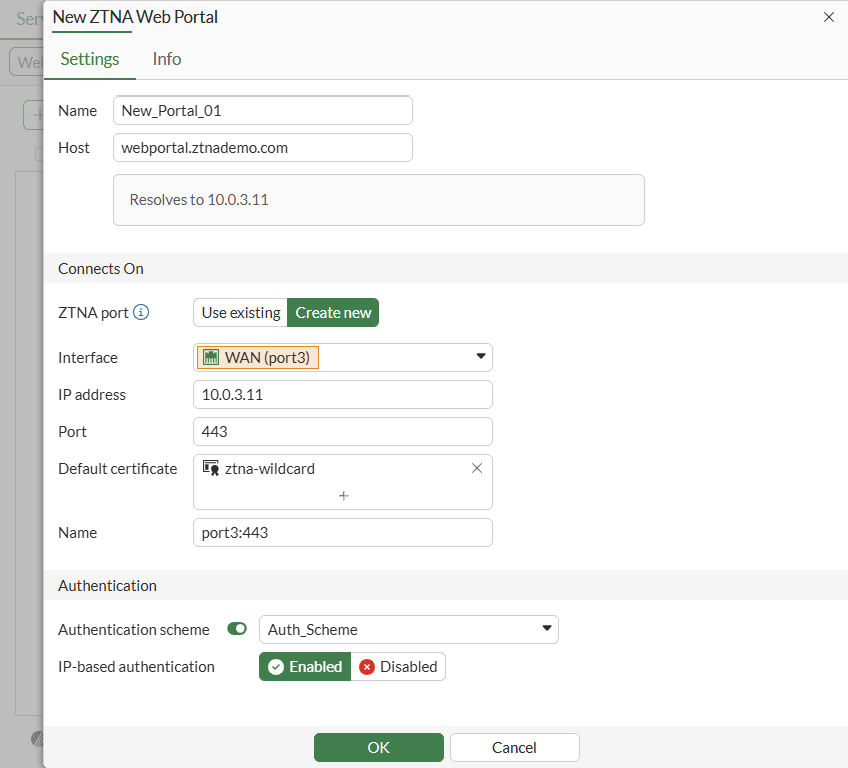
Configuring a Web Portal for Agentless Access
For agentless access, FOS 7.6 introduced the CLI for configuring a ZTNA web portal. FOS 8.0 enhances this by introducing GUI configurations for the web portal settings.
-
Go to Policy & Objects > ZTNA > Servers & Portals.
-
Go to the Web Portal sub-menu and click Create New.
-
Configure the following:
Setting
Description
Name
Name of the web portal object
Host
Name of the virtual host that your end users are accessing. This should resolve to the ZTNA web portal itself
ZTNA port
-
Use existing: Select a previously configured ZTNA VIP.
-
Create new: Input settings for a new ZTNA VIP.
Authentication Scheme
Enable to support authentication using an Authentication Scheme and Rule.
IP-based authentication
Enable authentication per IP address or per session.
-
-
Click OK.
The previous configuration generates the following CLI settings:
config firewall vip
    edit "port3:443"
        set type access-proxy
        set server-type https
        set extip 10.0.3.11
        set extintf "port3"
        set client-cert disable
        set extport 443
        set ssl-certificate "ztna-wildcard"
    next
end
config firewall access-proxy-virtual-host
    edit "web-portal_vh_mgh2dyqp"
        set ssl-certificate "ztna-wildcard"
        set host "webportal.ztnademo.com"
    next
end
config authentication rule
    edit "New_Portal_01_authrule"
        set status enable
        set protocol ztna-portal
        set ip-based enable
        set active-auth-method "Auth_Scheme"
        set sso-auth-method ''
        set comments ''
    next
end
config ztna web-portal
    edit "New_Portal_01"
        set vip "port3:443"
        set host "web-portal_vh_mgh2dyqp"
        set auth-rule "New_Portal_01_authrule"
    next
end
The authentication scheme is pre-configured in this example, which references a LDAP server:
config authentication scheme
    edit "Auth_Scheme"
        set method basic
        set user-database "LDAP-fortiad"
    next
end
Web portal bookmarks still need to be configured from the CLI. Most importantly, your user and groups must be defined in the bookmark setting to trigger access control on the ZTNA web portal login:
config ztna web-portal-bookmark
    edit "b"
        set groups "LDAP-Finance"
        config bookmarks
            edit "Webserver"
                set url "https://s2.ztnademo.com:9043"
            next
            edit "Server-S1-Web"
                set sso enable
                set url "https://s1.ztnademo.com"
            next
            edit "Server-S1-SSh"
                set apptype ssh
                set host "10.88.0.7"
            next
            edit "FortiGate-Internal-SSH"
                set apptype ssh
                set host "10.88.0.254"
            next
            edit "RDP"
                set apptype rdp
                set host "10.88.0.1"
                set port 3389
            next
        end
    next
end
See ZTNA agentless web-based application access for details.
Configuring a ZTNA traffic policy
ZTNA traffic policy can be configured using the ZTNA firewall policy, or a ZTNA proxy policy.
The difference is ZTNA firewall policy simplifies the config so specifying a ZTNA port will automatically allow all web-proxy associated with it. Also, all traffic forwarding servers are added.
ZTNA proxy policy allows more granularity for controlling the exact ZTNA server and ZTNA destination you wish to allow. Adding a traffic forwarding destination also triggers this destination to be synchronized to the EMS ZTNA Application Catalog.
Configuring a ZTNA firewall policy for web applications
In this scenario, a ZTNA Port is selected for accessing a ZTNA web server.
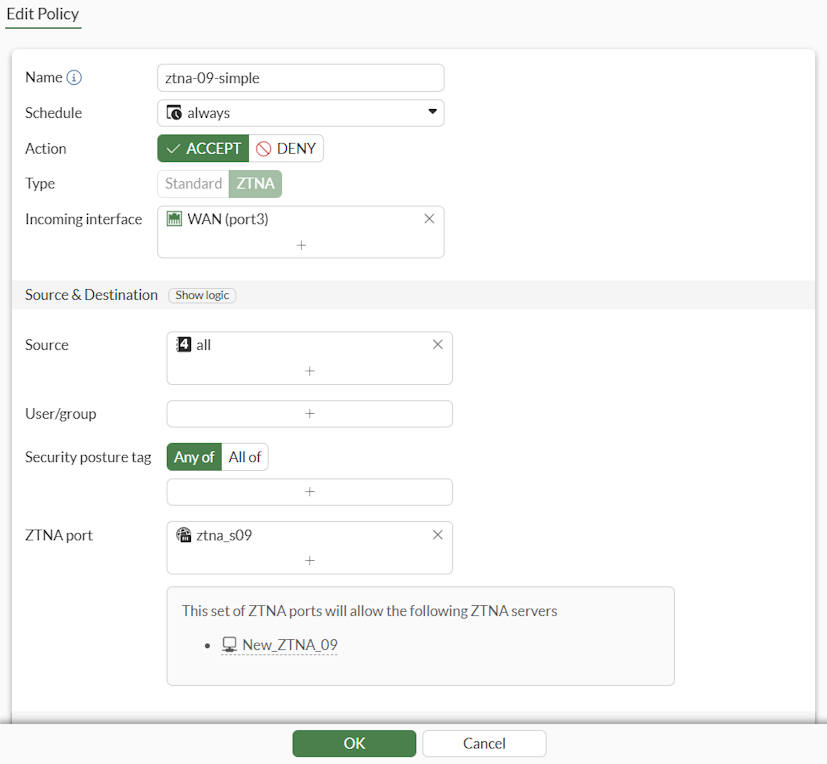
From a client, connecting to faz.ztnademo.com resolves to the ZTNA Port and user can access the ZTNA server accordingly.
Logs:
# execute log filter field subtype ztna
# execute log display

16 logs found.
10 logs returned.

1: date=2025-10-07 time=19:00:56 eventtime=1759888856776286391 tz="-0700" logid="0005000024" type="traffic" subtype="ztna" level="notice" vd="root" srcip=10.0.3.2 srcport=4816 srcintf="port3" srcintfrole="wan" dstcountry="Reserved" srccountry="Reserved" dstip=10.88.0.2 dstport=443 dstintf="port2" dstintfrole="dmz" sessionid=2059 srcuuid="b458a65a-f759-51ea-d7df-ef2e750026d1" service="HTTPS" proxyapptype="ztna-proxy" proto=6 action="accept" policyid=19 policytype="policy" poluuid="91b5d936-a3d1-51f0-99c6-2d2b1023f83f" policyname="ztna-09-simple" appcat="unscanned" duration=8 gatewayid=1 realserverid=1 vip="ztna_s09" vipincomingip=10.0.3.9 accessproxy="New_ZTNA_09" clientdevicemanageable="manageable" clientcert="yes" wanin=4199365 rcvdbyte=4199365 wanout=42022 lanin=9513 sentbyte=9513 lanout=4229931
Note that in some scenarios where the FortiGate cannot verify the certificate of the server, you can bypass this check for the specific realserver.
 config ztna web-proxy
    edit <server>
        config api-gateway
            edit <ID>
                config realservers
                    edit <ID>
                        set verify-cert disable
                    next
                end
            next
        end
    next
end
Configuring a ZTNA proxy policy for traffic forwarding
In this scenario, a proxy policy is used to allow traffic to a specific Traffic forwarding destination.
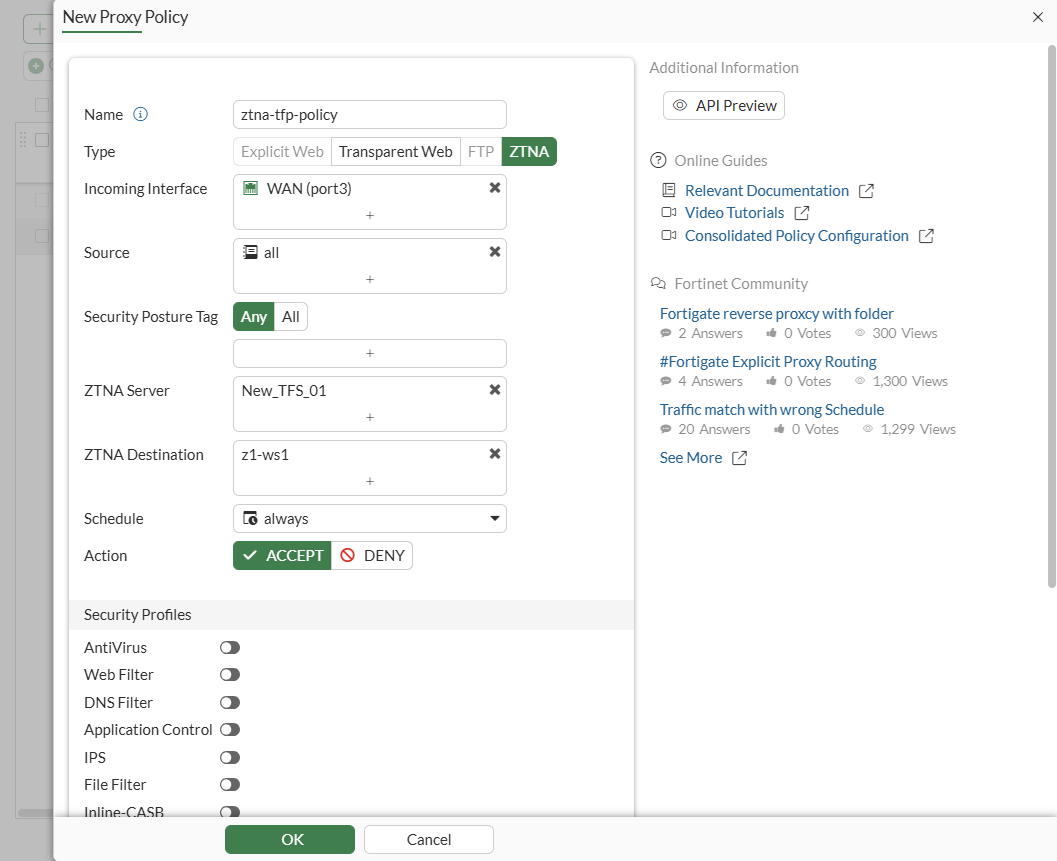
Once the ZTNA proxy policy is created, you edit the Destination Address from the policy view.
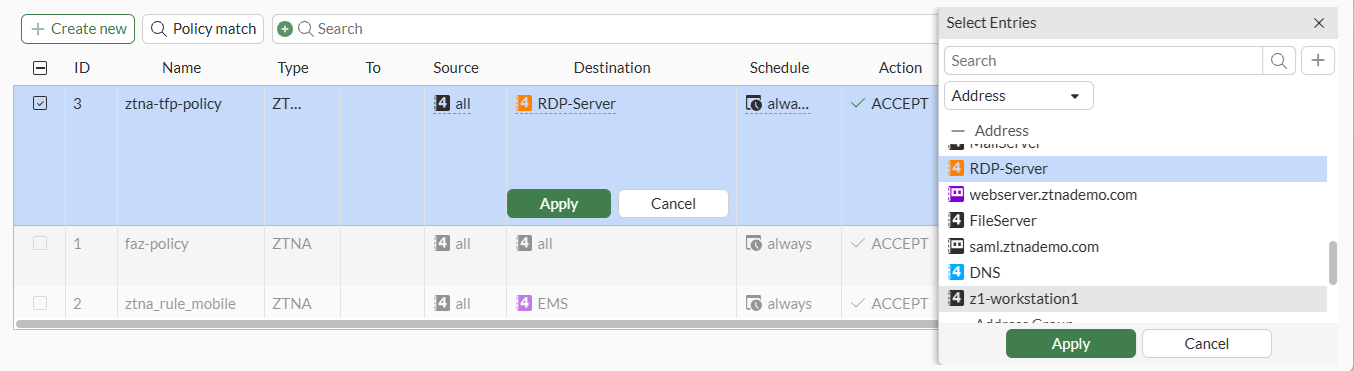
From the CLI:
config firewall proxy-policy
    edit 1
        set name “ztna-tfp-policy”
        set proxy ztna-proxy
        set ztna-proxy "New_TFS_01"
        set ztna-destination "z1-ws1"
        set srcintf "port3"
        set srcaddr "all"
        set dstaddr "RDP-Server"
        set action accept
        set schedule "always"
        set logtraffic all
    next
end
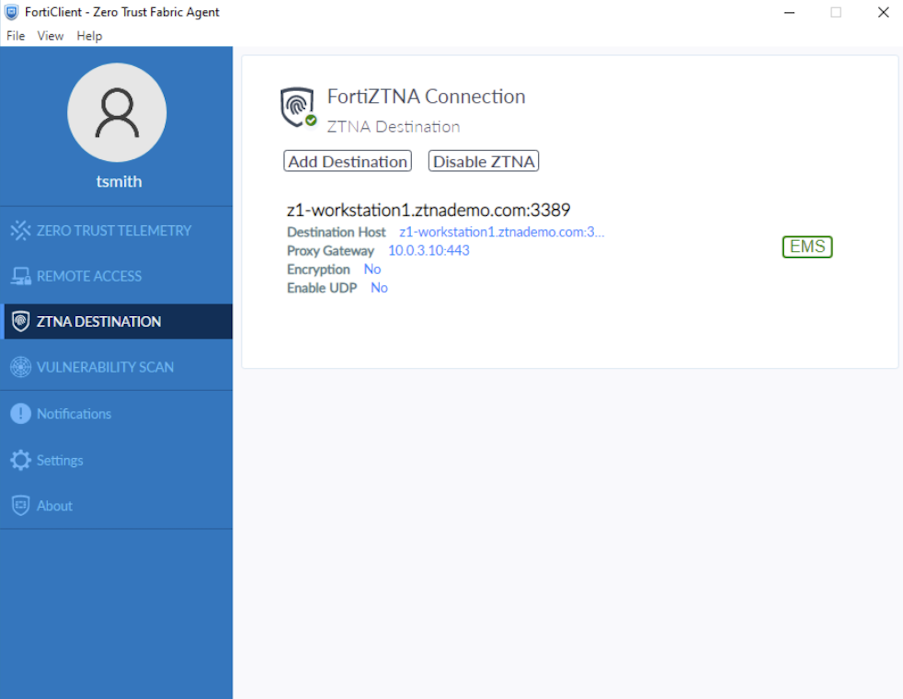
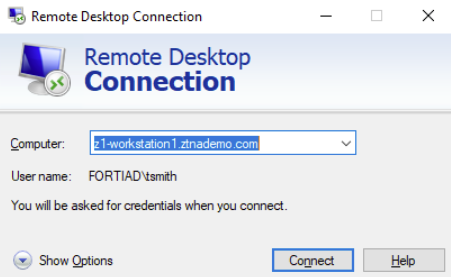
With the ZTNA traffic forwarding proxy and destination defined, this mapping will be pushed to EMS.
Once applied to an Endpoint Profile and pushed to a FortiClient, the user on the endpoint can now access the service.
Logs:
# execute log filter field subtype ztna
# execute log display
21 logs found.
10 logs returned.

1: date=2026-01-23 time=11:48:57 eventtime=1769197736891659763 tz="-0800" logid="0005000024" type="traffic" subtype="ztna" level="notice" vd="root" srcip=10.0.3.2 srcport=8033 srcintf="port3" srcintfrole="wan" dstcountry="Reserved" srccountry="Reserved" dstip=10.88.0.1 dstport=3389 dstintf="port2" dstintfrole="dmz" sessionid=761460 srcuuid="b458a65a-f759-51ea-d7df-ef2e750026d1" dstuuid="b872542a-94ce-51ec-993a-608548a2ab65" service="RDP" proxyapptype="ztna-proxy" proto=6 action="accept" policyid=1 policytype="proxy-policy" poluuid="a2e00a54-f892-51f0-f475-047ec06ea3a7" policyname="ztna-tfp-policy" appcat="unscanned" duration=7 gatewayid=1 vip="ztna_s7" vipincomingip=10.0.3.10 accessproxy="New_TFS_01" clientdevicemanageable="manageable" clientcert="yes" wanin=154496 rcvdbyte=154496 wanout=67763 lanin=69733 sentbyte=69733 lanout=157625
Configuring a ZTNA proxy policy for Web Portal access
A proxy policy must be configured to allow Web Portal access.
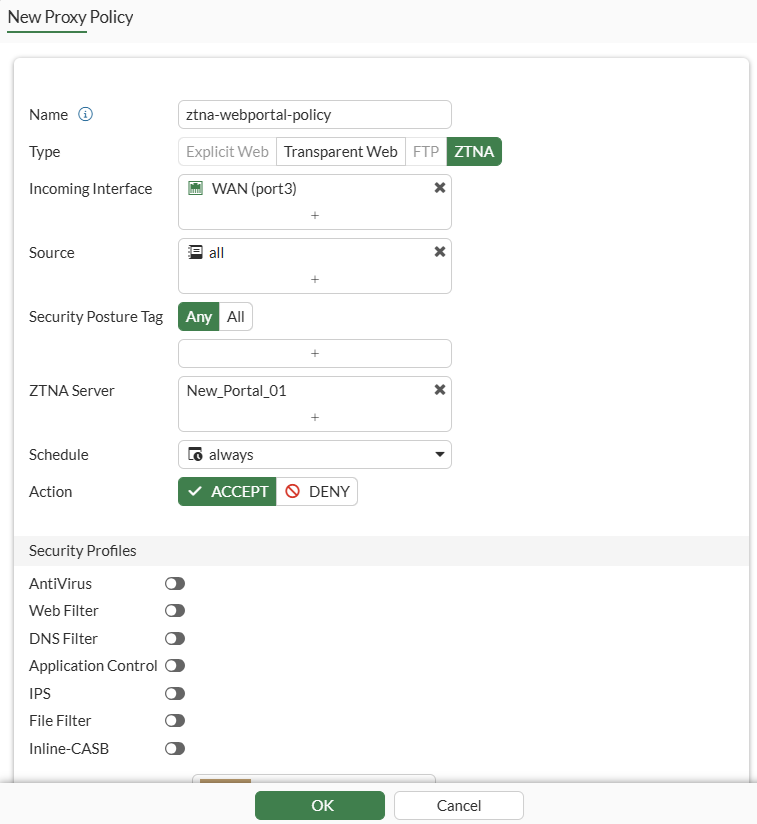
config firewall proxy-policy
    edit 2
        set proxy ztna-proxy
        set name "ztna-webportal-policy"
        set ztna-proxy "New_Portal_01"
        set srcintf "port3"
        set srcaddr "all"
        set dstaddr "all"
        set action accept
        set schedule "always"
        set logtraffic all
    next
end
The user group is taken care of in the web portal bookmarks settings. Therefore, the proxy policy above simply define the proxy that is allowed.
For complete agentless access without client certificate check, perform one more step:
config firewall access-proxy-virtual-host
    edit "web-portal_vh_mgh2dyqp"
        set ssl-certificate "ztna-wildcard"
        set host "webportal.ztnademo.com"
        set client-cert disable
    next
end
From a web client which does not have any FortiClient agent installed, access webportal.ztandemo.com. The client must be able to resolve this to the ZTNA Port.
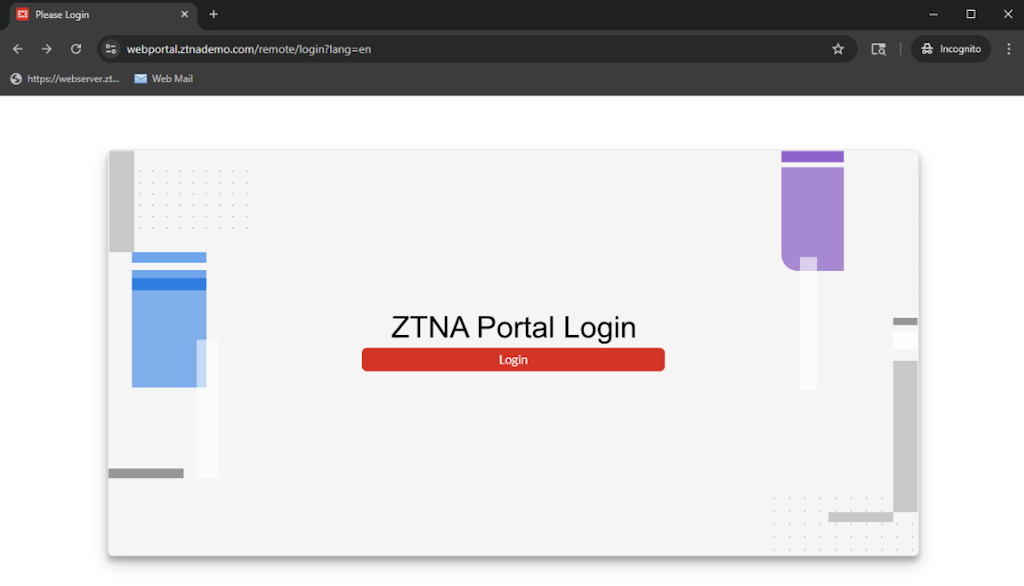
Sign in to the web portal:
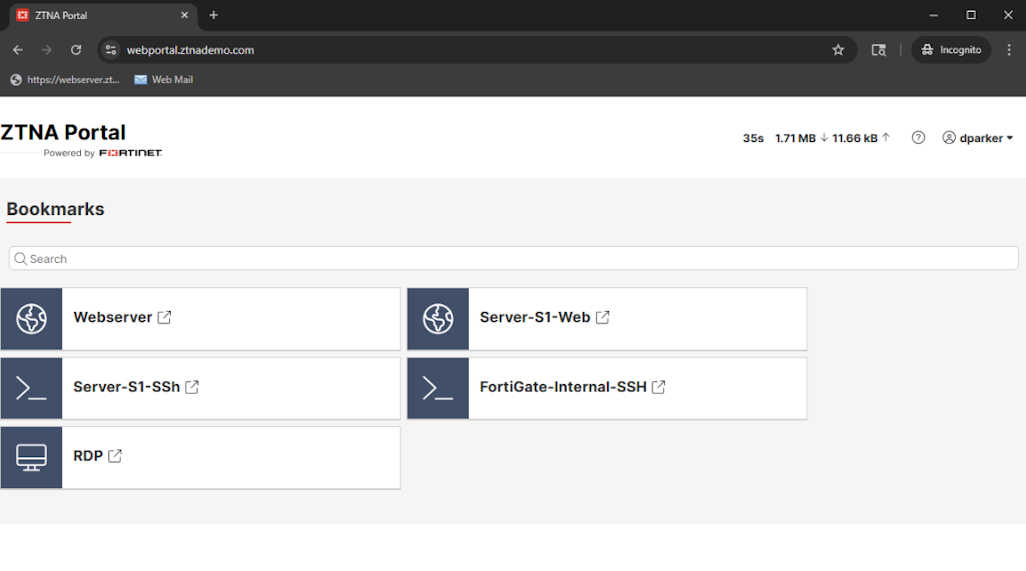
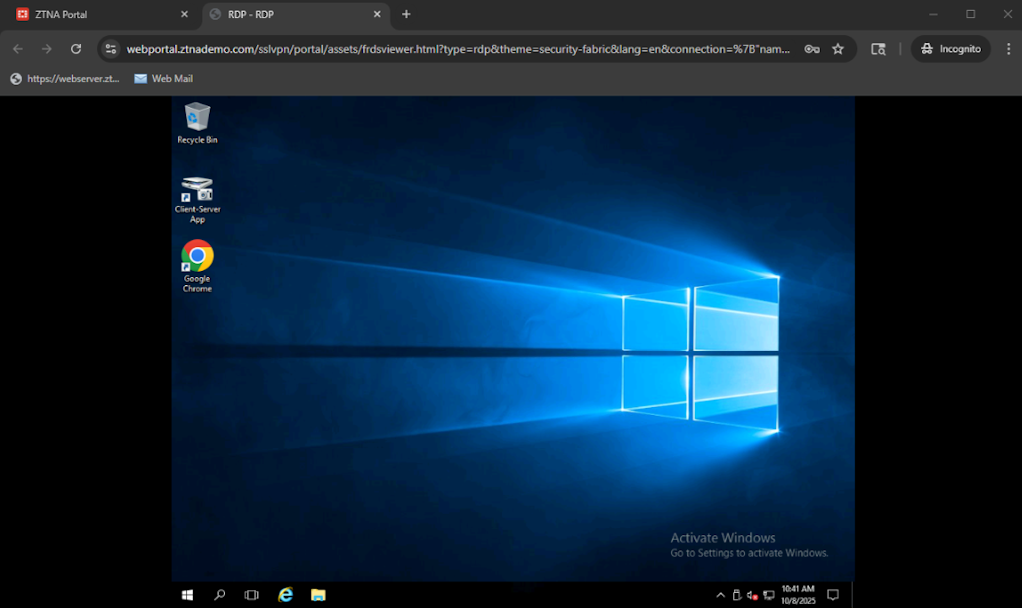
Access a shortcut:
Logs:
# execute log filter field subtype ztna
# execute log display
26 logs found.
10 logs returned.

1: date=2025-10-08 time=10:40:56 eventtime=1759945256077145902 tz="-0700" logid="0005000024" type="traffic" subtype="ztna" level="notice" vd="root" srcip=10.0.3.3 srcport=30265 srcintf="port3" srcintfrole="wan" dstcountry="Reserved" srccountry="Reserved" dstip=10.88.0.1 dstport=3389 dstintf="port2" dstintfrole="dmz" sessionid=14266 srcuuid="b458a65a-f759-51ea-d7df-ef2e750026d1" dstuuid="b458a65a-f759-51ea-d7df-ef2e750026d1" service="RDP" proxyapptype="ztna-proxy" proto=6 action="accept" policyid=2 policytype="proxy-policy" poluuid="62fc2e70-a3f8-51f0-b249-0d2835753986" appcat="unscanned" duration=0 gatewayid=1 vip="port3:443" vipincomingip=10.0.3.11 clientdevicemanageable="unknown" clientcert="yes" wanin=0 rcvdbyte=0 wanout=0 lanin=3576 sentbyte=3576 lanout=463
SAML authentication
Previously, the access-proxy linked a VIP and a samlsp service and was referenced directly in a proxy policy to allow SAML authentication for a ZTNA policy:
config firewall access-proxy
    edit "ztna-saml"
        set vip "ztna-saml-vip"
        config api-gateway
            edit 1
                set service samlsp
                set saml-server "fac-saml"
            next
        end
    next
end
config firewall proxy-policy
edit 2
set name "SAML_AUTH_ACCESS"
set proxy access-proxy
set access-proxy "ztna-saml"
set srcintf "port2"
set srcaddr "all"
set dstaddr "all"
set action accept
set schedule "always"
set logtraffic all
next
end
Now a new setting in the VIP set auth-portal controls SAML authentication access by matching the VIP’s extip:extport tuple to a user.saml.single-sign-on-url. In this example, demo.url.com resolves to 172.18.62.67.
config firewall vip
    edit "ztna-saml"
        set vip-id 2
        set type access-proxy
        set server-type https
        set extip 172.18.62.67
        set extintf "port2"
	 set auth-portal enable
        set extport 9443
        set ssl-certificate "default.test.com"
    next
end
config user saml
edit "ztna-saml"
set entity-id "http://demo.url.com:9443/remote/saml/metadata/"
set single-sign-on-url "https://demo.url.com:9443/remote/saml/login"
set single-logout-url "https://demo.url.com:9443/remote/saml/logout"
set idp-entity-id "http://fac.demo.url.com/saml-idp/ztna/metadata/"
set idp-single-sign-on-url "https://fac.demo.url.com/saml-idp/ztna/login/"
set idp-single-logout-url "https://fac.demo.url.com/saml-idp/ztna/logout/"
set idp-cert "REMOTE_Cert_3"
set user-name "username"
next
end
Upgrade
When upgrading from FortiOS 7.6 to 8.0, configurations can be migrated.
Example CLI configuration of ZTNA SAML authentication and the changes between FortiOS 7.6 and 8.0. The configuration previously found under firewall.access-proxy that enabled SAML service for the VIP has been removed and replaced by a new setting added to the VIP: set auth-portal enable.
|
FOS 7.6 |
FOS 8.0 |
|---|---|
config firewall vip
edit "ztna-saml-vip"
set vip-id 2
set type access-proxy
set server-type https
set extip 172.18.62.67
set extintf "port2"
set extport 9443
set ssl-certificate "default.test.com"
next
end
|
config firewall vip
edit "ztna-saml"
set vip-id 2
set type access-proxy
set server-type https
set extip 172.18.62.67
set extintf "port2"
set auth-portal enable
set extport 9443
set ssl-certificate "default.test.com"
next
end
|
config firewall access-proxy
edit "ztna-saml"
set vip "ztna-saml-vip"
config api-gateway
edit 1
set service samlsp
set saml-server "fac-saml"
next
end
next
end
|
Removed |
config user saml
    edit "ztna-saml"
        set entity-id "http://demo.url.com:9443/remote/saml/metadata/"
        set single-sign-on-url "https://demo.url.com:9443/remote/saml/login"
        set single-logout-url "https://demo.url.com:9443/remote/saml/logout"
        set idp-entity-id "http://fac.demo.url.com/saml-idp/ztna/metadata/"
        set idp-single-sign-on-url "https://fac.demo.url.com/saml-idp/ztna/login/"
        set idp-single-logout-url "https://fac.demo.url.com/saml-idp/ztna/logout/"
        set idp-cert "REMOTE_Cert_3"
        set user-name "username"
    next
end
|
Example CLI configuration of a ZTNA web proxy and the changes between FOS 7.6 to FOS 8.0. A single firewall.access-proxy entry is split into two ztna.web-proxy entries.
|
FOS 7.6 |
FOS 8.0 |
|---|---|
config firewall access-proxy
    edit "ztna_s7"
        set vip "ztna_s7"
        set auth-portal enable
        config api-gateway
            edit 1
                config realservers
                    edit 1
                        set addr-type fqdn
                        set address "server1.ztnademo.com"
                        set status standby
                    next
                end
            next
            edit 2
                set virtual-host "auto-ztna_s7-0"
                config realservers
                    edit 1
                        set addr-type fqdn
                        set address "s25.qa.fortinet.com"
                        set verify-cert disable
                    next
                end
            next
        end
    next
end
|
config ztna web-proxy
    edit "ap_ztna_s7_gwy_1_webproxy"
        set vip "ztna_s7"
        config api-gateway
            edit 1
                config realservers
                    edit 1
                        set addr-type fqdn
                        set address "server1.ztnademo.com"
                    next
                end
            next
        end
    next
    edit "ap_ztna_s7_gwy_2_webproxy"
        set vip "ztna_s7"
        set host "auto-ztna_s7-0"
        config api-gateway
            edit 2
                config realservers
                    edit 1
                        set addr-type fqdn
                        set address "s25.qa.fortinet.com"
                        set verify-cert disable
                    next
                end
            next
        end
    next
end
|
Example CLI configuration of a ZTNA traffic forwarding server and the changes between FOS 7.6 to FOS 8.0. A single firewall.access-proxy entry is split into a new ztna.traffic-forward-proxy entry and multiple ztna.destination entries.
|
FOS 7.6 |
FOS 8.0 |
|---|---|
config firewall access-proxy
    edit "ztna_s7"
        set vip "ztna_s7"
        set auth-portal enable
        config api-gateway
            edit 3
                set url-map "/tcp"
                set service tcp-forwarding
                config realservers
                    edit 1
                        set address "fgt"
                        set mappedport 445 443 4400-4401 23
                    next
                    edit 2
                        set address "s27.qa.fortinet.com"
                    next
                    edit 3
                        set address "server25"
                        set mappedport 22
                        set type ssh
                        set ssh-client-cert "ssh-access-proxy"
                        set ssh-host-key-validation enable
                        set ssh-host-key "ed25519"
                    next
                    edit 4
                        set address "smb101245"
                        set mappedport 445
                    next
                    edit 5
                        set address "internal1.fortinet.com"
                    next
                end
            next
            edit 4
                set url-map "/saas"
                set service saas
                set application "MS" "Google" "dropbox"
            next
        end
    next
end
|
config ztna traffic-forward-proxy
    edit "ap_ztna_s7_host__ztfp"
        set vip "ztna_s7"
    next
end
config ztna destination
    edit "ap_ztna_s7_host__svr_1_zdst"
        set uuid c8dff876-a000-51f0-4a68-10edb63a5d59
        set address "fgt"
        set mappedport 445 443 4400-4401 23
    next
    edit "ap_ztna_s7_host__svr_2_zdst"
        set uuid c8dffb5a-a000-51f0-2edc-e3f8802f351f
        set address "s27.qa.fortinet.com"
    next
    edit "ap_ztna_s7_host__svr_3_zdst"
        set uuid c8dffcae-a000-51f0-d56c-3de66b250af5
        set address "server25"
        set mappedport 22
    next
    edit "ap_ztna_s7_host__svr_4_zdst"
        set uuid c8dffdd0-a000-51f0-4a4a-b3f75bb3d353
        set address "smb101245"
        set mappedport 445
    next
    edit "ap_ztna_s7_host__svr_5_zdst"
        set uuid c8dffef2-a000-51f0-dd59-55cf4f11afab
        set address "internal1.fortinet.com"
    next
    edit "ap_ztna_s7_host__saas_4_zdst"
        set uuid c8e00078-a000-51f0-d9a4-bbd4e6c76b74
        set type saas
        set saas-application "MS" "Google" "dropbox"
    next
end
|
Example CLI configuration of a ZTNA proxy policy and the changes between FOS 7.6 to FOS 8.0. A single firewall.proxy-policy entry is split into two firewall.proxy-policy entries for web-proxy and traffic forwarding servers and destinations.
|
FOS 7.6 |
FOS 8.0 |
|---|---|
config firewall proxy-policy
    edit 3
        set uuid 9af7a056-4337-51f0-7da1-1b8273a78ae4
        set name "ZTNA_proxy_policy_02"
        set proxy access-proxy
        set access-proxy "ztna_s7"
        set srcintf "port2"
        set srcaddr "all"
        set dstaddr "all"
        set ztna-ems-tag "EMS7_ZTNA_ems_linux30_management_tag"
        set action accept
        set schedule "always"
        set logtraffic all
    next
end
|
config firewall proxy-policy
    edit 3
        set uuid 9af7a056-4337-51f0-7da1-1b8273a78ae4
        set name "ZTNA_proxy_policy_02"
        set proxy ztna-proxy
        set ztna-proxy "ap_ztna_s7_gwy_1_webproxy" "ap_ztna_s7_gwy_2_webproxy"
        set srcintf "port2"
        set srcaddr "all"
        set dstaddr "all"
        set ztna-ems-tag "EMS7_ZTNA_ems_linux30_management_tag"
        set action accept
        set schedule "always"
    next
    edit 5
        set uuid 40843cae-9aff-51f0-0e7a-2f1cbb3c1432
        set proxy ztna-proxy
        set ztna-proxy "ap_ztna_s7_host__ztfp"
        set ztna-destination "ap_ztna_s7_host__saas_4_zdst" "ap_ztna_s7_host__svr_1_zdst" "ap_ztna_s7_host__svr_2_zdst" "ap_ztna_s7_host__svr_3_zdst" "ap_ztna_s7_host__svr_4_zdst" "ap_ztna_s7_host__svr_5_zdst"
        set srcintf "port2"
        set srcaddr "all"
        set dstaddr "all"
        set ztna-ems-tag "EMS7_ZTNA_ems_linux30_management_tag"
        set action accept
        set schedule "always"
    next
end
|
Example CLI configuration of a ZTNA firewall policy and the changes between FOS 7.6 to FOS 8.0. ztna.destinations are defined within the new ZTNA firewall policy for traffic forwarding destinations.
|
FOS 7.6 |
FOS 8.0 |
|---|---|
config firewall policy
    edit 3
        set name "ZTNA_policy_01"
        set uuid 760d00d4-7497-51ef-cf53-73b4f106a8a0
        set srcintf "port2"
        set dstintf "any"
        set action accept
        set srcaddr "all"
        set dstaddr "ztna_s7"
        set ztna-ems-tag "EMS7_ZTNA_ems_linux30_management_tag"
        set schedule "always"
        set utm-status enable
        set ssl-ssh-profile "custom-deep-inspection"
        set av-profile "g-default"
        set logtraffic all
        set nat enable
    next
end
|
config firewall policy
    edit 3
        set name "ZTNA_policy_01"
        set uuid 760d00d4-7497-51ef-cf53-73b4f106a8a0
        set srcintf "port2"
        set dstintf "any"
        set action accept
        set srcaddr "all"
        set dstaddr "ztna_s7"
        set ztna-ems-tag "EMS7_ZTNA_ems_linux30_management_tag"
        set ztna-destination "ap_ztna_s7_host__saas_4_zdst" "ap_ZTNA14_host_auto-ZTNA_svr_1_zdst" "ap_ZTNA14_host__saas_3_zdst" "ap_ztna_s7_host__svr_1_zdst" "ap_ztna_s7_host__svr_2_zdst" "ap_ztna_s7_host__svr_3_zdst" "ap_ztna_s7_host__svr_4_zdst" "ap_ztna_s7_host__svr_5_zdst"
        set schedule "always"
        set utm-status enable
        set ssl-ssh-profile "custom-deep-inspection"
        set av-profile "g-default"
        set nat enable
        set groups "grp_radius"
    next
end
|
Limitations and known issues
Limitations
-
The host field is required for Web proxy server and Traffic forwarding server whereas this was not a required field in 7.6
-
Hosts are by default FQDN type when defined in the GUI. To define a wildcard or substring type virtual host, use the CLI.
-
ZTNA destinations can be defined for a ZTNA firewall policy, but only in the CLI.
-
Traffic forwarding destinations are only pushed to EMS when applied in a ZTNA policy