
Windows IKEv2 native VPN with user certificate
In this example, we configure remote access VPN for a Windows environment where remote clients use the built-in VPN client to connect over IKEv2 to the FortiGate VPN gateway. IKEv2 with Extensible Authentication Protocol – Transport Layer Security (EAP-TLS) using mutual certificate authentication is configured. Mutual certificate authentication means that both the client and server use certificates to identify themselves. Pre-shared Keys and password authentication are not used.
EAP-TLS is compatible with RADIUS, which is handled by the Network Policy Server (NPS) on the Windows server. Certificates are generated and distributed through Active Directory Certificate Services (AD CS). An additional certificate is used to identify the VPN gateway.
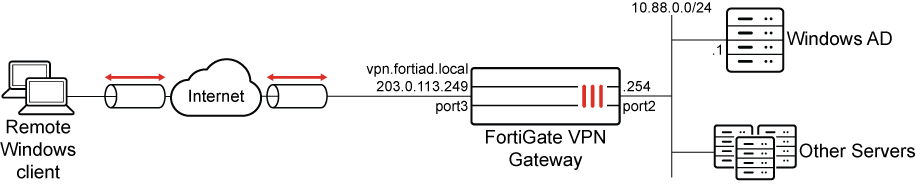
Topology
Prerequisites
Windows server
This example assumes that the following Windows server roles are installed and available:
-
NPS (RADIUS)
-
AD CS with a generated CA
-
Group Policy Management
-
DNS server
It is also assumed that a connection is established between the NPS and FortiGate, and a DNS entry exists for the NPS that the FortiGate can resolve.
Domain and users
Users are defined in the Active Directory and belong to various groups. The NPS (RADIUS) server defines a different policy for each group and returns the name of each group in a FortiGate Vendor-specific attribute (12356).
This example has 2 groups in the fortiad.info domain:
|
AD Group |
Vendor-specific attribute group name |
User |
|---|---|---|
|
FortiAD\MIS |
rad_mis |
tsmith (Tom Smith) |
|
FortiAD\Finance |
rad_finance |
dparker (Dan Parker) |
Certificates
The following certificates are required:
-
CA certificate for EAP-TLS to sign the client and server certificates.
-
Client certificate for EAP-TLS used by the windows client.
-
Server certificate for EAP-TLS used by the server providing RADIUS authentication.
-
VPN certificate used to identify the FortiGate dialup gateway.
To further detail the purpose of each type of certificate:
|
Certificate Type |
Details |
|---|---|
|
CA certificate |
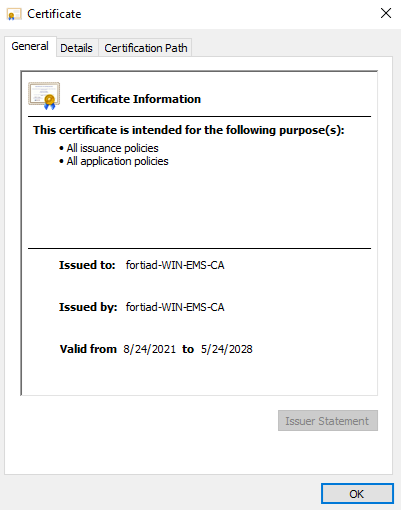
The CA certificate must be able to sign other certificates. It is created after AD CSs CA role installation.The CA certificate is automatically installed on the server that is hosting the AD CS role. In this example, that server is also hosting the NPS and DNS server. The Key Usage specifies Certificate Signing. In this example:
|
|
Client certificate |
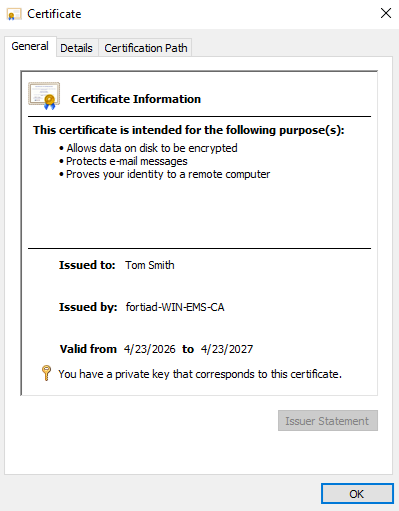
The client certificate is stored in the personal user certificate store and is used to authenticate the user. The certificate has Client Authentication and a SAN of the user's name, and is signed by the CA. The CA is stored in Current User > Trusted Root Certification Authorities. In this example:
|
|
Server certificate |
The NPS certificate must be in the hosting server's certificate store so that the NPS can access it. It has Server Authentication and a SAN DNS name to match the server's IP address. |
|
VPN gateway certificate |
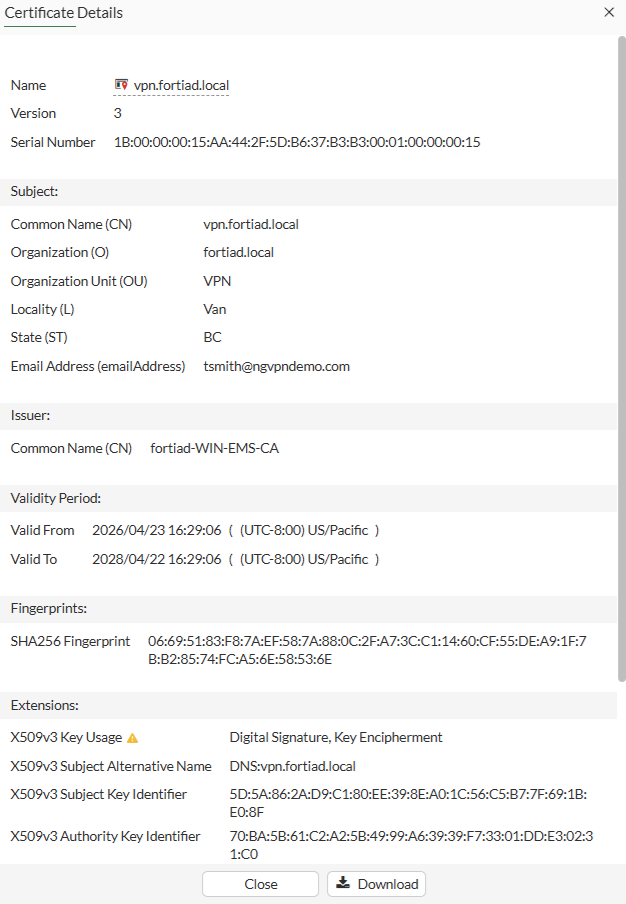
The FortiGate generates a CSR and stores the private key for this VPN gateway certificate. This CSR is signed by the Windows CA and uploaded to the FortiGate. The certificate has a SAN indicating the FQDN which resolves to the VPN gateway’s WAN interface. Clients should use the FQDN to connect to the VPN. In this example:
|
For instructions on how to configure various parts of the Windows server and certificates, see the following sections:
Configure the FortiGate
An VPN tunnel is configured using the VPN wizard to allow native windows clients to connect to the VPN using their built-in VPN clients. In this example, EAP-TLS is used, where each client uses their CA issued user certificate to authenticate against the NPS (RADIUS) server. FortiGate acts as a relay to pass the authentication requests to the RADIUS server. Subsequently, when the RADIUS identifies the user and user group from the client certificate, it returns the group-name via the Fortinet Vendor-Specific attribute 12356 to the FortiGate.
All traffic, including internet traffic, is routed through the tunnel. Role-based access control is used with different policies defined for each user group.
To configure the RADIUS server and user groups in the GUI:
-
Go to User & Authentication > RADIUS Servers and click Create New.
-
Configure the following:
Field
Value
Name
win-10.88.0.1
IP/Name
10.88.0.1
Secret
<secret>
For better security, use RADSEC.
-
Click OK.
-
Go to User & Authentication > User Groups and click Create new.
-
Set Name to rad_finance.
-
In the Remote Groups section, click Add.
-
Set Remote Server to win-10.88.0.1.
-
Set Groups to Specify and enter the group name: rad_finance
-
Click OK.
-
-
Click OK.
-
Click Create new again to create a second group named rad_mis.

To configure IPsec VPN in the GUI:
-
Go to VPN > IPsec Wizard.
-
Enter a name for the VPN, such as ikev2_native.
-
Set Template type to Remote Access, then click Begin.
-
In the VPN tunnel settings page, configure the following:
Field
Value
VPN Client Type
Native
Protocol
IKEv2
Client OS
Defaults to Windows and Android
Shared WAN
WAN (port3)
Authentication method
Signature (For IKEv2 native VPNs, PSK is not supported)
Certificate name
vpn.fortiad.local
The VPN gateway certificate
Peer certificate CA
FortiAD_CA_Cert
CA certificate the signed the remote, server and VPN certificates
EAP peer identification
EAP identity request
User group
rad_mis
Authentication on individual policies is configured later.
DNS Server
Use System DNS
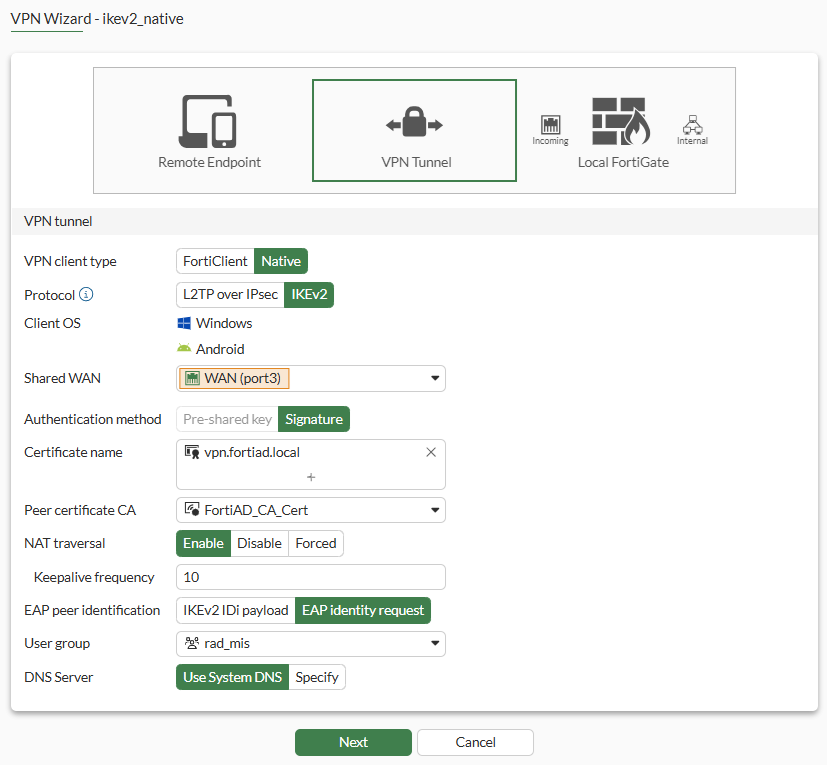
-
Click Next.
-
In the Remote endpoint settings page, configure the following:
Field
Value
Addressing mode for connected endpoints
Manual Addresses to assign to connected endpoints
10.130.1.1-10.130.1.20 Subnet for connected endpoints
255.255.255.255 -
Click Next.
-
In the Local FortiGate settings page, configure the following:
Field
Value
Incoming interface that binds to tunnel
(WAN) port3
Create and add interface to zone
Disable Local interface DMZ (port2) Local Address
DMZ_Network (10.88.0.0/24)
-
Click Next.
-
On the final review page, review the settings that will be installed.
Since we will configure additional local policies, we will rename the current Remote to local policy to vpn_ikev2_native_mis_allow.
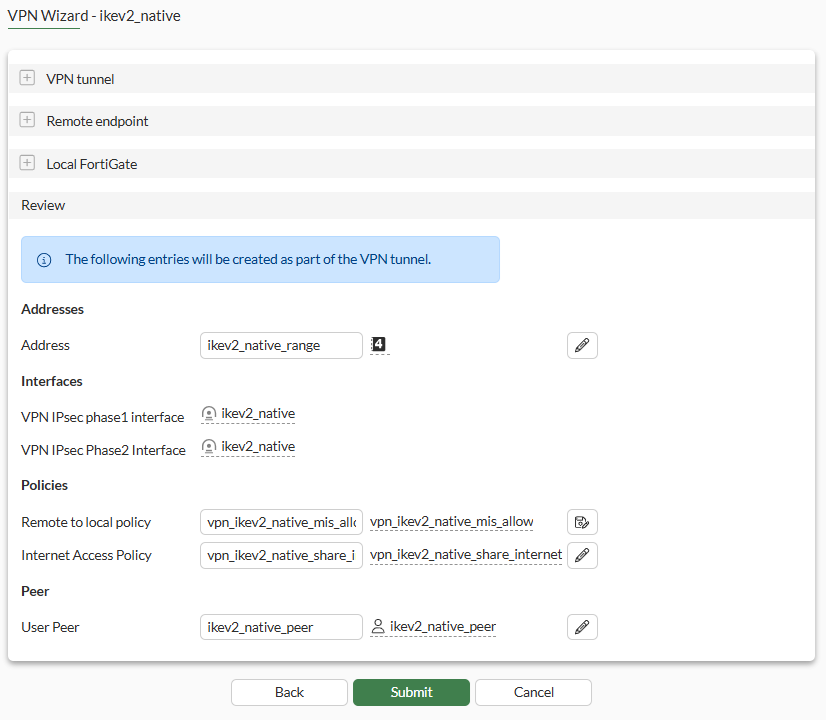
-
Click Submit.
-
After the VPN tunnel is configured, edit the tunnel:
-
Under Authentication, change User group from Specify to Inherit from policy.
-
Click OK.
-
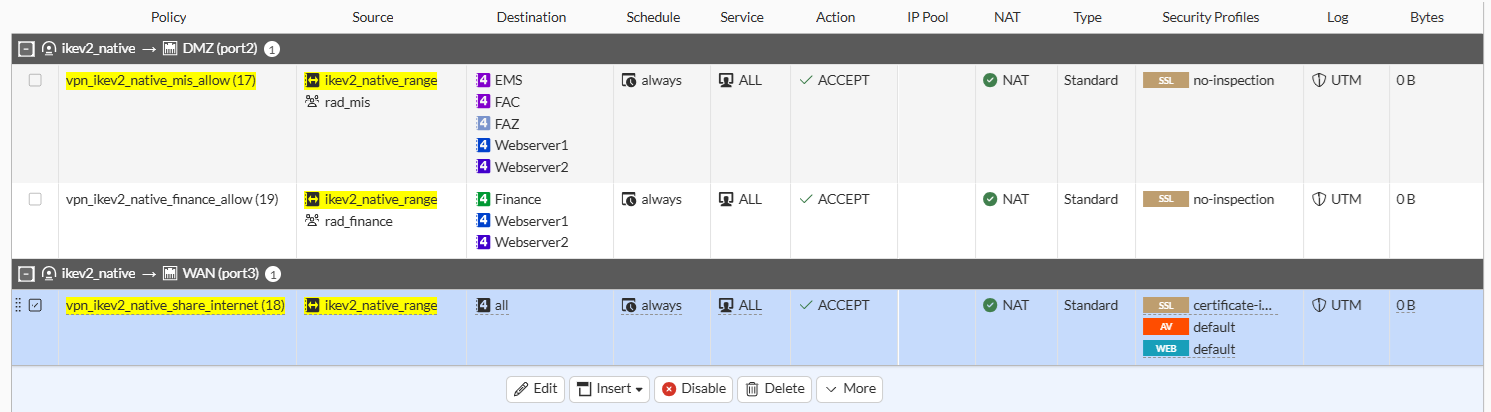
To configure the firewall policies in the GUI:
-
Go to Policy & Objects > Firewall Policy.
Two policies are configured by default for from the ikev2_native to local, and ikev2_native to Internet.
-
Edit the ikev2_native to local policy.
-
Set User/group to rad_mis.
-
Set Destination to specific servers accessible by MIS. For instance, EMS, FAZ, FAC, Webserver1 and Webserver2.
-
Click OK.
-
-
Copy and Paste the previous policy then click Edit.
-
Set the name to vpn_ikev2_native_finance_allow.
-
Change the User/group to rad_finance.
-
Set the Destination to specific servers accessible by MIS. For instance, Webserver1, Webserver2 and Finance.
-
Enable the policy.
-
Click OK.
-
-
Edit the ikev2_native to Internet policy to apply inspection that is appropriate for Internet traffic.
To review the configurations in CLI:
config vpn ipsec phase1-interface
    edit "VPN1"
        set type dynamic
        set interface "port1"
        set ike-version 2
        set authmethod signature
        set peertype any
        set net-device disable
        set mode-cfg enable
        set ipv4-dns-server1 192.168.1.100
        set proposal aes128-sha256 aes256-sha256 aes128-sha1
        set localid "vpn.lab.local"
        set dpd on-idle
        set dhgrp 14 5 2
        set eap enable
        set eap-identity send-request
        set certificate "vpn.lab.local"
        set ipv4-start-ip 10.58.58.1
        set ipv4-end-ip 10.58.58.10
        set ipv4-split-include "10/8_net"
        set dpd-retryinterval 60
    next
end
config vpn ipsec phase2-interface
    edit "VPN1"
        set phase1name "VPN1"
        set proposal aes128-sha256 aes256-sha256 aes128-sha1
        set pfs disable
        set keepalive enable
        set src-addr-type name
        set dst-addr-type name
        set src-name "all"
        set dst-name "all"
    next
end
Configure the Windows client
The configuration is done on a Windows 10 endpoint.
To add VPN connection and configure a VPN interface:
-
Open the Settings page and go to Network & Internet > VPN.
-
Click Add a VPN connection.
-
Configure the following:
VPN provider
Windows (built-in)
Connection name
vpn.lab.local
Server name or address
vpn.lab.local
VPN type
IKEv2
Type of sign-in info
Certificate
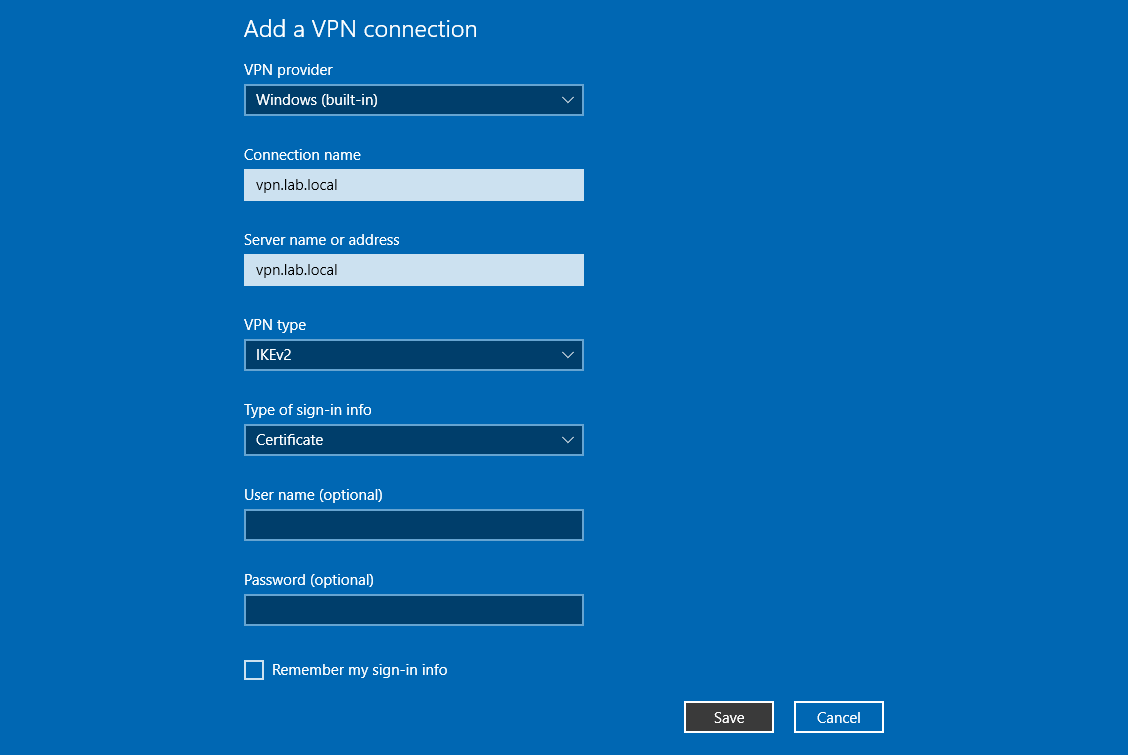
-
Click Save.
-
If you connected immediately but not all the certificates are in place or trusted, you may get an error like the following:
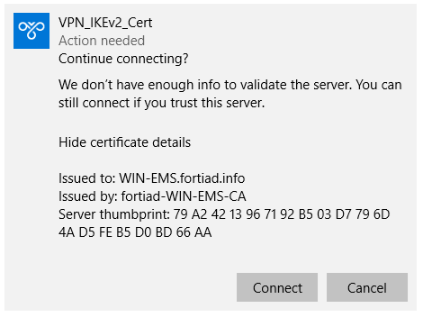
Click Connect to continue anyway.
-
To explicitly trust the signing CA, go to Network & Internet > Status and, under Advanced network settings, click Change adapter options.
-
Select the VPN connection then click Change settings of this connection, or right-click on the connection and select Properties:
-
Go to the Security tab and, in the Authentication section, click Properties.
-
Enable Verify the server's identity by validating the certificate.
-
Disable Connect to these servers.
-
In the Trusted Root Certificate Authorities list, select the CA fortiad-WIN-EMS-CA.
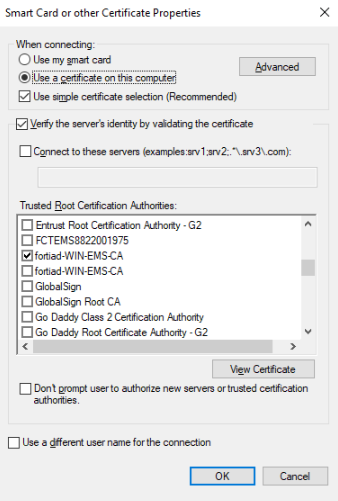
-
Click OK, then click OK again.
-
To test the connection:
-
Log in to the Windows endpoint as user1.
-
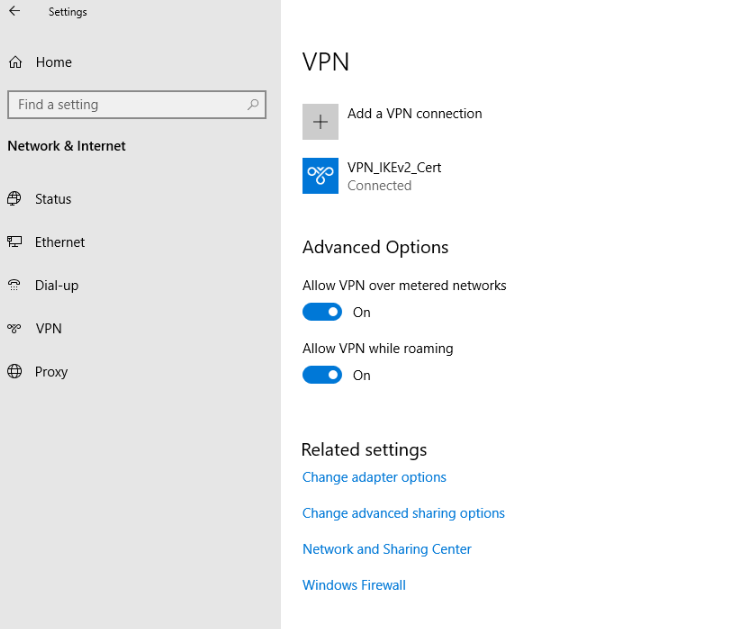
Open the network settings and connect to the VPN_IKEv2_Cert VPN.
-
In the Windows command prompt, use ipconfig /all to see the interface details:
C:\Users\tsmith.FORTIAD\Downloads>ipconfig /all Windows IP Configuration Host Name . . . . . . . . . . . . : WIN10-01 Primary Dns Suffix . . . . . . . : fortiad.info Node Type . . . . . . . . . . . . : Hybrid IP Routing Enabled. . . . . . . . : No WINS Proxy Enabled. . . . . . . . : No DNS Suffix Search List. . . . . . : fortiad.info … PPP adapter VPN_IKEv2_Cert: Connection-specific DNS Suffix . : Description . . . . . . . . . . . : VPN_IKEv2_Cert Physical Address. . . . . . . . . : DHCP Enabled. . . . . . . . . . . : No Autoconfiguration Enabled . . . . : Yes IPv4 Address. . . . . . . . . . . : 10.130.1.1 (Preferred) Subnet Mask . . . . . . . . . . . : 255.255.255.255 Default Gateway . . . . . . . . . : 0.0.0.0 DNS Servers . . . . . . . . . . . : 8.8.8.8 208.91.112.52 NetBIOS over Tcpip. . . . . . . . : Enabled -
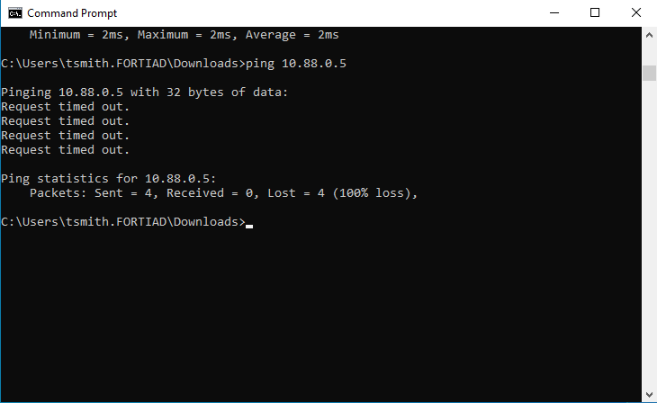
Pinging the internet and server should be successful.
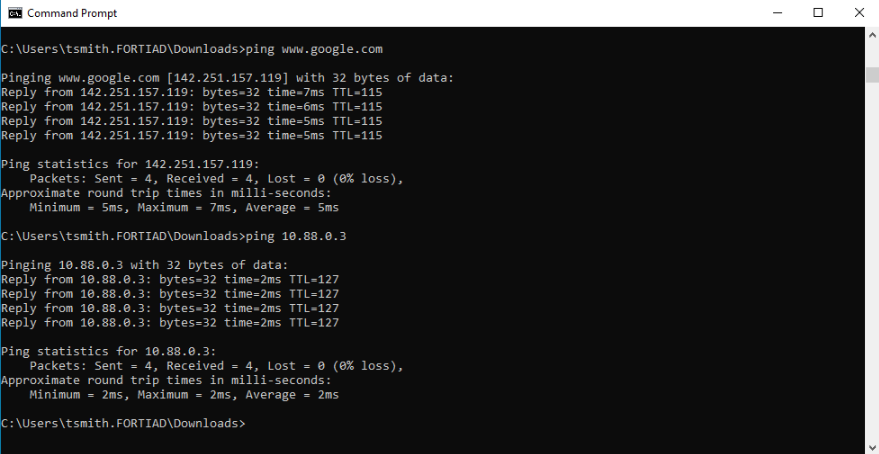
-
Pinging unauthorized devices should be unsuccessful.
-
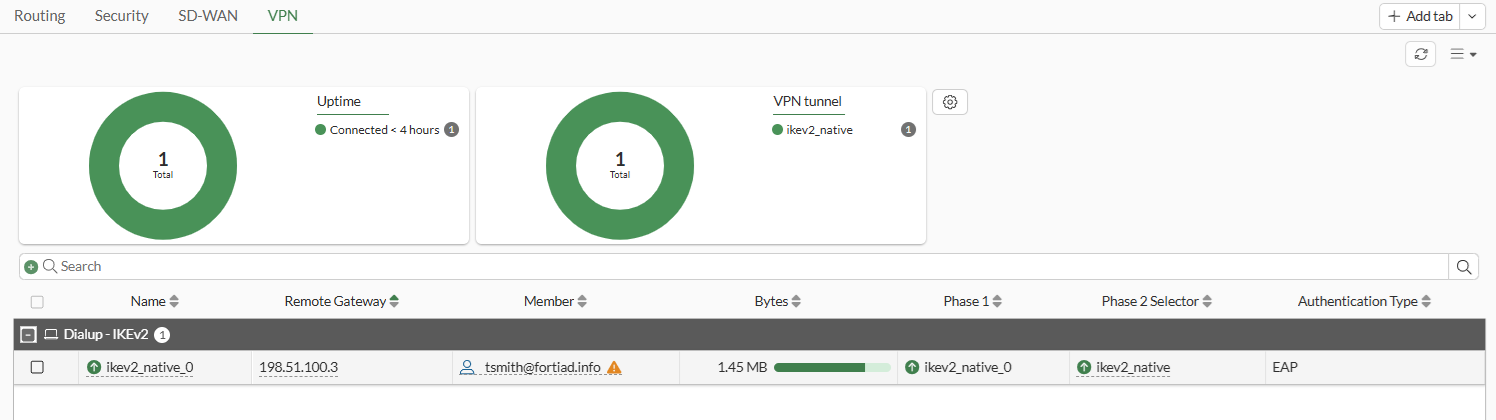
On the FortiGate, view the remote user on the Dashboard > Network Monitor > VPN page.
-
Go to the Command Palette (CTRL+P) > CLI Diagnostics. Search for vpn ike gateway and open the debug console. The outputs of the tunnel debugs are displayed.
vd: root/0
name: ikev2_native_0
version: 2
interface: port3 5
addr: 203.0.113.249:4500 -> 198.51.100.3:4500
tun_id: 10.130.1.1/::10.0.0.18
remote_location: 0.0.0.0
network-id: 0
transport: UDP
created: 4678s ago
eap-user: tsmith@fortiad.info
2FA: no
groups:
  rad_mis 9
assigned IPv4 address: 10.130.1.1/0.0.0.0
pending-queue: 0
PPK: no
IKE SA: created 1/1  established 1/1  time 80/80/80 ms
IPsec SA: created 1/2  established 2/2  time 0/0/0 ms

  id/spi: 6 020e1a72f1bf999a/e218cfa16a453939
  direction: responder
  status: established 4678-4678s ago = 80ms
  proposal: aes256-sha256
  child: no
  SK_ei: 7da383e491891e5d-d62d626f5acbe51d-8832e851c4f073ea-87789a94fde89285
  SK_er: 1f47117a7826662b-ee20090c11fa947a-6688c2ee7a2aa15e-19de24909f48cda6
  SK_ai: 9e7b3ee3b514acab-702ebb53eba7495a-7c82f9dcf03c8cb3-9968d852aca1ddbf
  SK_ar: 9cd8ac3ac823e4ab-a641c7ce3610ba72-403e39f1e17a25a7-1029eb2b51c49d4a
  PPK: no
  message-id sent/recv: 25/11
  QKD: no
  PQC-KEM (IKE): no
  PQC-KEM (all IPsec): no
  lifetime/rekey: 86400/81451
  DPD sent/recv: 00000019/00000019
-
Running real-time debugs shows the negotiations as the tunnel comes up.
# diagnose debug application ike -1
Debug messages will be on for 30 minutes.

# diagnose debug application fnbamd -1
Debug messages will be on for 30 minutes.

# diagnose debug enable

# ike V=root:0: udp comes 198.51.100.3:500->203.0.113.249:500,ifindex=5,vrf=0,len=1104....
…
ike V=root:0:1b7426f242a51912/0000000000000000:7: SA proposal chosen, matched gateway ikev2_native
ike V=root:0:ikev2_native:ikev2_native: created connection: 0x55f5098c82f0 5 203.0.113.249->198.51.100.3:500.
ike V=root:0:ikev2_native:7: processing notify type NAT_DETECTION_SOURCE_IP
ike V=root:0:ikev2_native:7: processing NAT-D payload
ike V=root:0:ikev2_native:7: NAT not detected
ike V=root:0:ikev2_native:7: process NAT-D
ike V=root:0:ikev2_native:7: processing notify type NAT_DETECTION_DESTINATION_IP
ike V=root:0:ikev2_native:7: processing NAT-D payload
ike V=root:0:ikev2_native:7: NAT not detected
ike V=root:0:ikev2_native:7: process NAT-D
ike V=root:0:ikev2_native:7: processing notify type FRAGMENTATION_SUPPORTED
ike V=root:0:ikev2_native:7: responder preparing SA_INIT msg
ike V=root:0:ikev2_native:7: create NAT-D hash local 203.0.113.249/500 remote 198.51.100.3/500
ike V=root:0:ikev2_native:7: sending CERTREQ payload (len=21)
…
ike V=root:0:ikev2_native:7: sent IKE msg (SA_INIT_RESPONSE): 203.0.113.249:500->198.51.100.3:500, len=341, vrf=0, id=1b7426f242a51912/63966ac9bbf0227d, oif=5
…
ike V=root:0: IKEv2 exchange=AUTH
…
ike V=root:0:ikev2_native:7: reassembled fragmented message
ike V=root:0:ikev2_native:7: responder received AUTH msg
ike V=root:0:ikev2_native:7: processing notify type MOBIKE_SUPPORTED
ike V=root:0:ikev2_native:7: peer identifier IPV4_ADDR 198.51.100.3
ike V=root:0:ikev2_native:7: eap-peer=yes
ike V=root:0:ikev2_native:7: re-validate gw ID
ike V=root:0:ikev2_native:7: gw validation OK
ike V=root:0:ikev2_native:7: received peer certreq '0D905DFB98916D025BF658D03BF82C3C1F399EFD'
…
ike V=root:0:ikev2_native:7: responder preparing EAP identity request
ike V=root:0:ikev2_native:7: local cert, subject='vpn.fortiad.local', issuer='fortiad-WIN-EMS-CA'
ike V=root:0:ikev2_native:7: local CA cert, subject='fortiad-WIN-EMS-CA', issuer='fortiad-WIN-EMS-CA'
ike V=root:0:ikev2_native:7: splitting payload len=2759 into 3 fragments
…
ike V=root:0:ikev2_native:7: sent IKE msg (AUTH_RESPONSE): 203.0.113.249:4500->198.51.100.3:4500, len=1124, vrf=0, id=1b7426f242a51912/63966ac9bbf0227d:00000001, oif=5
…
ike V=root:0:ikev2_native:7: responder received EAP msg
ike V=root:0:ikev2_native:7: send EAP message to FNBAM
ike V=root:0:ikev2_native:7: initiating EAP authentication
ike V=root:0:ikev2_native: EAP user "tsmith@fortiad.info"
ike V=root:0:ikev2_native: auth candidate group 'rad_mis' 9
ike V=root:0:ikev2_native: auth candidate group 'rad_finance' 10
…
ike V=root:0:ikev2_native:7 EAP 128797701255176 result FNBAM_CHALLENGED
ike V=root:0:ikev2_native: EAP challenged for user "tsmith@fortiad.info"
ike V=root:0:ikev2_native:7: responder preparing EAP pass through message
…
[672] __group_match-Use 'tsmith@fortiad.info' for user group matching.
[710] __group_match-Check if win-10.88.0.1 is a group member
[716] __group_match-Group 'rad_mis' passed group matching
[719] __group_match-Add matched group 'rad_mis'(9)
[710] __group_match-Check if win-10.88.0.1 is a group member
[269] find_matched_usr_grps-Passed group matching
[1012] update_auth_token_session-config does not require 2fa
[357] fnbamd_comm_send_result-Sending result 0 (nid 0) for req 128797701255176, len=2838
[2048] handle_child_rsp-Auth rsp 128797701255176, session created, line 36
ike V=root:0:ikev2_native:7 EAP 128797701255176 result FNBAM_SUCCESS
ike V=root:0:ikev2_native: user 'tsmith@fortiad.info' authenticated group 'rad_mis' 9
ike V=root:0:ikev2_native:7: responder preparing EAP pass through message
…
ike V=root:0:ikev2_native:7: responder received AUTH msg
ike V=root:0:ikev2_native:7: peer identifier IPV4_ADDR 198.51.100.3
ike V=root:0:ikev2_native:7: eap-peer=yes
ike V=root:0:ikev2_native:7: auth verify done
ike V=root:0:ikev2_native:7: responder AUTH continuation
ike V=root:0:ikev2_native:7: authentication succeeded
ike V=root:0:ikev2_native:7: responder creating new child
ike V=root:0:ikev2_native:7: mode-cfg type 1 request 0:''
ike V=root:0:ikev2_native: mode-cfg allocate 10.130.1.1/0.0.0.0
ike V=root:0:ikev2_native:7: mode-cfg using allocated IPv4 10.130.1.1
…
ike V=root:0:ikev2_native:7:ikev2_native:38: comparing selectors
ike V=root:0:ikev2_native:7:ikev2_native:38: matched by rfc-rule-3
ike V=root:0:ikev2_native:7:ikev2_native:38: phase2 matched by subset
ike V=root:0:ikev2_native:7:ikev2_native:38: using mode-cfg override 0:10.130.1.1-10.130.1.1:0
…
ike V=root:0:ikev2_native_0:7:ikev2_native:38: added IPsec SA: SPIs=e996330c/449bb83a
ike V=root:0:ikev2_native_0:7:ikev2_native:38: sending SNMP tunnel UP trap
ike V=root:0:ikev2_native_0: tunnel up event assigned address 10.130.1.1
ike V=root:0:ikev2_native_0: user 'tsmith@fortiad.info' 10.130.1.1 groups 1
Configure the Windows server
The Windows server includes AD-CS, a RADIUS server, and a DNS server.
After the AD CS role has been installed and configured, the CA is ready to sign certificates.
Users and groups are defined first. The groups are configured to automatically receive certificates and relay membership to the FortiGate for granular access control through group matching in policies.
RADIUS is used to authorize connecting users. The RADIUS server returns users' groups with the access-accept response, to indicate to the FortiGate what groups the users belong to.
To create a certificate template to enable automatic enrollment for the user groups:
-
Open Certification Authority.
-
In the navigation pane, expand the new CA, right-click Certificate Template and click Manage.
-
Configure a new certificate template:
-
Right-click the User template and click Duplicate Template.
-
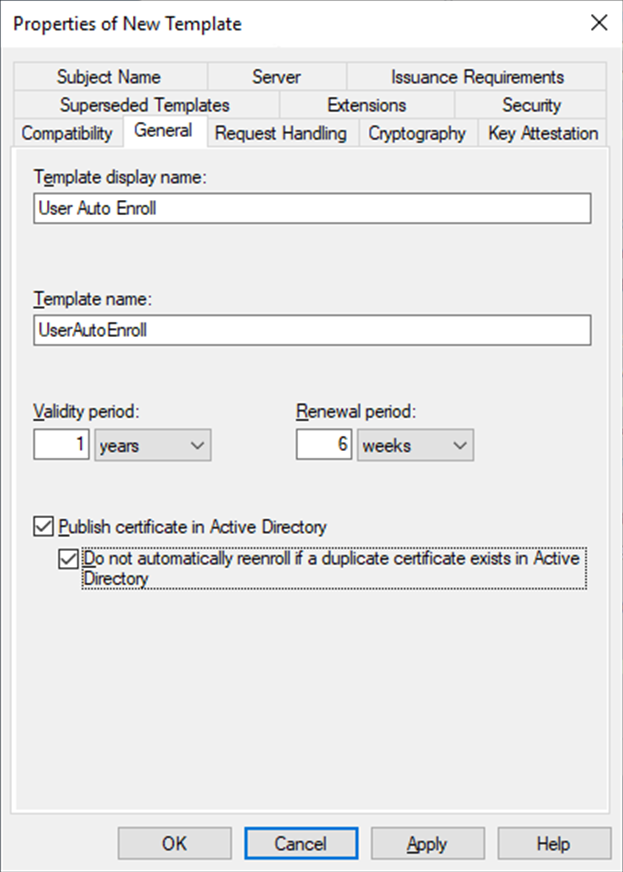
On the General tab, enter a Template display name, such as User Auto Enroll.
-
Enable Publish certificate in Active Directory and Do not automatically reenroll....
-
Configure the remaining settings as required, then go to the Request Handling tab.
-
Disable Allow private key to be exported and select Enroll subject without requiring any user input.
-
On the Security tab, in Group or user name, click Add.
-
Add AD groups where users needs to enroll.
-
Select each group and, under Permissions, enable Read, Enroll, and Autoenroll.
-
On the Extensions tab, click Application Policies then click Edit.
-
Remove all of the policies expect for Client Authentication.
-
Click OK then close the Certificate Templates console.
-
-
In the navigation pane, right-click Certificate Template and click New > Certificate Template to Issue.
-
Select the new certificate template, User Auto Enroll, then click OK.
To create a group policy to enable automatic enrollment:
-
Open the Group Policy Management console.
-
In the navigation pane, go to Forest:fortiad.info > Domains > fortiad.info, and then click Group Policy Objects.
-
Click Action, and then click New.
-
Set a Name for the new GPO then click OK.
-
Right-click the new GPO and click Edit.
-
In the Group Policy Management Editor navigation pane, go to User configuration > Policies > Windows Settings > Security Settings > Public Key Policies.
-
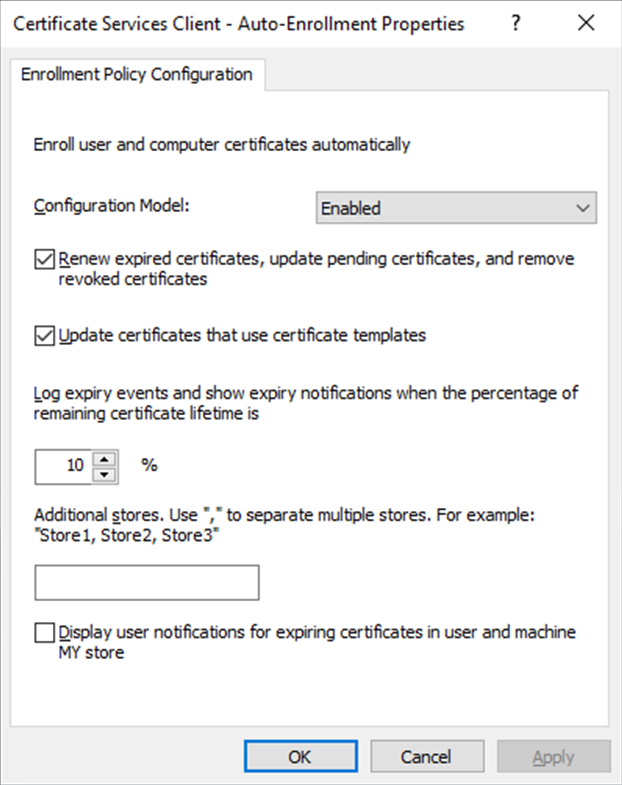
In the content pane, double-click Certificate Services Client - Auto-Enrollment.
-
Set Configuration Model to Enabled.
-
Enable Renew expired certificates... and Update certificates....
-
Click OK.
To verify that users are receiving certificates:
-
Log into an endpoint with a domain user.
-
On the server, open Certification Authority.
-
Expand the CA and select Issued Certificates.
-
Verify that the user logged into the endpoint is listed under Requested Name. You can also check the local user certificate store on the endpoint.
To generate and sign a CSR and import the signed certificate to the FortiGate:
-
On the FortiGate and go to System > Certificates and click Create/Import > Generate CSR.
-
Configure the CSR:
Field
Value
Certificate Name
vpn.fortiad.local
ID Type
Domain Name
Domain Name
vpn.fortiad.local
Subject Alternative Name
DNS:vpn.fortiad.local
-
Configure the remaining settings as required, then click OK.
-
Download the CSR to a location that is accessible to the CA server.
-
Sign the CSR with the previously created CA:
-
Open the command prompt as an administrator and enter the following:
certreq -submit -attrib "CertificateTemplate:WebServer" C:\CSR\vpn.fortiad.local.csr
The Certification Authority List window opens.
-
Select the CA and click OK.
-
Save the signed certificate with a .cer file extension to a location that is accessible from the FortiGate.
-
-
Import the signed certificate to the FortiGate:
-
On the FortiGate, go to System > Certificates and click Create/Import > Certificate.
-
Click Import Certificate.
-
Set Type to Local Certificate.
-
Click Upload and locate and select the signed certificate
-
Click Create then click OK.
-
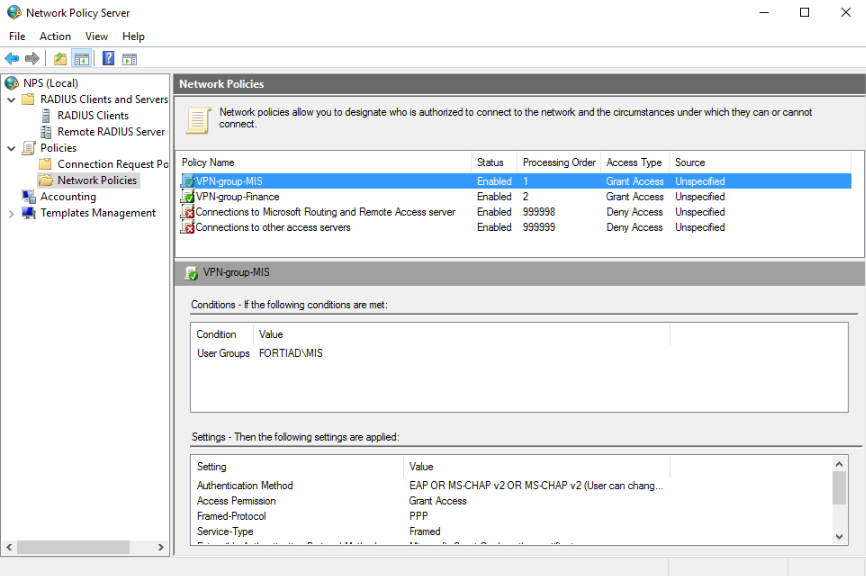
To configure network policies on the RADIUS server:
-
Open the Network Policy Server and, in the console tree, expand Policies.
-
Right-click on Network Policies and click New.
-
Enter a Policy name, such as VPN-group-MIS, then click Next.
-
Under Condition description click Add:
-
Select User Groups, then click Add.
-
Click Add Groups.
-
Enter the group name, MIS, click Check Names to confirm the group.
-
Click OK in both windows.
-
-
Click Next.
-
Make sure that Access granted is selected, then click Next.
-
On the Configure Authentication Methods page, click Add and add the EAP type Microsoft: Smart Care or other certificate.
-
Edit the EAP type, select the previously generated certificate, then click OK.
-
Deselect all of the Less secure authentication methods then click Next.
-
Configure constraints as needed, then click Next.
-
On the Configure Settings page, under RADIUS Attributes, select Vendor Specific, then click Add:
-
In the Attributes list, select Vendor-Specific, then click Add.
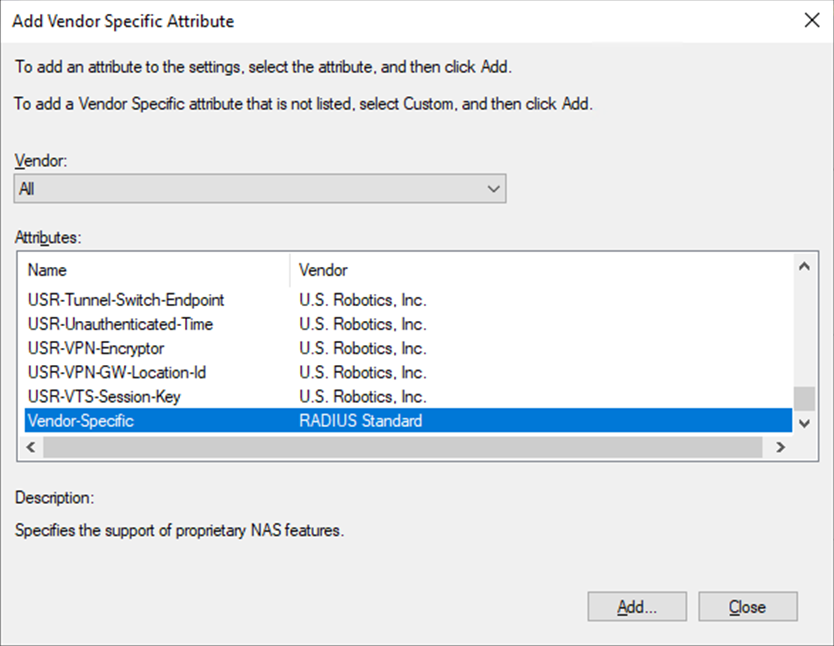
-
In the Attribute Information window, click Add.
-
In the Vendor-Specific Attribute Information window, enter the Vendor Code, 12356, and select Yes. It conforms.
-
Click Configure Attribute and configure the following:
Field
Value
Vendor-assigned attribute number
1
Attribute format
String
Attribute value
<Group Name returned to FortiGate>

-
Click OK on all three windows and on the Add Vendor Specific Attribute window click Close.
-
-
Click Next.
-
On the Completing New Network Policy page, review the configuration, then click Finish.
-
Duplicate the policy for Finance, and call the new policy VPN-group-Finance.
-
Reorder the policies so that the two groups are one and two in the processing order.
To add the FortiGate as a RADIUS client:
-
Open the Network Policy Server and, in the console tree, expand RADIUS Clients and Servers.
-
Right-click on RADIUS Clients and click New.
-
Add the FortiGate as a RADIUS client:
Field
Value
Friendly name
FGT
Address
10.88.0.254
Shared Secret
Manually enter the shared secret.
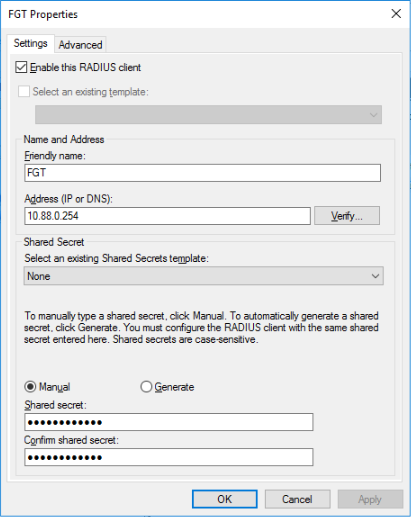
-
Click OK.
To create a DNS entry for the VPN connection:
-
Open the DNS Manager.
-
Go to DC > Forward Lookup Zones and select lab.local.
-
Right click in the content pane and select New Host (A or AAAA).
-
Enter the VPN name. The FQDN should be auto-filled with vpn.fortiad.local.
-
Enter an IP address (203.0.113.249).
-
Click Add Host.