
IPAM firewall address New
IPAM traditionally manages IP assignments directly on FortiGate interfaces by automatically configuring its IP, subnet, and DHCP based on network sizes. With this feature, IPAM can manage IP pools for a Firewall Address object. IPAM type firewall addresses in turn can be configured on VPN gateways for automatic IP range allocation to VPN clients. This allows centralized IP management and traffic control across distributed subnets, improving scalability and operational efficiency.
FortiGate also supports per-device subnet allocation for Fabric object firewall addresses that use IPAM. The ipam-allocate-unique option can be enabled for firewall address objects configured with type ipam and fabric-object enable. When enabled, each FortiGate in the Security Fabric receives a unique subnet allocation from IPAM instead of inheriting the same subnet through CSF synchronization.
This feature allows greater flexibility in multi-device deployments where shared IPAM addresses across all FortiGates are not desirable.
config firewall address
    edit "ipam"
        set type ipam
        set fabric-object enable
        set subnet 192.168.0.0 255.255.255.0
        set ipam-allocate-unique enable
    next
end
Example
In this example, we have 2 IP range allocation on IPAM. One range will be dedicated to address objects with a name starting with VPN. The other range will be assigned to other address objects.
To configure an IPAM firewall address in the GUI:
-
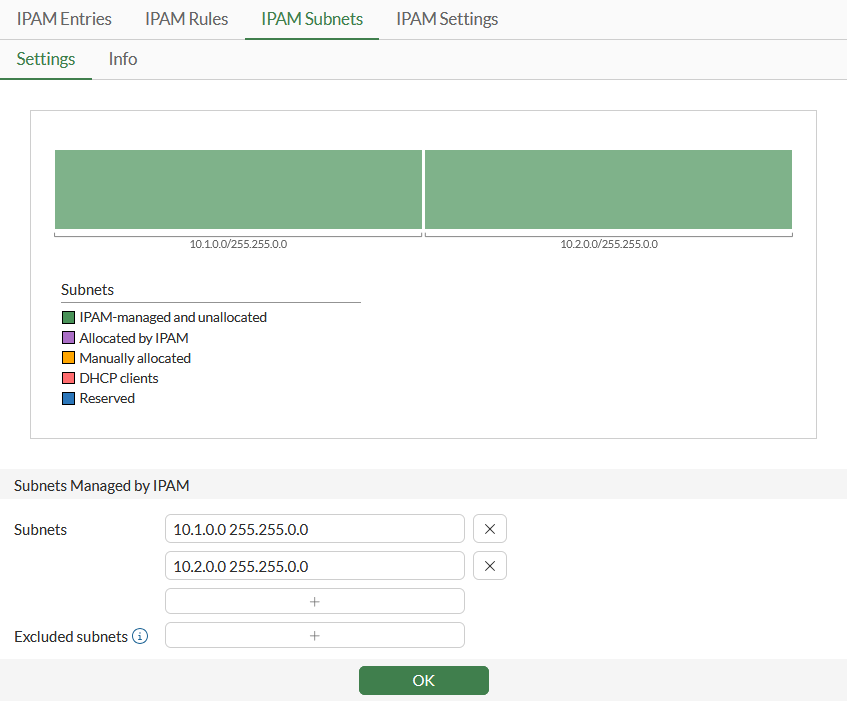
Enable IPAM and create 2 IPAM subnets:
-
Go to Network > IPAM > IPAM Settings.
-
Set Status to Enable then click OK.
-
Go to Network > IPAM > IPAM Subnets.
-
Create 2 subnets 10.1.0.0 255.255.0.0 and 10.2.0.0 255.255.0.0.
-
Click OK.
-
-
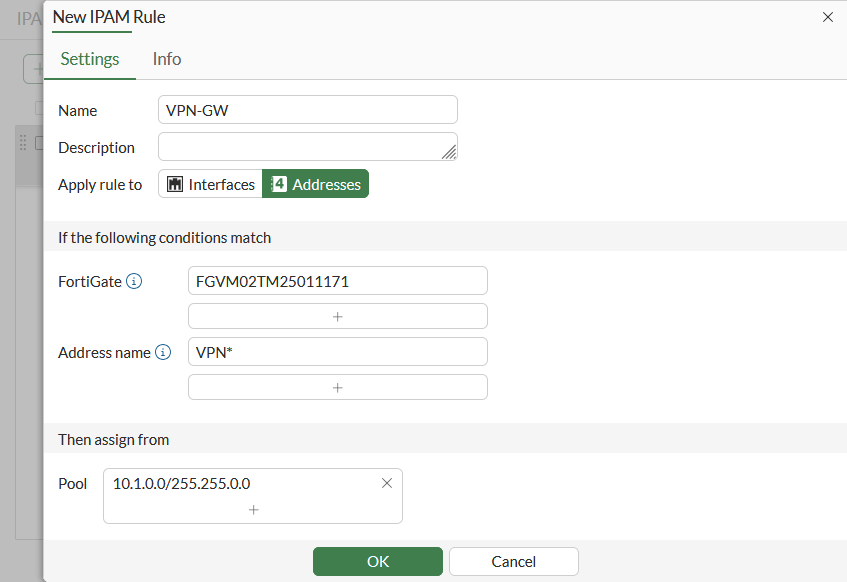
Create an IPAM rule for VPN firewall addresses:
-
Go to Network > IPAM > IPAM Rules and click Create new.
-
Enter a name for the rule.
-
Set Apply rule to to Addresses.
-
Set Address Name to the wildcard VPN*.
-
For the Pool, select the first subnet pool.
-
Click OK.
-
-
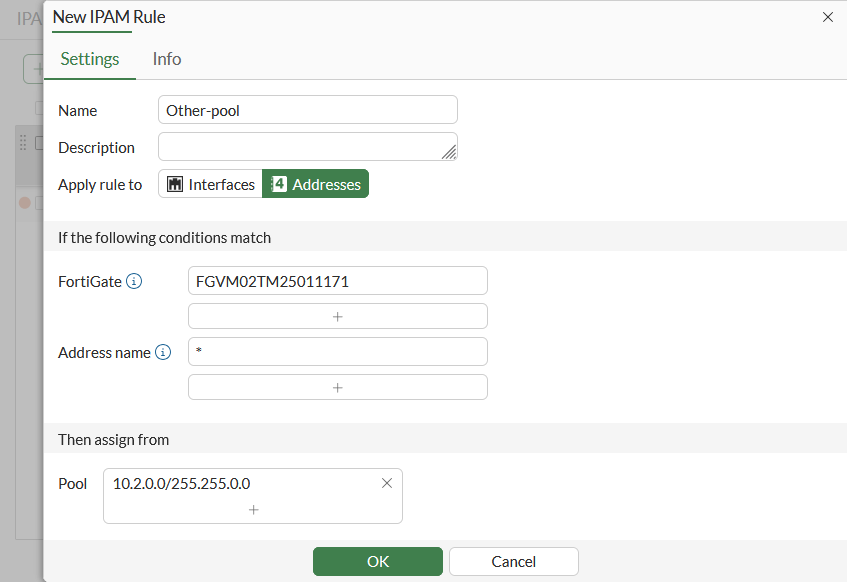
Create another IPAM rule for other firewall addresses, when Address name matches *, and assign the second address pool, 10.2.0.0/255.255.0.0.
-
Create a firewall address with the IPAM type that starts with VPN:
-
Go to Policy & Objects > Addresses and click Create new.
-
Enter a name for the address, such as VPN-pool1.
-
Set Type to IPAM.
-
Choose a Network size.
-
Configure the remaining settings as needed.

-
Click OK.
IPAM will start to allocate an address in the range 10.1.0.0/16.
-
-
Create a firewall address with the IPAM type that starts with another prefix.

-
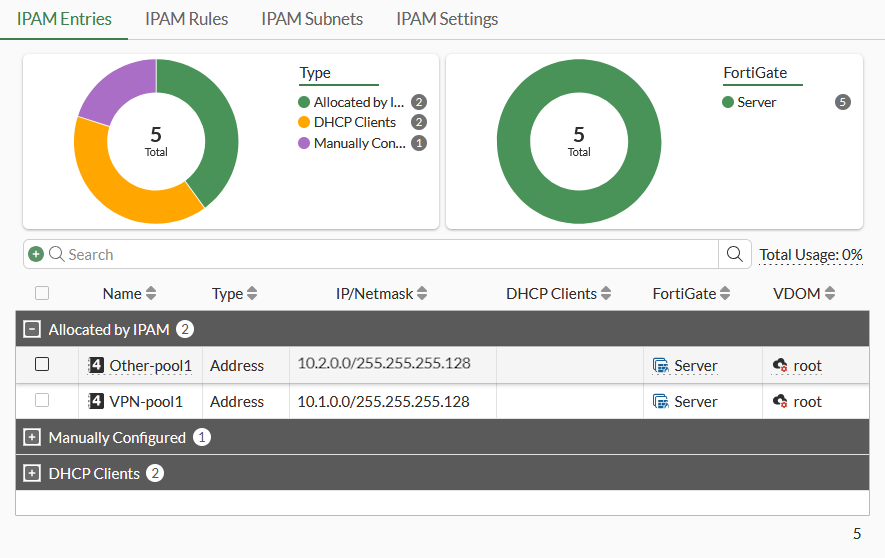
Go to Network > IPAM > IPAM Entries. As the address is managed by IPAM, it is listed on the IPAM Entries tab.
-
Check the IPAM assignments from the CLI as well.
To configure an IPAM firewall address in the CLI:
-
Create an IPAM rule for firewall addresses:
config system ipam set status enable set manage-lan-addresses disable set manage-lan-extension-addresses disable set manage-ssid-addresses disable config pools edit "1" set subnet 10.1.0.0 255.255.0.0 next edit "2" set subnet 10.2.0.0 255.255.0.0 next end config rules edit "VPN-GW" set item-type address set item-name "VPN*" set device "FGVM02TM25XXXXXX" set vdom "*" set pool "1" next edit "Other-pool" set item-type address set item-name "*" set device "FGVM02TM25XXXXXX" set vdom "*" set pool "2" next end end -
Create a firewall address with the IPAM type:
config firewall address edit "VPN-pool1" set type ipam set color 17 set managed-subnetwork-size 128 next edit "Other-pool1" set type ipam set managed-subnetwork-size 128 next end -
Check that the IPAM type firewall address is managed by the IPAM sever:
# diagnose sys ipam list entries
Entries: (sn, vdom, item-type, item, subnet/mask, conflict)

  IPAM Entries:
  FGVM02TM25011171 root firewall.address Other-pool1 10.2.0.0/25
  FGVM02TM25011171 root firewall.address VPN-pool1 10.1.0.0/25