
Add LDAP user authentication
This configuration adds LDAP user authentication to the FortiClient dialup VPN configuration (FortiClient as dialup client). You must have already generated and exported a CA certificate from your AD server.
Since IPsec uses IKEv2 by default, the FortiClient must utilize EAP-TTLS for authenticating against the FortiGate and the LDAPS authentication server. This requires FortiClient running 7.4.3 or later, and configurations synchronized from FortiClient EMS.
This example demonstrates the EMS configurations needed to configure the Remote Access profile.
For a complete end-to-end configuration with options to configure VPN over TCP, see LDAP authentication with TCP as transport.
To configure LDAP user authentication using the GUI:
-
Import the CA certificate into FortiGate:
-
Go to System > Certificates.
If the Certificates option is not visible, enable it in Feature Visibility. See Feature visibility for details.
-
Click Import > CA Certificate.
-
Set Type to File.
-
Click Upload then find and select the certificate file.
-
Click OK.
The CA certificate now appears in the list of External CA Certificates. In this example, it is called CA_Cert_1.
-
Optionally, rename the system generated CA_Cert_1 to something more descriptive:
config vpn certificate ca
    rename CA_Cert_1 to LDAPS-CA
end
-
-
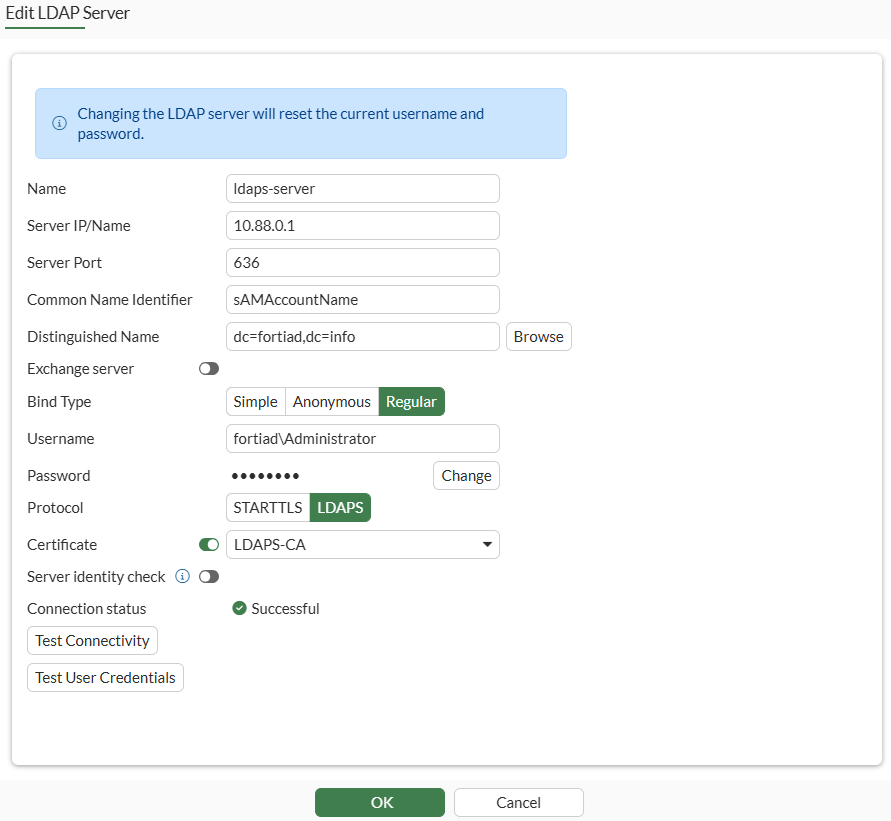
Configure the LDAP user:
-
Go to User & Authentication > LDAP Servers and click Create New.
-
Set Name to ldaps-server and specify Server IP/Name.
-
Specify Common Name Identifier and Distinguished Name.
-
Set Bind Type to Regular.
-
Specify Username and Password.
-
Set Protocol to LDAPS.
-
Enable Certificate and select LDAPS-CA from the list.
-
Optionally, enable Server identity check if you need to verify the server domain name/IP address against the server certificate.
-
Click Test Connectivity. The Connection status should change to Successful.
-
Click OK.
-
-
Add the LDAP user to the user group:
-
Go to User & Authentication > User Groups and edit the vpngroup group.
-
In Remote Groups, click Add to add the ldaps-server remote server.
-
Click OK.
-
To configure LDAP user authentication using the CLI:
-
Import the CA certificate using the GUI.
-
Configure the LDAP user:
config user ldap edit "ldaps-server" set server "10.88.0.1" set server-identity-check disable set cnid "sAMAccountName" set dn "dc=fortiad,dc=info" set type regular set username "fortiad\\Administrator" set password ENC ********** set secure ldaps set ca-cert "LDAPS-CA" set port 636 next end -
Add the LDAP user to the user group:
config user group
    edit "vpngroup"
        append member "ldaps-server"
    next
end
To configure the Remote Access profile from EMS:
-
On FortiClient EMS, navigate to Endpoint Profiles > Remote Access and click Edit on the Default endpoint profile.
-
Under VPN Tunnels, click Add Tunnel.
-
Set VPN type as Manual.
-
Click Next.
-
Under Basic Settings, enter the following:
Field
Value
Name
Corp_remote
Remote Gateway
203.0.113.249
Authentication Method
Pre-shared Key
Pre-Shared Key
Enter pre-shared key that was configured on FortiGate’s dialup VPN configuration.
Prompt for Username
Enabled
-
Click VPN Settings, enter the following:
Field
Value
IKE
Version 2
Address Assignment
Mode Config
Encapsulation
IKE UDP Port
IKE TCP Port
500
-
Click Phase 1, enter the following details:
Field
Value
IKE Proposal
Encryption, Authentication
AES128, SHA256
Encryption, Authentication
AES256, SHA256
DH Groups
20, 21
Key Life
86400
EAP Authentication Method
EAP-TTLS
Dead Peer Detection
Enable
NAT Traversal
Enable
-
Click Phase 2, enter the following details:
Field
Value
IKE Proposal
Encryption, Authentication
AES128, SHA256
Encryption, Authentication
AES256, SHA256
DH Groups
20
Key Life
43200
Enable Replay Detection
Enable
Enable Perfect Forward Secrecy (PFS)
Enable
-
Click Save to save the VPN Tunnel configuration.
-
Click Save to save Remote Access endpoint profile.
To verify the connection:
-
On the FortiClient, go to Remote Access and find the VPN tunnel Corp_remote to connect.
-
Click Connect.
-
When prompted, enter the LDAP username and password.
-
Once connected, go to the FortiGate > Dashboard > Network Monitor > VPN.
The LDAP user will be shown in the Member column:

-
In the debug command
diagnose vpn ike gateway list, theeap-userfield displays the LDAP user name:# diagnose vpn ike gateway list vd: root/0 name: remote_vpn_0 version: 2 interface: port3 5 addr: 203.0.113.249:4500 -> 198.51.100.2:58861 tun_id: 10.10.2.1/::10.0.0.6 remote_location: 0.0.0.0 network-id: 0 transport: UDP created: 1048s ago eap-user: tsmith 2FA: no peer-id: 198.51.100.2 peer-id-auth: no FortiClient UID: 9A016B5A6E914B42AD4168C066EB04CA assigned IPv4 address: 10.10.2.1/255.255.255.255