Custom tags NEW
Custom tags can be created and applied to various address types, address groups, and policy types. This helps administrators organize their addresses and policies, quickly visualize the category, and easily filter based on the assigned tags when many addresses and policies are configured.
The following objects can have custom tags assigned:
-
Firewall address and address groups (IPv4 and IPv6)
-
Proxy address and address groups
-
Multicast addresses (IPv4 and IPv6)
-
Firewall policy
-
NGFW security policy
-
Multicast policy
-
DoS policy
-
Local-in policy
-
Central SNAT mapping
-
Proxy policy
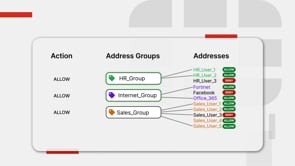
When address groups use custom tags as group members, they are called dynamic tag address groups. You can define more address objects for the tag associated with the address group for the firewall policy to automatically use the new address objects. No changes to the firewall policy are required.
Custom tags have tablesize limits. Refer to the Max Values table for exact size limits.
CLI syntax
Options are available to create custom tags:
config firewall custom-tag
    edit <tag name>
        set abbreviation <string>
        set comment <string>
        set color <integer>
    next
end
|
Command |
Descriptions |
|---|---|
|
abbreviation <string> |
Custom tag name abbreviation. Maximum of four uppercase letters and numbers. |
|
comment <string> |
Comment. |
|
color <integer> |
Color of the custom tag on the GUI (0 to 32, default = 1). |
To apply the tag to an address or policy:
config firewall address
    edit "taggedAddress"
        set custom-tags <tag> [tag]
    next
end
config firewall policy
edit <ID>
set custom-tags <tag> [tags]
next
end
Options are available to create dynamic tag address groups with tags as group members:
config firewall addrgrp
    edit <name>
        set type {default | folder | dynamic-tag}
        set custom-tags <string>
    next
end
|
Command |
Descriptions |
|---|---|
|
type {default | folder | dynamic-tag} |
Type of address group:
|
|
custom-tags <string> |
Name of the custom tag. Available when |
GUI
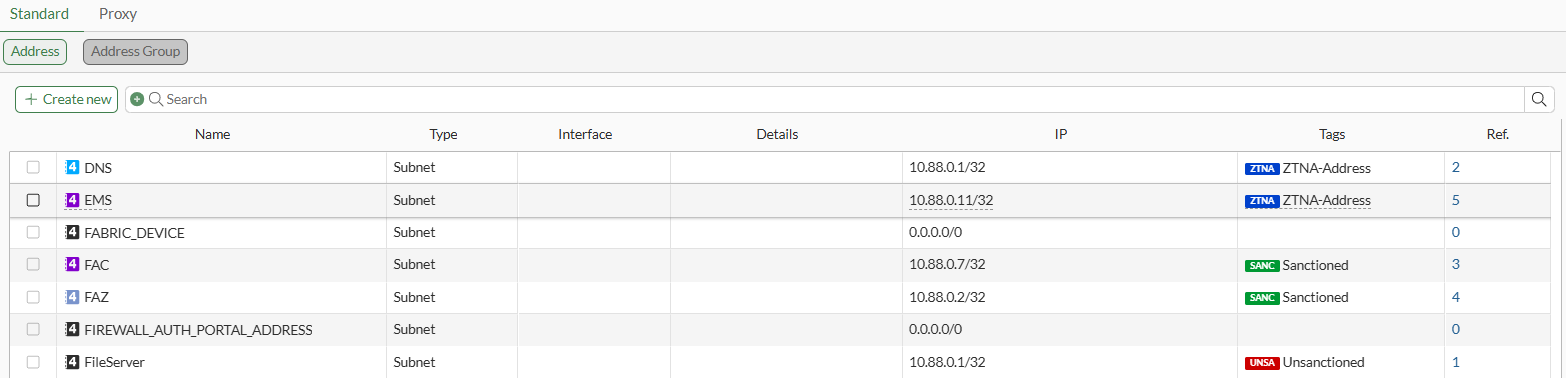
Custom tags can be configured from Policy & Objects > Tags.
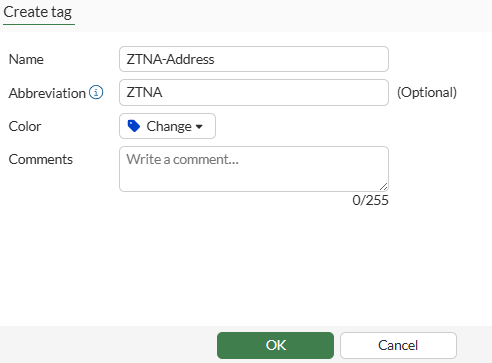
The abbreviation can be up to three uppercase letters and numbers.
In address groups, set Type to Dynamic tag to select one or more tags:
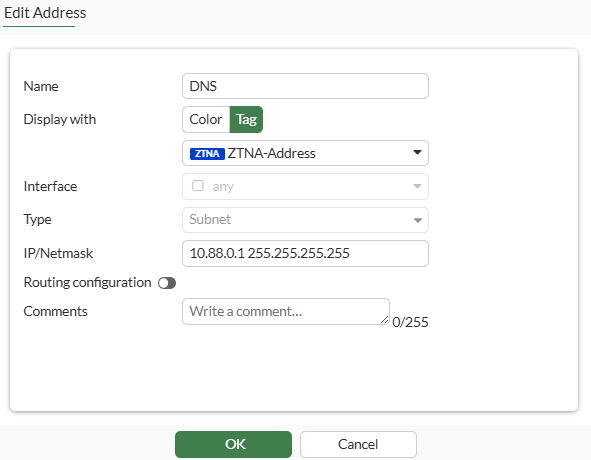
When All tags or First tag only is chosen as the display, the tag is shown as opposed to the default colored icon in the Address objects page for that particular object.
Policy Tagging is not enabled by default and must be enabled in Feature Visibility. Once enabled, a tag can be applied to the policy.
Tags are visible in the Policy list page and can be filtered in the Search bar.
Display changes slightly when multiple object tags are used. Use the Tags column to view the assigned tags.
Example
This example describes how to create two custom tags, associate the custom tags with address objects, and configure dynamic tag address groups. Dynamic tag address groups use tag names as group members instead of object names. The firewall policy is configured to use the dynamic tag address groups to allow traffic from PC1 to PC5.
The following items are created:
-
Two custom tags:
-
pc1_tag
-
pc5_tag
-
-
Two address objects:
-
pc1 assigned the pc1_tag
-
pc5 assigned the pc5_tag
-
-
Two dynamic tag address groups:
-
pc1_grp assigned the pc1_tag
-
pc5_grp assigned the pc5_tag
-
The firewall policy is configured to use the dynamic tag address groups (pc1_grp and pc5_grp) to allow traffic from PC1 to PC5.
When you add more address objects with tags, the tags are used to automatically update the dynamic tag address group used by the firewall policy. No changes are required on the associated firewall policy.
For example, you could create more address objects assigned the pc1_tag for the firewall policy to automatically use the address objects for the pc1_grp, which is configured to use address objects assigned the pc1_tag.
To create dynamic tag address groups in the GUI:
-
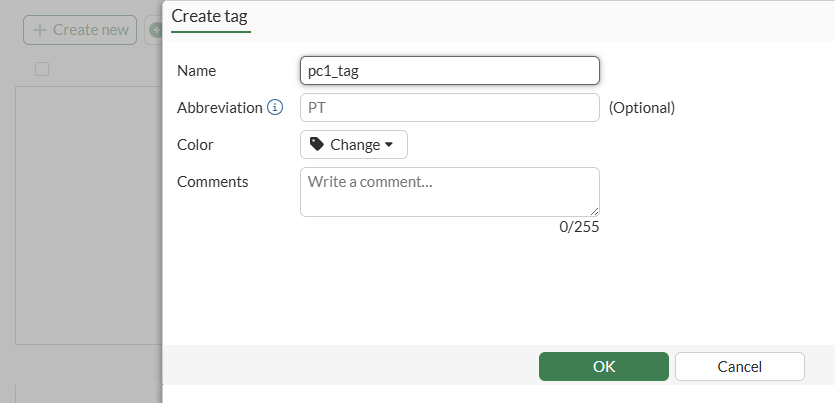
Create two custom tags:
-
Go to Policy & Objects > Tags.
-
Click Create new.
-
Enter a Name, such as pc1_tag.
-
Click OK.
-
Repeat this procedure to create another custom tag named pc5_tag.
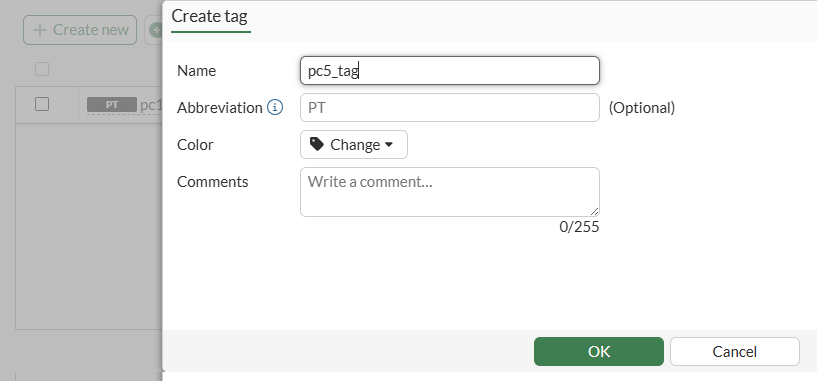
Two custom tags are available: pc1_tag and pc5.
-
-
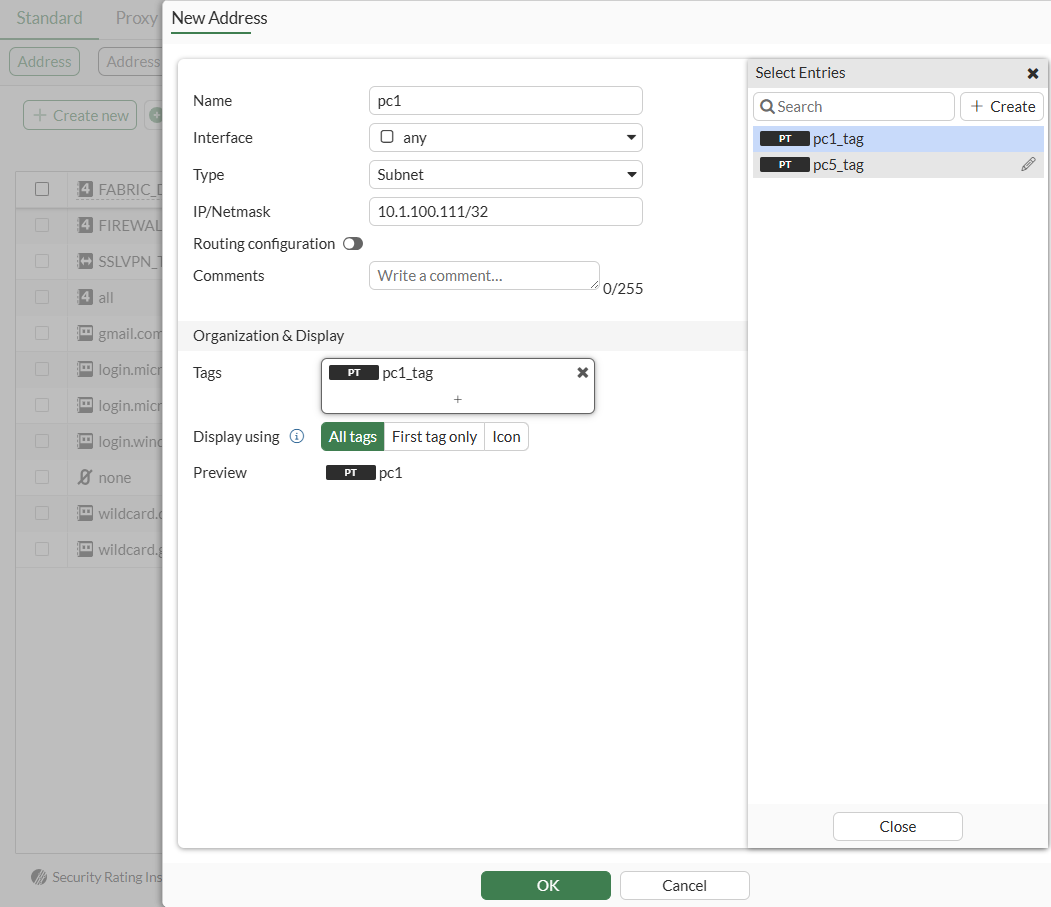
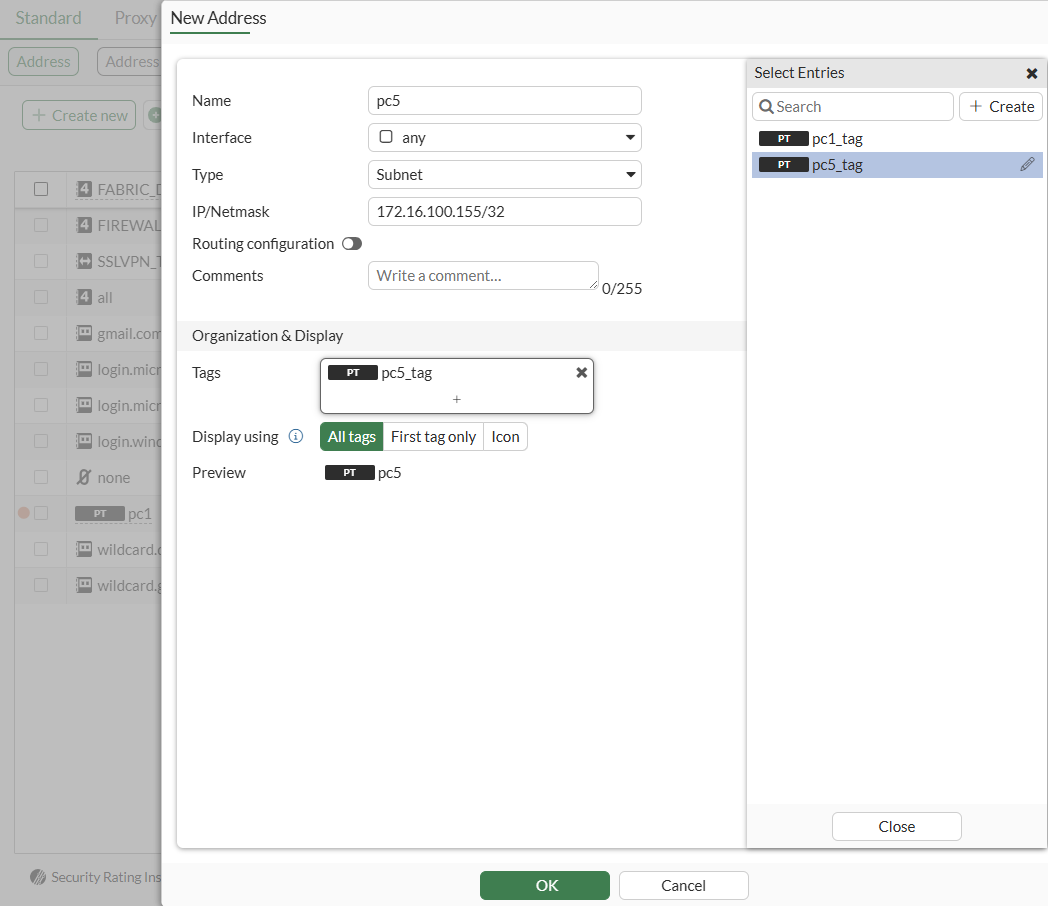
Create two address objects for PC1 and PC5 and assign to them the tags you created:
-
Go to Policy & Objects > Addresses.
-
On the Address tab, click Create new.
-
Enter a Name, such as pc1.
-
Beside Tags, click +, and select the pc1_tag you created.
-
Click OK.
-
Repeat this procedure to create an address for pc5 and select the pc5_tag.
-
-
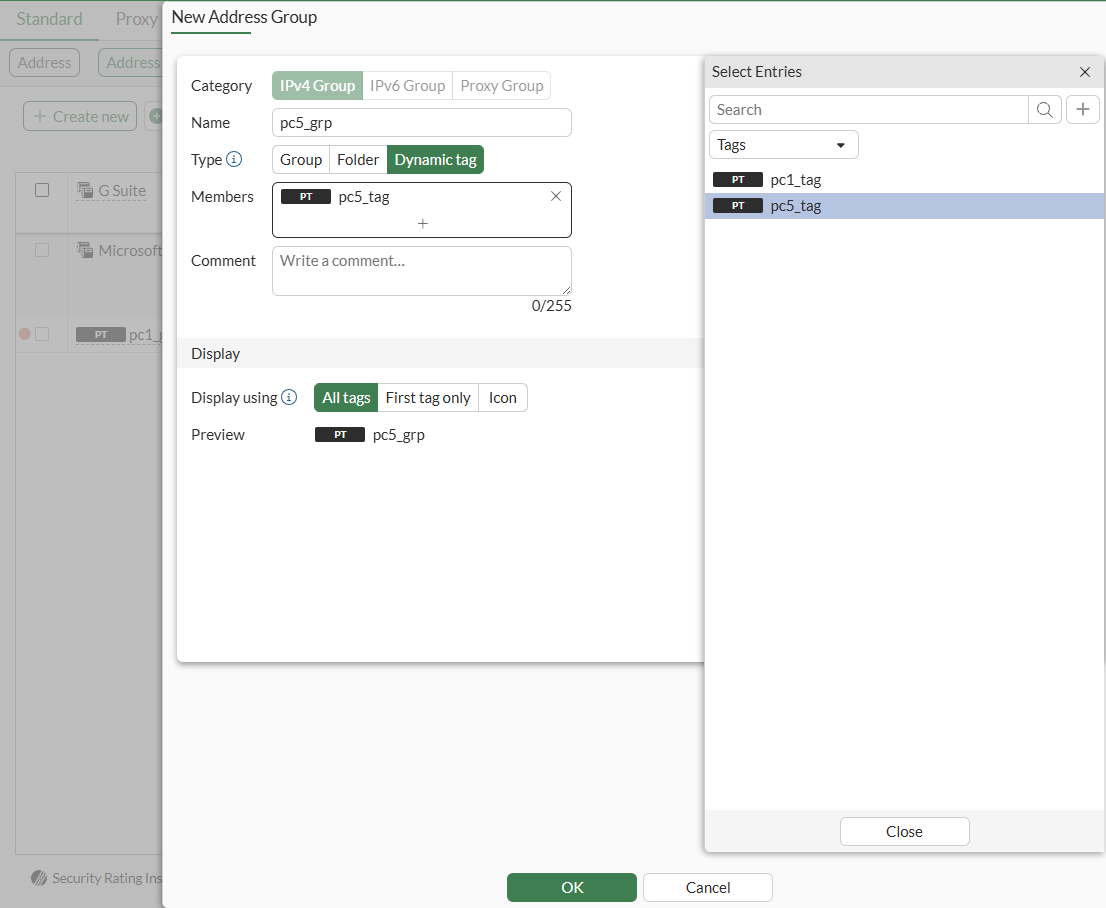
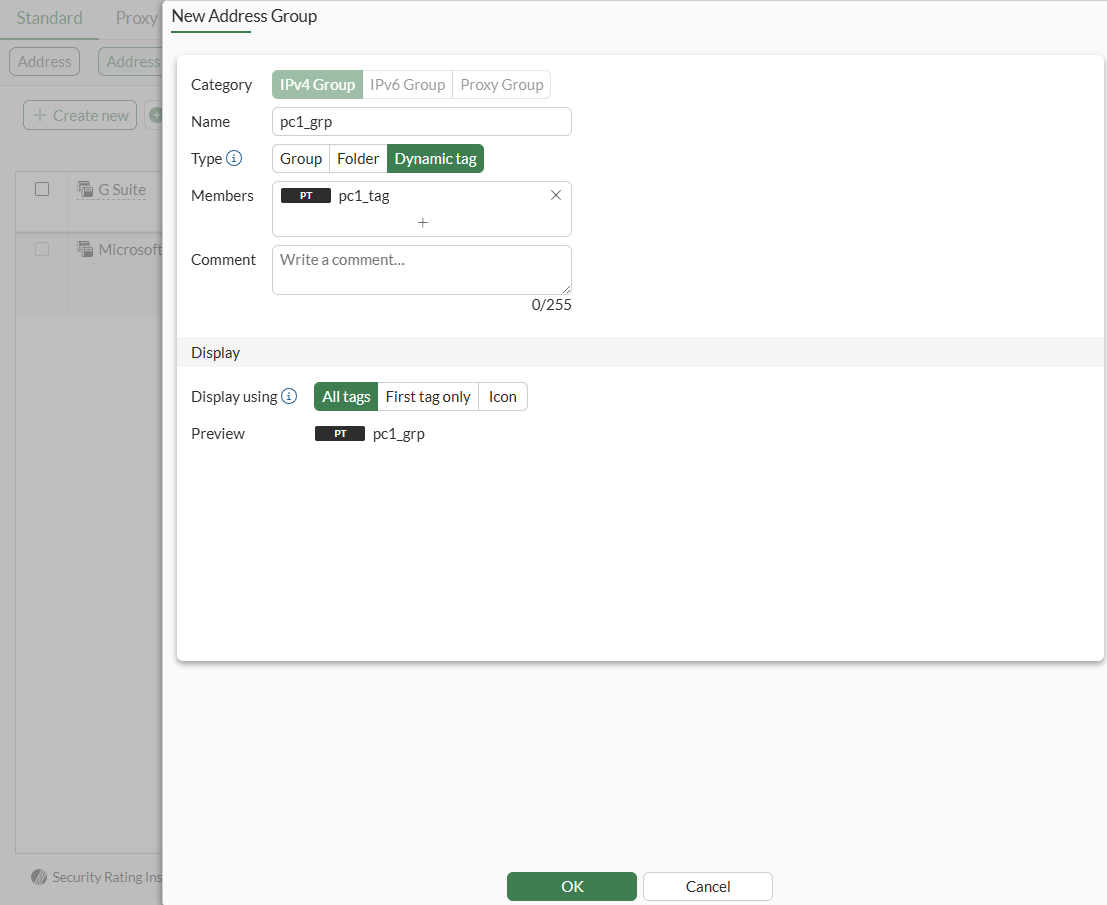
Create two dynamic tag address groups, with the tag names (pc1_tag and pc5_tag) as group members instead of the object names.
-
In Policy & Objects > Addresses, click the Address Group tab.
-
Click Create new.
-
Enter a Name, such as pc1_grp.
-
Set Type to Dynamic tag.
-
Beside Members, click +, select the tag name (pc1_tag), and click Close.
-
Repeat this procedure to create an address group named pc5_grp and add custom tag pc5_tag as group member.
-
-
Enable policy tagging:
-
Go to System > Feature Visibility.
-
Under Additional Features, enable Policy Tagging.
-
Click Apply.
-
-
Configure a firewall policy to allow traffic from PC1 to PC5.
-
Go to Policy & Objects > Firewall Policy.
-
Click Create new.
-
Enter a Name.
-
Beside Source, click +, select the address group named pc1_grp, and click Close.

-
Beside Destination, click +, select the address group named pc5_grp, and click Close
-
Set the remaining options as needed.
-
Click OK.
-
To create dynamic tag address groups in the CLI:
-
Create two custom tags:
config firewall custom-tag edit "pc1_tag" next edit "pc5_tag" next end -
Create two address objects named pc1 and pc5 with the pc1_tag and pc5_tag:
config firewall address edit "pc1" set custom-tags "pc1_tag" set subnet 10.1.100.111 255.255.255.255 next edit "pc5" set custom-tags "pc5_tag" set subnet 172.16.200.155 255.255.255.255 next end -
Create two dynamic tag address groups with the following tags as group members: pc1_tag and pc5_tag:
config firewall addrgrp edit "pc1_grp" set type dynamic-tag set custom-tags "pc1_tag" next edit "pc5_grp" set type dynamic-tag set custom-tags "pc5_tag" next end -
Configure a firewall policy to allow traffic from PC1 to PC5 using the address groups:
config firewall policy
    edit 1
        set srcintf "port2"
        set dstintf "port3"
        set action accept
        set srcaddr "pc1_grp"
        set dstaddr "pc5_grp"
        set schedule "always"
        set service "ALL"
        set auto-asic-offload disable
    next
end