


Installing the FortiEDR Threat Hunting Repository
The FortiEDR Threat Hunting feature (described in Threat Hunting) requires a license and the installation of the Threat Hunting repository, as described below. The installation of the FortiEDR Manager is a prerequisite for installing the Repository server.
Installation of FortiEDR Threat Hunting is comprised of the following steps:
- Creating a Virtual Machine
- Installing an Operating System ISO
- Installing a FortiEDR Repository Software ISO
Creating a Virtual Machine
To create a virtual machine
- Create a new virtual server. For example, by selecting File > New Virtual Machine…., then selecting Create a new virtual machine and clicking NEXT.
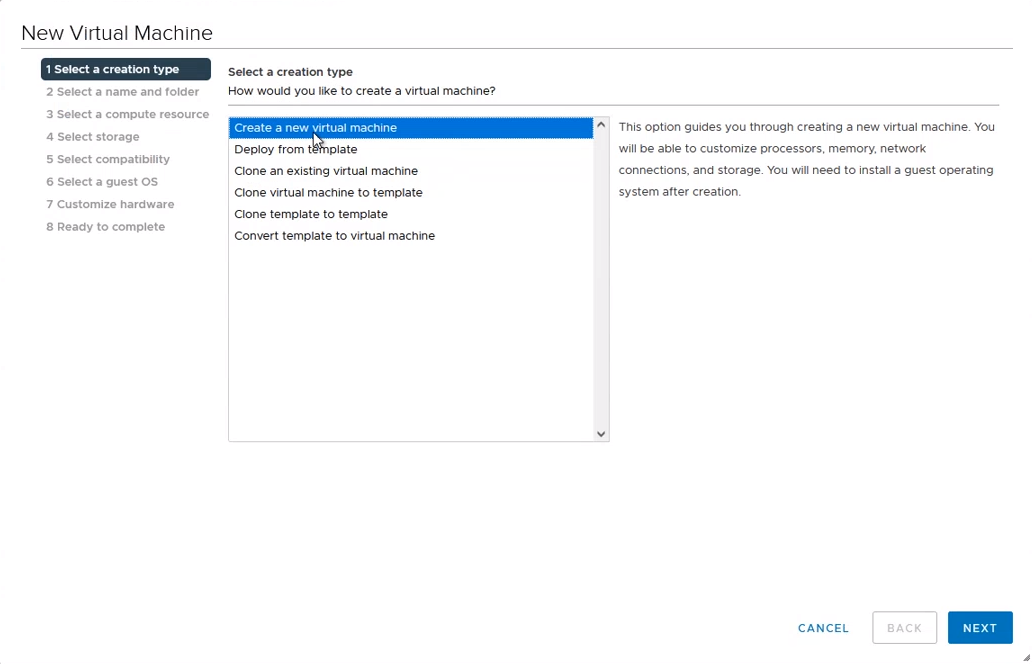
- Enter the desired virtual machine name. For example, FortiEDR-TH-Repository and click NEXT.
- Enter the virtual machine settings, as follows:
- In the Select storage step, select the storage where the virtual machine disk should be stored on and click NEXT.
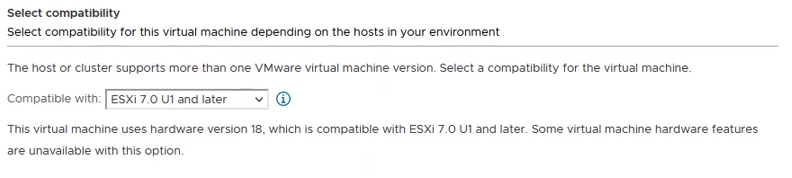
- In the Select Compatibility step, select ESXi 7.0 U1 and later and click NEXT.
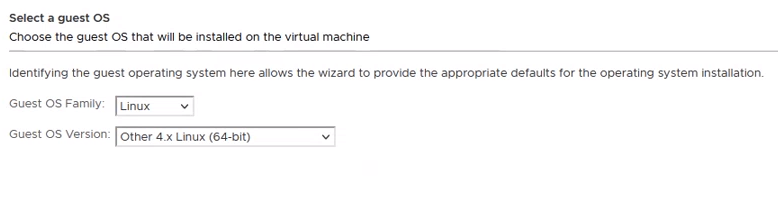
- At the Select a guest OS step:
- In the Guest OS family field, select Linux.
- In the Guest OS version field, select Other 4.x Linux (64-bit).
- Click Next. The following displays:
- In the Customize hardware step, do the following:
- In the CPU field, enter the number of CPUs, as specified in System Requirements
- In the Memory field, enter amount of memory in GB, as specified in the System Requirements
- In the New Hard disk, enter the SSD disk size in GB, as specified in the System Requirements. It is highly recommended to use SSD.
- Add an OS disk. In the New Hard disk:
- Enter the OS disk size in GB, as specified in System Requirements
- In the Disk Provisioning field, select Thin Provision.
- Add a DATA disk. In the New Hard disk:
- Enter the DATA disk size in GB, as specified in System Requirements
- It is highly recommended to use SSD.
- In the Disk Provisioning field, enter Thick Provision Eager Zeroed.
- In the New Network field choose VMXNET3
- To complete the creation of a virtual machine, select Finish.
Installing an Operating System ISO
To install an operating system ISO:
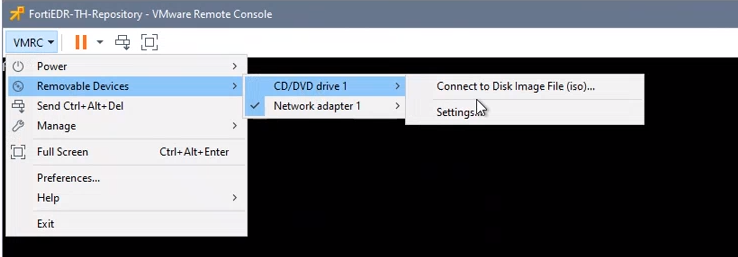
- Select the newly created virtual machine and click Launch Remote Console.
- In the VMRC menu, select Removable Device > CD/DVE drive 1 > Connect to Disk Image File (iso)….
- Select the FortiEDR_Repository_OSInstaller ISO file and click Open
Note: ISO should remain mounted

Another option instead of completing the two steps described above is to upload the ISO from the VMWare datastore (this is possible if the ISO has already been uploaded there).
- Restart the Virtual Machine. The virtual machine starts and the following menu is displayed:
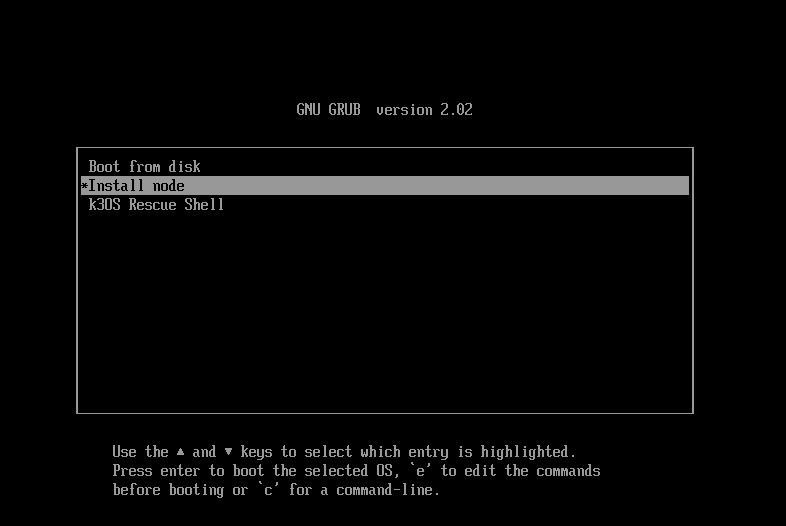
- Select the Install Node option
- Log in using the rancher user (without the password) and run the following commands in order to start the K8S node installation:
sudo su –
bash /k3os/system/install_k3os.sh
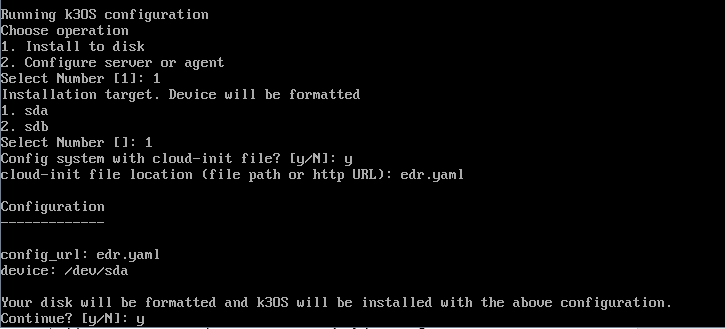
- For a new installation, enter 1.
- Complete the k3os installation by providing the following parameters:
- When prompted to enter the SSH password, enter the password to be used for the rancher user. A strong password must be entered.
- At the k8s cluster token prompt, enter the token to be used if additional nodes will be connected in the future. This token will be used by additional nodes in order to connect to this k8s cluster.
- At the Use DHCP (yes/no) prompt, enter no.
Note: Using DHCP causes a malfunction of the FortiEDR Repository server so that it is in an Offline state after the installation. When prompted, enter the IP, Mask and Gateway details of the virtual machine. - When prompted to select an operation, approve the default (1. Install to disk) by pressing Enter.
- To select the sda disk as the OS disk, enter 1.
- At the Config system with cloud-init file prompt, enter y.
- When asked to provide a Cloud-init file location (file path or http URL), enter edr.yaml.
- When prompted to continue, enter y.
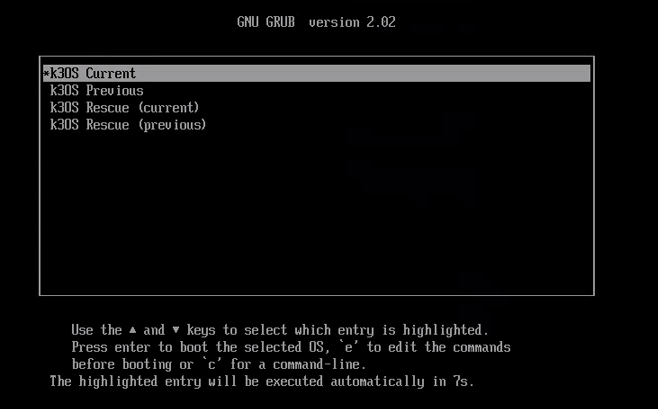
This may take a while. At the end, the Virtual Machine will restart automatically. - In the menu, approve the default (k30S Current).
The system will start. This might take a few minutes while OS data is copied to the Virtual Machine - Log in with the rancher name and the password set previously.
ISO should be disconnected before continuing
- Run the
sudo su -command
- Check that the installation was successful by running the
kubectl get nodescommand and checking that the status of edr-repo-master1 is Ready, as shown below:
Installing a FortiEDR Repository Software ISO
To install the FortiEDR Repository Software ISO, launch the FortiEDR_RepositoryInstaller ISO file:
- From the VMRC menu, select Removable Device > CD/DVD drive 1 > Connect to Disk Image File (iso)...
- Select the FortiEDR_RepositoryInstaller ISO file and click on Open.
Another option instead of the two steps described above is to upload the ISO from the VMWare datastore (this is possible if the ISO has already been uploaded there).
- Run the following command:
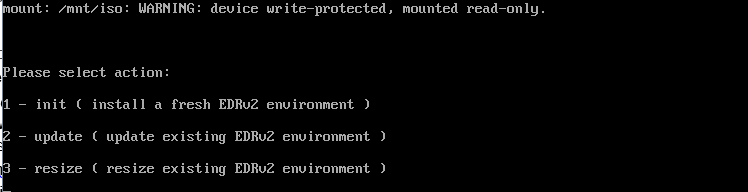
bash /k3os/system/install_edr2.shSelect init (1) for a new installation.
Existing virtual machine specifications (CPU and RAM) are being validated. If one is found to be lower than the minimum requirements for proper functioning of the FortiEDR Repository, the following warning appears and the installation is aborted:

Wait until required docker images import from ISO to local image storage (might take few minutes).
- Complete the FortiEDR Repository software installation by providing the following parameters:
- When prompted to enter the number of seats, enter the number of seats of your FortiEDR License (workstations and servers).
- When prompted to specify whether the repository will be used by a Managed Security Service Provider (MSSP), approve the default if you are not an MSSP or provide the number of expected organizations (meaning Tenants), if you are.
- When prompted for the FortiEDR Manager details, provide its IP and the credentials of one of the FortiEDR Console administrators that have RestAPI permissions.
- Review the displayed configuration. Type yes to approve it or if the parameters are not correct, press the Enter key to restart the configuration process.

Installation may take several minutes