
Installing EMS in standalone mode with a local DB
The following provides instructions for installing EMS in standalone mode with a local database and assumes that you have a machine with Linux installed. You can install EMS in other scenarios, such as high availability, with a remote database, and so on.
|
|
Installing EMS on Red Hat Enterprise Linux (RHEL) requires an active Red Hat subscription. |
To install standalone EMS:
- Download the
forticlientems_7.4.5.2111.M.arm64.binorforticlientems_7.4.5.2111.M.amd64.binfile from the Fortinet Support site. - Run
sudo -ito log in to the shell with root privileges. - Change permissions and add execute permissions to the installation file:
chmod +x forticlientems_7.4.5.2111.M.XXX64.bin

- Set
umaskto 022 if the existingumasksetting is more restrictive. -
If you are installing EMS on Red Hat Enterprise Linux (RHEL) 9, do one of the following. :
- If you are installing EMS on RHEL on Azure, run the following:
sudo dnf repolist enabled
Verify if
codeready-builder-for-rhel-9-x86_64-eus-rhui-rpmsis in the list. If it is in the list, it is enabled. If it is not in the list, then run the following:sudo subscription-manager repos --enable codeready-builder-for-rhel-9-x86_64-eus-rhui-rpms
Run the following commands:
sudo dnf install -y https://download.postgresql.org/pub/repos/yum/reporpms/EL-$(rpm -E %rhel)-$(uname -m)/pgdg-redhat-repo-latest.noarch.rpm sudo dnf config-manager --disable pgdg17 pgdg16 sudo dnf install -y https://rpms.remirepo.net/enterprise/remi-release-$(rpm -q --qf "%{VERSION}\n" redhat-release).rpm sudo curl -o /etc/pki/rpm-gpg/RPM-GPG-KEY-remi2021 https://rpms.remirepo.net/RPM-GPG-KEY-remi2021 sudo rpm --import /etc/pki/rpm-gpg/RPM-GPG-KEY-remi2021 sudo ln -sf /etc/pki/rpm-gpg/RPM-GPG-KEY-remi2021 /etc/pki/rpm-gpg/RPM-GPG-KEY-remi.el$(rpm -q --qf "%{VERSION}\n" redhat-release) -
If you are installing EMS on RHEL on AWS, run the following command:
sudo dnf config-manager --set-enabled codeready-builder-for-rhel-9-rhui-rpms
- If you are installing EMS on RHEL on Azure, run the following:
- Run the following command to install EMS:
./forticlientems_7.4.5.2111.M.XXX64.bin -- --allowed_hosts '*' --enable_remote_https
Run the installer to and from any directory other than
/tmp. Running the installer to or from/tmpcauses issues. -
After installation completes, check that all EMS services are running by entering the following command:
systemctl --all --type=service | grep -E 'fcems|apache|redis|postgres'
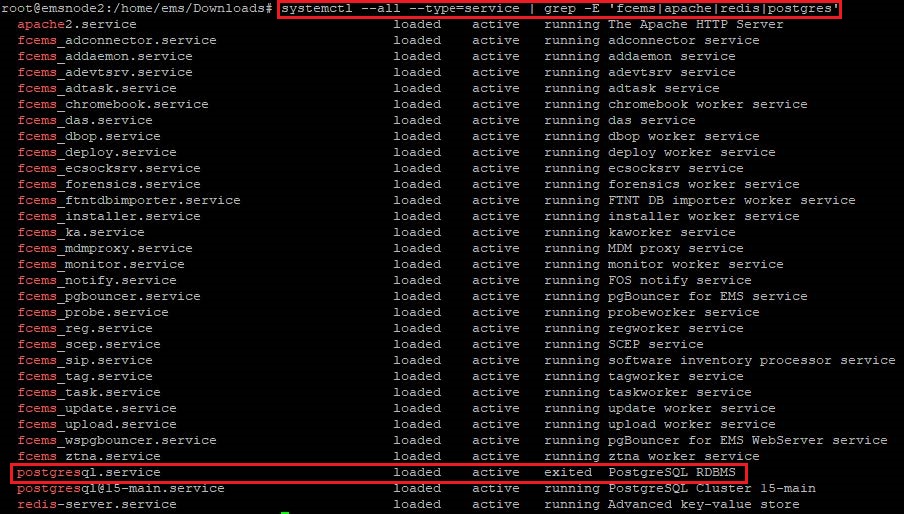
The output shows that postgresql.service status displays as
exited. This is the expected status. EMS does not create this service, which only exists to pass commands to version-specific Postgres services. It displays as part of the output as the command filters for all services that contain "postgres" in the name. - Access the EMS GUI and log in.
- If after initially installing EMS 7.4.5 you need to upgrade to a newer build, repeat the process with the new installation file.
Configuring the IP address
After deploying EMS in standalone mode, you may want to configure the IP address. Refer to one of the following procedures, depending on your platform.
|
|
An alternative way to configure the IP address is using the |
Ubuntu:
On Ubuntu, you configure the IP address by modifying the Netplan configuration files.
- On the Ubuntu machine, locate the Netplan configuration files. Ubuntu stores Netplan configuration files in
/etc/netplan. The files typically have a .yaml extension, such as 01-netcfg.yaml or 50-cloud-init.yaml. Run the following to list the files:ls /etc/netplan/
- Use a text editor such as nano or vim to open the yaml file for editing:
sudo nano /etc/netplan/01-netcfg.yaml
- In the yaml file, find the section for your desired network interface. Do one of the following:
- If you are using a static IP address, modify the file, setting
addresseswith your desired static IP address and subnet mask. Update the IP address underroutes: - to: default via:with your desired gateway, and modifynameserverswith search domains as needed. The following provides an example configuration where the static IP address is 192.168.1.100/24:network: version: 2 renderer: networkd ethernets: enp3s0: addresses: - 192.168.1.100/24 nameservers: addresses: [8.8.8.8, 1.1.1.1] search: [mydomain1.local, mydomain2.local] routes: - to: default via: 192.168.1.1 - If you are using DHCP, ensure that
dhcp4is set toyes. The following provides an example configuration:network: version: 2 renderer: networkd ethernets: enp0s3: dhcp4: yes
- If you are using a static IP address, modify the file, setting
- Before applying the changes permanently, run the following to test the configuration. This command temporarily applies the configuration and gives you 120 seconds to confirm the changes. If the configuration does not work, it rolls back automatically.
sudo netplan try
- If the test succeeds, apply the changes permanently:
sudo netplan apply
- To verify the configuration, check that the IP address is updated as you configured:
ip addr show
RHEL:
You can utilize several methods to configure a network interface with a static IP address on Red Hat Enterprise Linux (RHEL) 9. The following approach uses the nmcli command-line tool, which allows you to manage network connections from the command line.
-
Run the following command to list all network interfaces and identify the one you want to configure:
nmcli device status
-
Modify the connection using the following command (this example modifies the interface enp0s3):
sudo nmcli con mod 'enp0s3' ipv4.method manual ipv4.addresses 192.168.1.100/24 ipv4.gateway 192.168.1.1 ipv4.dns "8.8.8.8 8.8.4.4"
Replace enp0s3 with your actual interface name and adjust the IP address, gateway, and DNS servers as per your network configuration.
-
Apply the network interface changes by restarting the connection using the following command:
sudo nmcli con down 'enp0s3' && sudo nmcli con up 'enp0s3'
-
Verify the IP configuration using the following commands:
ip addr show enp0s3
ip route show
CentOS:
To configure the IP address on CentOS:
-
Run the following command to list all network interfaces and identify the one you want to configure:
nmcli connection show
-
Modify the connection to set a static IP address using the following commands (this example modifies the interface enp0s3):
sudo nmcli connection modify enp0s3 \
ipv4.method manual \
ipv4.addresses 192.168.1.100/24 \
ipv4.gateway 192.168.1.1 \
ipv4.dns "8.8.8.8 8.8.4.4" \
connection.autoconnect yes
Replace enp0s3 with your actual interface name and adjust the IP address, gateway, and DNS servers as per your network configuration.
-
Apply the network interface changes by restarting the connection using the following command:
sudo nmcli connection down enp0s3 && sudo nmcli connection up enp0s3
-
Verify the IP configuration using the following commands:
ip addr show enp0s3
ip route show