EMS nodes in HA with Postgres DB HA cluster using EMS PostgreSQL HA Docker, single region
EMS requires a custom PostgreSQL extension to function and Fortinet provides an EMS PostgreSQL HA repmgr custom docker image where that custom extension is already installed and ready for EMS. This image is further customized by Fortinet to include additional node reconciliation scripts to add another layer of protection and prevention of split brain.
|
|
When using this image, Fortinet is responsible for providing support for matters related to replication, failover, split-brain, and syncing between nodes, but are not responsible nor supports anything related to the database itself (PostgreSQL), docker, the host OS where the container will be running or network issues in the infrastructure that the cluster or DB nodes are part of. |
The following guide gives instructions on performing a fresh install of EMS HA with Postgres HA using EMS PostgreSQL HA Docker and for upgrading a previously installed EMS HA deployment with Postgres HA using EMS PostgreSQL HA Docker to 7.4.5:
- To configure EMS HA with Postgres HA using EMS PostgreSQL HA Docker:
- To upgrade a previously installed EMS deployment with Postgres HA using EMS PostgreSQL HA Docker to 7.4.5:
To configure EMS HA with Postgres HA using EMS PostgreSQL HA Docker:
- Prepare five Linux machines. Three act as Postgres DB nodes (two for data nodes and one for the witness node) and the other two are EMS nodes.
Refer to the EMS management capacity guide to plan the sizing of the data nodes.
- If using cloned virtual machines for the EMS nodes, run the following commands on the cloned machine:
sudo rm /etc/machine-id
sudo rm /var/lib/dbus/machine-id
sudo systemd-machine-id-setup
- Run
sudo -ito log in to the shell with root privileges. Perform all following steps with root privileges. - Configure the Postgres HA cluster:
- Load the EMS Postgres HA Docker image in all Postgres DB nodes:
- Install Docker:
apt install docker.io
- Download the Postgres Docker image
forticlientems_postgres-ha.tar.gzfile from the Fortinet Support site. - Load the image:
docker load -i forticlientems_postgres-ha.tar.gz
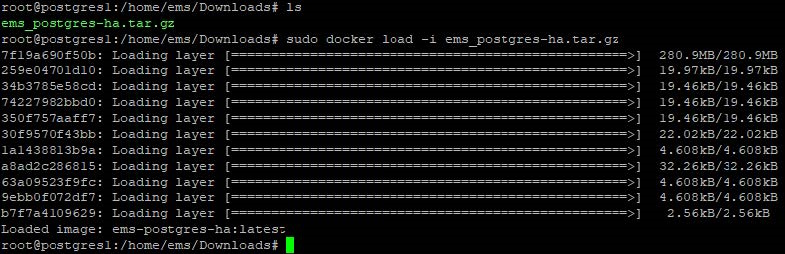
- List the images on Docker to verify the image has been created or loaded:
docker image ls
- Install Docker:
For each of the Postgres DB nodes (not the witness nodes), tune Postgres based on the host server specs by applying the recommended configuration as follows:

While there are various tools you can use to find the recommended configuration, the following instructions use PGTune to generate and copy the recommended configuration. Create a folder called
conf.dand configure the folder to be root owned with special permissions so it can be read by the containers:sudo chgrp -R root /path/to/conf.d/ sudo chmod -R g+rwX /path/to/conf.d/
Create a file in the folder called
extra.conf.- Go to PGTune and enter the following information:
Field
Value
DB version
15
OS Type
Linux
DB Type
Online transaction processing system
Total Memory (RAM)
Enter the total memory for your Postgres server. In this example, it is 4 GB.
Number of CPUs
Enter the total number of CPUs for your Postgres server. In this example, it is 4.
Number of Connections
1092
Data Storage
Enter the data storage type as per your device. In this example, it is SSD storage.
- Click Generate.
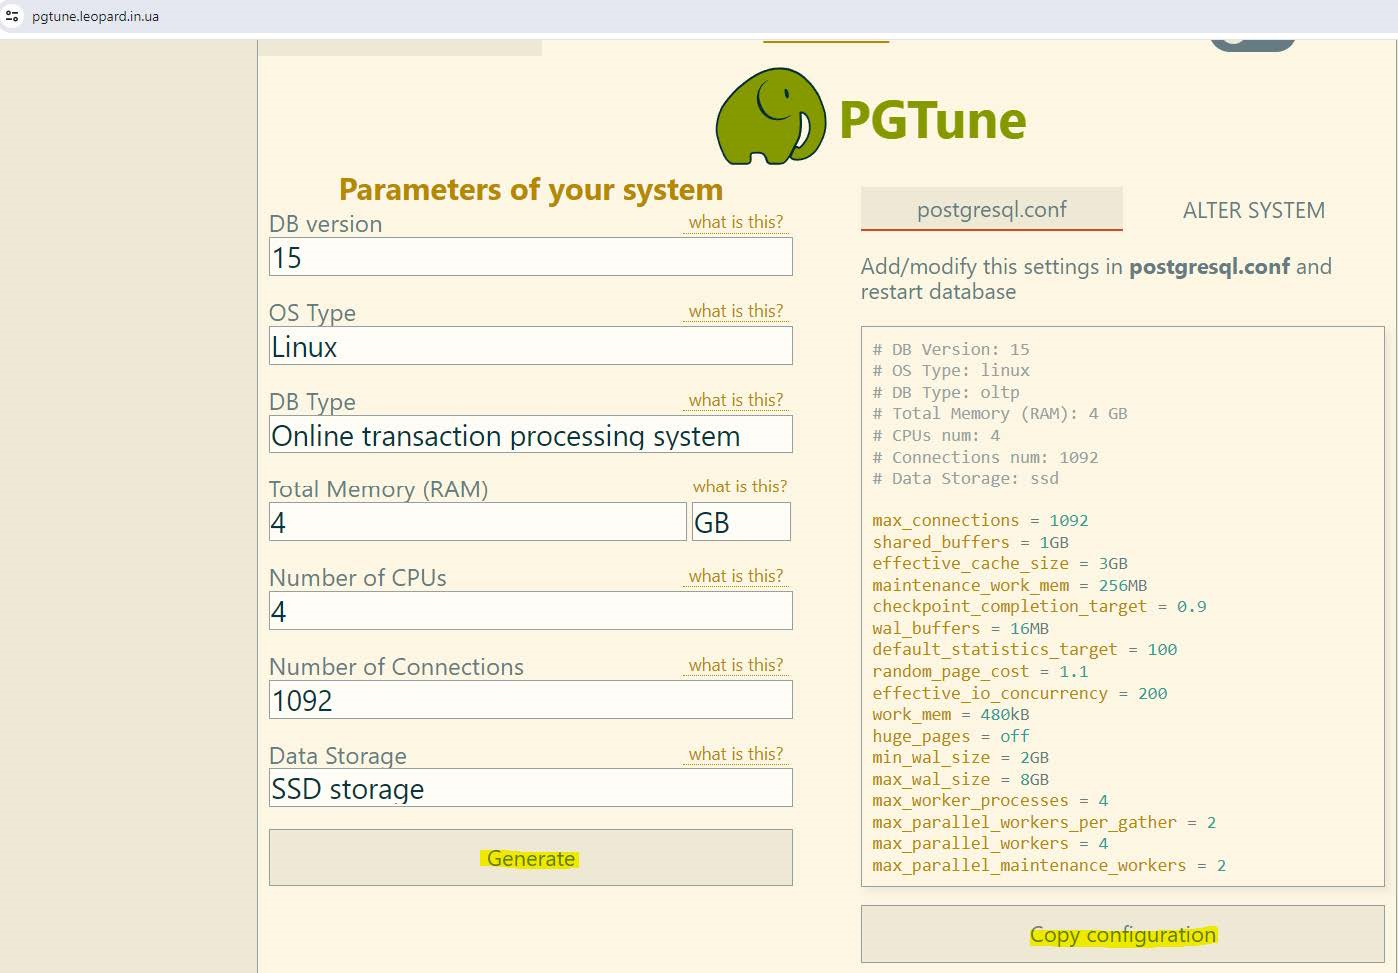
Click Copy configuration and save the configuration to the
extra.conffile you created earlier.
Start the primary DB:
- Start the EMS PostgreSQL HA container on the primary DB node. In this example, the primary DB node is pg-1:
docker run --restart always --detach --name pg-1 -p 5432:5432 \
  --env POSTGRESQL_PASSWORD=<pg_password> \
  --env POSTGRESQL_DAEMON_USER=<pg_username> \
  --env REPMGR_PASSWORD=<pg_password> \
  --env REPMGR_PRIMARY_HOST=pg-1 \
  --env REPMGR_PRIMARY_PORT=5432 \
  --env REPMGR_PARTNER_NODES=pg-1,pg-2,pgw-1:5432 \
  --env REPMGR_NODE_NAME=pg-1 \
  --env REPMGR_NODE_NETWORK_NAME=pg-1 \
  --env REPMGR_PORT_NUMBER=5432 \
  --env REPMGR_DEGRADED_MONITORING_TIMEOUT=-1 \
  --env REPMGR_NODE_PRIORITY=100 \
  --volume pg_1_data:/fortinet/postgresql \
  --volume <path to conf.d>:/fortinet/postgresql/conf/conf.d \
  --shm-size 1g \
  --add-host pg-1:<ip/fqdn node 1> \
  --add-host pg-2:<ip/fqdn node 2> \
  --add-host pgw-1:<ip/fqdn witness 1 dc 1> \
ems-postgres-ha
Replace
<pg_password>,<pg_username>, and<path to conf.d>with your actual Postgres password, username, and path toconf.dfile that you created earlier in the PostgreSQL configuration (such as/home/ems/conf.d).
Replace
<ip/fqdn xxxx>with the correct IP or FQDN to the corresponding PostgreSQL or witness node.
The following provides details for some of the parameters:
Parameter
Value
REPMGR_PRIMARY_HOST
Hostname or IP address of where this node is running, which other nodes can access
REPMGR_PARTNER_NODES
Comma-separated list of the hostnames or IP addresses of all nodes that form this cluster
REPMGR_NODE_NAME
Node name. This can but does not necessarily need to match the hostname. This value shows when you perform step d to verify the cluster status.
REPMGR_NODE_NETWORK_NAME
Hostname or IP address of where this node is running.
- Verify if the container is running:
docker ps -a
Verify that the node has joined the cluster successfully:
docker exec -it pg-1 bash /opt/fortinet/scripts/postgresql-repmgr/entrypoint.sh repmgr -f /opt/fortinet/repmgr/conf/repmgr.conf service status
- Start the EMS PostgreSQL HA container on the primary DB node. In this example, the primary DB node is pg-1:
- From the secondary DB node, start the DB:
- Start the EMS PostgreSQL HA container on the secondary node. In this example, the secondary node is pg-2:
docker run --restart always --detach --name pg-2 -p 5432:5432 \
  --env POSTGRESQL_PASSWORD=<pg_password> \
  --env POSTGRESQL_DAEMON_USER=<pg_username> \
  --env REPMGR_PASSWORD=<pg_password> \
  --env REPMGR_PRIMARY_HOST=pg-1 \
  --env REPMGR_PRIMARY_PORT=5432 \
  --env REPMGR_PARTNER_NODES=pg-1,pg-2,pgw-1:5432 \
  --env REPMGR_NODE_NAME=pg-2 \
  --env REPMGR_NODE_NETWORK_NAME=pg-2 \
  --env REPMGR_PORT_NUMBER=5432 \
  --env REPMGR_DEGRADED_MONITORING_TIMEOUT=-1 \
  --env REPMGR_NODE_PRIORITY=100 \
  --volume pg_2_data:/fortinet/postgresql \
  --volume <path to conf.d>:/fortinet/postgresql/conf/conf.d \
  --shm-size 1g \
  --add-host pg-1:<ip/fqdn node 1> \
  --add-host pg-2:<ip/fqdn node 2> \
  --add-host pgw-1:<ip/fqdn witness 1 dc 1> \
ems-postgres-ha
Replace
<pg_password>,<pg_username>, and<path to conf.d>with your actual Postgres password, username, and path toconf.dfile that you created earlier in the PostgreSQL configuration (such as/home/ems/conf.d).
Replace
<ip/fqdn xxxx>with the correct IP or FQDN to the corresponding PostgreSQL or witness node.
The following provides details for some of the parameters:
Parameter
Value
REPMGR_PRIMARY_HOST
Hostname or IP address of where the primary node is running, which other nodes can access
REPMGR_PARTNER_NODES
Comma-separated list of the hostnames or IP addresses of all nodes that form this cluster
REPMGR_NODE_NAME
Node name. This can but does not necessarily need to match the hostname.
REPMGR_NODE_NETWORK_NAME
Hostname or IP address of where this node is running
- Verify if the container is running:
docker ps -a
Verify that the node has joined the cluster successfully:
docker exec -it pg-2 bash /opt/fortinet/scripts/postgresql-repmgr/entrypoint.sh repmgr -f /opt/fortinet/repmgr/conf/repmgr.conf service status
- Start the EMS PostgreSQL HA container on the secondary node. In this example, the secondary node is pg-2:
- Start the PostgreSQL witness node:
The witness node does not take part in the data replication process and is a member of the cluster for the purposes of voting on node promotion. It requires as little as 2 GB RAM and 2 CPU.
- Start the Postgres witness node. In this example, the witness node is pgw-1:
docker run --restart always --detach --name pgw-1 -p 5432:5432 \
  --env POSTGRESQL_PASSWORD=<pg_password> \
  --env POSTGRESQL_DAEMON_USER=<pg_username> \
  --env REPMGR_PASSWORD=<pg_password> \
  --env REPMGR_PRIMARY_HOST=pg-1 \
  --env REPMGR_PRIMARY_PORT=5432 \
  --env REPMGR_PARTNER_NODES=pg-1,pg-2,pgw-1:5432 \
  --env REPMGR_NODE_NAME=pgw-1 \
  --env REPMGR_NODE_NETWORK_NAME=pgw-1 \
  --env REPMGR_PORT_NUMBER=5432 \
  --env REPMGR_DEGRADED_MONITORING_TIMEOUT=-1 \
  --env REPMGR_NODE_TYPE=witness \
  --env REPMGR_NODE_ID_START_SEED=2000 \
  --volume pgw_1_data:/fortinet/postgresql \
  --shm-size 1g \
  --add-host pg-1:<ip/fqdn node 1> \
  --add-host pg-2:<ip/fqdn node 2> \
  --add-host pgw-1:<ip/fqdn witness 1 dc 1> \
ems-postgres-ha
Replace
<pg_password>and<pg_username>with your actual Postgres password and username.
Replace
<ip/fqdn xxxx>with the correct IP or FQDN to the corresponding PostgreSQL or witness node.
The following provides details for some of the parameters:
Parameter
Value
REPMGR_PRIMARY_HOST
Hostname or IP address of where the primary node is running, which other nodes can access
REPMGR_PARTNER_NODES
Comma-separated list of the hostnames or IP addresses of all nodes that form this cluster
REPMGR_NODE_NAME
Node name. This can but does not necessarily need to match the hostname.
REPMGR_NODE_NETWORK_NAME
Hostname or IP address of where this node is running
- Verify if the container is running:
docker ps -a
Verify that the node has joined the cluster successfully:
docker exec -it pgw-1 bash /opt/fortinet/scripts/postgresql-repmgr/entrypoint.sh repmgr -f /opt/fortinet/repmgr/conf/repmgr.conf service status
- Start the Postgres witness node. In this example, the witness node is pgw-1:
- Load the EMS Postgres HA Docker image in all Postgres DB nodes:
-
After the DB cluster is up and running, configure EMS HA:
- On both nodes, do the following:
- Download the
forticlientems_7.4.5.2111.M.binfile from the Fortinet Support site. - Change permissions and add execute permissions to the installation file:
chmod +x forticlientems_7.4.5.2111.M.bin
- Download the
- On the primary node, install EMS:
- Set
umaskto 022 on file/etc/login.defsif the existingumasksetting is more restrictive. If you are installing EMS on Red Hat Enterprise Linux (RHEL) 9, do one of the following.
EMS 7.4.5 and later versions support install on RHEL 9. :- If you are installing EMS on RHEL on Azure, run the following:
sudo dnf repolist enabled
Verify if
codeready-builder-for-rhel-9-x86_64-eus-rhui-rpmsis in the list. If it is in the list, it is enabled. If it is not in the list, then run the following:sudo subscription-manager repos --enable codeready-builder-for-rhel-9-x86_64-eus-rhui-rpms
Run the following commands:
sudo dnf install -y https://download.postgresql.org/pub/repos/yum/reporpms/EL-$(rpm -E %rhel)-$(uname -m)/pgdg-redhat-repo-latest.noarch.rpm
sudo dnf config-manager --disable pgdg17 pgdg16
sudo dnf install -y https://rpms.remirepo.net/enterprise/remi-release-$(rpm -q --qf "%{VERSION}\n" redhat-release).rpm
sudo curl -o /etc/pki/rpm-gpg/RPM-GPG-KEY-remi2021 https://rpms.remirepo.net/RPM-GPG-KEY-remi2021
sudo rpm --import /etc/pki/rpm-gpg/RPM-GPG-KEY-remi2021
sudo ln -sf /etc/pki/rpm-gpg/RPM-GPG-KEY-remi2021 /etc/pki/rpm-gpg/RPM-GPG-KEY-remi.el$(rpm -q --qf "%{VERSION}\n" redhat-release)
If you are installing EMS on RHEL on AWS, run the following command:
sudo dnf config-manager --set-enabled codeready-builder-for-rhel-9-rhui-rpms
- If you are installing EMS on RHEL on Azure, run the following:
- Install EMS:
./forticlientems_7.4.5.2111.M.bin -- --db_host "<ip/fqdn node 1>,<ip/fqdn node 2>" --db_user postgres --db_pass postgres --skip_db_install --allowed_hosts '*' --enable_remote_https
Run the installer to and from any directory other than
/tmp. Running the installer to or from/tmpcauses issues.Replace
<ip/fqdn xxxx>with the correct IP address or FQDN of the corresponding DB node. After installation completes, check that all EMS services are running by entering the following command:
systemctl --all --type=service | grep -E 'fcems|apache|redis|postgres'

The output shows that postgresql.service status displays as
exited. This is the expected status. EMS does not create this service, which only exists to pass commands to version-specific Postgres services. It displays as part of the output as the command filters for all services that contain "postgres" in the name.
- Set
- On the secondary node, install EMS:
- Set
umaskto 022 if the existingumasksetting is more restrictive. If you are installing EMS on Red Hat Enterprise Linux (RHEL) 9, do one of the following.
EMS 7.4.5 and later versions support install on RHEL 9. :- If you are installing EMS on RHEL on Azure, run the following:
sudo dnf repolist enabled
Verify if
codeready-builder-for-rhel-9-x86_64-eus-rhui-rpmsis in the list. If it is in the list, it is enabled. If it is not in the list, then run the following:sudo subscription-manager repos --enable codeready-builder-for-rhel-9-x86_64-eus-rhui-rpms
Run the following commands:
sudo dnf install -y https://download.postgresql.org/pub/repos/yum/reporpms/EL-$(rpm -E %rhel)-$(uname -m)/pgdg-redhat-repo-latest.noarch.rpm
sudo dnf config-manager --disable pgdg17 pgdg16
sudo dnf install -y https://rpms.remirepo.net/enterprise/remi-release-$(rpm -q --qf "%{VERSION}\n" redhat-release).rpm
sudo curl -o /etc/pki/rpm-gpg/RPM-GPG-KEY-remi2021 https://rpms.remirepo.net/RPM-GPG-KEY-remi2021
sudo rpm --import /etc/pki/rpm-gpg/RPM-GPG-KEY-remi2021
sudo ln -sf /etc/pki/rpm-gpg/RPM-GPG-KEY-remi2021 /etc/pki/rpm-gpg/RPM-GPG-KEY-remi.el$(rpm -q --qf "%{VERSION}\n" redhat-release)
If you are installing EMS on RHEL on AWS, run the following command:
sudo dnf config-manager --set-enabled codeready-builder-for-rhel-9-rhui-rpms
- If you are installing EMS on RHEL on Azure, run the following:
- Install EMS:
./forticlientems_7.4.5.2111.M.bin -- --db_host "<ip/fqdn node 1>,<ip/fqdn node 2>" --db_user postgres --db_pass postgres --skip_db_install --skip_db_deploy --allowed_hosts '*' --enable_remote_https
Replace
<ip/fqdn xxxx>with the correct IP address or FQDN of the corresponding DB node.Run the installer to and from any directory other than
/tmp. Running the installer to or from/tmpcauses issues. - After installation completes, check that EMS services are running by entering the following command:
systemctl --all --type=service | grep -E 'fcems|apache|redis|postgres'
- Set
-
After installation on both nodes completes, do the following:
- On the primary node, log in to EMS. License EMS as Starting FortiClient EMS and logging in describes. EMS HA requires a single license for the primary node and the secondary node(s). You only need to add the license to the primary node.
- Go to System Settings > EMS Settings.
- Under Shared Settings, confirm that Listen on IP is set to All.
- Enable Use FQDN.
- Enter the desired FQDN.
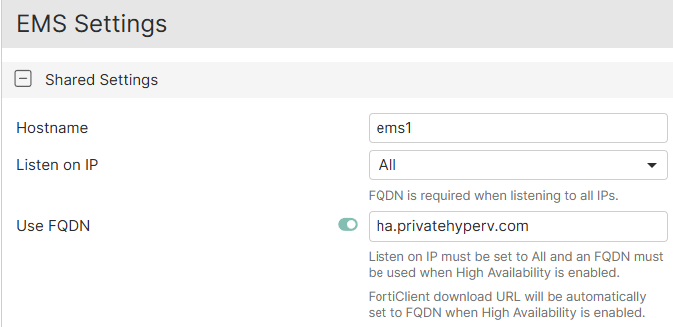
-
In the Custom hostname field, enter a virtual IP address (VIP) that is configured in the FortiGate load balancer (LB) as the VIP for EMS. In this example, the VIP is 172.16.1.50.
- Configure the High Availability Keep Alive Internal field with a value between 5 and 30 seconds.
- Go to Dashboard > Status. Confirm that the System Information widget displays that EMS is running in HA mode. If running in HA mode, the widget also lists the HA primary and secondary nodes and their statuses.
- On both nodes, do the following:
-
Configure a FortiGate as an LB for EMS HA:
- Create a health check:
- Go to Policy & Objects > Health Check. Click Create New.
For Type, select TCP.
- In the Interval field, enter 10.
- In the Timeout field, enter 2.
- In the Retry field, enter 3.
In the Port field, enter 8013. Click OK.
- Create a virtual server:
- Go to Policy & Objects and create a virtual server.
- Configure the fields as follows:
Field
Value
Virtual server IP
VIP that you configured in step 4.f. In this example, the VIP is 172.16.1.50.
Virtual server port
10443
Load Balancing method
First Alive
Health check
Monitor that you configured.
Network Type
TCP
- Under Real Servers, select Create New.
- In the IPv4 address field, enter the primary EMS node IP address. In this example, it is 192.168.1.10.
- In the Port field, enter 10443.
- In the Max connections field, enter 0.
- For Mode, select Active.
- Create a real server for the secondary EMS node. Click Save.
- Repeat steps i-ix to create five additional virtual servers. The additional servers use ports 443, 8013, 8015, 8443, and 8871, but otherwise have identical settings to the first virtual server created. If you have enabled Chromebook management, create a virtual server for port 8443. Similarly, if you require importing an ACME certificate, create a virtual server for port 80.
- Create a security policy that includes the LB virtual server as a destination address:
- Go to Policy & Objects > Firewall Policy.
- Click Create New.
- Configure the Incoming Interface and Outgoing Interface fields. The outgoing interface connects to the primary EMS node.
- For Source, select all.
- In the Destination field, select ports 10443, 443, 8013, 8015, 8443, and 8871.
- For Service, select ALL.
- For Inspection Mode, select Proxy-based.
- Save the policy.
- If the EMS nodes are in different subnets, repeat these steps to configure a policy for the secondary EMS node. In this example, the nodes are in the same subnet, so you do not need to add a separate policy for the secondary EMS.
- Create a health check:
-
After the FortiGate LB configuration is complete, you can access EMS using the VIP configured in the FortiGate LB. If after initially installing EMS 7.4.5 you need to upgrade to a newer build, repeat steps 4.a.-c. with the new installation file.
To upgrade a previously installed EMS deployment with Postgres HA using EMS PostgreSQL HA Docker to 7.4.5:
If you are upgrading a previously installed EMS deployment with Postgres HA using EMS PostgreSQL HA (Bitnami) Docker from 7.4.3 or an earlier 7.4 version to 7.4.5, you must use the following procedure to ensure that your Postgres instances are upgraded without incurring data loss.
|
|
To upgrade your EMS nodes in a high availability (HA) cluster to 7.4.5, see Upgrading EMS in HA in the EMS Administration Guide. |
- Confirm that replication extensions are enabled on each node by running the following:
docker exec -ti pg-X psql -U postgres -c "ALTER SYSTEM SET shared_preload_libraries TO pg_stat_statements, repmgr;"
Replace
pg-xwith the actual Docker container name on each node. For example, the Docker container names may be pg-1, pg-2, and so on. - Stop the containers on each node:
docker stop pg-X
Replace
pg-xwith the actual Docker container name on each node. For example, the Docker container names may be pg-1, pg-2, and so on. - Download the new image from the Fortinet Support portal and load it on the new primary node:
docker load -i forticlientems_7.4.5.2111.M_postgres-ha.tar.gz
- Create a new instance (pgn-1 in this example) that points to the existing primary volume:
docker run --restart always --detach --name pgn-1 -p 5432:5432 \
  --env POSTGRESQL_PASSWORD=<pg_password> \
  --env POSTGRESQL_DAEMON_USER=<pg_username> \
  --env REPMGR_PASSWORD=<pg_password> \
  --env REPMGR_PRIMARY_HOST=pgn-1 \
  --env REPMGR_PRIMARY_PORT=5432 \
  --env REPMGR_PARTNER_NODES=pgn-1,pgn-2:5432 \
  --env REPMGR_NODE_NAME=pgn-1 \
  --env REPMGR_NODE_NETWORK_NAME=pgn-1 \
  --env REPMGR_PORT_NUMBER=5432 \
  --env REPMGR_DEGRADED_MONITORING_TIMEOUT=-1 \
  --env REPMGR_NODE_PRIORITY=100 \
  --env REPMGR_UPGRADE_EXTENSION=yes \
  --volume pg_1_data:/fortinet/postgresql \
  --volume <path to conf.d>:/fortinet/postgresql/conf/conf.d \
  --shm-size 1g \
  --add-host pgn-1:<ip/fqdn node 1> \
  --add-host pgn-2:<ip/fqdn node 2> \
ems-postgres-ha
Replace
<pg_password>,<pg_username>, and<path to conf.d>with your actual Postgres password, username, and path toconf.dfile that you created earlier in the PostgreSQL configuration (such as/home/ems/conf.d).
Replace
<ip/fqdn xxxx>with the correct IP or FQDN to the corresponding PostgreSQL node.
- Register the new primary node by updating the extensions to recognize the new node configurations:
docker exec -it pgn-1 /opt/fortinet/scripts/postgresql-repmgr/entrypoint.sh repmgr -f /opt/fortinet/repmgr/conf/repmgr.conf primary register --force
- Download the new image from the Fortinet Support portal and load it on the new secondary node:
docker load -i forticlientems_7.4.5.2111.M_postgres-ha.tar.gz
- Create a new instance (pgn-2 in this example) that points to the existing secondary volume:
docker run --restart always --detach --name pgn-2 -p 5432:5432 \
  --env POSTGRESQL_PASSWORD=<pg_password> \
  --env POSTGRESQL_DAEMON_USER=<pg_username> \
  --env REPMGR_PASSWORD=<pg_password> \
  --env REPMGR_PRIMARY_HOST=pgn-1 \
  --env REPMGR_PRIMARY_PORT=5432 \
  --env REPMGR_PARTNER_NODES=pgn-1,pgn-2:5432 \
  --env REPMGR_NODE_NAME=pgn-2 \
  --env REPMGR_NODE_NETWORK_NAME=pgn-2 \
  --env REPMGR_PORT_NUMBER=5432 \
  --env REPMGR_DEGRADED_MONITORING_TIMEOUT=-1 \
  --env REPMGR_NODE_PRIORITY=100 \
  --env REPMGR_UPGRADE_EXTENSION=yes \
  --volume pg_1_data:/fortinet/postgresql \
  --volume <path to conf.d>:/fortinet/postgresql/conf/conf.d \
  --shm-size 1g \
  --add-host pgn-1:<ip/fqdn node 1> \
  --add-host pgn-2:<ip/fqdn node 2> \
ems-postgres-ha
Replace
<pg_password>,<pg_username>, and<path to conf.d>with your actual Postgres password, username, and path toconf.dfile that you created earlier in the PostgreSQL configuration (such as/home/ems/conf.d).
Replace
<ip/fqdn xxxx>with the correct IP or FQDN to the corresponding PostgreSQL node.
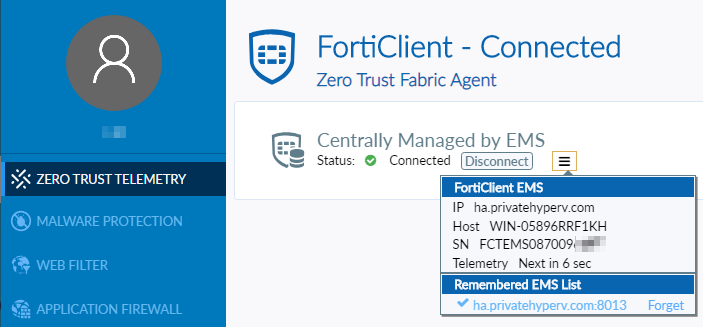
To validate the EMS HA configuration:
- Go to Deployment & Installers > Manage Deployment. Create a deployment package to deploy FortiClient to endpoints. See Adding a FortiClient installer.
- On an endpoint, download the deployment package from the download link.
- Install FortiClient on the endpoint.
- Ensure that FortiClient can register to the EMS server successfully using the FQDN.
- Simulate HA by stopping FortiClient Endpoint Management Server Monitor Service on the primary EMS node. Ensure that the secondary EMS node is now the primary.
- Ensure that FortiClient can still register to the EMS successfully using the FQDN.