
IP Protection
You can block requests from clients based upon their source IP address directly
Conversely, you can also exempt clients from scans typically included by the policy.
To configure IP Protection, you must have already enabled this module in Add Modules. See Add and Remove Modules.
IP reputation
To block the following attacks, you can configure FortiAppSec Cloud to block client access based on up-to-date threat intelligence.
- botnets
- spammers
- phishers
- malicious spiders/crawlers
- virus-infected clients
- clients using anonymizing proxies
- DDoS participants
IP reputation leverages many techniques for accurate, early, and frequently updated identification of compromised and malicious clients so you can block attackers before they target your servers. Data about dangerous clients derives from many sources around the globe, including:
- FortiGuard service statistics
- honeypots
- botnet forensic analysis
- anonymizing proxies
- 3rd party sources in the security community
From these sources, FortiAppSec Cloud compiles a reputation for each public IP address. Clients will have poor reputations if they have been participating in attacks, willingly or otherwise. Because blocking innocent clients is equally undesirable, FortiAppSec Cloud also restores the reputations of clients that have improved their behaviors. This is crucial when an infected computer is cleaned, or in DHCP or PPPoE pools where an innocent client receives an IP address that was previously leased by an attacker.
Check whether an IP address is malicious through FortiGuard IP Web Application Security Service: https://www.fortiguard.com/services/botnet.
If you believe an IP address is wrongly classified as a malicious IP, you can report it to our TAC team.
For help with Geolocation Service and issues, you can find more information at https://www.fortiguard.com/services/ipge, and submit a report at https://www.fortiguard.com/faq/ipge.
Go to ACCESS RULES > IP Protection to enable IP Reputation.
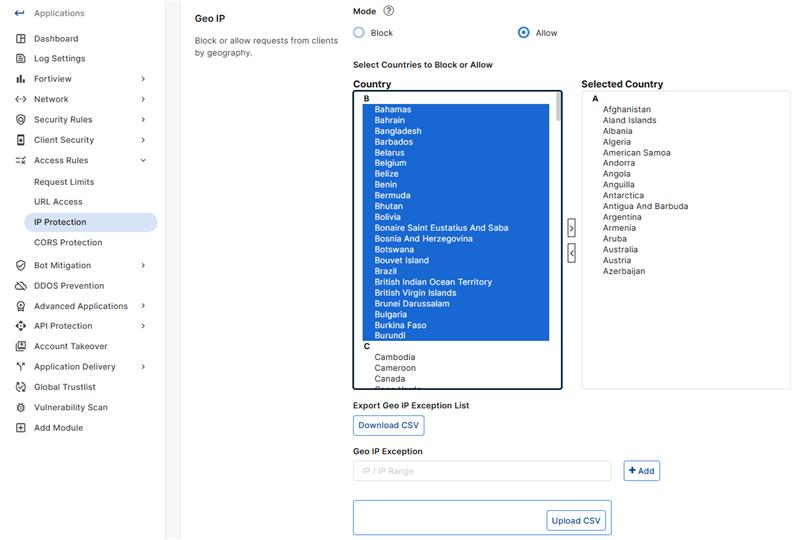
Geo IP
-
To configure blocking or allowing by geography, select a Mode to choose whether to Block or Allow the countries in the Selected Country list.
-
Select one or more regions that you want to block traffic from the Country list, then click the right arrow or double click the countries to move them to the Selected Country list on the right.
-
In addition to countries, the Country list also includes distinct territories within a country, such as Puerto Rico, and regions that are not associated with any country, such as Antarctica.
-
The action taken for the GEO IP violations is Period Block (600 seconds).
-
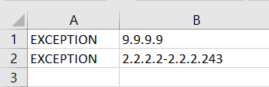
Geo IP Exception
IPs in the Geo IP Exception list are exempt from the selected security Mode. You can add them in two ways:
-
Manual entry: Enter IP addresses or IP ranges from the Selected Country list, separated by commas.
-
CSV Upload: To easily upload multiple IP addresses or IP ranges, click Upload CSV.
Please ensure each line of the CSV file is formatted as follows:
-
Column A: Contains "EXCEPTION".
-
Column B: Contains a single IP address or IP range.
-
When Mode is set to Block, traffic from IP addresses entered under Geo IP Exception are allowed. When Mode is set to Allow, traffic from these IP addresses are blocked.
While there is no maximum number of supported IP addresses, the character limit for this list is 1 048 576. Therefore, the number of supported IP addresses will vary depending on their length.
IP list
Define trusted, distrusted, or allowed client IP addresses.
Click Download CSV to download a file of your trusted and untrusted IPs.
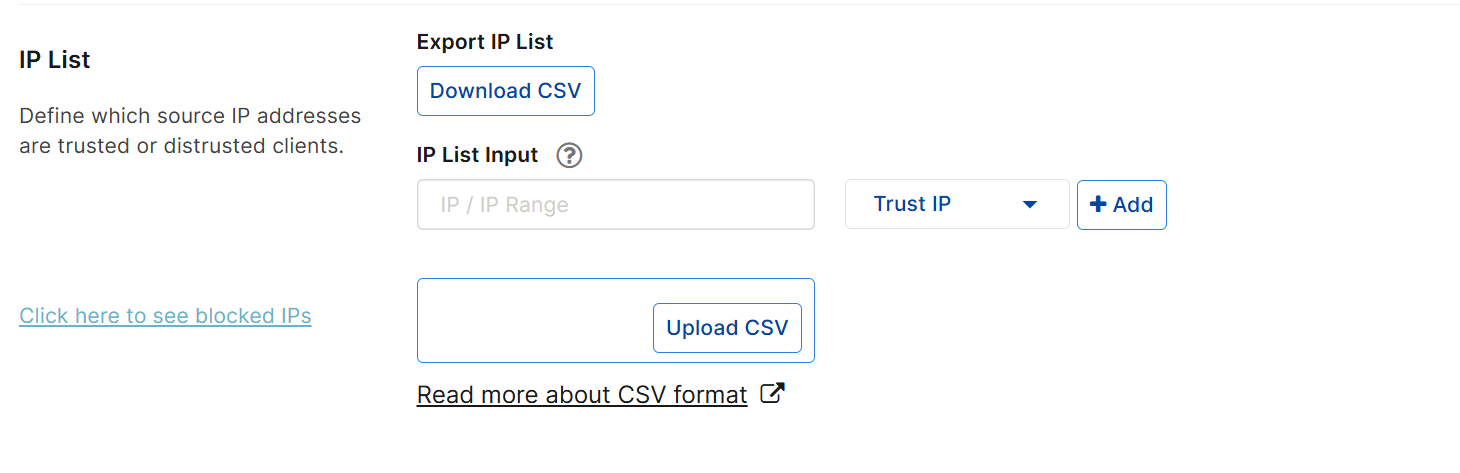
There are two ways to add IPs to your allowlist or blocklist:
- Manually input IP/IP range one by one
-
Upload a CSV file to add IPs in batch
Type the client’s source IP address, then click Add to add more.
You can enter either a single IP address or a range of addresses (for example, 172.22.14.1-172.22.14.255 or 10:200::10:1-10:200:10:100). Each entry should contain only one IP address or IP range. Both IPv4 and IPv6 addresses are supported only on AWS platform currently.
Note: A maximum number of 30,000 IPs/IP Ranges is supported, 10,000 for each IP/IP Range type.
Select a Type to indicate the action FortiAppSec Cloud takes on the input IP/IP Range. For more information on the selected Type, please refer to Type
Click Upload CSV to import a CSV file that contains multiple IPs.
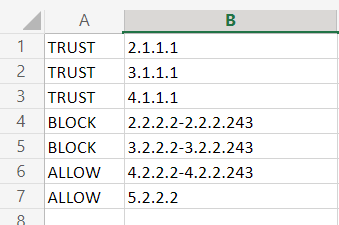
The type should be one of "BLOCK", "ALLOW","TRUST" . For more information on the selected Type, please refer to Type
Use the following format for each IP/IP range (enter one IP/IP range per line) in the CSV file:
BLOCK,<IP Address>
ALLOW,<IP Address>
TRUST,<IP Address>-<IP Address>
Type
Choose an action to take for each input IP/IP range:
- Block IP—The source IP address that is distrusted, and is permanently blocked from accessing your web servers, even if it would normally pass all other scans.
Note: If multiple clients share the same source IP address, such as when a group of clients is behind a firewall or router performing network address translation (NAT), blocking the source IP address could block innocent clients that share the same source IP address with an offending client.
- Trust IP—The source IP address is trusted and allowed to access your web servers, bypassing any further scanning by subsequent security modules.
By default, if the IP address of a request is neither in the Block IP nor Trust IP list, FortiAppSec Cloud will pass this request to other scans to decide whether it is allowed to access your web servers. However, you can define the Allow Only list so that such requests can be screened against this list before it's passed to other scans.
- Allow Only—If the source IP address is in the Allow Only list, it will be passed to other scans to decide whether it's allowed to access your web servers. If not, it will be blocked.
If this list is empty, then the source IP addresses which are not in the Block IP and Trust IP list will be passed directly to other scans.
The scan sequence for processing IP addresses is as follows: Block IP > Trust IP > Allow Only. For example, if an IP address is present in the Block IP list, the system will block it immediately without proceeding to scan against the Trust IP and Allow Only IP lists.
In other words, if an IP address appears in multiple IP lists, it will be processed only against the list which is scanned first. For example, if you wish to trust an IP range but block specific IP addresses within that range, then you can add those IP addresses to the Block IP list and the IP range in the Trust IP list. This approach will allow the IP range to be trusted while the specified IP addresses are blocked, since the Block IP list is scanned first.
Requests that are blocked according to the IP Protection lists will receive a warning message as the HTTP response. The warning message page includes ID: 70007, which is the ID of all attack log messages about requests from blocked IPs.
Blocked IPs List
Click the Click here to see blocked IPs link to view all IPs already blocked by FortiAppSec Cloud.
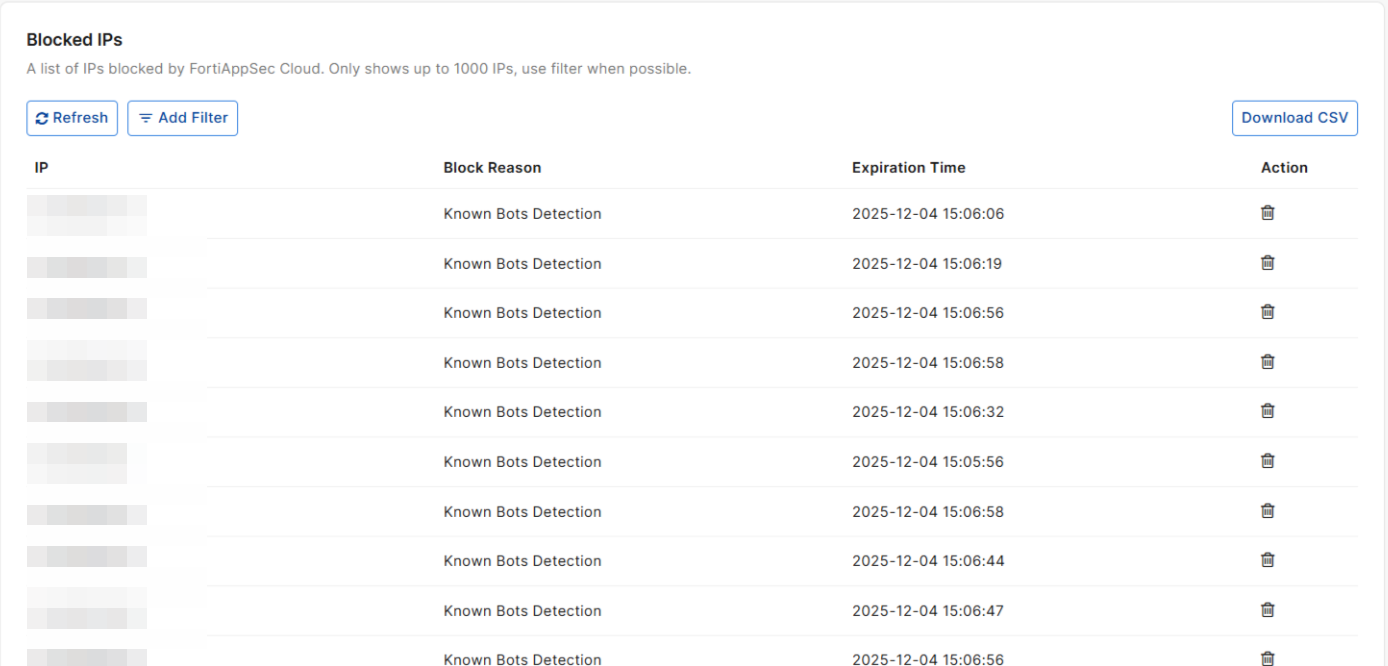
|
IP |
The blocked IP address. |
|
Block Reason |
The reason an IP address was added to the blocklist |
|
Expiration Time |
The date and time when this blocked IP will be automatically removed from the blocklist and allowed to connect again. |
|
Action |
Click the delete icon to remove this IP from the blocklist and allow future connections. |
To apply changes, click SAVE.
|
|
If you have enabled Use X-Header to Identify Original Clients' IP in Rewriting Requests, the IP address in the header will be identified as the client IP and be scanned by IP Protection. |