


Guest WLAN - Captive Portal SSID with Pre-configured Guest Passes
FortiGate enables multiple options for Guest Networking. This section covers how to secure the Guest WLAN using predefined guest users passes that can be pre-printed and handed out to visitors after checking in with an admin.
One option is to create an SSID, as covered inSSIDs for Authorized Users with WPA2/WPA3 Enterprise Security Mode. Select WPA 2 Personal or WPA3 SAE (if the clients can support it), and then fill the SAE Password or Pre-shared Key field. The key can then be shared with guests as needed.

The disadvantage to this option is that it only provides appropriate security for very small organizations, and Fortinet does not recommend this approach. While the security isolation inherent in Fortinet Security Driven Networking may be sufficient to offset much of the risk, it is better to make full use of the FortiGates capabilities.
Instead, Fortinet recommends creating guest passes that are unique to each guest user and of limited duration. We also recommend creating a guest pass administrator who can be on-site. There are four steps to set up this type of guest access:
- Create a guest group.
- Create guest users.
- Create a guest administrator who can create more passes.
- Create the Captive Portal SSID.
To create a Guest User Group:
- From the Management tab for the FortiGate you want to configure:
Navigate to Config > User & Device > Users & Groups.
Click Create New > User Group.
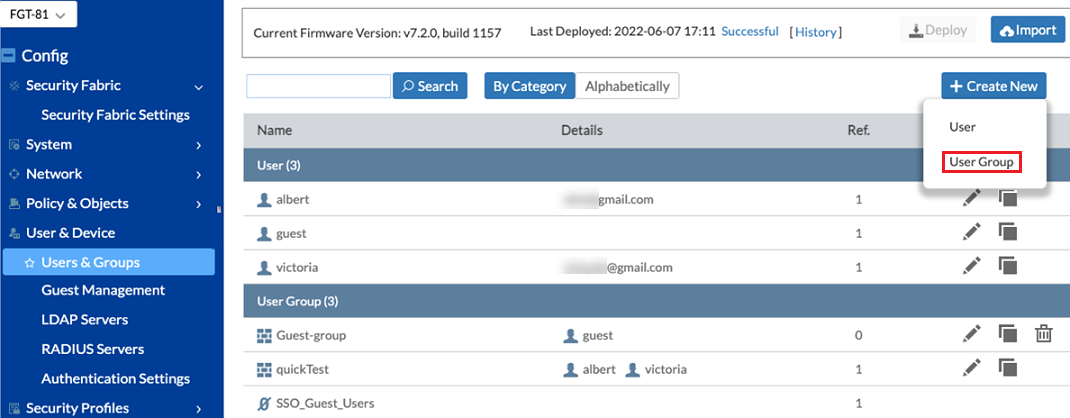
The New User Group page loads.
-
From the New User Group page, complete the following fields:
- In the Name field, enter a name for the User Group.
-
In the Type field, select Guest User Group.
The available configuration options change.
-
Enable Batch Guest Account Creation.
The available configuration options change.
- For Expire Type, select After First Login.
- Set Default Expire Time as appropriate. The default is 4 hours
- When you are finished, click Save.

To add a Guest Administrator:
The flexibility of guest administration and registration can be increased by adding one or more guest administrators, who can be local to the FortiGate site. That is, a front desk admin who can issue the guest passes.
- From the Management tab for the FortiGate you want to configure:
Navigate to Config > System > Administrator.
Click Create New.
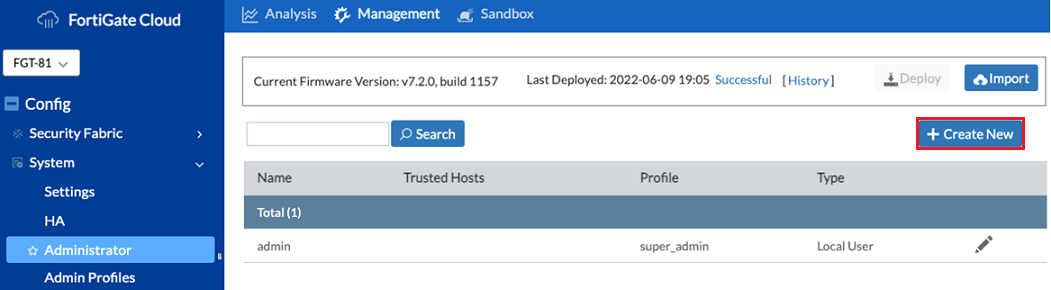
The New Administrator page loads.
-
From the New Administrator page, complete the following fields:
- In the Name field, enter a name for the Guest Administrator.
-
In the Type field, select Local User.
-
Enter a Password
-
Scroll down and check Restrict admin to guest account provisioning only.
-
Choose the Guest Group
- When you are finished, click Save.

-
Deploy the changes to the FortiGate.
Once the changes have been deployed, the Guest Administrator can log in locally to the FortiGate and generate guest passes.
Using a Guest Administrator Account
After the Guest Administrator logs into the FortiGate locally via a web browser (using https and the local IP address of the FortiGate), they are presented with a restricted screen showing existing guest accounts.
-
From the FortiGate GUI, they can double-click on any guest user to edit.
-
They can also click Create New to create a new user.
-
Depending on the specifics of the user group, fields for additional information (such as sponsor or email address) may be optional or required.
-
Click OK to create the Guest User
-

Other administrative tasks can be performed from this page.
-
To print out guest passes, select one or more guest users and click Print, or right-click and select Print from the context menu.
-
To revoke a guest pass early, select one or more guest users and then right-click and select Expire from the context menu.

An example of a Guest Pass printout:

Create a Guest SSID with Captive Portal
- From the Management tab for the FortiGate you want to configure:
Navigate to Config > FortiAP > SSIDs.
Click Create New > SSID.
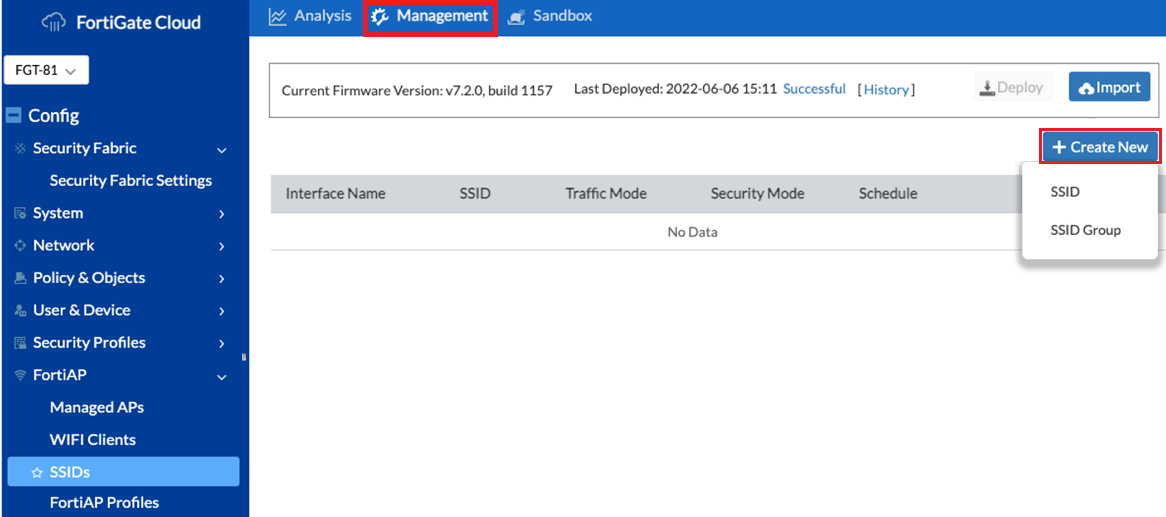
The New SSID page loads.
-
From the New SSID page, complete the following fields:
-
Enter an Interface Name.
- Set Traffic mode to Tunnel.
-
Enter the interface IP Address and set the Subnet Mask.
This is the address of the FortiGate on this subnet, and will also be the gateway address for the subnet
-
There is no need to select any of the Administrative Access options.
Administrative access options allow access to the FortiGate via this SSID. There should be no need for this when the FortiGate is managed via FortiCloud
-
Enable DHCP Server.
-
Set or adjust the DHCP Address Range.

-
- In the same New SSID page, scroll down to complete the following WIFI SETTING fields:
Name the SSIDs.
This is the over-the-air network name.
In Security Mode, select Captive Portal.
In Portal Type, select Disclaimer + Authentication.
- In Authentication Portal, select Local.
In the User Groups field, select the Guest Group you created earlier.
When you are finished, click Save.

Add Firewall Policies for the guest SSID
Once the newly configure SSID is deployed, the FortiAPs begin broadcasting the guest SSID and clients can connect to the WLAN at a Layer 2 level, but the traffic is isolated to the FortiGate WiFi Controller. The Fortinet Security Driven Networking model allows only traffic explicitly allowed via firewall policies. Firewall policies must be added to allow Internet or other network access.
To add a policy for Internet access:
- From the Management tab for the FortiGate you want to configure:
- Navigate to Policy & Objects > Firewall Policy.
Click Create New.

The New Policy page loads.
-
From the New Policy page, complete the following fields:
-
Name the policy.
-
In the Incoming Interface field, select the SSID you previously defined.
As a new interface, the FortiGate WiFi Controller created an address object.
-
In the Outgoing Interface field, select the WAN interfaces.
-
Set Source to all.
-
Set Destination to all.
-
Set Schedule to always.
-
Set Service to a more limited set of services, under the assumption that Guest networking is for Internet access only
-
Set Action to Accept.
-
For all other fields, keep the default settings.
-
Inspection mode is Flow-based.
-
NAT is enabled.
-
-
Other settings are beyond the scope of this guide, to learn more, you can refer to the FortiGate Documentation.
-
Click Save.

This is a very simple, single rule Firewall Policy set. Keep in mind, the FortiGate WiFi Controller is a full featured Next Generation Firewall (NGFW), and Firewall Policies can be as detailed as needed.
-
-
Click Deploy to deploy the configuration changes.
Once deployed, the SSID will broadcast and clients that connect to it will be able to reach the Internet.

Guest Access is now fully enabled. The FortiGate WiFi Controller remains very versatile and can support a great deal of customization of Guest Access. See https://docs.fortinet.com/product/fortigate/7.2 for more options.
As configured, the guest user will need one of the generated username/password combinations from above. When opening a browser, they will be presented with disclaimer screen to click through, and then an authentication page in order to access the Internet.
