
The Exchange connector provides a robust, platform-independent, and simple interface for communicating with Microsoft Exchange 2007-2016 Server or Office 365 using Exchange Web Services (EWS).
This document provides information about the Exchange connector, which facilitates automated interactions, with an Exchange server using FortiSOAR™ playbooks. Add the Exchange connector as a step in FortiSOAR™ playbooks and perform automated operations, such as retrieving unread emails, moving or deleting emails from the Exchange server, sending an email from the Exchange server, or running a query on the Exchange server based on the parameter (s) that you have specified.
Use the Data Ingestion Wizard to easily ingest data into FortiSOAR™ by pulling email content from Exchange. Currently, the email content ingested from Exchange is mapped to alerts in FortiSOAR™. For more information, see the Data Ingestion Support section.
IMPORTANT: The Exchange connector supports OAuth authentication and not Basic authentication as Office 365 no longer supports Basic authentication. Microsoft announced that starting October 1, 2022, basic authentication is disabled for Outlook, EWS, RPS, POP, IMAP, and EAS protocols in Exchange Online. For more information, see the Deprecation of Basic authentication in Exchange Online article.
Connector Version: 4.7.0
FortiSOAR™ Version Tested on: 7.6.4-5623
Exchange Version Tested on: Microsoft Exchange 2007-2019 Server or Office 365
Supported Authentication Types:
On-Premise Exchange Server: Basic, NTLM, and Digest
Office 365 (Cloud): OAuth 2.0
Authored By: Fortinet
Certified: Yes
Following enhancements have been made to the Exchange connector in version 4.7.0:
Inline images from MSG attachments are now rendering appropriately.
Email response body text field now no longer returns empty content.
Added attachment and inline image support to the action Send Reply.
Added following new parameters to the action Send Reply:
Cc Recipients
Attachment IRIs
Use the Content Hub to install the connector. For the detailed procedure to install a connector, click here.
You can also use the yum command to install the connector:
sudo yum install cyops-connector-exchangeBefore you begin upgrading your Exchange connector, you should stop the Listener. You can restart the Listener once your Exchange connector is upgraded. To stop the listener, clear the Enable Email Notification Service checkbox on the configuration page of the Exchange connector. For more information on the Exchange connector's configuration parameters, see the Configuration Parameters section.
If the Communications Module, which is part of the SOAR Framework Solution Pack, is not installed, then upgrading the connector from a version prior to 3.4.3 and that is enabled with the Listener to version 3.4.3 and later, requires you to modify the Set Variable step in the > Exchange > Fetch playbook to set the use_communications variable to false as shown in the following image:

For more information on the Communications Module and Use Unified Communications parameter, see the Data Ingestion Support section.
You must reconfigure the Exchange connector after upgrading the connector from any version lower than v4.2.0.
Consider upgrading your SOAR Framework solution pack to v2.2.1 if upgrading to Exchange version v4.7.0. The Create FileHash MD5 Indicator step may need de-linking if you are not upgrading to SOAR Framework solution pack v2.2.1. For de-linking instructions refer to the section De-linking Playbook Step.
You must have the hostname of the Exchange server to which you will connect and perform the automated operations required credentials based on the selected authentication method.
You must open port 993 (IMAP) on the firewall to allow communication between FortiSOAR™ and the Exchange server.
The FortiSOAR™ server should have outbound connectivity to port 443 on the Exchange Server.
Exchange v4.7.0 and later should only be installed when SOAR Framework solution pack v2.2.1 is deployed on the system. The Create FileHash MD5 Indicator step may need de-linking if you are not upgrading to SOAR Framework solution pack v2.2.1. For de-linking instructions refer to the section De-linking Playbook Step.
To extract QR codes from emails during data ingestion, install the connector QR Code Tools
For the procedure to configure a connector, click here.
IMPORTANT: After upgrading the connector from a version lower than v4.2.0, you must reconfigure the Exchange connector.
In FortiSOAR™, on the Content Hub (or Connector Store) page, click the Manage tab, and then click the Exchange connector card. On the connector popup, click the Configurations tab to enter the required configuration details:
httphttpsoutlook.office365.com. If 2FA is enabled for the Outlook Live account, use App Password in the configuration. For information on how to generate an App Password, refer https://support.microsoft.com/en-us/account-billing/using-app-passwords-with-apps-that-don-t-support-two-step-verification-5896ed9b-4263-e681-128a-a6f2979a7944Domain\Username, to access the Exchange server/Office 365 server.httphttps (default)outlook.office365.com.full_app permissions for granting your admin's consent.
false.true.Enable Email Notification Service: Select to set up a listener that would instantly notify FortiSOAR™ whenever a new email arrives in the mailbox. By default, this option is selected, i.e., set to true.
Folder Path to Monitor: Specify the path of the mailbox that you want the listener to monitor. By default, this is set to the user's Inbox; however, it can be changed to any folder by entering the path of that folder in this field. For example, to monitor a Phishing mailbox that is present within Inbox, enter Inbox/Phishing in this field.
From version 4.1.0 onwards, you can configure multiple folders that you want the listener to monitor in the same mailbox, by providing the paths of the folder, separated by a comma, within the same mailbox that you want the listener to monitor in the Folder Path to Monitor field. For example, to monitor the Inbox mailbox and the Phishing and Analysis mailboxes within the Inbox mailbox specify Inbox, Inbox/Phishing, Inbox/Analysisin the Folder Path to Monitor field.
Important: The name that you provide for the mailbox that you want to monitor must be unique for the listener to work.
Note: If you have configured the listener for a custom folder and not the Inbox, then you must update the source and source_folder variables in the Set Variable step of the > Exchange > Fetch playbook. Specify Custom Folder in the source field and the name of the folder in the source_folder field. For example, if you want to monitor the Inbox/Phishing mailbox, specify Inbox/Phishing in the source_folder field. This is required for retrieving unread emails from the specified custom folder. Refer to the following screenshot:

Listener Port: Specify the port on which to start the listener.
Note: This port is used for communication between FortiSOAR™ and the Exchange notification service process. 10011 is the default port number. You can specify any unused port number if the default port is unavailable. You can also use a similar port number for multiple Exchange connector configurations as the Exchange notification service process is capable of communicating with multiple Exchange servers.
Playbook Trigger: Specify the API endpoint used to trigger the playbook
Note: The playbook authentication method should be set to HMAC.
The following automated operations can be included in playbooks, and you can also use the annotations to access operations from FortiSOAR™
| Function | Description | Annotation and Category |
|---|---|---|
| Get Unread Emails | Gets all unread emails from your Exchange account. You can also mark the retrieved Unread emails as Read. | get_email_new Investigation |
| Create Calendar Event | Creates an event in a calendar on the Exchange Server, based on input parameters, such as subject, from date, and to date, you have specified. | create_event Investigation |
| Get Calendar Events | Gets events from the calendar on the Exchange server, based on the filter criteria, such as subject, from time, and to time, you have specified. | get_events Investigation |
| Get Contacts | Retrieves the list of contacts from the mailbox associated with your Exchange account. | get_contacts Investigation |
| Delete Email | Deletes an email from a specified folder in your Exchange account, based on the input parameters, such as message ID and delete type, you have specified. | delete_email Investigation |
| Mark Email as Read | Marks an unread email as read in your Exchange account, based on the message ID you have specified. | mark_as_read Investigation |
| Move Email | Moves an email from a specified folder to a specified folder, based on the message ID and the source and destination folder you have specified. | move_email Miscellaneous |
| Copy Email | Copy an email from a specified folder to a specified folder, based on the message ID and the source and destination folder you have specified. | copy_email Miscellaneous |
| Search Email | Runs a query in your Exchange account and searches emails, based on input parameters, such as folder name, email address, query, and other input parameters you have specified. | search_query Investigation |
| Send Email | Sends an email from your Exchange account based on the email body, recipients' email addresses, and other input parameters you have specified. | send_email Investigation |
| Send Email (Advanced) | Sends an email from your Exchange account based on the email body type, recipients' email addresses, and other input parameters you have specified. | send_email_new Investigation |
| Send Reply | Sends a reply to an email based on the message ID to which you want to send a reply, the content of the reply, and other input parameters you have specified. Note: To send a reply to an email using the message ID of the parent mail, use the message ID of the most recently received mail or the most recently sent reply. |
send_reply Investigation |
| Get Folder Metadata | Retrieves the count of all the emails, including unread emails and subfolder details, from your Exchange account for the folder you have specified. | get_folder_metadata Investigation |
| Get Unread Emails (Deprecated) | Gets all unread emails from your Exchange account. You can also mark the retrieved Unread emails as Read. Important: This operation has been retained since the new Get Unread Emails has an updated output schema. If you have used this operation earlier in an existing playbook, then the playbook would fail if this operation is removed. |
get_email Investigation |
| Add Category | Assigns categories to an email in your Exchange account based on the message ID and categories that you have specified. | add_category Containment |
| Get Category | Retrieves categories associated with the specified email in your Exchange account based on the message ID that you have specified. | get_category Investigation |
| Remove Category | Removes categories from an email in your Exchange account based on the message ID and categories that you have specified. | remove_category Investigation |
| Create Folder | Creates a new folder in the specified mailbox based on the mailbox name, parent folder path, and the folder name that you have specified. | create_folder Investigation |
| Mark Emails as Junk | Blocks the sender and moves the emails to the junk folder in an Exchange account based on the message IDs, folder name, Target Email Address, and other input parameters that you have specified. | mark_emails_as_junk Investigation |
| Parameter | Description |
|---|---|
| Target Email Address | (Optional) Specify the email address from which to get unread emails. Important: The Exchange account specified in the configuration parameters and used by the connector to log into Exchange must have either read access on this email address for delegate access type or have Impersonation rights on this email address. For more information on granting Application Impersonation Rights in Office 365, refer to the "How to Grant Application Impersonation Rights in Office 365" article. |
| Source | Select the source folder from which you want to retrieve unread emails from your Exchange account. You can choose from All, Inbox, Sent, Drafts, Trash, or Custom Folder. By default, this is set as Inbox. If you select All, then this operation will search for emails across all folders associated with your Exchange account. If you select Custom Folder, then you must specify the folder in your Exchange account from which you want to retrieve unread emails. |
| Mark as Read | Select this option, i.e., set it to True (default), to retrieve the unread emails from the Exchange account and also mark these emails as Read. By default, this is set to True. |
| Pull Oldest First | Select this option, i.e., set it to True, to retrieve the oldest unread email first from the Exchange account, i.e., if this operation is checked, then the unread emails get sorted by DateTime from oldest to newest. By default, this is unchecked, i.e., it is set as False. |
| Limit | (Optional) The maximum number of emails, based on your filter criterion, you want to include in the output of this operation. If you do not specify anything in this field then all emails based on your filter criterion will be included in the output of this operation. |
| Parse Inline Images | Select this option, i.e., set it to True, to retrieve the body of the unread emails including inline images, from the Exchange account. By default, this is set to False (the option is unchecked). |
| Save Email | Select this option, i.e., set it to True(default) to save the email as a file in the Attachments module. |
| Extract Attachment Data | Select this option, i.e., set it to True (default) to also extract the attachment data for the unread emails, if the type of the attachment is eml or msg. |
| Exclude Absolute Path in Output | Select this checkbox if you want to exclude the absolute path from this operation's output. This helps to improve the performance of connector operations, especially in the case of large mailboxes. By default, this checkbox is unchecked. |
The output contains the following populated JSON schema:
[
  {
    "epilogue": "",
    "extract_attach_data": "",
    "attachment_files": [],
    "body": {
      "html": "",
      "text": "",
      "json": "",
      "inline_images": [
        {
          "file": "",
          "metadata": {
            "md5": "",
            "sha1": "",
            "sha256": "",
            "filename": "",
            "content_type": "",
            "content_length": ""
          }
        }
      ]
    },
    "preamble": "",
    "headers": {
      "x-received": "",
      "mime-version": "",
      "message-id": "",
      "x-exchange-antispam-report-test": "",
      "x-exchange-antispam-report-cfa-test": "",
      "x-ms-office365-filtering-correlation-id": "",
      "x-ms-exchange-crosstenant-network-message-id": "",
      "x-microsoft-exchange-diagnostics": [],
      "x-ms-exchange-crosstenant-id": "",
      "x-ms-exchange-crosstenant-fromentityheader": "",
      "spamdiagnosticmetadata": "",
      "x-gm-message-state": "",
      "spamdiagnosticoutput": "",
      "to": "",
      "x-microsoft-antispam": "",
      "subject": "",
      "from": "",
      "received": [],
      "x-ms-exchange-crosstenant-originalarrivaltime": "",
      "x-microsoft-antispam-message-info": [],
      "authentication-results": "",
      "x-ms-publictraffictype": "",
      "received-spf": "",
      "x-ms-traffictypediagnostic": "",
      "x-ms-exchange-transport-crosstenantheadersstamped": "",
      "sender": "",
      "x-ms-exchange-organization-authsource": "",
      "x-ms-exchange-organization-messagedirectionality": "",
      "x-ms-exchange-organization-scl": "",
      "auto-submitted": "",
      "x-forefront-antispam-report": "",
      "x-eoptenantattributedmessage": "",
      "dkim-signature": [],
      "x-google-smtp-source": "",
      "reply-to": "",
      "x-ms-exchange-processed-by-bccfoldering": "",
      "x-google-dkim-signature": "",
      "x-ms-exchange-organization-authas": "",
      "content-type": "",
      "x-ms-exchange-organization-network-message-id": "",
      "return-path": "",
      "x-eopattributedmessage": "",
      "x-ms-exchange-transport-endtoendlatency": ""
    },
    "item_id": "",
    "attachments": [
      {
        "file": "",
        "metadata": {
          "sha256": "",
          "content_length": "",
          "content_type": "",
          "sha1": "",
          "filename": "",
          "md5": ""
        },
        "json": "",
        "text": ""
      }
    ],
    "email_as_attachment": {
      "id": "",
      "@id": "",
      "cVEs": [],
      "file": {
        "id": "",
        "@id": "",
        "size": "",
        "uuid": "",
        "@type": "",
        "assignee": "",
        "filename": "",
        "metadata": [],
        "mimeType": "",
        "thumbnail": "",
        "uploadDate": ""
      },
      "name": "",
      "type": "",
      "uuid": "",
      "@type": "",
      "tasks": [],
      "alerts": [],
      "assets": [],
      "owners": [],
      "people": [],
      "@context": "",
      "assignee": "",
      "comments": [],
      "warrooms": [],
      "incidents": [],
      "createDate": "",
      "createUser": {
        "id": "",
        "@id": "",
        "name": "",
        "uuid": "",
        "@type": "",
        "avatar": "",
        "userId": "",
        "userType": "",
        "createDate": "",
        "createUser": "",
        "modifyDate": "",
        "modifyUser": ""
      },
      "indicators": [],
      "modifyDate": "",
      "modifyUser": {
        "id": "",
        "@id": "",
        "name": "",
        "uuid": "",
        "@type": "",
        "avatar": "",
        "userId": "",
        "userType": "",
        "createDate": "",
        "createUser": "",
        "modifyDate": "",
        "modifyUser": ""
      },
      "recordTags": [],
      "userOwners": [],
      "workspaces": [],
      "description": "",
      "vulnerabilities": []
    },
    "folder_path": "",
    "parsed_attachment_data": []
  }
]| Parameter | Description |
|---|---|
| Subject | The subject line of the event that you want to create on the Exchange server. |
| Start Date | Start date and time of the event that you want to create on the Exchange server. |
| End Date | End date and time of the event that you want to create on the Exchange server. |
| Required Attendees | Email IDs of the members who are required to attend the event. You must add the email IDs in the CSV or list format. For example, @xyz.com, def@lmn.com |
| Optional Attendees | (Optional) Email IDs of the optional members who can attend the event. You must add the email IDs in the CSV or list format. |
| Body | (Optional) Details of the event that you want to create on the Exchange server. |
| Location | (Optional) Location of the event that you want to create on the Exchange server. |
| Categories | (Optional) Category of the event that you want to create on the Exchange server. You must add the categories in the CSV or list format. For example, Blue category, Green Category, etc. |
| Show As | (Optional) Status of the attendees when they are attending this event. You can choose one of the following options: - Free - Working elsewhere - Tentative - Busy - OOF |
| Reminder | (Optional) Time before the event starts when you want to set a reminder for the attendees. You can choose one of the following options: 0 minutes, 5 minutes, 10 minutes, 15 minutes, 30 minutes, 1 hour, 2 hour, 3 hour, 4 hour, 8 hour, 12 hour, 1 day, 2 day, 3 day, 1 week, or 2 week. |
| Is All Day | If you select this option, i.e., set it to True, then this sets the event as a full-day event. By default, this is set to False. |
| Is Private | If you select this option, i.e., set it to True, then this sets the event as a private event, and it can be viewed only by its attendees. By default, this is set to True. |
The output contains the following populated JSON schema:
{
  "message": ""
}Note: All the input parameters are optional. However, if you do not specify any parameter, then no filter criterion is applied, and an unfiltered list is returned.
| Parameter | Description |
|---|---|
| Subject | Subject text based on which you want to filter events on the Exchange server. |
| From Time | Start date and time from when you want to retrieve events from the Exchange server. |
| To Time | End date and time till when you want to retrieve events from the Exchange server. |
The JSON output contains the retrieved events from the calendar on the Exchange server, based on the input parameters you have specified.
The output contains the following populated JSON schema:
[
  {
      "sensitivity": "",
      "Required attendees": [],
      "Importance": "",
      "Reminder is set": "",
      "Optional attendees": [],
      "Subject": "",
      "Reminder minutes before start": "",
      "Attachments": [
          {
              "content_type": "",
              "Name": "",
              "size": ""
          }
      ],
      "Categories": [],
      "Organizer": "",
      "Legacy status": "",
      "Body": "",
      "Start": "",
      "Location": "",
      "End": "",
      "Is all day": ""
  }
]None.
The JSON output contains the retrieved contact list from the mailbox on the Exchange server.
The output contains the following populated JSON schema:
[
  {
      "CLASS": "",
      "TEL": "",
      "PRODID": "",
      "FN": "",
      "N": "",
      "EMAIL": "",
      "MAILER": "",
      "REV": "",
      "LABEL": "",
      "VERSION": "",
      "ADR": "",
      "ORG": "",
      "X-MS-SPOUSE": "",
      "X-MS-MANAGER": "",
      "X-MS-ASSISTANT": ""
  }
]| Parameter | Description |
|---|---|
| Message ID | The ID of the email that you want to delete from an Exchange account. |
| Delete Type | Type of Delete that you want to use to delete the email. You can choose from the following options: Soft Delete, Hard Delete, or Move To Trash. |
| Folder Name | (Optional) Folder in the Exchange account from which you want to delete the email. By default, this is set as Inbox. |
| Target Email Address | (Optional) The email address from which you want to delete the specified email. Important: The Exchange account that you have specified in the configuration parameters and using which the connector has logged into Exchange must have Impersonation rights on this email address. For information on how to grant Impersonation rights in Office 365, see the How to Grant Application Impersonation Rights in Office 365? article. |
The output contains the following populated JSON schema:
{
  "message": ""
}| Parameter | Description |
|---|---|
| Message ID | The ID of the email that you want to mark as read. |
| Folder Name | (Optional) Name of the folder name that contains the email message that you want to mark as read. |
The output contains the following populated JSON schema:
{
  "message": ""
}| Parameter | Description |
|---|---|
| Source Email Address | (Optional) The email address from which you want to move the specified email. Important: The Exchange account that you have specified in the configuration parameters and using which the connector has logged into Exchange must have Impersonation rights on this email address. For information on how to grant Impersonation rights in Office 365, see the How to Grant Application Impersonation Rights in Office 365? article. |
| Source | Source folder on the Exchange server from where you want to move the email. To specify the source, you can choose to specify either the Folder Name or Folder Path. If you choose Folder Name, then in the Source Folder Name parameter, specify the name of the source folder on the Exchange server from where you want to move the email. If you choose Folder Path, then in the Source Folder Path parameter, specify the path of the source folder on the Exchange server from where you want to move the email. |
| Message ID | The ID of the email that you want to move. |
| Destination Email Address | (Optional) Email address to which you want to move the specified email. Important: The Exchange account that you have specified in the configuration parameters and using which the connector has logged into Exchange must have Impersonation rights on this email address. For information on how to grant Impersonation rights in Office 365, see the How to Grant Application Impersonation Rights in Office 365? article. |
| Destination Folder | The destination folder on the Exchange server to which you want to move the email. To specify the destination, you can choose to specify either the Folder Name or Folder Path. If you choose Folder Name, then in the Destination Folder Name parameter, specify the name of the destination folder on the Exchange server to which you want to move the email. If you choose Folder Path, then in the Destination Folder Path parameter, specify the path of the destination folder on the Exchange server to which you want to move the email. |
The output contains the following populated JSON schema:
{
  "message": ""
}| Parameter | Description |
|---|---|
| Source Email Address | (Optional) The email address from which you want to copy the specified email. Important: The Exchange account that you have specified in the configuration parameters and using which the connector has logged into Exchange must have Impersonation rights on this email address. For information on how to grant Impersonation rights in Office 365, see the How to Grant Application Impersonation Rights in Office 365? article. |
| Source | Source folder on the Exchange server from where you want to copy the email. To specify the source, you can choose to specify either the Folder Name or Folder Path. If you choose Folder Name, then in the Source Folder Name parameter, specify the name of the source folder on the Exchange server from where you want to copy the email. If you choose Folder Path, then in the Source Folder Path parameter, specify the path of the source folder on the Exchange server from where you want to copy the email. |
| Message ID | The ID of the email that you want to copy. |
| Destination Email Address | (Optional) Email address to which you want to copy the specified email. Important: The Exchange account that you have specified in the configuration parameters and using which the connector has logged into Exchange must have Impersonation rights on this email address. For information on how to grant Impersonation rights in Office 365, see the How to Grant Application Impersonation Rights in Office 365? article. |
| Destination | The destination folder on the Exchange server to which you want to copy the email. To specify the destination, you can choose to specify either the Folder Name or Folder Path. If you choose Folder Name, then in the Destination Folder Name parameter, specify the name of the destination folder on the Exchange server to which you want to copy the email. If you choose Folder Path, then in the Destination Folder Path parameter, specify the path of the destination folder on the Exchange server to which you want to copy the email. |
The output contains the following populated JSON schema:
{
  "message": ""
}Note: All the input parameters are optional. However, if you do not specify any parameter, then no filter criterion is applied, and an unfiltered list is returned.
| Parameter | Description |
|---|---|
| Target Email Address | (Optional) Specify the email address in which to search for emails. Important: The Exchange account that you have specified in the configuration parameters and using which the connector has logged into Exchange must have Impersonation rights on this email address. For information on how to grant Impersonation rights in Office 365, see the How to Grant Application Impersonation Rights in Office 365? article. |
| Folder Name | Specify the folder in the Exchange account based on which you want to search for emails. Note: If you enter All in this field, then this operation will search for emails across all folders associated with your Exchange account. |
| Query Type | Select the type of query that you want to use to search for emails on your Exchange account. You can choose from the following options: - Basic: Specify values in the following fields: - Subject: Specify the Subject of the email message based on which you want to search emails on your Exchange account. - Body: Content within the body of the email based on which you want to search emails on the Exchange account. - Sender: Email address of the sender based on which you want to search emails on the Exchange account. - Query: Search parameters based on which you want to search emails on the Exchange server in the form of a query. Accepts input in the dictionary format. For example: {'subject__icontains' : _365_,datetime_receivedgt: '2018-01-20T18:30:00.000Z'}You can also provide options such as: - `subjectexact='foo' // Returns items where the subject is 'foo'. Same as the filter(subject='foo')<br /> -subjectiexact='foo'// Returns items where subject is _foo_,FOOorFoo<br /> -subject_contains='foo'//Returns items where the subject containsfoo<br /> -subject_icontains<br /> -subject_startswith<br /> -subject_istartswith<br />- **Advanced**: Specify the query based on which you want to search emails on the Exchange server. For example:<br /> -Q(subjectiexact='foo') | Q(subjectcontains='bar')) & ~Q(datetime_receivedgt='2022-12-30T12:30:50Z')<br /> -((Q(sendericontains ='domain1') | Q(sendericontains='domain2') | Q(sendericontains='domain3')) | Q(subject_icontains='request')) & Q(datetime_createdgt='2021-12-12')<br /> -Q(is_read=False) & Q(has_attachments=True) & Q(subjectstartswith='TEST')<br /> -Q(is_read=False) & Q(has_attachments=True) & ~Q(subject__startswith='View')<br /> -((Q(display_toistartswith='qa@') | Q(display_to__istartswith='snikam@')) & Q(datetime_sent_gte='2023-06-22T00:00:00Z')) & ~Q(body` |
| Pull Oldest First | Select this option, i.e., set it to True to pull the oldest email first from the Exchange account, i.e., if this operation is checked, then the emails get sorted by DateTime from oldest to newest. By default, this is unchecked, i.e., it is set as False. |
| Parse Inline Images | Select this option, i.e., set it to True, to retrieve the body of the unread emails including inline images, from the Exchange account. By default, this is not selected, i.e., set to False. |
| Extract Attachment Data | Select this option, i.e., set it to True (default) to also extract the attachment data for the searched emails, if the type of the attachment is eml or msg. |
| Exclude Absolute Path in Output | Select this checkbox if you want to exclude the absolute path from this operation's output. This helps to improve the performance of connector operations, especially in the case of large mailboxes. By default, this checkbox is unchecked. |
| Save Email | (Optional) Select this option, i.e., set it to True, to save the email as a file in the Attachments module. |
| Limit | The maximum number of emails, based on your filter criterion, you want to include in the output of this operation. If you do not specify anything in this field then all emails based on your filter criterion will be included in the output of this operation. |
The JSON output contains the details of all emails that match the search criteria that you have specified.
The output contains the following populated JSON schema:
{
  "emails": [
    {
      "epilogue": "",
      "attachment_files": [],
      "body": {
        "html": "",
        "text": "",
        "json": "",
        "inline_images": [
          {
            "file": "",
            "metadata": {
              "md5": "",
              "sha1": "",
              "sha256": "",
              "filename": "",
              "content_type": "",
              "content_length": ""
            }
          }
        ]
      },
      "preamble": "",
      "headers": {
        "X-Received": "",
        "MIME-Version": "",
        "Message-ID": "",
        "X-Exchange-Antispam-Report-Test": "",
        "X-Exchange-Antispam-Report-CFA-Test": "",
        "X-MS-Office365-Filtering-Correlation-Id": "",
        "X-MS-Exchange-CrossTenant-Network-Message-Id": "",
        "X-Microsoft-Exchange-Diagnostics": [],
        "X-MS-Exchange-CrossTenant-Id": "",
        "X-MS-Exchange-CrossTenant-FromEntityHeader": "",
        "SpamDiagnosticMetadata": "",
        "X-Gm-Message-State": "",
        "SpamDiagnosticOutput": "",
        "To": "",
        "X-Microsoft-Antispam": "",
        "Subject": "",
        "From": "",
        "Received": [],
        "X-MS-Exchange-CrossTenant-OriginalArrivalTime": "",
        "X-Microsoft-Antispam-Message-Info": [],
        "Authentication-Results": "",
        "X-MS-PublicTrafficType": "",
        "Received-SPF": "",
        "X-MS-TrafficTypeDiagnostic": "",
        "X-MS-Exchange-Transport-CrossTenantHeadersStamped": "",
        "Sender": "",
        "X-MS-Exchange-Organization-AuthSource": "",
        "X-MS-Exchange-Organization-MessageDirectionality": "",
        "X-MS-Exchange-Organization-SCL": "",
        "Auto-Submitted": "",
        "X-Forefront-Antispam-Report": "",
        "X-EOPTenantAttributedMessage": "",
        "DKIM-Signature": [],
        "X-Google-Smtp-Source": "",
        "Reply-To": "",
        "X-MS-Exchange-Processed-By-BccFoldering": "",
        "X-Google-DKIM-Signature": "",
        "X-MS-Exchange-Organization-AuthAs": "",
        "Content-Type": "",
        "X-MS-Exchange-Organization-Network-Message-Id": "",
        "Return-Path": "",
        "X-EOPAttributedMessage": "",
        "X-MS-Exchange-Transport-EndToEndLatency": ""
      },
      "file": "",
      "item_id": "",
      "attachments": [
        {
          "file": "",
          "json": "",
          "text": "",
          "metadata": {
            "md5": "",
            "sha1": "",
            "sha256": "",
            "filename": "",
            "content_type": "",
            "content_length": ""
          },
          "detected_metadata": {
            "md5": "",
            "sha1": "",
            "sha256": "",
            "filename": "",
            "content_type": "",
            "content_length": ""
          }
        }
      ],
      "email_as_attachment": {
        "id": "",
        "@id": "",
        "cVEs": [],
        "file": {
          "id": "",
          "@id": "",
          "size": "",
          "uuid": "",
          "@type": "",
          "assignee": "",
          "filename": "",
          "metadata": [],
          "mimeType": "",
          "thumbnail": "",
          "uploadDate": ""
        },
        "name": "",
        "type": "",
        "uuid": "",
        "@type": "",
        "tasks": [],
        "alerts": [],
        "assets": [],
        "owners": [],
        "people": [],
        "@context": "",
        "assignee": "",
        "comments": [],
        "warrooms": [],
        "incidents": [],
        "createDate": "",
        "createUser": {
          "id": "",
          "@id": "",
          "name": "",
          "uuid": "",
          "@type": "",
          "avatar": "",
          "userId": "",
          "userType": "",
          "createDate": "",
          "createUser": "",
          "modifyDate": "",
          "modifyUser": ""
        },
        "indicators": [],
        "modifyDate": "",
        "modifyUser": {
          "id": "",
          "@id": "",
          "name": "",
          "uuid": "",
          "@type": "",
          "avatar": "",
          "userId": "",
          "userType": "",
          "createDate": "",
          "createUser": "",
          "modifyDate": "",
          "modifyUser": ""
        },
        "recordTags": [],
        "userOwners": [],
        "workspaces": [],
        "description": "",
        "vulnerabilities": []
      },
      "folder_path": "",
      "parsed_attachment_data": []
    }
  ],
  "search_fields": ""
}Important: For this operation to work, you must have the FortiSOAR™ Built-in connector: "Utilities" (minimum version required is 2.0.1) installed on your system. For more information on FortiSOAR™ Built-in connectors, see FortiSOAR™ product documentation.
| Parameter | Description |
|---|---|
| Subject | (Optional) The subject of the email message that you want to send from the Exchange account. |
| TO Recipients | Email IDs of the members to whom you want to send the email message from the Exchange account. You must add the email IDs in the CSV or list format. For example, abc@xyz.com, def@lmn.com Important: You must specify email ID(s) in at least one of the following fields: TO Recipients, CC Recipients, or BCC Recipients. |
| CC Recipients | Email IDs of the members to be added to the CC list of the email message that you want to send from the Exchange account. You must add the email IDs in the CSV or list format. |
| BCC Recipients | Email IDs of the members to be added to the BCC list of the email messages that you want to send from the Exchange account. You must add the email IDs in the CSV or list format. |
| Body | (Optional) Message or content of the email that you want to send from the Exchange account. |
| Attachment IRIs | (Optional) List of IRI ID(s) of the file (s) that you want to attach to the email that you want to send from the Exchange server. IRI IDs are used to access files from the Attachments module. You must add the Attachment IRIs in the CSV or list format. |
| Inline Attachment IRIs | (Optional) List of IRI ID(s) of the file (s) that you want to add inline to the email that you want to send from the Exchange server. You can add the image content inline in the email body using its UUIDs. For example, <img src="cid%3Adfe26867-01a1-4969-8168-8c8882586538"> |
The output contains the following populated JSON schema:
{
  "message": ""
}| Parameter | Description |
|---|---|
| To Recipients | Specify email IDs of the recipients to send the email message from the Exchange account. You must add the email IDs in the CSV or list format. For example: abc@xyz.com, def@lmn.comIMPORTANT: You must specify email ID(s) in at least ONE of the following fields: TO Recipients, CC Recipients, or BCC Recipients. |
| Cc Recipients | (Optional) Specify the email IDs of the recipients to be added in the Cc list of the email message to send from the Exchange account. You must add the email IDs in the CSV or list format. |
| Bcc Recipients | (Optional) Specify the email IDs of the recipients to be added in the Bcc list of the email message that you want to send from the Exchange account. You must add the email IDs in the CSV or list format. |
| Body Type | Select the format in which you want to send the email. You can choose from the following options: - Rich Text: Select this option to add formatted content, images, and custom jinja expressions using dynamic values. Specify values in the following fields: - Subject: Specify a subject of the email being sent. - Body: Add formatted content, images, and jinja expressions with dynamic values. - Email Template: Select a template, in the Email Template field, to use when sending emails to users. Options are dynamically fetched from Resources > Email Templates in FortiSOAR. |
| Attachment IRIs | (Optional) Specify a list of IRIs of the file to attach to the email being sent from the Exchange server. IRI IDs are used to access files from the Attachments module. You can add multiple IRIs as comma-separated values or as a list. |
| Inline Attachment IRIs | (Optional) Specify a list of IRIs of the file to add inline to the email being sent from the Exchange server. You can add the image content inline in the email body using the image's UUID as an src attribute. For example, <img src="uuid_for_inline_images"> |
The output contains the following populated JSON schema:
{
  "message": ""
}| Parameter | Description |
|---|---|
| Target Email Address | (Optional) Specify the email address from to send the reply. Important: The Exchange account specified in the configuration parameters and used by the connector to log into Exchange must have both read and write access on this email address for delegate access type or have Impersonation rights on this email address. For more information on granting Application Impersonation Rights in Office 365, refer to the "How to Grant Application Impersonation Rights in Office 365" article. |
| Message ID | The ID of the email to which you want to send a reply. |
| Reply all | Select this checkbox to send the reply to the sender of the previous message and everyone who received the original email. |
| Subject | (Optional) The subject of the email message that you want to send as a reply to the specified email from the Exchange account. |
| To Recipients | (Optional) Specify the email IDs of the members to whom you want to send the reply email message from the Exchange account. These email IDs are in addition to the email address of the original sender of the email. You must add the email IDs in the CSV or list format. |
| Cc Recipients | (Optional) Specify the email IDs of the members to be added to the CC list of the email message that you want to send from the Exchange account. You must add the email IDs in the CSV or list format. |
| Body | Message or content of the email that you want to send as a reply to the specified email from the Exchange account. |
| Attachment IRIs | (Optional) Specify a list of IRI ID(s) of the file (s) to attach to the email being sent from the Exchange server. IRI IDs are used to access files from the Attachments module. You must add the Attachment IRIs in the CSV or list format. |
The output contains the following populated JSON schema:
{
  "message": ""
}| Parameter | Description |
|---|---|
| Source | Select the source folder whose total email count, including unread emails and subfolder details you want to retrieve from your Exchange account. You can choose from Inbox, Sent, Drafts, Trash, or Custom Folder. By default, this is set as Inbox. If you select Custom Folder, then you must specify the folder in your Exchange account from which you want to retrieve unread emails. |
The output contains the following populated JSON schema:
{
  "folder": "",
  "total_email_count": "",
  "unread_email_count": "",
  "child_folder_count": "",
  "child_folder_metadata": []
}Note: This operation is deprecated and replaced with the "Get Unread Emails" operation. However, this operation has been retained since the new "Get Unread Emails" has an updated output schema. Therefore, if you had used this operation earlier in an existing playbook, then the playbook would fail if this operation is completely removed.
| Parameter | Description |
|---|---|
| Source | Select the source folder from which you want to retrieve unread emails from your Exchange account. You can choose from All, Inbox, Sent, Drafts, Trash, or Custom Folder. By default, this is set as Inbox. If you select All, then this operation will search for emails across all folders associated with your Exchange account. If you select Custom Folder, then you must specify the folder in your Exchange account from which you want to retrieve unread emails. |
| Mark as Read | Select this option, i.e., set it to True (default) to retrieve the unread emails from the Exchange account and also mark these emails as Read. By default, this is set to True. |
| Pull Oldest First | Select this option, i.e., set it to True to retrieve the oldest unread email first from the Exchange account, i.e., if this operation is checked, then the unread emails get sorted by DateTime from oldest to newest. By default, this is unchecked, i.e., it is set as False. |
| Limit | (Optional) The maximum number of emails, based on your filter criterion, you want to include in the output of this operation. If you do not specify anything in this field then all emails based on your filter criterion will be included in the output of this operation. |
| Parse Inline Images | Select this option, i.e., set it to True, to retrieve the body of the unread emails including inline images, from the Exchange account. By default, this is set to False (the option is unchecked). |
| Save Email | Select this option, i.e., set it to True(default) to save the email as a file in the Attachments module. |
| Extract Attachment Data | Select this option, i.e., set it to True (default) to also extract the attachment data for the unread emails, if the type of the attachment is eml or msg. |
The output contains the following populated JSON schema:
[
  {
      "epilogue": "",
      "attachment_files": [],
      "body": {
          "html": "",
          "text": "",
          "json": ""
      },
      "preamble": "",
      "headers": {
          "X-Received": "",
          "MIME-Version": "",
          "Message-ID": "",
          "X-Exchange-Antispam-Report-Test": "",
          "X-Exchange-Antispam-Report-CFA-Test": "",
          "X-MS-Office365-Filtering-Correlation-Id": "",
          "X-MS-Exchange-CrossTenant-Network-Message-Id": "",
          "X-Microsoft-Exchange-Diagnostics": [],
          "X-MS-Exchange-CrossTenant-Id": "",
          "X-MS-Exchange-CrossTenant-FromEntityHeader": "",
          "SpamDiagnosticMetadata": "",
          "X-Gm-Message-State": "",
          "SpamDiagnosticOutput": "",
          "To": "",
          "X-Microsoft-Antispam": "",
          "Subject": "",
          "From": "",
          "Received": [],
          "X-MS-Exchange-CrossTenant-OriginalArrivalTime": "",
          "X-Microsoft-Antispam-Message-Info": [],
          "Authentication-Results": "",
          "X-MS-PublicTrafficType": "",
          "Received-SPF": "",
          "X-MS-TrafficTypeDiagnostic": "",
          "X-MS-Exchange-Transport-CrossTenantHeadersStamped": "",
          "Sender": "",
          "X-MS-Exchange-Organization-AuthSource": "",
          "X-MS-Exchange-Organization-MessageDirectionality": "",
          "X-MS-Exchange-Organization-SCL": "",
          "Auto-Submitted": "",
          "X-Forefront-Antispam-Report": "",
          "X-EOPTenantAttributedMessage": "",
          "DKIM-Signature": [],
          "X-Google-Smtp-Source": "",
          "Reply-To": "",
          "X-MS-Exchange-Processed-By-BccFoldering": "",
          "X-Google-DKIM-Signature": "",
          "X-MS-Exchange-Organization-AuthAs": "",
          "Content-Type": "",
          "X-MS-Exchange-Organization-Network-Message-Id": "",
          "Return-Path": "",
          "X-EOPAttributedMessage": "",
          "X-MS-Exchange-Transport-EndToEndLatency": ""
      },
      "item_id": "",
      "attachments": [
          {
              "file": "",
              "metadata": {
                  "sha256": "",
                  "content_length": "",
                  "content_type": "",
                  "sha1": "",
                  "filename": "",
                  "md5": ""
              },
              "json": "",
              "text": ""
          }
      ],
      "email_as_attachment": "",
      "folder_path": "",
      "parsed_attachment_data": []
  }
]| Parameter | Description |
|---|---|
| Source | (Optional) Name of the source folder from which you want to retrieve the email to which you want to add categories. You can choose from the following options: All, Inbox, Sent, Drafts, Trash, or Custom Folder. If you choose Custom Folder, then you must specify the following parameter: - Folder Name: Name of the folder from which you want to retrieve the email. |
| Message ID | The message ID of the email to which you want to assign the specified categories. |
| Categories | The CSV list of categories that you want to assign to the specified email. |
The output contains the following populated JSON schema:
{
  "status": "",
  "message": "",
  "message_id": "",
  "categories": [],
  "subject": ""
}| Parameter | Description |
|---|---|
| Source | (Optional) Name of the source folder from which you want to retrieve the email whose categories you want to retrieve. You can choose from the following options: All, Inbox, Sent, Drafts, Trash, or Custom Folder. If you choose Custom Folder, then you must specify the following parameter: - Folder Name: Name of the folder from which you want to retrieve the email. |
| Message ID | The message ID of the email whose categories you want to retrieve. |
The output contains the following populated JSON schema:
{
  "status": "",
  "message": "",
  "message_id": "",
  "categories": [],
  "subject": ""
}| Parameter | Description |
|---|---|
| Source | (Optional) Name of the source folder from which you want to retrieve the email whose categories you want to remove. You can choose from the following options: All, Inbox, Sent, Drafts, Trash, or Custom Folder. If you choose Custom Folder, then you must specify the following parameter: - Folder Name: Name of the folder from which you want to retrieve the email. |
| Message ID | The message ID of the email from which you want to remove the specified categories. |
| Categories | The CSV list of categories that you want to remove from the specified email. |
The output contains the following populated JSON schema:
{
  "status": "",
  "message": "",
  "message_id": "",
  "removed": [],
  "not_found": [],
  "subject": ""
}| Parameter | Description |
|---|---|
| Target Email Address | (Optional) Specify the email address of the mailbox to create a new folder. If this value is not specified, the default value of Email Address from configuration is used. |
| Parent Folder Path | (Optional) Specify the path of the parent folder in which you want to create the new folder. If the parent folder path is not provided, /root/Top of Information Store is considered as the default value. |
| Folder Name | Specify a name for the newly created folder. |
The output contains the following populated JSON schema:
{
  "status": "",
  "message": "",
  "folder_absolute_path": "",
  "folder_creation_status": ""
}| Parameter | Description |
|---|---|
| Message IDs | Specify the IDs of the emails, in CSV format, to mark as junk in the Exchange account. |
| Folder Name | (Optional) Specify the name of the folder in the Exchange account from which you want to mark the email as junk. By default, it searches all folders. |
| Mark as Read | (Optional) Select this option to mark emails as Read after they have been marked as Junk. By default, this is set to False. |
| Target Email Address | (Optional) Specify the email address from which to mark the specified email as Junk. Important: The Exchange account that you have specified in the configuration parameters and using which the connector has logged into Exchange must have Impersonation rights on this email address. For information on how to grant Impersonation rights in Office 365, see the How to Grant Application Impersonation Rights in Office 365? article. |
The output contains the following populated JSON schema:
{
  "marked_as_junk": [
      {
          "message_id": ""
      }
  ],
  "message_ids_not_found": []
}The Sample - Exchange - 4.7.0 playbook collection comes bundled with the Exchange connector. This playbook contains steps using which you can perform all supported actions. You can see the bundled playbooks in the Automation > Playbooks section in FortiSOAR™ after importing the Exchange connector.
Calendar : Create Calendar Event
Calendar : Get Calendar Events
Categorize : Add Category
Categorize : Get Category
Categorize : Remove Category
Contacts : Get Contacts
Email : Copy Email
Email : Delete Email
Email : Mark Email as Read
Email : Move Email
Email : Search Email
Email : Send Email
Email : Send Reply
> Exchange > Create Indicators and Attachments
> Exchange > Extract File Indicators and Create Alert with the Linked Indicators
> Exchange > Fetch
Exchange > Ingest
> Exchange > Process Email
Folder : Get Folder Metadata
Get Unread Emails
Create Folder
Send Email (Advanced)
Mark Emails as Junk
Note: If you are planning to use any of the sample playbooks in your environment, ensure that you clone those playbooks and move them to a different collection since the sample playbook collection gets deleted during the connector upgrade and delete.
Use the Data Ingestion Wizard to easily ingest data into FortiSOAR™ by pulling email content from Exchange. Currently, email content ingested from Exchange is mapped to "alerts" in FortiSOAR™. For more information on the Data Ingestion Wizard, see the "Connectors Guide" in the FortiSOAR™ product documentation.
The following changes have been made to the process of extracting attachments, from Exchange v4.2.0 onwards:
Support has been added for extracting .zip attachments. For more effective content extraction from zipped files, use SOAR Framework Solution Pack v2.1.1 or later. For more information on the SOAR Framework Solution Pack, see FortiSOAR Content Hub.
If the .zip file contains a single .eml file, this .eml file will be extracted.
If the .zip file contains multiple non-email files, then their respective attachments and indicators are created along with the parent zip file.
Support has been added for single-level zip extraction only.
Inline image indicators or attachments will no longer be created.
You can configure data ingestion using the "Data Ingestion Wizard" to seamlessly map the incoming Exchange email content to FortiSOAR™ "Alerts".
The Data Ingestion Wizard enables you to configure the scheduled pulling of data from Exchange into FortiSOAR™. It also lets you pull some sample data from Exchange using which you can define the mapping of data between Exchange and FortiSOAR™. The mapping of common fields is generally already done by the Data Ingestion Wizard; users mostly required to only map any custom fields that are added to email content from Exchange.
To begin configuring data ingestion, click Configure Data Ingestion on the Exchange connector's "Configurations" page.
Click Let's Start by fetching some data, to open the Fetch Sample Data screen.
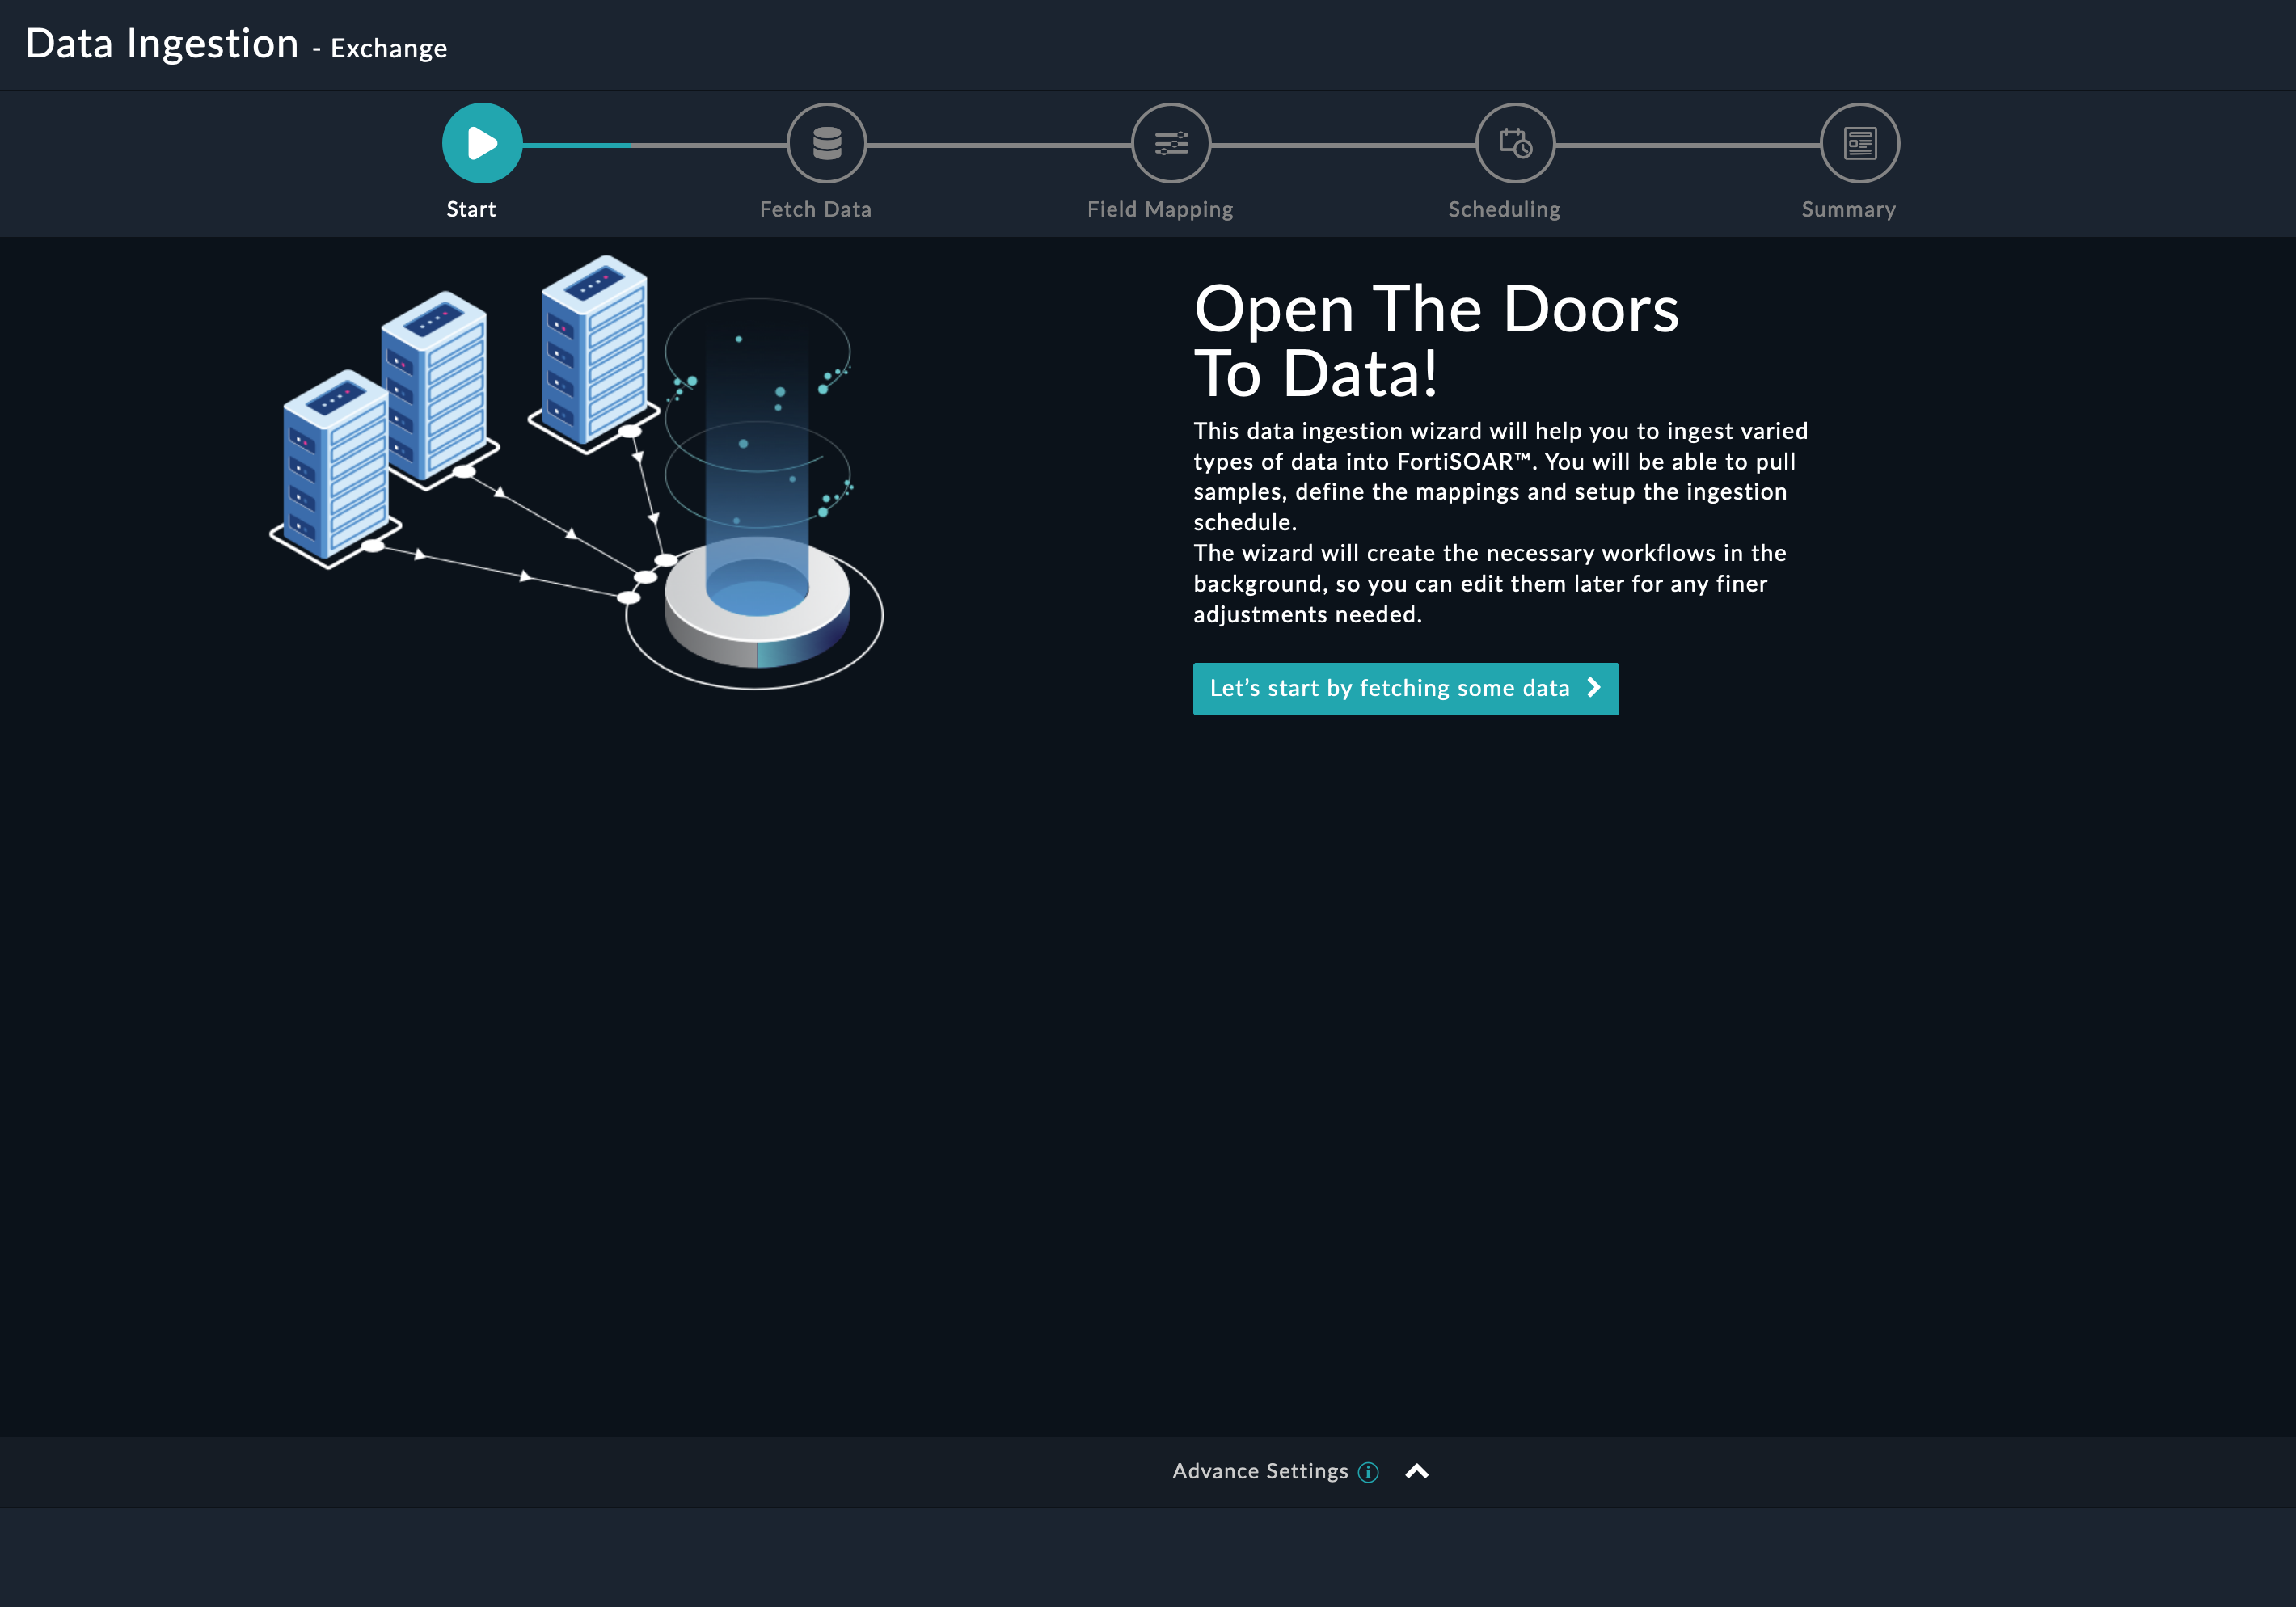
Sample data is required to create a field mapping between the Exchange email data and FortiSOAR™. The sample data is pulled from connector actions or ingestion playbooks.
On the Fetch Data screen, provide the configurations required to fetch email data from Exchange.
Specify a Target Email Address from which to fetch emails. The configured account must have appropriate delegate or impersonation rights on this email address.
From the Source drop-down list. choose the folder from which the unread emails need to be retrieved from the Exchange server. By default, this is set as Inbox.
You can select the Fetch Inline Image checkbox if you want to include the inline images while retrieving the body of the unread emails from the Exchange server.
Select the Use Unified Communications checkbox to allow communication with external entities, for example, other SOC teams using emails, instant messaging, etc. from within an alert generated in FortiSOAR™. For "Unified Communications" to work, you must install and configure the SOAR Framework Solution Pack on your FortiSOAR™ instance. For more information on the SOAR Framework Solution Pack see the SOAR Framework Solution Pack documentation.
Specify the Emails to Ingest per Execution if you want to limit the emails to ingest per execution of data ingestion.

Once you have completed specifying the configurations, click Fetch Data.
On the Field Mapping screen, map the fields of an email ingested from Exchange to the fields of an alert present in FortiSOAR™.
To map a field, click the key in the sample data to add the "jinja" value of the field. For example, to map the fromparameter of an email ingested from Exchange to the Email From parameter of a FortiSOAR™ alert, click the Email From field and then click the from field to populate its keys:
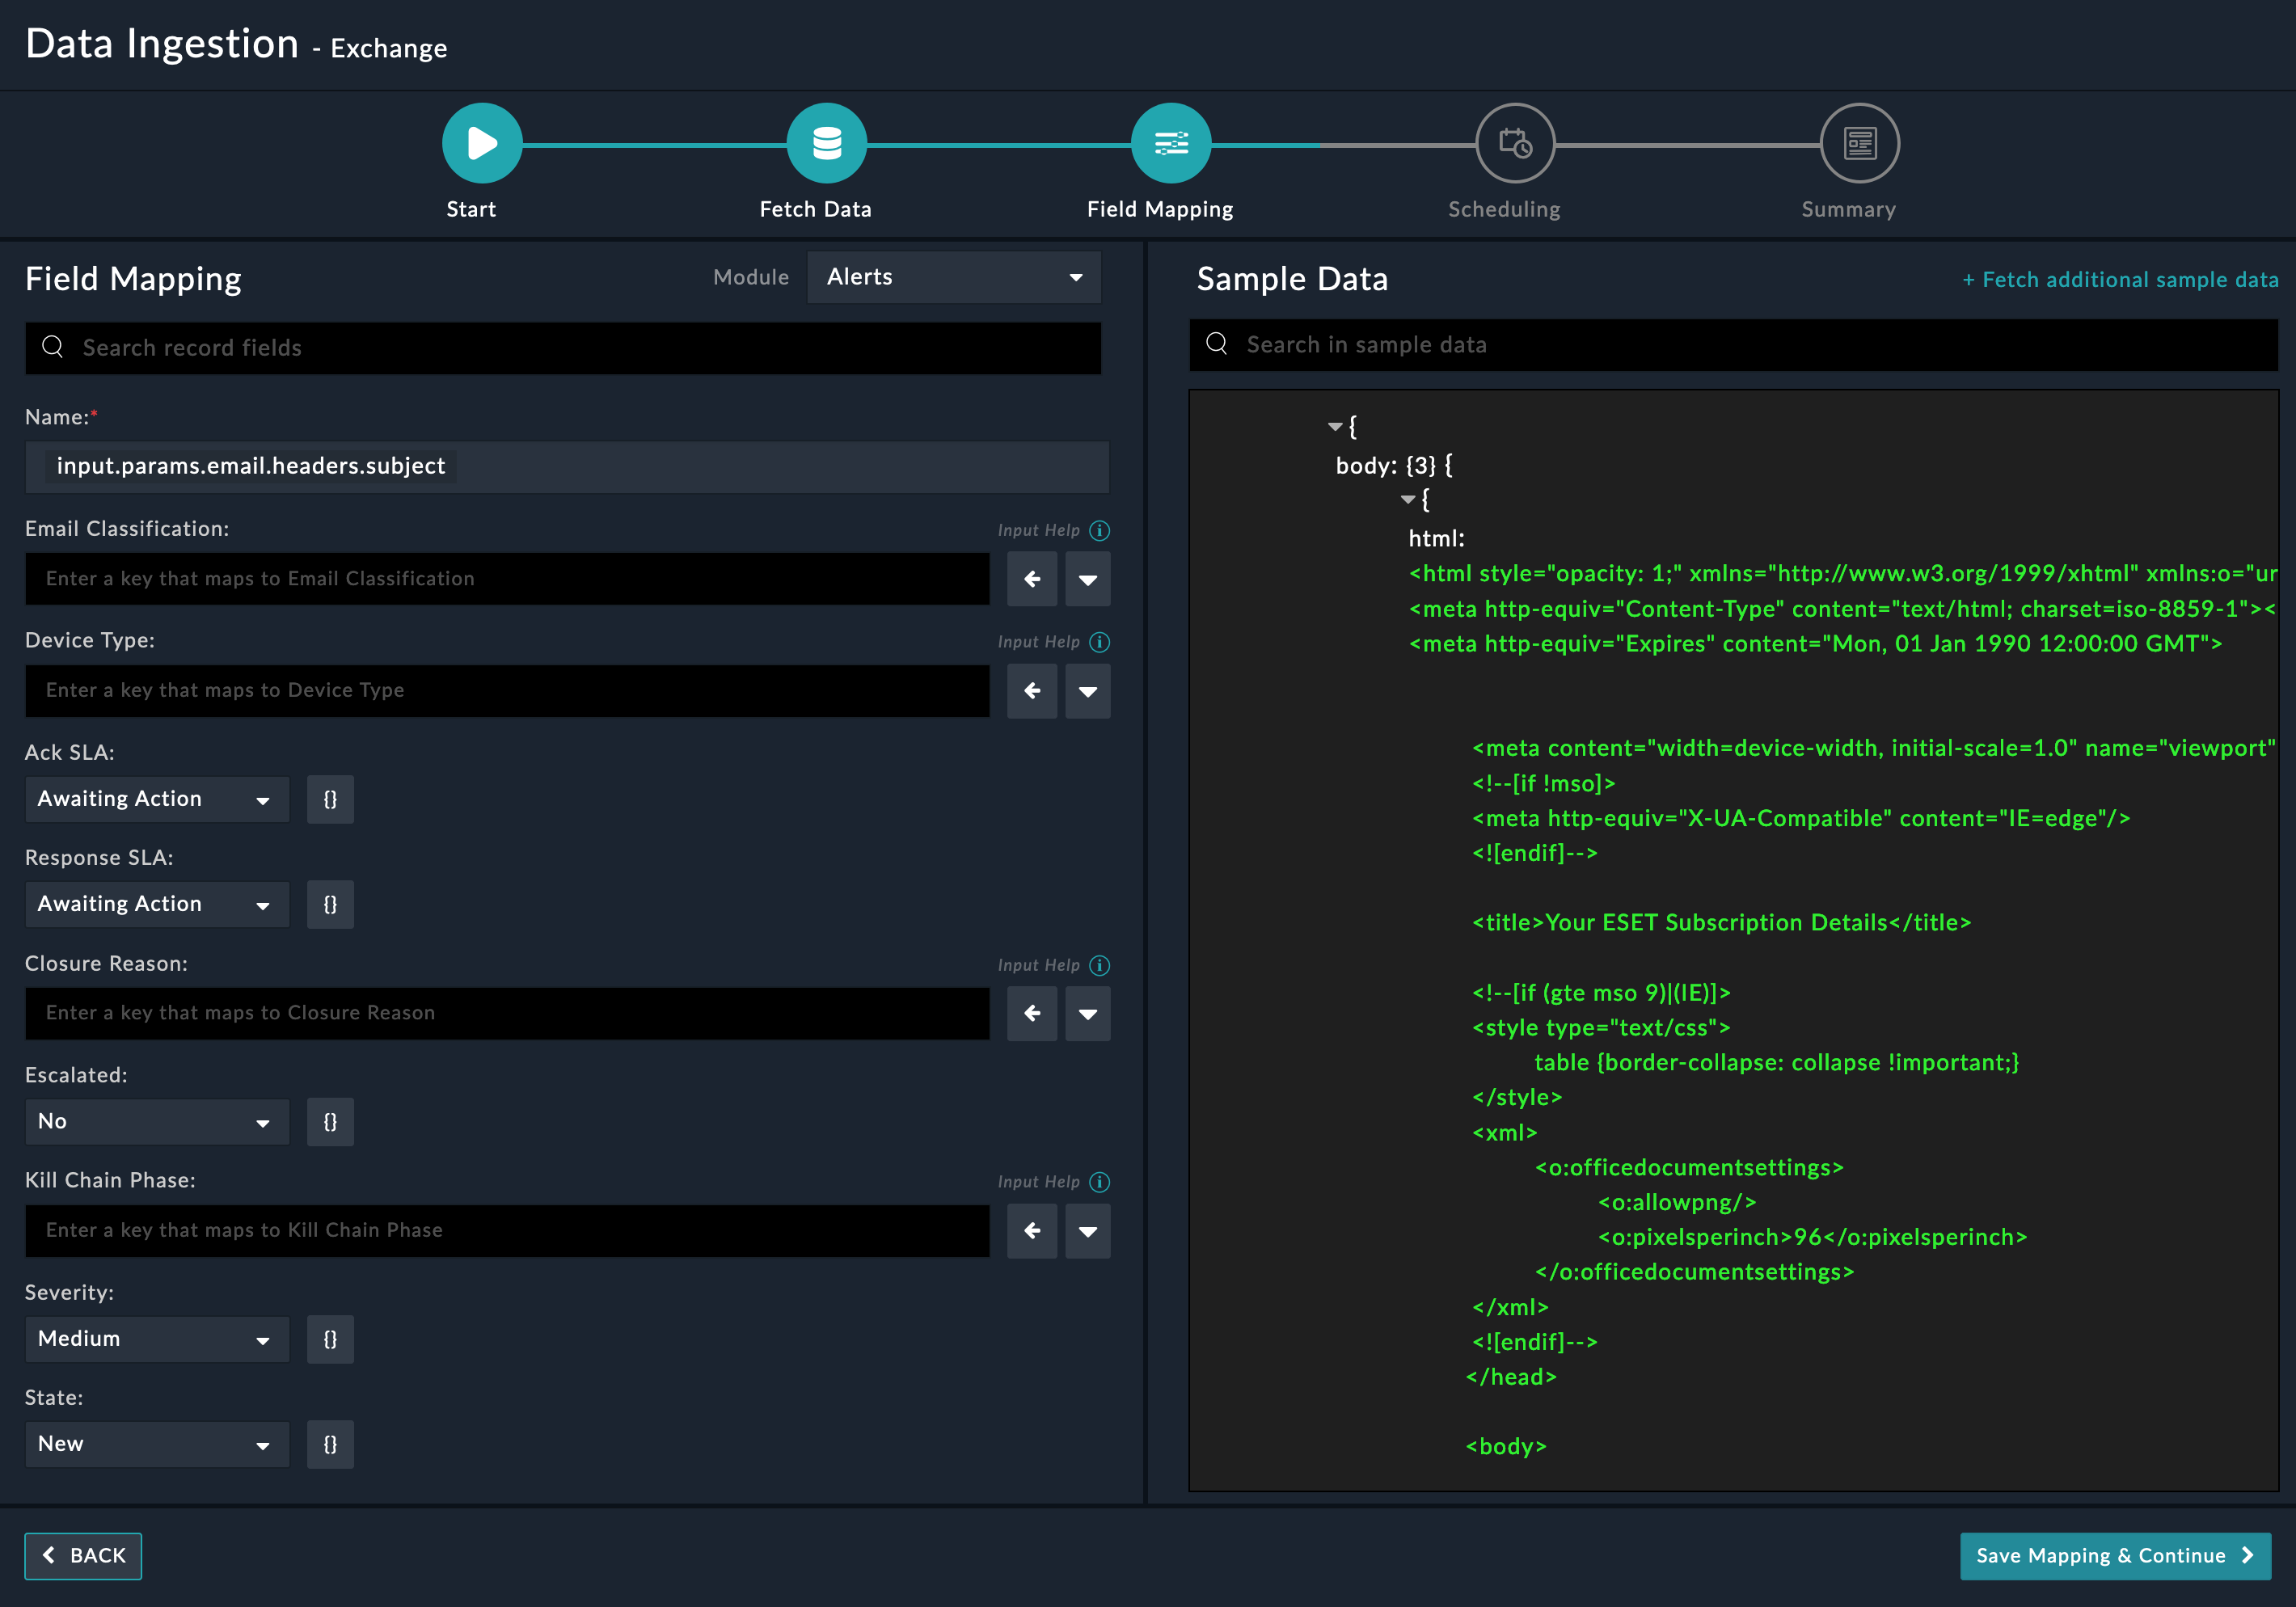
For more information on field mapping, see the Data Ingestionchapter in the Connectors Guide in the FortiSOAR™ product documentation. Once you have completed mapping fields, click Save Mapping & Continue.
Use the Scheduling screen to configure schedule-based ingestion, i.e., specify the polling frequency to Exchange, so that the content gets pulled from the Exchange integration into FortiSOAR™.
On the Scheduling screen, from the Do you want to schedule the ingestion? drop-down list, select Yes.
In the "Configure Schedule Settings" section, specify the Cron expression for the schedule. For example, if you want to pull unread emails from Exchange every 5 minutes, click Every X Minute, and in the minute box enter */5. This would mean that based on the configuration you have set up, unread emails will be pulled from Exchange every 5 minutes.

Once you have completed scheduling, click Save Settings & Continue.
The Summary screen displays a summary of the mapping done, and it also contains links to the Ingestion playbooks. Click Done to complete the data ingestion and exit the Data Ingestion Wizard.

Important: After you have completed configuring the data ingestion for Exchange on an agent or are using the listener-based ingestion on an agent, then users must update the "> Exchange > Extract and Link File Indicator" playbook that is part of the Exchange ingestion playbooks collection (Connectors page > Data Ingestion > Exchange > Select Agent Configuration > Playbooks). You must update the configuration of the Utility connector from "Self" to "Agent" in the "Upload File IOCs" step of the "> Exchange > Extract and Link File Indicator" playbook.


localhost.
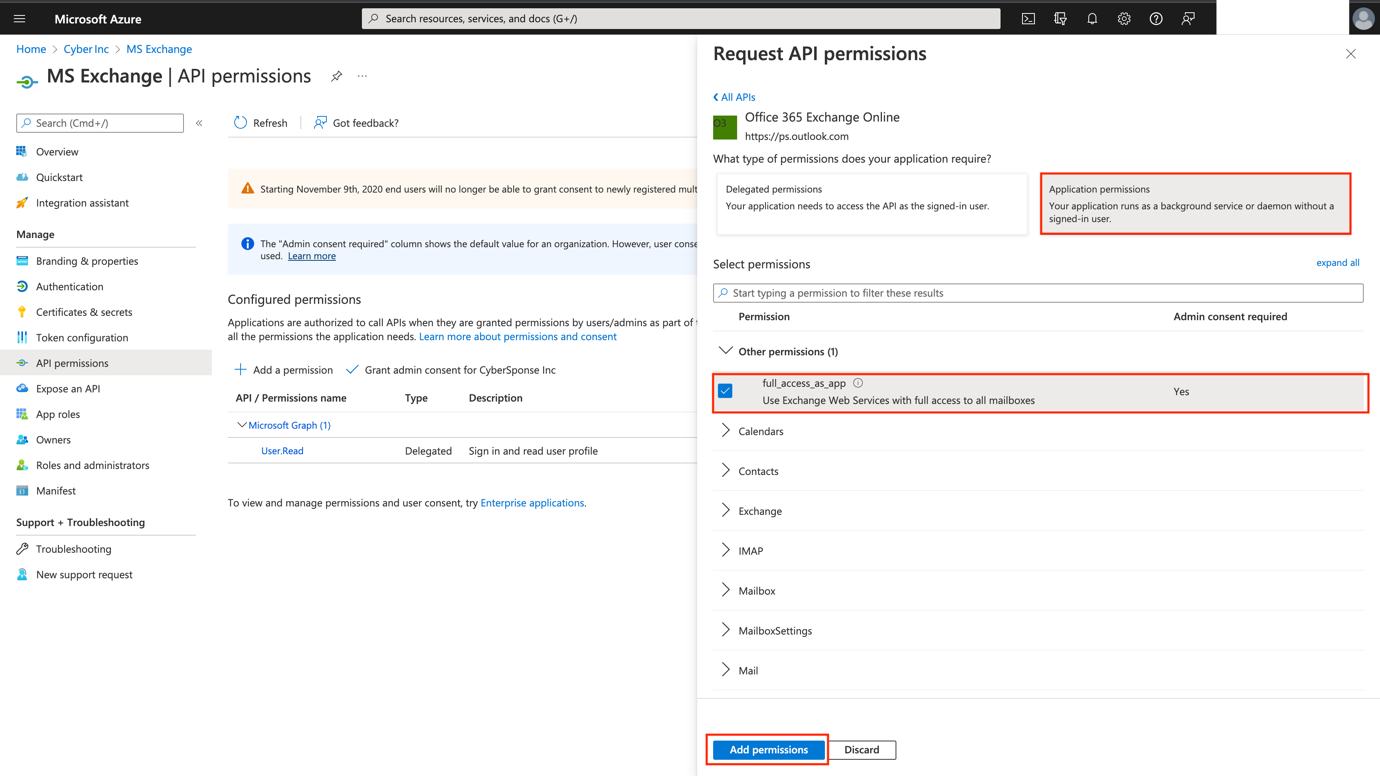
Office" in the search bar, and select Office 365 Exchange Online.
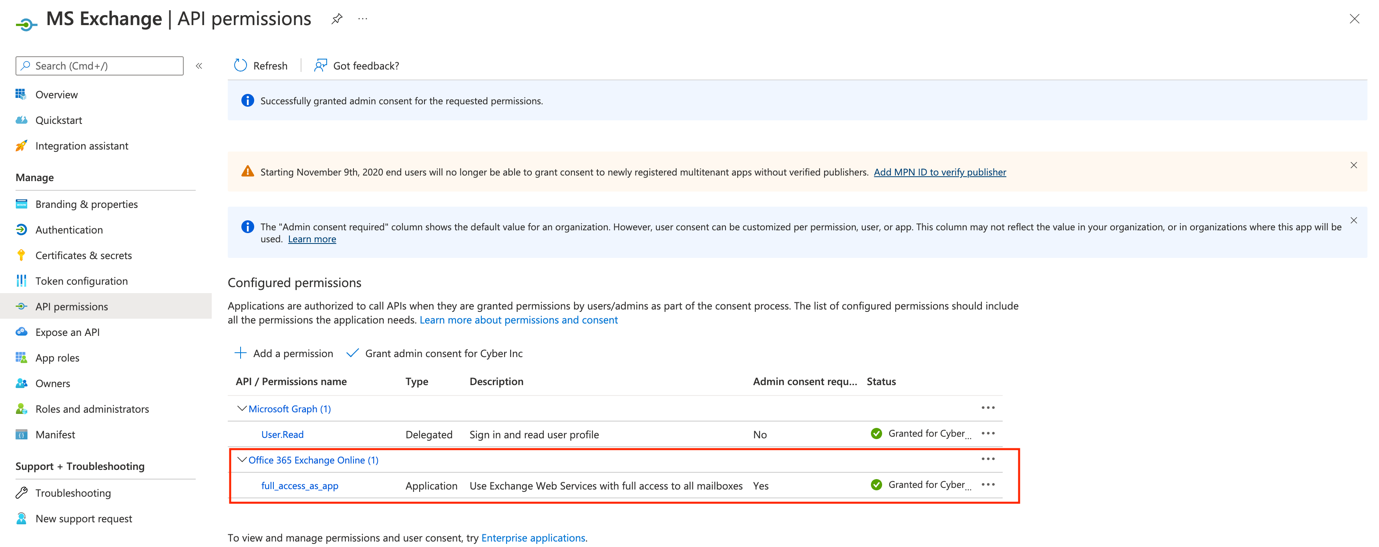


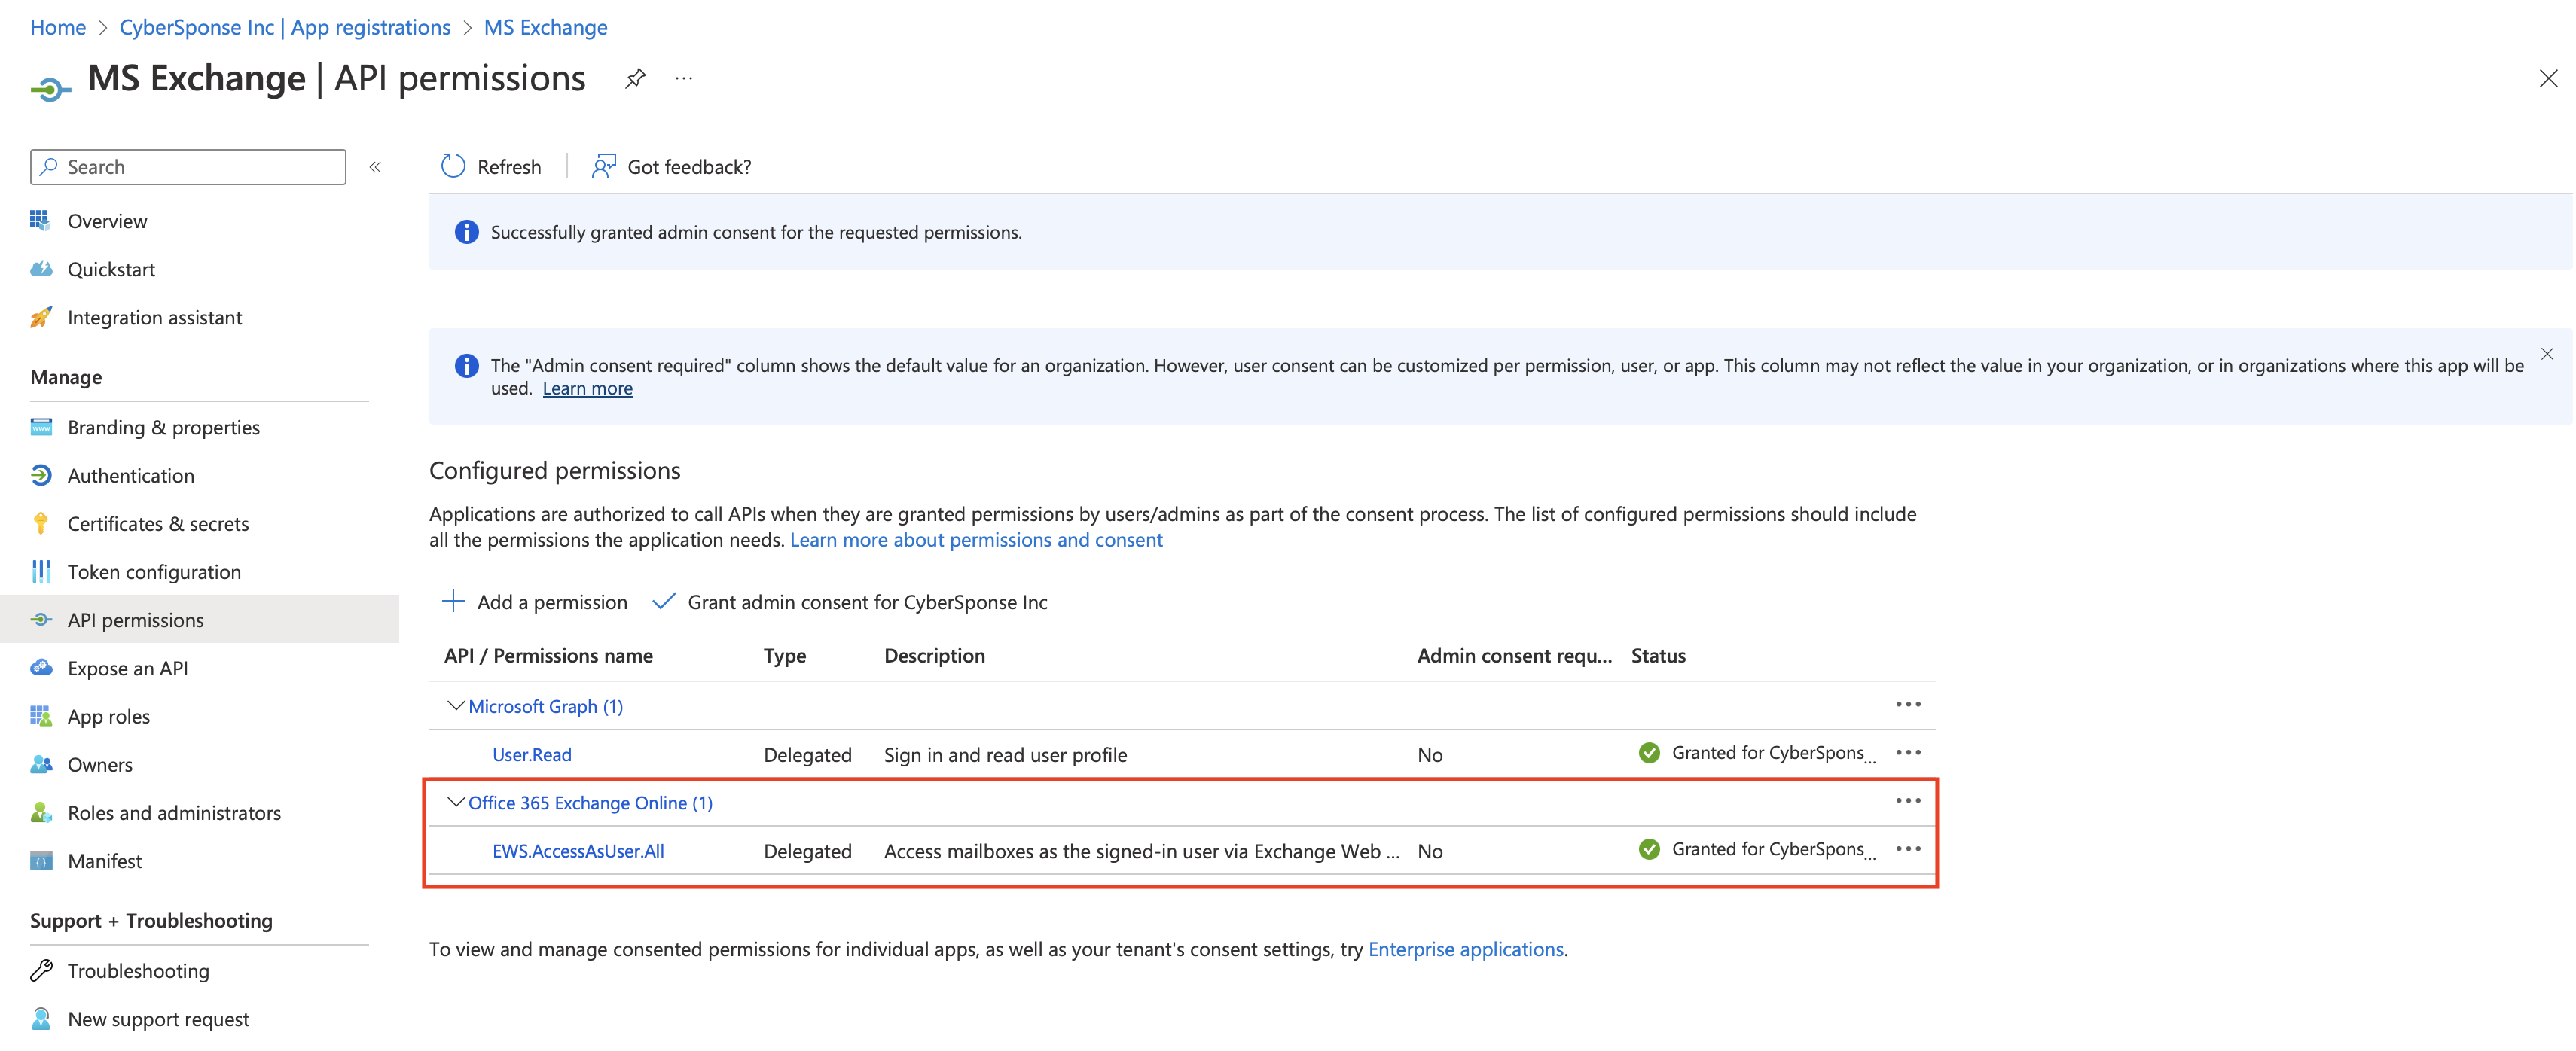
Gather information for the following parameters:
Get the authorization code by using your web browser to browse to the following URL. Replace the fields in the following URL example with your values.
https://login.microsoftonline.com/<tenantid>/oauth2/v2.0/authorize?response_type=code&scope=offline_access https://outlook.office365.com/EWS.AccessAsUser.All&client_id=<client-id>&response_mode=query&grant_type=authorization_code
Replace:
<tenant-id> with the registered application's tenant ID.
<client-id> with the registered application's client ID
Note: The above URL must be sent as a single line; line breaks have been added to the following URL for readability. For more information, see Request an authorization code.
Paste the URL as a single line into your web browser and, if prompted, sign in to Azure.

The URL returns the authorization code in the code field. Save the authorization code in a secure location.
The full returned URL looks as shown in the following image, with the full code field value, 0.ASkAIj...RxgFhSAA, shortened for brevity:

Copy the authorization code from to the equal to (=) sign and without the "code=" prefix, till the "&session_state" and paste it into your instance configuration in the Authorization Code parameter.
For example, http://localhost/?code=**0.ASkAIj...RxgFhSAA**&session_state=c44574d5-38ba-4f93-b2a3-a830db8e8cdf
In the Authorization Code parameter, enter only the bold text, i.e., 0.ASkAIj...RxgFhSAA
After you have successfully assigned permissions to the application, create the client's secret:
On the Add a client secret page, add the description of the app and the duration of the expiration of the secret, and then click Add.
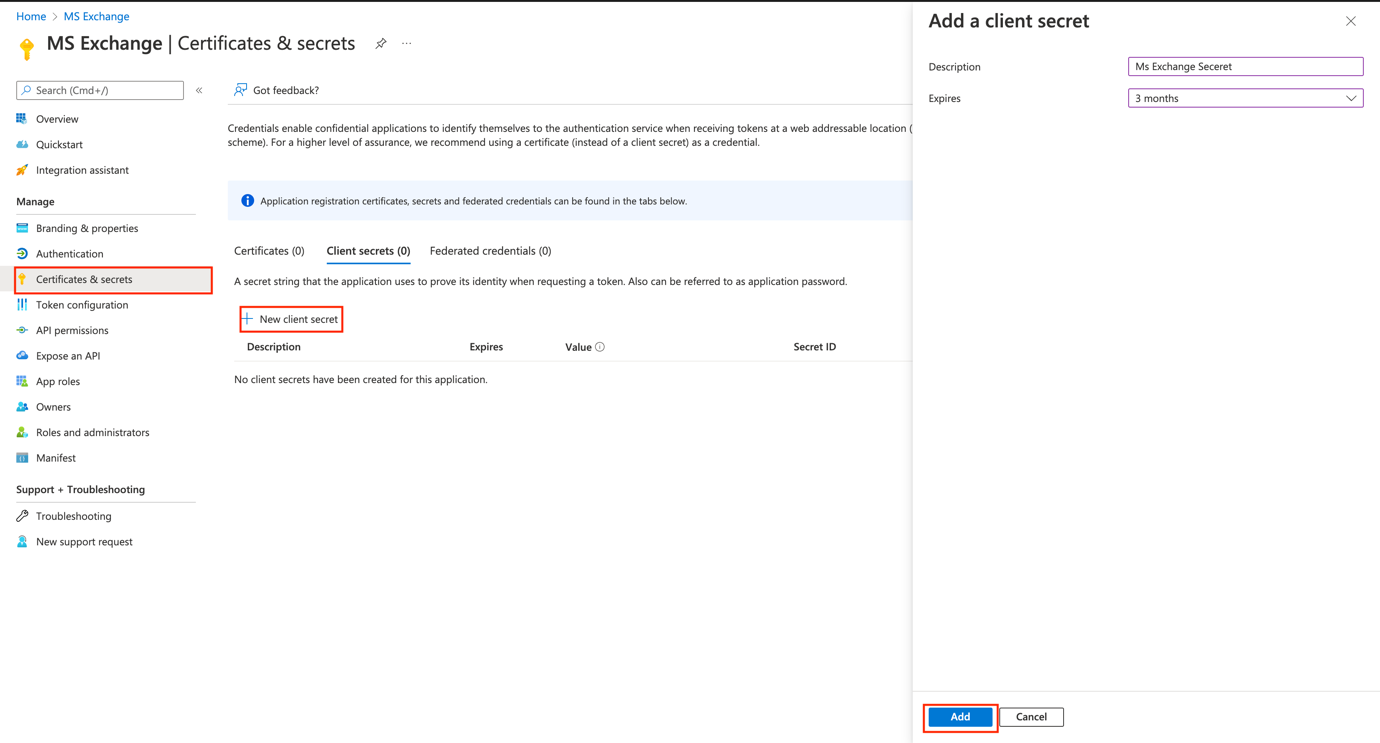 The Certificates & secrets will display the value of the secret for the application:

Important: The value of the client's secret is visible only initially, so do not forget to store the value of the secret.
When you upgrade the connector, you might get the following as an input:
"connectors.exchange connector check_health(): Unsupported tzinfo type: _PytzShimTimezone(datetime.timezone.utc, 'UTC')" error while executing connector actions that take 'DateTime'If this issue occurs on a FortiSOAR system, then do the following to resolve this issue:
SSH to your FortiSOAR system.
Restart the uwsgi service using the following command:
systemctl restart uwsgiIf this issue occurs on an FSR Agent system, then do the following to resolve this issue:
SSH to your FSR Agent system.
Restart the cyops-integrations-agent service, using the following command:
systemctl restart cyops-integrations-agentIf you are updating the Exchange connector to v4.7.0, and SFSP v2.2.1 is not deployed on your system, it is recommended to de-link Create FileHash MD5 Indicator step from the > Exchange > Create Indicators and Attachments playbook.
The following images show the playbook before and after de-linking:
 |
 |
|---|---|
| Before de-linking | After de-linking |
The Exchange connector provides a robust, platform-independent, and simple interface for communicating with Microsoft Exchange 2007-2016 Server or Office 365 using Exchange Web Services (EWS).
This document provides information about the Exchange connector, which facilitates automated interactions, with an Exchange server using FortiSOAR™ playbooks. Add the Exchange connector as a step in FortiSOAR™ playbooks and perform automated operations, such as retrieving unread emails, moving or deleting emails from the Exchange server, sending an email from the Exchange server, or running a query on the Exchange server based on the parameter (s) that you have specified.
Use the Data Ingestion Wizard to easily ingest data into FortiSOAR™ by pulling email content from Exchange. Currently, the email content ingested from Exchange is mapped to alerts in FortiSOAR™. For more information, see the Data Ingestion Support section.
IMPORTANT: The Exchange connector supports OAuth authentication and not Basic authentication as Office 365 no longer supports Basic authentication. Microsoft announced that starting October 1, 2022, basic authentication is disabled for Outlook, EWS, RPS, POP, IMAP, and EAS protocols in Exchange Online. For more information, see the Deprecation of Basic authentication in Exchange Online article.
Connector Version: 4.7.0
FortiSOAR™ Version Tested on: 7.6.4-5623
Exchange Version Tested on: Microsoft Exchange 2007-2019 Server or Office 365
Supported Authentication Types:
On-Premise Exchange Server: Basic, NTLM, and Digest
Office 365 (Cloud): OAuth 2.0
Authored By: Fortinet
Certified: Yes
Following enhancements have been made to the Exchange connector in version 4.7.0:
Inline images from MSG attachments are now rendering appropriately.
Email response body text field now no longer returns empty content.
Added attachment and inline image support to the action Send Reply.
Added following new parameters to the action Send Reply:
Cc Recipients
Attachment IRIs
Use the Content Hub to install the connector. For the detailed procedure to install a connector, click here.
You can also use the yum command to install the connector:
sudo yum install cyops-connector-exchangeBefore you begin upgrading your Exchange connector, you should stop the Listener. You can restart the Listener once your Exchange connector is upgraded. To stop the listener, clear the Enable Email Notification Service checkbox on the configuration page of the Exchange connector. For more information on the Exchange connector's configuration parameters, see the Configuration Parameters section.
If the Communications Module, which is part of the SOAR Framework Solution Pack, is not installed, then upgrading the connector from a version prior to 3.4.3 and that is enabled with the Listener to version 3.4.3 and later, requires you to modify the Set Variable step in the > Exchange > Fetch playbook to set the use_communications variable to false as shown in the following image:
For more information on the Communications Module and Use Unified Communications parameter, see the Data Ingestion Support section.
You must reconfigure the Exchange connector after upgrading the connector from any version lower than v4.2.0.
Consider upgrading your SOAR Framework solution pack to v2.2.1 if upgrading to Exchange version v4.7.0. The Create FileHash MD5 Indicator step may need de-linking if you are not upgrading to SOAR Framework solution pack v2.2.1. For de-linking instructions refer to the section De-linking Playbook Step.
You must have the hostname of the Exchange server to which you will connect and perform the automated operations required credentials based on the selected authentication method.
You must open port 993 (IMAP) on the firewall to allow communication between FortiSOAR™ and the Exchange server.
The FortiSOAR™ server should have outbound connectivity to port 443 on the Exchange Server.
Exchange v4.7.0 and later should only be installed when SOAR Framework solution pack v2.2.1 is deployed on the system. The Create FileHash MD5 Indicator step may need de-linking if you are not upgrading to SOAR Framework solution pack v2.2.1. For de-linking instructions refer to the section De-linking Playbook Step.
To extract QR codes from emails during data ingestion, install the connector QR Code Tools
For the procedure to configure a connector, click here.
IMPORTANT: After upgrading the connector from a version lower than v4.2.0, you must reconfigure the Exchange connector.
In FortiSOAR™, on the Content Hub (or Connector Store) page, click the Manage tab, and then click the Exchange connector card. On the connector popup, click the Configurations tab to enter the required configuration details:
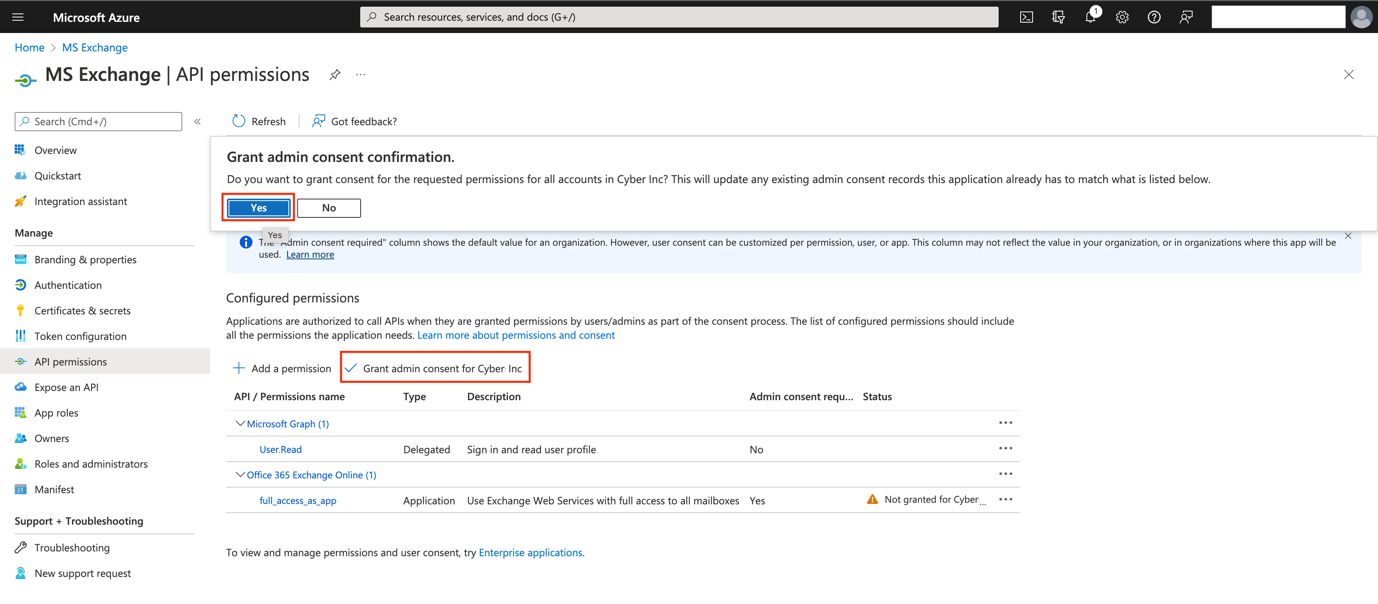
httphttpsoutlook.office365.com. If 2FA is enabled for the Outlook Live account, use App Password in the configuration. For information on how to generate an App Password, refer https://support.microsoft.com/en-us/account-billing/using-app-passwords-with-apps-that-don-t-support-two-step-verification-5896ed9b-4263-e681-128a-a6f2979a7944Domain\Username, to access the Exchange server/Office 365 server.httphttps (default)outlook.office365.com.full_app permissions for granting your admin's consent.
false.true.Enable Email Notification Service: Select to set up a listener that would instantly notify FortiSOAR™ whenever a new email arrives in the mailbox. By default, this option is selected, i.e., set to true.
Folder Path to Monitor: Specify the path of the mailbox that you want the listener to monitor. By default, this is set to the user's Inbox; however, it can be changed to any folder by entering the path of that folder in this field. For example, to monitor a Phishing mailbox that is present within Inbox, enter Inbox/Phishing in this field.
From version 4.1.0 onwards, you can configure multiple folders that you want the listener to monitor in the same mailbox, by providing the paths of the folder, separated by a comma, within the same mailbox that you want the listener to monitor in the Folder Path to Monitor field. For example, to monitor the Inbox mailbox and the Phishing and Analysis mailboxes within the Inbox mailbox specify Inbox, Inbox/Phishing, Inbox/Analysisin the Folder Path to Monitor field.
Important: The name that you provide for the mailbox that you want to monitor must be unique for the listener to work.
Note: If you have configured the listener for a custom folder and not the Inbox, then you must update the source and source_folder variables in the Set Variable step of the > Exchange > Fetch playbook. Specify Custom Folder in the source field and the name of the folder in the source_folder field. For example, if you want to monitor the Inbox/Phishing mailbox, specify Inbox/Phishing in the source_folder field. This is required for retrieving unread emails from the specified custom folder. Refer to the following screenshot:
Listener Port: Specify the port on which to start the listener.
Note: This port is used for communication between FortiSOAR™ and the Exchange notification service process. 10011 is the default port number. You can specify any unused port number if the default port is unavailable. You can also use a similar port number for multiple Exchange connector configurations as the Exchange notification service process is capable of communicating with multiple Exchange servers.
Playbook Trigger: Specify the API endpoint used to trigger the playbook
Note: The playbook authentication method should be set to HMAC.
The following automated operations can be included in playbooks, and you can also use the annotations to access operations from FortiSOAR™
| Function | Description | Annotation and Category |
|---|---|---|
| Get Unread Emails | Gets all unread emails from your Exchange account. You can also mark the retrieved Unread emails as Read. | get_email_new Investigation |
| Create Calendar Event | Creates an event in a calendar on the Exchange Server, based on input parameters, such as subject, from date, and to date, you have specified. | create_event Investigation |
| Get Calendar Events | Gets events from the calendar on the Exchange server, based on the filter criteria, such as subject, from time, and to time, you have specified. | get_events Investigation |
| Get Contacts | Retrieves the list of contacts from the mailbox associated with your Exchange account. | get_contacts Investigation |
| Delete Email | Deletes an email from a specified folder in your Exchange account, based on the input parameters, such as message ID and delete type, you have specified. | delete_email Investigation |
| Mark Email as Read | Marks an unread email as read in your Exchange account, based on the message ID you have specified. | mark_as_read Investigation |
| Move Email | Moves an email from a specified folder to a specified folder, based on the message ID and the source and destination folder you have specified. | move_email Miscellaneous |
| Copy Email | Copy an email from a specified folder to a specified folder, based on the message ID and the source and destination folder you have specified. | copy_email Miscellaneous |
| Search Email | Runs a query in your Exchange account and searches emails, based on input parameters, such as folder name, email address, query, and other input parameters you have specified. | search_query Investigation |
| Send Email | Sends an email from your Exchange account based on the email body, recipients' email addresses, and other input parameters you have specified. | send_email Investigation |
| Send Email (Advanced) | Sends an email from your Exchange account based on the email body type, recipients' email addresses, and other input parameters you have specified. | send_email_new Investigation |
| Send Reply | Sends a reply to an email based on the message ID to which you want to send a reply, the content of the reply, and other input parameters you have specified. Note: To send a reply to an email using the message ID of the parent mail, use the message ID of the most recently received mail or the most recently sent reply. |
send_reply Investigation |
| Get Folder Metadata | Retrieves the count of all the emails, including unread emails and subfolder details, from your Exchange account for the folder you have specified. | get_folder_metadata Investigation |
| Get Unread Emails (Deprecated) | Gets all unread emails from your Exchange account. You can also mark the retrieved Unread emails as Read. Important: This operation has been retained since the new Get Unread Emails has an updated output schema. If you have used this operation earlier in an existing playbook, then the playbook would fail if this operation is removed. |
get_email Investigation |
| Add Category | Assigns categories to an email in your Exchange account based on the message ID and categories that you have specified. | add_category Containment |
| Get Category | Retrieves categories associated with the specified email in your Exchange account based on the message ID that you have specified. | get_category Investigation |
| Remove Category | Removes categories from an email in your Exchange account based on the message ID and categories that you have specified. | remove_category Investigation |
| Create Folder | Creates a new folder in the specified mailbox based on the mailbox name, parent folder path, and the folder name that you have specified. | create_folder Investigation |
| Mark Emails as Junk | Blocks the sender and moves the emails to the junk folder in an Exchange account based on the message IDs, folder name, Target Email Address, and other input parameters that you have specified. | mark_emails_as_junk Investigation |
| Parameter | Description |
|---|---|
| Target Email Address | (Optional) Specify the email address from which to get unread emails. Important: The Exchange account specified in the configuration parameters and used by the connector to log into Exchange must have either read access on this email address for delegate access type or have Impersonation rights on this email address. For more information on granting Application Impersonation Rights in Office 365, refer to the "How to Grant Application Impersonation Rights in Office 365" article. |
| Source | Select the source folder from which you want to retrieve unread emails from your Exchange account. You can choose from All, Inbox, Sent, Drafts, Trash, or Custom Folder. By default, this is set as Inbox. If you select All, then this operation will search for emails across all folders associated with your Exchange account. If you select Custom Folder, then you must specify the folder in your Exchange account from which you want to retrieve unread emails. |
| Mark as Read | Select this option, i.e., set it to True (default), to retrieve the unread emails from the Exchange account and also mark these emails as Read. By default, this is set to True. |
| Pull Oldest First | Select this option, i.e., set it to True, to retrieve the oldest unread email first from the Exchange account, i.e., if this operation is checked, then the unread emails get sorted by DateTime from oldest to newest. By default, this is unchecked, i.e., it is set as False. |
| Limit | (Optional) The maximum number of emails, based on your filter criterion, you want to include in the output of this operation. If you do not specify anything in this field then all emails based on your filter criterion will be included in the output of this operation. |
| Parse Inline Images | Select this option, i.e., set it to True, to retrieve the body of the unread emails including inline images, from the Exchange account. By default, this is set to False (the option is unchecked). |
| Save Email | Select this option, i.e., set it to True(default) to save the email as a file in the Attachments module. |
| Extract Attachment Data | Select this option, i.e., set it to True (default) to also extract the attachment data for the unread emails, if the type of the attachment is eml or msg. |
| Exclude Absolute Path in Output | Select this checkbox if you want to exclude the absolute path from this operation's output. This helps to improve the performance of connector operations, especially in the case of large mailboxes. By default, this checkbox is unchecked. |
The output contains the following populated JSON schema:
[
  {
    "epilogue": "",
    "extract_attach_data": "",
    "attachment_files": [],
    "body": {
      "html": "",
      "text": "",
      "json": "",
      "inline_images": [
        {
          "file": "",
          "metadata": {
            "md5": "",
            "sha1": "",
            "sha256": "",
            "filename": "",
            "content_type": "",
            "content_length": ""
          }
        }
      ]
    },
    "preamble": "",
    "headers": {
      "x-received": "",
      "mime-version": "",
      "message-id": "",
      "x-exchange-antispam-report-test": "",
      "x-exchange-antispam-report-cfa-test": "",
      "x-ms-office365-filtering-correlation-id": "",
      "x-ms-exchange-crosstenant-network-message-id": "",
      "x-microsoft-exchange-diagnostics": [],
      "x-ms-exchange-crosstenant-id": "",
      "x-ms-exchange-crosstenant-fromentityheader": "",
      "spamdiagnosticmetadata": "",
      "x-gm-message-state": "",
      "spamdiagnosticoutput": "",
      "to": "",
      "x-microsoft-antispam": "",
      "subject": "",
      "from": "",
      "received": [],
      "x-ms-exchange-crosstenant-originalarrivaltime": "",
      "x-microsoft-antispam-message-info": [],
      "authentication-results": "",
      "x-ms-publictraffictype": "",
      "received-spf": "",
      "x-ms-traffictypediagnostic": "",
      "x-ms-exchange-transport-crosstenantheadersstamped": "",
      "sender": "",
      "x-ms-exchange-organization-authsource": "",
      "x-ms-exchange-organization-messagedirectionality": "",
      "x-ms-exchange-organization-scl": "",
      "auto-submitted": "",
      "x-forefront-antispam-report": "",
      "x-eoptenantattributedmessage": "",
      "dkim-signature": [],
      "x-google-smtp-source": "",
      "reply-to": "",
      "x-ms-exchange-processed-by-bccfoldering": "",
      "x-google-dkim-signature": "",
      "x-ms-exchange-organization-authas": "",
      "content-type": "",
      "x-ms-exchange-organization-network-message-id": "",
      "return-path": "",
      "x-eopattributedmessage": "",
      "x-ms-exchange-transport-endtoendlatency": ""
    },
    "item_id": "",
    "attachments": [
      {
        "file": "",
        "metadata": {
          "sha256": "",
          "content_length": "",
          "content_type": "",
          "sha1": "",
          "filename": "",
          "md5": ""
        },
        "json": "",
        "text": ""
      }
    ],
    "email_as_attachment": {
      "id": "",
      "@id": "",
      "cVEs": [],
      "file": {
        "id": "",
        "@id": "",
        "size": "",
        "uuid": "",
        "@type": "",
        "assignee": "",
        "filename": "",
        "metadata": [],
        "mimeType": "",
        "thumbnail": "",
        "uploadDate": ""
      },
      "name": "",
      "type": "",
      "uuid": "",
      "@type": "",
      "tasks": [],
      "alerts": [],
      "assets": [],
      "owners": [],
      "people": [],
      "@context": "",
      "assignee": "",
      "comments": [],
      "warrooms": [],
      "incidents": [],
      "createDate": "",
      "createUser": {
        "id": "",
        "@id": "",
        "name": "",
        "uuid": "",
        "@type": "",
        "avatar": "",
        "userId": "",
        "userType": "",
        "createDate": "",
        "createUser": "",
        "modifyDate": "",
        "modifyUser": ""
      },
      "indicators": [],
      "modifyDate": "",
      "modifyUser": {
        "id": "",
        "@id": "",
        "name": "",
        "uuid": "",
        "@type": "",
        "avatar": "",
        "userId": "",
        "userType": "",
        "createDate": "",
        "createUser": "",
        "modifyDate": "",
        "modifyUser": ""
      },
      "recordTags": [],
      "userOwners": [],
      "workspaces": [],
      "description": "",
      "vulnerabilities": []
    },
    "folder_path": "",
    "parsed_attachment_data": []
  }
]| Parameter | Description |
|---|---|
| Subject | The subject line of the event that you want to create on the Exchange server. |
| Start Date | Start date and time of the event that you want to create on the Exchange server. |
| End Date | End date and time of the event that you want to create on the Exchange server. |
| Required Attendees | Email IDs of the members who are required to attend the event. You must add the email IDs in the CSV or list format. For example, @xyz.com, def@lmn.com |
| Optional Attendees | (Optional) Email IDs of the optional members who can attend the event. You must add the email IDs in the CSV or list format. |
| Body | (Optional) Details of the event that you want to create on the Exchange server. |
| Location | (Optional) Location of the event that you want to create on the Exchange server. |
| Categories | (Optional) Category of the event that you want to create on the Exchange server. You must add the categories in the CSV or list format. For example, Blue category, Green Category, etc. |
| Show As | (Optional) Status of the attendees when they are attending this event. You can choose one of the following options: - Free - Working elsewhere - Tentative - Busy - OOF |
| Reminder | (Optional) Time before the event starts when you want to set a reminder for the attendees. You can choose one of the following options: 0 minutes, 5 minutes, 10 minutes, 15 minutes, 30 minutes, 1 hour, 2 hour, 3 hour, 4 hour, 8 hour, 12 hour, 1 day, 2 day, 3 day, 1 week, or 2 week. |
| Is All Day | If you select this option, i.e., set it to True, then this sets the event as a full-day event. By default, this is set to False. |
| Is Private | If you select this option, i.e., set it to True, then this sets the event as a private event, and it can be viewed only by its attendees. By default, this is set to True. |
The output contains the following populated JSON schema:
{
  "message": ""
}Note: All the input parameters are optional. However, if you do not specify any parameter, then no filter criterion is applied, and an unfiltered list is returned.
| Parameter | Description |
|---|---|
| Subject | Subject text based on which you want to filter events on the Exchange server. |
| From Time | Start date and time from when you want to retrieve events from the Exchange server. |
| To Time | End date and time till when you want to retrieve events from the Exchange server. |
The JSON output contains the retrieved events from the calendar on the Exchange server, based on the input parameters you have specified.
The output contains the following populated JSON schema:
[
  {
      "sensitivity": "",
      "Required attendees": [],
      "Importance": "",
      "Reminder is set": "",
      "Optional attendees": [],
      "Subject": "",
      "Reminder minutes before start": "",
      "Attachments": [
          {
              "content_type": "",
              "Name": "",
              "size": ""
          }
      ],
      "Categories": [],
      "Organizer": "",
      "Legacy status": "",
      "Body": "",
      "Start": "",
      "Location": "",
      "End": "",
      "Is all day": ""
  }
]None.
The JSON output contains the retrieved contact list from the mailbox on the Exchange server.
The output contains the following populated JSON schema:
[
  {
      "CLASS": "",
      "TEL": "",
      "PRODID": "",
      "FN": "",
      "N": "",
      "EMAIL": "",
      "MAILER": "",
      "REV": "",
      "LABEL": "",
      "VERSION": "",
      "ADR": "",
      "ORG": "",
      "X-MS-SPOUSE": "",
      "X-MS-MANAGER": "",
      "X-MS-ASSISTANT": ""
  }
]| Parameter | Description |
|---|---|
| Message ID | The ID of the email that you want to delete from an Exchange account. |
| Delete Type | Type of Delete that you want to use to delete the email. You can choose from the following options: Soft Delete, Hard Delete, or Move To Trash. |
| Folder Name | (Optional) Folder in the Exchange account from which you want to delete the email. By default, this is set as Inbox. |
| Target Email Address | (Optional) The email address from which you want to delete the specified email. Important: The Exchange account that you have specified in the configuration parameters and using which the connector has logged into Exchange must have Impersonation rights on this email address. For information on how to grant Impersonation rights in Office 365, see the How to Grant Application Impersonation Rights in Office 365? article. |
The output contains the following populated JSON schema:
{
  "message": ""
}| Parameter | Description |
|---|---|
| Message ID | The ID of the email that you want to mark as read. |
| Folder Name | (Optional) Name of the folder name that contains the email message that you want to mark as read. |
The output contains the following populated JSON schema:
{
  "message": ""
}| Parameter | Description |
|---|---|
| Source Email Address | (Optional) The email address from which you want to move the specified email. Important: The Exchange account that you have specified in the configuration parameters and using which the connector has logged into Exchange must have Impersonation rights on this email address. For information on how to grant Impersonation rights in Office 365, see the How to Grant Application Impersonation Rights in Office 365? article. |
| Source | Source folder on the Exchange server from where you want to move the email. To specify the source, you can choose to specify either the Folder Name or Folder Path. If you choose Folder Name, then in the Source Folder Name parameter, specify the name of the source folder on the Exchange server from where you want to move the email. If you choose Folder Path, then in the Source Folder Path parameter, specify the path of the source folder on the Exchange server from where you want to move the email. |
| Message ID | The ID of the email that you want to move. |
| Destination Email Address | (Optional) Email address to which you want to move the specified email. Important: The Exchange account that you have specified in the configuration parameters and using which the connector has logged into Exchange must have Impersonation rights on this email address. For information on how to grant Impersonation rights in Office 365, see the How to Grant Application Impersonation Rights in Office 365? article. |
| Destination Folder | The destination folder on the Exchange server to which you want to move the email. To specify the destination, you can choose to specify either the Folder Name or Folder Path. If you choose Folder Name, then in the Destination Folder Name parameter, specify the name of the destination folder on the Exchange server to which you want to move the email. If you choose Folder Path, then in the Destination Folder Path parameter, specify the path of the destination folder on the Exchange server to which you want to move the email. |
The output contains the following populated JSON schema:
{
  "message": ""
}| Parameter | Description |
|---|---|
| Source Email Address | (Optional) The email address from which you want to copy the specified email. Important: The Exchange account that you have specified in the configuration parameters and using which the connector has logged into Exchange must have Impersonation rights on this email address. For information on how to grant Impersonation rights in Office 365, see the How to Grant Application Impersonation Rights in Office 365? article. |
| Source | Source folder on the Exchange server from where you want to copy the email. To specify the source, you can choose to specify either the Folder Name or Folder Path. If you choose Folder Name, then in the Source Folder Name parameter, specify the name of the source folder on the Exchange server from where you want to copy the email. If you choose Folder Path, then in the Source Folder Path parameter, specify the path of the source folder on the Exchange server from where you want to copy the email. |
| Message ID | The ID of the email that you want to copy. |
| Destination Email Address | (Optional) Email address to which you want to copy the specified email. Important: The Exchange account that you have specified in the configuration parameters and using which the connector has logged into Exchange must have Impersonation rights on this email address. For information on how to grant Impersonation rights in Office 365, see the How to Grant Application Impersonation Rights in Office 365? article. |
| Destination | The destination folder on the Exchange server to which you want to copy the email. To specify the destination, you can choose to specify either the Folder Name or Folder Path. If you choose Folder Name, then in the Destination Folder Name parameter, specify the name of the destination folder on the Exchange server to which you want to copy the email. If you choose Folder Path, then in the Destination Folder Path parameter, specify the path of the destination folder on the Exchange server to which you want to copy the email. |
The output contains the following populated JSON schema:
{
  "message": ""
}Note: All the input parameters are optional. However, if you do not specify any parameter, then no filter criterion is applied, and an unfiltered list is returned.
| Parameter | Description |
|---|---|
| Target Email Address | (Optional) Specify the email address in which to search for emails. Important: The Exchange account that you have specified in the configuration parameters and using which the connector has logged into Exchange must have Impersonation rights on this email address. For information on how to grant Impersonation rights in Office 365, see the How to Grant Application Impersonation Rights in Office 365? article. |
| Folder Name | Specify the folder in the Exchange account based on which you want to search for emails. Note: If you enter All in this field, then this operation will search for emails across all folders associated with your Exchange account. |
| Query Type | Select the type of query that you want to use to search for emails on your Exchange account. You can choose from the following options: - Basic: Specify values in the following fields: - Subject: Specify the Subject of the email message based on which you want to search emails on your Exchange account. - Body: Content within the body of the email based on which you want to search emails on the Exchange account. - Sender: Email address of the sender based on which you want to search emails on the Exchange account. - Query: Search parameters based on which you want to search emails on the Exchange server in the form of a query. Accepts input in the dictionary format. For example: {'subject__icontains' : _365_,datetime_receivedgt: '2018-01-20T18:30:00.000Z'}You can also provide options such as: - `subjectexact='foo' // Returns items where the subject is 'foo'. Same as the filter(subject='foo')<br /> -subjectiexact='foo'// Returns items where subject is _foo_,FOOorFoo<br /> -subject_contains='foo'//Returns items where the subject containsfoo<br /> -subject_icontains<br /> -subject_startswith<br /> -subject_istartswith<br />- **Advanced**: Specify the query based on which you want to search emails on the Exchange server. For example:<br /> -Q(subjectiexact='foo') | Q(subjectcontains='bar')) & ~Q(datetime_receivedgt='2022-12-30T12:30:50Z')<br /> -((Q(sendericontains ='domain1') | Q(sendericontains='domain2') | Q(sendericontains='domain3')) | Q(subject_icontains='request')) & Q(datetime_createdgt='2021-12-12')<br /> -Q(is_read=False) & Q(has_attachments=True) & Q(subjectstartswith='TEST')<br /> -Q(is_read=False) & Q(has_attachments=True) & ~Q(subject__startswith='View')<br /> -((Q(display_toistartswith='qa@') | Q(display_to__istartswith='snikam@')) & Q(datetime_sent_gte='2023-06-22T00:00:00Z')) & ~Q(body` |
| Pull Oldest First | Select this option, i.e., set it to True to pull the oldest email first from the Exchange account, i.e., if this operation is checked, then the emails get sorted by DateTime from oldest to newest. By default, this is unchecked, i.e., it is set as False. |
| Parse Inline Images | Select this option, i.e., set it to True, to retrieve the body of the unread emails including inline images, from the Exchange account. By default, this is not selected, i.e., set to False. |
| Extract Attachment Data | Select this option, i.e., set it to True (default) to also extract the attachment data for the searched emails, if the type of the attachment is eml or msg. |
| Exclude Absolute Path in Output | Select this checkbox if you want to exclude the absolute path from this operation's output. This helps to improve the performance of connector operations, especially in the case of large mailboxes. By default, this checkbox is unchecked. |
| Save Email | (Optional) Select this option, i.e., set it to True, to save the email as a file in the Attachments module. |
| Limit | The maximum number of emails, based on your filter criterion, you want to include in the output of this operation. If you do not specify anything in this field then all emails based on your filter criterion will be included in the output of this operation. |
The JSON output contains the details of all emails that match the search criteria that you have specified.
The output contains the following populated JSON schema:
{
  "emails": [
    {
      "epilogue": "",
      "attachment_files": [],
      "body": {
        "html": "",
        "text": "",
        "json": "",
        "inline_images": [
          {
            "file": "",
            "metadata": {
              "md5": "",
              "sha1": "",
              "sha256": "",
              "filename": "",
              "content_type": "",
              "content_length": ""
            }
          }
        ]
      },
      "preamble": "",
      "headers": {
        "X-Received": "",
        "MIME-Version": "",
        "Message-ID": "",
        "X-Exchange-Antispam-Report-Test": "",
        "X-Exchange-Antispam-Report-CFA-Test": "",
        "X-MS-Office365-Filtering-Correlation-Id": "",
        "X-MS-Exchange-CrossTenant-Network-Message-Id": "",
        "X-Microsoft-Exchange-Diagnostics": [],
        "X-MS-Exchange-CrossTenant-Id": "",
        "X-MS-Exchange-CrossTenant-FromEntityHeader": "",
        "SpamDiagnosticMetadata": "",
        "X-Gm-Message-State": "",
        "SpamDiagnosticOutput": "",
        "To": "",
        "X-Microsoft-Antispam": "",
        "Subject": "",
        "From": "",
        "Received": [],
        "X-MS-Exchange-CrossTenant-OriginalArrivalTime": "",
        "X-Microsoft-Antispam-Message-Info": [],
        "Authentication-Results": "",
        "X-MS-PublicTrafficType": "",
        "Received-SPF": "",
        "X-MS-TrafficTypeDiagnostic": "",
        "X-MS-Exchange-Transport-CrossTenantHeadersStamped": "",
        "Sender": "",
        "X-MS-Exchange-Organization-AuthSource": "",
        "X-MS-Exchange-Organization-MessageDirectionality": "",
        "X-MS-Exchange-Organization-SCL": "",
        "Auto-Submitted": "",
        "X-Forefront-Antispam-Report": "",
        "X-EOPTenantAttributedMessage": "",
        "DKIM-Signature": [],
        "X-Google-Smtp-Source": "",
        "Reply-To": "",
        "X-MS-Exchange-Processed-By-BccFoldering": "",
        "X-Google-DKIM-Signature": "",
        "X-MS-Exchange-Organization-AuthAs": "",
        "Content-Type": "",
        "X-MS-Exchange-Organization-Network-Message-Id": "",
        "Return-Path": "",
        "X-EOPAttributedMessage": "",
        "X-MS-Exchange-Transport-EndToEndLatency": ""
      },
      "file": "",
      "item_id": "",
      "attachments": [
        {
          "file": "",
          "json": "",
          "text": "",
          "metadata": {
            "md5": "",
            "sha1": "",
            "sha256": "",
            "filename": "",
            "content_type": "",
            "content_length": ""
          },
          "detected_metadata": {
            "md5": "",
            "sha1": "",
            "sha256": "",
            "filename": "",
            "content_type": "",
            "content_length": ""
          }
        }
      ],
      "email_as_attachment": {
        "id": "",
        "@id": "",
        "cVEs": [],
        "file": {
          "id": "",
          "@id": "",
          "size": "",
          "uuid": "",
          "@type": "",
          "assignee": "",
          "filename": "",
          "metadata": [],
          "mimeType": "",
          "thumbnail": "",
          "uploadDate": ""
        },
        "name": "",
        "type": "",
        "uuid": "",
        "@type": "",
        "tasks": [],
        "alerts": [],
        "assets": [],
        "owners": [],
        "people": [],
        "@context": "",
        "assignee": "",
        "comments": [],
        "warrooms": [],
        "incidents": [],
        "createDate": "",
        "createUser": {
          "id": "",
          "@id": "",
          "name": "",
          "uuid": "",
          "@type": "",
          "avatar": "",
          "userId": "",
          "userType": "",
          "createDate": "",
          "createUser": "",
          "modifyDate": "",
          "modifyUser": ""
        },
        "indicators": [],
        "modifyDate": "",
        "modifyUser": {
          "id": "",
          "@id": "",
          "name": "",
          "uuid": "",
          "@type": "",
          "avatar": "",
          "userId": "",
          "userType": "",
          "createDate": "",
          "createUser": "",
          "modifyDate": "",
          "modifyUser": ""
        },
        "recordTags": [],
        "userOwners": [],
        "workspaces": [],
        "description": "",
        "vulnerabilities": []
      },
      "folder_path": "",
      "parsed_attachment_data": []
    }
  ],
  "search_fields": ""
}Important: For this operation to work, you must have the FortiSOAR™ Built-in connector: "Utilities" (minimum version required is 2.0.1) installed on your system. For more information on FortiSOAR™ Built-in connectors, see FortiSOAR™ product documentation.
| Parameter | Description |
|---|---|
| Subject | (Optional) The subject of the email message that you want to send from the Exchange account. |
| TO Recipients | Email IDs of the members to whom you want to send the email message from the Exchange account. You must add the email IDs in the CSV or list format. For example, abc@xyz.com, def@lmn.com Important: You must specify email ID(s) in at least one of the following fields: TO Recipients, CC Recipients, or BCC Recipients. |
| CC Recipients | Email IDs of the members to be added to the CC list of the email message that you want to send from the Exchange account. You must add the email IDs in the CSV or list format. |
| BCC Recipients | Email IDs of the members to be added to the BCC list of the email messages that you want to send from the Exchange account. You must add the email IDs in the CSV or list format. |
| Body | (Optional) Message or content of the email that you want to send from the Exchange account. |
| Attachment IRIs | (Optional) List of IRI ID(s) of the file (s) that you want to attach to the email that you want to send from the Exchange server. IRI IDs are used to access files from the Attachments module. You must add the Attachment IRIs in the CSV or list format. |
| Inline Attachment IRIs | (Optional) List of IRI ID(s) of the file (s) that you want to add inline to the email that you want to send from the Exchange server. You can add the image content inline in the email body using its UUIDs. For example, <img src="cid%3Adfe26867-01a1-4969-8168-8c8882586538"> |
The output contains the following populated JSON schema:
{
  "message": ""
}| Parameter | Description |
|---|---|
| To Recipients | Specify email IDs of the recipients to send the email message from the Exchange account. You must add the email IDs in the CSV or list format. For example: abc@xyz.com, def@lmn.comIMPORTANT: You must specify email ID(s) in at least ONE of the following fields: TO Recipients, CC Recipients, or BCC Recipients. |
| Cc Recipients | (Optional) Specify the email IDs of the recipients to be added in the Cc list of the email message to send from the Exchange account. You must add the email IDs in the CSV or list format. |
| Bcc Recipients | (Optional) Specify the email IDs of the recipients to be added in the Bcc list of the email message that you want to send from the Exchange account. You must add the email IDs in the CSV or list format. |
| Body Type | Select the format in which you want to send the email. You can choose from the following options: - Rich Text: Select this option to add formatted content, images, and custom jinja expressions using dynamic values. Specify values in the following fields: - Subject: Specify a subject of the email being sent. - Body: Add formatted content, images, and jinja expressions with dynamic values. - Email Template: Select a template, in the Email Template field, to use when sending emails to users. Options are dynamically fetched from Resources > Email Templates in FortiSOAR. |
| Attachment IRIs | (Optional) Specify a list of IRIs of the file to attach to the email being sent from the Exchange server. IRI IDs are used to access files from the Attachments module. You can add multiple IRIs as comma-separated values or as a list. |
| Inline Attachment IRIs | (Optional) Specify a list of IRIs of the file to add inline to the email being sent from the Exchange server. You can add the image content inline in the email body using the image's UUID as an src attribute. For example, <img src="uuid_for_inline_images"> |
The output contains the following populated JSON schema:
{
  "message": ""
}| Parameter | Description |
|---|---|
| Target Email Address | (Optional) Specify the email address from to send the reply. Important: The Exchange account specified in the configuration parameters and used by the connector to log into Exchange must have both read and write access on this email address for delegate access type or have Impersonation rights on this email address. For more information on granting Application Impersonation Rights in Office 365, refer to the "How to Grant Application Impersonation Rights in Office 365" article. |
| Message ID | The ID of the email to which you want to send a reply. |
| Reply all | Select this checkbox to send the reply to the sender of the previous message and everyone who received the original email. |
| Subject | (Optional) The subject of the email message that you want to send as a reply to the specified email from the Exchange account. |
| To Recipients | (Optional) Specify the email IDs of the members to whom you want to send the reply email message from the Exchange account. These email IDs are in addition to the email address of the original sender of the email. You must add the email IDs in the CSV or list format. |
| Cc Recipients | (Optional) Specify the email IDs of the members to be added to the CC list of the email message that you want to send from the Exchange account. You must add the email IDs in the CSV or list format. |
| Body | Message or content of the email that you want to send as a reply to the specified email from the Exchange account. |
| Attachment IRIs | (Optional) Specify a list of IRI ID(s) of the file (s) to attach to the email being sent from the Exchange server. IRI IDs are used to access files from the Attachments module. You must add the Attachment IRIs in the CSV or list format. |
The output contains the following populated JSON schema:
{
  "message": ""
}| Parameter | Description |
|---|---|
| Source | Select the source folder whose total email count, including unread emails and subfolder details you want to retrieve from your Exchange account. You can choose from Inbox, Sent, Drafts, Trash, or Custom Folder. By default, this is set as Inbox. If you select Custom Folder, then you must specify the folder in your Exchange account from which you want to retrieve unread emails. |
The output contains the following populated JSON schema:
{
  "folder": "",
  "total_email_count": "",
  "unread_email_count": "",
  "child_folder_count": "",
  "child_folder_metadata": []
}Note: This operation is deprecated and replaced with the "Get Unread Emails" operation. However, this operation has been retained since the new "Get Unread Emails" has an updated output schema. Therefore, if you had used this operation earlier in an existing playbook, then the playbook would fail if this operation is completely removed.
| Parameter | Description |
|---|---|
| Source | Select the source folder from which you want to retrieve unread emails from your Exchange account. You can choose from All, Inbox, Sent, Drafts, Trash, or Custom Folder. By default, this is set as Inbox. If you select All, then this operation will search for emails across all folders associated with your Exchange account. If you select Custom Folder, then you must specify the folder in your Exchange account from which you want to retrieve unread emails. |
| Mark as Read | Select this option, i.e., set it to True (default) to retrieve the unread emails from the Exchange account and also mark these emails as Read. By default, this is set to True. |
| Pull Oldest First | Select this option, i.e., set it to True to retrieve the oldest unread email first from the Exchange account, i.e., if this operation is checked, then the unread emails get sorted by DateTime from oldest to newest. By default, this is unchecked, i.e., it is set as False. |
| Limit | (Optional) The maximum number of emails, based on your filter criterion, you want to include in the output of this operation. If you do not specify anything in this field then all emails based on your filter criterion will be included in the output of this operation. |
| Parse Inline Images | Select this option, i.e., set it to True, to retrieve the body of the unread emails including inline images, from the Exchange account. By default, this is set to False (the option is unchecked). |
| Save Email | Select this option, i.e., set it to True(default) to save the email as a file in the Attachments module. |
| Extract Attachment Data | Select this option, i.e., set it to True (default) to also extract the attachment data for the unread emails, if the type of the attachment is eml or msg. |
The output contains the following populated JSON schema:
[
  {
      "epilogue": "",
      "attachment_files": [],
      "body": {
          "html": "",
          "text": "",
          "json": ""
      },
      "preamble": "",
      "headers": {
          "X-Received": "",
          "MIME-Version": "",
          "Message-ID": "",
          "X-Exchange-Antispam-Report-Test": "",
          "X-Exchange-Antispam-Report-CFA-Test": "",
          "X-MS-Office365-Filtering-Correlation-Id": "",
          "X-MS-Exchange-CrossTenant-Network-Message-Id": "",
          "X-Microsoft-Exchange-Diagnostics": [],
          "X-MS-Exchange-CrossTenant-Id": "",
          "X-MS-Exchange-CrossTenant-FromEntityHeader": "",
          "SpamDiagnosticMetadata": "",
          "X-Gm-Message-State": "",
          "SpamDiagnosticOutput": "",
          "To": "",
          "X-Microsoft-Antispam": "",
          "Subject": "",
          "From": "",
          "Received": [],
          "X-MS-Exchange-CrossTenant-OriginalArrivalTime": "",
          "X-Microsoft-Antispam-Message-Info": [],
          "Authentication-Results": "",
          "X-MS-PublicTrafficType": "",
          "Received-SPF": "",
          "X-MS-TrafficTypeDiagnostic": "",
          "X-MS-Exchange-Transport-CrossTenantHeadersStamped": "",
          "Sender": "",
          "X-MS-Exchange-Organization-AuthSource": "",
          "X-MS-Exchange-Organization-MessageDirectionality": "",
          "X-MS-Exchange-Organization-SCL": "",
          "Auto-Submitted": "",
          "X-Forefront-Antispam-Report": "",
          "X-EOPTenantAttributedMessage": "",
          "DKIM-Signature": [],
          "X-Google-Smtp-Source": "",
          "Reply-To": "",
          "X-MS-Exchange-Processed-By-BccFoldering": "",
          "X-Google-DKIM-Signature": "",
          "X-MS-Exchange-Organization-AuthAs": "",
          "Content-Type": "",
          "X-MS-Exchange-Organization-Network-Message-Id": "",
          "Return-Path": "",
          "X-EOPAttributedMessage": "",
          "X-MS-Exchange-Transport-EndToEndLatency": ""
      },
      "item_id": "",
      "attachments": [
          {
              "file": "",
              "metadata": {
                  "sha256": "",
                  "content_length": "",
                  "content_type": "",
                  "sha1": "",
                  "filename": "",
                  "md5": ""
              },
              "json": "",
              "text": ""
          }
      ],
      "email_as_attachment": "",
      "folder_path": "",
      "parsed_attachment_data": []
  }
]| Parameter | Description |
|---|---|
| Source | (Optional) Name of the source folder from which you want to retrieve the email to which you want to add categories. You can choose from the following options: All, Inbox, Sent, Drafts, Trash, or Custom Folder. If you choose Custom Folder, then you must specify the following parameter: - Folder Name: Name of the folder from which you want to retrieve the email. |
| Message ID | The message ID of the email to which you want to assign the specified categories. |
| Categories | The CSV list of categories that you want to assign to the specified email. |
The output contains the following populated JSON schema:
{
  "status": "",
  "message": "",
  "message_id": "",
  "categories": [],
  "subject": ""
}| Parameter | Description |
|---|---|
| Source | (Optional) Name of the source folder from which you want to retrieve the email whose categories you want to retrieve. You can choose from the following options: All, Inbox, Sent, Drafts, Trash, or Custom Folder. If you choose Custom Folder, then you must specify the following parameter: - Folder Name: Name of the folder from which you want to retrieve the email. |
| Message ID | The message ID of the email whose categories you want to retrieve. |
The output contains the following populated JSON schema:
{
  "status": "",
  "message": "",
  "message_id": "",
  "categories": [],
  "subject": ""
}| Parameter | Description |
|---|---|
| Source | (Optional) Name of the source folder from which you want to retrieve the email whose categories you want to remove. You can choose from the following options: All, Inbox, Sent, Drafts, Trash, or Custom Folder. If you choose Custom Folder, then you must specify the following parameter: - Folder Name: Name of the folder from which you want to retrieve the email. |
| Message ID | The message ID of the email from which you want to remove the specified categories. |
| Categories | The CSV list of categories that you want to remove from the specified email. |
The output contains the following populated JSON schema:
{
  "status": "",
  "message": "",
  "message_id": "",
  "removed": [],
  "not_found": [],
  "subject": ""
}| Parameter | Description |
|---|---|
| Target Email Address | (Optional) Specify the email address of the mailbox to create a new folder. If this value is not specified, the default value of Email Address from configuration is used. |
| Parent Folder Path | (Optional) Specify the path of the parent folder in which you want to create the new folder. If the parent folder path is not provided, /root/Top of Information Store is considered as the default value. |
| Folder Name | Specify a name for the newly created folder. |
The output contains the following populated JSON schema:
{
  "status": "",
  "message": "",
  "folder_absolute_path": "",
  "folder_creation_status": ""
}| Parameter | Description |
|---|---|
| Message IDs | Specify the IDs of the emails, in CSV format, to mark as junk in the Exchange account. |
| Folder Name | (Optional) Specify the name of the folder in the Exchange account from which you want to mark the email as junk. By default, it searches all folders. |
| Mark as Read | (Optional) Select this option to mark emails as Read after they have been marked as Junk. By default, this is set to False. |
| Target Email Address | (Optional) Specify the email address from which to mark the specified email as Junk. Important: The Exchange account that you have specified in the configuration parameters and using which the connector has logged into Exchange must have Impersonation rights on this email address. For information on how to grant Impersonation rights in Office 365, see the How to Grant Application Impersonation Rights in Office 365? article. |
The output contains the following populated JSON schema:
{
  "marked_as_junk": [
      {
          "message_id": ""
      }
  ],
  "message_ids_not_found": []
}The Sample - Exchange - 4.7.0 playbook collection comes bundled with the Exchange connector. This playbook contains steps using which you can perform all supported actions. You can see the bundled playbooks in the Automation > Playbooks section in FortiSOAR™ after importing the Exchange connector.
Calendar : Create Calendar Event
Calendar : Get Calendar Events
Categorize : Add Category
Categorize : Get Category
Categorize : Remove Category
Contacts : Get Contacts
Email : Copy Email
Email : Delete Email
Email : Mark Email as Read
Email : Move Email
Email : Search Email
Email : Send Email
Email : Send Reply
> Exchange > Create Indicators and Attachments
> Exchange > Extract File Indicators and Create Alert with the Linked Indicators
> Exchange > Fetch
Exchange > Ingest
> Exchange > Process Email
Folder : Get Folder Metadata
Get Unread Emails
Create Folder
Send Email (Advanced)
Mark Emails as Junk
Note: If you are planning to use any of the sample playbooks in your environment, ensure that you clone those playbooks and move them to a different collection since the sample playbook collection gets deleted during the connector upgrade and delete.
Use the Data Ingestion Wizard to easily ingest data into FortiSOAR™ by pulling email content from Exchange. Currently, email content ingested from Exchange is mapped to "alerts" in FortiSOAR™. For more information on the Data Ingestion Wizard, see the "Connectors Guide" in the FortiSOAR™ product documentation.
The following changes have been made to the process of extracting attachments, from Exchange v4.2.0 onwards:
Support has been added for extracting .zip attachments. For more effective content extraction from zipped files, use SOAR Framework Solution Pack v2.1.1 or later. For more information on the SOAR Framework Solution Pack, see FortiSOAR Content Hub.
If the .zip file contains a single .eml file, this .eml file will be extracted.
If the .zip file contains multiple non-email files, then their respective attachments and indicators are created along with the parent zip file.
Support has been added for single-level zip extraction only.
Inline image indicators or attachments will no longer be created.
You can configure data ingestion using the "Data Ingestion Wizard" to seamlessly map the incoming Exchange email content to FortiSOAR™ "Alerts".
The Data Ingestion Wizard enables you to configure the scheduled pulling of data from Exchange into FortiSOAR™. It also lets you pull some sample data from Exchange using which you can define the mapping of data between Exchange and FortiSOAR™. The mapping of common fields is generally already done by the Data Ingestion Wizard; users mostly required to only map any custom fields that are added to email content from Exchange.
To begin configuring data ingestion, click Configure Data Ingestion on the Exchange connector's "Configurations" page.
Click Let's Start by fetching some data, to open the Fetch Sample Data screen.
Sample data is required to create a field mapping between the Exchange email data and FortiSOAR™. The sample data is pulled from connector actions or ingestion playbooks.
On the Fetch Data screen, provide the configurations required to fetch email data from Exchange.
Specify a Target Email Address from which to fetch emails. The configured account must have appropriate delegate or impersonation rights on this email address.
From the Source drop-down list. choose the folder from which the unread emails need to be retrieved from the Exchange server. By default, this is set as Inbox.
You can select the Fetch Inline Image checkbox if you want to include the inline images while retrieving the body of the unread emails from the Exchange server.
Select the Use Unified Communications checkbox to allow communication with external entities, for example, other SOC teams using emails, instant messaging, etc. from within an alert generated in FortiSOAR™. For "Unified Communications" to work, you must install and configure the SOAR Framework Solution Pack on your FortiSOAR™ instance. For more information on the SOAR Framework Solution Pack see the SOAR Framework Solution Pack documentation.
Specify the Emails to Ingest per Execution if you want to limit the emails to ingest per execution of data ingestion.
Once you have completed specifying the configurations, click Fetch Data.
On the Field Mapping screen, map the fields of an email ingested from Exchange to the fields of an alert present in FortiSOAR™.
To map a field, click the key in the sample data to add the "jinja" value of the field. For example, to map the fromparameter of an email ingested from Exchange to the Email From parameter of a FortiSOAR™ alert, click the Email From field and then click the from field to populate its keys:
For more information on field mapping, see the Data Ingestionchapter in the Connectors Guide in the FortiSOAR™ product documentation. Once you have completed mapping fields, click Save Mapping & Continue.
Use the Scheduling screen to configure schedule-based ingestion, i.e., specify the polling frequency to Exchange, so that the content gets pulled from the Exchange integration into FortiSOAR™.
On the Scheduling screen, from the Do you want to schedule the ingestion? drop-down list, select Yes.
In the "Configure Schedule Settings" section, specify the Cron expression for the schedule. For example, if you want to pull unread emails from Exchange every 5 minutes, click Every X Minute, and in the minute box enter */5. This would mean that based on the configuration you have set up, unread emails will be pulled from Exchange every 5 minutes.
Once you have completed scheduling, click Save Settings & Continue.
The Summary screen displays a summary of the mapping done, and it also contains links to the Ingestion playbooks. Click Done to complete the data ingestion and exit the Data Ingestion Wizard.
Important: After you have completed configuring the data ingestion for Exchange on an agent or are using the listener-based ingestion on an agent, then users must update the "> Exchange > Extract and Link File Indicator" playbook that is part of the Exchange ingestion playbooks collection (Connectors page > Data Ingestion > Exchange > Select Agent Configuration > Playbooks). You must update the configuration of the Utility connector from "Self" to "Agent" in the "Upload File IOCs" step of the "> Exchange > Extract and Link File Indicator" playbook.
localhost.Office" in the search bar, and select Office 365 Exchange Online.Gather information for the following parameters:
Get the authorization code by using your web browser to browse to the following URL. Replace the fields in the following URL example with your values.
https://login.microsoftonline.com/<tenantid>/oauth2/v2.0/authorize?response_type=code&scope=offline_access https://outlook.office365.com/EWS.AccessAsUser.All&client_id=<client-id>&response_mode=query&grant_type=authorization_code
Replace:
<tenant-id> with the registered application's tenant ID.
<client-id> with the registered application's client ID
Note: The above URL must be sent as a single line; line breaks have been added to the following URL for readability. For more information, see Request an authorization code.
Paste the URL as a single line into your web browser and, if prompted, sign in to Azure.
The URL returns the authorization code in the code field. Save the authorization code in a secure location.
The full returned URL looks as shown in the following image, with the full code field value, 0.ASkAIj...RxgFhSAA, shortened for brevity:
Copy the authorization code from to the equal to (=) sign and without the "code=" prefix, till the "&session_state" and paste it into your instance configuration in the Authorization Code parameter.
For example, http://localhost/?code=**0.ASkAIj...RxgFhSAA**&session_state=c44574d5-38ba-4f93-b2a3-a830db8e8cdf
In the Authorization Code parameter, enter only the bold text, i.e., 0.ASkAIj...RxgFhSAA
After you have successfully assigned permissions to the application, create the client's secret:
On the Add a client secret page, add the description of the app and the duration of the expiration of the secret, and then click Add.
The Certificates & secrets will display the value of the secret for the application:
Important: The value of the client's secret is visible only initially, so do not forget to store the value of the secret.
When you upgrade the connector, you might get the following as an input:
"connectors.exchange connector check_health(): Unsupported tzinfo type: _PytzShimTimezone(datetime.timezone.utc, 'UTC')" error while executing connector actions that take 'DateTime'If this issue occurs on a FortiSOAR system, then do the following to resolve this issue:
SSH to your FortiSOAR system.
Restart the uwsgi service using the following command:
systemctl restart uwsgiIf this issue occurs on an FSR Agent system, then do the following to resolve this issue:
SSH to your FSR Agent system.
Restart the cyops-integrations-agent service, using the following command:
systemctl restart cyops-integrations-agentIf you are updating the Exchange connector to v4.7.0, and SFSP v2.2.1 is not deployed on your system, it is recommended to de-link Create FileHash MD5 Indicator step from the > Exchange > Create Indicators and Attachments playbook.
The following images show the playbook before and after de-linking:
|
|
|---|---|
| Before de-linking | After de-linking |