Multi-Tenancy Onboarding
Login Landing Page
-
Log in using your MSSP (root) administrator account. This account provides full access to manage all tenants and system configurations.
-
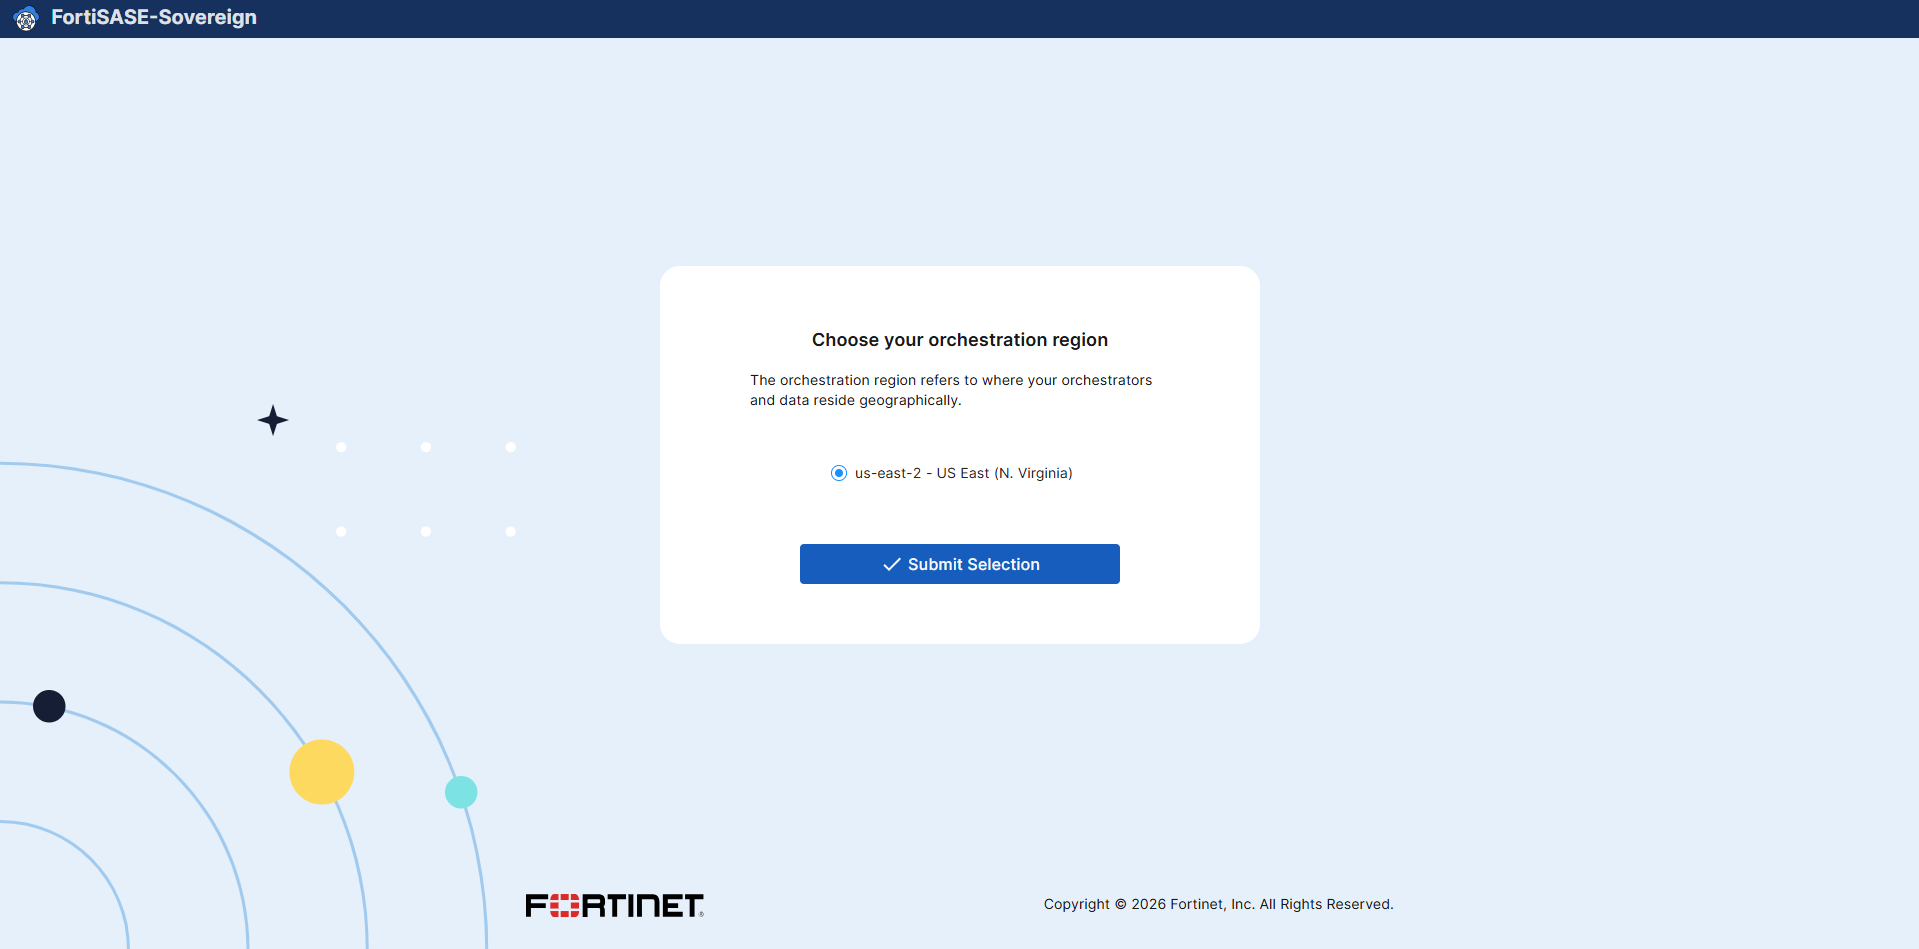
Select the appropriate orchestration region based on your deployment location and compliance requirements, then click Submit. The selected region determines where the management plane infrastructure will be provisioned and governs data residency boundaries for all tenants under this MSSP account.
-
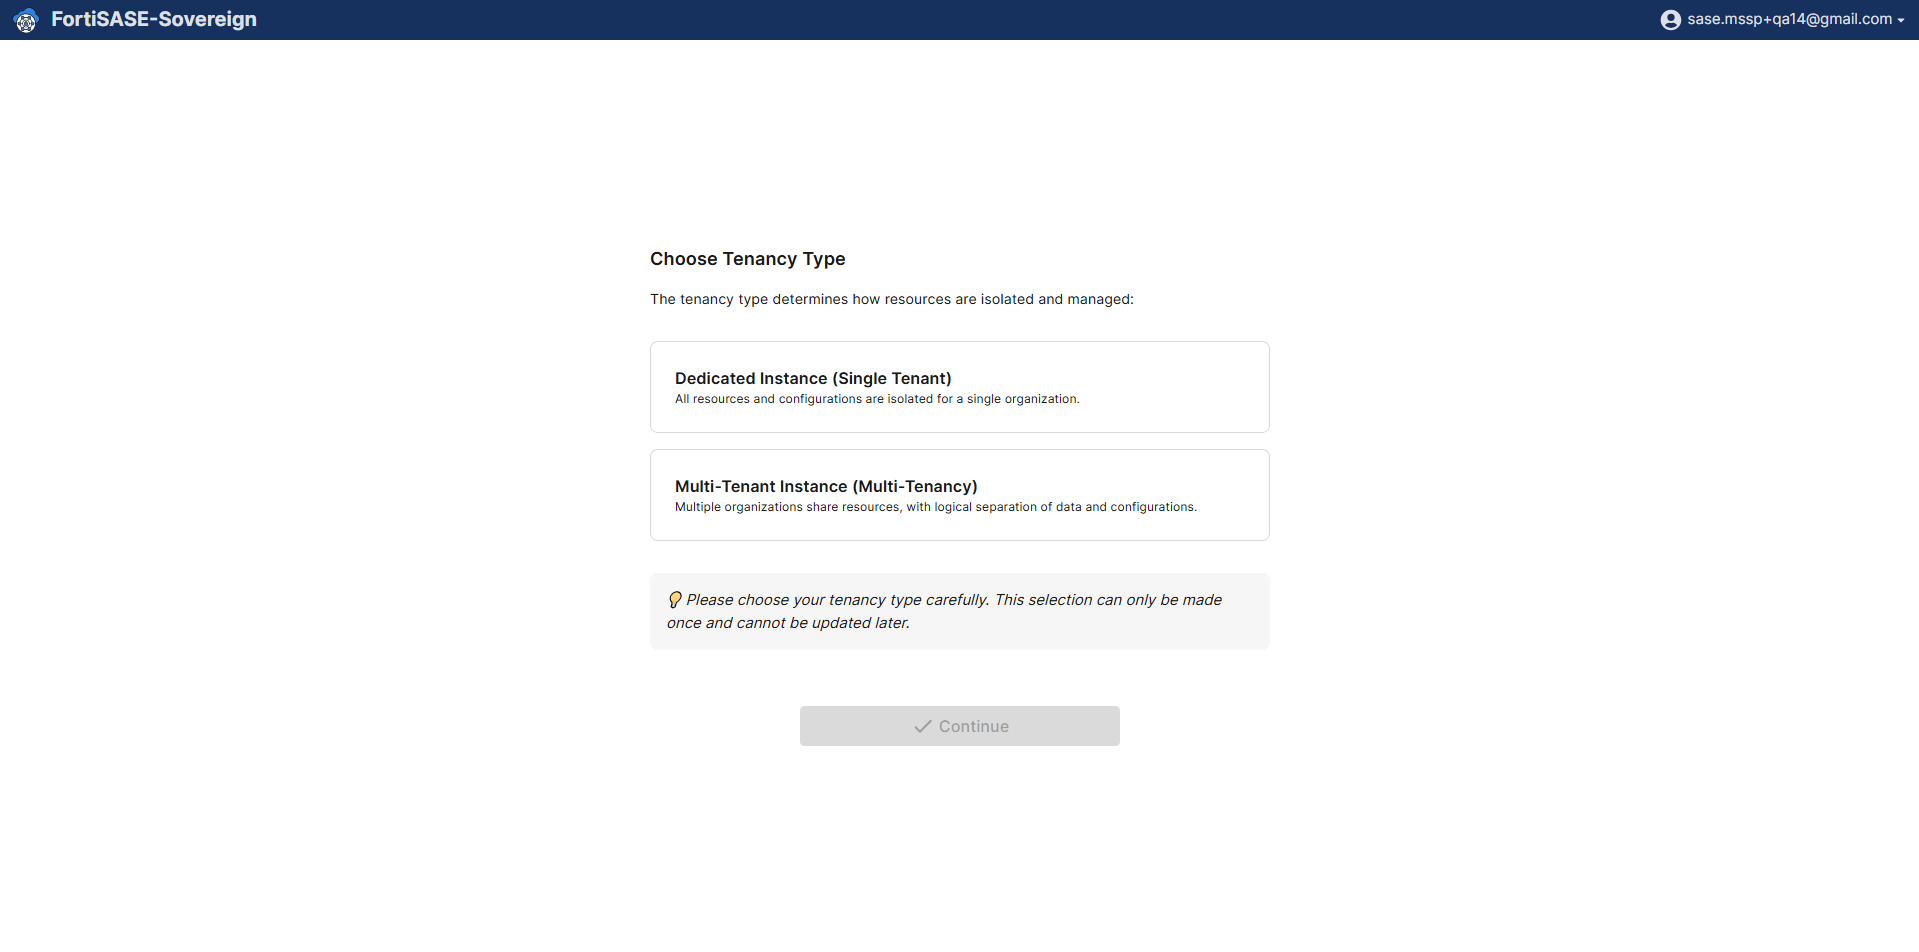
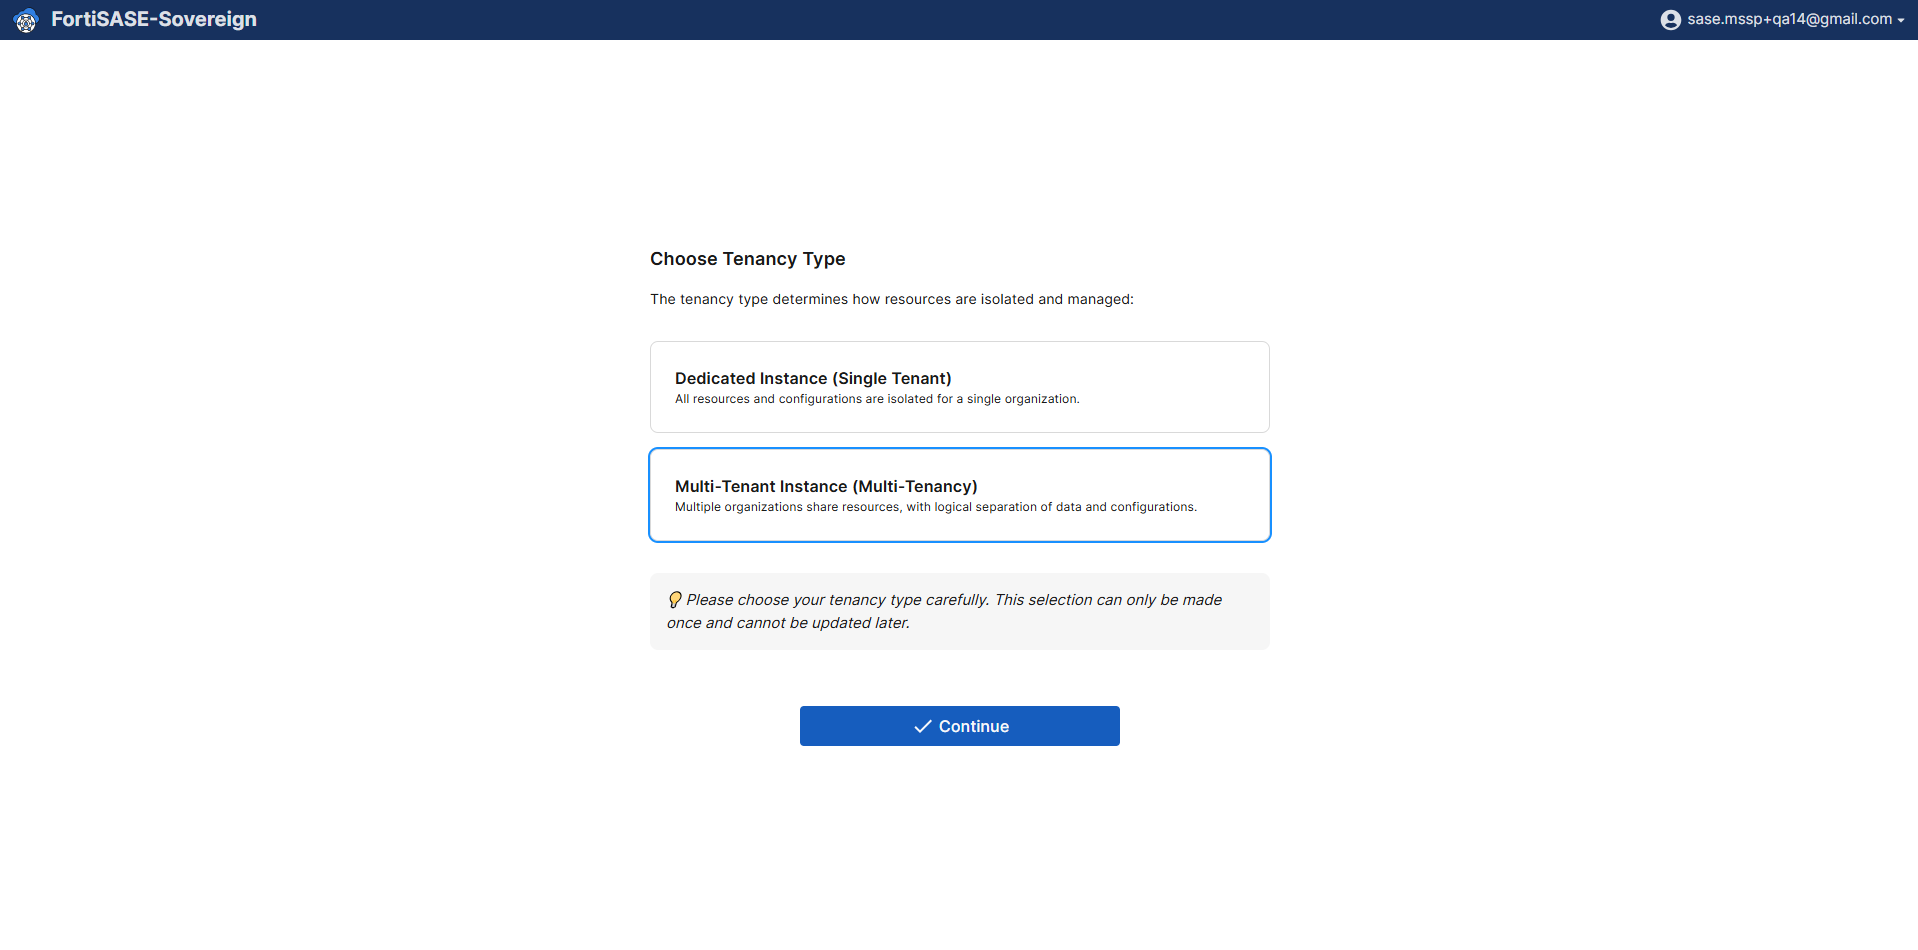
Select the tenancy model that fits your deployment: choose Dedicated Instance (Single Tenant) for an isolated, single-customer environment, or Multi-Tenant Instance (Multi-Tenancy) to enable a shared infrastructure model that supports multiple managed tenants under a single MSSP controller. This choice defines how your environment is structured.
-
Note: This tenancy selection is a one-time, permanent configuration that cannot be modified after the initial setup is complete. Ensure the correct deployment model is selected before proceeding.
-
-
Select Multi-Tenant Instance (Multi-Tenancy) as the deployment model to enable the full MSSP multi-tenancy feature set, and then click Continue to proceed to the controller configuration phase. This option activates the shared infrastructure framework required for managing multiple independent tenant environments.
Controller Onboarding
-
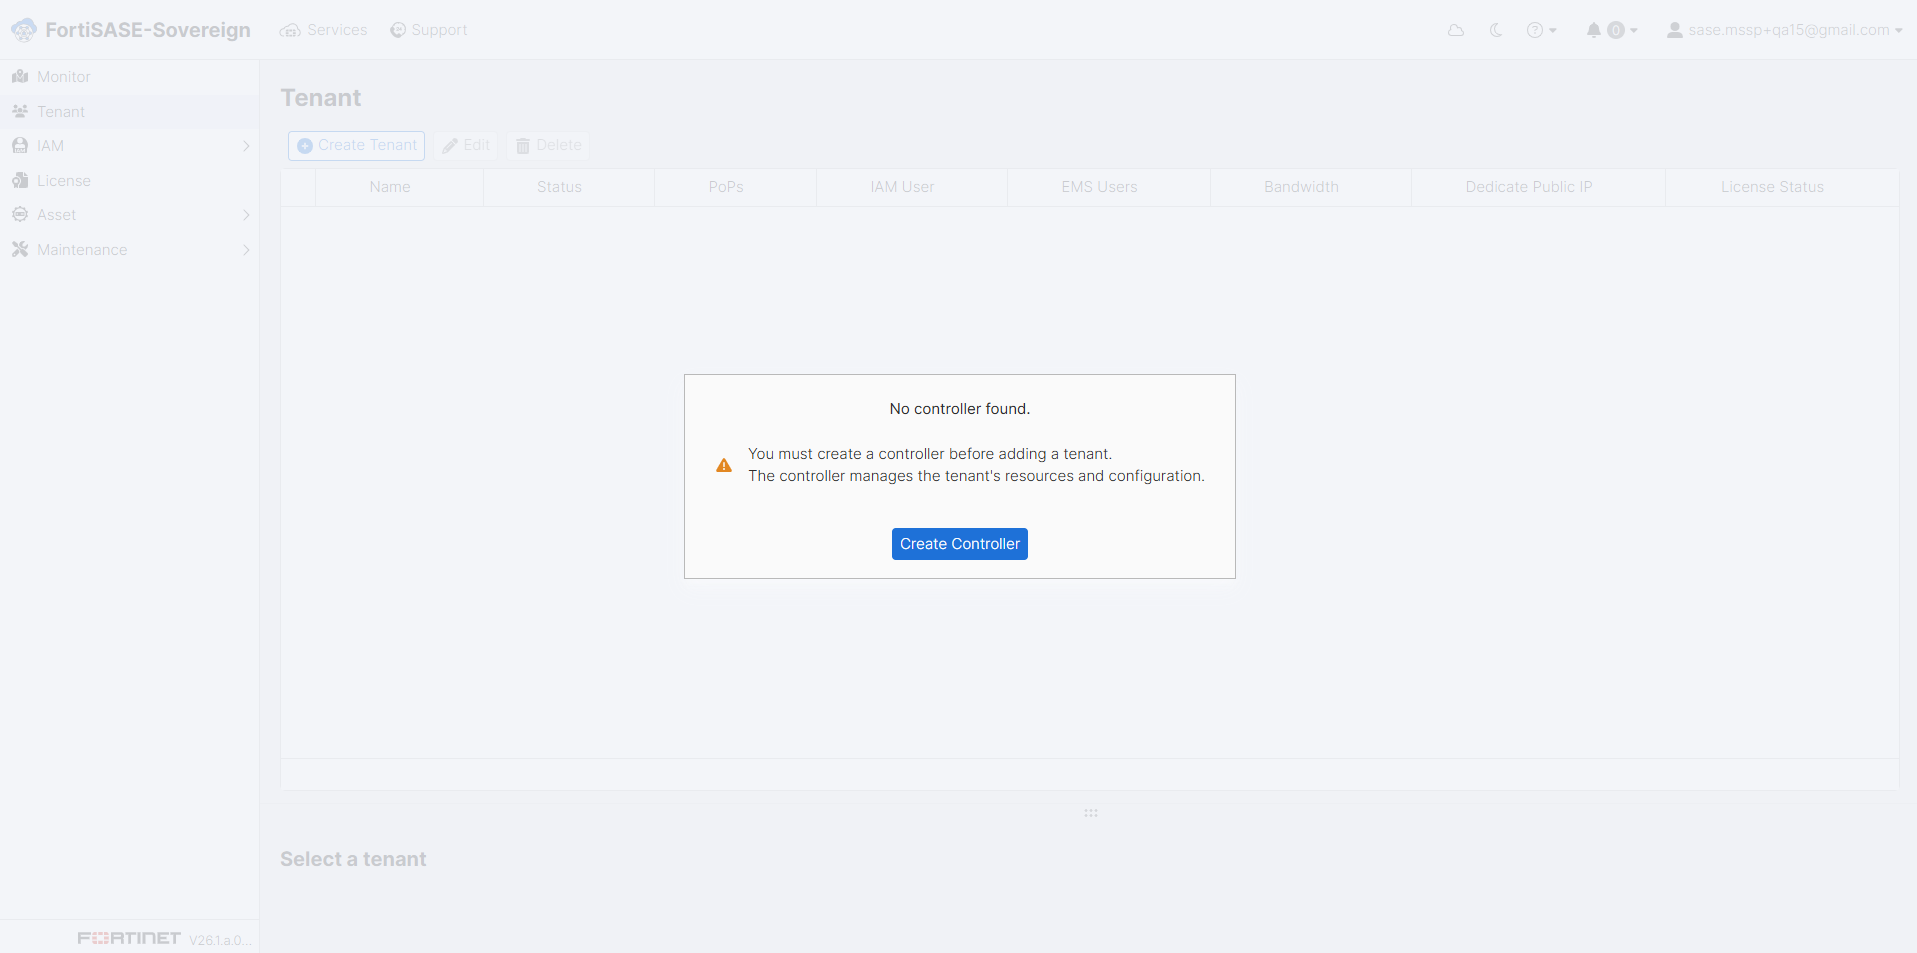
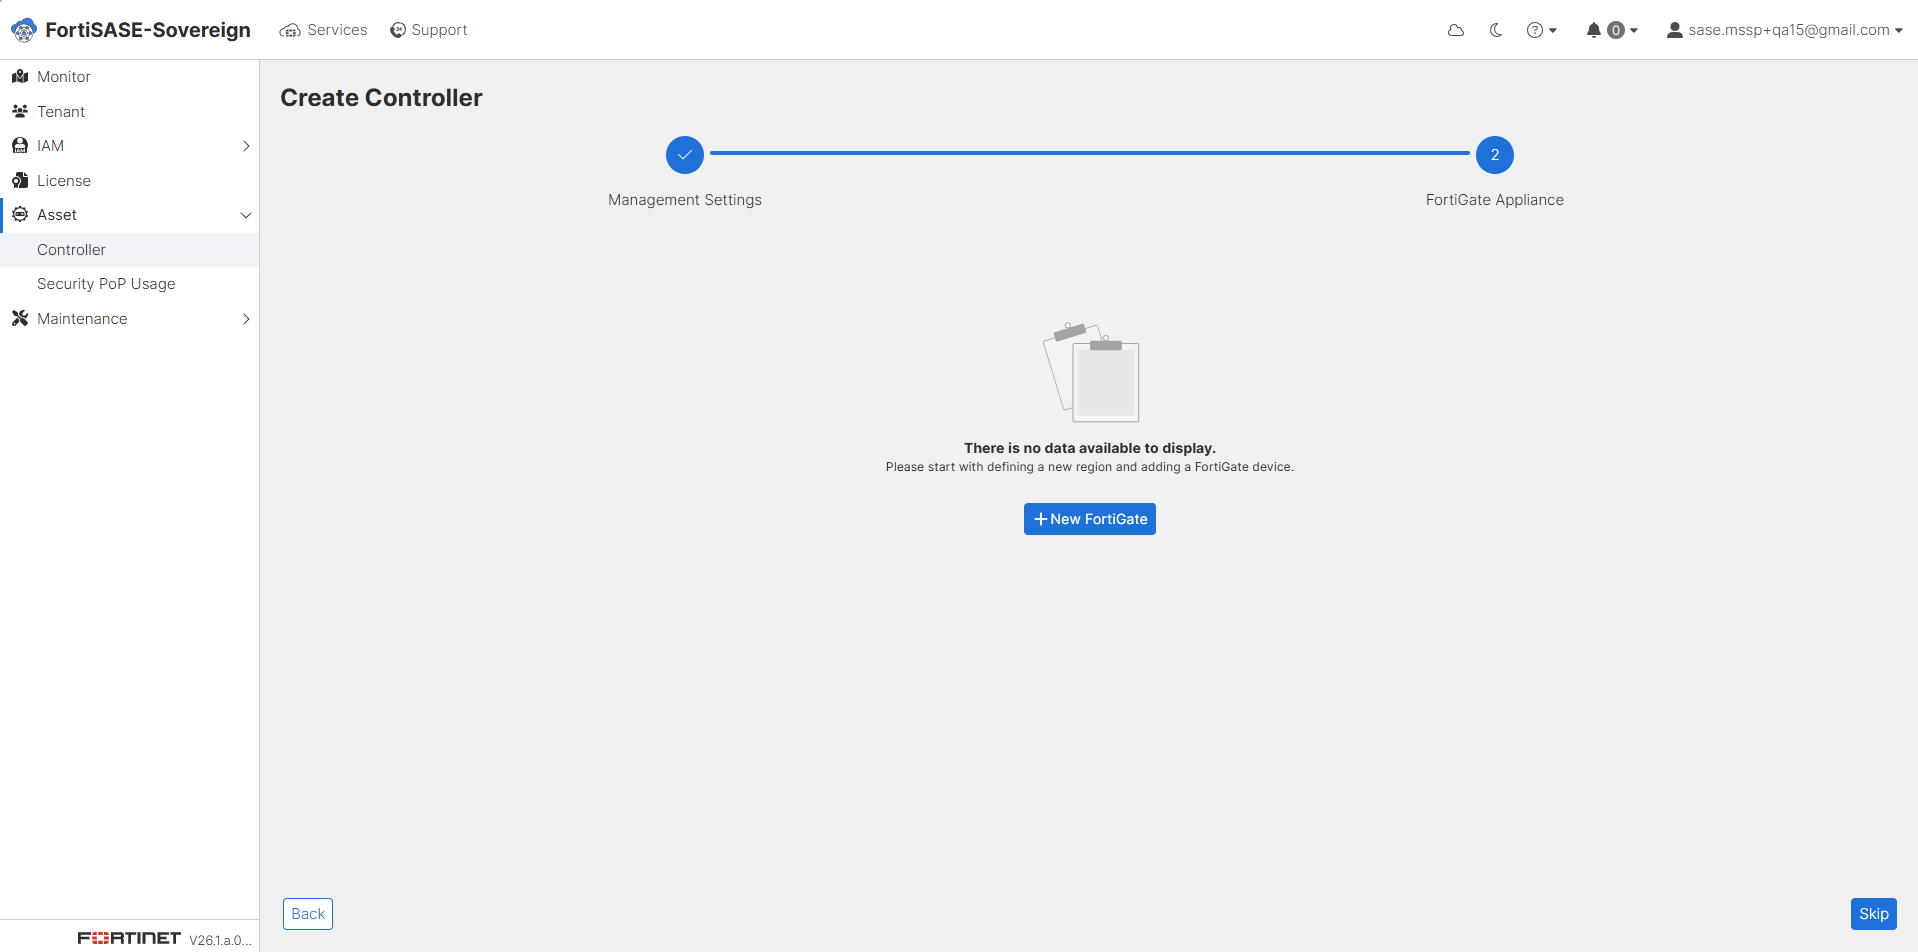
If no controller is configured, the system will prompt you and display a “No Controller Found” notification dialog. Click Create Controller within this dialog to initiate the controller provisioning workflow. A controller is required before any tenant onboarding or security policy management can take place.
-
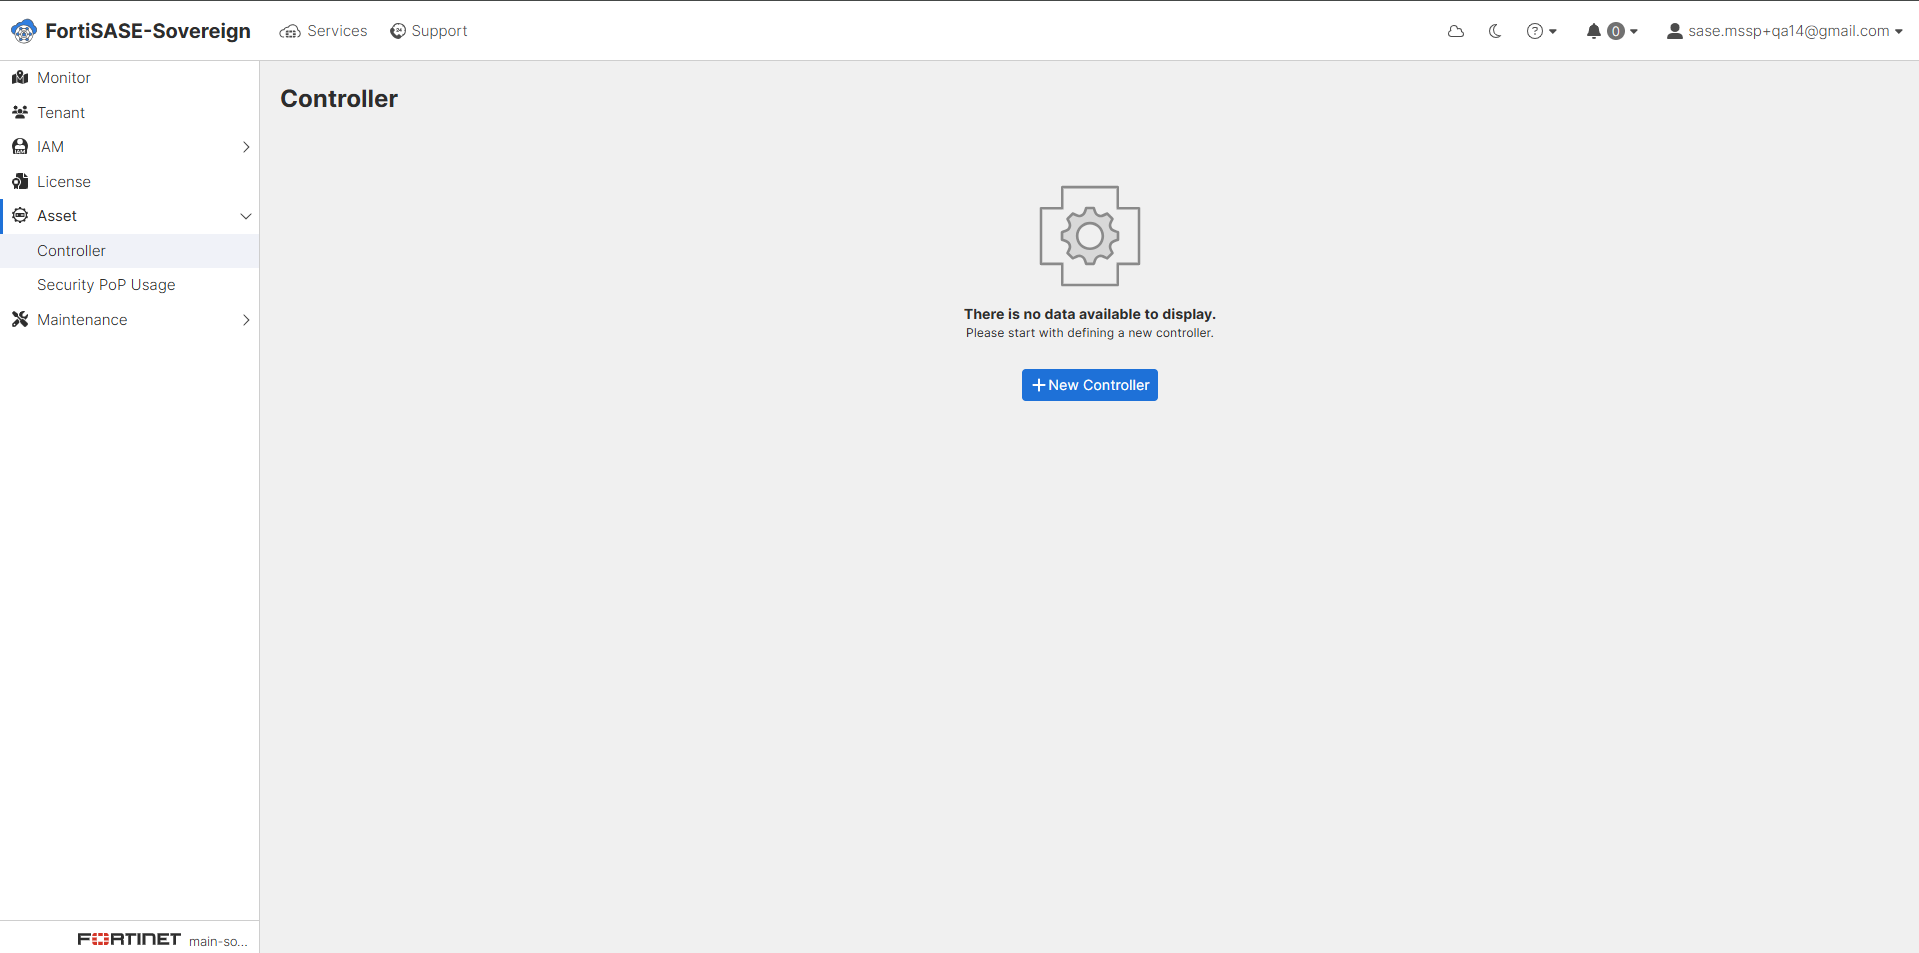
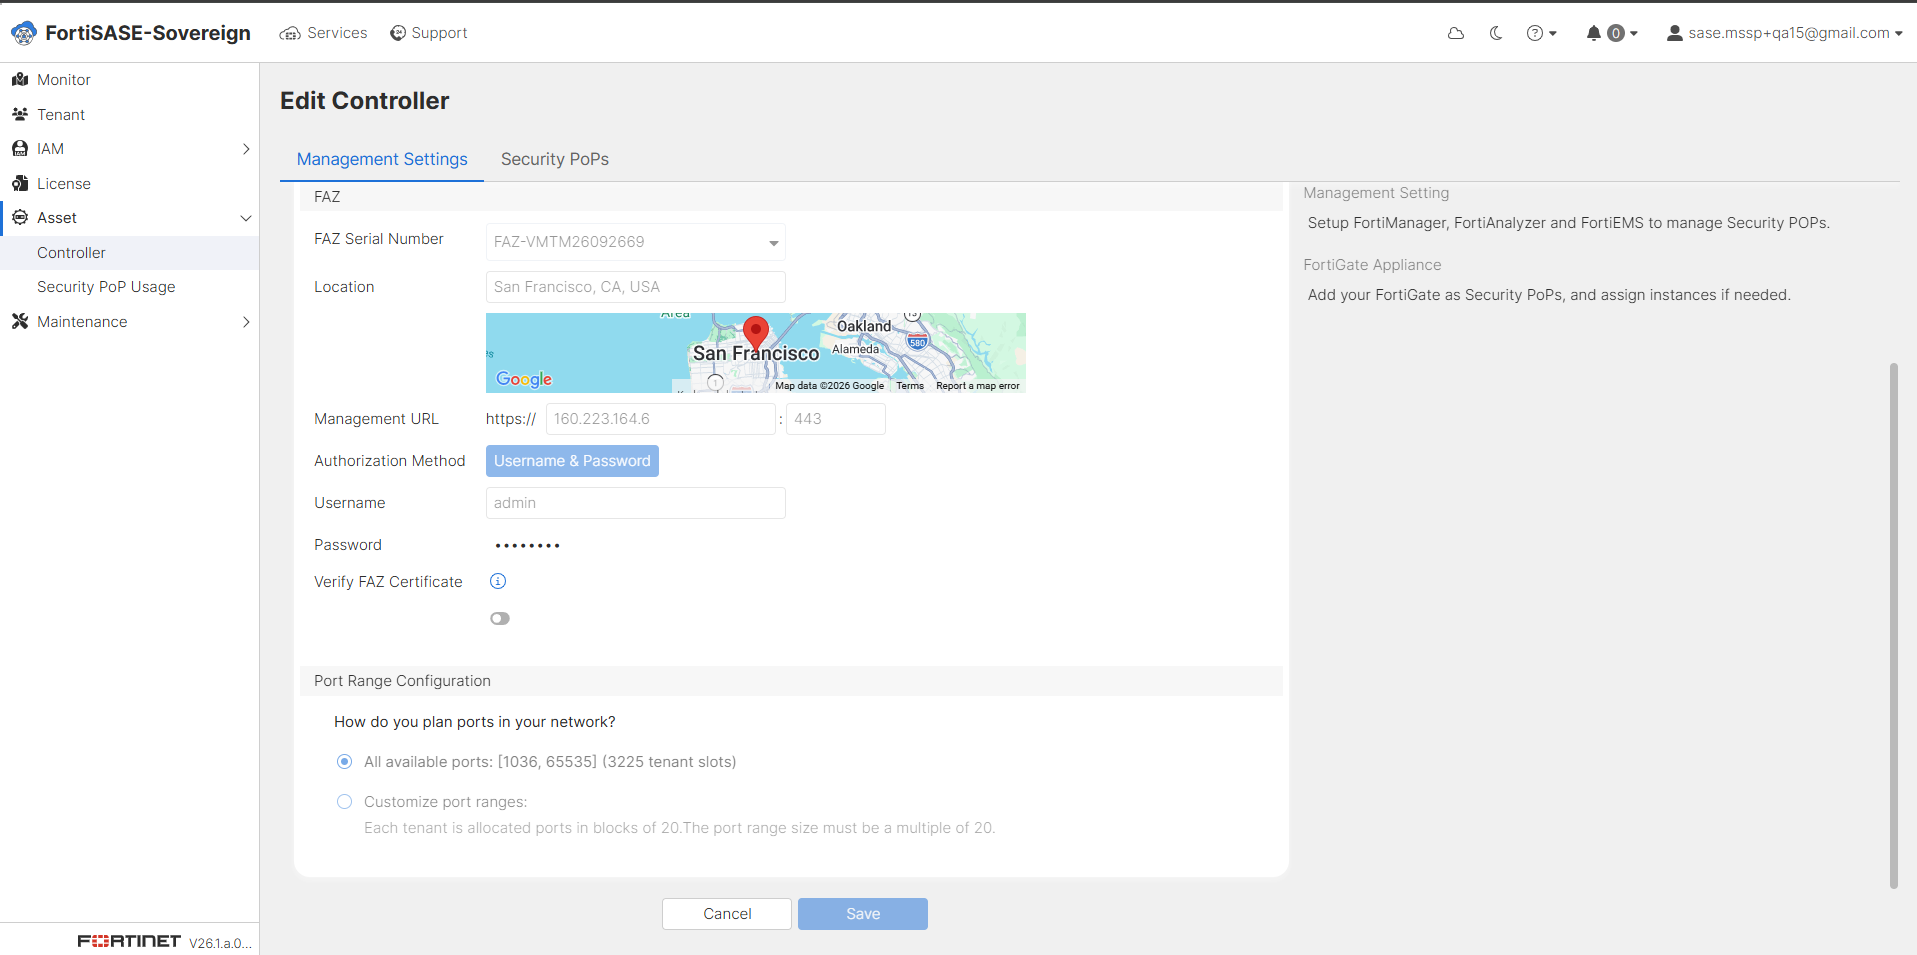
Go to Asset > Controller in the portal, then click +New Controller to begin registering a new controller instance. The Asset Controller serves as the central management node responsible for orchestrating security policies, tenant segmentation, and FortiGate integration across the Multi-Tenant Instance.
-
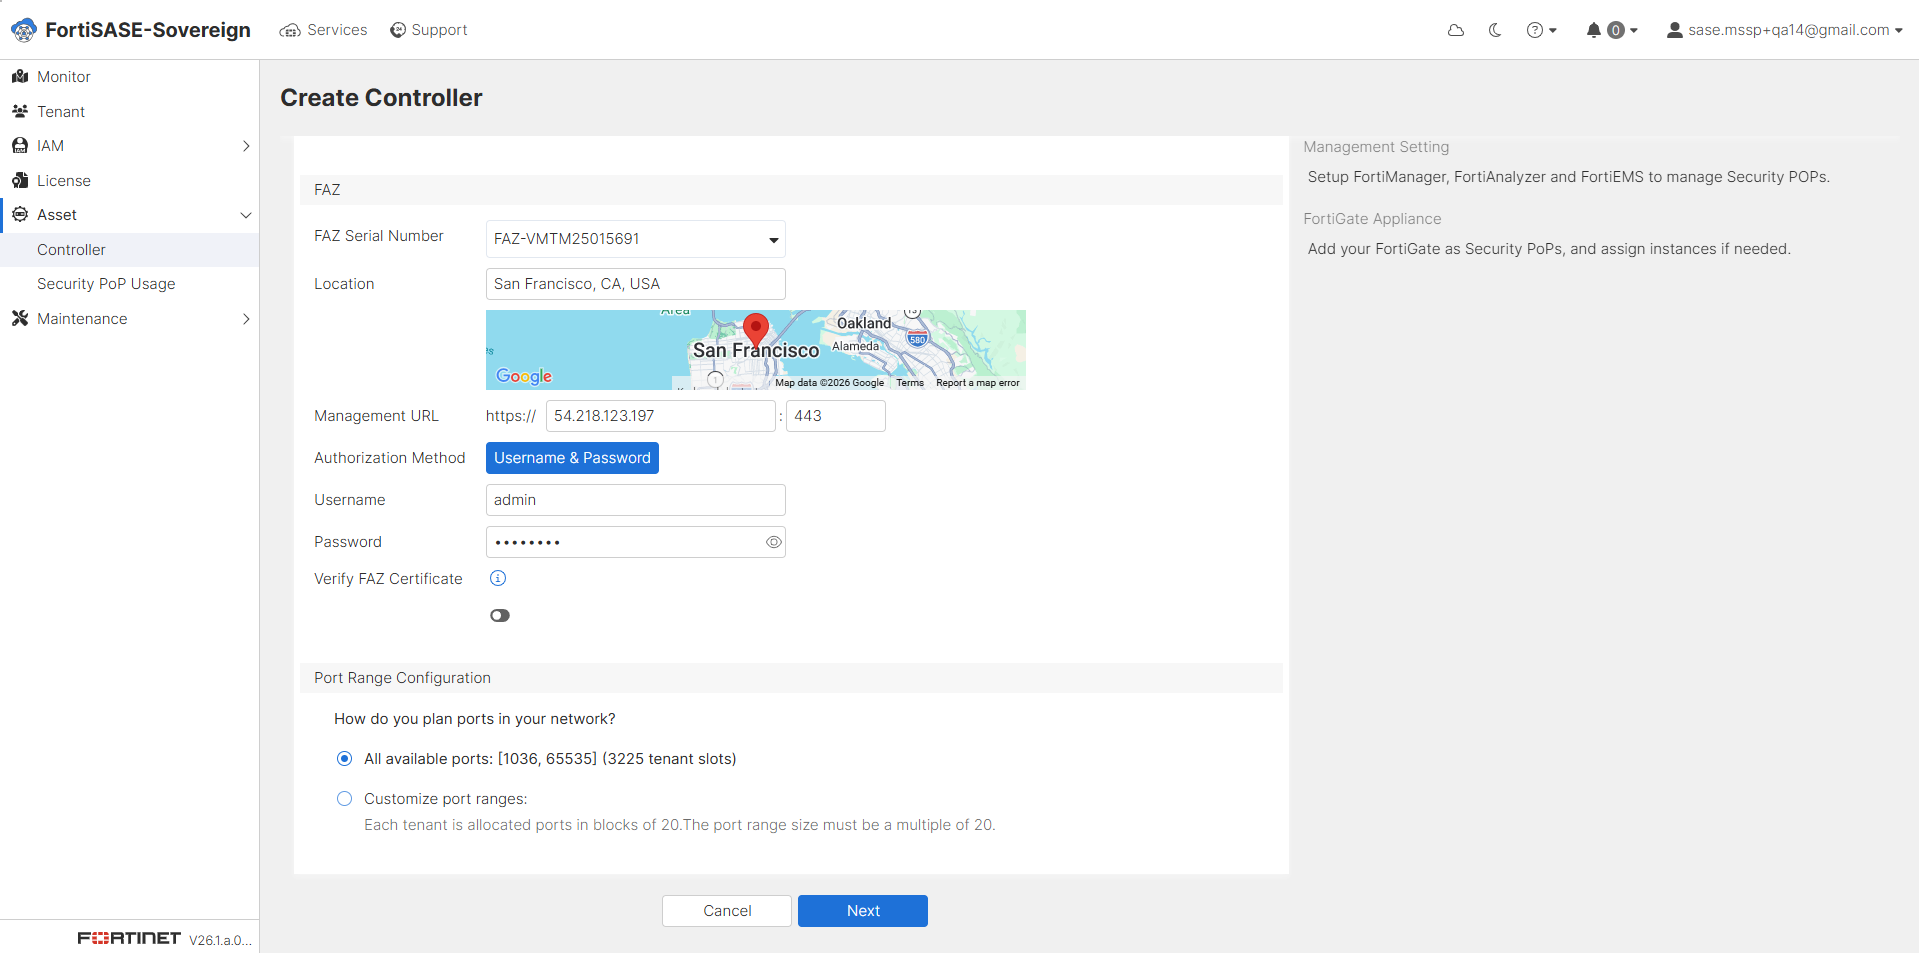
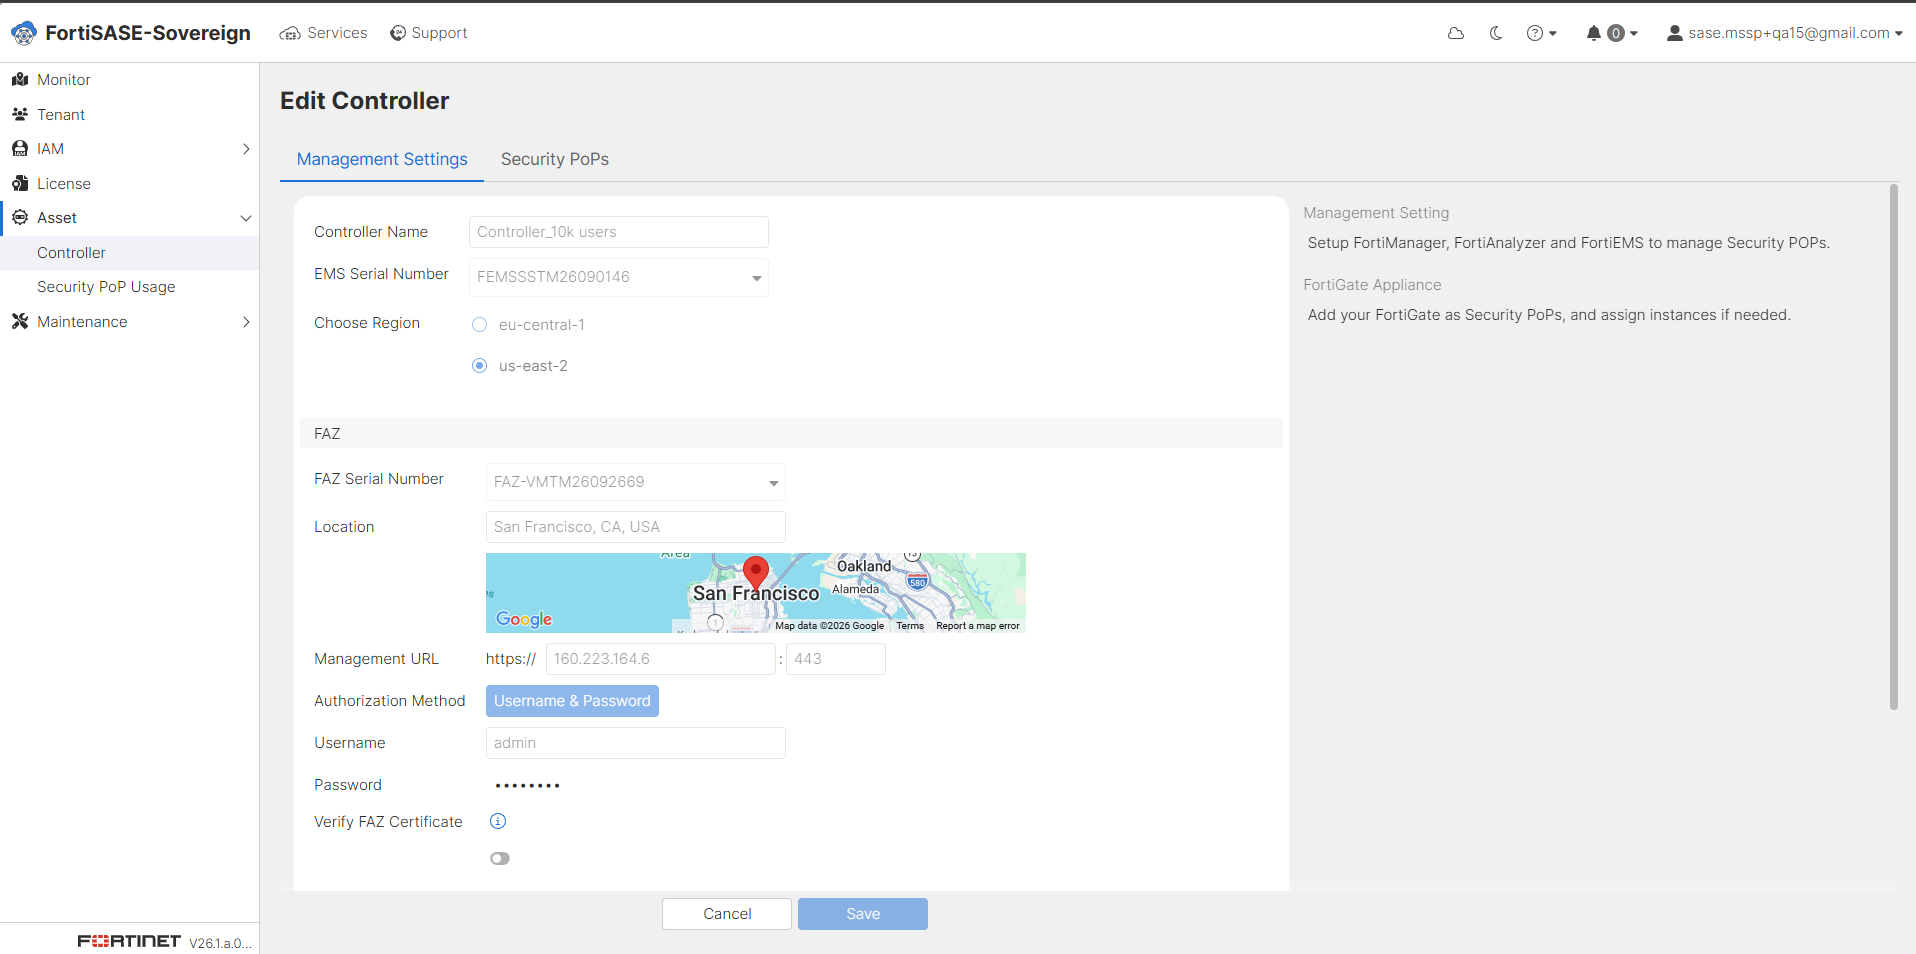
Enter the required controller details: enter a descriptive Controller Name, select the associated FortiClient EMS Serial Number from the available inventory, choose the target deployment Region, select the corresponding FortiAnalyzer Serial Number for log aggregation, and specify the physical or logical Location. Additionally, enter the Management URL along with valid administrator Username and Password credentials, and define the Port Range Configuration to govern VDOM allocation. Once all fields have been populated, click Next to proceed.
-
To add a FortiGate to a Security PoP, click +New FortiGate and proceed with the configuration steps outlined below. If you wish to complete the initial controller onboarding without adding a FortiGate at this stage, click Skip. FortiGate devices can be added or modified at any time after the onboarding process is complete.
-
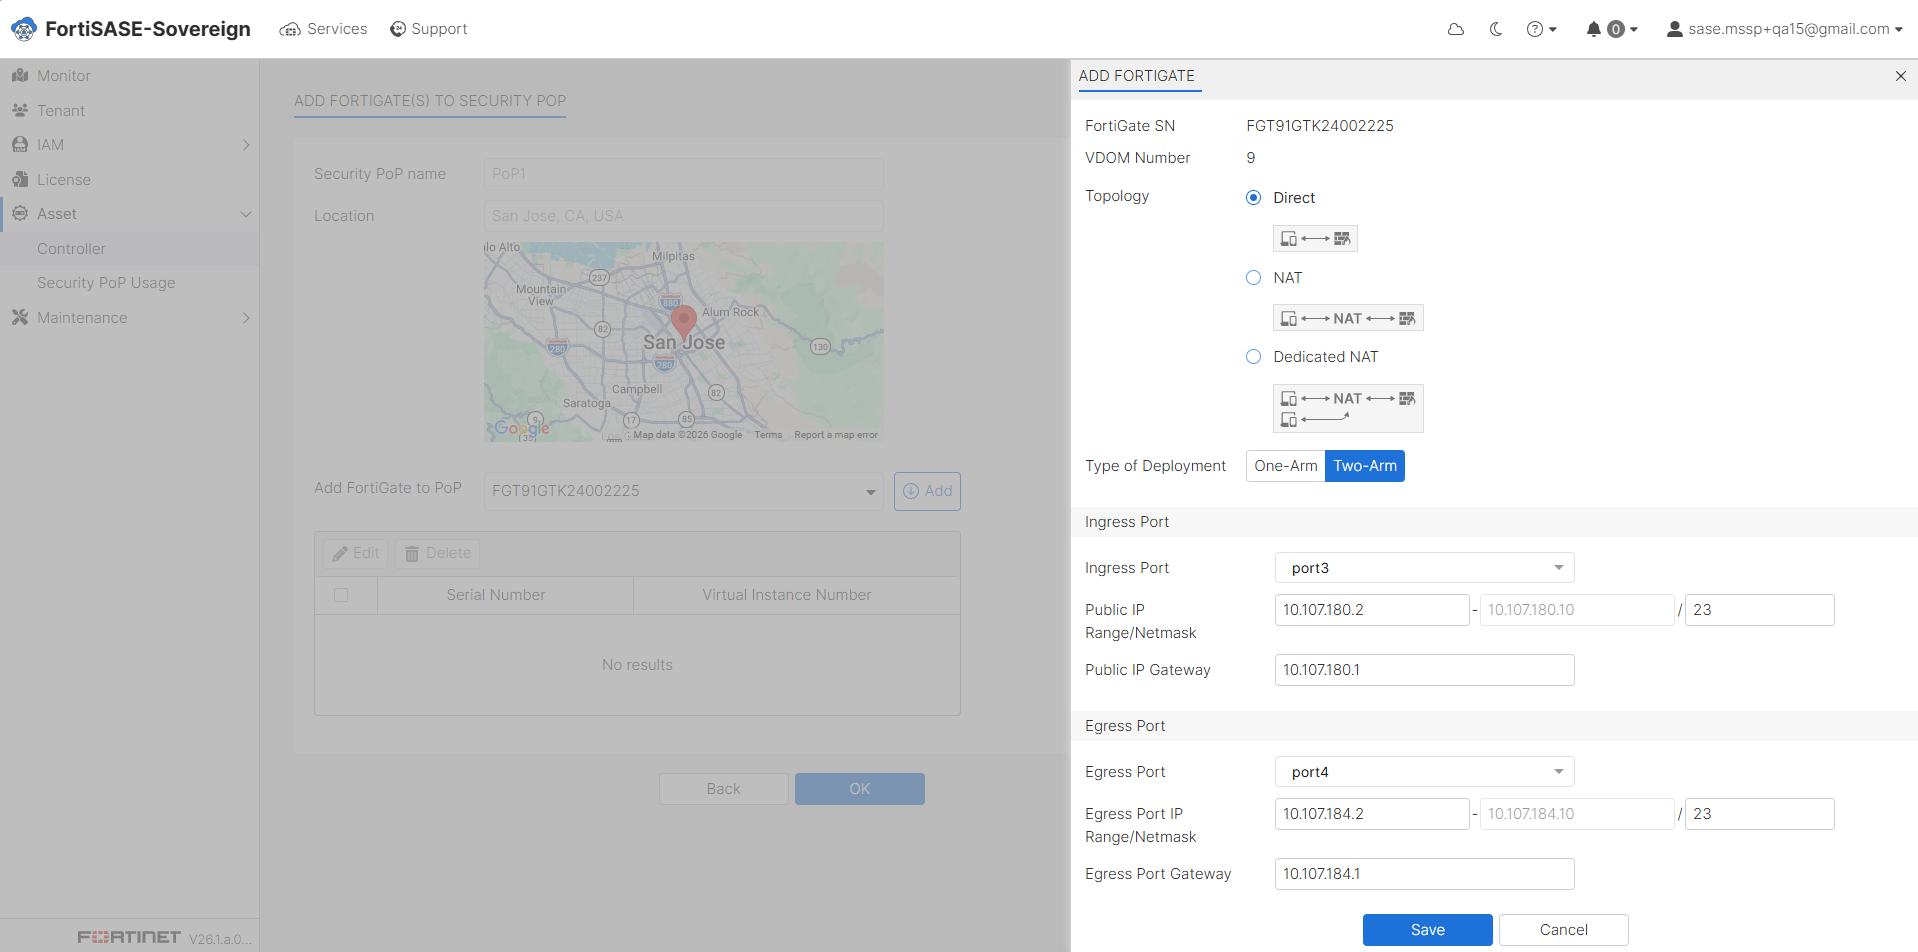
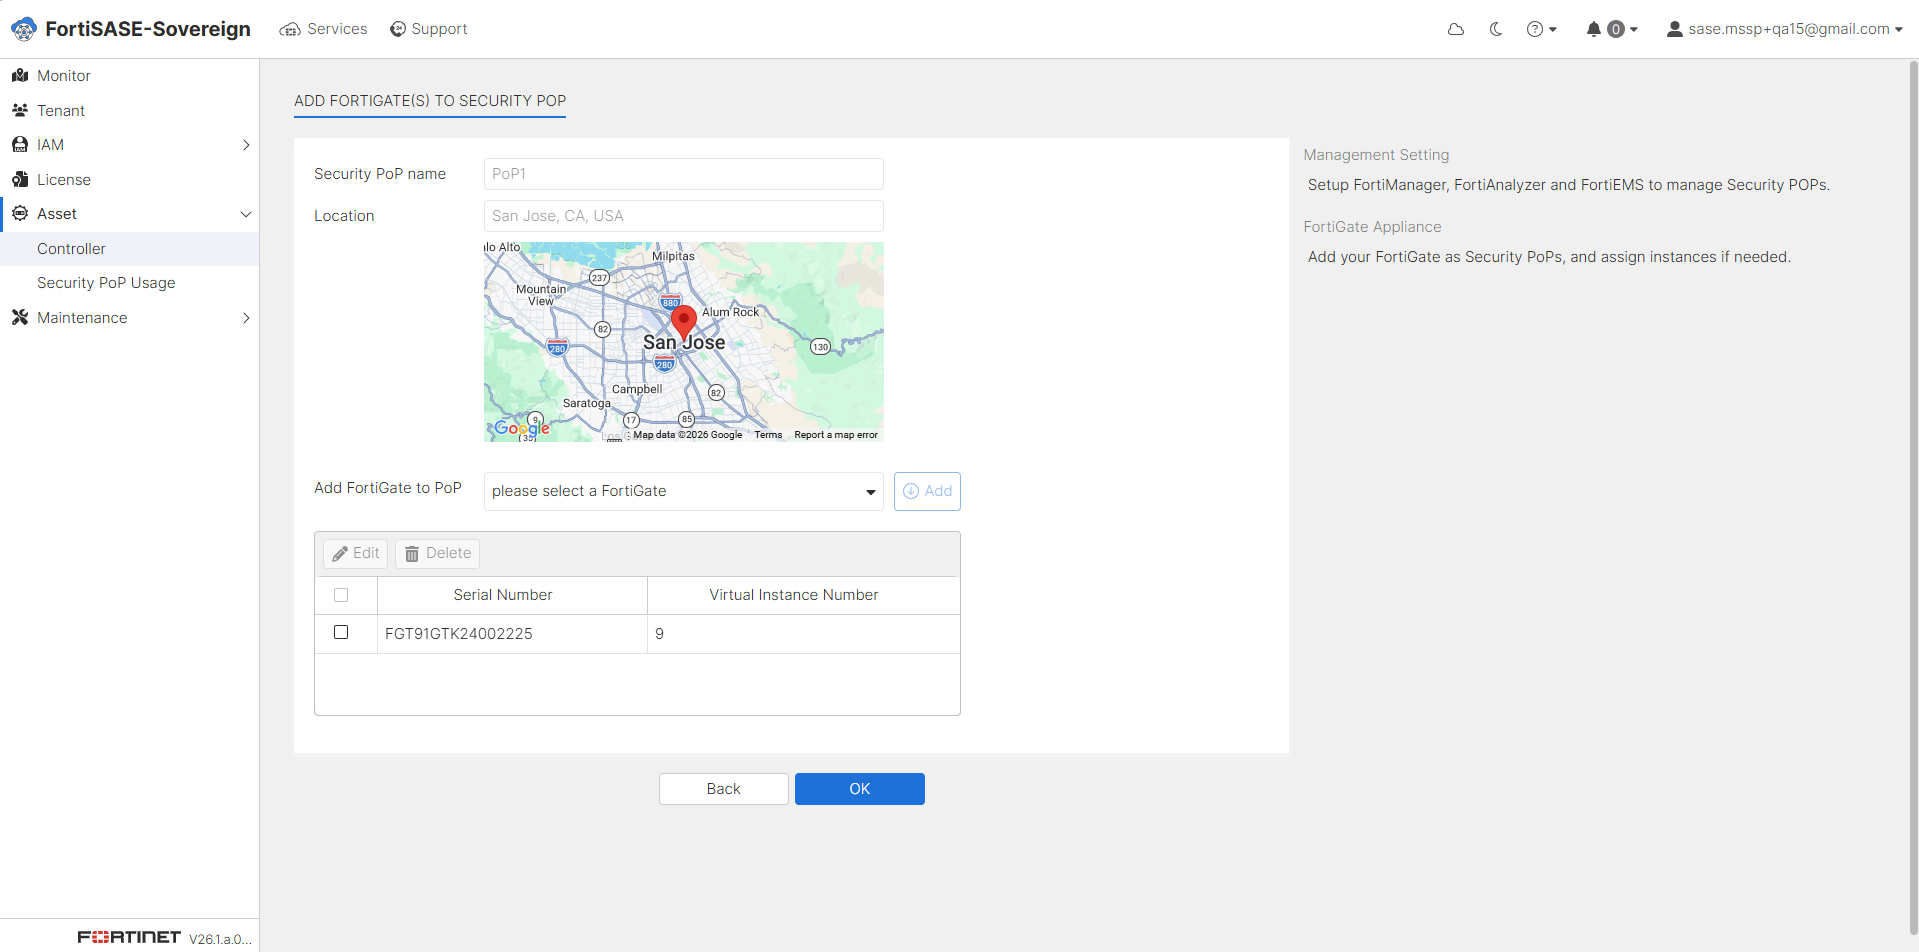
Configure the Security Point of Presence (PoP) by providing the Security PoP Name and physical or logical Location, then select the FortiGate device(s) to be assigned to this PoP. Each Security PoP represents a logical enforcement point through which tenant traffic is inspected and secured. Configure the FortiGate using the following steps:
-
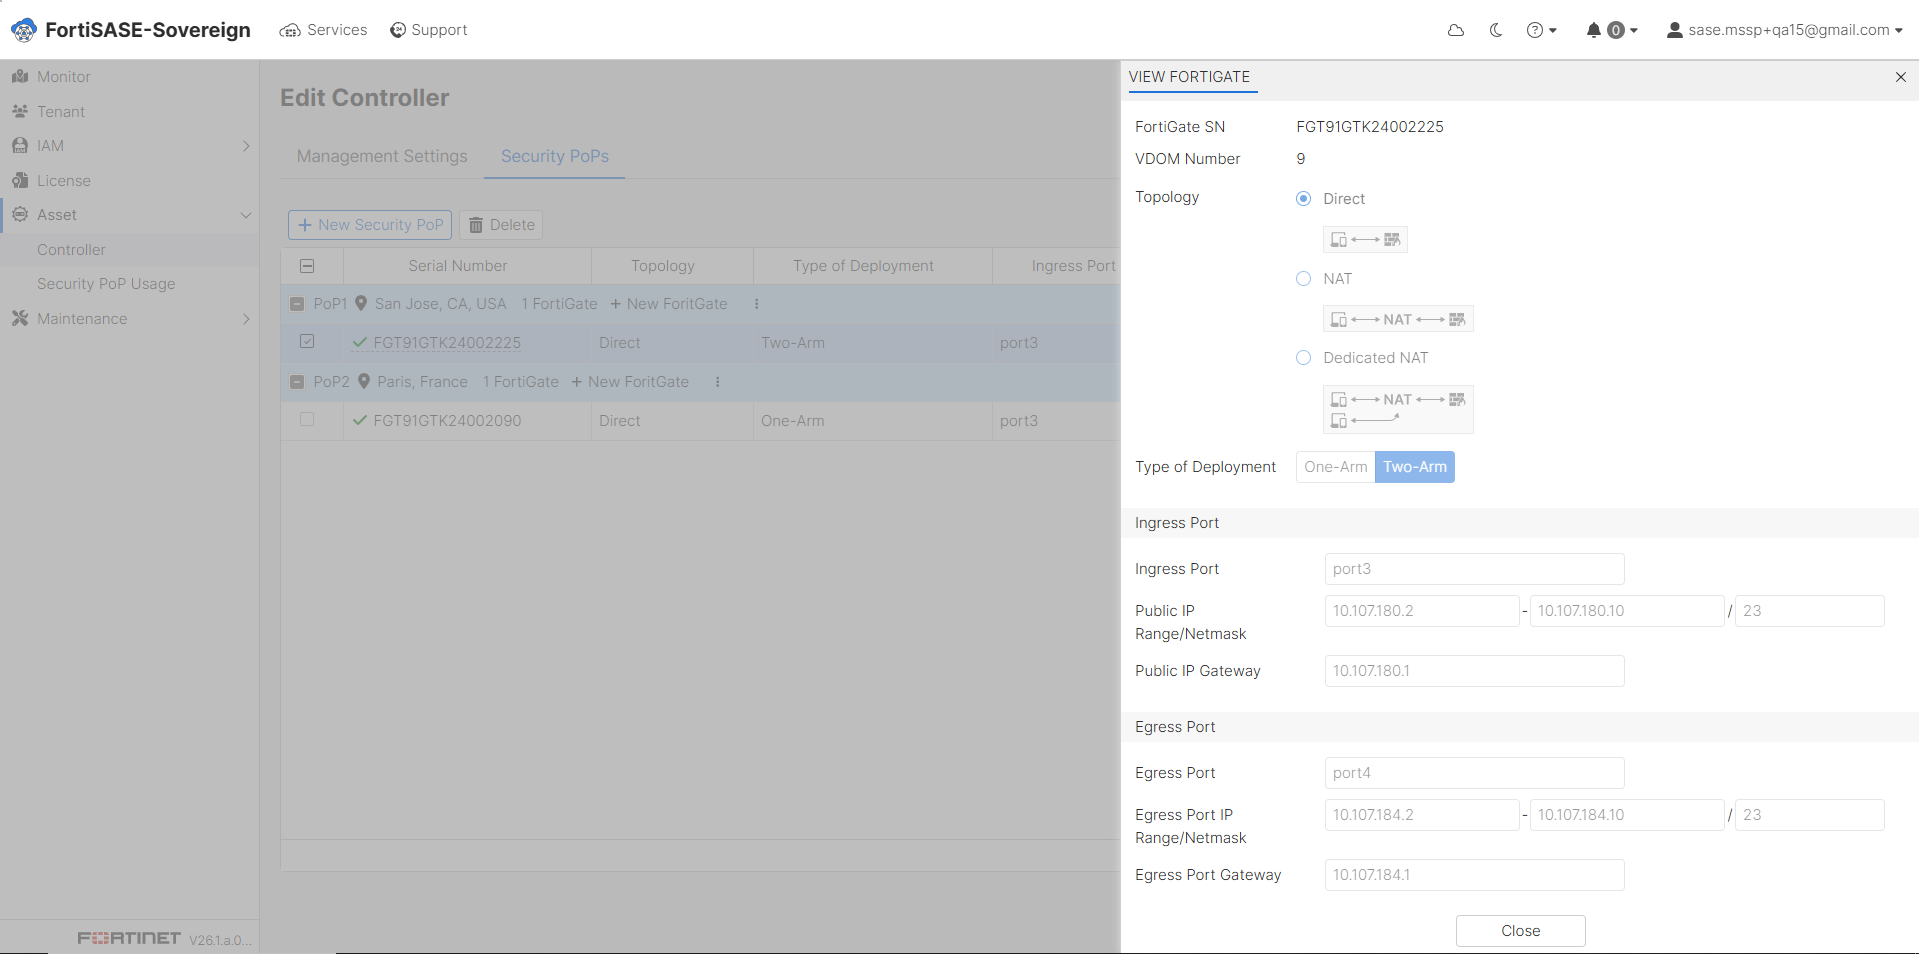
Open the ADD FORTIGATE panel and verify the FortiGate Serial Number (SN) and the designated VDOM Number to ensure the correct appliance is being registered.
-
Select the appropriate network Topology from the three available options — Direct, NAT, or Dedicated NAT — based on your network architecture and traffic routing requirements.
-
Select the Type of Deployment that best suits your network design. Two deployment modes are available:
-
Two-Arm: Utilizes separate, dedicated interfaces for ingress and egress traffic, providing enhanced traffic isolation and granular policy enforcement at each network boundary.
-
One-Arm: Employs a single shared interface for both traffic directions, commonly used in environments that require inline inspection with centralized routing separation.
-
-
Configure the Ingress Port by specifying the network interface parameters through which inbound tenant traffic will enter the FortiGate appliance for inspection and policy enforcement.
-
Configure the Egress Interface by defining the outbound network interface parameters through which processed traffic will exit the FortiGate appliance toward its destination.
-
Review the configuration, and then click Save to commit the FortiGate settings to the controller. The system will validate the configuration before finalizing the registration.
-
-
Review the FortiGate configuration summary presented in the confirmation dialog. Once all parameters have been verified as correct, click OK to finalize the FortiGate registration and associate the appliance with the designated Security PoP.
-
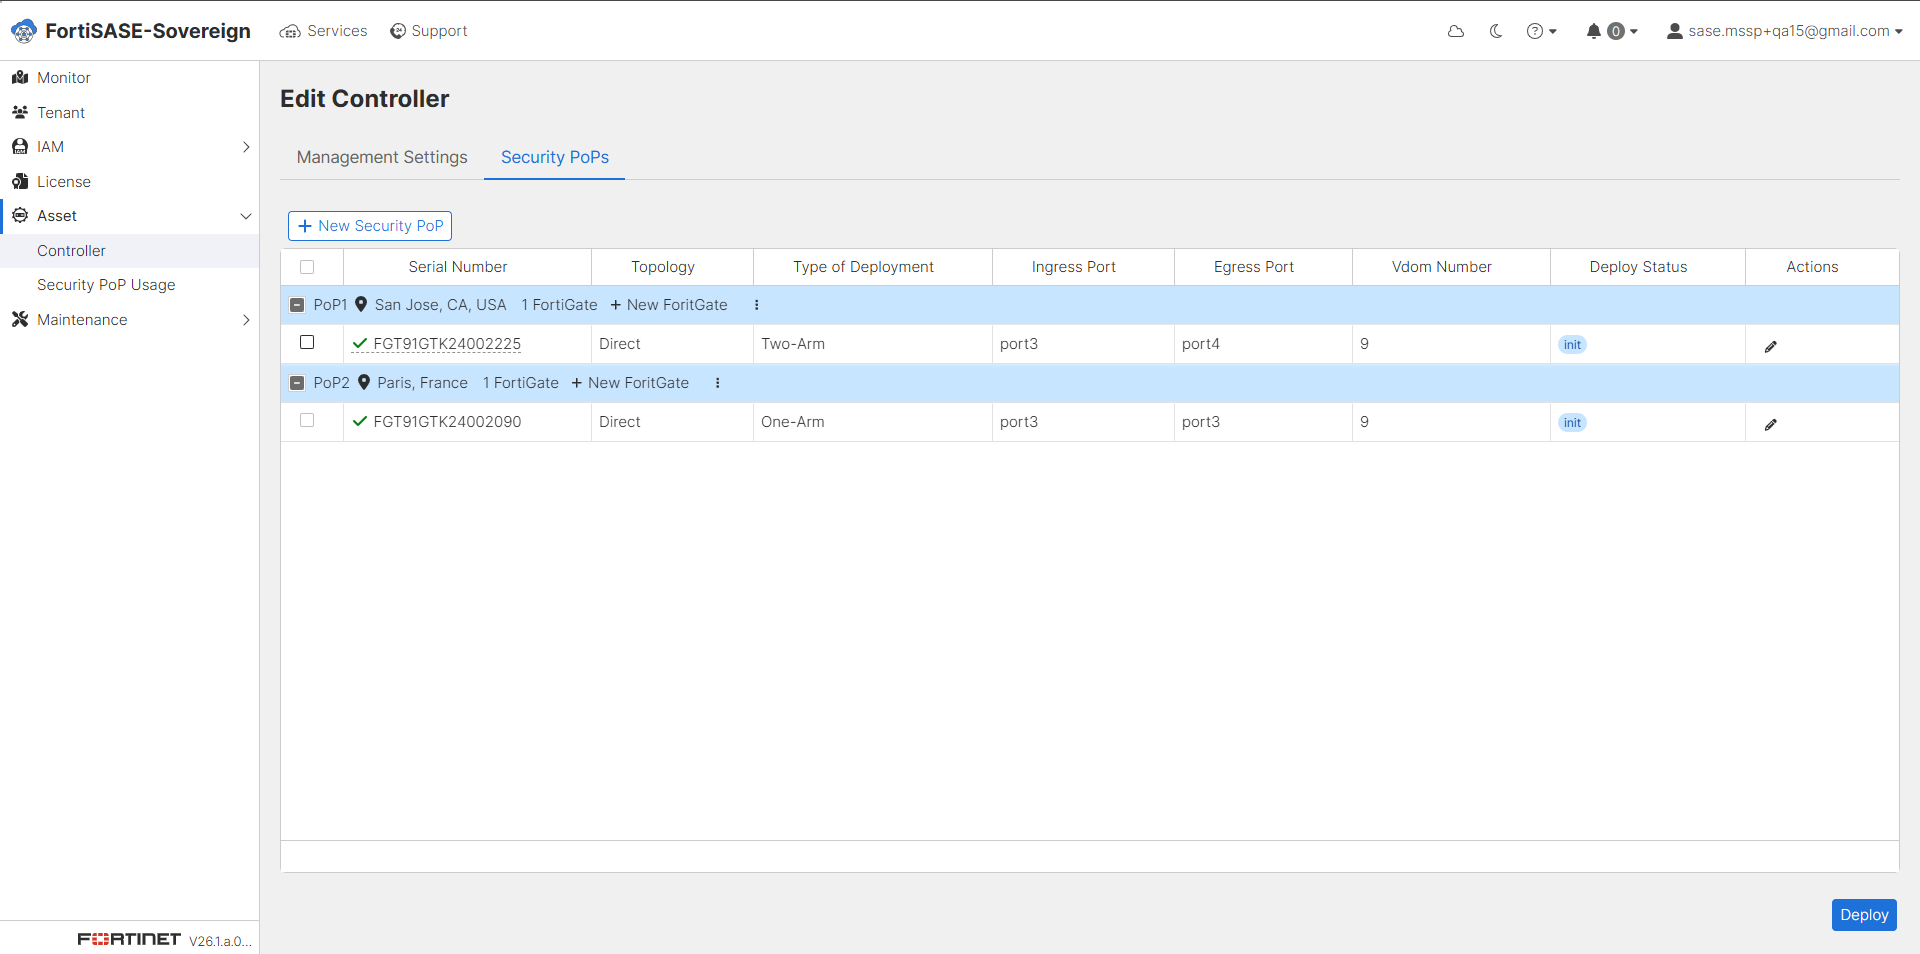
Review the Security PoP summary to confirm that all FortiGate appliances have been successfully registered and are displaying an Init Deploy Status, indicating they are ready for provisioning. Once the configuration has been verified, click Deploy to initiate the automated onboarding process and begin VDOM generation across all registered FortiGate devices.
-
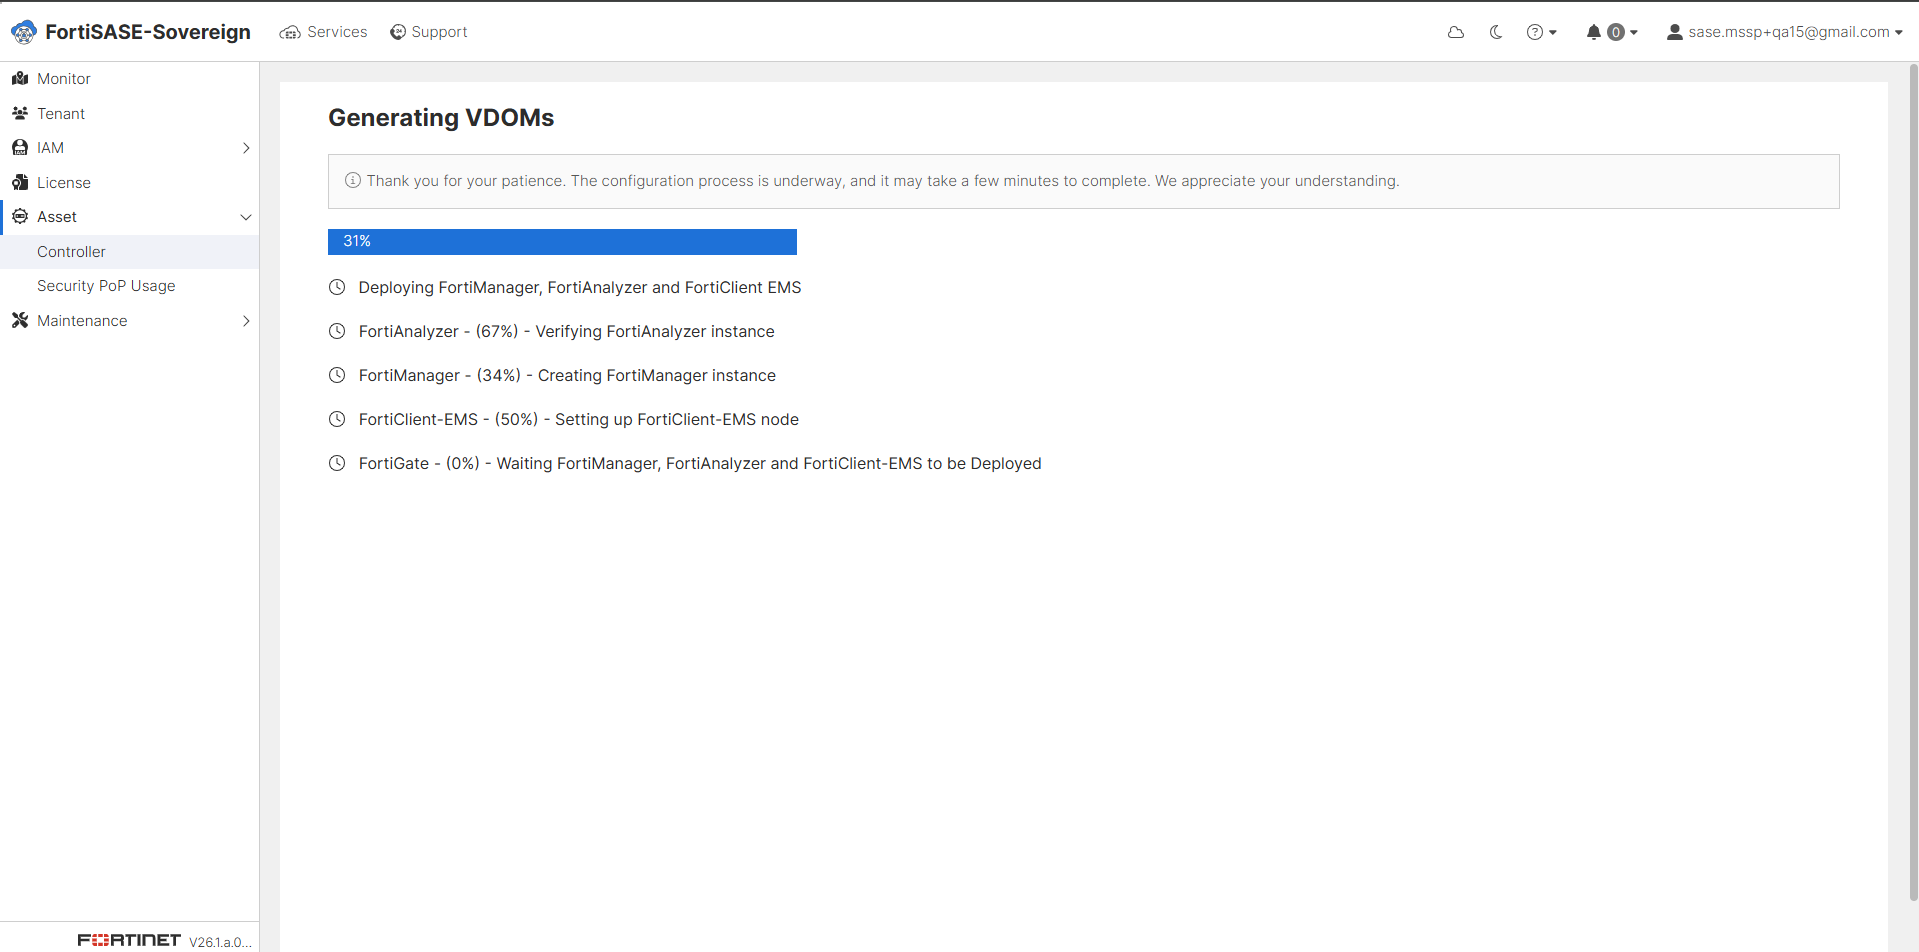
Monitor the deployment progress on the Generating VDOMs page. Each VDOM provisioning task will display its current status as the system automatically configures virtual domains across all associated FortiGate appliances. This also includes FortiManager, FortiAnalyzer and FortiClient EMS deployment. It is suggested do not navigate away from this page while the deployment is in progress.
-
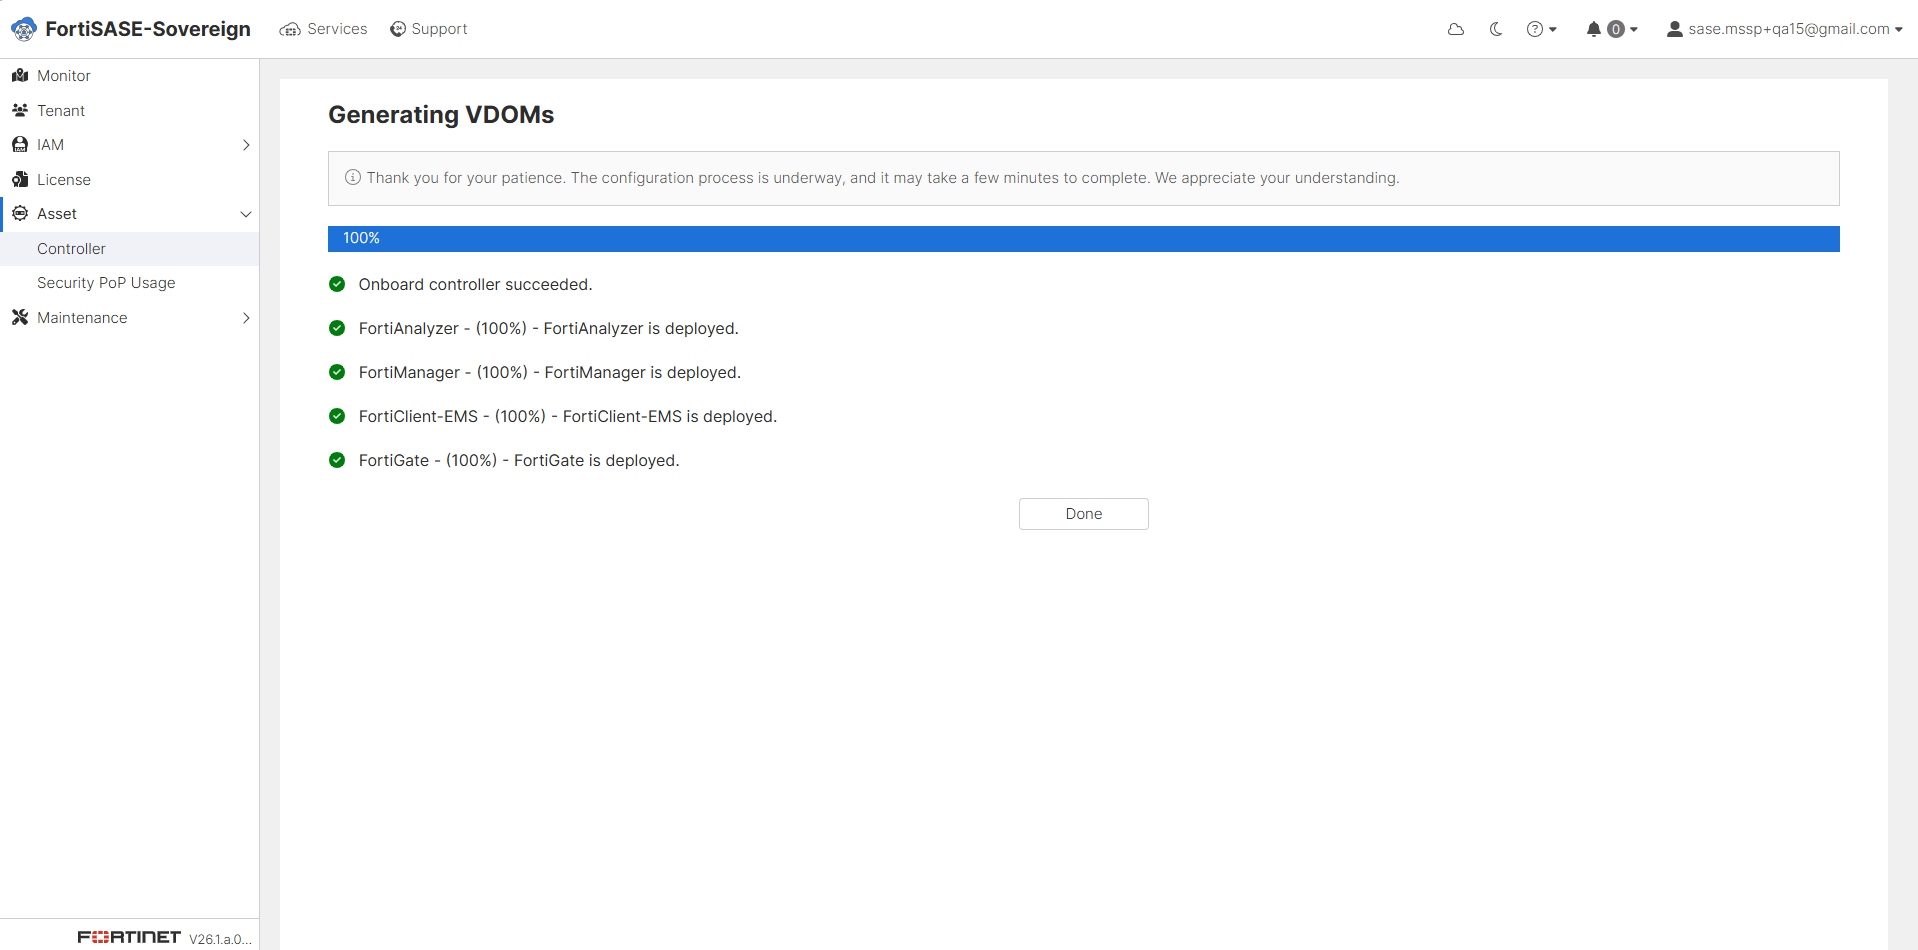
When deployment reaches 100% and the system confirms Onboard controller succeeded click Done to exit the deployment wizard. The controller is now fully provisioned and operational within the Multi-Tenant Instance.
-
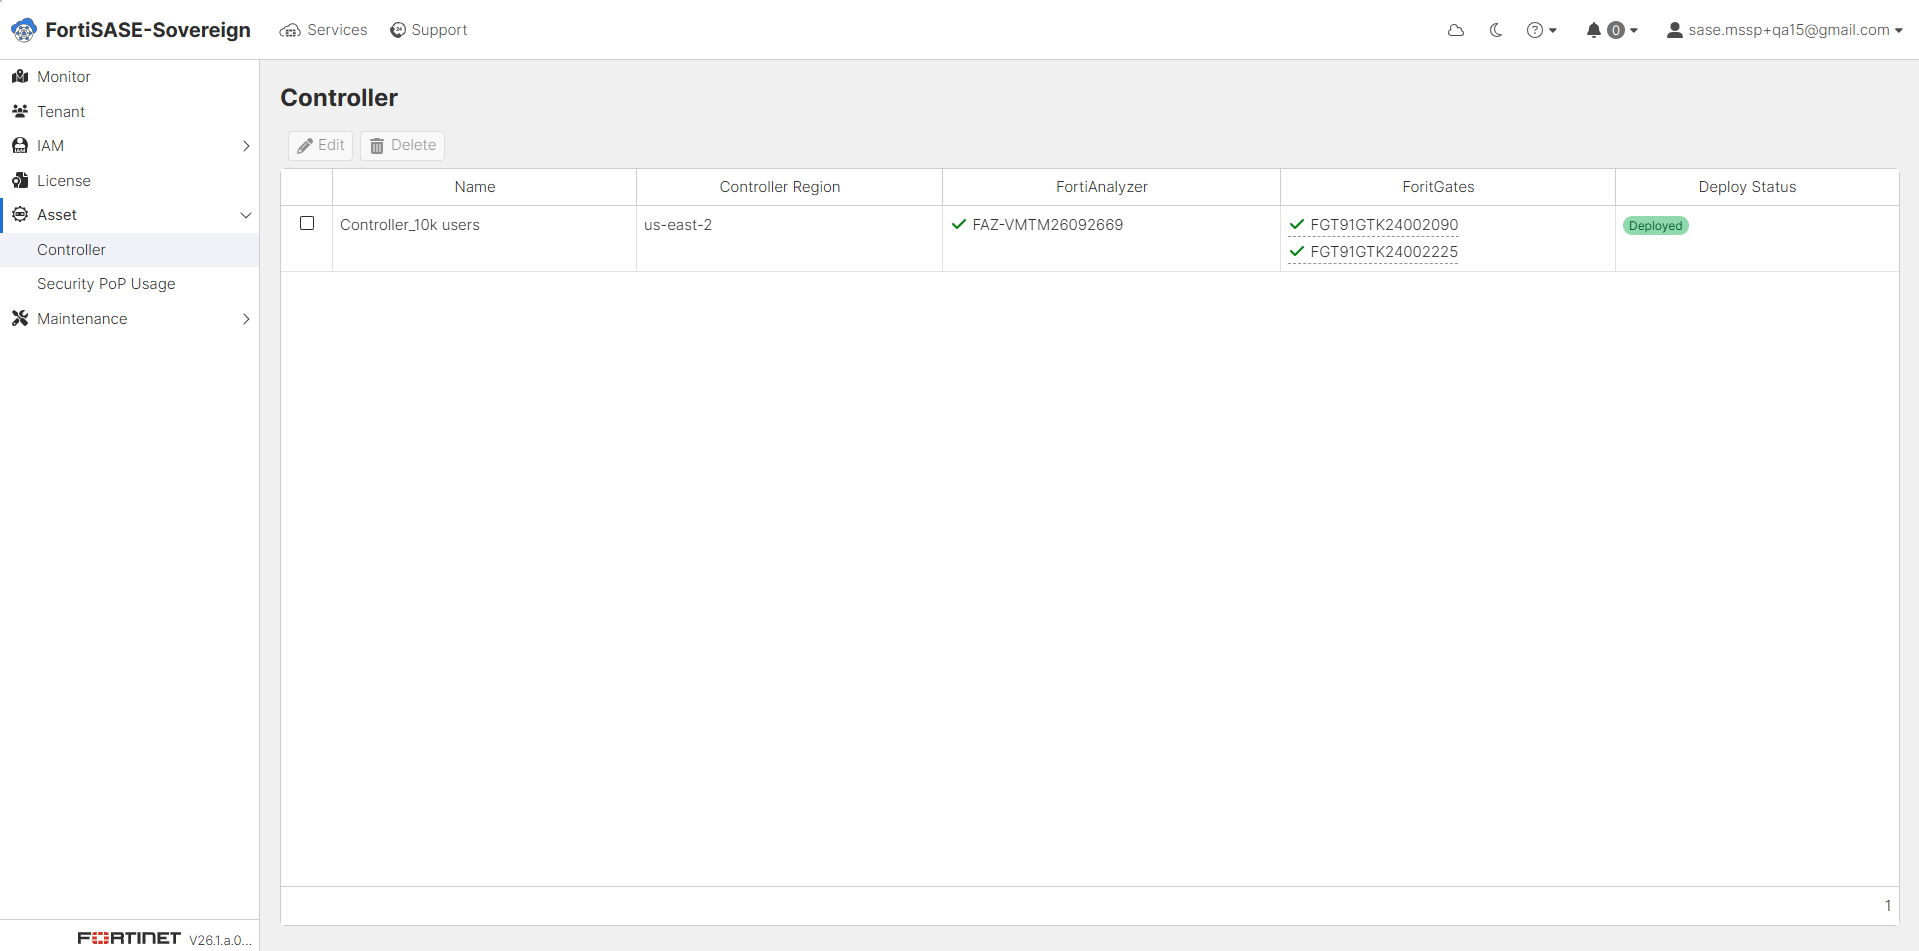
Return to the Asset Controller dashboard to verify that the newly provisioned controller is listed with Deployed status. Confirm that all associated FortiGate appliances, Security PoP configurations, and VDOM assignments are accurately reflected in the system. The Multi-Tenant Instance Controller Onboarding process is now complete and the environment is ready for Tenant Onboarding.
Controller Management
-
Select the desired controller from the list, Click Edit Controller to open the configuration page, select the Management Settings tab to view all controller related configurations.
-
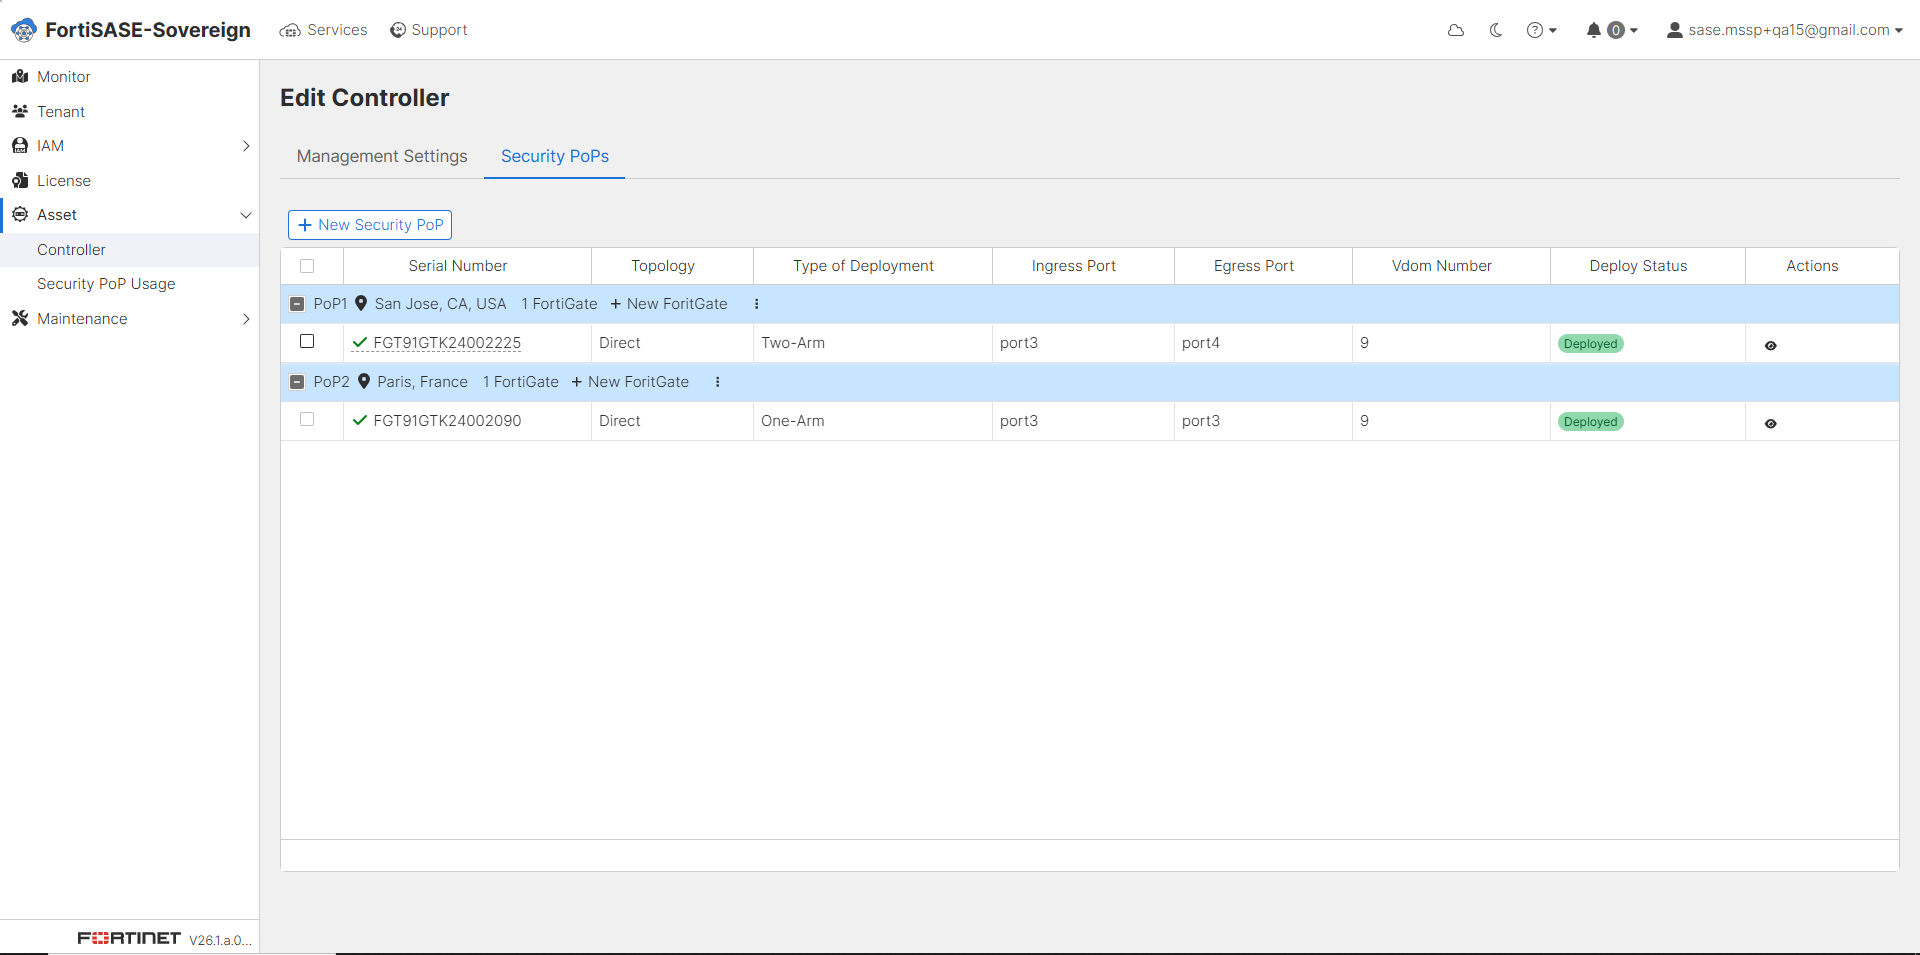
Click Security PoPs tab to manage Security PoPs.
-
Add a New Security PoP.
-
Click + New Security PoP to initiate the PoP creation workflow.
-
Configure FortiGate device details, topology, deployment type, and interface mappings.
-
-
View Existing PoP Details
-
Expand a PoP entry to view associated FortiGate devices.
-
Review configuration details such as topology, ports, and VDOM assignments.
-
-
Verify Deployment Status
-
Ensure each PoP shows a Deployed status.
-
A deployed state indicates successful provisioning and readiness for traffic handling.
-
-
Validate Interface Configuration
-
Confirm that Ingress and Egress ports are correctly mapped based on deployment type:
-
Two-Arm: Separate ingress and egress interfaces (e.g., port3 → port4).
-
One-Arm: Same interface used for both directions (e.g., port3 → port3).
-
-
-
Check Multi-Region Deployment
-
Verify PoPs across different geographic locations (e.g., San Jose, Paris) to ensure global coverage and redundancy.
-
-
Tenant Onboarding
-
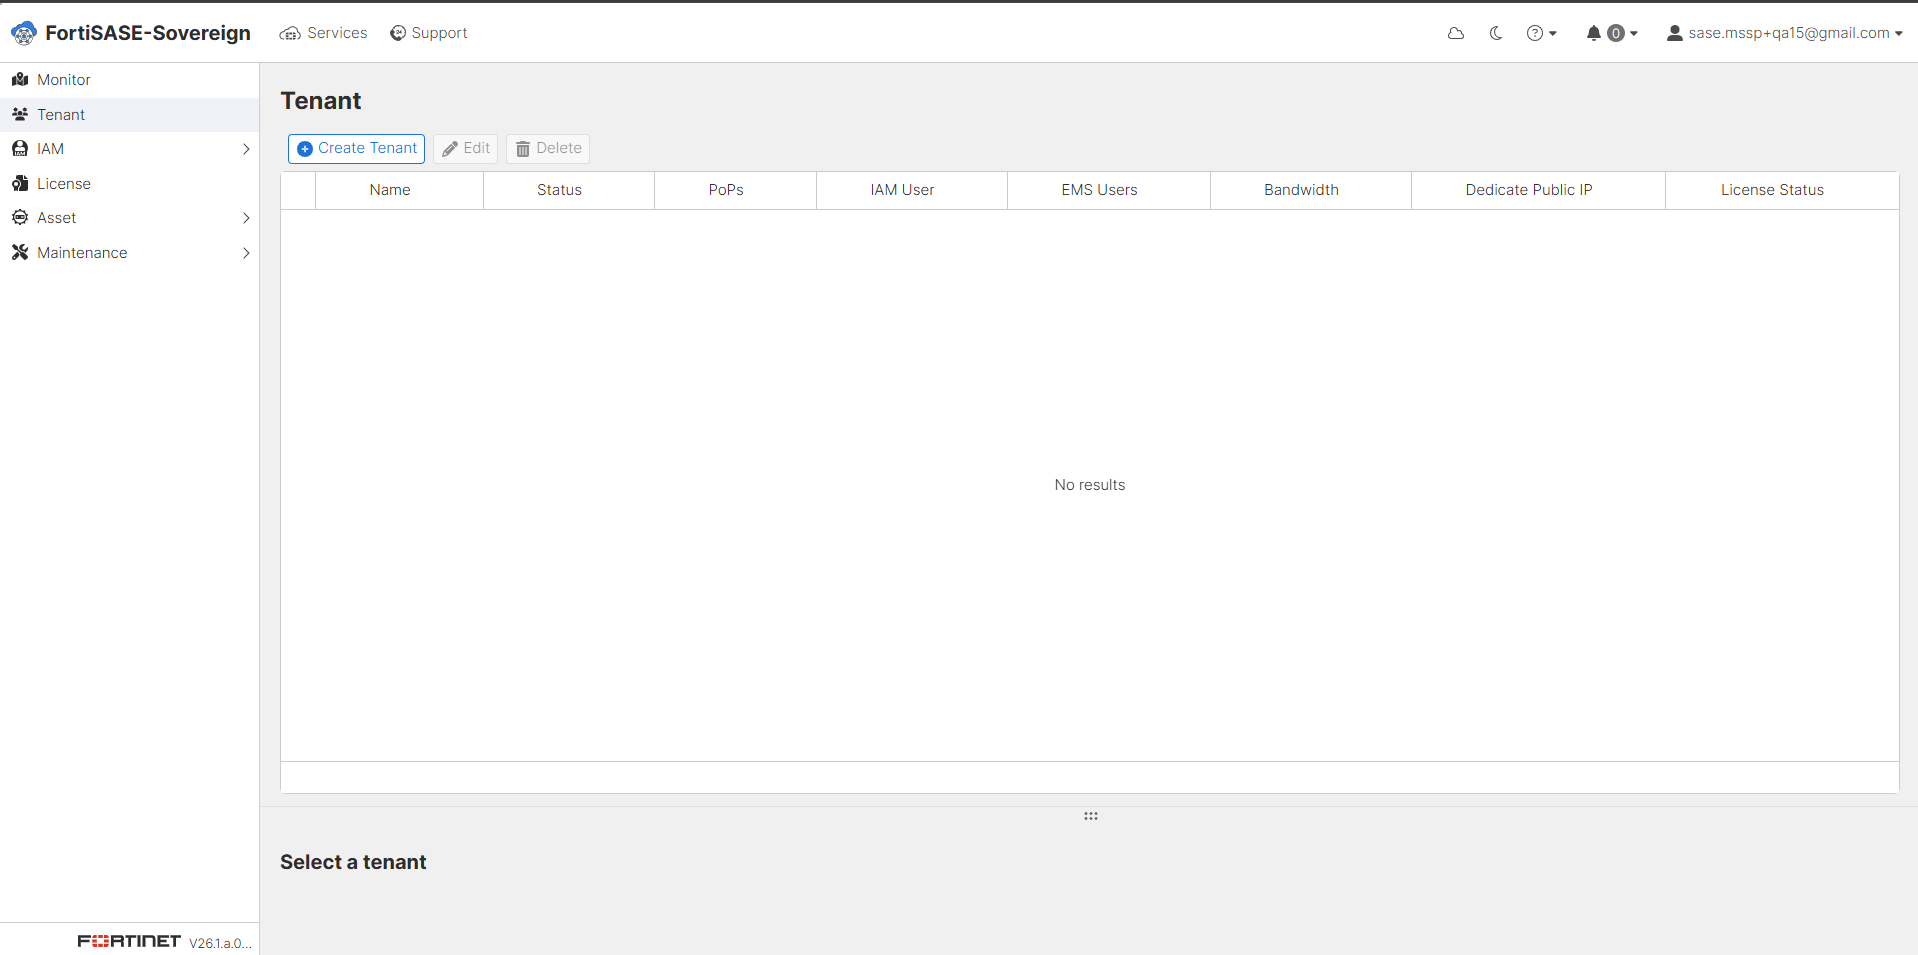
Go to the Tenant section. The tenant list will display No results when no tenants have been provisioned. Click Create Tenant to begin onboarding a new managed tenant environment under the MSSP controller.
-
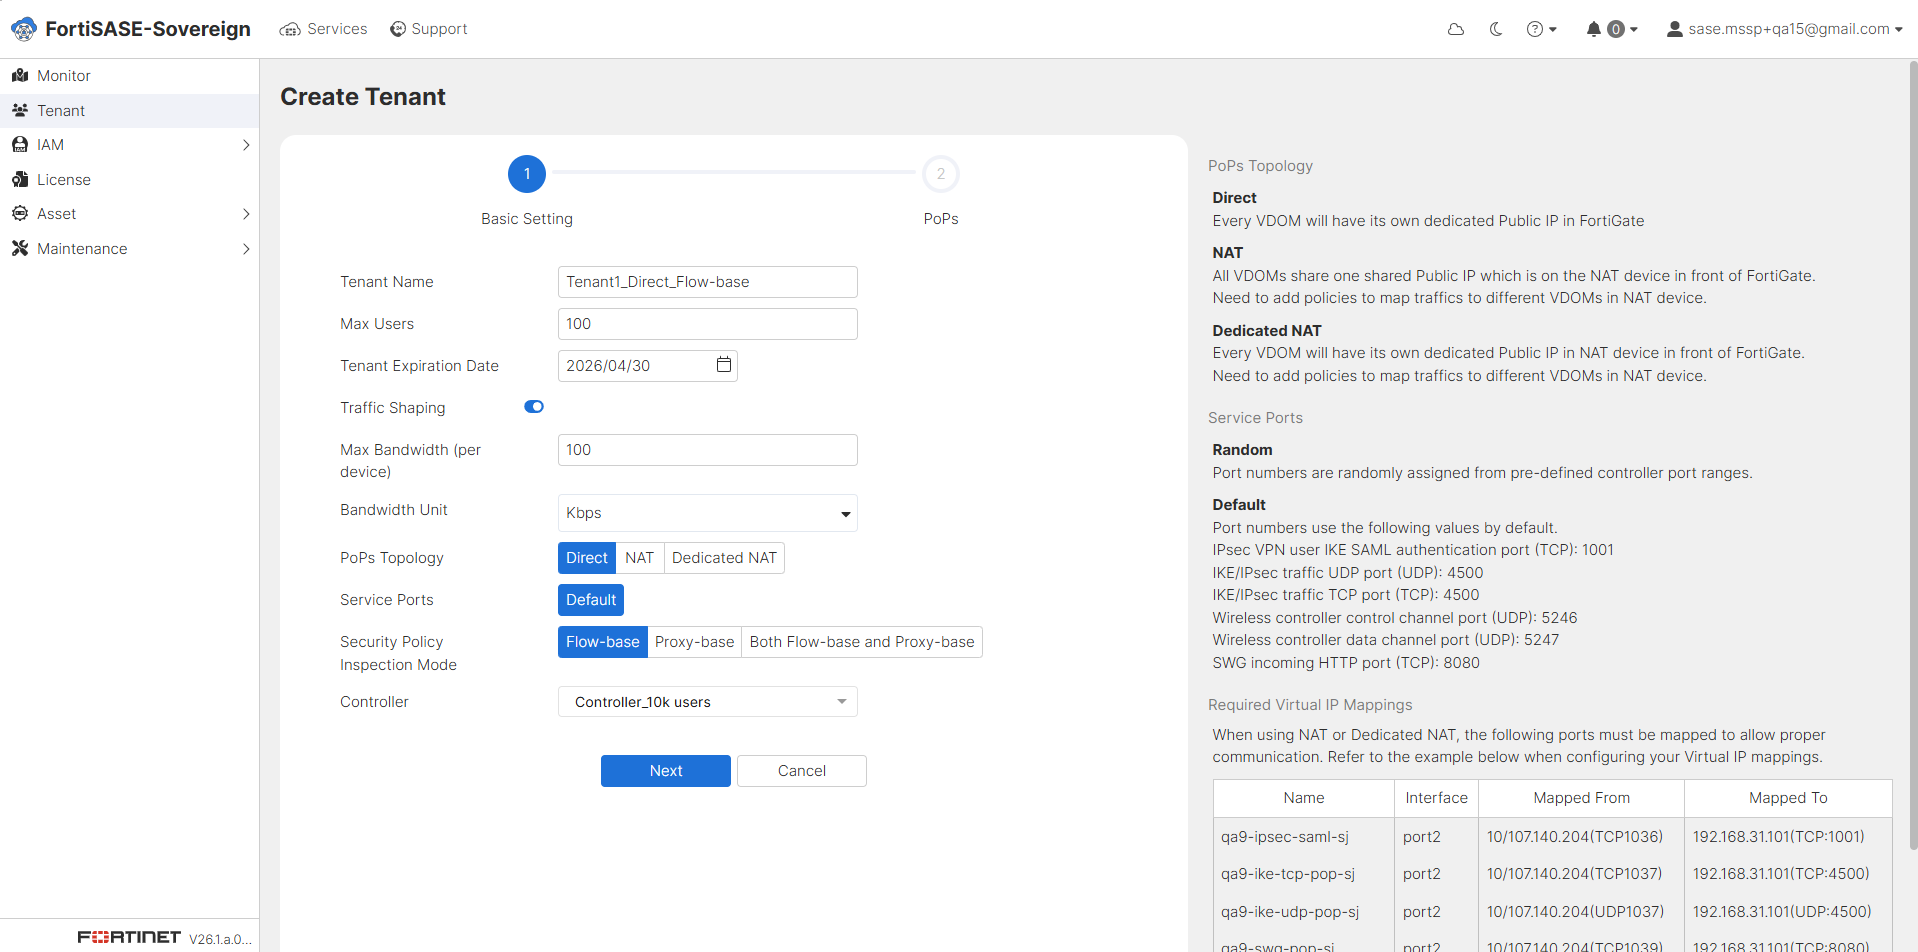
Fill in the basic tenant settings. Enter a descriptive Tenant Name, specify the maximum number of licensed user seats (Max Users), and set the Tenant Expiration Date. Enable Traffic Shaping if bandwidth management is required and configure the Max Bandwidth (per device) and Bandwidth Unit accordingly. Select the PoPs Topology (Direct, NAT, or Dedicated NAT), choose the Service Ports allocation method (Random or Default), and set the Security Policy Inspection Mode (Flow-base, Proxy-base, or Both Flow-base and Proxy-base). Finally, assign the appropriate Controller. The right-hand panel provides topology descriptions and required Virtual IP mappings for reference. Click Next to proceed to the PoPs assignment step.
-
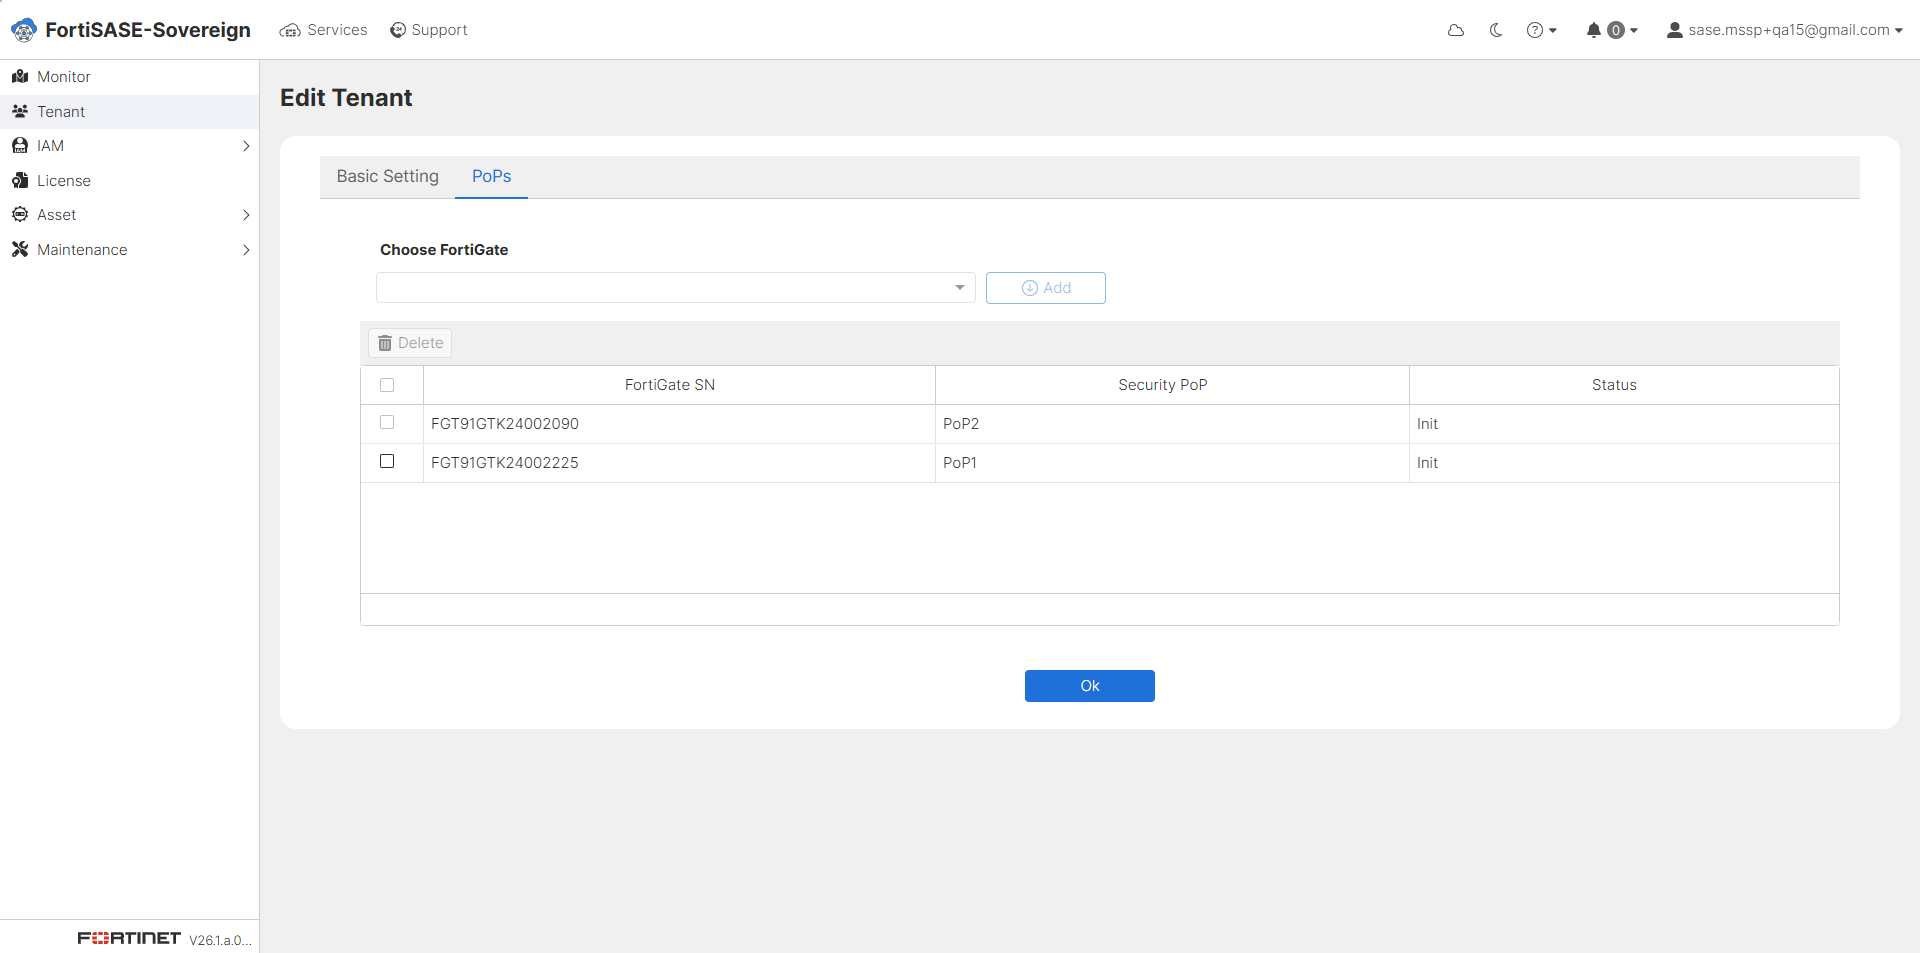
In the PoPs assignment step, use the Choose FortiGate dropdown to select the FortiGate appliances to associate with this tenant. The table displays each FortiGate Serial Number, its assigned Security PoP, and the current initialization status. Once all desired FortiGate devices have been added, click OK to confirm the PoP assignment and complete the tenant creation.
-
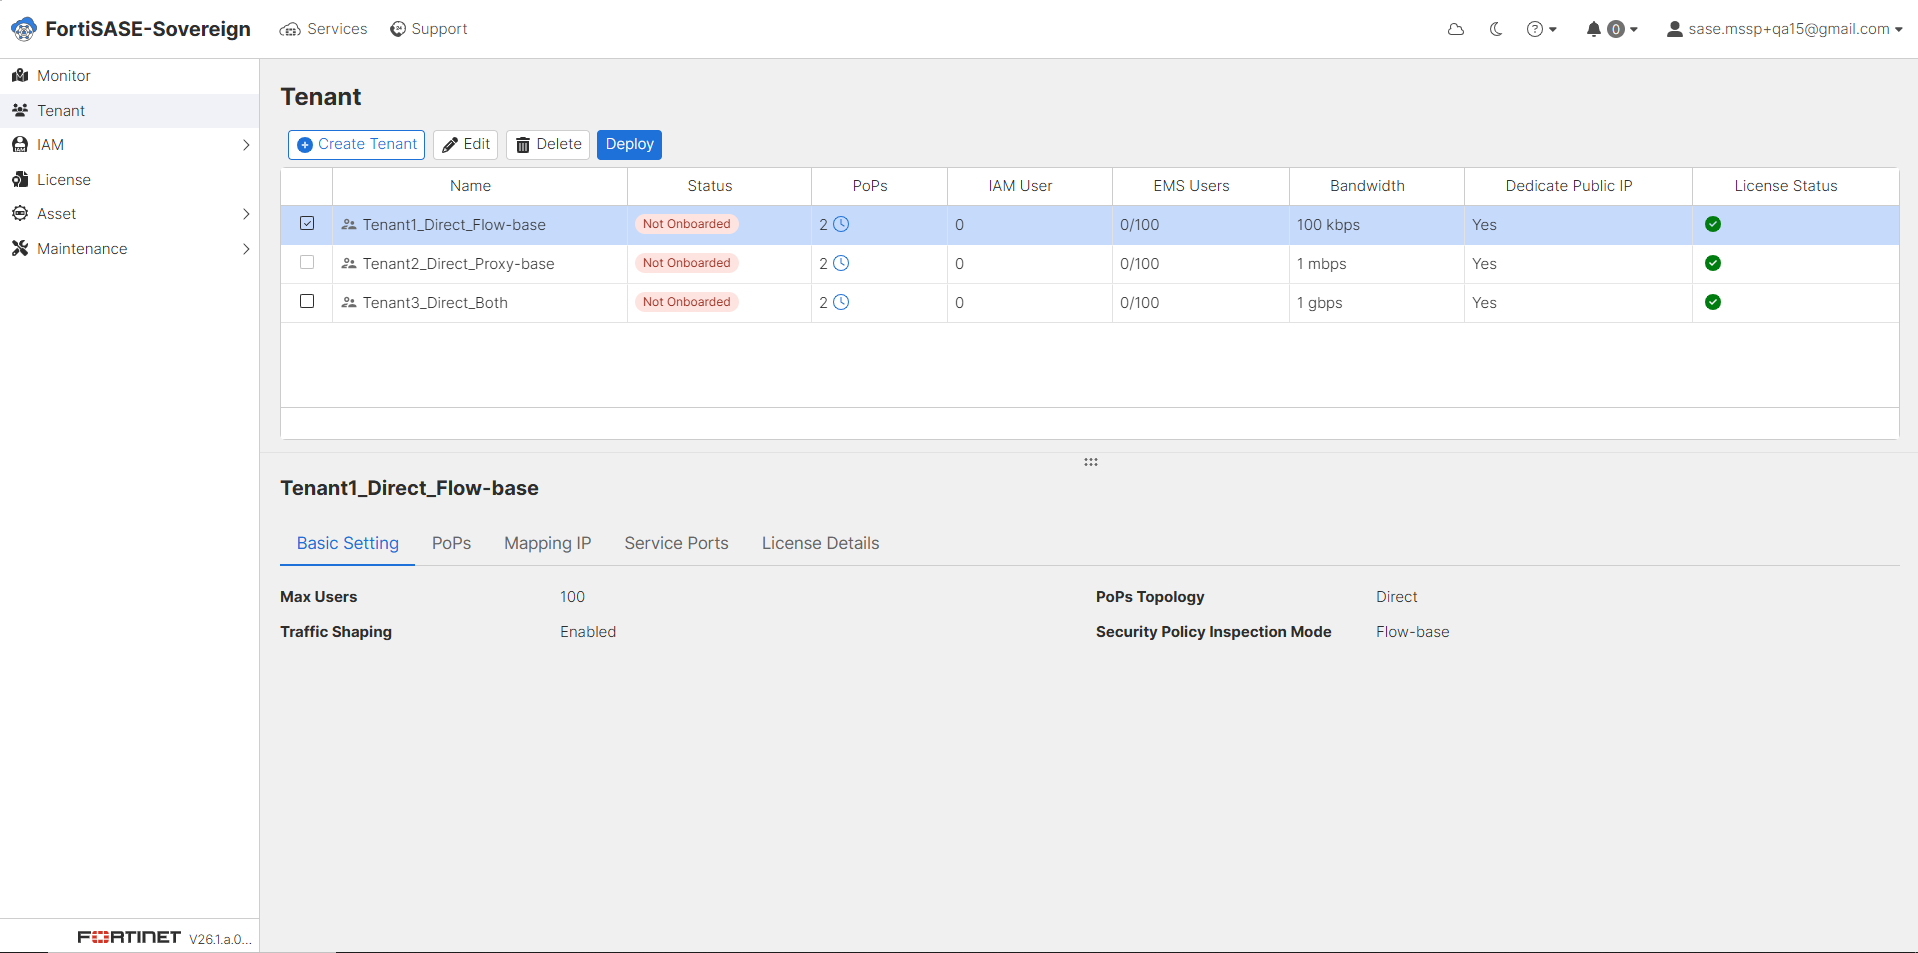
After creating tenants, the Tenant list displays all provisioned tenants showing each tenant’s Name, Status, PoPs count, IAM User count, EMS Users, Bandwidth, Dedicated Public IP assignment, and License Status. Newly created tenants will show a Not Onboarded status, indicating they are pending deployment. Select one or more tenants and click Deploy to initiate the automated provisioning process for the selected tenant environments.
-
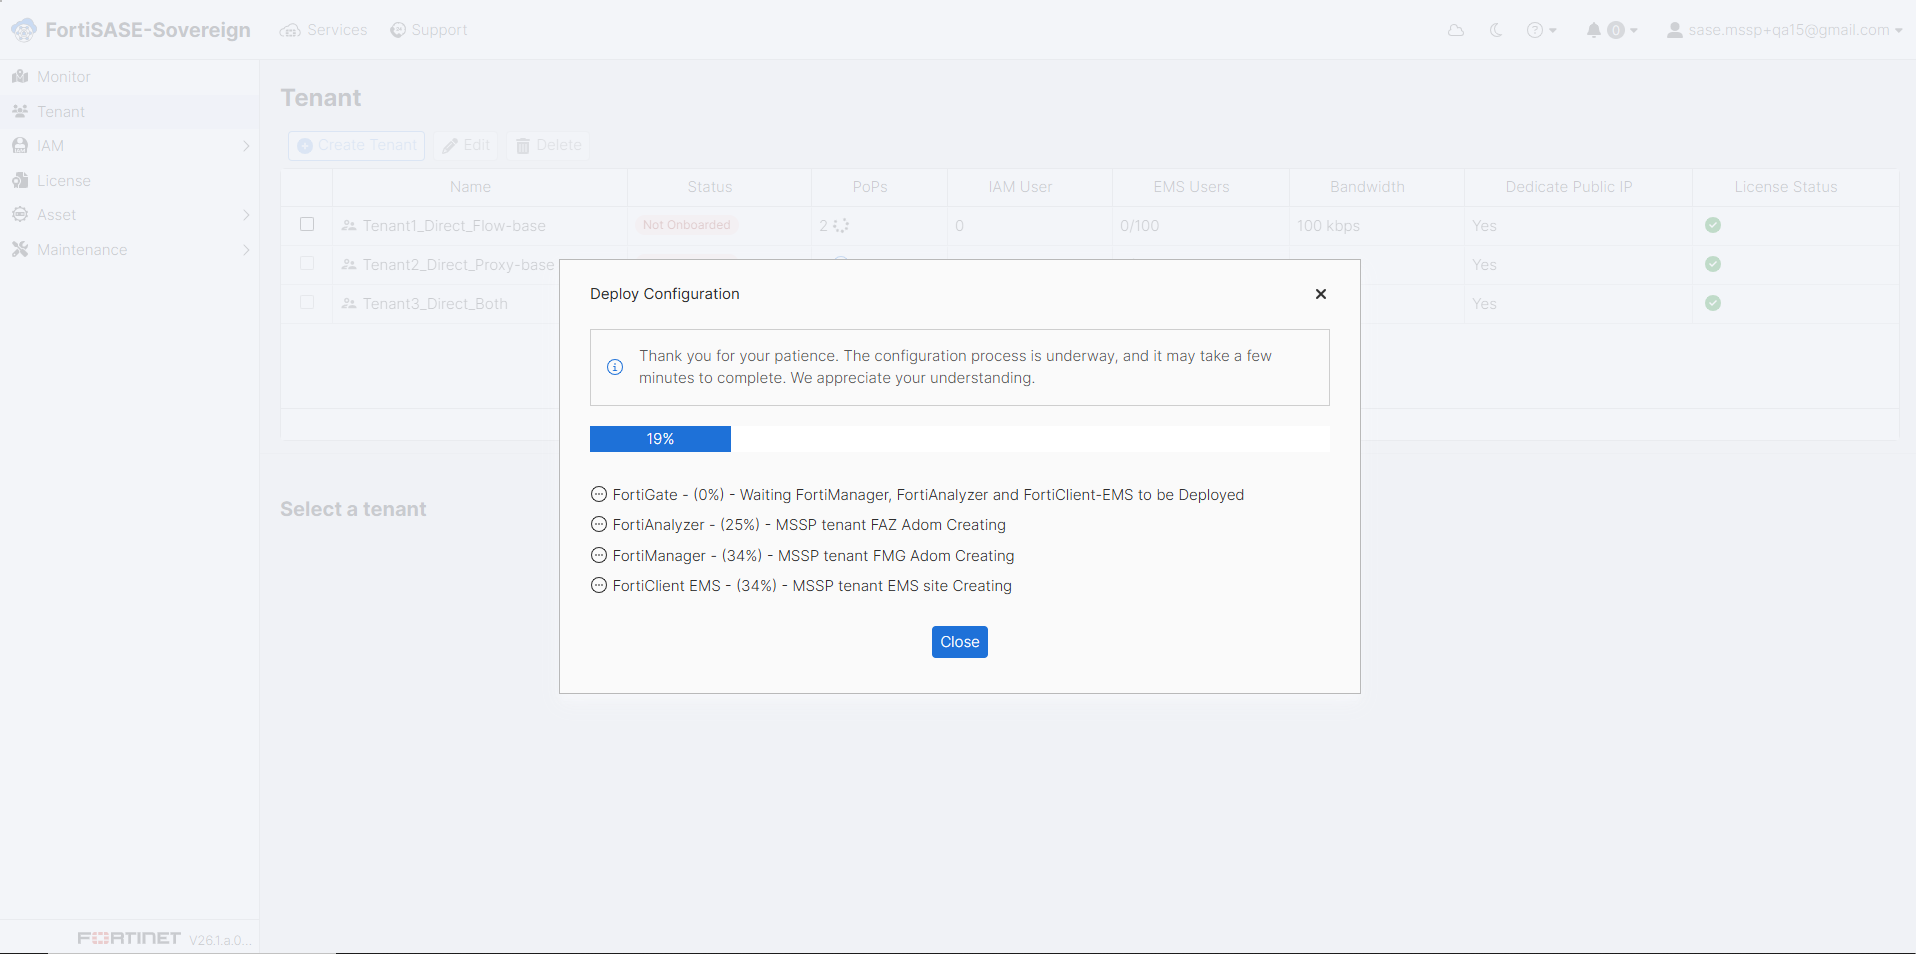
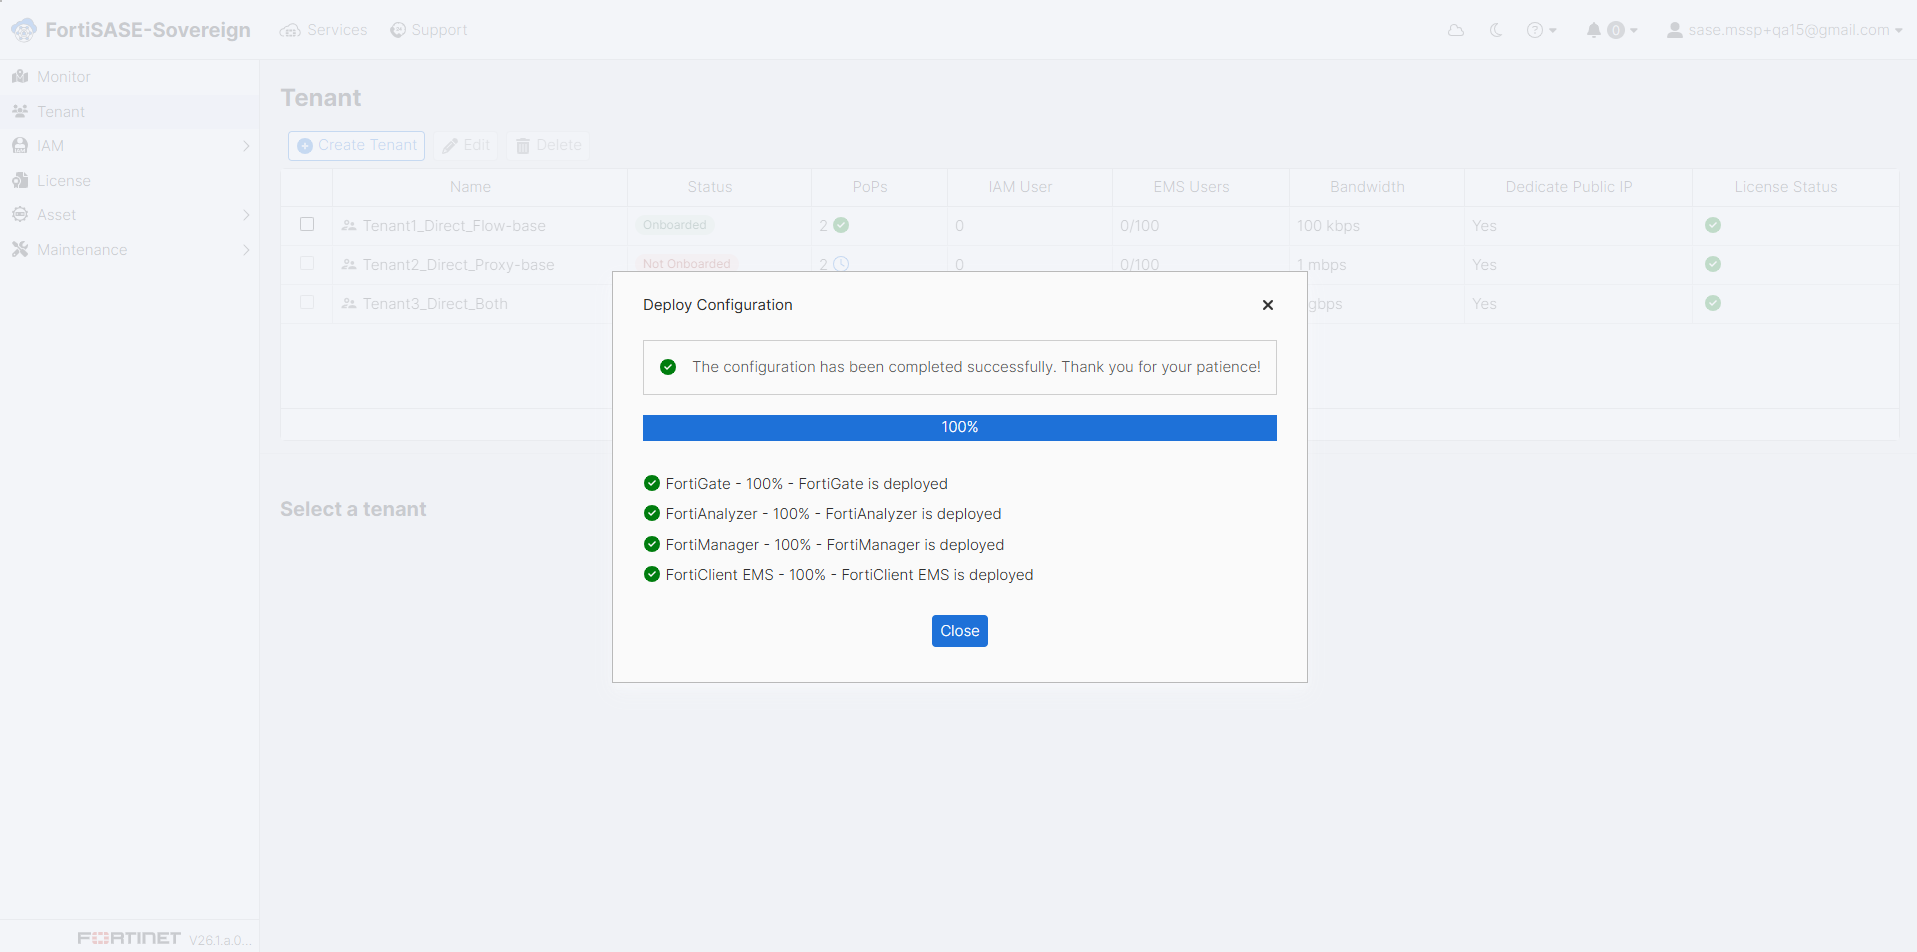
After clicking Deploy, the Deploy Configuration dialog appears and shows real-time provisioning progress. The system sequentially deploys FortiGate, FortiAnalyzer, FortiManager, and FortiClient EMS components for the tenant. Each component displays its current progress percentage and task description. Clicking Close can close this dialog while provisioning is in progress background.
-
When all components have reached 100% and the dialog confirms “The configuration has been completed successfully,” click Close to dismiss the Deploy Configuration dialog. All four components — FortiGate, FortiAnalyzer, FortiManager, and FortiClient EMS — should display a fully deployed status before proceeding.
-
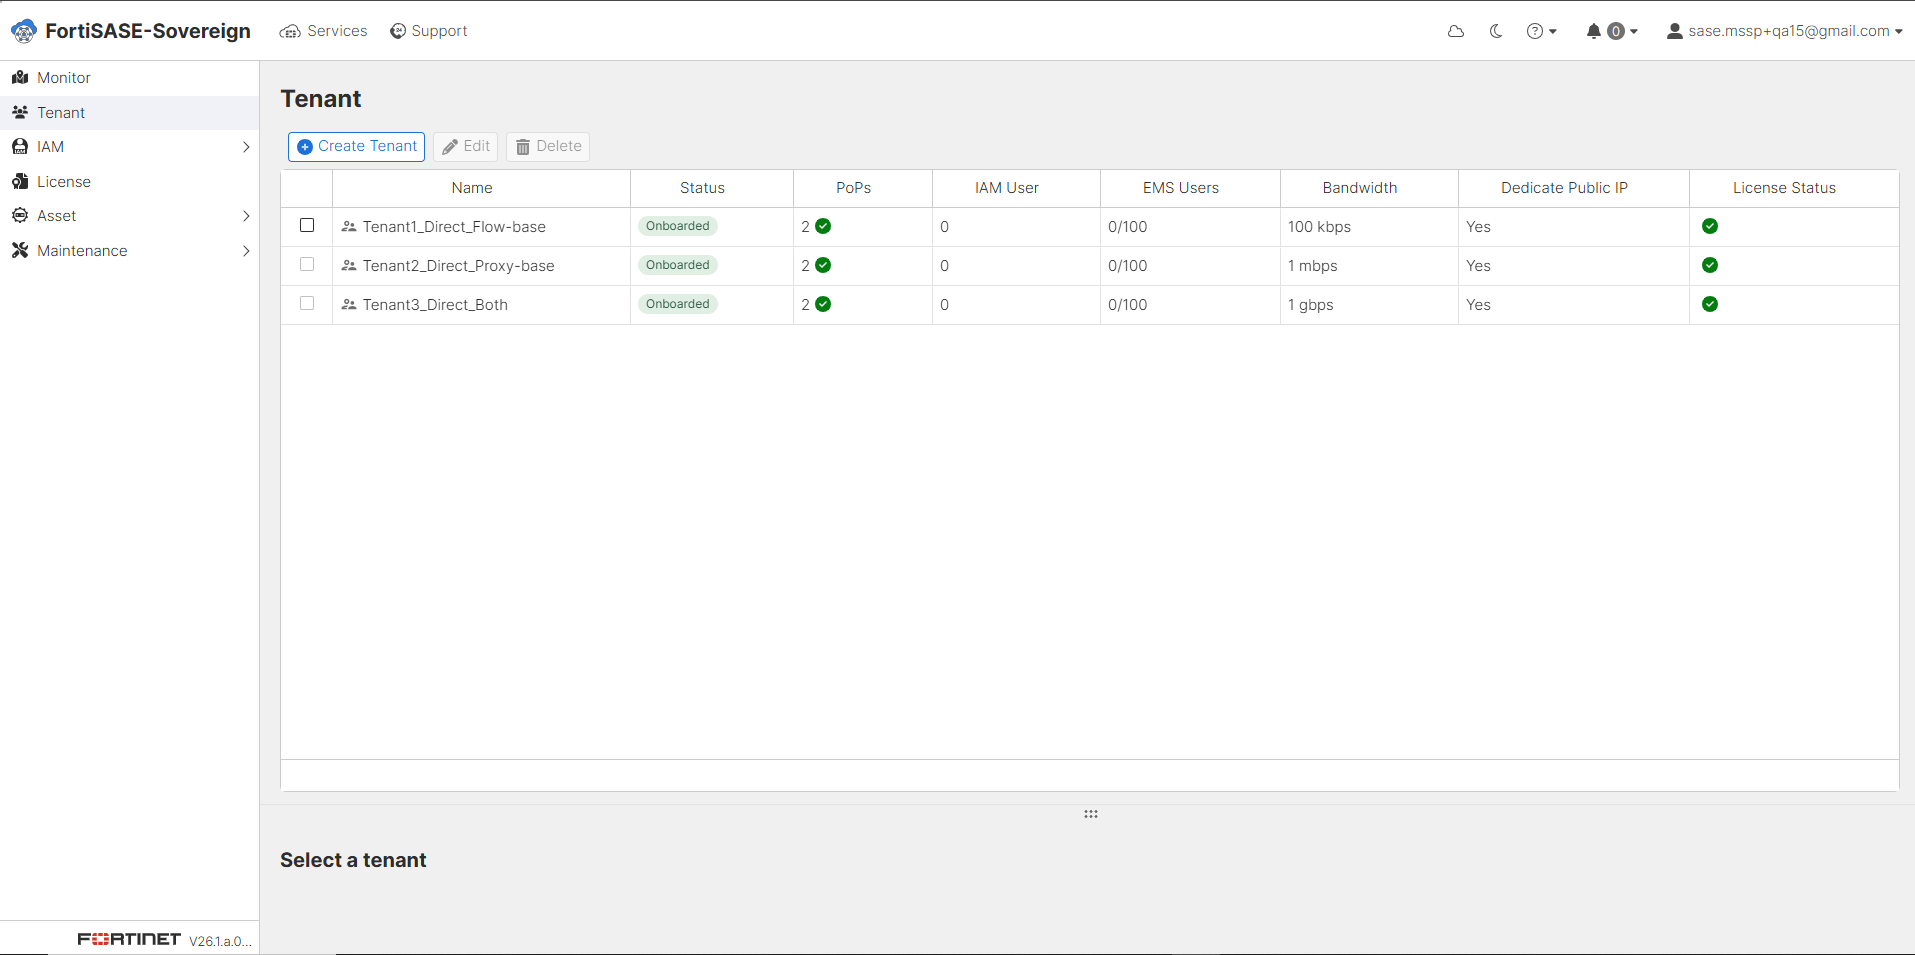
Return to the Tenant list to verify that all deployed tenants now display an Onboarded status with a green indicator. Confirm that each tenant’s PoP count, Bandwidth allocation, Dedicated Public IP assignment, and License Status are accurately reflected. The tenant onboarding process is now complete and each tenant environment is ready for end-user connectivity and policy configuration.
Tenant Management
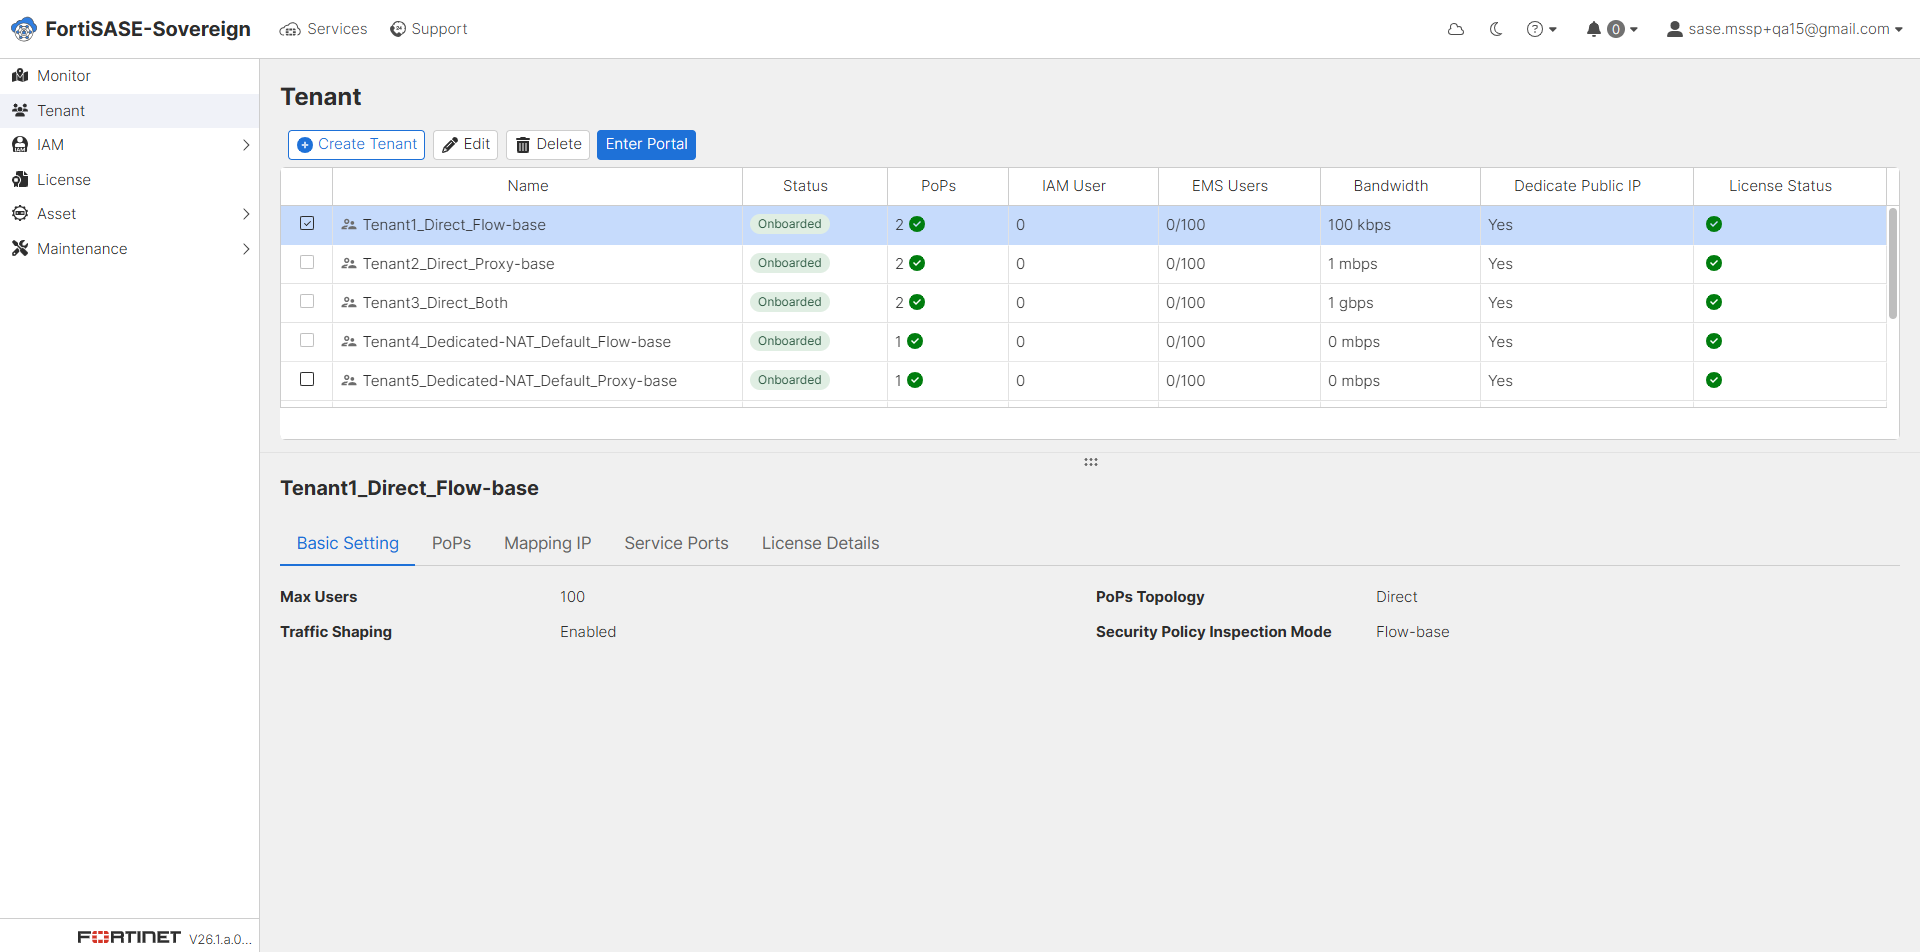
The Tenant Management section allows administrators to manage tenants over tenant environments. From this view, MSSP administrators can create new tenants, modify existing tenant configurations via the Edit action, or permanently remove a tenant using the Delete option. Each listed tenant can be individually selected to reveal detailed configuration tabs in the panel below.
To access a tenant’s dedicated management portal, select the tenant from the list and click Enter Portal. This launches the tenant-scoped interface, where administrators can manage security policies, device configurations, and monitoring dashboards specific to that tenant environment.
Select a tenant from the list to display its Basic Setting details in the lower panel. The Basic Setting tab provides a summary of the tenant’s core configuration parameters, including the maximum licensed user count (Max Users), Traffic Shaping status, PoPs Topology type, and the configured Security Policy Inspection Mode. This tab serves as the primary reference for validating the tenant’s foundational deployment parameters.
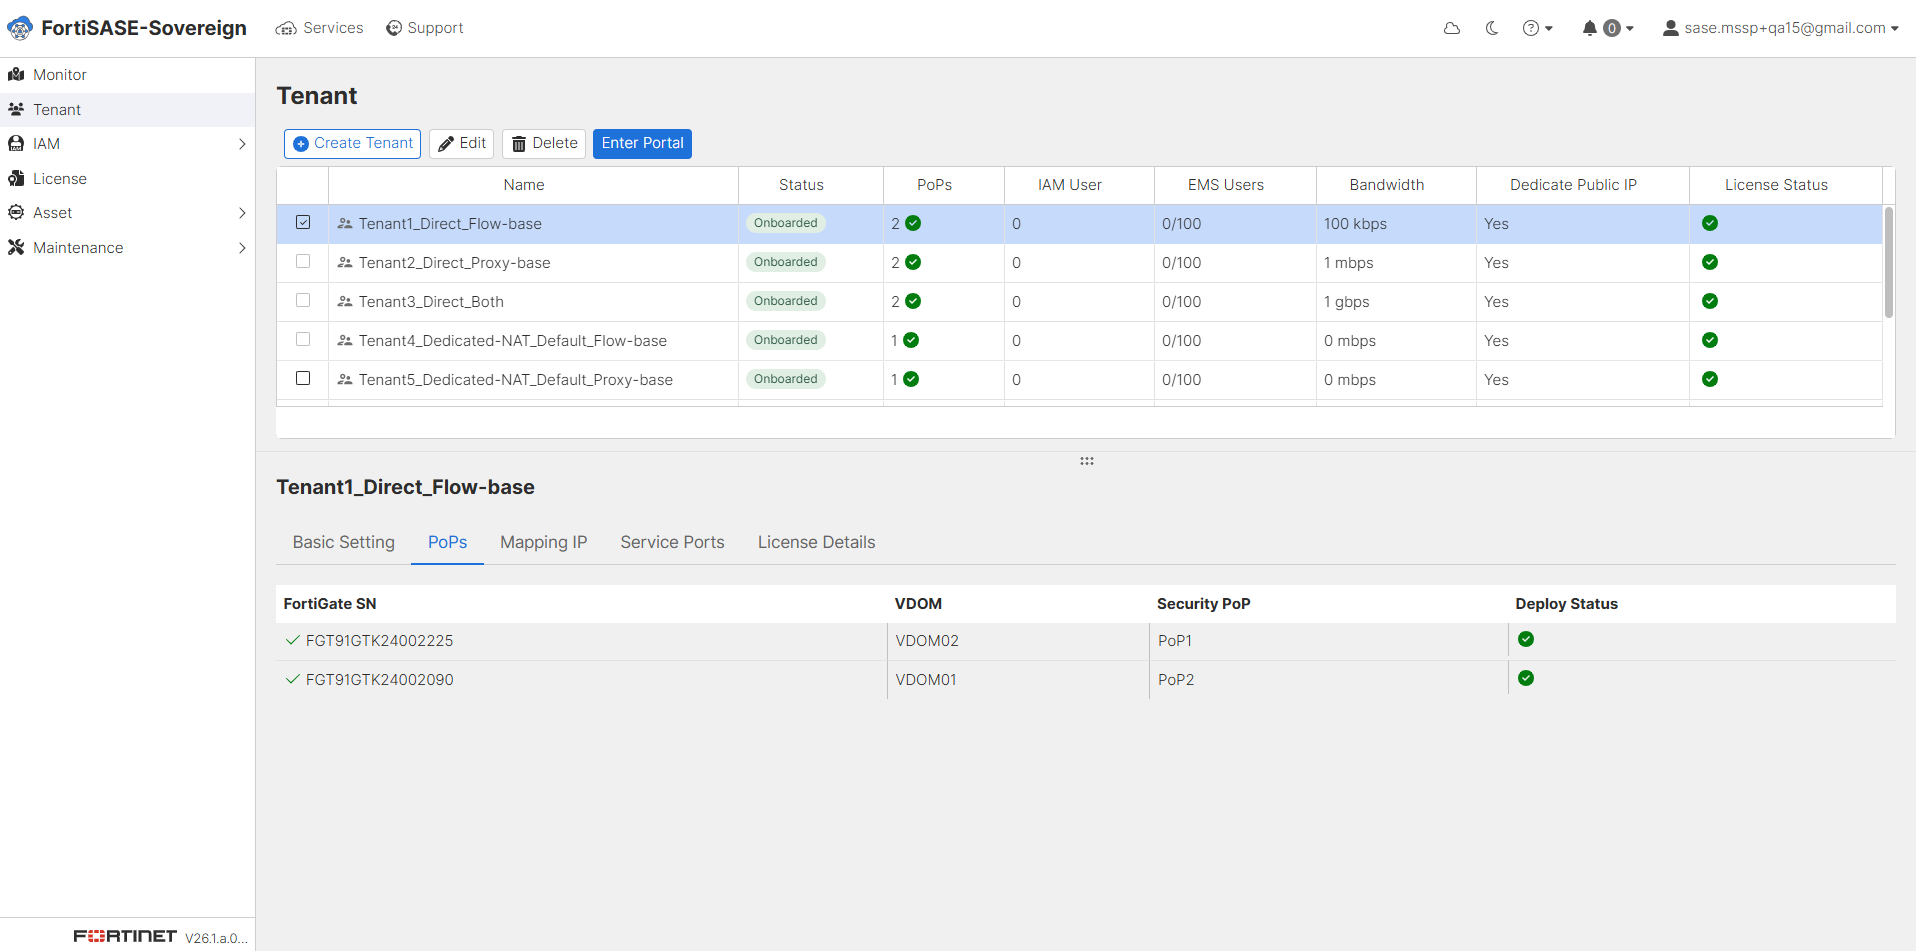
Select a tenant and navigate to the PoPs tab to display all Security Points of Presence associated with that tenant. The table lists each assigned FortiGate SN (Serial Number), its corresponding VDOM identifier, the linked Security PoP name, and the current Deploy Status. A green indicator confirms that the FortiGate is successfully deployed and actively enforcing traffic policies for the tenant.
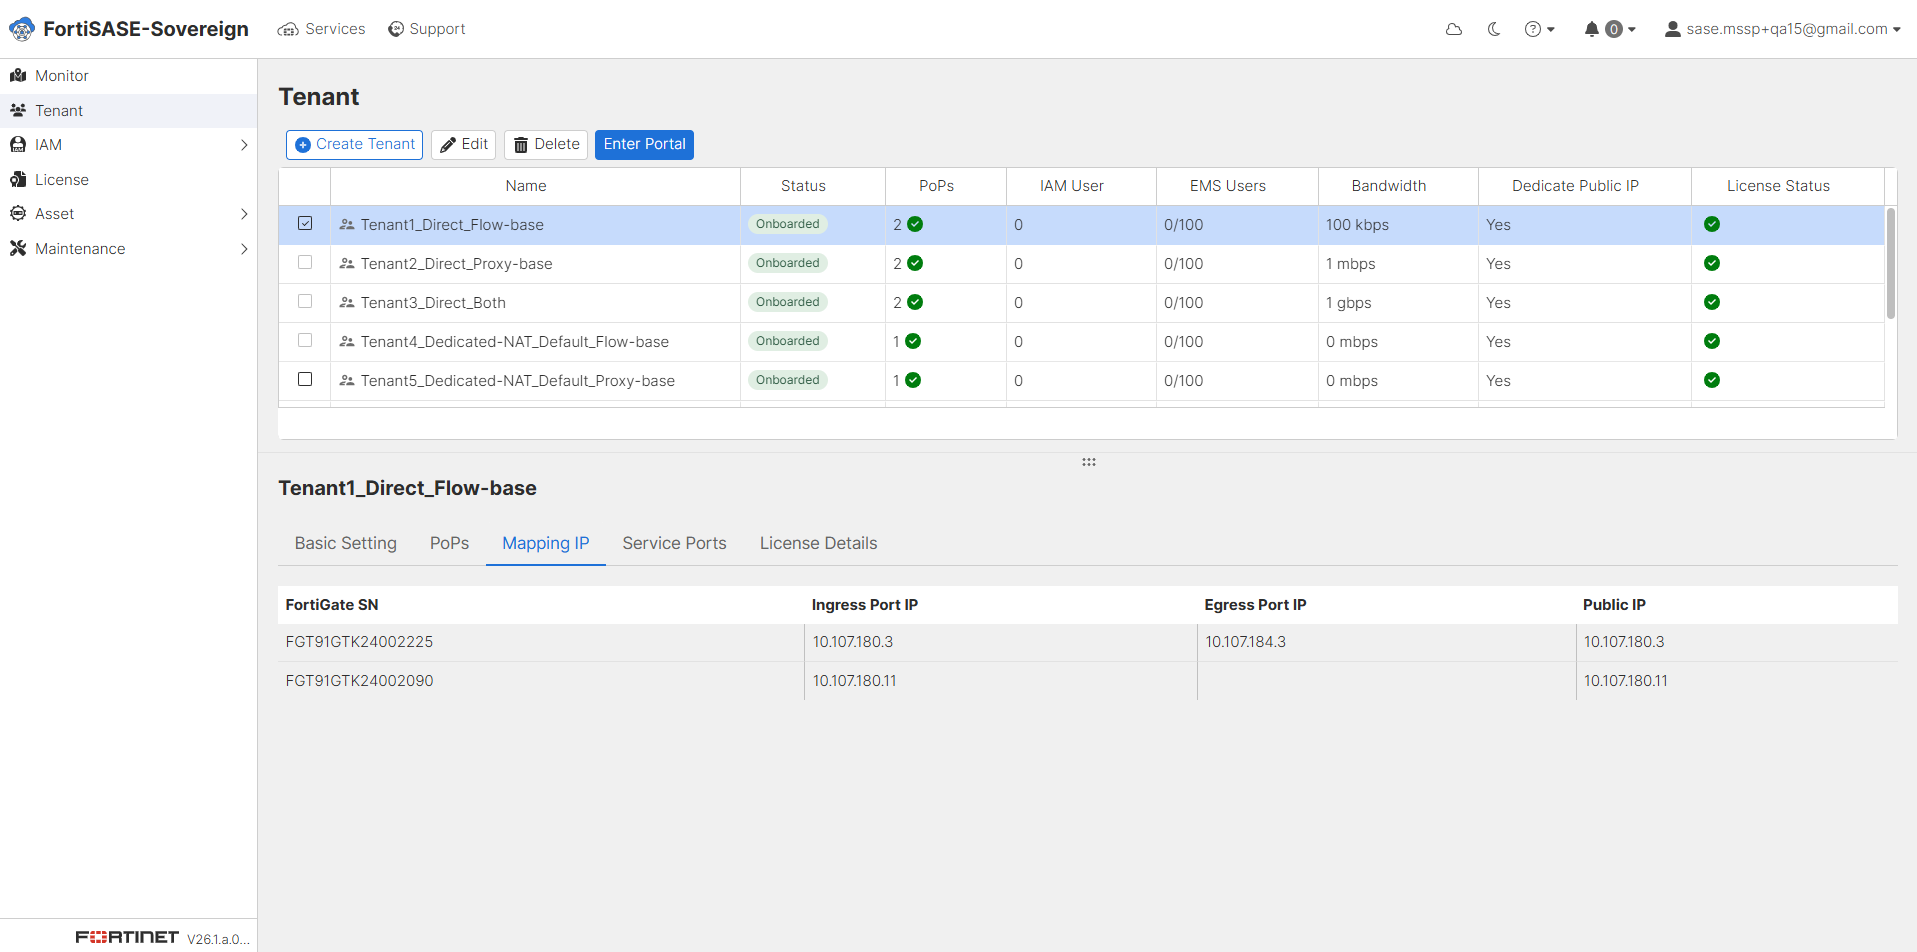
Select a tenant and navigate to the Mapping IP tab to view the IP address assignments for each FortiGate appliance associated with that tenant. The table displays each FortiGate SN (Serial Number) alongside its Ingress Port IP, Egress Port IP, and the assigned Public IP address. This information is essential for verifying correct traffic routing and for configuring upstream firewall or NAT rules that direct tenant traffic to the appropriate FortiGate interfaces.
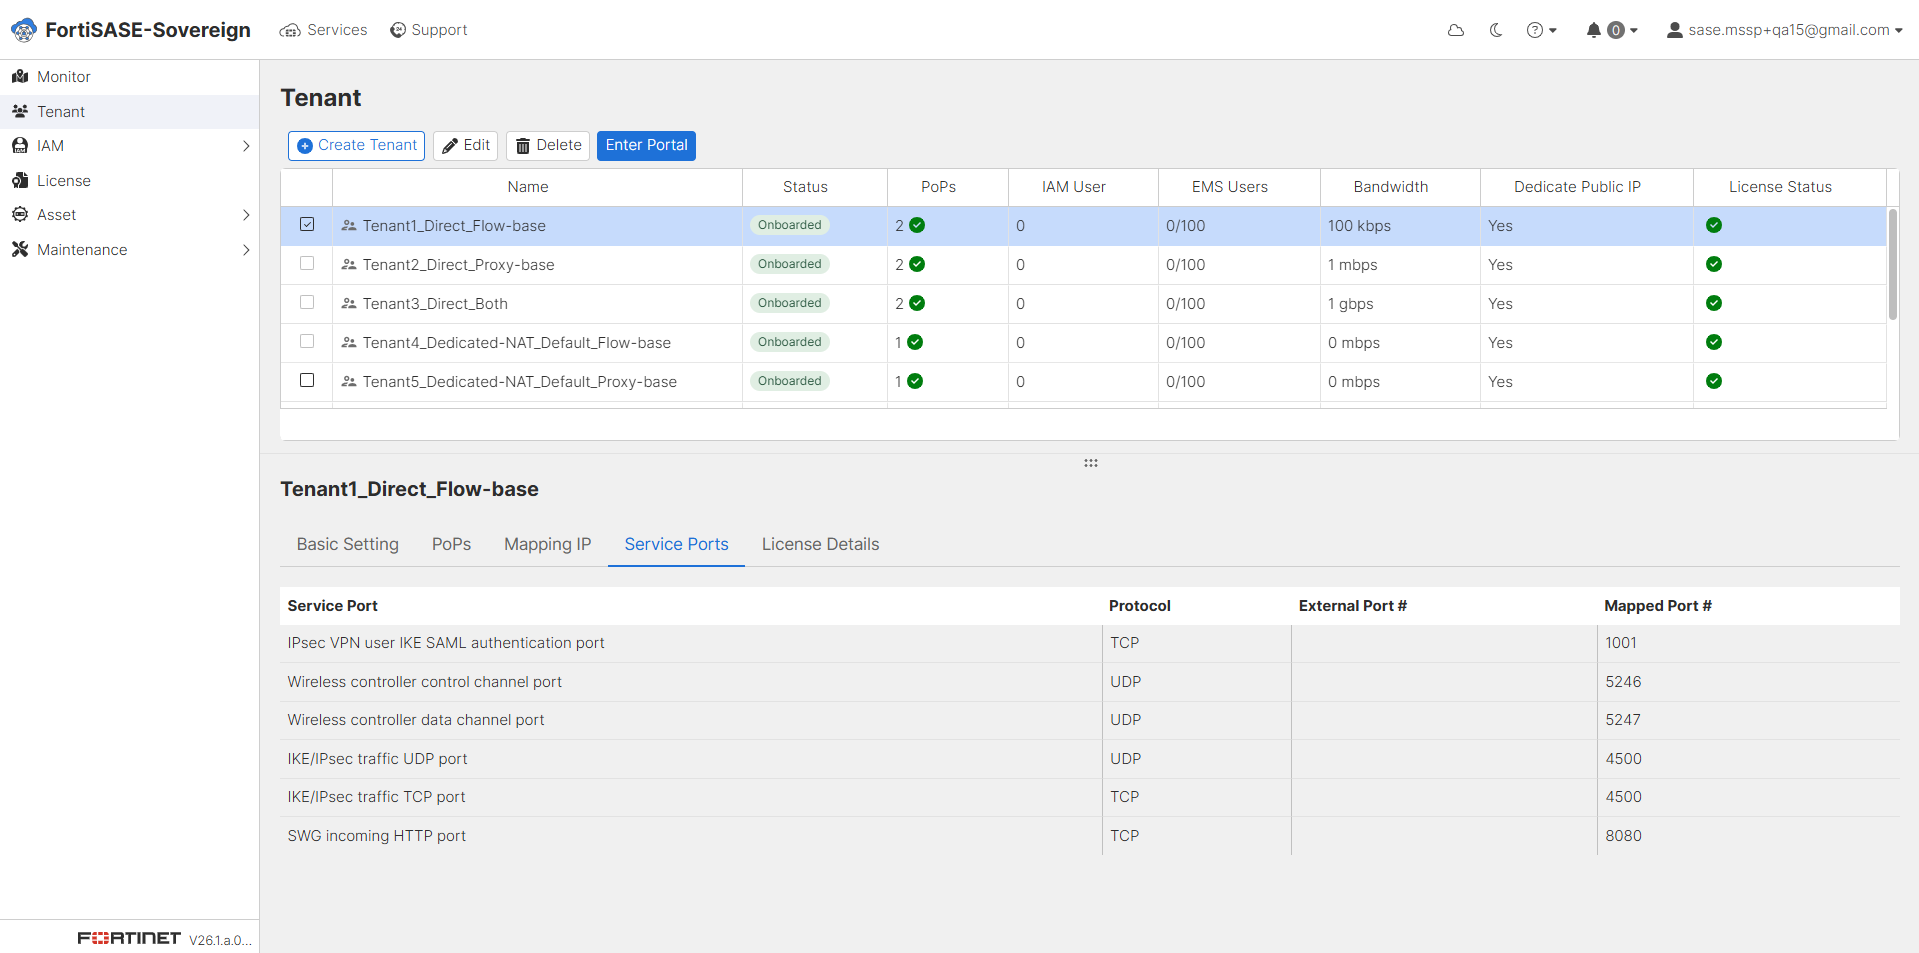
Select a tenant and navigate to the Service Ports tab to review the port mappings that govern tenant service connectivity. The table lists each Service Port by name (such as IPsec VPN, Wireless controller, IKE/IPsec traffic, and SWG Incoming HTTP), its Protocol (TCP or UDP), the External Port number exposed to tenant users, and the internally Mapped Port number used within the FortiGate VDOM. These mappings must align with the Virtual IP configurations applied to the FortiGate to ensure uninterrupted service delivery.
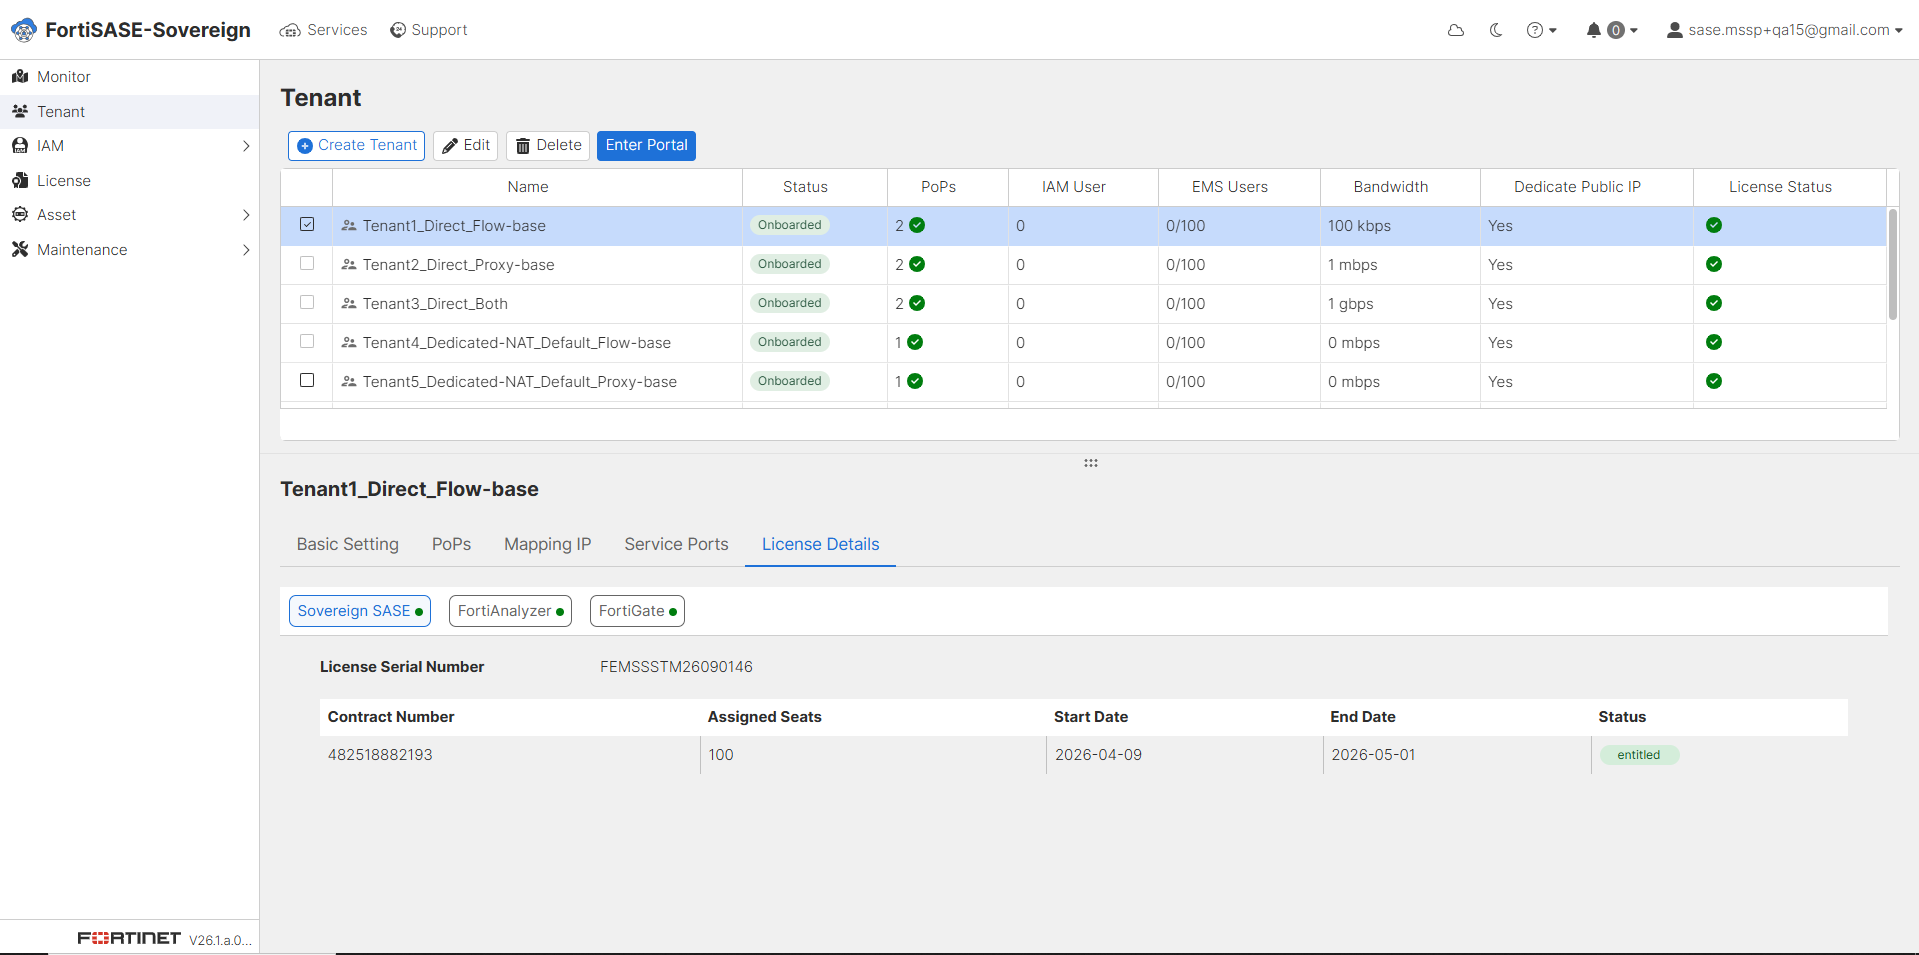
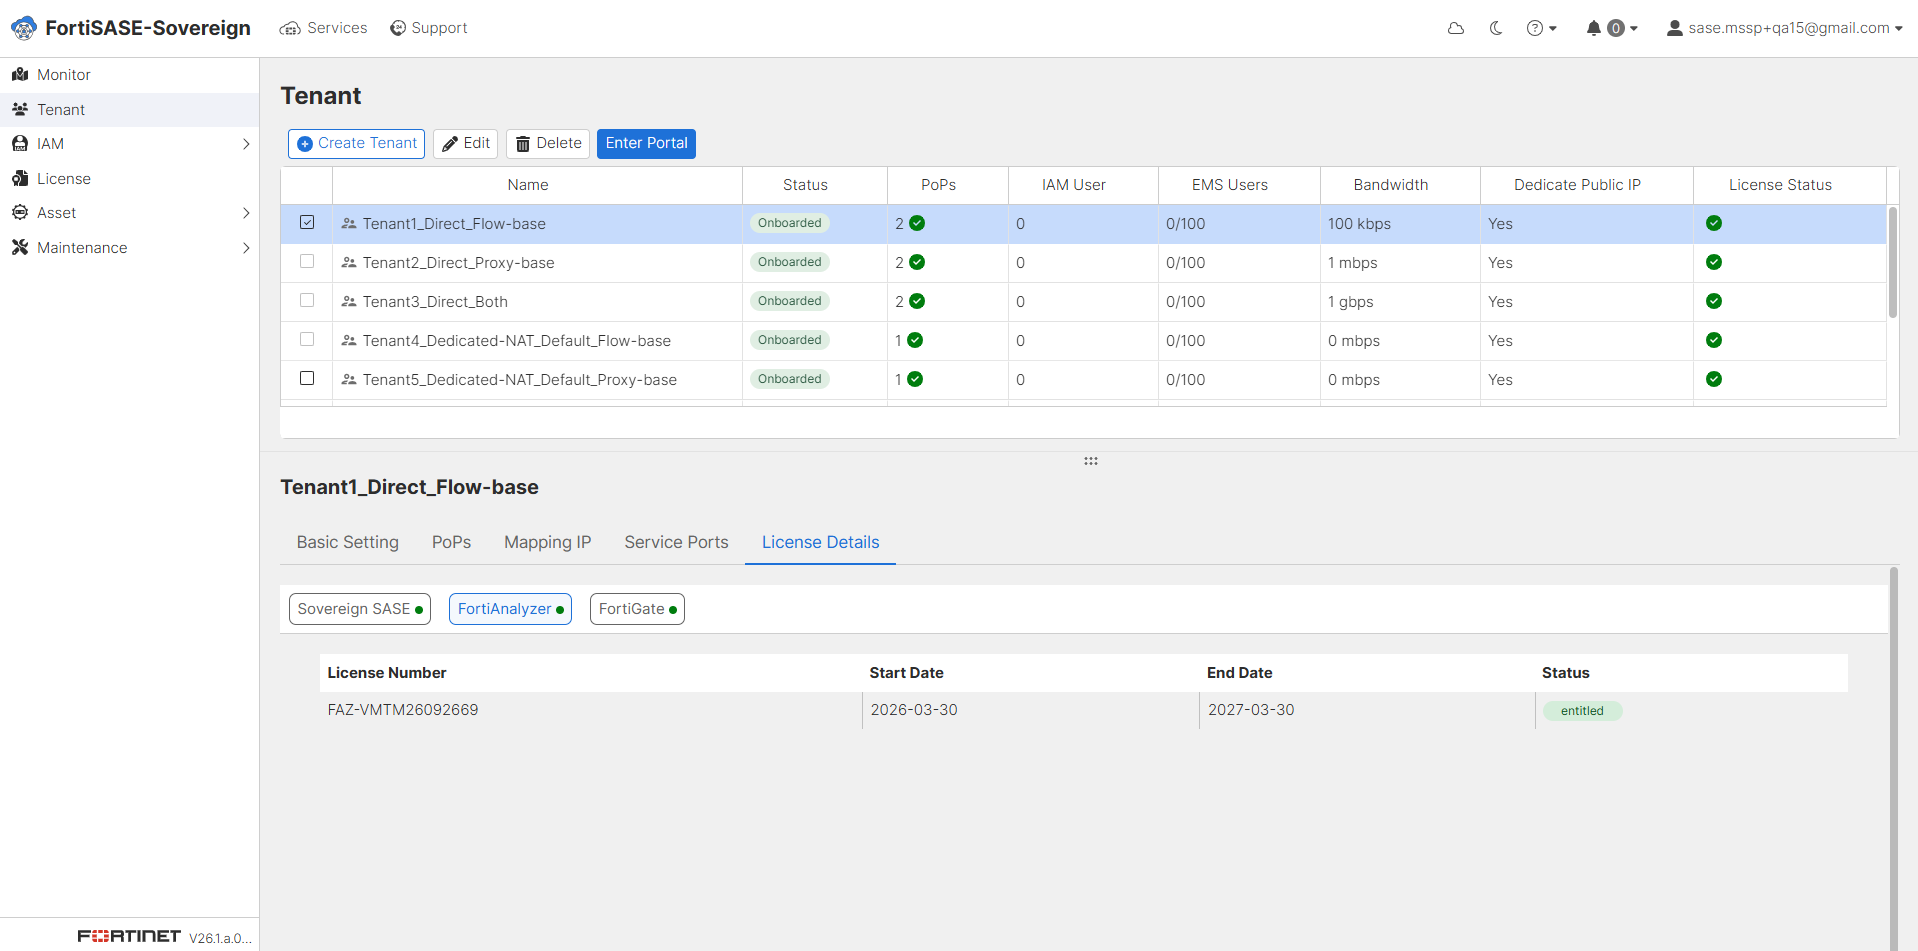
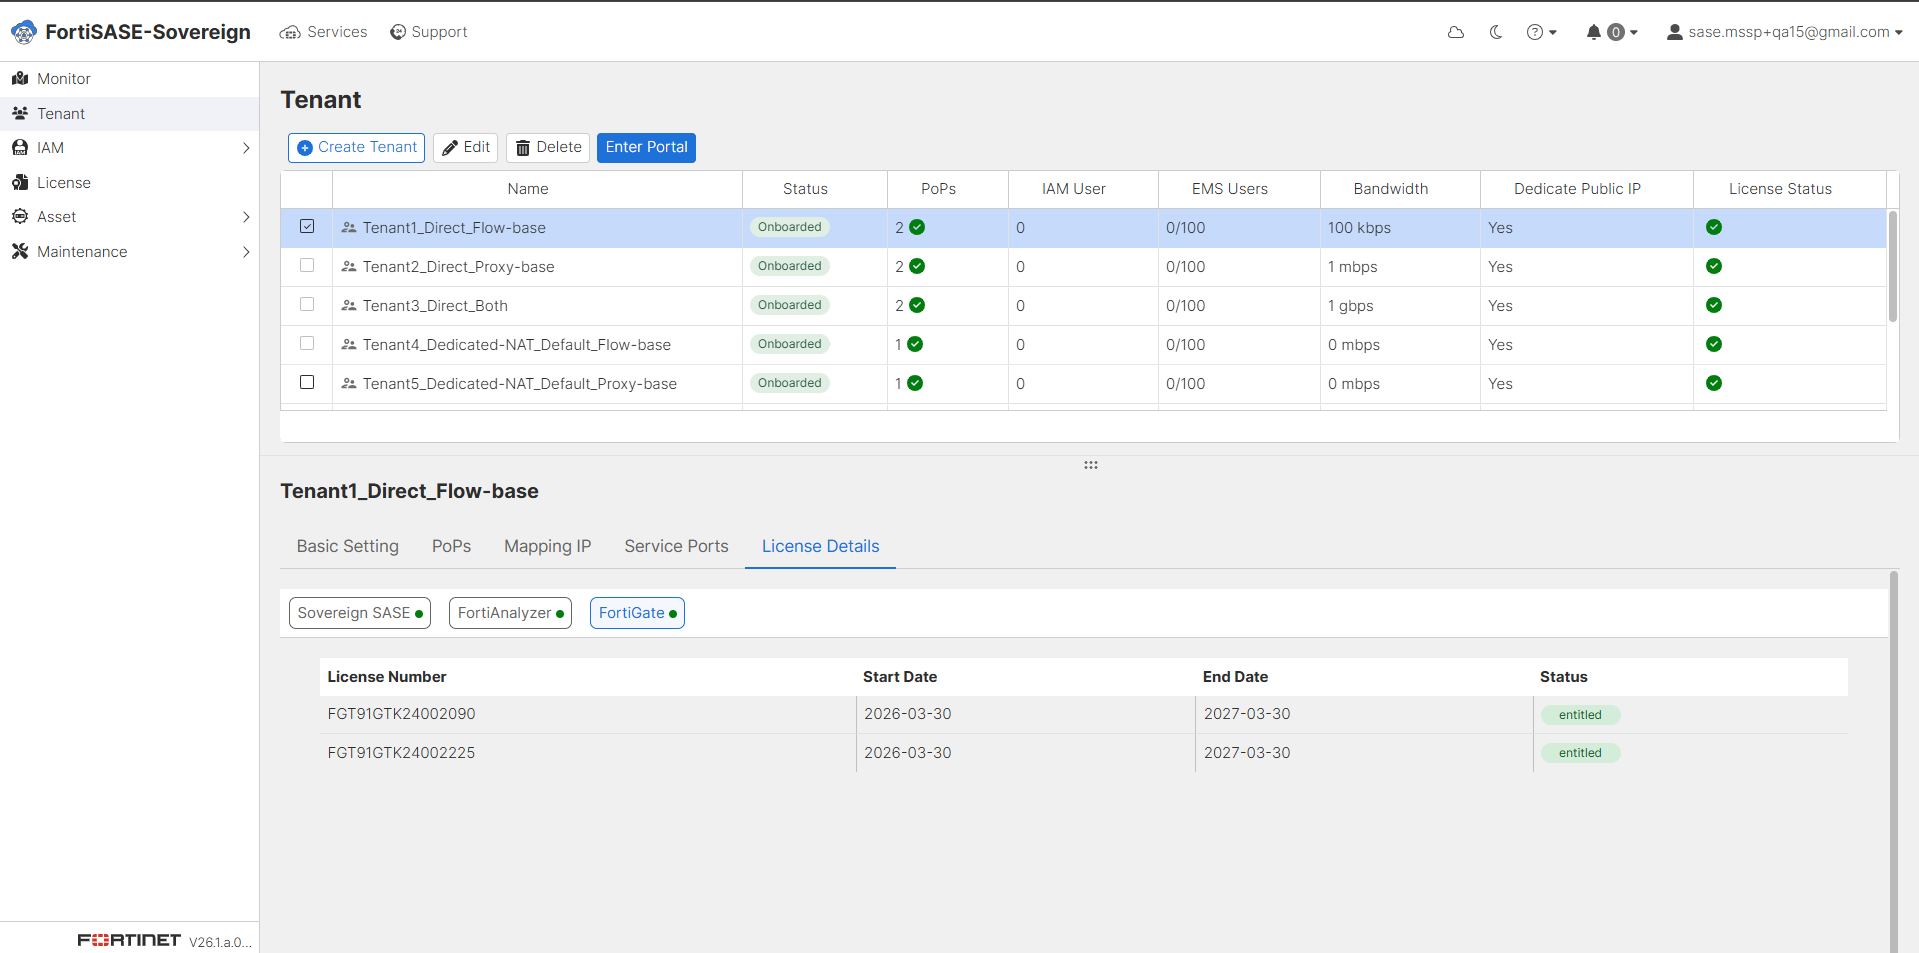
Select a tenant and navigate to the License Details tab to review all active license entitlements associated with that tenant. The tab is organized into three sub-tabs — Sovereign SASE, FortiAnalyzer, and FortiGate — each displaying the relevant license serial numbers, contract details, assigned seat counts, validity dates, and current activation status.
The Sovereign SASE sub-tab displays the FortiClient EMS license details provisioned for this tenant. The table shows the License Serial Number, associated Contract Number, the number of Assigned Seats, the contract Start Date, End Date, and current activation Status. Verify that the license status shows entitled and that the seat count and validity period align with the tenant’s service agreement before granting end-user access.
The FortiAnalyzer sub-tab displays the log management and analytics license associated with this tenant’s FortiAnalyzer instance. The table lists the License Number, contract Start Date, End Date, and activation Status. Confirm the license is entitled status and within its validity period to ensure uninterrupted log collection, event correlation, and compliance reporting for the tenant.
The FortiGate sub-tab lists the individual FortiGate appliance licenses assigned to this tenant. Each row displays the License Number corresponding to a specific FortiGate Serial Number, along with the contract Start Date, End Date, and current activation Status. Verify that all FortiGate licenses are showing an entitled status and that their validity periods cover the full term of the tenant’s service contract.
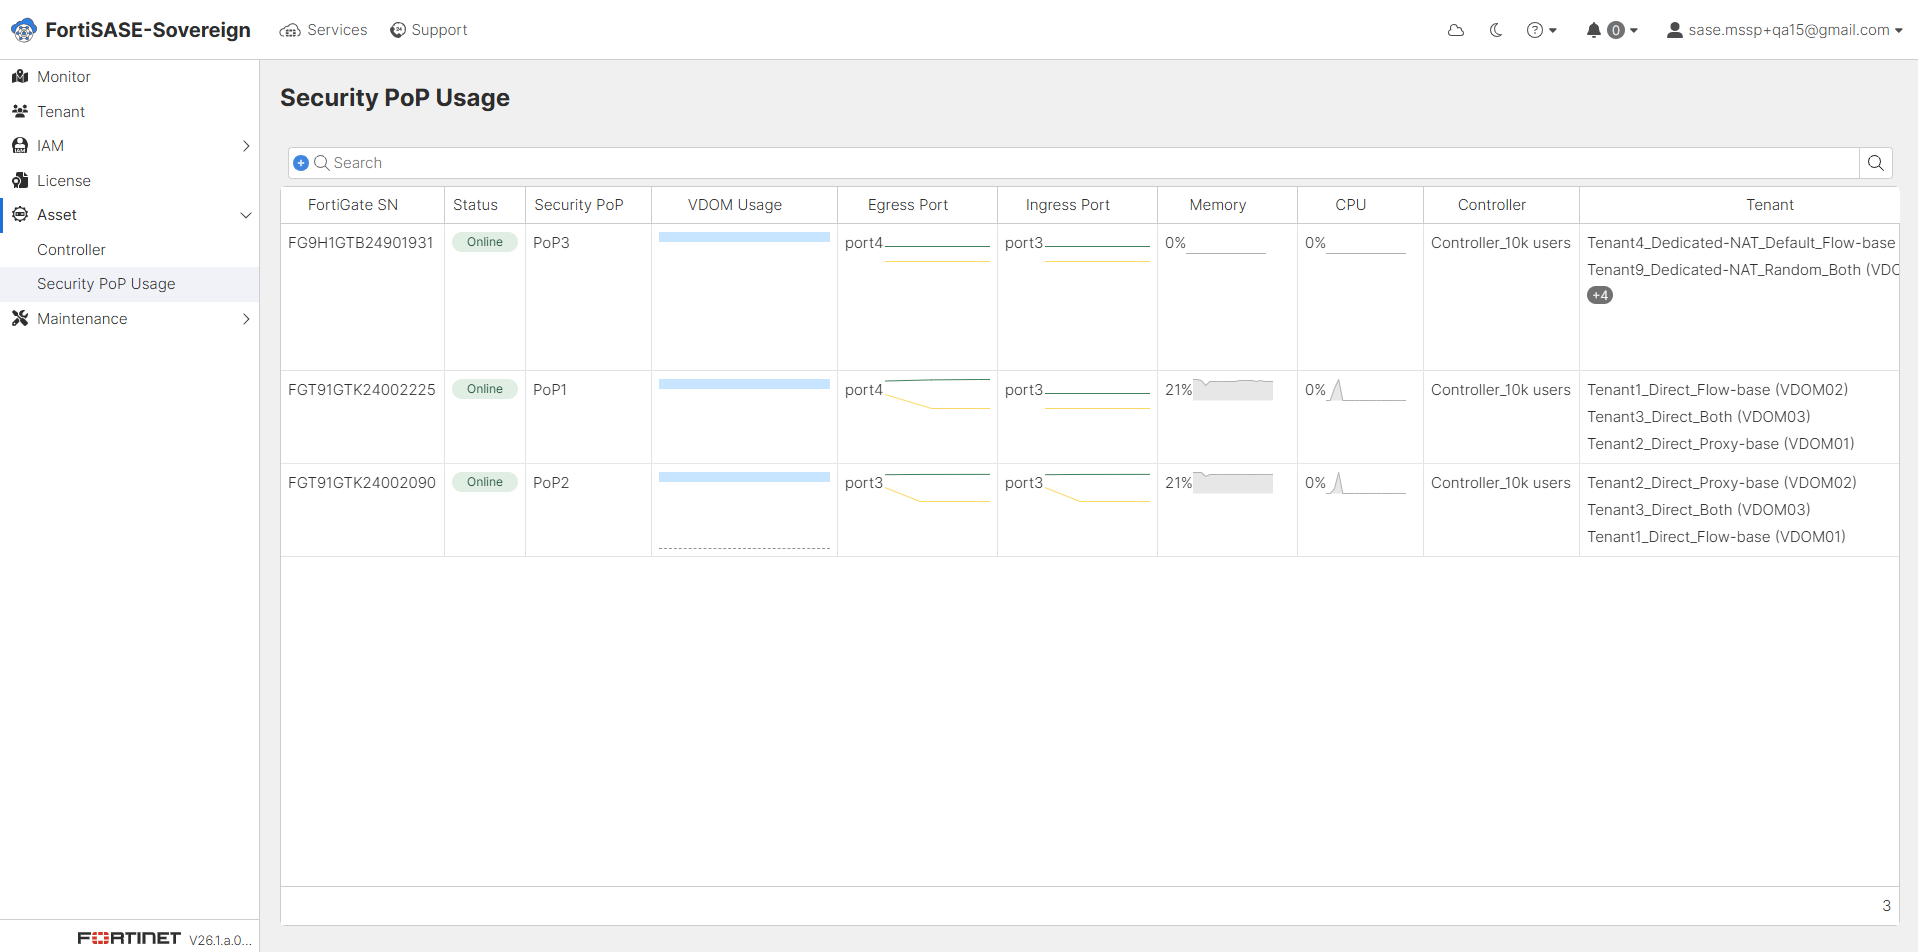
Security PoP Usage
The Security PoP Usage dashboard, accessible from Asset > Security PoP Usage, provides a consolidated, real-time operational view of all FortiGate appliances across every registered Security PoP. Each row represents a FortiGate device and displays its Serial Number, online Status, assigned Security PoP name, VDOM Usage bar, Egress Port, Ingress Port, Memory utilization, CPU load, associated Controller, and the list of Tenant VDOMs currently hosted on that appliance. This view is the primary resource for monitoring hardware resource consumption, validating tenant VDOM distribution across PoPs, and identifying any FortiGate appliances that may require capacity attention.
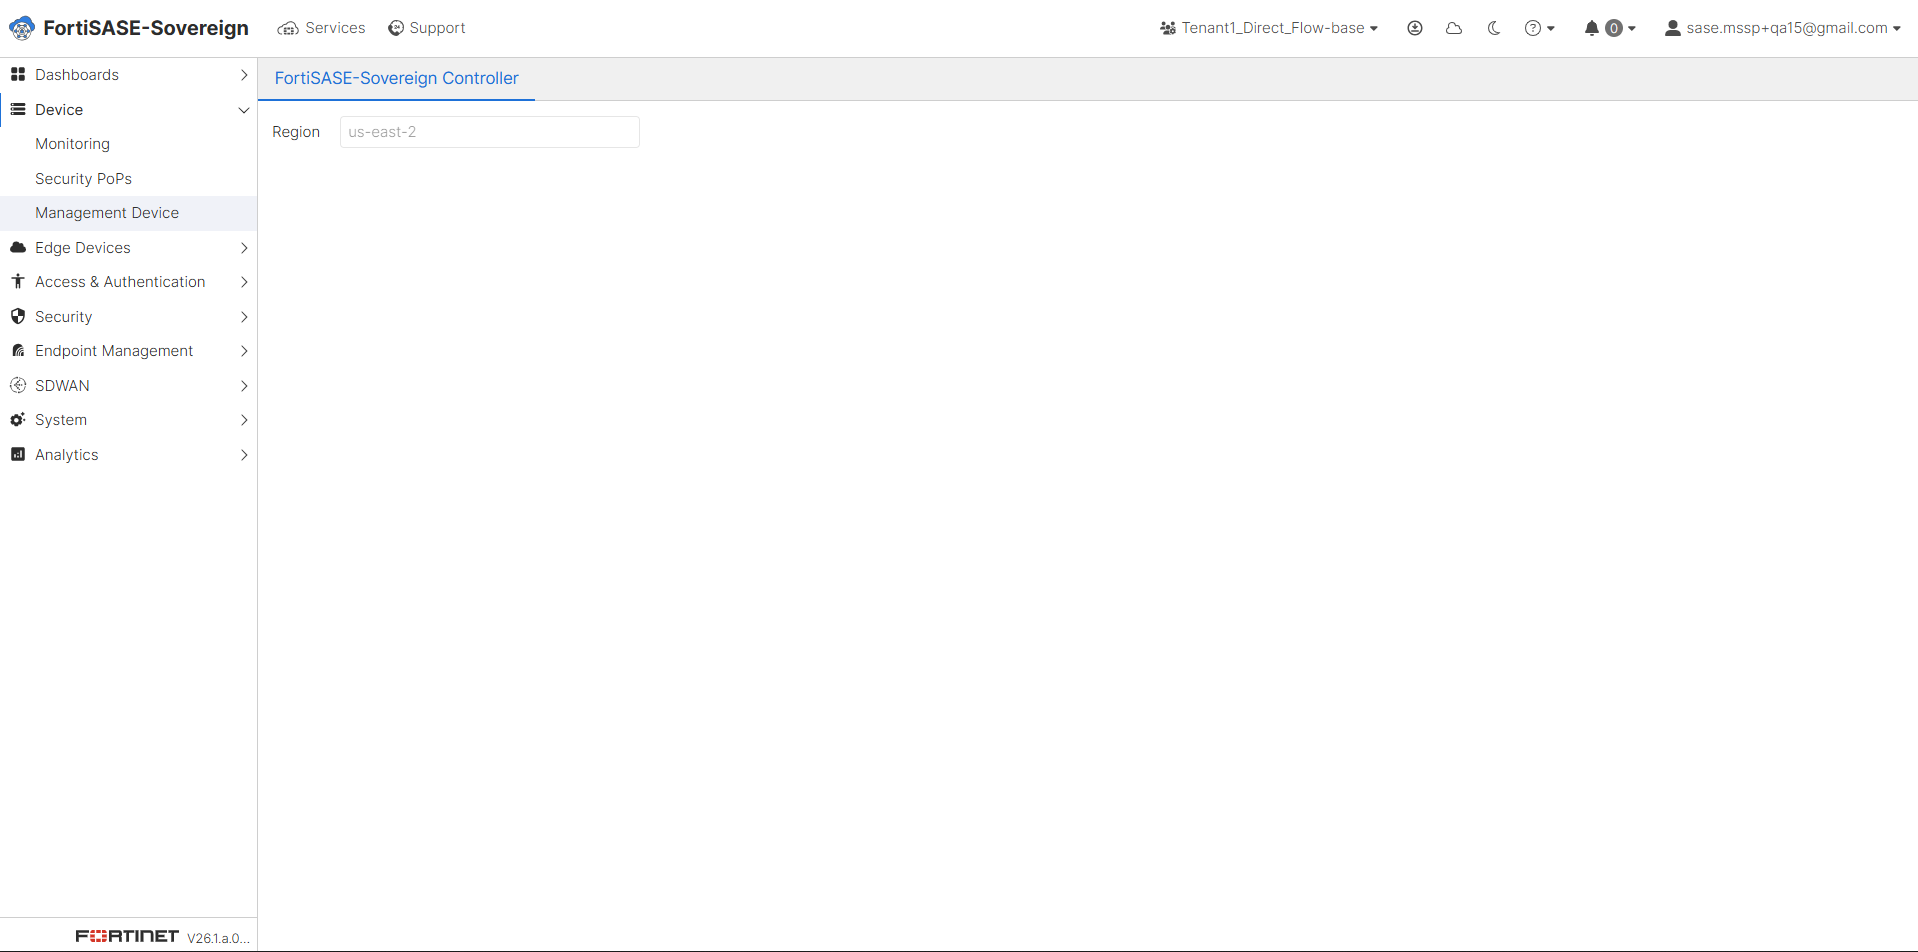
Tenant Portal Device Management
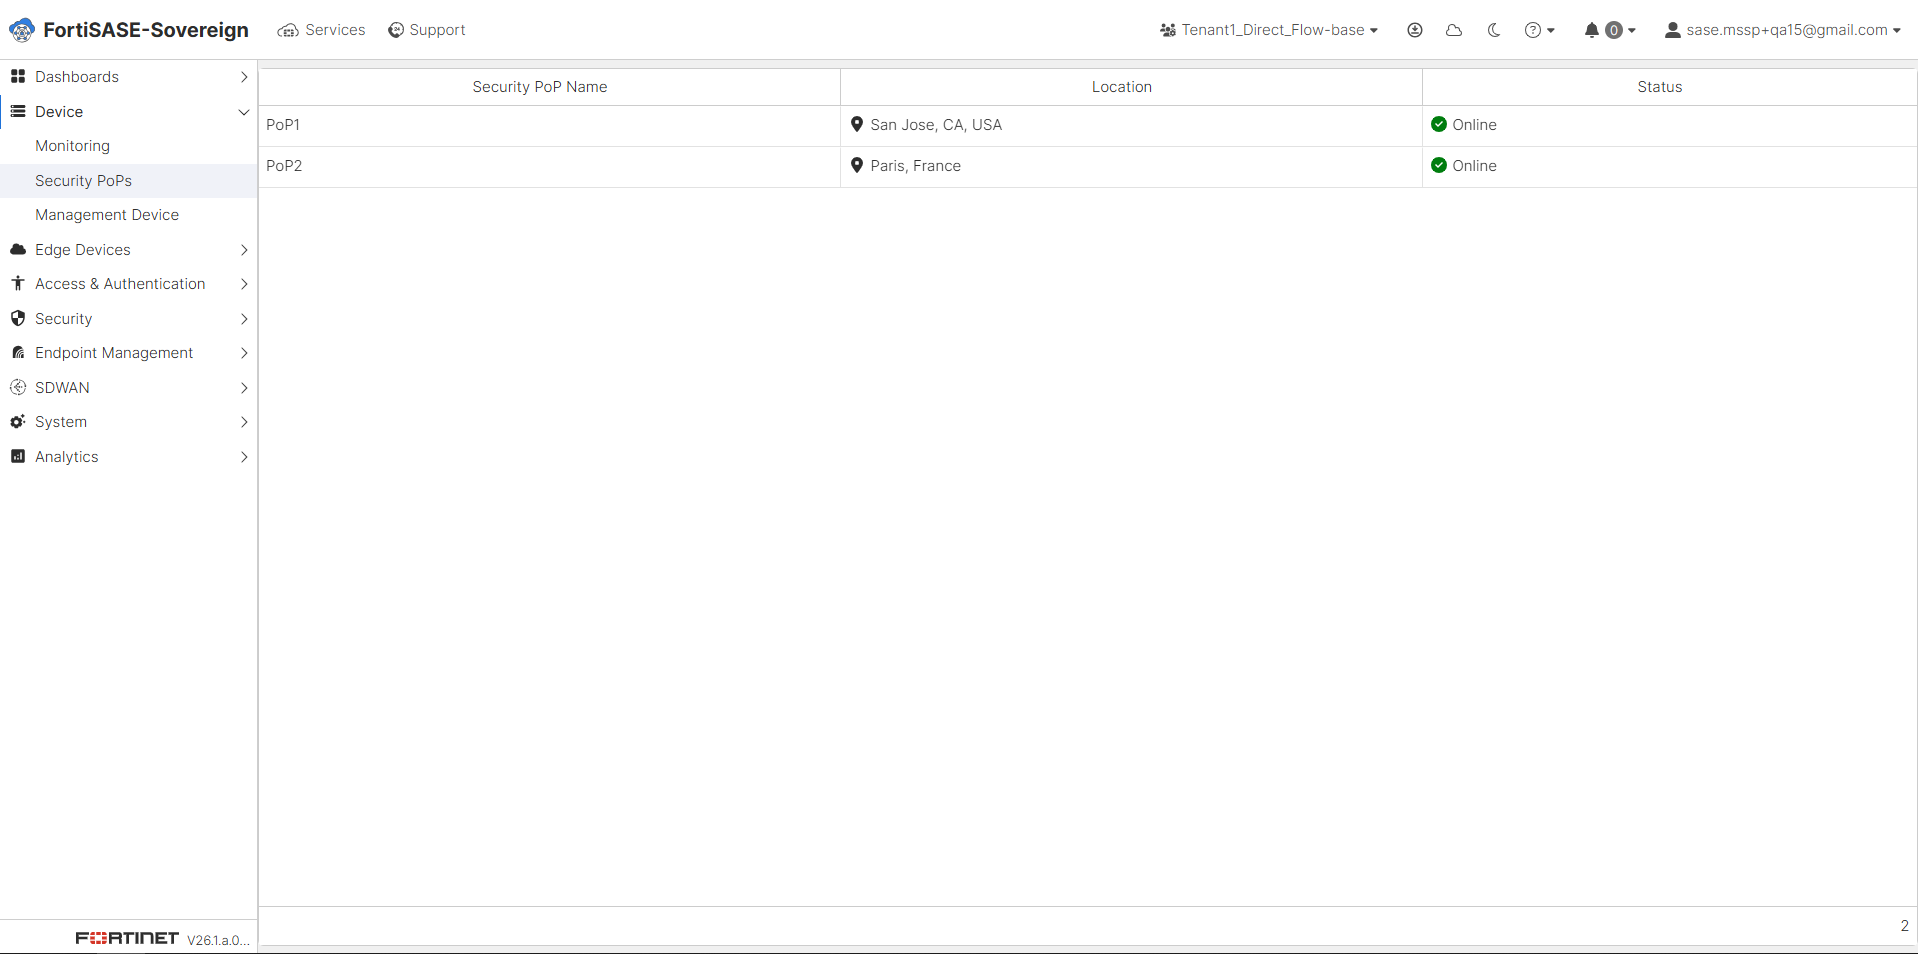
Within each tenant’s dedicated portal, the Device section provides tenant-level visibility and management of the infrastructure components assigned to that environment. This section is divided into two sub-pages: Security PoPs and Management Device, both accessible under Device in the tenant portal navigation.
Security PoPs Management: The Security PoPs sub-page within the tenant portal displays all Security Points of Presence assigned to the tenant, along with their geographic Location and current operational Status. Each PoP entry shows the Security PoP Name, its physical or logical deployment Location (e.g., San Jose, CA, USA or Paris, France), and an Online/Offline Status indicator confirming active enforcement. Administrators can use this view to verify that all assigned PoPs are reachable and operational before rolling out end-user connectivity.
Management Device: The Management Device sub-page displays the FortiSASE-Sovereign Controller instance associated with the tenant. This view confirms the controller Region assignment and provides a reference point for the management plane infrastructure serving the tenant environment. Administrators can use this page to confirm that the tenant is associated with the expected regional controller. Ensure the displayed region matches the intended deployment location.