


VLAN mode
VLAN mode is an alternative to the default CAPWAP mode for FortiGate to FortiExtender connectivity. In the default FEX-WAN type interface, all traffic to and from the FortiGate is encapsulated in the CAPWAP data channel. In VLAN mode, traffic is sent and received on the VLAN interface. Because there is no encapsulation overhead and data traffic is processed in userspace currently, VLAN mode delivers better performance with the requirement that the VLAN interface be directly created on the port on which the FortiExtender is connected to the FortiGate.
It is important to note that in VLAN mode, the FortiExtender and the FortiGate can be connected directly to each other or through a switch. In case of a switch in between, the switch must be configured to support the configured VLANs.
Set up FortiExtender as the WAN-extension of FortiGate using VLAN mode
Before you start, keep the following in mind:
-
Ensure that the VLAN interface is created according to the actual physical interface of the connected FortiExtender.
|
|
In this sample configuration, Port 4 of the FortiExtender is directly connected to the WAN2 interface on the FortiGate. |
Configure the FortiGate
- Create a WAN2 interface, setting the IP address to 192.168.2.99 with a DHCP server running on it and allowing Security Fabric connection traffic.
-
Enable
'fortiextender-vlan-mode':
By default, VLAN mode is disabled on FortiGate, and must be explicitly enabled on the FortiGate:
config system global
(global)set fortiextender-vlan-mode enablevlan
(global)end
Before enabling VLAN mode, you must delete all the FortiExtender-WAN interfaces created on the device.
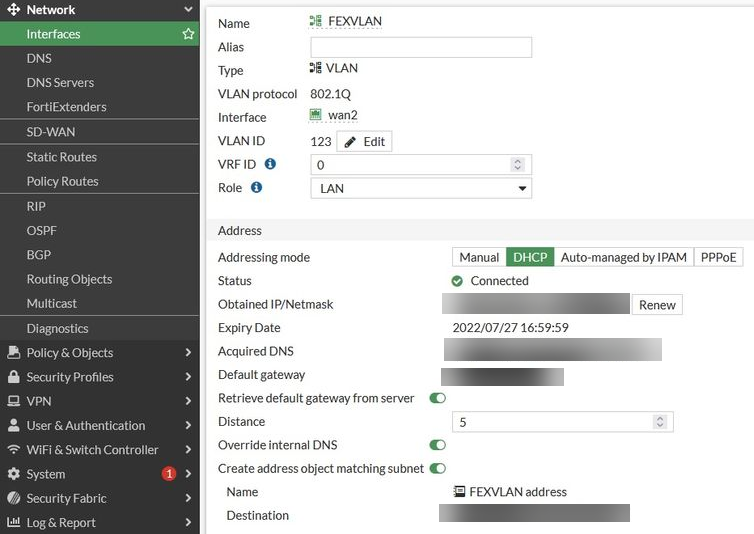
- Create a VLAN interface (any VLAN ID, e.g., 123) on top of the WAN2 interface, name it FEXVLAN, and make this interface type DHCP client.

Configure the FortiExtender
- Ensure that the port4 interface is connected to WAN2 to get the IP address (192.168.2.98) from the FortiGate.
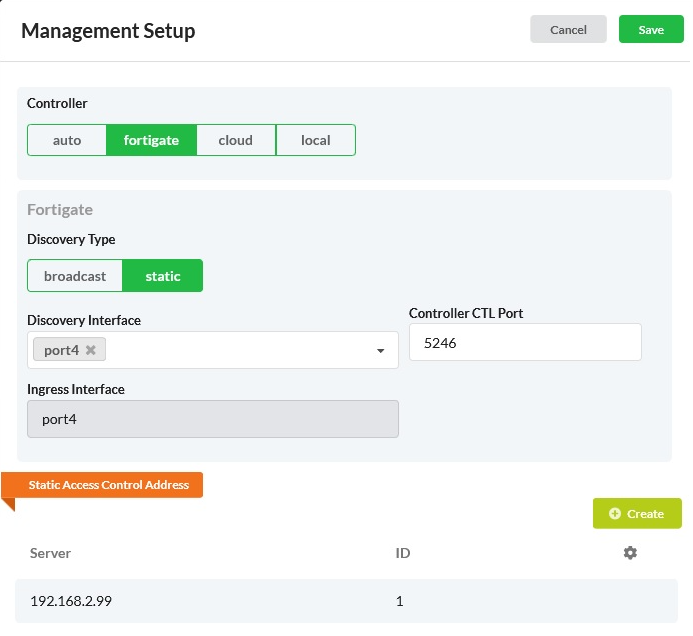
- On the FortiExtender GUI, select Setting>Management, and set the following:
- Controller — FortiGate
- Discovery Type — Static
- Discovery Interface — port4
- Static Access Control Address > Server —192.168.2.99
-
On the FortiGate GUI, select Network>FortiExtenders, wait for the FortiExtender to be discovered by the FortiGate, and then authorize the FortiExtender by setting the following:
- Mode — WAN extension
- Modem 1 Interface — FEXVLAN

- Wait for a few moments, for the FortiExtender may need to reboot when the mode is changed from NAT to IP-passthrough (VLAN).
- After the WAN extension tunnel is set up, check its status from the FortiExtender Dashboard for the following Controller Information:
- FortiGate, with Status — Connected
- Mode — FortiGate (ip-passthrough (VLAN))
- Check the status of the WAN extension with the following FortiExtender CLI command:
# get extender status
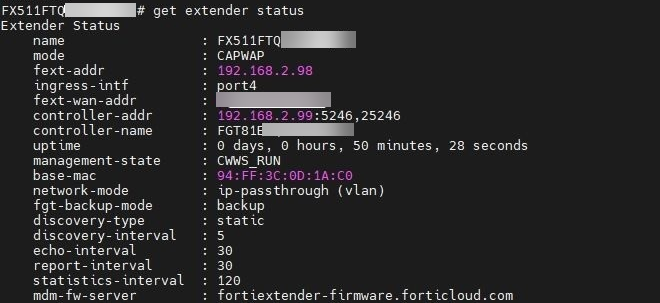
The FortiGate will send the VLAN ID to the FortiExtender over CAPWAP, and the FortiExtender will then create a VLAN interface automatically with the name VLAN1 and vid 123, for example. No special configuration is needed.

Now when the FortiExtender modem is connected to the internet, the FortiGate VLAN interface, i.e., FEXVLAN, will get the same IP address as the one of the FortiExtender LTE interface.
On the FortiGate, after configuring the correct firewall policy, the client behind the FortiGate can go to the internet via the FEXVLAN interface. This will ensure that the VLANs are separated for data traffic from control traffic.