


Fresh Installation
Pre-Installation Checklist
Before you begin, check the following:
-
Ensure that your system can connect to the network. You will be asked to provide a DNS Server and a host that can be resolved by the DNS Server and responds to ping. The host can either be an internal host or a public domain host like google.com.
- Choose deployment type – Enterprise or Service Provider. The Service Provider deployment provides multi-tenancy.
- Determine whether FIPS should be enabled
- Choose install type:
- All-in-one with FortiSIEM Manager
- Cluster with Manager, Supervisor and Workers
- All-in-one with Supervisor only, or
- Cluster with Supervisor and Workers
- All-in-one with FortiSIEM Manager
- Choose storage type for Supervisor, Worker, and/or Collector
- Online storage - There are 4 choices
- ClickHouse - Recommended for most deployments. Please see ClickHouse Reference Architecture for more information.
- EventDB on local disk
- EventDB on NFS
- Elasticsearch
- Archive storage – There are 2 choices
- EventDB on NFS
- HDFS
- Online storage - There are 4 choices
- Determine hardware requirements:
| Node | vCPU | RAM | Local Disks |
|
Manager |
Minimum – 16 |
Minimum
Recommended
|
OS – 25GB OPT – 200GB CMDB – 100GB SVN – 60GB |
| Supervisor (All in one) | Minimum – 12 Recommended - 32 |
Minimum
Recommended
|
OS – 25GB OPT – 100GB CMDB – 60GB SVN – 60GB Local Event database – based on need |
| Supervisor (Cluster) | Minimum – 12 Recommended - 32 |
Minimum
Recommended
|
OS – 25GB OPT – 100GB CMDB – 60GB SVN – 60GB
|
| Workers | Minimum – 8 Recommended - 16 |
Minimum – 16GB Recommended – 24GB |
OS – 25GB OPT – 100GB |
| Collector | Minimum – 4 Recommended – 8 ( based on load) |
Minimum – 4GB Recommended – 8GB |
OS – 25GB OPT – 100GB |
-
If your Online event database is external (e.g. EventDB on NFS or Elasticsearch), then you must configure external storage before proceeding to FortiSIEM deployment.
-
If your Online event database is internal, that is, inside Supervisor or Worker nodes, then you need to determine the size of the disks based on your EPS and event retention needs.
-
For OPT - 100GB, the 100GB disk for /opt will consist of a single disk that will split into 2 partitions, /OPT and swap. The partitions will be created and managed by FortiSIEM when
configFSM.shruns.
All-in-one Installation
This is the simplest installation with a single Virtual Appliance. If storage is external, then you must configure external storage before proceeding with installation.
- Import FortiSIEM into Oracle Cloud Console
- Configure FortiSIEM
- Upload the FortiSIEM License
- Configure an Event Database
- Final Check
Import FortiSIEM into Oracle Cloud Console
- Go to the Fortinet Support website https://support.fortinet.com to download the KVM package
FSM_Full_All_KVM_7.1.3_build0165.zip. See Downloading FortiSIEM Products for more information on downloading products from the support website. - Download the packages for Super/Worker and Collector to the location where you want to install the image. For example:
FSM_Full_All_KVM_7.1.3_build0165.zip. - Unzip the
.zipfile to get theFortiSIEM-7.1.3.0165.qcow2file. - Login to the Oracle Cloud Console.
- At the top of the console, use the Region drop-down list to set the region where you want to deploy FortiSIEM.
- Open the navigation menu, and click Storage, then under Object Storage & Archive Storage, click Buckets.
- Under List Scope, select the compartment from the provided list. All buckets in that compartment are listed in tabular form. This is the compartment where the bucket you create will be located.
- Click Create Bucket.
- In the Bucket Name field, enter a unique bucket name, such as "fortisiem-images".
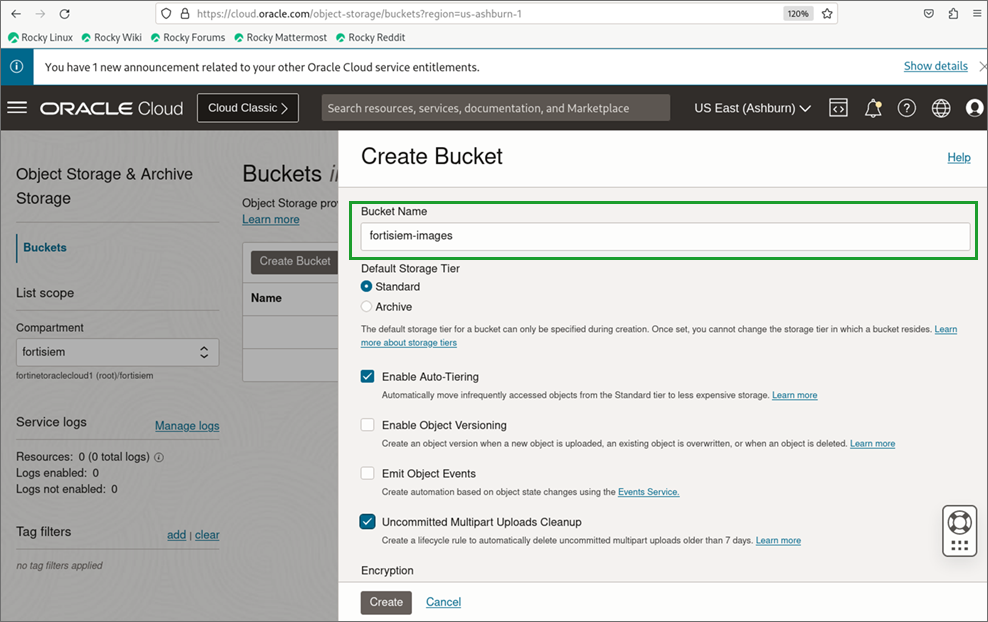
- Click Create.
- Click on your bucket name, in this example, "fortisiem-images", and you will see a Upload button at the bottom of the page.
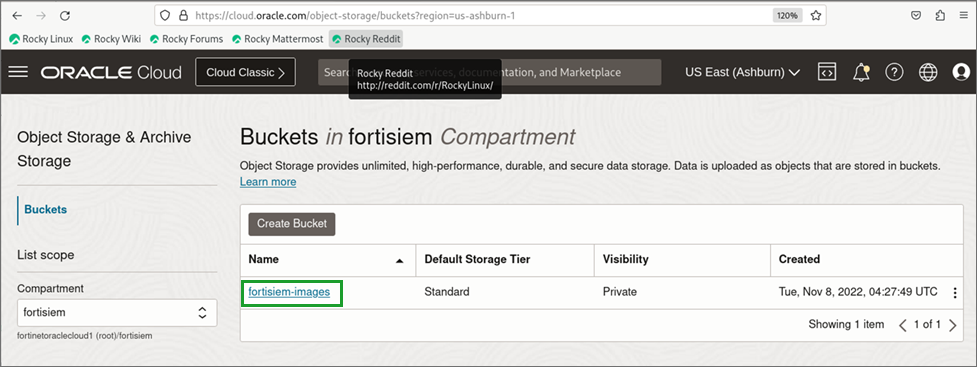
- Click Upload, choose the qcow2 image for FortiSIEM, and from the Upload Objects window, click Upload.

- From the left pane navigation menu, click on Compute > Custom Images.
- Create or select a compartment to organize your resource, for example "fortisiem".
- Click Import image.
- From the Import image window, take the following steps:
- In the Name field, enter the name of the image that will be imported, in this example, "FortiSIEM-VA-7.1.0.0.142".
- In the Operating system field, enter "Rocky Linux", and select Import from an Object Storage bucket.
- In the Create in compartment field, select the compartment for your image, in this example, fortisiem.
- In the Bucket in <compartment> field, where <compartment> is the name of your compartment, select your bucket, in this example, fortisiem-images.
- In the Object name field, select your image, in this example, FortiSIEM-VA-7.1.0.0142.qcow2.
- Under Image type, select QCOW2.
- Under Launch mode, ensure Paravirtualized mode is selected. If it isn't, select it.
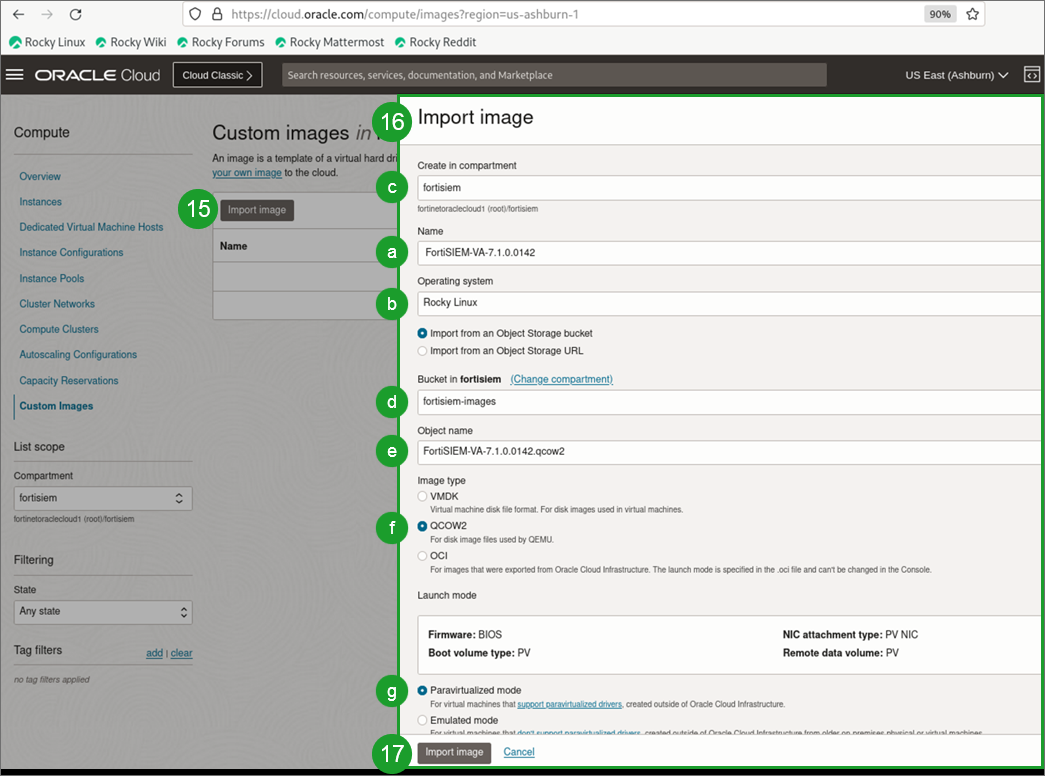
- Click Import image.
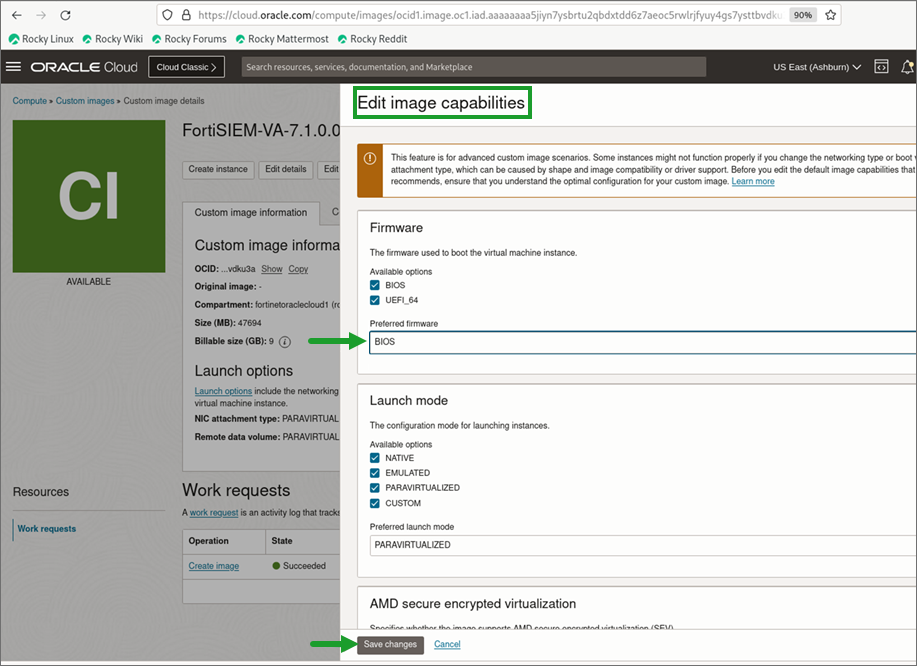
- Wait for the creation of the image to be completed successfully before proceeding.
- Click on Edit image capabilities, and from the Edit Image Capabilities window, set Preferred firmware to BIOS, then click Save changes.
- Additional disks are needed by FortiSIEM. FortiSIEM requires an opt-disk, cmdb-disk, svn-disk, and depending on whether you EventDB on local storage or ClickHouse, an additional 5th disk, called the data-disk. Determine the number of disks you require before proceeding. The following steps provide the general configuration, including an example for the opt-disk.
Disk Size Disk Name opt-disk (Hard Disk 2) 100GB /opt
For OPT - 100GB, the 100GB disk for /opt will consist of a single disk that will split into 2 partitions, /OPT and swap. The partitions will be created and managed by FortiSIEM when
configFSM.shruns.cmdb-disk (Hard Disk 3) 60GB /cmdb svn-disk (Hard Disk 4) 60GB /svn data-disk (Hard Disk 5) 60GB+ /data (see the following note) Note on Hard Disk 5:
Add the 5th disk only if using EventDB on local storage or ClickHouse. In all other cases, this disk is not required. ClickHouse is recommended for most deployments. Please see ClickHouse Reference Architecture for more information.
For EventDB on local disk, choose a disk based on your EPS and event retention policy. See EventDB Sizing Guide for guidance. 60GB is the minimum.
For ClickHouse, choose disks based on the number of Tiers and disks on each Tier. These depend on your EPS and event retention policy. See ClickHouse Sizing Guide for guidance. For example, you can choose 1 large disk for Hot Tier. Or you can choose 2 Tiers - Hot Tier comprised of one or more SSD disks and Warm Tier comprised of one or more magnetic hard disks.
- From the navigation menu, click Storage, and under Block Storage, click Block Volumes.
- Click on Create Block Volume.
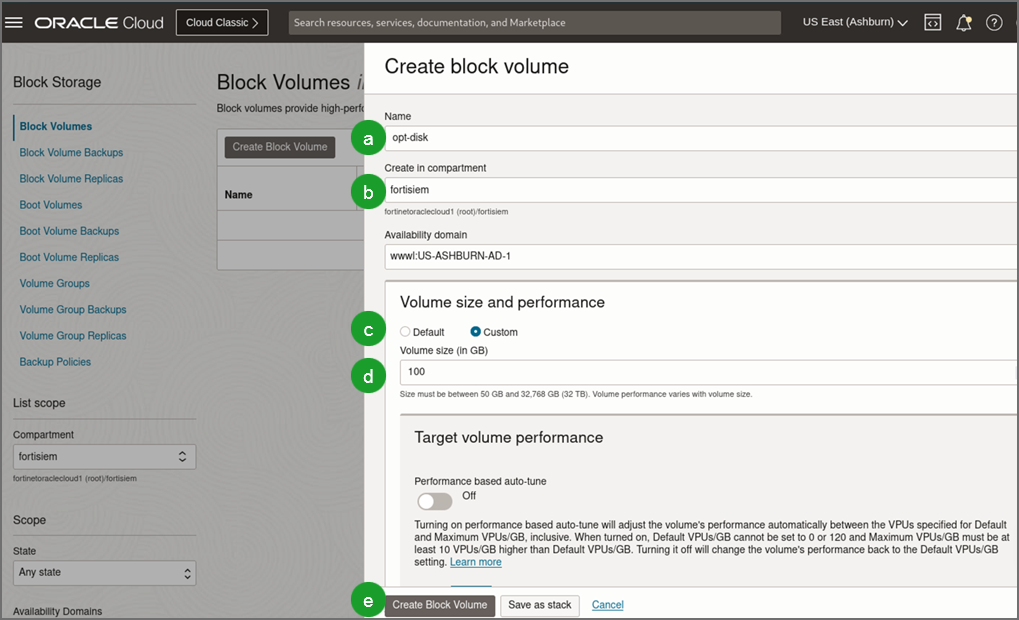
- From the Create block volume window, take the following steps.
- In the Name field, enter a name for the volume, for example, "opt-disk".
- In Create in compartment, select the compartment to create the volume in if it differs from the compartment you wish to use.
- In Volume size and performance, select Custom.
- In the Volume size (in GB) field, enter the size for the disk you wish to create. In this example, for the opt-disk, enter "100", for 100GB.
- Click Create Block Volume.
- In the Name field, enter a name for the volume, for example, "opt-disk".
- Repeat steps 22-23 to add all disks that you require before proceeding.
- From the left pane navigation menu, click Compute, and under Compute, click Instance Configurations.
- Click Create instance configuration.
- Specify a name for your instance configuration, for example, "FortiSIEM-7.1.0-Super".
- In Image and Shape, configure the Image to the custom image you created above. For example, FortiSIEM-VA-7.1.0.0142, and configure Shape to have at least 12 vCPU and 32 GB RAM (use the minimum/recommended values from Pre-Installation Checklist at the beginning of this install guide).
- Create a new VNIC, or use an existing VNIC and subnet if you already have one.
- Automatically assign a public IPv4 address if you plan to connect to it over the Internet.
- You can generate a new SSH key pair and save the private/public keys.
- Attach the necessary Block Volumes required by taking the following steps.
- In the left pane navigation menu, click Compute, and under Compute, click Instances.
- Under List scope, select the compartment that contains your instance.
- From the Instances list, click your instance name that you wish to add a volume to.
- In Resources, click Attached block volumes.
- Click Select volume, and select a volume from the Volume list, with it configured as Attachment type – Paravirtualized. Repeat this process until you've attached all necessary volumes (opt, cmdb, svn, and data disks).
- Click Create.
- With this instance configuration, click on Launch instance, provide a name, and click Create.
- Once the instance is successfully created, click Start to get the instance running.
- After the instance has booted up, which can take a minute or two, you can SSH to the instance with the default password and change it, or use the Console connection > Launch Cloud Shell connection.
- Log in with the default login credentials:
User:root
Password:ProspectHills - You will be required to change the password. Remember this updated password for future use. At this point, you can continue configuring FortiSIEM by using the GUI.
Configure FortiSIEM
Follow these steps to configure FortiSIEM by using a simple GUI.
- Log in as user
rootwith the updated password you set in Import FortiSIEM into Oracle Cloud Console above. - At the command prompt, go to
/usr/local/binand enterconfigFSM.sh, for example:# configFSM.sh - In VM console, select 1 Set Timezone and then press Next.

- Select your Region, and press Next.

- Select your Country, and press Next.

- Select the Country and City for your timezone, and press Next.

- If installing a Supervisor, select 1 Supervisor, and press Next.
If installing a Worker, select 2 Worker, and press Next.
If installing a Collector, select 3 Collector, and press Next.
If Installing FortiSIEM Manager, select 4 FortiSIEM Manager, and press Next.
If Installing FortiSIEM Supervisor Follower, select 5 Supervisor Follower and press Next.
Note: The appliance type cannot be changed once it is deployed, so ensure you have selected the correct option.

Regardless of whether you select FortiSIEM Manager,Supervisor, Supervisor Follower, Worker, or Collector, you will see the same series of screens with only the header changed to reflect your target installation, unless noted otherwise.
A dedicated ClickHouse Keeper uses a Worker, so first install a Worker and then in later steps configure the Worker as a ClickHouse Keeper.
-
Select the Network Interface you wish to use, and press Next.
Note: If a bond interface is configured, it will appear in the Select Network Interface window.

- If you want to enable FIPS, then choose 2. Otherwise, choose 1. You have the option of enabling FIPS (option 3) or disabling FIPS (option 4) later.
Note: After Installation, a 5th option to change your network configuration (5 change_network_config) is available. This allows you to change your network settings and/or host name.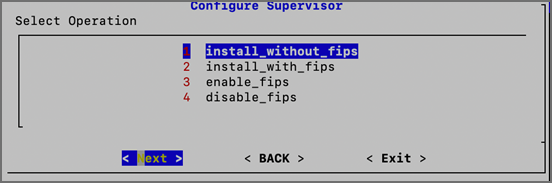
- Determine whether your network supports IPv4-only, IPv6-only, or both IPv4 and IPv6 (Dual Stack). Choose 1 for IPv4-only, choose 2 for IPv6-only, or choose 3 for both IPv4 and IPv6.
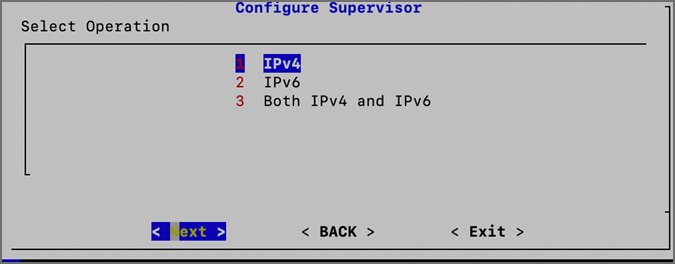
- If you choose 1 (IPv4) or choose 3 (Both IPv4 and IPv6), and press Next, then you will move to step 12. If you choose 2 (IPv6), and press Next, then skip to step 13.
- Configure the network by entering the following fields. Press Next.
Option Description IPv4 Address The Manager/Supervisor/Worker/Collector's IPv4 address NetMask The Manager/Supervisor/Worker/Collector's subnet Gateway Network gateway address DNS1, DNS2 Addresses of the DNS servers 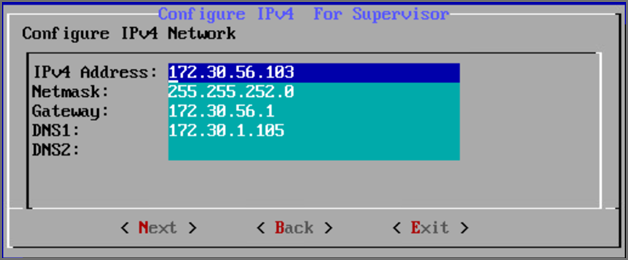
- If you chose 1 in step 10, then you will need to skip to step 14. If you chose 2 or 3 in step 10, then you will configure the IPv6 network by entering the following fields, then press Next.
Option Description IPv6 Address The Manager/Supervisor/Worker/Collector's IPv6 address prefix (Netmask) The Manager/Supervisor/Worker/Collector's IPv6 prefix Gateway ipv6 IPv6 Network gateway address DNS1 IPv6, DNS2 IPv6 Addresses of the IPv6 DNS server 1 and DNS server2 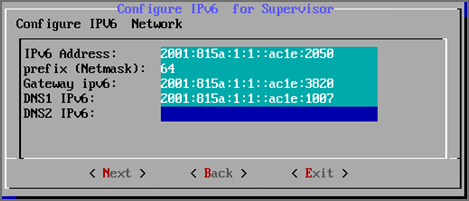
Note: If you chose option 3 in step 10 for both IPv4 and IPv6, then even if you configure 2 DNS servers for IPv4 and IPv6, the system will only use the first DNS server from IPv4 and the first DNS server from the IPv6 configuration.
Note: In many dual stack networks, IPv4 DNS server(s) can resolve names to both IPv4 and IPv6. In such environments, if you do not have an IPv6 DNS server, then you can use public IPv6 DNS servers or use IPv4-mapped IPv6 address. - Configure Hostname for FortiSIEM Manager/Supervisor/Worker/Collector. Press Next.
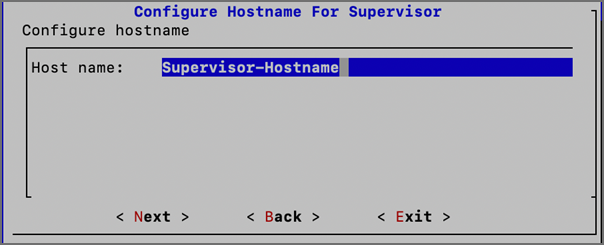
Note: FQDN is no longer needed. - Test network connectivity by entering a host name that can be resolved by your DNS Server (entered in the previous step) and can respond to a ping. The host can either be an internal host or a public domain host like google.com. Press Next.
Note: By default, “google.com” is shown for the connectivity test, but if configuring IPv6, you must enter an accessible internally approved IPv6 DNS server, for example: “ipv6-dns.fortinet.com"
Note: When configuring both IPv4 and IPv6, only testing connectivity for the IPv6 DNS is required because the IPV6 takes higher precedence. So update the host field with an approved IPv6 DNS server.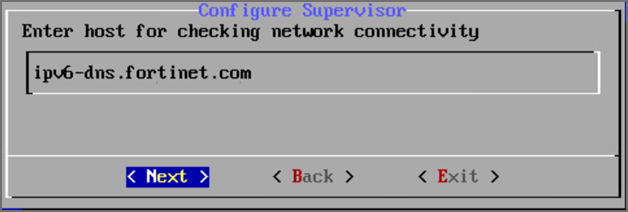
- The final configuration confirmation is displayed.
Verify that the parameters are correct. If they are not, then press Back to return to previous dialog boxes to correct any errors. If everything is OK, then press Run.
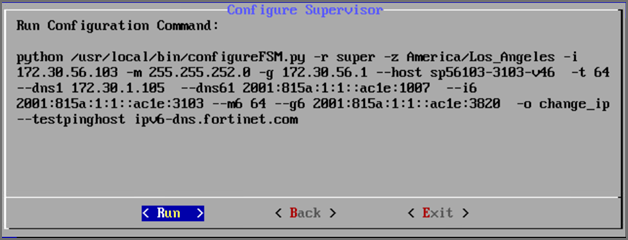
The options are described in the following table.
Option Description -r The FortiSIEM component being configured -z The time zone being configured -i IPv4-formatted address -m Address of the subnet mask -g Address of the gateway server used --host Host name -f FQDN address: fully-qualified domain name -t The IP type. The values can be either 4 (for ipv4) or 6 (for v6) or 64 (for both ipv4 and ipv6). --dns1, --dns2
Addresses of the DNS servers
--i6
IPv6-formatted address
--m6
IPv6 prefix
--g6
IPv6 gateway
-o
Installation option (install_without_fips, install_with_fips, enable_fips, disable_fips, change_network_config*)
*Option only available after installation.-z Time zone. Possible values are US/Pacific, Asia/Shanghai, Europe/London, or Africa/Tunis --testpinghost
The URL used to test connectivity
- It will take some time for this process to finish. When it is done, proceed to Upload the FortiSIEM License. If the VM fails, you can inspect the
ansible.logfile located at/usr/local/fresh-install/logsto try and identify the problem.
Upload the FortiSIEM License
|
|
Before proceeding, make sure that you have obtained valid FortiSIEM license from Forticare. For more information, see the Licensing Guide. |
You will now be asked to input a license.
- Open a Web browser and log in to the FortiSIEM UI. Use link https://<supervisor-ip> to login. Please note that if you are logging into FortiSIEM with an IPv6 address, you should input https://[IPv6 address] on the browser tab.
- The License Upload dialog box will open.

- Click Browse and upload the license file.
Make sure that the Hardware ID shown in the License Upload page matches the license.
- For User ID and Password, choose any Full Admin credentials.
For the first time installation, enter
adminas the user andadmin*1as the password. You will then be asked to create a new password for GUI access. - Choose License type as Enterprise or Service Provider.
This option is available only for a first time installation. Once the database is configured, this option will not be available.
For FortiSIEM Manager, License Type is not an available option, and will not appear. At this point, FortiSIEM Manager installation is complete. You will not be taken the Event Database Storage page, so you can skip Configure an Event Database.
Note: The FortiSIEM Manager license allows a certain number of instances that can be registered to FortiSIEM Manager. - Proceed to Configure an Event Database.
Configure an Event Database
Choose the event database.

If the Event Database is one of the following options, additional disk configuration is required.
-
ClickHouse: See Case 2 in Creating ClickHouse Online Storage.
Recommended for most deployments. Please see ClickHouse Reference Architecture for more information.
-
EventDB on Local Disk: See Case 2 in Creating EventDB Online Storage.
Final Check
FortiSIEM installation is complete. If the installation is successful, the VM will reboot automatically. Otherwise, the VM will stop at the failed task.
You can inspect the ansible.log file located at /usr/local/fresh-install/logs if you encounter any issues during FortiSIEM installation.
After installation completes, ensure that the phMonitor is up and running, for example:
# phstatus
For the Supervisor, Supervisor Follower, Worker and Collector, the response should be similar to the following.

For FortiSIEM Manager, the response should look similar to the following. 
Cluster Installation
For larger installations, you can choose Worker nodes, Collector nodes, and external storage (NFS, ClickHouse, or Elasticsearch).
- Install Supervisor
- Install Workers
- Register Workers
- Create ClickHouse Topology (Optional)
- Install Collectors
- Register Collectors
- Install Manager
- Register Instances to Manager
Install Supervisor
Follow the steps in All-in-one Installation, except with the following differences.
-
Event Database choices are EventDB on NFS, ClickHouse, or Elasticsearch.
-
If you choose EventDB on NFS
-
Disk 5 is not required (See Import FortiSIEM into Oracle Cloud Console Step 20).
-
You need to configure NFS after license upload.

-
-
If you choose ClickHouse
-
You need to create disks during Import FortiSIEM into Oracle Cloud Console Step 20 based on the role of the Supervisor node in the ClickHouse cluster. See the ClickHouse Sizing Guide for details.
-
You need to configure disks after license upload.

-
-
If you choose Elasticsearch, define Elasticsearch endpoints after license upload. See the Elasticsearch Sizing Guide for details.

Install Workers
Once the Supervisor is installed, take the same steps in All-in-one Installation to install a Worker with the following differences.
-
Choose appropriate CPU and memory for the Worker nodes based on Sizing guide.
-
Two hard disks for Operating Systems and FortiSIEM Application:
-
OS – 25GB
-
OPT – 100GB
For OPT - 100GB, the 100GB disk for /opt will consist of a single disk that will split into 2 partitions, /OPT and swap. The partitions will be created and managed by FortiSIEM when
configFSM.shruns.
-
-
If you are running ClickHouse, then create additional data disks based on the role of the Worker in ClickHouse topology. If it is a Keeper node, then a smaller disk is needed. If it is a data node, then a bigger disk is needed based on your EPS and retention policy. See ClickHouse Sizing Guide for details.
Sizing Guide References:
Register Workers
Once the Worker is up and running, add the Worker to the Supervisor node.
- Go to ADMIN > License > Nodes.
-
Select Worker from the Mode drop-down list and enter the following information:
-
In the Host Name field, enter the Worker's host name.
-
In the IP Address field, enter the Worker's IP address.
-
If you are running ClickHouse, then select the number for Storage Tiers from the Storage Tiers drop-down list, and input disk paths for disks in each Tier in the Disk Path fields.
For Disk Path, use one of the following CLI commands to find the disk names.
fdisk -lor
lsblkWhen using
lsblkto find the disk name, please note that the path will be/dev/<disk>. As an example,/dev/sdc. -
Click Test.

-
If the test succeeds, then click Save.
-
-
See ADMIN > Health > Cloud Health to ensure that the Workers are up, healthy, and properly added to the system.

Create ClickHouse Topology (Optional)
If you are running ClickHouse, you need to configure ClickHouse topology by specifying which nodes belong to ClickHouse Keeper and Data Clusters. Follow the steps in Configuring ClickHouse Topology.
Install Collectors
Once Supervisor and Workers are installed, follow the same steps in All-in-one Install to install a Collector except you need to only choose OS and OPT disks. The recommended settings for Collector node are:
- CPU = 4
- Memory = 8GB
- Two hard disks:
- OS – 25GB
- OPT – 100GB
For OPT - 100GB, the 100GB disk for /opt will consist of a single disk that will split into 2 partitions, /OPT and swap. The partitions will be created and managed by FortiSIEM whenconfigFSM.shruns.
Register Collectors
Collectors can be deployed in Enterprise or Service Provider environments.
Enterprise Deployments
For Enterprise deployments, follow these steps.
- Log in to Supervisor with 'Admin' privileges.
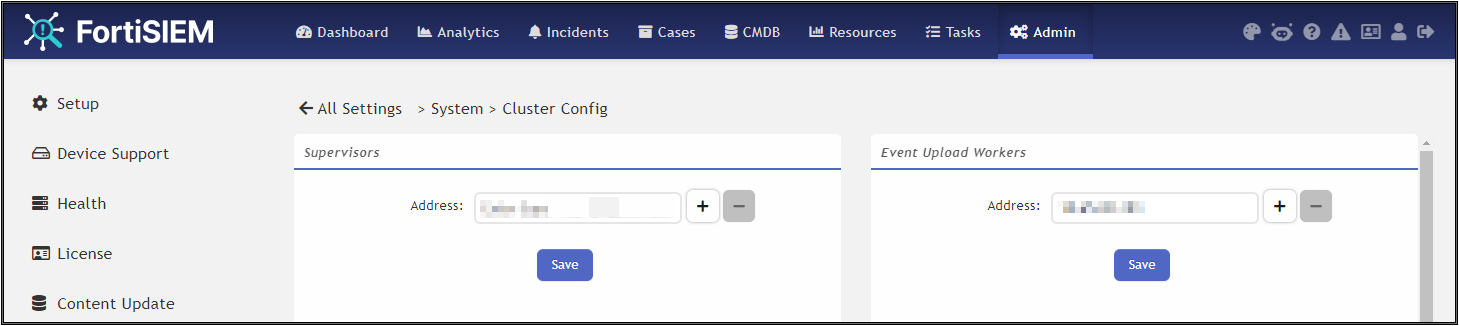
- Go to ADMIN > Settings > System > Event Worker.
- Enter the IP of the Worker node. If a Supervisor node is only used, then enter the IP of the Supervisor node. Multiple IP addresses can be entered on separate lines. In this case, the Collectors will load balance the upload of events to the listed Event Workers.
Note: Rather than using IP addresses, a DNS name is recommended. The reasoning is, should the IP addressing change, it becomes a matter of updating the DNS rather than modifying the Event Worker IP addresses in FortiSIEM. - Click OK.
- Enter the IP of the Worker node. If a Supervisor node is only used, then enter the IP of the Supervisor node. Multiple IP addresses can be entered on separate lines. In this case, the Collectors will load balance the upload of events to the listed Event Workers.
- Go to ADMIN > Setup > Collectors and add a Collector by entering:
- SSH to the Collector and run following script to register Collectors:
phProvisionCollector --add <user> '<password>' <Super IP or Host> <Organization> <CollectorName>The password should be enclosed in single quotes to ensure that any non-alphanumeric characters are escaped.
- Set
userandpasswordusing the admin user name and password for the Supervisor. - Set
Super IP or Hostas the Supervisor's IP address. - Set
Organization. For Enterprise deployments, the default name is Super. - Set
CollectorNamefrom Step 2a.The Collector will reboot during the Registration.
- Set
- Go to ADMIN > Health > Collector Health for the status.

Service Provider Deployments
For Service Provider deployments, follow these steps.
- Log in to Supervisor with 'Admin' privileges.
- Go to ADMIN > Settings > System > Event Worker.
- Enter the IP of the Worker node. If a Supervisor node is only used, then enter the IP of the Supervisor node. Multiple IP addresses can be entered on separate lines. In this case, the Collectors will load balance the upload of events to the listed Event Workers.
Note: Rather than using IP addresses, a DNS name is recommended. The reasoning is, should the IP addressing change, it becomes a matter of updating the DNS rather than modifying the Event Worker IP addresses in FortiSIEM. - Click OK.
- Enter the IP of the Worker node. If a Supervisor node is only used, then enter the IP of the Supervisor node. Multiple IP addresses can be entered on separate lines. In this case, the Collectors will load balance the upload of events to the listed Event Workers.
- Go to ADMIN > Setup > Organizations and click New to add an Organization.
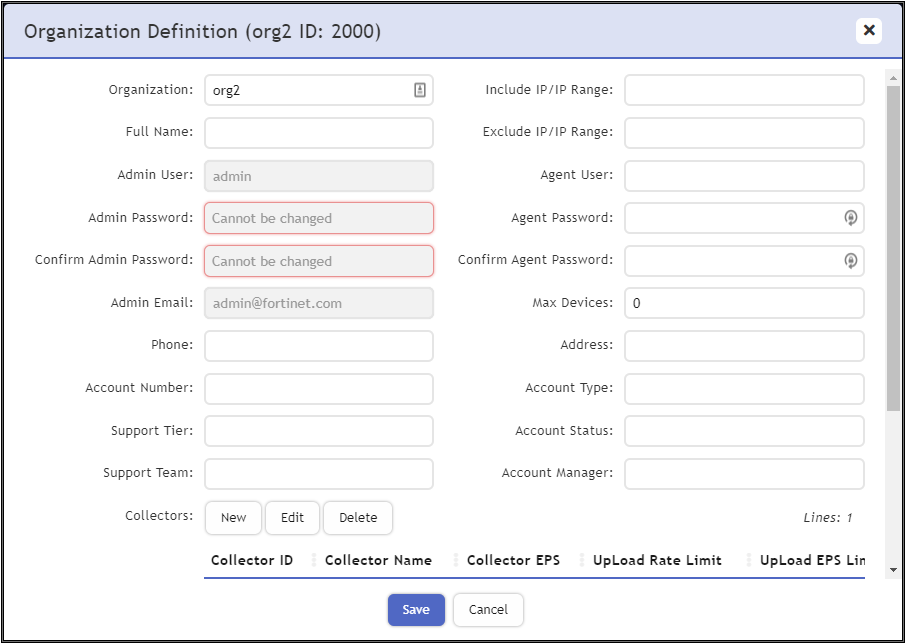
- Enter the Organization Name, Admin User, Admin Password, and Admin Email.
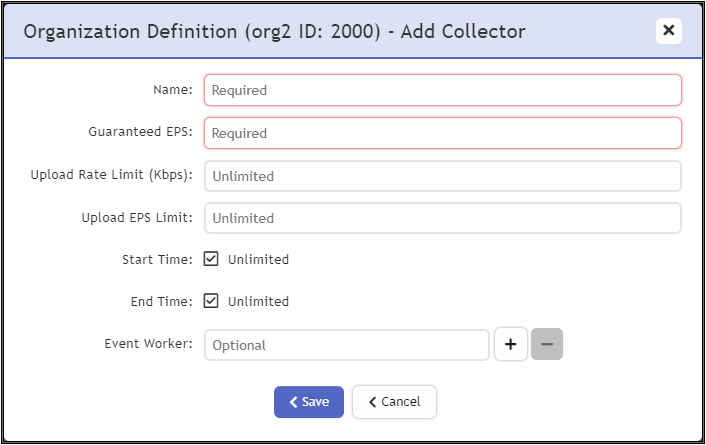
- Under Collectors, click New.
- Enter the Collector Name, Guaranteed EPS, Start Time, and End Time.
The last two values could be set as Unlimited. Guaranteed EPS is the EPS that the Collector will always be able to send. It could send more if there is excess EPS available.
- SSH to the Collector and run following script to register Collectors:
phProvisionCollector --add <user> '<password>' <Super IP or Host> <Organization> <CollectorName>The password should be enclosed in single quotes to ensure that any non-alphanumeric characters are escaped.
- Set
userandpasswordusing the admin user name and password for the Organization that the Collector is going to be registered to. - Set
Super IP or Hostas the Supervisor's IP address. - Set
Organizationas the name of an organization created on the Supervisor. - Set
CollectorNamefrom Step 6.
The Collector will reboot during the Registration.
- Set
- Go to ADMIN > Health > Collector Health and check the status.
Install Manager
Starting with release 6.5.0, you can install FortiSIEM Manager to monitor and manage multiple FortiSIEM instances. An instance includes a Supervisor and optionally, Workers and Collectors. The FortiSIEM Manager needs to be installed on a separate Virtual Machine and requires a separate license. FortiSIEM Supervisors must be on 6.5.0 or later versions.
Follow the steps in All-in-one Install to install Manager. After any Supervisor, Workers, and Collectors are installed, you add the Supervisor instance to Manager, then Register the instance to Manager. See Register Instances to Manager.
Register Instances to Manager
To register your Supervisor instance with Manager, you will need to do two things in the following order.
Note that Communication between FortiSIEM Manager and instances is via REST APIs over HTTP(S).
Adding Instance to Manager
You can add an instance to Manager by taking the following steps.
Note: Make sure to record the FortiSIEM Instance Name, Admin User and Admin Password, as this is needed when you register your instance.
-
Login to FortiSIEM Manager.
-
Navigate to ADMIN > Setup.
-
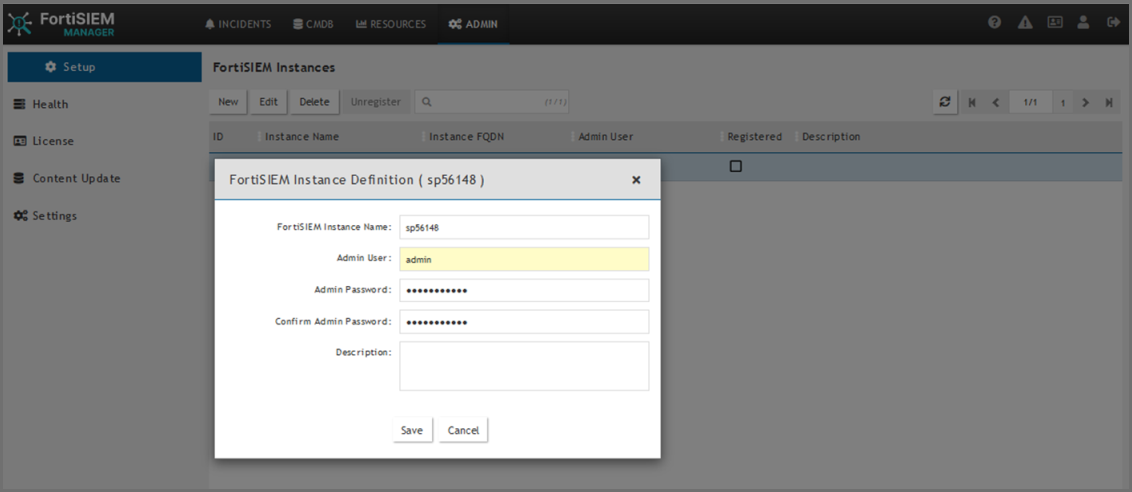
Click New.
-
In the FortiSIEM Instance field, enter the name of the Supervisor instance you wish to add.
-
In the Admin User field, enter the Account name you wish to use to access Manager.
-
In the Admin Password field, enter the Password that will be associated with the Admin User account.
-
In the Confirm Admin Password field, re-enter the Password.
-
(Optional) In the Description field, enter any information you wish to provide about the instance.
-
Click Save.
-
Repeat steps 1-9 to add any additional instances to Manager.
Now, follow the instructions in Register the Instance Itself to Manager for each instance.
Register the Instance Itself to Manager
To register your instance with Manager, take the following steps.
-
From your FortiSIEM Supervisor/Instance, navigate to ADMIN > Setup > FortiSIEM Manager, and take the following steps.
-
In the FortiSIEM Manager FQDN/IP field, enter the FortiSIEM Manager Fully Qualified Domain Name (FQDN) or IP address.
-
If the Supervisor is under a Supervisor Cluster environment, in the FortiSIEM super cluster FQDN/IP field, enter the Supervisor Cluster Fully Qualified Domain Name (FQDN) or IP address.
-
In the FortiSIEM Instance Name field, enter the instance name used when adding the instance to Manager.
-
In the Account field, enter the Admin User name used when adding the instance to Manager.
-
In the Password field, enter your password to be associated with the Admin User name.
-
In the Confirm Password field, re-enter your password.
-
Click Test to verify the configuration.
-
Click Register.
A dialog box displaying "Registered successfully" should appear if everything is valid.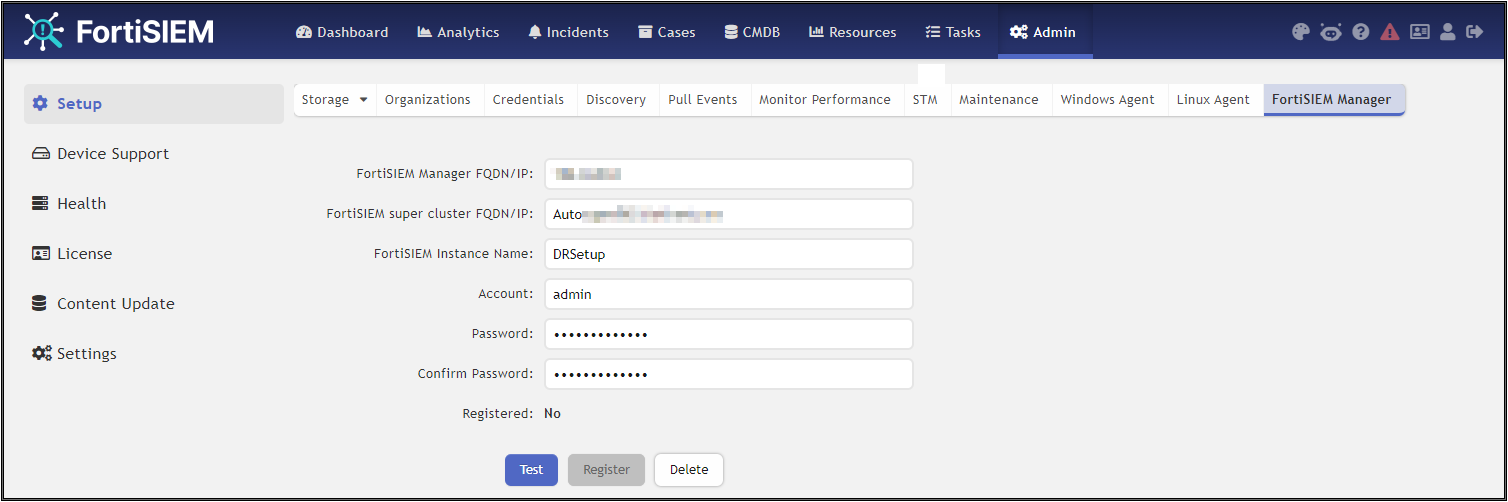
-
Login to Manager, and navigate to any one of the following pages to verify registration.
-
ADMIN > Setup and check that the box is marked in the Registered column for your instance.
-
ADMIN > Health, look for your instance under FortiSIEM Instances.
-
ADMIN > License, look for your instance under FortiSIEM Instances.
-
-
Install Log
The install ansible log file is located here: /usr/local/fresh-install/logs/ansible.log.
Errors can be found at the end of the file.