


Deploy FortiSandbox-VM on GCP
Deploy FortiSandbox-VM with the Deployment Image
Obtaining the deployment image
To obtain the deployment image:
- Log in to FortiCloud.
- In the banner, go to Support > VM Images.
- From the Select Product dropdown list, selectFortiSandbox.
- From the Select Platform dropdown list, select Google.
- Download the deployment package file. The deployment package file is named
“fsa-gcp-vX-buildXXXX-fortinet.tar.gz”, wherevXis the major version number andXXXXis the build number.
|
|
This deployment method only applies for Bring Your Own License (BYOL). |
Uploading the FortiSandbox deployment image to Google Cloud
To upload the FortiSandbox deployment image to Google Cloud:
- Log in to FortiSandbox Cloud.
- Go to Storage > Browser.
- Create a new bucket or go to an existing bucket.
- Click UPLOAD FILES to upload the newly downloaded deployment file.

Creating the FortiSandbox deployment image
To create the FortiSandbox deployment image:
- Go to Compute Engine > Images.

- In the top-right corner of the page, click Activate Cloud Shell .

- On the Cloud Shell interface, enter the command to create the custom image and click Enter.
gcloud compute images create <custom image name> \
--source-uri <The gs-uri of the uploaded original image file> \
--guest-os-features MULTI_IP_SUBNET
Example:
gcloud compute images create fsa-gcp-v400-build0255-fortinet \
--source-uri gs://fortisandbox-image/fsa-gcp-v400-build0255-fortinet.tar.gz \
--guest-os-features MULTI_IP_SUBNET

- Click REFRESH. The new image should be displayed in the IMAGE list. The image is listed on the Images pane.
Deploying the FSA-VM instance
- Go to Compute Engine > VM Instances. Click CREATE INSTANCE.

- Configure the instance:
- In the Name field, enter a name for the instance. From the dropdowns select the Zone and Machine type.

- Under Boot disk, click Change.

- On the Custom images tab, select the newly created image. Change the Boot disk type as required, and enter
10for the Size. Click Select.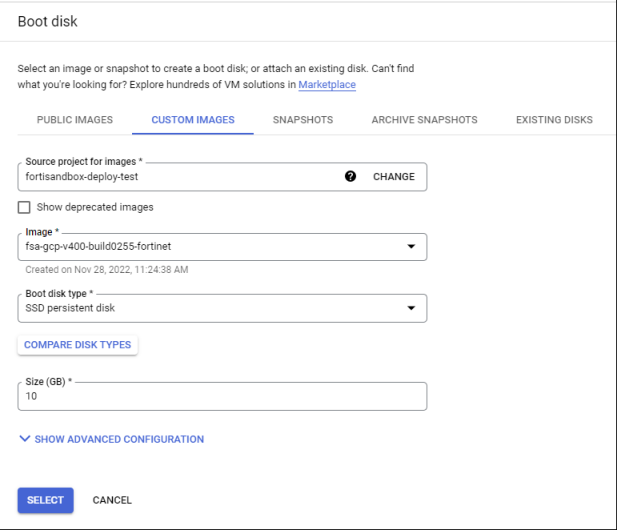
- Ensure the new image is selected.
- Under Firewall Option, select Allow HTTPS traffic.
You will access the FortiSandbox management console using HTTPS. If you allocate multiple network interfaces to the FortiSandbox , please refer to GCP VPC settings. Each network card needs to belong to different VPC.
- Click Advanced options.
- Click Networking. Here you want to specify multiple network interfaces. One is located on the public-facing side of the Internet, the other facing a protected private network.

- Edit the first network interface. We recommend assigning a static IP address. Configure the other items as needed and click Done.

- Click Add network interface to add the second interface for the private subnet. If you click Network you will see the list of preconfigured networks. Choose the network located in the same region you chose to deploy the instance. Under External IP, select None.
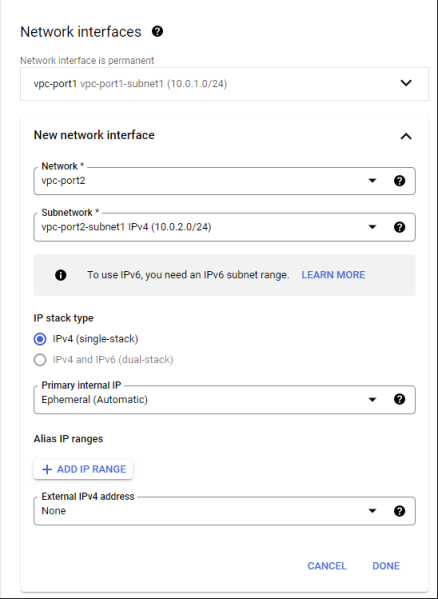

The VPC and Subnetwork used should be set up in advance and given appropriate outbound and inbound firewall policies.
- Under Advanced options, click Disks, and attach a Datadrive disk for the FortiSandbox instance.
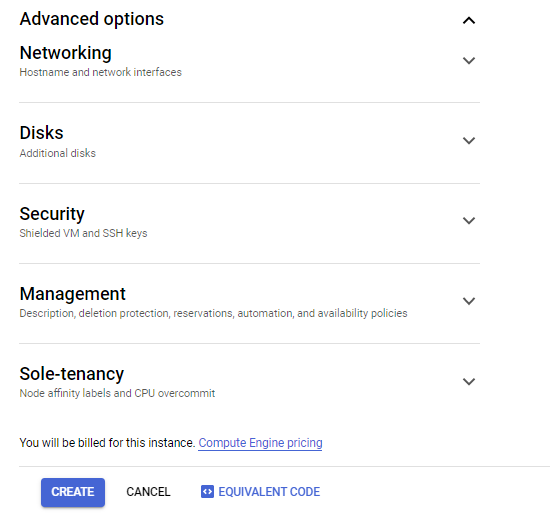
- Click ADD NEW DISK, and select the appropriate Disk Type and Size. The recommended minimum value 80G.

- Click SAVE.
- In the Name field, enter a name for the instance. From the dropdowns select the Zone and Machine type.
- After configuring all elements, click Create.

After several minutes, the instance should be up and running.

Deploy FortiSandbox-VM from Marketplace
Initial deployment of FortiSandbox-VM
To perform the initial deployment of the FortiSandbox-VM:
- Go to Google Cloud Marketplace, and search for FortiSandbox Zero-Day Threat Protection .

- Select either BringYyour-Own-License (BYOL) or Pay-As-You-Go (PAYG )according to your needs.

- Click LAUNCH
- Configure the deployment variables as required:
See Deployment variables for a description of the variables.

- Add more networks and network interfaces as required:
- Under Network interface, click ADD NETWORK INTERFACE.
- From the dropdowns, select the desired Network and Subnetwork, then click DONE.
Note: Google Cloud instances support a maximum of eight interfaces, based on the selected VM type. (The minimum number of FortiSandbox requirements is 2)

- Select the required firewall policy

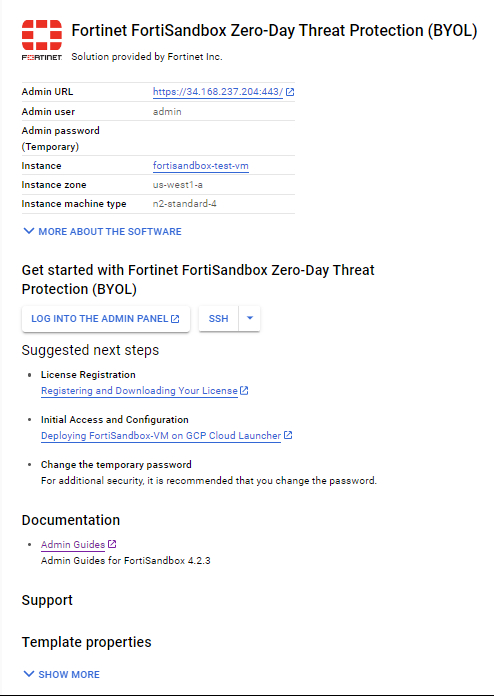
- Click Deploy. When the deployment is done, the following screen appears.
Deployment variables
|
Deployment name |
Enter the FortiSandbox-VM name to appear in the Compute Engine portal. |
|
Zone |
Choose the zone to deploy the FortiSandbox to. |
|
Machine type |
Choose the instance type required. |
|
Boot disk type |
Choose the desired boot disk type. |
|
Boot disk size in GB |
Leave as-is at 10 GB. |
|
Network |
Select the network located in the selected zone. |
|
Subnetwork |
Select the subnetwork where the FortiSandbox resides. |
|
Firewall |
Leave all selected as shown, or allow at least HTTPS if the strictest security is allowed in your network as the first setup. Change firewall settings as needed later on. These are the open ports allowed in Google Cloud to protect incoming access to the FortiSandbox instance over the Internet and are not part of FortiSandbox firewall features. |
|
External IP |
Select Ephemeral. You must access the FortiSandbox GUI via this public IP address. |
|
Enable data disk |
Enable the data disk. |
|
Data disk type |
Select the desired data disk type. |
|
Data disk size in GB |
Select the desired data disk size or leave as-is at 80 GB. |
|
Delete data disk when instance is deleted |
If enabled, the data disk is removed once you delete the FortiSandbox -VM instance. To retain the log disk after FortiSandbox -VM instance deletion, leave this disabled. |
|
Image Version |
Select the FortiSandbox version. The latest version is the default. |