


Deployment
You can deploy FortiGate Cloud using one of the following methods:
After deploying FortiGate Cloud using one of the methods described, complete basic configuration by doing the following:
- Create a firewall policy with logging enabled. Configure log uploading if necessary.
- Log in to FortiGate Cloud using your FortiCloud account.
|
|
For FortiGates that are part of a high availability pair, you must activate FortiGate Cloud on the primary FortiGate. Activate FortiGate Cloud on the primary FortiGate as To deploy a FortiGate/FortiWifi to FortiGate Cloud in the FortiOS GUI: describes. FortiGate Cloud activation on the primary FortiGate activates FortiGate Cloud on the secondary FortiGate. Local FortiGate Cloud activation on the secondary FortiGate fails. |
For a FortiGate with a US-Government license to use the US region service of FortiGate Cloud, you must import the device into your US region FortiGate Cloud account by a cloud/FortiDeploy key or use the CLI login command execute fortiguard-log login <email> <password> US if cloud/FortiDeploy key is unavailable.
FortiGate Cloud supports FortiGates with FIPS-CC mode enabled for Management and Analysis features.
To deploy a FortiGate/FortiWifi to FortiGate Cloud using the FortiCloud key:
- Log in to the FortiGate Cloud portal.
- Do one of the following:
- Click Add FortiGate.
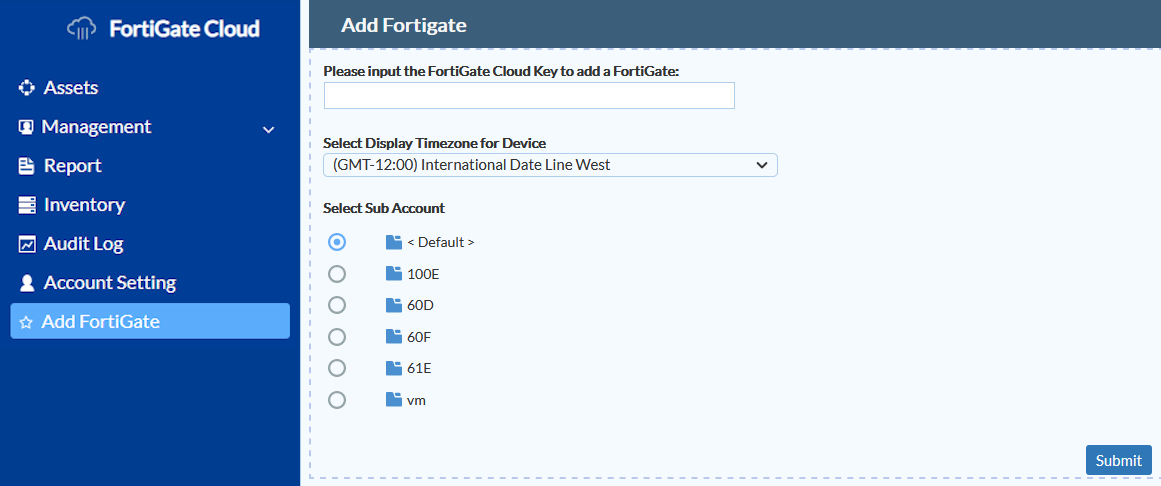
- Go to Inventory, then click Import FortiCloud Key.

- Click Add FortiGate.
- Enter the key printed on your FortiGate.
- From the Select Display Timezone for Device dropdown list, select the desired time zone.
- Under Select Sub Account, select the desired subaccount.
- Click Submit.

After the device successfully deploys, the device key becomes invalid. You can only use the key once to deploy a device.
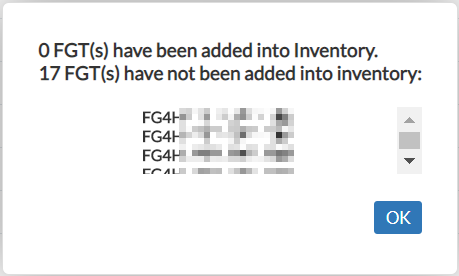
To deploy multiple FortiGate/FortiWifi devices to FortiGate Cloud using a FortiDeploy bulk key:
- Log in to the FortiGate Cloud portal, then click Inventory.
- Click Import Bulk Key.
- In the Please input the Bulk Key: field, enter the FortiDeploy bulk key.
- Click Submit. The portal displays a list of the FortiGate/FortiWifi serial numbers associated with the bulk key. If FortiGate Cloud fails to add any FortiGate/FortiWifi devices, it lists those failed devices' serial numbers.
To deploy a FortiGate/FortiWifi to FortiGate Cloud in the FortiOS GUI:
- In the FortiCloud portal, ensure that you have a product entitlement for FortiGate Cloud for the desired FortiGate or FortiWifi.
- In FortiOS, do one of the following:
- Go to Security Fabric > Settings, and enable Central Management. Click FortiGate Cloud.
- In the Dashboard, in the FortiGate Cloud widget, the Status displays as Not Activated. Click Not Activated.
- Click the Activate button.
- In the Activate FortiGate Cloud panel, for Account, select FortinetOne.
- In the Email and Password fields, enter the email address and password associated with the FortiCloud account.
- Enable Send logs to FortiGate Cloud. Click OK.
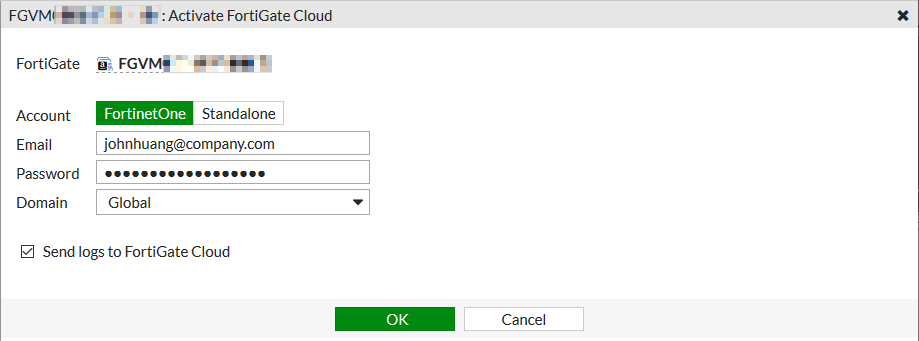
- This automatically enables Cloud Logging. Ensure that Cloud Logging is enabled. If it is disabled, enable it, then set Type to FortiGate Cloud.

- At this point you can access Analysis and SandBox features for this device. To access Management features, you must authorize the FortiGate in FortiGate Cloud by entering the a local superadministrator username and password when prompted. After authorization, you can manage that FortiGate from FortiGate Cloud.
- You must set the central management setting to FortiCloud, as this is the initial requirement for enabling device management features.
To unsubscribe from FortiGate Cloud:
You can disconnect your account from the dashboard in your FortiGate/FortiWifi.
- In the FortiOS Dashboard FortiGate Cloud widget, the Status appears as Activated. Click Activated, then click the Logout button.
- In the confirmation dialog, click OK. This detaches the FortiGate/FortiWifi from the account and stops uploading logs.
To move a FortiGate/FortiWifi deployed to FortiGate Cloud to another account:
To move a FortiGate/FortiWifi that is already deployed to FortiGate Cloud to another account and retain its historical data, you must follow these instructions.
- Log in to the FortiGate Cloud portal using the account that the FortiGate/FortiWifi is currently deployed on.
- Click the Config icon for the desired device.
- Click Migrate Existing Data.
- In the Account ID field of the Migrate Existing Data dialog, enter the desired new account. Click Submit.
- In FortiOS, go to Security Fabric > Settings. Log out of the FortiGate Cloud account that the FortiGate/FortiWifi is currently deployed on.
- Deploy the device to FortiGate Cloud using the new account by following the instructions for To deploy a FortiGate/FortiWifi to FortiGate Cloud in the FortiOS GUI:.
After moving a FortiGate to another FortiGate Cloud account, you must also transfer that FortiGate to the same account in FortiCare.