About the connector
Microsoft Defender for Cloud is a solution for cloud security posture management (CSPM) and cloud workload protection (CWP) that finds weak spots across your cloud configuration, helps strengthen the overall security posture of your environment, and can protect workloads across multicloud and hybrid environments from evolving threat. This connector facilitates the automated operations related to alerts, managing APS, ATP, etc.
This document provides information about the Microsoft Defender For Cloud Connector, which facilitates automated interactions, with a Microsoft Defender For Cloud server using FortiSOAR™ playbooks. Add the Microsoft Defender For Cloud Connector as a step in FortiSOAR™ playbooks and perform automated operations with Microsoft Defender For Cloud.
You can use FortiSOAR™'s Data Ingestion Wizard to easily ingest data into FortiSOAR™ by pulling alerts from Microsoft Defender For Cloud. For more information, see the Data Ingestion Support section.
Version information
Connector Version: 1.1.0
FortiSOAR™ Version Tested on: 7.3.2-2150
Microsoft Defender For Cloud Version Tested on: 2022-01-01
Authored By: Fortinet
Certified: Yes
Getting Access Tokens
You can get authentication tokens to access the Microsoft Defender For Cloud APIs using the "On behalf of the User – Delegate Permission. For more information see, Create an app to access Microsoft 365 Defender APIs on behalf of a user article.
Getting Access Tokens using the On behalf of the User – Delegate Permission method
- Ensure that the required permissions are granted for the registration of the application. Select API Permissions > Add permission > Microsoft APIs > Azure Service Management.
Note: The 'user_impersonation' API Permission should be granted to the registered application.
- The Redirect URL can be directed to any web application in which you want to receive responses from Azure AD. If you are unsure about what to set as a redirect URL, you can use https://localhost/myapp.
- Copy the following URL and replace the
TENANT_ID, CLIENT_ID, and REDIRECT_URI with your own tenant ID, client ID, and redirect URI: https://login.microsoftonline.com/TENANT_ID/oauth2/v2.0/authorize?response_type=code&scope=https://management.azure.com/.default&client_id=CLIENT_ID&redirect_uri=REDIRECT_URI
- Enter the above link with the replaced values and you will be prompted to grant permissions for your Azure Service Management. You will be automatically redirected to a link with the following structure:
REDIRECT_URI?code=AUTH_CODE&session_state=SESSION_STATE
- Enter the following details in the Connector Configuration dialog in your FortiSOAR instance:
- Copy the
AUTH_CODE (without the "code=" prefix) and paste it in the 'Authorization Code' parameter.
- Copy your client ID to the 'Client ID' parameter field.
- Copy your tenant ID to the 'Tenant ID' parameter field.
- Copy your client secret to the 'Client Secret' parameter field.
- Copy your redirect URI to the 'Redirect URI' parameter field. By default, it is set to https://localhost/myapp.
Release Notes for version 1.1.0
Following enhancements have been made to the Microsoft Defender For Cloud Connector in version 1.1.0:
- Added a new action and a new playbook –
Search Alerts
- Added the ability to configure data ingestion (using the Data Ingestion Wizard). The Data Ingestion Wizard also supports multiple configurations specified on the Configurations tab of the Microsoft Defender For Cloud connector, ensuring respective global variables based on the selected configuration are used while ingesting data.
Installing the connector
Use the Content Hub to install the connector. For the detailed procedure to install a connector, click here.
You can also use the yum command as a root user to install the connector:
yum install cyops-connector-microsoft-defender-for-cloud
Prerequisites to configuring the connector
- You must have your Service-based URI to which you will connect and perform the automated operations.
- You must also have the Client ID and the Tenant ID of your Azure application.
- Ensure that host login.microsoftonline.com on port 443 is whitelisted.
Minimum Permissions Required
Configuring the connector
For the procedure to configure a connector, click here
Configuration parameters
In FortiSOAR™, on the Connectors page, click the Microsoft Defender For Cloud connector row (if you are in the Grid view on the Connectors page) and in the Configurations tab enter the required configuration details:
| Parameter |
Description |
| Server URL |
Enter the Service-based URI to which you will connect and perform the automated operations. |
| Directory (tenant) ID |
Enter the ID of the tenant that you have been provided for your Azure Active Directory instance. |
| Application (Client) ID |
Enter the unique ID of the Azure Active Directory application that is used to create an authentication token required to access the API. |
| Application (Client) Secret |
Enter the unique Client Secret of the Azure Active Directory application that is used to create an authentication token required to access the API. |
| Authorization Code |
Enter the authorization code that you acquired during the authorization step. For more information, see the Getting Access Tokens using the On behalf of the user – Delegate Permission method section. |
| Redirect URL |
Enter the redirect_uri of your app, where authentication responses can be sent and received by your app. The redirect URL that you specify here must exactly match one of the redirect_uri's you have registered in your app registration portal |
| Subscription ID |
Enter your Azure Subscription ID for Microsoft Defender For Cloud. |
| Verify SSL |
Specifies whether the SSL certificate for the server is to be verified or not.
By default, this option is set as True. |
Actions supported by the connector
The following automated operations can be included in playbooks and you can also use the annotations to access operations from FortiSOAR™:
| Function |
Description |
Annotation and Category |
| Get Alert List |
Retrieves the list of all the alerts or specific alerts that are associated with the specified subscription, resource groups that are stored in a specific location, and other input parameters you have specified. |
get_alert_list
Investigation |
| Update Alert |
Updates the state of the specific alert based on the alert name, Azure Security Center (ASC) location, and other input parameters you have specified. |
update_alert
Investigation |
| Get APS |
Retrieves details of a specific Auto Provisioning Setting (APS) based on the setting name you have specified. |
get_aps
Investigation |
| Update APS |
Updates a specific APS based on the settings name and auto provisioning setting you have specified. |
update_aps
Investigation |
| Get ATP |
Retrieves the ATP (Advanced Threat Protection) setting details for the specified resource based on the resource ID and other input parameters you have specified. |
get_atp
Investigation |
| Update ATP |
Updates ATP setting details based on the resource group name, storage account, and other input parameters you have specified. |
update_atp
Investigation |
| Get APS List |
Retrieves a list of all the auto-provisioning settings for the specified subscription. |
get_aps_list
Investigation |
| Get Secure Score |
Retrieves the secure score for a specific Microsoft Defender for Cloud initiative within your current scope. To get the secure score for the ASC 'Default' initiative, use 'ascScore'. |
get_secure_score
Investigation |
| Get Locations List |
Retrieves the location of the responsible Azure Security Center (ASC) for the specific subscription (home region). For each subscription, there is only one responsible location. The location in the response should be used to read or write other resources in ASC according to their ID. |
get_locations_list
Investigation |
| Get Storage List |
Retrieves a list of all the storage accounts available under the subscription. |
get_storage_list
Investigation |
| Get JIT List |
Retrieves the list of all policies or specific policies used to protect resources using Just-in-Time access control based on the resource group name, ASC location, and other input parameters you have specified. |
get_jit_list
Investigation |
| Get Subscriptions List |
Retrieves the list of all subscriptions for a given tenant. |
get_subscriptions_list
Investigation |
| Search Alerts |
Retrieves the list of alerts or specific alerts that are associated with the specified subscription, resource groups that are stored in a specific location, and other input parameters you have specified. Note: This action uses 2019-01-01 API Version |
search_alerts
Investigation |
operation: Get Alert List
Input parameters
| Parameter |
Description |
| Resource Group Name |
Specify the name of the resource group within the user's subscription for which you want to retrieve the alerts.
NOTE: The name is not case-sensitive. |
| ASC Location |
Specify the location where Azure Security Center (ASC) stores the subscription data. You can retrieve the Azure Security Center (ASC) locations using the Get Locations List operation. |
Output
The output contains the following populated JSON schema:
{
"value": [
{
"id": "",
"name": "",
"type": "",
"properties": {
"version": "",
"alertType": "",
"systemAlertId": "",
"productComponentName": "",
"alertDisplayName": "",
"description": "",
"severity": "",
"intent": "",
"startTimeUtc": "",
"endTimeUtc": "",
"resourceIdentifiers": [
{
"azureResourceId": "",
"type": ""
},
{
"workspaceId": "",
"workspaceSubscriptionId": "",
"workspaceResourceGroup": "",
"agentId": "",
"type": ""
}
],
"remediationSteps": [],
"vendorName": "",
"status": "",
"extendedLinks": [
{
"Category": "",
"Label": "",
"Href": "",
"Type": ""
}
],
"alertUri": "",
"timeGeneratedUtc": "",
"productName": "",
"processingEndTimeUtc": "",
"entities": [
{
"address": "",
"location": {
"countryCode": "",
"state": "",
"city": "",
"longitude": "",
"latitude": "",
"asn": ""
},
"type": ""
}
],
"isIncident": "",
"correlationKey": "",
"extendedProperties": {
"Property1": ""
},
"compromisedEntity": "",
"techniques": [],
"subTechniques": [],
"supportingEvidence": {
"type": "",
"title": "",
"columns": [],
"rows": [
[]
]
}
}
}
]
}
operation: Update Alert
Input parameters
| Parameter |
Description |
| Alert Name |
Specify the name of the alert object for which to update the status. For example - 2517300056433270383_103cc5be-e568-47f6-8781-6cef0a477f0a |
| Change State To |
Select the state that you want to assign to the specified alert. You can choose from the following options:
- Activate
- Dismiss
- In Progress
- Resolve
|
| ASC Location |
Specify the location where Azure Security Center (ASC) stores the subscription data. You can retrieve the Azure Security Center (ASC) locations using the Get Locations List operation. |
| Resource Group Name |
Specify the name of the resource group within the user's subscription.
NOTE: The name is not case-sensitive. |
Output
The output contains a non-dictionary value.
operation: Get APS
Input parameters
| Parameter |
Description |
| Setting Name |
Specify the name of the auto-provisioning setting (APS) whose details you want to retrieve. |
Output
The output contains the following populated JSON schema:
{
"id": "",
"name": "",
"type": "",
"properties": {
"autoProvision": ""
}
}
operation: Update APS
Input parameters
| Parameter |
Description |
| Setting Name |
Specify the name of the auto-provisioning setting (APS) that you want to update. By default, the key (name) is set to default. |
| Auto Provision |
Describes the kind of security agent provisioning action to take.
- On: Install missing security agents on VMs automatically.
- Off: Do not install a security agent on the VMs automatically.
|
Output
The output contains the following populated JSON schema:
{
"id": "",
"name": "",
"type": "",
"properties": {
"autoProvision": ""
}
}
operation: Get ATP
Input parameters
| Parameter |
Description |
| Resource Id |
Specify the identifier of the resource for which you want to retrieve Advanced Threat Protection (ATP) setting details. |
| Setting Name |
Specify the ATP setting name whose details you want to retrieve. By default, the name of the setting is set to current. |
Output
The output contains the following populated JSON schema:
{
"id": "",
"name": "",
"type": "",
"properties": {
"isEnabled": ""
}
}
operation: Update ATP
Input parameters
| Parameter |
Description |
| Resource Group Name |
Specify the name of the resource group within the user's subscription for which you want to retrieve the alerts.
NOTE: The name is not case-sensitive. |
| Storage Account |
Specify the name of the storage in your Azure account where you want to update the ATP settings details. |
| Is Enabled |
Select True to enable Advanced Threat Protection and False to disable ATP. |
| Setting Name |
Specify the Advanced Threat Protection setting name for which you want to update the ATP, the default setting name is current. |
Output
The output contains the following populated JSON schema:
{
"id": "",
"name": "",
"type": "",
"properties": {
"isEnabled": ""
}
}
operation: Get APS List
Input parameters
None.
Output
The output contains the following populated JSON schema:
{
"value": [
{
"id": "",
"name": "",
"type": "",
"properties": {
"autoProvision": ""
}
}
]
}
operation: Get Secure Score
Input parameters
| Parameter |
Description |
| Secure Score Name |
Specify the score name (initiative name) to retrieve the secure score. For the ASC Default initiative, use ascScore. |
Output
The output contains the following populated JSON schema:
{
"id": "",
"name": "",
"type": "",
"properties": {
"displayName": "",
"score": {
"max": "",
"current": "",
"percentage": ""
},
"weight": ""
}
}
operation: Get Locations List
Input parameters
None.
Output
The output contains the following populated JSON schema:
{
"value": [
{
"id": "",
"name": "",
"type": "",
"properties": {
"homeRegionName": ""
}
}
]
}
operation: Get Storage List
Input parameters
None.
Output
The output contains the following populated JSON schema:
{
"value": [
{
"id": "",
"kind": "",
"location": "",
"name": "",
"properties": {
"isHnsEnabled": "",
"creationTime": "",
"primaryEndpoints": {
"web": "",
"dfs": "",
"blob": "",
"file": "",
"queue": "",
"table": "",
"microsoftEndpoints": {
"web": "",
"dfs": "",
"blob": "",
"file": "",
"queue": "",
"table": ""
},
"internetEndpoints": {
"web": "",
"dfs": "",
"blob": "",
"file": ""
}
},
"primaryLocation": "",
"provisioningState": "",
"routingPreference": {
"routingChoice": "",
"publishMicrosoftEndpoints": "",
"publishInternetEndpoints": ""
},
"encryption": {
"services": {
"file": {
"keyType": "",
"enabled": "",
"lastEnabledTime": ""
},
"blob": {
"keyType": "",
"enabled": "",
"lastEnabledTime": ""
}
},
"keySource": ""
},
"secondaryLocation": "",
"statusOfPrimary": "",
"statusOfSecondary": "",
"supportsHttpsTrafficOnly": ""
},
"sku": {
"name": "",
"tier": ""
},
"tags": {
"key1": ""
},
"type": ""
}
]
}
operation: Get JIT List
Input parameters
| Parameter |
Description |
| Resource Group Name |
Specify the name of the resource group within the user's subscription for which you want to retrieve the alerts.
NOTE: The name is not case-sensitive. |
| ASC Location |
Specify the location where Azure Security Center (ASC) stores the subscription data. You can retrieve the Azure Security Center (ASC) locations using the Get Locations List operation. |
Output
The output contains the following populated JSON schema:
{
"value": [
{
"kind": "",
"properties": {
"virtualMachines": [
{
"id": "",
"ports": [
{
"number": "",
"protocol": "",
"allowedSourceAddressPrefix": "",
"maxRequestAccessDuration": ""
}
]
}
],
"requests": [
{
"virtualMachines": [
{
"id": "",
"ports": [
{
"number": "",
"allowedSourceAddressPrefix": "",
"endTimeUtc": "",
"status": "",
"statusReason": ""
}
]
}
],
"startTimeUtc": "",
"requestor": "",
"justification": ""
}
],
"provisioningState": ""
},
"id": "",
"name": "",
"type": "",
"location": ""
}
]
}
operation: Get Subscriptions List
Input parameters
None.
Output
The output contains the following populated JSON schema:
{
"value": [
{
"id": "",
"subscriptionId": "",
"tenantId": "",
"displayName": "",
"state": "",
"subscriptionPolicies": {
"locationPlacementId": "",
"quotaId": "",
"spendingLimit": ""
},
"authorizationSource": "",
"managedByTenants": [
{
"tenantId": ""
}
],
"tags": {
"tagKey1": ""
}
}
],
"nextLink": ""
}
operation: Search Alerts
Input parameters
| Parameter |
Description |
| Resource Group Name |
Specify the name of the resource group within the user's subscription for which you want to retrieve the alerts.
NOTE: The name is not case-sensitive. |
| ASC Location |
Specify the location where Azure Security Center (ASC) stores the subscription data. You can retrieve the Azure Security Center (ASC) locations using the Get Locations List operation. |
| Reported Severity |
Specify the Reported Severity based on which you want to filter the alerts. You can choose from following options:
|
| State |
Specify the state of alerts based on which you want to filter the alerts. You can choose from Active or Dismissed |
| Detected After |
Specify the time to retrieve the alerts whose detectedTimeUtc value is equal to or later than this time. |
Output
The output contains the following populated JSON schema:
{
"value": [
{
"id": "",
"name": "",
"type": "",
"properties": {
"systemSource": "",
"vendorName": "",
"alertDisplayName": "",
"alertName": "",
"detectedTimeUtc": "",
"description": "",
"remediationSteps": "",
"actionTaken": "",
"reportedSeverity": "",
"compromisedEntity": "",
"associatedResource": "",
"subscriptionId": "",
"instanceId": "",
"extendedProperties": {
"compromised Host": "",
"user Name": "",
"suspicious Process": "",
"suspicious Command Line": "",
"suspicious Process Id": "",
"resourceType": "",
"killChainIntent": ""
},
"state": "",
"reportedTimeUtc": "",
"workspaceArmId": "",
"confidenceReasons": [],
"canBeInvestigated": "",
"isIncident": "",
"entities": [
{
"$id": "",
"hostName": "",
"netBiosName": "",
"azureID": "",
"omsAgentID": "",
"osFamily": "",
"osVersion": "",
"type": ""
}
]
}
}
]
}
Included playbooks
The Sample - Microsoft Defender for Cloud - 1.1.0 playbook collection comes bundled with the Microsoft Defender For Cloud connector. These playbooks contain steps using which you can perform all supported actions. You can see bundled playbooks in the Automation > Playbooks section in FortiSOARTM after importing the Microsoft Defender For Cloud connector.
- > Microsoft Defender for Cloud > Fetch and Create
- Get APS
- Get APS List
- Get ATP
- Get Alert List
- Get JIT List
- Get Locations List
- Get Secure Score
- Get Storage List
- Get Subscriptions List
- MicrosoftDefenderForCloud > Ingest
- Search Alerts
- Update APS
- Update ATP
- Update Alert
Note: If you are planning to use any of the sample playbooks in your environment, ensure that you clone those playbooks and move them to a different collection since the sample playbook collection gets deleted during connector upgrade and delete.
Data Ingestion Support
Use the Data Ingestion Wizard to easily ingest data into FortiSOAR™ by pulling alerts from Microsoft Defender For Clouds. Currently, "alerts" in Microsoft Defender For Cloud are mapped to "alerts" in FortiSOAR™. For more information on the Data Ingestion Wizard, see the "Connectors Guide" in the FortiSOAR™ product documentation.
Configure Data Ingestion
You can configure data ingestion using the Data Ingestion Wizard to seamlessly map the incoming Microsoft Defender For Cloud alerts to FortiSOAR™ alerts.
The Data Ingestion Wizard enables you to configure scheduled pulling of data from Microsoft Defender For Cloud into FortiSOAR™. It also lets you pull some sample data from Microsoft Defender For Cloud using which you can define the mapping of data between Microsoft Defender For Cloud and FortiSOAR™. The mapping of common fields is generally already done by the Data Ingestion Wizard; users mostly require to only map any custom fields that are added to the Microsoft Defender For Cloud alerts.
- To begin configuring data ingestion, click Configure Data Ingestion on the Microsoft Defender For Cloud connector's Configurations page.
Click Let's Start by fetching some data, to open the Fetch Sample Data screen.
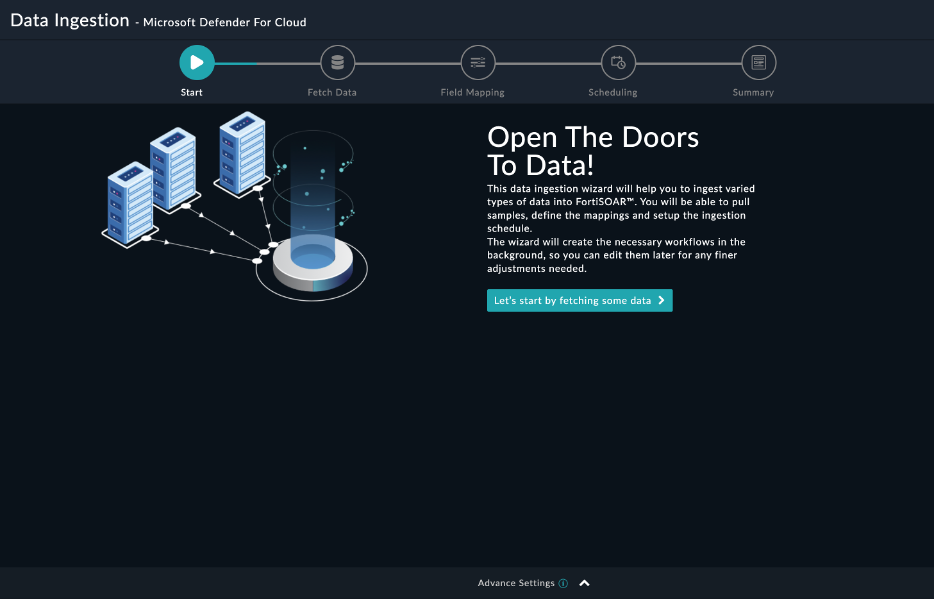
Sample data is required to create a field mapping between Microsoft Defender For Cloud data and FortiSOAR™. The sample data is pulled from connector actions or ingestion playbooks.
- On the Fetch Data screen, provide the configurations required to fetch alerts from Microsoft Defender For Cloud. You can specify the pull alerts created in past
X minutes. The fetched data is used to create a mapping between the Microsoft Defender For Cloud data and FortiSOAR™ alerts.
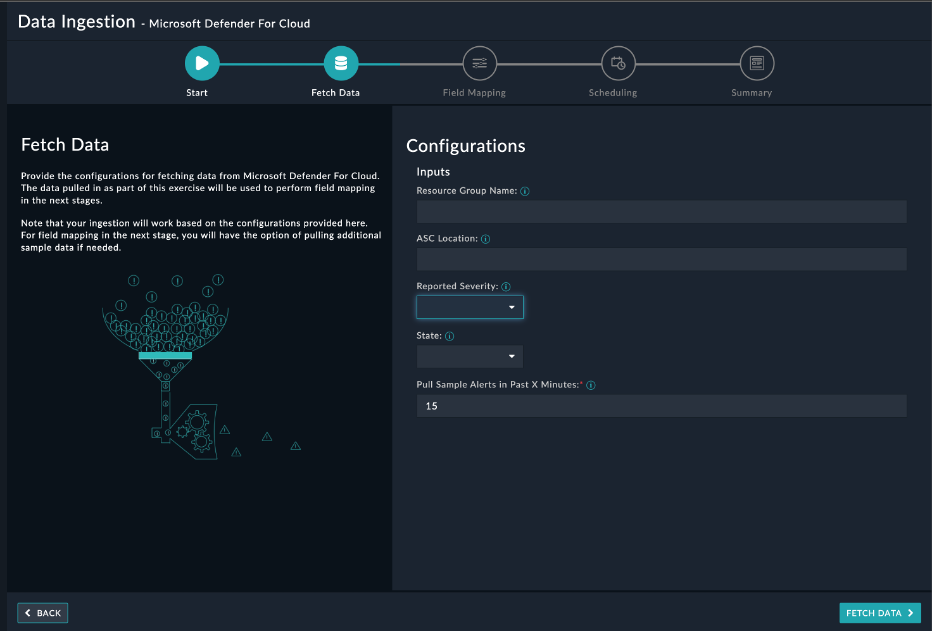
Once you have completed specifying the configurations, click Fetch Data.
-
On the Field Mapping screen, map the fields of the Microsoft Defender For Cloud alert to that of Microsoft Defender For Cloud present in FortiSOAR™. To map a field, click the key in the sample data to add the jinja value of the field. For example, to map the alertDisplayName parameter in properties field of a Microsoft Defender For Cloud alert to the Name parameter of a FortiSOAR™ alert, click the Severity field and then click the alert Severity field to populate its keys:
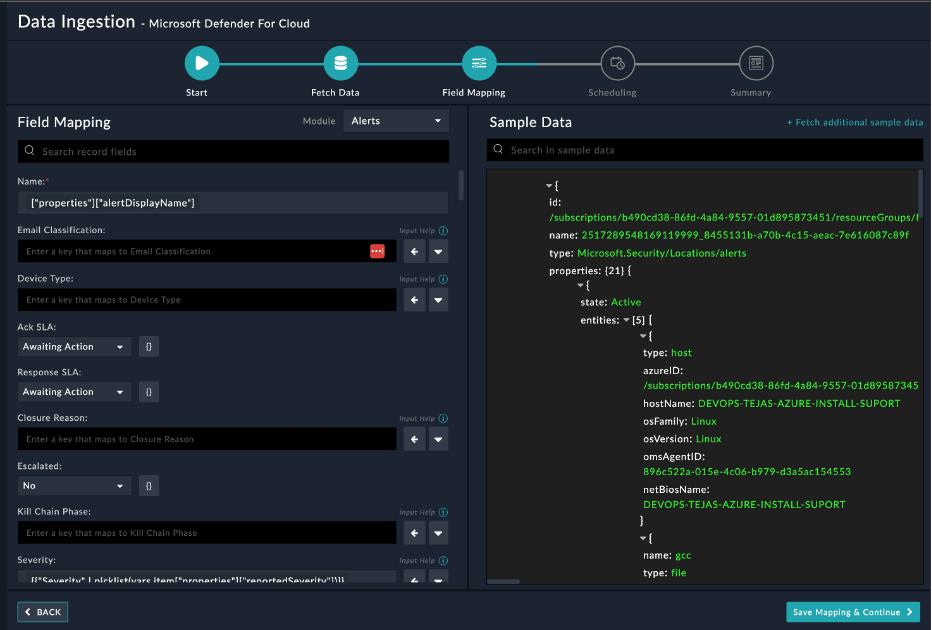
For more information on field mapping, see the Data Ingestion chapter in the Connectors Guide in the FortiSOAR™ product documentation. Once you have completed mapping fields, click Save Mapping & Continue.
-
(Optional) Use the Scheduling screen to configure schedule-based ingestion, i.e., specify the pulling frequency to Microsoft Defender For Cloud, so that the content gets pulled from the Microsoft Defender For Cloud integration into FortiSOAR™.
In the Configure Schedule Settings section, specify the Cron expression for the schedule. For example, if you want to pull data from Microsoft Defender For Cloud every 5 minutes, click Every X Minute and in the minute box enter */5. This would mean that based on the configuration you have set up, data, i.e., alerts will be pulled from Microsoft Defender For Cloud every 5 minutes.
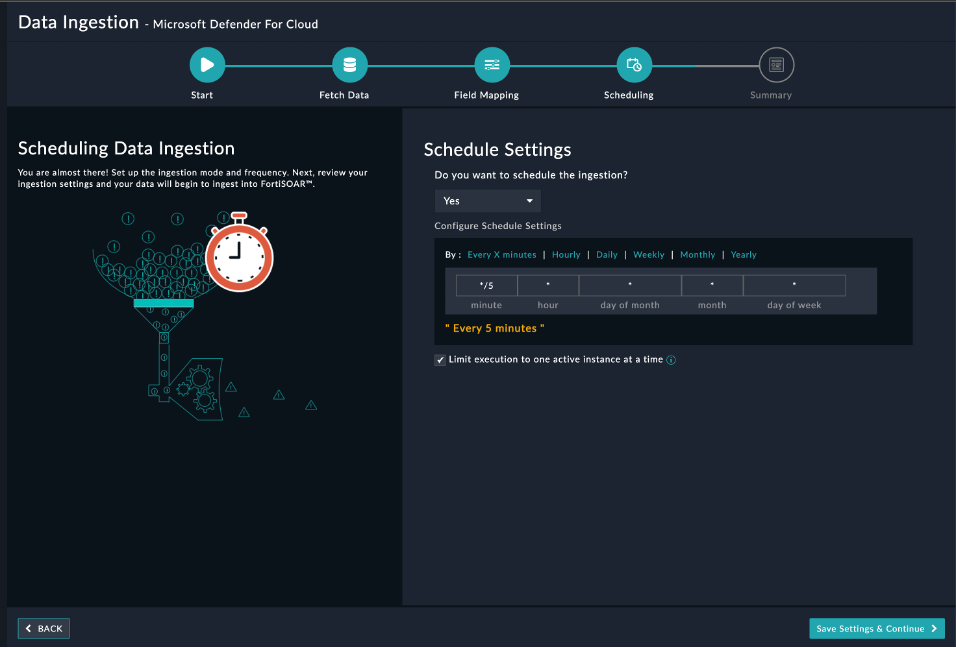
Once you have completed scheduling, click Save Settings & Continue.
-
The Summary screen displays a summary of the mapping done, and it also contains links to the Ingestion playbooks. Click Done to complete the data ingestion and exit the Data Ingestion Wizard.


