Defining your proxies, clients, & X-headers
In some topologies, you must configure FortiWeb’s use of X-headers such as X-Forwarded-For:, X-Real-IP:, or True-Client-IP:, including when:
- FortiWeb has been deployed behind a proxy/load balancer which applies NAT. Connection-wise, this causes all requests appear to come from the IP address of the proxy or load balancer, not the original client. FortiWeb requires the true client’s source IP so that when blocking attacks, it does not block the proxy/load balancer’s IP, affecting innocent requests. FortiWeb also requires some way to derive the original client’s IP so that attack logs and reports to show the IP of the actual attacker, rather than misleadingly blaming the load balancer.
- The web server needs the client’s source IP address for purposes such as analytics, but FortiWeb is operating in Reverse Proxy mode, which applies NAT, and therefore all requests appear to come from FortiWeb’s IP address.
Due to source NAT (SNAT), a packet’s source address in its IP layer may have been changed, and therefore the original address of the client may not be directly visible to FortiWeb and/or its protected web servers. During a packet’s transit from the client to the web server, it could be changed several times: web proxies, load balancers, routers, and firewalls can all apply NAT.
Depending on whether the NAT devices are HTTP-aware, the NAT device can record the packet’s original source IP address in the HTTP headers. HTTP X-headers such as X-Real-IP: can be used by FortiWeb instead to trace the original source IP (and each source IP address along the path) in request packets. They may also be used by back-end web servers for client analysis.
Affects of source NAT at the IP and HTTP layers of request packets when in-between devices are HTTP-aware

Indicating the original client’s IP to back-end web servers
Some web applications need to know the IP address of the client where the request originated in order to log or analyze it.
For example, if your web applications need to display different available products for clients in Canada instead of the United States, your web applications may need to analyze the original client’s IP for a corresponding geographic location.
In that case, you would enable FortiWeb to add or append to an X-Forwarded-For: or X-Real-IP: header. Otherwise, from the web server’s perspective, all IP sessions appear to be coming from FortiWeb—not from the original requester. The back-end web server would not be able to guess what the original client’s public IP was, and therefore would not be able to analyze it. When these options are enabled, the web server can instead use this HTTP-layer header to find the public source IP and path of the IP-layer session from the original client.
To configure FortiWeb to add the packet’s source IP to X-Forwarded-For: and/or X-Real-IP:
- Go to Server Objects > X-Forwarded-For.
- Configure these settings:
- Click OK.
- To apply the X-header rule, select it when configuring an inline protection profile. For details, see Configuring a protection profile for inline topologies.
| Name |
Type a unique name that can be referenced in other parts of the configuration. The maximum length is 63 characters. Note: The name cannot be changed after this part of the configuration is saved. To rename a part of the configuration, clone it, select it in all parts of the configuration that reference the old name, then delete the item with the old name. |
| Add X-Forwarded-For: |
Enable to include the If the HTTP client or web proxy does not provide the header, FortiWeb adds it, using the source IP address of the connection. If the HTTP client or web proxy already provides the header, it appends the source IP address to the header's list of IP addresses. This option can be useful if your web servers log or analyze clients’ public IP addresses, if they support the This option applies only when FortiWeb is operating in Reverse Proxy mode or True Transparent Proxy mode, which applies source network address translation (NAT) and therefore rewrites the source address in the IP layer. |
|
Add Source Port: |
Enable to add an |
|
Add X-Forwarded-Port: |
Enable to add an Available only when FortiWeb operates in Reverse Proxy, True Transparent Proxy, or WCCP mode. |
| Add X-Real-IP: |
Enable to include the Like This option applies only when FortiWeb is operating in Reverse Proxy mode or True Transparent Proxy mode, which applies source network address translation (NAT) and therefore rewrites the source address in the IP layer. Note: This does not support IPv6. |
See also
Indicating to back-end web servers that the client’s request was HTTPS
Usually if your FortiWeb is receiving HTTPS requests from clients, and it is operating in Reverse Proxy mode, SSL/TLS is being offloaded. FortiWeb has terminated the SSL/TLS connection and the second segment of the request, where it forwards to the back-end servers, is clear text HTTP. In some cases, your back-end server may need to know that the original request was, in fact, encrypted HTTPS, not HTTP.
To add an HTTP header that indicates the service used in the client’s original request, go to Server Objects > X-Forwarded-For and enable X-Forwarded-Proto:.
See also
Blocking the attacker’s IP, not your load balancer
When you configure Use X-Header to Identify Original Client’s IP, FortiWeb compensates for NAT in your data center by using an HTTP header to derive the client’s IP address. In this way, even if the connection is not established directly between the web browser and FortiWeb, but instead is relayed, with the last segment established between your proxy/load balancer’s IP and FortiWeb, FortiWeb will still be able to report and block the actual attacker, rather than your own infrastructure.
Only public IPs will be used. If the original client’s IP is a private network IP (e.g. 192.168.*, 172.16.*, 10.*), FortiWeb will instead use the first public IP before or after the original client’s IP in the HTTP header line. Whether this is counted from the left or right end of the header line depends on IP Location in X-Header. In most cases, this public IP will be the client’s Internet gateway, and therefore blocking based on this IP may affect innocent clients that share the attacker’s Internet connection. For details, seeShared IP.
To limit the performance impact, FortiWeb will analyze the HTTP header for the client’s IP only for the first request in the TCP/IP connection. As a result, it is not suitable for use behind load balancers that multiplex—that is, attempt to reduce total simultaneous TCP/IP connections by sending multiple, unrelated HTTP requests from different clients within the same TCP/IP connection. Symptoms of this misconfiguration include FortiWeb mistakenly attributing subsequent requests within the same TCP/IP connection to the IP found in the first request’s HTTP header, even though the X-header indicates that the request originated from a different client.
After FortiWeb has traced the original source IP of the client, FortiWeb will use it in attack logs and reports so that they reflect the true origin of the attack, not your load balancer or proxy. FortiWeb will also use the original source IP as the basis for blocking when using some features that operate on the source IP:
- DoS prevention
- brute force login prevention
- period block
|
|
Like addresses at the IP layer, attackers can spoof and alter addresses in the HTTP layer. Do not assume that they are 100% accurate, unless there are anti-spoofing measures in place such as defining trusted providers of X-headers. |
For example, on FortiWeb, if you provide the IP address of the proxy or load balancer, when blocking requests and writing attack log messages or building reports, instead of using the SRC field in the IP layer of traffic as the client’s IP address (which would cause all attacks to appear to originate from the load balancer), FortiWeb can instead find the client’s real IP address in the X-Forwarded-For: HTTP header. FortiWeb could also add its own IP address to the chain in X-Forwarded-For:, helping back-end web servers that require the original client’s source IP for purposes such as server-side analytics—providing news in the client’s first language or ads relevant to their city, for example.
Like IP-layer NAT, some networks also translate addresses at the HTTP layer. In those cases, enabling Use X-Header to Identify Original Client’s IP may have no effect. To determine the name of your network’s X-headers, if any, and to see whether or not they are translated, use diagnose network sniffer in the CLI or external packet capture software such as Wireshark.
To configure FortiWeb to obtain the packet’s original source IP address from an HTTP header
- Go to Server Objects > X-Forwarded-For.
- Configure these settings:
- Click OK to save the configuration.
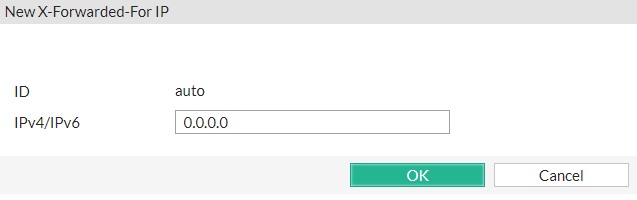
- Click Create New.
- In New X-Forwarded-For IP, type the IP address of the external proxy or load balancer according to packets’
SRCfield in the IP layer when received by FortiWeb. - Click OK.
- To apply the X-header rule, select it when configuring an inline protection profile. For details, see Configuring a protection profile for inline topologies.
| Use X-Header to Identify Original Client’s IP |
If FortiWeb is deployed behind a device that applies NAT, enable this option to derive the original client’s source IP address from an HTTP X-header, instead of the This HTTP header is often For deployment guidelines and mechanism details, see Blocking the attacker’s IP, not your load balancer. Caution: To combat forgery, configure the IP addresses of load balancers and proxies that are trusted providers of this header. Also configure those proxies/load balancers to reject fraudulent headers, rather than passing them to FortiWeb. |
| IP Location in X-Header |
Select whether to extract the original client’s IP from either the left or right end of the HTTP X-header line. Most proxies put the request’s origin at the left end, which is the default setting. Some proxies, however, place it on the right end. |
| Block Using Original Client’s IP |
Enable to be able to block requests that violate your policies by using the original client’s IP derived from this HTTP X-header. When disabled, attack logs and reports will not use the original client’s IP. |
|
Block Using Full Scan |
Enable to scan all the IP addresses listed in the X-Forwarded-For header against IP reputation. This is to prevent special crafted X-Forwarded-For headers being used to bypass security rules. Available only when Block Using Original Client’s IP is enabled. |
To apply anti-spoofing measures and improve security, FortiWeb will only trust the HTTP header contents of the IPs that you specified in Trusted X-Header Sources table.
|
|
The following configuration is optional. If you do not specify IPs in Trusted X-Header Sources table, X-headers of all IPs will be trusted by FortiWeb. |
A sub-dialog appears.