


High Availability support in FortiSOAR
High Availability (HA) can be achieved using the following methods:
- Nightly database backups and incremental VM snapshots: FortiSOAR provides backup scripts that are scheduled to run at pre-defined intervals and take full database backup on a shared or backed up drive. The full backups have to be supplemented with incremental Virtual Machine (VM) snapshots whenever there are changes made to the file system, such as connector installation changes, config file changes, upgrades, schedule changes, etc. For more information, see the Backing up and Restoring FortiSOAR chapter.
- HA provided by the underlying virtualization platform: Your Virtualization platform also provides HA, such as VMware HA and AWS EBS snapshots. This method relies on your expertise and infrastructure.
- Externalized Database: This method allows you to externalize your PostgreSQL database and uses your own database's HA solution. VM snapshots have to be taken when there are changes made to the file system, such as connector installation changes, config file changes, upgrades, schedule changes, etc.
For more information on externalizing PostgreSQL database, see the Externalization of your FortiSOAR PostgreSQL database chapter. - HA clusters: FortiSOAR provides a clustering solution with more than one FortiSOAR node joined to form an HA cluster. When you deploy FortiSOAR instance, the FortiSOAR Configuration Wizard configures the instance as a single node cluster, and it is created as an active primary node. You can join more nodes to this node to form a multi-node cluster. This method is explained in detail in this chapter.
FortiSOAR implements HA Clustering with the use of PostgreSQL database clustering. It supports Active/Active and Active/Passive configurations with both internal and external PostgreSQL databases. HA clusters can be used to fulfill the following two use cases: Disaster Recovery (DR) and Scaling. For DR you can configure an Active/Passive cluster that has the passive node located in a remote datacenter. For scaling workflow execution across multiple nodes, you can use co-located Active/Active cluster nodes.
From release 7.2.0 onwards, replication slots are used to set up your HA cluster. Prior to release 7.2.0, streaming replication without slots was used to set up your HA cluster. Using replication slots to set up HA clusters, adds support for differential synchronization between the primary node and the secondary nodes when the secondary nodes get out of sync with the primary node (streaming replication without slots required full synchronization). Differential sync helps enhance the performance of various HA operations such as restoring the secondary nodes after a firedrill, forming a HA cluster after upgrading a secondary node, etc. For more information, see the Usage of the csadm ha command topic.
High Availability Types supported with FortiSOAR
You can configure FortiSOAR with either an externalized PostgreSQL database or an internal PostgreSQL database. For both cases you can configure Active-Active or Active-Passive high availability clusters.
High Availability with an internal PostgreSQL database
FortiSOAR HA/DR is based on internal clustering that takes care of replicating data (PostgreSQL) to all cluster nodes, and provides an administration CLI (csadm) to manage the cluster and perform the "Takeover" operation, when necessary. FortiSOAR uses PostgreSQL streaming replication, which is asynchronous in nature. For more information, see PostgreSQL: Documentation.
You can configure FortiSOAR for high availability (HA) with an internal PostgreSQL database in the following two ways:
- In an Active-Active HA cluster configuration, at least two nodes are actively running the same kind of service simultaneously. The main aim of the active-active cluster is to achieve load balancing and horizontal scaling, while data is being replicated asynchronously. You should front multiple active nodes with a proxy or a load balancer to effectively direct requests to all nodes. For more information about load balancers, see the Load Balancer section.
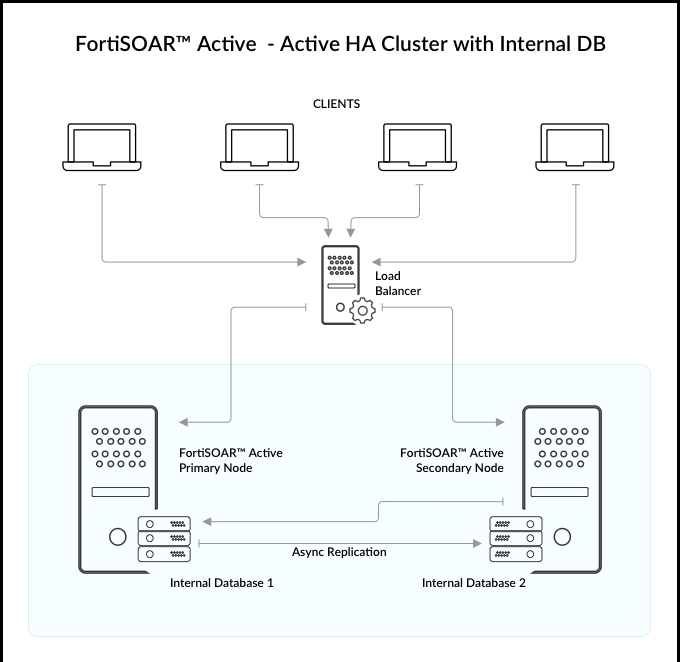
- In an Active-Passive HA cluster configuration, one or more passive or standby nodes are available to take over if the primary node fails. Processing is done only by the primary node. However, when the primary node fails, then a standby node can be promoted as the primary node. In this configuration, you can have one active node and one or more passive nodes configured in a cluster, which provides redundancy, while data is being replicated asynchronously.

High Availability with an externalized PostgreSQL database
In case of an externalized database, the user will use their own database's HA solution. FortiSOAR ensures that changes done in the file system of any of the cluster nodes arising from the connector install/uninstall or any changes in the module definitions are synced across every node so a secondary or passive node can takeover in the least time in case of a failure of the primary node.

Cluster Licensing
FortiSOAR version 6.4.4 and later does not mandate 'Additional Users' entitlement to be the same across all cluster nodes, i.e., you do not require to buy additional user licenses for clustered nodes. User count entitlement is validated from the primary node. The secondary nodes can have the basic two-user entitlement. The HA cluster shares the user count details from primary node of the cluster. Hence, all 'Concurrent Users' count restrictions apply as per the primary node. If a node leaves the cluster, the restriction will apply as per its own original license. For more information about FortiSOAR licensing, see the Licensing FortiSOAR chapter in the "Deployment Guide."
|
|
In the case of an HA environment, you only need to buy one Threat Intelligence Management (TIM) subscription that can be used across your HA cluster. The primary node subscription gets cascaded to the secondary nodes. |
Viewing and updating the license of an HA cluster
In case your FortiSOAR instance is part of a High Availability cluster, the License Manager page also displays the information about the nodes in the cluster, if you have added secondary node(s) as shown in the following image:
As shown in the above image, the primary node is Node 2 and that node is licensed with 7 users, therefore the Allowed User Seats count displays as 7 users.
To update the license for each node, click Update License and upload the license for that node.
|
|
If you update a license that does not match with the system UUID, then you will get a warning on UI while updating the license. If you update the same license in more than one environment then the license is detected duplicate and you require to correct the license, else your FortiSOAR UI will be blocked in 2 hours. |
If a license on one node of an HA cluster expires, you will not be able to access any nodes of that HA cluster. All nodes in that HA cluster will display the same FortiSOAR UI page, asking you to deploy a new valid license for the expired nodes: 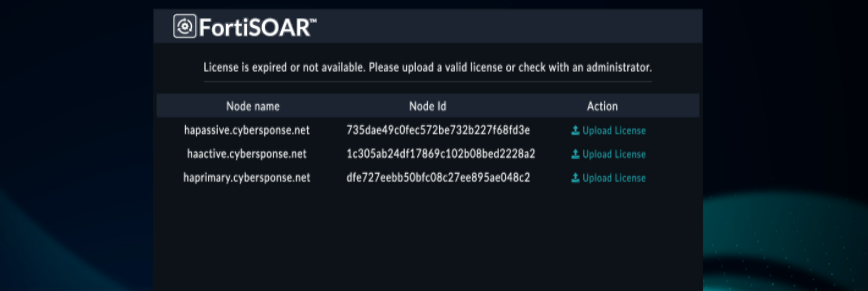
Prerequisites to configuring High Availability
- Your FortiSOAR instance must be a 5.0.0 and later instance, either a fresh install of 5.0.0 and later or your instance must be upgraded to 5.0.0 and later.
- All nodes of a cluster must be on the same FortiSOAR version.
- All nodes of a cluster should DNS resolvable from each other.
- Execute the
tmuxcommand to ensure that yoursshsession does not timeout. - If you have a security group (AWS) or an external firewall between the HA nodes, then you must open the following ports between HA nodes on AWS or the external firewall:
For SSH TCP: 22, For HTTPS: 443, For PostgreSQL: 5432, for MQ TCP traffic: 5671, and for ElasticSearch: 9200 - Fronting and accessing the FortiSOAR HA Cluster with a Load Balancer such as HAProxy, FortiADC, Gobetween, or a Reverse Proxy is recommended so that the address remains unchanged on takeover. For more information about load balancers, see the Load Balancer section.
Process for configuring High Availability
Steps to configure FortiSOAR HA cluster with an internal PostgreSQL database
If you are configuring HA with an internal PostgreSQL database, ensure that you have met all the Prerequisites criteria (see the Prerequisites to configuring High Availability section) and then perform the following steps:
Important: You must join nodes to a HA cluster in a sequentially order.
- Use the FortiSOAR Admin CLI (
csadm) to configure HA for your FortiSOAR instances. For more information, see the FortiSOAR Admin CLI chapter. Connect to your VM as a root user and run the following command:# csadm ha
This will display the options available to configure HA:
- To configure a node as a secondary node, ensure that all HA nodes are resolvable through DNS and then SSH to the server that you want to configure as a secondary node and run the following command:
# csadm ha join-cluster --status <active, passive> --role secondary --primary-node <DNS_Resolvable_Primary_Node_Name>
Once you enter this command, you will be prompted to enter the SSH password to access your primary node.
In case of a cloud environment, where authentication is key-based, you require to run the following command:# csadm ha join-cluster --status <active, passive> --role <primary, secondary> --primary-node <DNS_Resolvable_Primary_Node_Name> --primary-node-ssh-key <Path_To_Pem_File>
This will add the node as a secondary node in the cluster.
Note: When you join a node to an HA cluster, thelist-nodessubcommand does not display that a node is in the process of joining the cluster. The newly added node will be displayed in thelist-nodessubcommand only after it has been added to the HA cluster.
|
|
If you have upgraded FortiSOAR and are joining a freshly provisioned node using the |
Steps to configure FortiSOAR HA cluster with an external PostgreSQL database
If you are configuring HA with an external PostgreSQL database, perform the following steps:
- Externalize the PostgreSQL database for the primary node of your HA configuration. For the procedure for externalizing PostgreSQL databases, see the Externalization of your FortiSOAR PostgreSQL database chapter.
- Add the hostnames of the secondary nodes to the allowlist in the external database.
- Add the hostnames of the secondary notes to the
pg_hba.conf(/var/lib/pgsql/14/data/pg_hba.conf) file in the external database. This ensures that the external database trusts the FortiSOAR server for incoming connections. - Ensure that you have met all the Prerequisites criteria (see the Prerequisites to configuring High Availability section).
- Create the HA cluster by following the steps mentioned in the Steps to configure FortiSOAR HA cluster with an internal PostgreSQL database section.
Takeover
Use the csadm ha takeover command to perform a takeover when your active primary node is down. Run this command on the secondary node that you want to configure as your active primary node.
|
|
In the case of a FortiSOAR High Availability cluster environment, if a proxy is configured on a node in the cluster, then it is advisable to add other nodes in the ' |
If during takeover you specify no to the Do you want to invoke ‘join-cluster’ on other cluster nodes? prompt, or if any node(s) is not reachable, then you will have to reconfigure all the nodes (or the node(s) that were not reachable) in the cluster to point to the new active primary node using the csadm ha join-cluster command.
During the takeover operation, if the secondary node license user entitlement is lesser than that on the primary node, then the licenses get swapped between the new primary node (node B) and the old primary node (node A). To prevent any undesirable node lockouts, FortiSOAR checks the user count entitlement of both licenses before exchanging the licenses between Node A and Node B. If Node B already has a higher user entitlement, then the licenses are not swapped. Therefore, no duplicate license violation will occur once Node A comes back online in case of matching user entitlements of cluster nodes.
The swapping of licenses during takeover leads to the following scenarios:
- If Node A is alive at the time of the takeover operation, then whether Node A joins back the HA cluster or not, it synchronizes to the Fortinet Licensing Portal with the license previously associated with Node B.
- If Node A is not alive at the time of the takeover operation, then it synchronizes with FDN with its old license, which is being used by Node B as well; and this might cause a node lockout, if this is not corrected manually, by deploying the old Node B license onto Node A, in the grace window of two hours. Note, that FortiSOAR allows a grace period of two hours even when FDN reports a duplicate license.
|
|
After you have performed takeover and configured a secondary node as the active primary node, then you will observe that the log forwarder configurations are not present on the new primary node. This is because Syslog settings are not replicated to the passive node since the passive node could be in a remote datacenter and with network latencies between datacenters. Also, the same Syslog server might not be the ideal choice for log forwarding from the DR node. If you want to forward logs from the passive node, you must enable it manually using the |
Usage of the csadm ha command
Certain operations, such as takeover, join cluster, etc. might take a longer period of time to run, therefore you must execute the tmux command to ensure that your ssh session does not timeout.
You can get help for the csadm ha command and subcommands using the --help argument.
|
|
It is recommended that you perform operations such as join-cluster, leave-cluster, etc sequentially. For example, when you are adding nodes to a cluster, it is recommended that you add the nodes in a sequence, i.e., one after the other rather than adding them in parallel. |
The following table lists all the subcommands that you can use with the csadm ha command:
| Subcommand | Brief Description |
|---|---|
| list-nodes | Lists all the nodes that are available in the cluster with their respective node names and ID, status, role, and a comment that contains information about which nodes have joined the specific HA cluster and the primary server. You can filter nodes for specific status, role, etc. For example, if you want to retrieve only those nodes that are active use the following command: csadm ha list-nodes --active, or if you want to retrieve secondary active nodes, then use the following command: csadm ha list-nodes --active --secondary. Note: The list-nodes subcommand will not display a node that is in the process of joining the cluster, i.e., it will display the newly added node only after it has been added to the HA cluster. |
| export-conf | Exports the configuration of details of the active primary node to a configuration file named ha.conf. For more details on export-conf, see the Process for configuring HA section. |
| allowlist |
Adds the hostnames of the secondary nodes in the HA cluster to the allowlist on the active primary node. For more details on You can use the following argument with this sub-command:
|
| join-cluster |
Adds a node to the cluster with the role and status you have specified. For more details on
|
| get-replication-stat | Displays the replication statistics, i.e., the replication lag and status between cluster nodes. Important: The get-replication-stat sub-command is applicable only on the primary node.This sub-command displays information about sending lag, receiving lag, relaying lag, and total lag. Note: If you have configured FortiSOAR with an externalized PostgreSQL database, then replication statistics will not be displayed for the cluster nodes. |
| show-health | Displays the health information for the current node. You can use the following arguments with this sub-command: --all nodes: Displays the health information for all the nodes in an HA cluster. This information is also available for a single node, and can be used to setup monitoring and sending health statistics of a FortiSOAR instance to external monitoring applications. --json: Displays the health information in the JSON format. |
| firedrill | Tests your disaster recovery configuration. You can perform a firedrill on a secondary (active or passive) node only. Running the firedrill suspends the replication to the node's database and sets it up as a standalone node pointing to its local database. Since the firedrill is primarily performed to ensure that the database replication is set up correctly, hence it is not applicable when the database is externalized. Once you have completed the firedrill, ensure that you perform restore, to get the nodes back to replication mode. Note: If you intend to run the firedrill for extended periods of time, such as 5 or 6 hours, it is recommended that you delete replication slots. Deleting replication slots prevents disk space from getting full before the HA cluster is restored. Use the following command to delete the replication slots: csadm ha utils replication-slots remove --slot-name <nameOfSlot>Licenses on a firedrilled node: - If the node license had a user license entitlement matching the primary node user entitlement, all users can login to the firedrilled node. - If the node license had a basic user entitlement and the HA cluster had more active users, then only the csadmin user can login to the UI of the firedrilled node. The csadmin user can then activate two users who need to test the firedrill and make the rest of the users inactive. Note: This does not cause any impact to the primary node or other nodes in the HA cluster. Post-restore, the firedrilled node will join the cluster back and maximum active users as per the entitlement will be honored. Schedules on a firedrilled node: The node on which a firedrill is being performed will have their schedules and playbooks stopped, i.e., celerybeatd will be disabled on this node. This is done intentionally as any configured schedules or playbooks should not run when the node is in the firedrill mode. |
| restore | Restores the node back to its original state in the cluster after you have performed a firedrill. That is, csadm ha restore restores the node that was converted to the active primary node after the firedrill back to its original state of a secondary node. The restore command discards all activities such as record creation, that is done during the firedrill since that data is assumed to be test data. This command will restore the database from the content backed up prior to firedrill. |
| takeover |
Performs a takeover when your active primary node is down. Therefore, you must run the You can use the following argument with this sub-command:
|
| leave-cluster |
Removes a node from the cluster and the node goes back to the state it was in before joining the cluster. You can use the following argument with this sub-command:
|
|
clone-db |
Clones the database from the HA cluster's primary server. This is required when the database of a secondary node goes out of sync with the database of the primary node.
|
| suspend-cluster |
Temporarily suspends the cluster for upgrading FortiSOAR. You can use the following argument with this sub-command:
|
| resume cluster | Resumes the cluster once the upgrade is successfully completed on the secondary node. The resume cluster sub-command automatically joins the secondary node to the node that was the primary when suspend cluster was run on this node.Note: You can run resume cluster only on a suspended node. You should run the resume-cluster sub-command on all the secondary nodes to form the ha cluster. You can run the resume-cluster sub-command in parallel on all the secondary nodes that need to join back to the cluster.
|
| utils |
Utilities that manage the replication slots. You can use the following options with this sub-command:
|
Overview of nodes in a FortiSOAR HA cluster
- A FortiSOAR HA cluster can have only one active primary node, all the other nodes are either active secondary nodes or passive nodes. Uniqueness of the primary node is due to the following:
- In case of an internal database, all active nodes talk to the database of the primary node for all reads/writes. The database of all other nodes is in the read-only mode and setup for replication from the primary node.
- Although the queued workflows are distributed amongst all active nodes, the Workflow scheduler runs only on the primary node.
- All active nodes index the data for quick search into ElasticSearch at the primary node.
- All integrations or connectors that have a listener configured for notifications, such as IMAP, Exchange, Syslog, etc run the listeners only on the primary node.
Therefore, if the primary node goes down, one of the other nodes in the cluster must be promoted as the new primary node and the other nodes should rejoin the cluster connecting to the new primary.
- Active secondary nodes connect to the database of the active primary node and serve FortiSOAR requests. However, passive nodes are used only for disaster recovery and they do not serve any FortiSOAR requests.
Checking replication between nodes in an active-passive configuration
When using an active-passive configuration with internal databases, ensure that replication between the nodes is working correctly using the following steps:
- Perform the
firedrilloperation at regular intervals to ensure that the passive node can takeover successfully, when required. - Schedule full nightly backups at the active primary node using the FortiSOAR backup and restore scripts. For more information on backup and restore, see the Backing up and Restoring FortiSOAR chapter.
Installation of connectors on nodes in a HA cluster
Once you install connectors on a FortiSOAR node that is part of a HA cluster, the installation process automatically installs these connectors seamlessly on the other nodes of the HA cluster.
From release 7.2.1 onwards, once you have installed a connector dependency on a FortiSOAR node using the Install link on the connector's Configurations dialog, then that dependency is installed seamlessly on the other nodes of the HA cluster.
From release 7.2.0 onwards, when you install a custom connector or older versions of connectors that did not have their rpm available on the FortiSOAR server, or connectors that were created and published using the "Create New Connector" wizard, on a FortiSOAR node that is part of a HA cluster, the installation process automatically installs these connectors seamlessly on the other nodes of the HA cluster, as is the case with a FortiSOAR-published connector, i.e., connectors that have rpms.
Prior to release 7.2.0, you were required to upload the .tgz file of the custom connectors on all the nodes within the HA cluster, and the connectors needed to be manually installed on each node in the HA cluster using the CLI. You were also required to ensure that you have uploaded the same version of the connector to all the nodes, and that the Delete all existing versions checkbox is selected while uploading the .tgz file on all the nodes.
Changing the hostname of primary and secondary nodes in an HA cluster
Perform the following steps if you want to change the hostname of the primary and secondary nodes in an existing HA cluster.
|
|
After the hostname has been reset, when users execute playbooks with an external manual input link, it is observed that the link that is generated in the email contains the original FQDN (hostname) rather than the one that has been updated. Therefore, users who are required to provide the input, have to manually update the FQDN (hostname) in the manual input link present in the email. |
Changing the hostname of the primary node
- Ensure the new hostname of the primary node is DNS resolvable from all the cluster nodes.
If you are using/etc/hosts, ensure you update/etc/hostscorrectly on all the cluster nodes with the new hostname of the primary node. - SSH to the secondary/passive node and stop all services using the following command:
csadm services --stop - SSH to the primary node and change the hostname using the following command:
csadm hostname --set <new-hostname> - SSH to the secondary/passive node and perform the following steps:
- Update the new hostname of the primary node in the following files:
/opt/cyops/configs/database/db_config.yml- If your database is not externalized, then update the '
primary_conninfo' attribute in the/var/lib/pgsqlfile with the new hostname of the primary node.
Important: You must update the new hostname of the primary node in the above-mentioned files on all the secondary/passive nodes in the HA cluster.
- Start all the services using the following command:
csadm services --start - Clear the crudhub cache using the following command:
sudo -u nginx php /opt/cyops-api/bin/console cache:clear --no-interaction - Restart all the services again using the following command:
csadm services --restart
- Update the new hostname of the primary node in the following files:
Changing the hostname of a secondary/passive node
- Ensure the new hostname of a secondary/passive node is DNS resolvable from all the cluster nodes.
If you are using/etc/hosts, ensure you update/etc/hostscorrectly on all the cluster nodes with the new hostname of the secondary/passive node. - SSH to the primary node and add the new hostname of the secondary/passive node to the 'allowlist' in the primary node. Use the following command to add the new hostnames to the 'allowlist':
csadm ha allowlist --nodes <new-hostname-of-secondary/passive> - SSH to the secondary/passive node and change the hostname using the following command:
csadm hostname --set <new-hostname>
You must follow the above steps on each secondary/passive node for which you are changing the hostname.
Upgrading an HA cluster
For the procedure on how to upgrade a FortiSOAR High Availability Cluster see the Upgrading a FortiSOAR High Availability Cluster chapter in the "Upgrade Guide."
Load Balancer
The clustered instances should be fronted by a TCP Load Balancer such as HAProxy, FortiADC, or Gobetween, and clients should connect to the cluster using the address of the proxy.
Setting up HAProxy as a TCP load balancer fronting the two clustered nodes
The following steps list out the steps to install "HAProxy" as a load balancer on a Virtual Machine:
# yum install haproxy- Edit the
/etc/haproxy/haproxy.cfgfile to configure your HAProxy as follows:- Configure your HAProxy by adding the policy using any of the following two options:
Option 1:listen fsr_ha_cluster_front
bind <hostname of HAProxy server>:443
mode tcp
balance roundrobin
server <YourFortiSOARIPAddressForHANode1> <hostname of HAProxy server>:443 check
server <YourFortiSOARIPAddressForHANode2> <hostname of HAProxy server>:443 check
Option 2:frontend fsr_ha_cluster
bind <hostname of HAProxy server>:443
mode tcp
default_backend fsr_ha_cluster_backbackend fsr_ha_cluster_back
balance roundrobin
server <YourFortiSOARIPAddressForHANode1> <hostname of HAProxy server>:443
server <YourFortiSOARIPAddressForHANode2> <hostname of HAProxy server>:443 - In the '
defaults' section of the/etc/haproxy/haproxy.cfgfile, update the value of the 'mode' parameter to 'tcp'.
- Configure your HAProxy by adding the policy using any of the following two options:
- To reload the firewall, run the following commands:
$ sudo firewall-cmd --zone=public --add-port=<portspecifiedwhilebindingHAProxy>/tcp --permanent$ sudo firewall-cmd --reload - Restart
haproxyusing the following command:# systemctl restart haproxy - Use the bind address (instead of the IP address of the node in the cluster) for accessing the FortiSOAR UI.
Configuring FortiSOAR in FortiADC
FortiADC is an advanced application delivery controller (ADC) that routes traffic to available destination servers based on health checks and load-balancing algorithms. It also improves application performance by assuming some of the server task load. Server tasks that can be handled by the FortiADC appliance include SSL encryption/decryption, WAF protection, Gzip compression, and routing processes, such as NAT.
Configuring FortiSOAR Active/Active HA cluster with FortiADC
- Login to FortiADC and navigate to Server Load Balance > Real Server Pool, and then click the Real Server Pool tab.
- Click Create New, and provide the following details to configure a new real server pool:
- Specify a name of the new real server pool.
- Select the appropriate address type for the new real server pool. You can choose between IPv4 or IPv6.
- Enable Health Check and then in the
Health Checksection, select and add theLB_HLTHCK_ICMPandLB_HLTHCK_HTTPSprofiles. - From the Real Server SSL Profile drop-down, select the appropriate profiles. It is recommended to select the
LB_RS_SSL_PROF_DEFAULTprofile.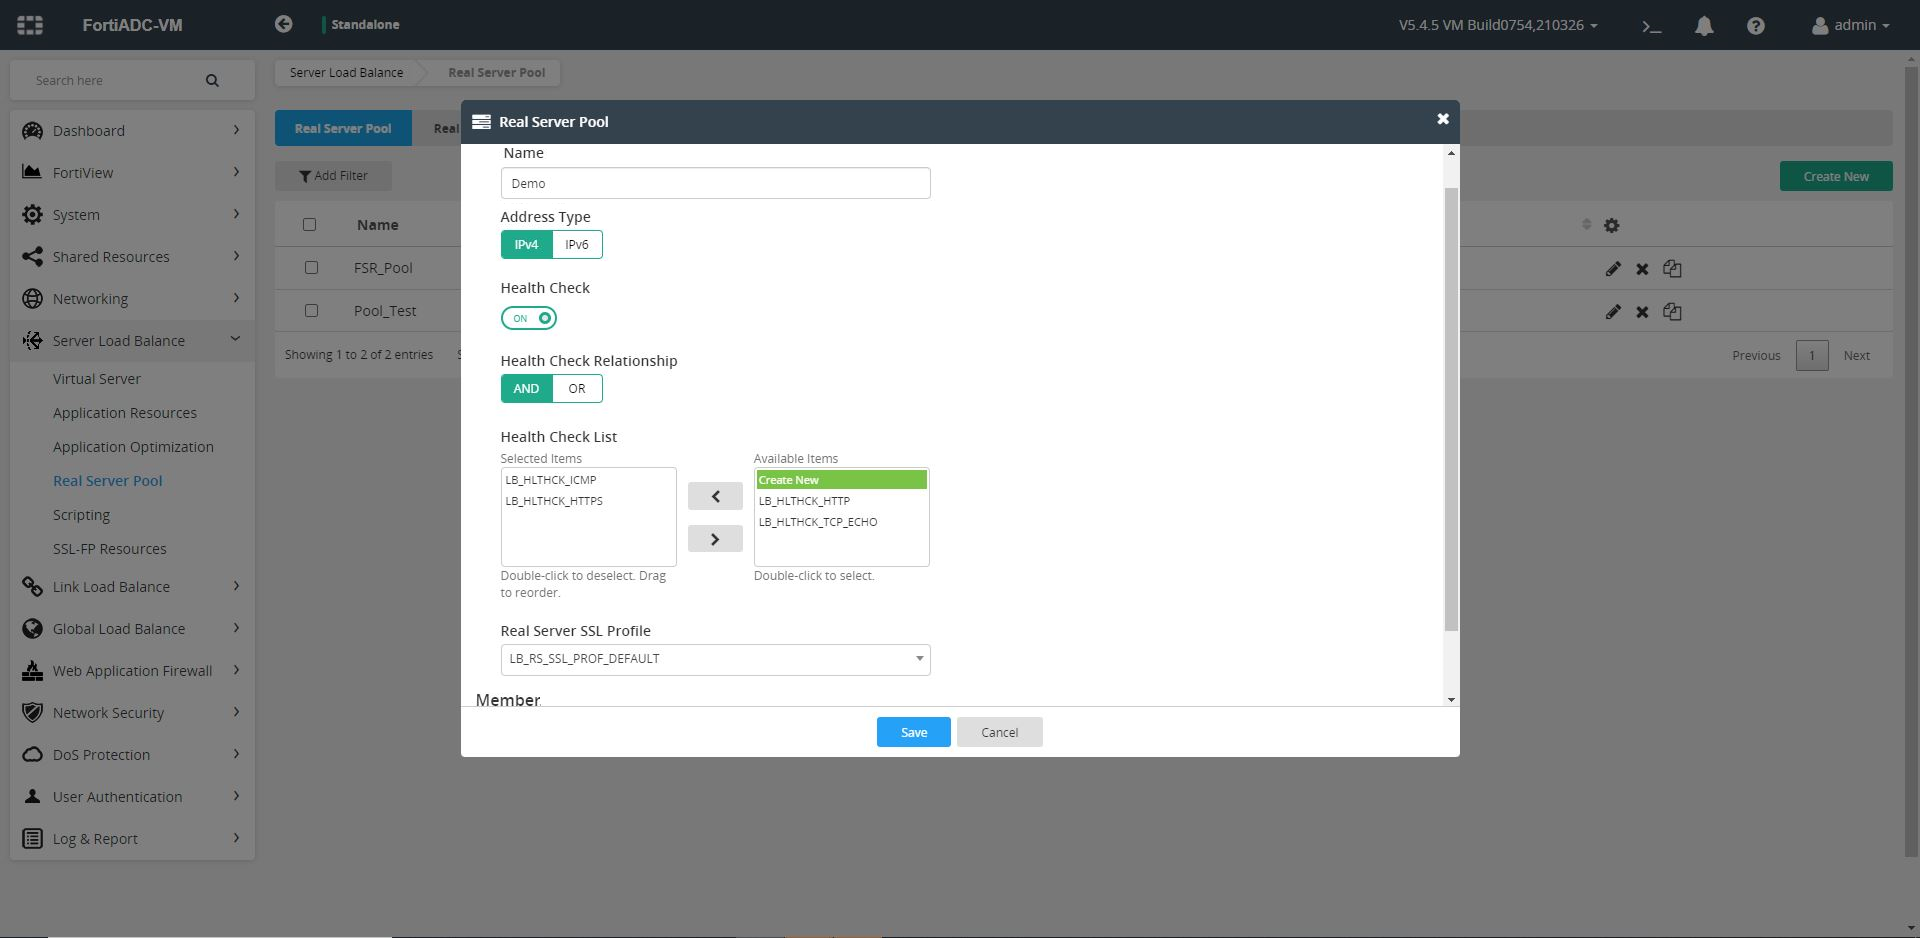
- Click Save to save the configurations for your new real server pool.
- Navigate to Server Load Balance > Real Server Pool, and then click the Real Server tab.
- Click Create New, and set the following details to configure a new real server:
- Specify a name of the new real server.
- Select the appropriate type for the new real server. You can choose between IP or FQDN.
- Specify a valid IP or Hostname of the FortiSOAR machine.
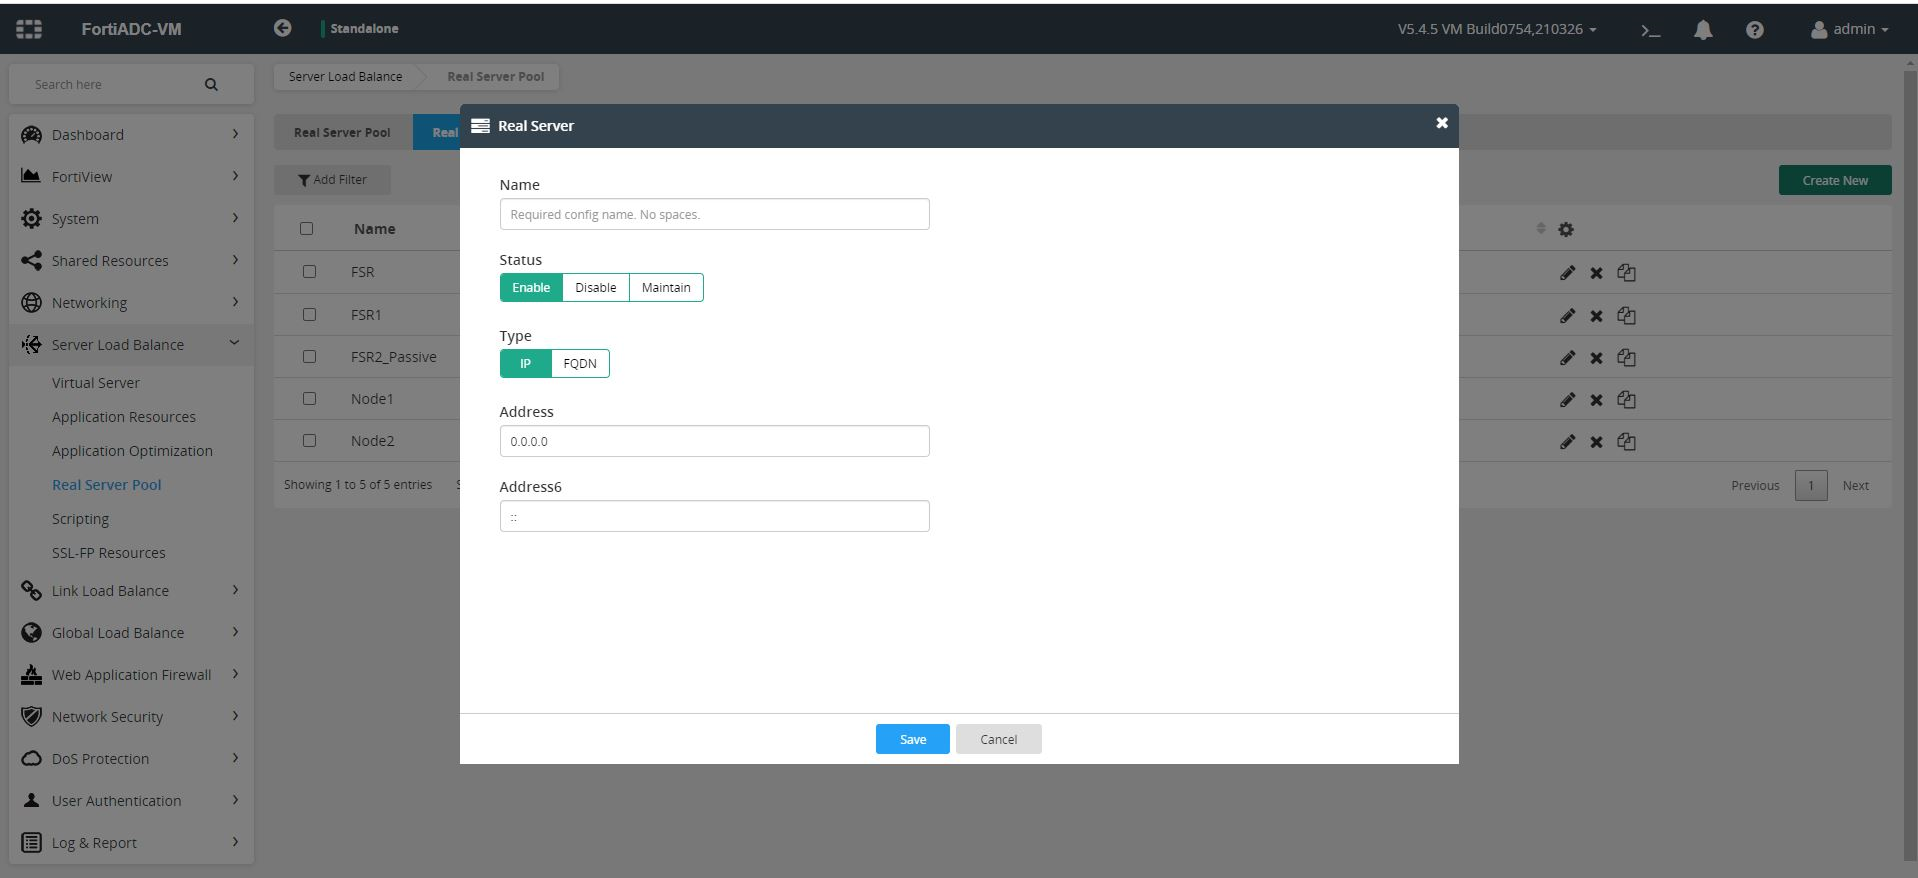
- Click Save to save the configurations for your new real server.
- To add the newly created real server to your created server pool:
- Navigate to Server Load Balance > Real Server Pool, and then click the Real Server Pool tab.
- Edit the server pool that you have created.
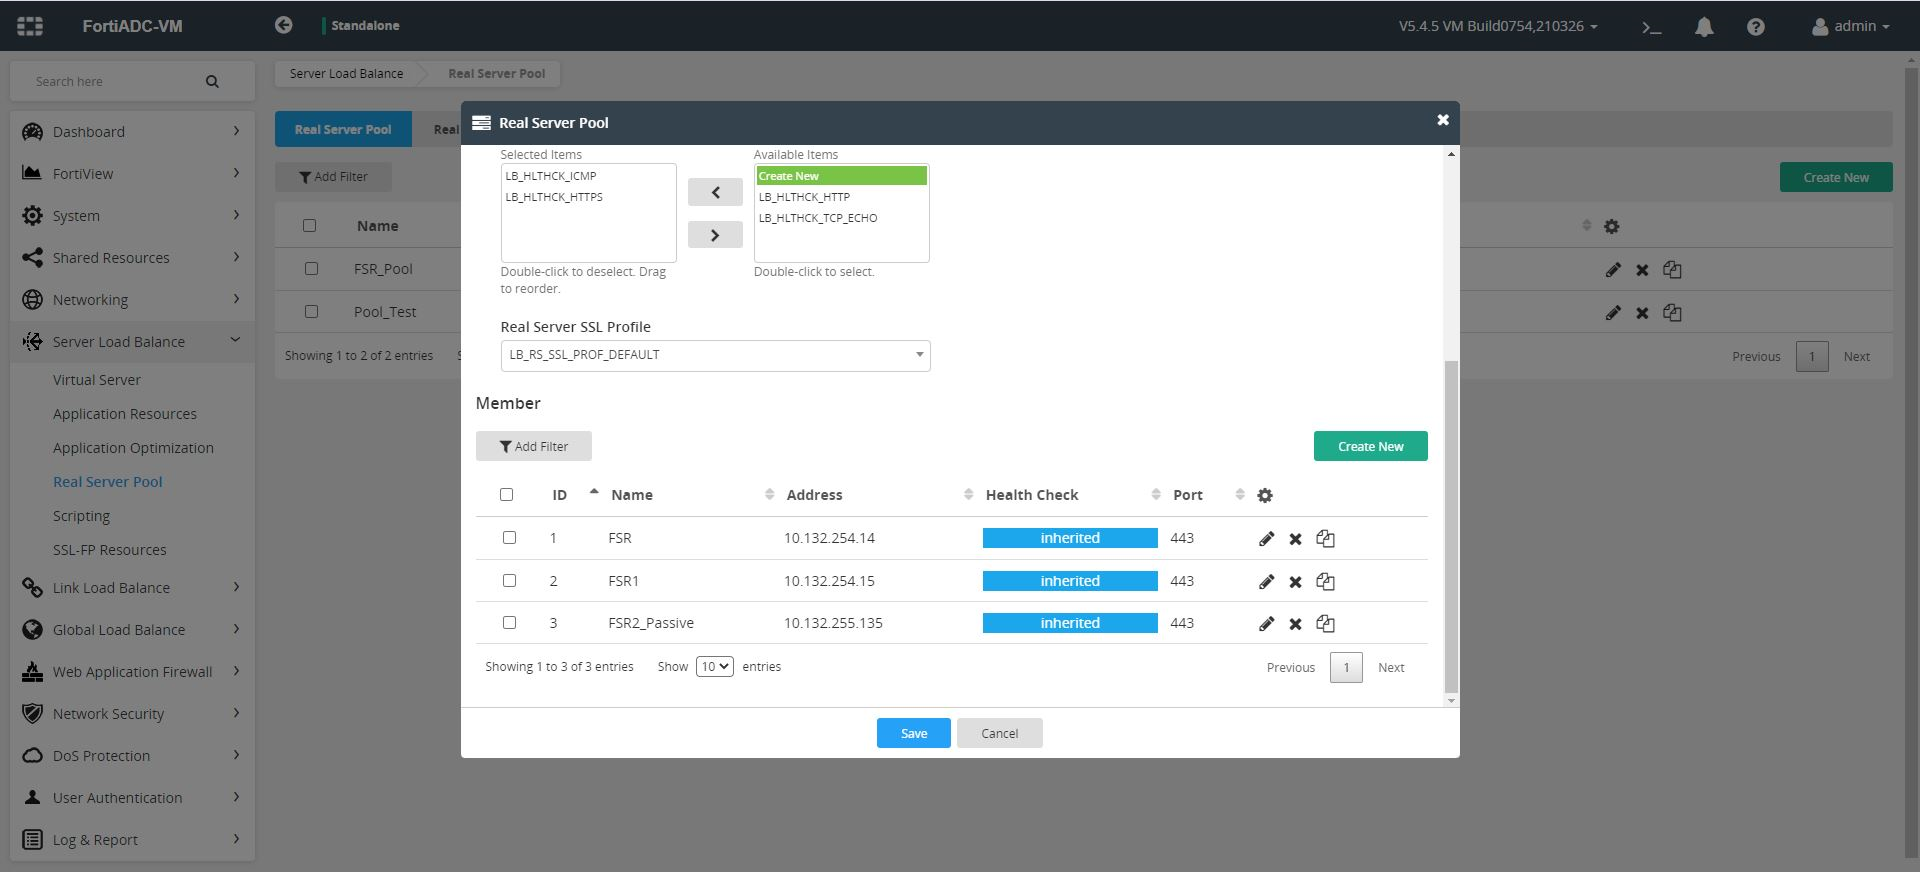
- Scroll down to the
Membersection and click Create New to add FortiSOAR servers in the server pool you have created. - Select the appropriate real server pool and specify 443 as the port number for FortiSOAR servers:

- Leave the remaining parameters as per their default values, if you want and click Save to add FortiSOAR servers in the selected server pool. Once you have added all the servers to the selected server pool, the real server pool page appears as shown in the following image:
- Navigate to Server Load Balance > Virtual Server, and then click the Virtual Server tab.
- Click Create New, and set the following details to configure a new virtual server:
- Specify a name of the new virtual server.
- From the Application list, select HTTPS.
- Specify a valid virtual server address. You can specify any free IP in the network that is reachable by FortiSOAR machines.
- Specify any valid TCP port.
- Select a real server pool that you have created.

- Click Save to save the configurations for your new virtual server.
Configuring FortiSOAR Active/Passive HA cluster with FortiADC
To configure FortiSOAR Active/Passive HA cluster with FortiADC, you need to follow the same steps as mentioned in the Configuring FortiSOAR Active/Passive HA cluster with FortiADC section. In addition to these steps, you also need to enable the backup server flag for the FortiSOAR Passive server as follows:
- To add a node as a passive node, navigate to Server Load Balance > Real Server Pool, and clicking on the Real Server Pool tab.
- On the Real Server Pool page, either add the FortiSOAR server or select the FortiSOAR server that you want to add as a passive node and enable Backup, i.e., set the Backup to ON:

- Click Save to add the selected node as a passive node.
Using the Gobetween load balancer
Gobetween is a minimalistic yet powerful high-performance L4 TCP, TLS, and UDP based load balancer.
It works on multiple platforms like Windows, Linux, Docker, Darwin, etc., and you can build your own load balancer using from source code. Balancing is done based on the following algorithms that you can choose in the configuration:
-
IP hash
-
World famous - Round Robin
-
Least bandwidth
-
Least connection
-
Weight
Configuring Gotbetween for FortiSOAR Active/Active HA Cluster
Installation:
Gobetween can be installed either on the Linux platform or on Windows. For details on installing gobetween, see 'Installation' section of the gobetween documentation.
Configuration:
Edit the gobetween.toml configuration file and then restart the gobetween service for the changes to take effect. A sample configuration follows:
The configuration has three sections,
-
The first one describes the protocol to be used and defines the port to which the load balancer will be bound:
[servers.fsr]
protocol = "tcp"
bind = "0.0.0.0:3000" -
The second describes how the FortiSOAR nodes are discovered:
[servers.fsr.discovery]
kind = "static"
static_list = [
     "<YourIPAddressForHANode1>:443 weight=25 priority=1",
     "<YourIPAddressForHANode2>:443 weight=25 priority=1",
     "<YourIPAddressForHANode3>:443 weight=25 priority=1",
     "<YourIPAddressForHANode4>:443 weight=25 priority=1"
]
In the node discovery section, you need to add FortiSOAR nodes and provide their weight and priority to determine how requests to the load balancer will be addressed. -
The last one checks the ‘
health’ status of each node:[servers.fsr.healthcheck]
fails = 1
passes = 1
interval = "2s"
timeout="1s"
kind = "ping"
ping_timeout_duration = "500ms"
After you change the configuration file, you need to open the port and load the firewall:
- Reload the firewall using the following commands:
$ sudo firewall-cmd --zone=public --add-port=<portspecifiedwhilebindingHAProxy>/tcp --permanent$ sudo firewall-cmd --reload - Run the 'gobetween' service in
tmuxusing the following command:# sudo ./gobetween -c config/gobetween.toml
For more details about configuration, see the gobetween documentation.
Configuring Gotbetween for a MQ Cluster
Initial procedure for setting up a RabbitMQ cluster, such as setting up the hosts file, installing the RabbitMQ server, etc, should already have been completed. Once the initial setup is completed, do the following:
- Set up the RabbitMQ cluster: To setup the RabbitMQ cluster, ensure that the
.erlang.cookiefile is the same on all nodes. To achieve this, copy the '.erlang.cookie' file from the/var/lib/rabbitmqdirectory of the primary node to the other nodes. For our example, let us assume the primary node is 'node1' and secondary nodes are 'node2' and 'node3'. To copy the '.erlang.cookie' file use thescpcommand from the primary node ('node1'). For example:scp /var/lib/rabbitmq/.erlang.cookie root@node2:/var/lib/rabbitmq/scp /var/lib/rabbitmq/.erlang.cookie root@node3:/var/lib/rabbitmq/
Ensure that there are no errors on both the servers, then join the node2 and node3 to node1, using thejoin-clustercommand, to create a RabbitMQ cluster. For more information, see the Process for configuring High Availability section. - Configure RabbitMQ Setup Queue Mirroring: You must configure the 'ha policy' cluster for queue mirroring and replication to all cluster nodes. If the node that hosts queue master fails, the oldest mirror will be promoted to the new master as long as it synchronized, depending on the 'ha-mode' and 'ha-params' policies.
Following are some examples of the RabbitMQ ha policies:
Setup an ha policy named 'ha-all' with all queues on the RabbitMQ cluster that will be mirrored to all nodes on the cluster:sudo rabbitmqctl set_policy ha-all ".*" '{"ha-mode":"all"}'
Setup ha policy named 'ha-nodes' with all queue names that start with 'nodes' and that will be mirrored to two specific nodes 'node02' and 'node03' on the cluster:sudo rabbitmqctl set_policy ha-nodes "^nodes\." \'{"ha-mode":"nodes","ha-params":["rabbit@node02", "rabbit@node03"]}'
You can check all the available policies using the following command:sudo rabbitmqctl list_policies;
If you want to remove a specific policy, use the following command:sudo rabbitmqctl clear_policy <name_of_policy> - Ensure that the SSL certificates that you specify while configuring the secure message exchange must be the same on all the nodes and should have the secure message exchange's CN name or should be a wildcard.
For information on adding a secure message exchange, see the Deploying FortiSOAR chapter in the "Deployment Guide." When you are adding or configuring the secure message exchange, in theAdd New Secure Message Exchangedialog ensure the following:- In the Server Name Indication field, ensure that you enter the Server Name Indication (SNI) address for the Secure Message Exchange. You must specify the SNI address when the Secure Message Exchange is behind a reverse proxy or in a cluster behind a load balancer.
- In the TCP Port field ensure that you enter the same TCP port that you have specified while configuring the secure message exchange. Also, ensure that the FortiSOARnode has outbound connectivity to the secure message exchange at this port.
- In the Certificate field, you must copy-paste the certificate text of the Certificate Authority (CA) that has signed the secure message exchange certificate in the
pemformat. If it is a chain, then the complete chain must be provided. By default, the CA certificate for the FortiSOAR self-signed certificate is present at the following location:/opt/cyops/configs/rabbitmq/ssl/cyopsca/cacert.pem - Enter the required details in the other fields and save the secure message exchange configuration.
- Edit the
gobetween.tomlconfiguration file on each of the nodes in the MQ cluster and then restart thegobetweenservice for the changes to take effect. A sample configuration follows:
The configuration has three sections,The first one describes the protocol to be used and defines the ports to which the load balancer will be bound on various nodes of the MQ cluster. Ensure that you the enter the same TCP port that you have specified while configuring the secure message exchange and added in the
Add New Secure Message Exchangedialog.
For example, on node 1 it could be:[servers.routerapi]
protocol = "tcp"
bind = "0.0.0.0:3000"
For example, on node 2 it could be:[servers.routertcp]
protocol = "tcp"
bind = "0.0.0.0:3000"The second describes how the MQ cluster nodes are discovered:
For example, on node 1 it could be:[servers.routerapi.discovery]
kind = "static"
static_list = [
"router-node1.fortisoar.in:15671 weight=25 priority=1",
"router-node2.fortisoar.in:54549 weight=25 priority=1",
"router-node3.fortisoar.in:54549 weight=25 priority=2"
]
For example, on node 2 it could be:[servers.routertcp.discovery]
kind = "static"
static_list = [
"router-node1.fortisoar.in:5671 weight=25 priority=1",
"router-node2.fortisoar.in:54558 weight=25 priority=1",
"router-node3.fortisoar.in:54559 weight=25 priority=1"
]
In the node discovery section, you need to add the secure message exchange for the nodes and provide their weight and priority to determine how requests to the load balancer will be addressed.The last one checks the ‘
health’ status of the MQ cluster:
For example, on node 1 it could be:[servers.routerapi.healthcheck]
fails = 1
passes = 1
interval = "2s"
timeout="1s"
kind = "ping"
ping_timeout_duration = "500ms"
For example, on node 2 it could be:[servers.routertcp.healthcheck]
fails = 1
passes = 1
interval = "2s"
timeout="1s"
kind = "ping"
ping_timeout_duration = "500ms"
- After you change the configuration file, you need to open the port and load the firewall:
- Reload the firewall using the following commands:
$ sudo firewall-cmd --zone=public --add-port=<portspecifiedwhilebindingHAProxy>/tcp --permanent$ sudo firewall-cmd --reload - Run the 'gobetween' service in
tmuxusing the following command:# sudo ./gobetween -c config/gobetween.toml
- Reload the firewall using the following commands:
- Test your RabbitMQ cluster by opening your web browser and typing the IP address of a node, for example, node 1, whose port is set as '5671'.
http://<node1IP>:5671/
Type in the username and password you have configured. If everything is setup correctly, you will see the RabbitMQ admin Dashboard with the status of all the members of the cluster, i.e., node1, node2, and node3, displaying as up and running. You can click the Admin tab and click the Users menu to view the list of active users and the Policies menu to view the list of created policies.
Behavior that might be observed while publishing modules when you are accessing HA clusters using a load balancer
When you have initiated a publish for any module management activity and you are accessing your HA cluster with one or more active secondary nodes using a load balancer such as "HAProxy", then you might observe the following behaviors:
- While the Publish operation is in progress, you might see many publish status messages on the UI.
- If you have added a new field to the module, or you have removed a field from the module, then you might observe that these changes are not reflected on the UI. In such cases, you must log out of FortiSOAR and log back into FortiSOAR.
- After a successful publish of the module(s), you might observe that the Publish button is yet enabled and the modules yet have the asterisk (*) sign. In such cases, you must log out of FortiSOAR and log back into FortiSOAR to view the correct state of the Publish operation.
Extending support for two NICs on a FortiSOAR appliance for controlled traffic routing
Multihoming is a practice of connecting a host or a computer network to more than one network, which helps in segregating the network traffic for better performance and security. This section talks about multihoming FortiSOAR with two NICs. The first NIC works as a service interface and the second one as a management interface. The service interface is considered to be the default route having outbound internet connectivity. The management interface is considered to be protected from public space attacks and is connected to the intranet subnet. Data replication is done using the management interface.
|
|
The steps mentioned in this section can be followed from version 7.0.2 Maintenance Pack 2 onwards |
If you have already set up an HA cluster, then you require to break that cluster by running the following command on each of the secondary nodes:# csadm ha leave-cluster
The process of multihoming is divided into two sections:
- Section 1: Rocky Linux or RHEL changes for multihoming (MultiNIC)
- Section 2: FortiSOAR changes for multihoming
Section 1: Rocky Linux or RHEL changes for multihoming (MultiNIC)
- Add a new NIC to the VM. Depending on your hypervisor, steps to add a new NIC might differ. Follow the hypervisor-specific document for the steps to add a new NIC.
- Configure policy-based routing on Rocky Linux or RHEL, via network scripts when the NetworkManager is running, using the following steps:
# yum install NetworkManager-config-routing-rules# systemctl enable NetworkManager-dispatcher.service# systemctl start NetworkManager-dispatcher.service - Determine the name of the network interface for the newly added NIC using the following command:
# ip -o link show | awk -F': ' '{print $2}'| grep -v 'lo'
Note: This command displays all the network interface names excluding loopback. If the newly-adding NIC is not visible, you need to reboot the VM using the 'reboot' command. After the reboot, you can re-run the command and determine the name of the new NIC. The output of the command appears as follows:# ip -o link show | awk -F': ' '{print $2}'| grep -v 'lo'ens160ens192
#
Note: The output displayed is for a FortiSOAR VM on a VMWare hypervisor, the output will vary depending on your hypervisor.
Also, from this step onwards till the end of the procedure, 'ens160' is considered as the 'service interface' (default route having outbound internet connectivity), and 'ens192' is considered as the 'management interface' (protected from public space attacks, private NIC) - Open the
/etc/sysconfig/network-scripts/ifcfg-ens160file, and then add the following content:
Note: Ensure that you update values for attributes like HWADDR, IPADDR, etc. according to you your instance.
If DHCP,DEVICE=ens160
HWADDR=00:0c:29:11:e6:03
TYPE=Ethernet
ONBOOT=yes
BOOTPROTO=dhcp
DEFROUTE=yes
If Static,DEVICE=ens160Note: The values of the IP address, gateway, and DNS mentioned in the above code are sample values for the management interface, and they will be used across the procedures.
HWADDR=00:0c:29:11:e6:03
TYPE=Ethernet
ONBOOT=yes
BOOTPROTO=static
DEFROUTE=yes
PREFIX=24
IPADDR=10.132.255.237
GATEWAY=10.132.255.1
PEERDNS=yes
DNS1=10.132.255.41
DNS2=10.132.255.42 # You can skip this if no secondary DNS
DOMAIN=fortinet.com - Open the
/etc/sysconfig/network-scripts/ifcfg-ens192file, and then add the following content:
Note: Ensure that you update values for attributes such as HWADDR, IPADD, etc. according to your instance.
If DHCP,DEVICE=ens192
HWADDR=00:0c:29:11:e6:17
TYPE=Ethernet
ONBOOT=yes
BOOTPROTO=dhcp
DEFROUTE=no
If Static,DEVICE=ens192Note: The values of the IP address and gateway mentioned in the above code are sample values for the management interface, and they will be used across the procedures.
HWADDR=00:0c:29:11:e6:17
TYPE=Ethernet
ONBOOT=yes
BOOTPROTO=static
DEFROUTE=no
PREFIX=24
IPADDR=192.168.10.22
GATEWAY=192.168.10.1 - Open the
/etc/iproute2/rt_tablesfile and add the following lines to the file for the routing table information of the interfaces:200 ens160-rt201 ens192-rt - Add the rule for the service interface. The format of the rule is as follows:
from <ip-of-NIC>/32 table <table-name-from-routing-table>to <ip-of-NIC>/32 table <table-name-from-routing-table>
Note: Ensure that you add the IP address of your instance.
Open the/etc/sysconfig/network-scripts/rule-ens160file and add the following lines:from 10.132.255.237/32 table ens160-rtto 10.132.255.237/32 table ens160-rt - Add the rule for the management interface. The format of the rule is as follows:
Note: Ensure that you add the IP address of your instance.
Open the/etc/sysconfig/network-scripts/rule-ens192file and add the following lines:from 192.168.10.22/32 table ens192-rtto 192.168.10.22/32 table ens192-rt - Add the route for the service interface. The format of the rule is as follows:
<subnet of NIC>/24 dev <NIC name> table <table-name-from-routing-table>default via <subnet gateway> dev <NIC name> table <table-name-from-routing-table>
Note: Ensure that you add the subnet and default gateway of your instance.
Open the/etc/sysconfig/network-scripts/route-ens160file and add the following lines:10.132.255.0/24 dev ens160 table ens160-rtdefault via 10.132.255.1 dev ens160 table ens160-rt - Add the route for the management interface.
Note: Ensure that you add the subnet and default gateway of your instance.
Open the/etc/sysconfig/network-scripts/route-ens192file and add the following lines:192.168.10.0/24 dev ens192 table ens192-rtdefault via 192.168.10.1 dev ens192 table ens192-rt - Reload and notify changes to the NetworkManager using the following commands:
# nmcli connection reload# nmcli connection up '<connection_name>'# nmcli connection up '<connection name>'
You can get the connection names using the# nmcli connection showcommand, and then run the commands to reload and notify changes, for example:# nmcli connection reload# nmcli connection up 'System ens160'# nmcli connection up 'System ens192'
Section 2: FortiSOAR changes for Multihoming
FortiSOAR Enterprise changes for Multihoming
- Configure PostgreSQL to listen on the management NIC:
Open the/var/lib/pgsql/14/data/postgresql.conffile
Update the following entry and save the file:listen_addresses = 'localhost,192.168.10.22'Note: 192.168.10.22 is the sample IP address value of the management NIC. - Configure ElasticSearch to listen on the management NIC:
Open the/etc/elasticsearch/elasticsearch.ymlfile
Update the following entry and save the file:network.host: [ _ens192_ , _lo_ ]Note: 'ens192' is the network interface name of the management NIC and 'lo' means loopback. - From this step onwards, assume the service interface DNS name to be ‘fortisoar.myorgdomain’ and the management interface DNS name to be ‘fortisoar-management.myorgdomain’.
Add the service and management interface DNS names inalt_namessection in the/opt/cyops/certs/leaf.openssl.conffile.
For example,
The originalalt_namessection in theleaf.openssl.conffile:[alt_names]DNS.1 = fortisoar.myorgdomainDNS.2 = localhostIP.1 = 127.0.0.1
After adding the service and management interface DNS names:[alt_names]DNS.1 = fortisoar-management.myorgdomainDNS.2 = localhostDNS.3 = fortisoar.myorgdomainIP.1 = 127.0.0.1 - Add the service and management interface DNS names in
alt_namessection in the/opt/cyops-rabbitmq/configs/ssl/openssl.cnffile.
For example,
The originalalt_namessection in theopenssl.cnffile:[alt_names]DNS.1 = fortisoar.myorgdomain
After adding the service and management interface DNS names:[alt_names]DNS.1 = fortisoar-management.myorgdomainDNS.2 = fortisoar.myorgdomain
Note: If you use signed certificates, ensure that the certificate resolves both the service and management interface names. - Set the hostname to the management interface DNS name using the following command:
# csadm hostname --set fortisoar-management.myorgdomain - Set the service interface DNS name in 'workflow' and 'crudhub' using the following commands:
- Update the value of
Server_fqhnin the Playbook Designer by opening any playbook, and clicking Tools > Global Variables. In the Global Variables pane, set the value of theServer_fqhnvariable as the service interface DNS name. - Update the service interface DNS name in 'crudhub' using the following commands:
# service_interface_dns_name=”fortisoar.myorgdomain”# /opt/cyops/scripts/api_caller.py --endpoint "https://localhost/api/3/system_settings/845c05cc-05b3-450e-9afb-df6b6e436321" --method PUT --payload "{\"globalValues\": { \"hostname\": \"$service_interface_dns_name\"}}" >/dev/null
- Update the value of
- Form the HA cluster again using the management interface DNS name. Use the
csadm ha join-clustercommand to reform the HA cluster. For more information on forming an HA cluster, see the Process for configuring High Availability topic.
FortiSOAR Secure Message Exchange changes for Multihoming
- If you are using a signed certificate for secure message exchange, and if the master and tenant connect using different interfaces, ensure that the certificate resolves both the service and management interface names through Subject Alternative Names.
If you are using a self-signed certificate for secure message exchange, then do the following:- Add the service and management interface DNS names in
alt_namessection in the/opt/cyops-rabbitmq/configs/ssl/openssl.cnffile.
For example, the originalalt_namessection in theopenssl.cnffile appears as follows:[alt_names]
DNS.1 = fortisoar.myorgdomain
Theopenssl.cnffile appears as follows after you have added the service and management interface DNS names in thealt_namessection:[alt_names]
DNS.1 = fortisoar-management.myorgdomain
DNS.2 = fortisoar.myorgdomain - Regenerate the self-signed certificates using the FortiSOAR CLI:
csadm mq certs generate - If you have already configured master and tenant nodes, then do the following:
- Update the configuration of the secure message exchange with the new certificate on the master.
- Remove the master configuration from the tenant node.
- Restart the service using the
systemctl restart cyops-postmancommand on both the master and tenant nodes.
- If the tenant nodes connect using a different hostname than the master node, then you will have to update the name in the configuration file downloaded from the master node for the 'sni' and 'address' keys before applying the configuration on tenant nodes.
- Add the service and management interface DNS names in
Setting up a High Availability FortiSOAR cluster in the AWS Cloud with Aurora as the external database
This topic describes the procedure and sample test runs for setting up a highly scalable FortiSOAR cluster with Amazon Aurora as the database backend.
This topic covers the following tests:
- Verifying FortiSOAR functionality with the Aurora external database
- Verifying FortiSOAR cluster failover to another region
- FortiSOAR nodes Hydration
- Upgrading Hydrated nodes in a FortiSOAR cluster
Configuration Details
The DR setup, for our example, has been configured as follows:
- Three FortiSOAR nodes in different Availability Zones located in the AWS Mumbai Region.
- Three FortiSOAR nodes in different Availability Zones located in the AWS Oregon Region.
- AWS Aurora Cluster with One Reader Instance and One Writer Instance with Global Database. For details see, https://aws.amazon.com/blogs/database/cross-region-disaster-recovery-using-amazon-aurora-global-database-for-amazon-aurora-postgresql/.
- Setup the Amazon Route53 service as the load balancer for Aurora database endpoint as follows:
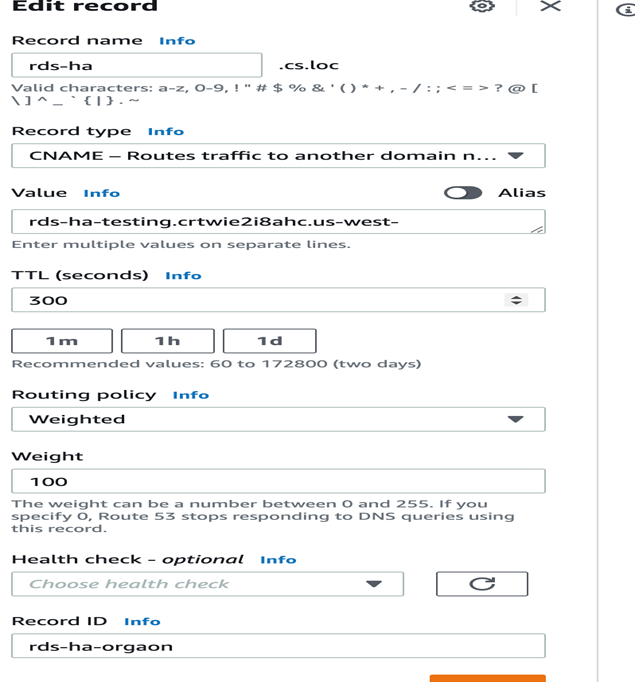
- Create a Route53 record set in the domain in which you want to configure the Route53 service. In the
Edit Recordform, enter the following details:- In the Value field, specify the global database cluster identifier name.
- In the Weight field, specify 100.
- For all other fields, you can retain the default value:

- Create a Route53 record set in the domain in which you want to configure the Route53 service. In the
Setting up an external Aurora database on FortiSOAR
For the process of setting up an external Aurora database on FortiSOAR, see the Externalization of your FortiSOAR PostgreSQL database chapter.
For more information on ingestion and playbook environment details, see the "Sizing Guide" on https://docs.fortinet.com/product/fortisoar/.
System Requirements
| Name | Configuration |
| Aurora Database |
|
| FortiSOAR Configuration |
|
Network Diagram

Structure of the Aurora Database

Verifying FortiSOAR functionality with the Aurora external database
- Create a six-node FortiSOAR cluster where three nodes are in one region but in different availability zones and the other three nodes are in different regions and different availability zones. See the Network Diagram for more information.
- Create an RDS Aurora Cluster with global database instances that span across regions. See the Structure of the Aurora Database diagram for more information.
- Create an Amazon Route 53 setup in which you must add the database identifier of the primary database cluster.
- Externalize the database of your FortiSOAR primary node. For more information on database externalization, see the Externalization of your FortiSOAR PostgreSQL database chapter.
- Create a FortiSOAR HA cluster by adding the other FortiSOAR nodes to the primary node using the join-cluster command. In this HA cluster, three of the nodes will be active and the other three that are in different regions will be passive. For more information on creating an HA cluster, see the Process for configuring High Availability topic.
- For generating data samples and verifying playbook execution as part of the test, the FortiSOAR Incident Response Solution Pack was used.
Note: It is not mandatory for the configuration to install the Incident Response Solution Pack.
For more information, see FortiSOAR Documentation in FUSE. - Create Demo Alerts with the following two schedules and properties:
- Create one alert per minute
- Create a burst of 150 alerts every hour
- Each created alert has a size of 1 MB
- Twelve playbooks run per alert
Note: Keep this schedule running for a minimum of one week.
Outcomes
Confirmed the FortiSOAR functionality with the Aurora external database by performing operations such as:
- Installation and configuration of connectors and solution packs.
-
Set up of data ingestion.
-
Tested the SLA workflow and widgets.
-
Scheduled and triggered playbook executions.
Verifying FortiSOAR cluster failover to another region
The following sequence of steps were executed to verify the cluster failover:
- Create or use the FortiSOAR HA cluster you have created in the Verifying FortiSOAR functionality with the Aurora external database topic.
- Shut down the primary Site and initiate failover of the Aurora RDS Cluster to another region.
- Once the failover of the Aurora database is completed, update the weightage in Route 53:
- Initiate the Takeover operation on one of the passive FortiSOAR nodes and make it active. For information on the Takeover process, see the Takeover topic.
Note: It took three minutes to complete the takeover operation. - After you have completed the takeover process and created the HA cluster using the
join-clustercommand, verify the data by logging onto a FortiSOAR active node.
Note: It took six minutes to completejoin-clusteroperation for the remaining three nodes and the data size on the primary node is 52 GB.
Outcomes
Confirmed that the FortiSOAR cluster could successfully failover to another region, and it took five minutes to complete the failover operation. For the setup containing 52 GB of data, it was observed that the join-cluster operation for the remaining two nodes took 6 minutes.
FortiSOAR Nodes Hydration
Create a configuration that is similar to your FortiSOAR configuration VMs to test hydration.
- Provision six new FortiSOAR VMs from the 7.0.2 AMI + MP1 pack.
These nodes serve as hydration replacements for the six original node, and hence there would be one in each of the availability zones as the original system. - Take the configuration backup from the original FortiSOAR nodes. For more information on backup and restore, see the Backing up and Restoring FortiSOAR chapter.
- Restore that backup on each of the hydrated nodes. For more information on backup and restore, see the Backing up and Restoring FortiSOAR chapter.
- On the primary hydrated node, do the following:
- Run the
sudo -u nginx php /opt/cyops-api/bin/console cache:clearcommand. - Run the
sudo -u nginx php /opt/cyops-api/bin/console app:system:updatecommand. - Update the Device UUID in
db_config.ymlfor the RabbitMQ password. - Run the
csadm license –refresh-device-uuidcommand. - Restart all the services using
csadm services --restartcommand.
- Run the
- Run the
join-clustercommand on the secondary nodes to join these nodes with the primary node and create the HA cluster. - Perform a sanity check on the newly-hydrated FortiSOAR VM cluster.
- Delete the old FortiSOAR VMs.
Outcomes
The hydration process was successfully completed and a maintenance window of approximately two hours is needed to complete the hydration process.
Upgrading Hydrated FortiSOAR Nodes
The hydrated FortiSOAR Nodes were upgraded from FortiSOAR release 7.0.2-664 to 7.2.0 - Interim Build.
- Run the leave-cluster command on each of the nodes to remove them from the FortiSOAR VM cluster.
- Download the FortiSOAR Upgrade script on each node.
- Upgrade each of the nodes. For more information on upgrading FortiSOAR, see the "Upgrade Guide."
- Once all the nodes are upgraded, run the
join-clustercommand again on the nodes, to re-create the HA cluster.
Tunables
You can tune the following configurations:
max_wal_senders= 10
This attribute defines the maximum number of walsender processes. By default, this is set as10.max_replication_slots= 10
This attribute defines the maximum number of replication slots. By default, this is set as10.
Every secondary/passive node needs one wal sender process and one replication slot on the primary node, which means that the above setting can configure a maximum of 10 secondary/passive nodes.
If you have more than 10 secondary/passive nodes, then you need to edit the value of the max_wal_senders and max_replication_slots attributes in the /var/lib/pgsql/14/data/postgresql.conf file on the primary node and restart the PostgreSQL server using the following command:
systemctl restart postgresql-14
Note: You might find multiple occurrences of max_wal_senders and max_replication_slots attributes in the postgresql.conf file. You always need to edit last occurrence of the max_wal_senders attribute in the postgresql.conf file.
Also note that Settings changes that are done in any configuration file on an instance, such as changing the log level, etc., apply only to that instance. Therefore, if you want to apply the changed setting to all the node, you have to make those changes across all the cluster nodes.
Best practices
- Fronting and accessing the FortiSOAR HA cluster with a Load Balancer or a Reverse Proxy is recommended so that the address remains unchanged on takeover.
- You must ensure that the SIEM and other endpoints that FortiSOAR connects to are reachable on the virtualized host name (DNS) that would remain intact even after a failover (local or geo wide).
- The FortiSOAR node connects outbound to the SIEM, to periodically pull the "Alerts" (Terminology for this would differ for each SIEM, Eg, ‘Offense’, ‘Corelated Event’, ‘Notable’). The "pull" model also ensures resiliency. In the case of downtime, once the FortiSOAR node comes back up, it would pull the alerts from last pulled time, ensuring there is no data loss even during down time.
- If you are planning to configure high availability in case of a multi-tenancy environment, i.e., for your master or tenant nodes, you must first configure high availability then configure MSSP. For more information on MSSP, see the "Multi-Tenancy support in FortiSOAR Guide".
Best practices for changing the shared memory size on HA nodes after setting up an HA cluster
The settings of some parameters determine the size of shared memory for tracking transaction IDs, locks, and prepared transactions. These shared memory structures should ideally be the same size on both the primary and standby nodes. This is needed to ensure that the standby nodes do not run out of shared memory during recovery. For example, if the primary had used a prepared transaction but the standby had not allocated any shared memory for tracking prepared transactions, then the recovery would pause until you change the configuration of the standby nodes. The parameters used for tracking transaction IDs, locks, and prepared transactions are as follows:
max_connectionsmax_prepared_transactionsmax_locks_per_transactionmax_wal_sendersmax_worker_processes
The easiest way to ensure that the size of shared memory does not become a problem is to set the value of these parameters on the standby nodes such that they are equal to or greater than those on the primary node. Therefore, if you want to increase the values of these parameters, you should increase the parameter values first on all the standby nodes, before applying these changes to the primary node. Conversely, if you want to decrease these values; they should be decreased first on the primary node, before applying these changes to all the standby nodes. Also, note that when a standby node is promoted, it becomes the new reference for the required parameter settings for all the other standby nodes. Therefore, to avoid the size of shared memory becoming a problem during a switchover or failover, it is recommended to keep these settings the same on all the standby nodes.
Monitoring health of HA clusters
All secondary nodes in the cluster exchange HA heartbeat packets with the primary node so that the primary node can monitor and verify the status of all the secondary nodes and the secondary nodes can verify the status of the primary node.
Your system administrator can configure the monitoring of heartbeats on the System Configuration > Application Configuration > System & Cluster Health Monitoring > Cluster Health section. Once you have configured monitoring of heartbeats and if any node in the HA cluster is unreachable, then the other active nodes in the cluster, which are operational, send email notifications and write log messages to alert the system administrator that a failure has occurred. For more information, see the Configuring System and Cluster Health Monitoring topic in the System Administration chapter.
Understanding HA Cluster Health Notifications
HA cluster health notification checks on the primary node
On every scheduled monitoring interval, which defaults to 5 minutes on the primary node for every secondary/passive node, the HA cluster health notifications checks:
- If there is a heartbeat miss from the secondary/passive node(s) in the last 15 minutes by taking the default values of monitoring interval (5 minutes) * missed heartbeat count (3). If there is a missed heartbeat, then the health notification check sends a "heartbeat failure" notification and exits.
-
If the data replication from the primary node is broken. If yes, then the health notification check sends a notification containing the replication lag with respect to the last known
replay_lsnof secondary node and exits.
Following is a sample notification:Following secondary FortiSOAR node(s) seem to have failed - Node: hasecondary.myorgdomain Current lag with primary node is 97 kB Failure reason: 1. The postgres database replication to the secondary node is not working due to data log rotation at the primary node. 2. The secondary node has been shutdown/halted. 3. PostgreSQL not running on node(s). 4. nodeName from 'csadm ha list-nodes' differs from actual FQDN used during join-cluster. If node is up and running, 1. Check the status of PostgreSQL service using 'systemctl status postgresql-<postgresql_version_here> -l' on node to get more details. 2. If you see 'FATAL: could not receive data from WAL stream: requested WAL segment has already been removed' in the PostgreSQL service status, you need to re-join the cluster using 'csadm ha join-cluster --fetch-fresh-backup' -
If the replication lag reaches or crosses the set threshold specified, then the health notification check sends a notification containing the replication lag as shown in the following sample notification:
Replication lag threshold is reached on following node(s): Node: hasecondary.myorgdomain Current lag with primary node : 3431 MB Configured Threshold : 3 GB - If any service is not running, then the health notification check sends a "service failure" notification and exits.
-
If a firedrill is in progress on a secondary/passive node. If yes, then the health notification check sends the following notification and exits.
Firedrill is in progress on following node(s):Node: hasecondary.myorgdomainCurrent lag with primary node : 52 kB
You can ignore the lag that is displayed in this case since this lag indicates the amount of data the firedrill node needs to sync whencsadm ha restoreis performed.
You can also check the lag using theget-replication-statcommand on the primary node.
HA cluster health notification checks on the secondary node
On every scheduled monitoring interval, which defaults to 5 minutes on the secondary node, the HA cluster health notifications checks:
- If there is a heartbeat miss from the primary node in the last 15 minutes by taking the default values of health beat interval (5minutes) * missed heartbeat count (3). If there is a missed heartbeat, then the health notification check sends a "heartbeat failure" notification and exits.
- If there is no heartbeat failure but there is a service failure, then the health notification check sends a "service failure" notification and exits.
HA cluster health notification checks when the HA cluster is set up with an external PostgreSQL database
If the PostgreSQL database is externalized, the email notifications generated by the primary node are different from when the PostgreSQL database is not externalized. On the primary node for every secondary/passive node, the HA cluster health notifications checks:
- If there is a heartbeat miss from the secondary/passive node(s) in the last 15 minutes by taking the default values of health beat interval (5 minutes) * missed heartbeat count (3). If there is a missed heartbeat, then the health notification check sends a "heartbeat failure" notification as follow and exits:
Following secondary FortiSOAR node(s) seem to have failed -Node: hasecondary.myorgdomainFailure reason: Heartbeat failure. Check if the 'cyops-ha' service is running or not using 'systemctl status cyops-ha'. - If any service is not running, then the health notification check sends a "service failure" notification as follows and exits:
Following secondary FortiSOAR node(s) seem to have failed -Node: hasecondary.myorgdomainFailure reason: cyops-auth service(s) not running.
HA cluster health notification checks when a secondary node is firedrilled
When a firedrill is in progress on a secondary/passive node, then you do not receive any 'out of sync' notification, instead the health notification check sends the following email notification and exits.Firedrill is in progress on following node(s):Node: hasecondary.myorgdomainCurrent lag with primary node : 52 kB
You can ignore the lag that is displayed in this case since this lag indicates the amount of data the firedrill node needs to sync when csadm ha restore is performed.
You can also check the lag using the get-replication-stat command on the primary node. If a firedrill is in progress on a secondary/passive node, then you can ignore the lag displayed. This is because the 'total_lag' that gets shown in the get-replication-stat messages indicates the amount of data the secondary/passive node will need to sync when the csadm ha restore operation is performed on the node once the firedrill completes.
HA cluster health notification checks during takeover
- When takeover is in progress, the previous primary node might send 'out of sync' email notifications for the node that is taken over, because the previous primary sees it as not replicating data anymore. These can be ignored. After the takeover is completed, we mark the previous primary node as
faulted. Therefore, you will not see any replication statistics on the old primary node. - After the takeover is performed, you can ignore the messages of the
get-replication-statcommand on the new primary node. You can also ignore the 'out of sync' email notification that is generated by the new primary node since when we perform the takeover, the entries of all the nodes in the cluster are yet included incsadm ha list-nodes, and because the remaining nodes yet require to join the new primary node, this new primary node keeps generating the notification for all those nodes. - When all the other nodes of a HA cluster join back to the new primary node, then the health notification check starts to work and there will not be any ignorable notification.
Troubleshooting issues based on the notifications
The following section provides details on how to check and fix the possible reasons of failures that are listed in the email notifications sent by the HA cluster check.
To troubleshoot HA issues, you can use the HA log located at: /var/log/cyops/cyops-auth/ha.log.
WAL files size exceeds the configured threshold
The default threshold for WAL files size is 20 GB. The WAL files are stored at /var/lib/pgsql/<postgresql_version>/data/pg_wal.
Resolution:
- Check if you have a higher value set for '
wal_keep_size' in the/var/lib/pgsql/<postgresql_version>/data/postgresql.conffile. The default value is 1024 that denotes 1024MB, which means that thepg_waldirectory will have 1024MB WALs.
Reduce this value and restart the postgresql-<postgresql_version> service. For example:systemctl restart postgresql-14 - If the 'wal_keep_size' value is lower, then do the following:
- List all replication slots using the following command:
csadm ha utils replication-slots list
The CLI will display the output as follows:# csadm ha utils replication-slots listslot_name active
-------------------------------------------- --------
slot_phy_fsr_a82d365c74172096671a54741e074191 False
slot_phy_fsr_46a5e8c98e7c77e4d16f5d29f28d2bc3 True
# - The format for
slot_nameis 'slot_phy_fsr_<nodeId>'. The 'nodeId' is similar to the 'nodeId' shown in 'csadm ha list-nodes'. The second column can have True/False. False indicates that the slot is inactive. You need to find all the inactive slots and compare their nodeIds against the output of the 'csadm ha list-nodes' sub-command. Using this method, you can find out the nodes that have inactive slots present on the current server, and if that node is not part of the cluster, then you can remove its replication slot.
Note: If a node is temporary down, then also the second column will display as False, i.e., indicative of an inactive slot. If you know that this node will not come online soon, then you can remove its replication slot. - Remove the inactive replication slots that you have identified in the previous step using the following command:
casdm ha utils replication-slots remove --slot-name <>
For example:casdm ha utils replication-slots remove --slot-name slot_phy_fsr_a82d365c74172096671a54741e074191
- List all replication slots using the following command:
Heartbeat Failure
Resolution:
When you get a heartbeat failure notification for a secondary node, then do the following:
- Check if the
cyops-haservice is running on that node, using thesystemctl status cyops-hacommand. - If it is not running, then you must restart the
cyops-haservice.
Node name differs from actual FQDN
Resolution:
Correct the notification such as nodeName from 'csadm ha list-nodes' differs from actual FQDN used during join-cluster. using the following steps:
- Login on the node for which you are receiving the above notification using SSH.
- Use the following command to correct the FQDN of the node:
csadm ha set-node-name <enter-correct-FQDN-here>
Secondary/Passive node is out of sync with the Primary node
This issue could occur due to the following reasons:
- PostgreSQL service status shows
requested WAL segment <some-number-here> has already been removed
OR
Thecsadm ha get-replication-statcommand shows a higher time lapsed from the last sync when compared to the general time lapsed.
Resolution:
In these cases, since the secondary/passive node is completely out of sync with the primary node, you need to perform the following steps on the secondary/passive node:
1. Run thetouch /home/csadmin/.joincluster_in_progresscommand to create the.joincluster_in_progressfile. 2. Rejoin the cluster as follows:csadm ha join-cluster --status active/passive --role secondary --primary-node <Primary-node-FQDN> --fetch-fresh-backup - When there is heavy write on the primary node and the secondary node has not yet copied the data before the data has rolled over, it will be 'out of sync' and a full synchronization is needed, which can cause the above failures.
Resolution:
Increase thewal_keep_sizesetting in the/var/lib/pgsql/14/data/postgresql.conffile.
PostgreSQL service is down on the primary node or PostgreSQL service is down on the externalized database host
If PostgreSQL service is down on the primary node, then the cyops-ha service on all the nodes will be down and there will be no notifications generated since the whole cluster is down; due to this you will also not be able to login to the FortiSOAR UI.
Resolution:
- Check the reason for the failure using the
systemctl status postgresql-<postgresql_version_here> -lon the primary node or the externalized database host. - Fix the issue based on the reason for failure.
Sample scale test that were done in the lab to understand the behavior of 'csadm ha get-replication-stat'
What was done before observing the behavior:
First we stopped the PostgreSQL service on the secondary/passive node.
Next, generated data on the primary node using the following script. You need to kill the script after some time when enough data is generated on the primary node.
[root@cybersponse csadmin]# cat data_load.sh
#!/bin/sh

psql -U cyberpgsql -d das -c "CREATE TABLE scale_data (
   section NUMERIC NOT NULL,
   id1     NUMERIC NOT NULL,
   id2     NUMERIC NOT NULL
);"


psql -U cyberpgsql -d das -c "
INSERT INTO scale_data
SELECT sections.*, gen.*
     , CEIL(RANDOM()*100)
  FROM GENERATE_SERIES(1, 300)     sections,
       GENERATE_SERIES(1, 900000) gen
 WHERE gen <= sections * 3000;"
[root@cybersponse csadmin]#
During the data generation process, we ran the csadm ha get-replication-stat on the primary node and you can observe that the secondary node is lagging with 4702 MB.
get-replication-stat on the primary node:

[root@cybersponse csadmin]# csadm ha get-replication-stat
------------------------------------------------
Warning:
Following could be the issues with the nodes:
1. The postgres database replication to the secondary node is not working due to data log rotation at the primarynode.
2. The secondary node has been shutdown/halted.
3. PostgreSQL not running on node(s).
4. nodeName from 'csadm ha list-nodes' differs from actual FQDN used during join-cluster.
5. If a firedrill is in progress on the node, no action is required. The 'lag' that is displayed indicates the amount of data the firedrill node needs to sync when 'csadm ha restore' will be performed.

If node is up and running,
1.  Check the status of PostgreSQL service using 'systemctl status postgresql-14 -l' on node to get more details.
2. If you see 'FATAL: could not receive data from WAL stream: requested WAL segment has already been removed' in the PostgreSQL service status, you need to re-join the cluster using 'csadm ha join-cluster --fetch-fresh-backup' for this node.

------------------------------------------------

nodeId                            nodeName                 status    role       comment                                      total_lag
--------------------------------  -----------------------  --------  ---------  --------------------------------------------  -----------
469c6330613a332c30dd4d8e3a607cf2  hasecondary.myorgdomain  active    secondary  Joined cluster with haprimary.myorgdomain  4702 MB
[root@cybersponse csadmin]#
Next, start PostgreSQL on the secondary node and observed the 'replication-stat' on the primary node:
On the Primary node:

Every 2.0s: csadm ha get-replication-stat                                                       Tue May 12 05:27:31 2020

------------------------------------------------
Note:
'sending_lag' indicates load on the primary node
'receiving_lag' indicates network delay or load on the passive/secondary node
'replaying_lag' indicates load on the passive/secondary node
------------------------------------------------

node_hostname            sending_lag    receiving_lag    replaying_lag    total_lag
-----------------------  -------------  ---------------  ---------------  -----------
hasecondary.mydomain  4458 MB        11 MB            213 MB           4683 MB
On the Primary node:

------------------------------------------------
Note:
'sending_lag' indicates load on the primary node
'receiving_lag' indicates network delay or load on the passive/secondary node
'replaying_lag' indicates load on the passive/secondary node
------------------------------------------------

node_hostname            sending_lag    receiving_lag    replaying_lag    total_lag
-----------------------  -------------  ---------------  ---------------  -----------
hasecondary.mydomain  3600 MB        3456 kB          727 MB           4330 MB

On the Primary node:

Every 2.0s: csadm ha get-replication-stat                                                       Tue May 12 05:28:05 2020

------------------------------------------------
Note:
'sending_lag' indicates load on the primary node
'receiving_lag' indicates network delay or load on the passive/secondary node
'replaying_lag' indicates load on the passive/secondary node
------------------------------------------------

node_hostname            sending_lag    receiving_lag    replaying_lag    total_lag
-----------------------  -------------  ---------------  ---------------  -----------
hasecondary.mydomain  2774 MB        5632 kB          1273 MB          4052 MB


On the Primary node:

Every 2.0s: csadm ha get-replication-stat                                                       Tue May 12 05:28:28 2020

------------------------------------------------
Note:
'sending_lag' indicates load on the primary node
'receiving_lag' indicates network delay or load on the passive/secondary node
'replaying_lag' indicates load on the passive/secondary node
------------------------------------------------

node_hostname            sending_lag    receiving_lag    replaying_lag    total_lag
-----------------------  -------------  ---------------  ---------------  -----------
hasecondary.mydomain  1910 MB        6784 kB          1803 MB          3719 MB


On the Primary node:

Every 2.0s: csadm ha get-replication-stat                                                       Tue May 12 05:28:44 2020

------------------------------------------------
Note:
'sending_lag' indicates load on the primary node
'receiving_lag' indicates network delay or load on the passive/secondary node
'replaying_lag' indicates load on the passive/secondary node
------------------------------------------------

node_hostname            sending_lag    receiving_lag    replaying_lag    total_lag
-----------------------  -------------  ---------------  ---------------  -----------
hasecondary.mydomain  1153 MB        1408 kB          2278 MB          3433 MB

On the Primary node:

Every 2.0s: csadm ha get-replication-stat                                                       Tue May 12 05:29:00 2020

------------------------------------------------
Note:
'sending_lag' indicates load on the primary node
'receiving_lag' indicates network delay or load on the passive/secondary node
'replaying_lag' indicates load on the passive/secondary node
------------------------------------------------

node_hostname            sending_lag    receiving_lag    replaying_lag    total_lag
-----------------------  -------------  ---------------  ---------------  -----------
hasecondary.mydomain  452 MB         3200 kB          2726 MB          3181 MB
On the Primary node:

Every 2.0s: csadm ha get-replication-stat                                                       Tue May 12 05:29:25 2020

------------------------------------------------
Note:
'sending_lag' indicates load on the primary node
'receiving_lag' indicates network delay or load on the passive/secondary node
'replaying_lag' indicates load on the passive/secondary node
------------------------------------------------

node_hostname            sending_lag    receiving_lag    replaying_lag    total_lag
-----------------------  -------------  ---------------  ---------------  -----------
hasecondary.mydomain  0 bytes        0 bytes          2658 MB          2658 MB

On the Primary node:

Every 2.0s: csadm ha get-replication-stat                                                       Tue May 12 05:29:46 2020

------------------------------------------------
Note:
'sending_lag' indicates load on the primary node
'receiving_lag' indicates network delay or load on the passive/secondary node
'replaying_lag' indicates load on the passive/secondary node
------------------------------------------------

node_hostname            sending_lag    receiving_lag    replaying_lag    total_lag
-----------------------  -------------  ---------------  ---------------  -----------
hasecondary.mydomain  0 bytes        154 kB           2172 MB          2172 MB


On the Primary node:

Every 2.0s: csadm ha get-replication-stat                                                       Tue May 12 05:30:06 2020

------------------------------------------------
Note:
'sending_lag' indicates load on the primary node
'receiving_lag' indicates network delay or load on the passive/secondary node
'replaying_lag' indicates load on the passive/secondary node
------------------------------------------------

node_hostname            sending_lag    receiving_lag    replaying_lag    total_lag
-----------------------  -------------  ---------------  ---------------  -----------
hasecondary.mydomain  0 bytes        0 bytes          1687 MB          1687 MB
Troubleshooting
To troubleshoot HA issues, you can use the HA log located at: /var/log/cyops/cyops-auth/ha.log. To understand and troubleshoot the HA cluster health notifications, see the Monitoring health of HA clusters section.
Failure to create an HA cluster
If the process to configure HA using the automated join cluster fails, and the HA cluster is not created due to reasons such as, proxies set up etc, you can perform the steps mention in the following procedure and configure HA:
- Connect to your VM as a root user and run the following command:
# csadm ha
This will display the options available to configure HA. - To configure a node as a secondary node, perform the following steps:
- SSH to the active primary node and run the
csadm ha export-confcommand to export the configuration details of the active primary node to a configuration file namedha.conf.
You must copy theha.conffile from the active primary node to the node that you want to configure as a secondary node. - On the active primary server, add the hostnames of the secondary nodes to the allowlist, using the following command:
# csadm ha allowlist --nodes
Add the comma-separated list of hostnames of the cluster nodes that you want to the add to the allowlist after the--nodesargument.
Important: In case of an externalized database, you need to add all the nodes in a cluster to the allowlist in thepg_hba.conffile. - Ensure that all HA nodes are resolvable through DNS and then SSH to the server that you want to configure as a secondary node and run the following command:
# csadm ha join-cluster --status <active, passive> --role <primary, secondary> --conf <location of the ha.conf file>
For example,# csadm ha join-cluster --status passive --role secondary --conf tmp/ha.conf
This will add the node as a secondary node in the cluster.
Note: If you run thecsadm ha join-clustercommand without adding the hostnames of the secondary nodes to the allowlist, then you will get an error such as,Failed to verify....
Also, when you join a node to an HA cluster, thelist-nodescommand does not display that a node is in the process of joining the cluster. The newly added node will be displayed in thelist-nodescommand only after it has been added to the HA cluster.
- SSH to the active primary node and run the
Timeout failure while creating an HA cluster
The join-cluster operation fails with the "Error: command timedout". Currently, the timeout value set is 21600 seconds, i.e., 6 hours. However, if the primary node has a huge amount of data, 200 GB or more, then it is possible for the join-cluster operation to timeout.
Resolution
If you get a timeout error while running the join-cluster operation, then you can increase the value of the timeout key in the config.yaml file as follows:
- Open the
/opt/cyops/configs/ha/config.yamlfile. - Change the value of the
timeoutkey. The value of thetimeoutkey is stored in seconds, and currently, it is set to 21600 seconds (6 hours). - Restart the
cyops-haservice using thesystemctl restart cyops-hacommand.
Note: You need to perform these steps on each HA cluster node.
Unable to add a node to an HA cluster using join-cluster, and the node gets stuck at a service restart
This issue occurs when you are performing join-cluster of any node and that node sticks at service restart, specifically at PostgreSQL restart.
Resolution
Terminate the join-cluster process and retry join-cluster using the --fetch-fresh-backup argument.
Fixing the HA cluster when the Primary node of that cluster is halted and then resumed
If your primary node is halted due to a system crash or other such events, and a new cluster is made with the other nodes in the HA cluster, the list-nodes command on other nodes will display that the primary node is in the Faulted state. Since the administrator has triggered takeover on other cluster nodes, the administrator will be aware of the faulted primary node. Also, note that even after the primary node resumes, post the halt, the primary node still remains the primary node of its own cluster, and therefore, after the resume, the list-nodes command on the primary node will display this node as Primary Active.
Resolution
To fix the HA cluster to have only one node as primary active node, do the following:
- On the primary node, which got resumed, run
leave-cluster, which will remove this node from the HA cluster. - Run
join-clustercommand to join this node to the HA cluster with the new primary node.
Unable to join a node to an HA cluster when a proxy is enabled
You are unable to join a node to an HA cluster using the join-cluster command when you have enabled a proxy using which clients should connect to the HA cluster.
Resolution
Run the following commands on your primary node:
$ sudo firewall-cmd --zone=trusted --add-source=<CIDR> --add-port=<ElasticSearchPort>/tcp --permanent
$ sudo firewall-cmd --reload
For example,
$ sudo firewall-cmd --zone=trusted --add-source=64.39.96.0/20 --add-port=9200/tcp --permanent
$ sudo firewall-cmd --reload
Changes made in nodes in an active-active cluster fronted with a load balancer take some time to reflect
In the case of a FortiSOAR active-active cluster that is fronted with a load balancer or reverse proxy such as an HAProxy, changes such as, adding a module to the FortiSOAR navigation, updating or adding the permissions of the logged-in user, or updates done to the logged-in user's parents, child, and sibling hierarchy, do not get reflected immediately.
These issues occur due to local caching of these settings at the individual cluster nodes.
Resolution
Log off and log back into the FortiSOAR user interface after ten minutes to see the recent updates.
OR
If you want the settings to reflect immediately, run the following command on the "active" nodes in the cluster:php /opt/cyops-api/bin/console --env=prod app:cache:clear --env=prod
Important: You do not require to run the above command on the "passive" nodes of the cluster.
Post Takeover the nodes in an HA cluster do not point to the new active primary node
This issue occurs when during the takeover process either the previous primary node is down or automatic join-cluster fails. In case of an internal database cluster, when the failed primary node comes online after the takeover, it still thinks of itself as the active primary node with all its services running. In case of an external database cluster, when the failed primary node comes online after the takeover, it detects its status as "Faulted" and disables all its services.
Resolution
Run the csadm ha join-cluster command to point all the nodes to the new active primary node. For details on join-cluster, see Process for configuring HA.
After performing the leave-cluster operation, the license is not found on a secondary node
In case of an internal DB, after you have performed the leave-cluster operation on a secondary node, if for example, you are upgrading the node, and when you are rejoining the node to the cluster, once the upgrade is done, you might see the following error: "License not found on the system". You might also see this error while trying to perform the 'restore' operation on a secondary node after completing the 'firedrill' operation.
Resolution
Run the following script as a root user on the secondary node on which you are getting the "License not found on the system" error:
#!/bin/bash

init(){
    current_pg_version=$(/bin/psql --version | egrep -o '[0-9]{1,}\.' | cut -d'.' -f1)
    re_join_cluster_sql="/opt/cyops-auth/.re-join-cluster.sql"
    db_config="/opt/cyops/configs/database/db_config.yml"
}

re_join_cluster(){
    if [ ! -f "$re_join_cluster_sql" ]; then
        echo "File [$re_join_cluster_sql] does not exist. Contact the Fortinet support team for further assistance"
        exit 1
    fi
    csadm services --stop
    if [ ! -d "/var/lib/pgsql/${current_pg_version}.bkp" ]; then
        mv /var/lib/pgsql/$current_pg_version /var/lib/pgsql/${current_pg_version}.bkp
    fi
    # Below rm is required if in case user re-run the script again.
    rm -rf /var/lib/pgsql/${current_pg_version}
    rm -f /opt/cyops/configs/cyops_pg_${current_pg_version}_configured
    mkdir -p /var/lib/pgsql/${current_pg_version}/data
    chown -R postgres:postgres /var/lib/pgsql/${current_pg_version}
    chmod -R 700 /var/lib/pgsql/${current_pg_version}
    /opt/cyops-postgresql/config/config.sh ${current_pg_version}
    local hkey=$(csadm license --get-device-uuid)
    sudo -Hiu postgres psql -U postgres -c "ALTER USER cyberpgsql WITH ENCRYPTED PASSWORD '$hkey';"
    createdb -U cyberpgsql -e -w --no-password das -O cyberpgsql -E UTF8
    psql -U cyberpgsql -d das < $re_join_cluster_sql
    touch /home/csadmin/.joincluster_in_progress
    if [ ! -f "${db_config}.bkp" ]; then
        yes| cp ${db_config} ${db_config}.bkp
    fi
    local db_pass_encrypted=$(python3 /opt/cyops/scripts/manage_passwords.py --encrypt $hkey)
    /opt/cyops/scripts/confUtil.py -f $db_config -k 'pg_password' -v "$db_pass_encrypted"
    systemctl start postgresql-${current_pg_version}
}

echo_manual_steps(){
echo "Perform below steps manually"
echo "
    1. If node is passive, then run below command, else skip it.
       csadm ha join-cluster --status passive --primary-node <primary-node> --fetch-fresh-backup
    2. If node is active/secondary.
       csadm ha join-cluster --status active --role secondary --primary-node <primary-node> --fetch-fresh-backup
    3. rm -rf /var/lib/pgsql/${current_pg_version}.bkp
    4. rm -f /opt/cyops/configs/database/db_config.yml.bkp
    5. rm -rf /var/lib/pgsql/test_dr_backups"
}
####################
# Main/main/MAIN starts here
####################

# Stop right after any command failure
set -e
# Debug mode
set -x
init
re_join_cluster
####################
# You need to perform the below step manually.
########
# Turn off the dubug mode to see the steps to perform manually clearly
set +x
echo_manual_steps
exit 0
The leave-cluster operation fails at the "Starting PostgreSQL Service" step when a node in the cluster is faulted
This issue occurs in case of an active-active-passive cluster that has an internal db and whose HA cluster contains a node whose status is 'Faulted'. In this case, when you run the leave-cluster operation it fails at the "Starting service postgresql-14" step.
Resolution
To resolve this issue, run the following commands:
systemctl stop postgresql-14
rm -f /var/lib/pgsql/14/data/standby.signal
systemctl start postgresql-14
Once you have completed performing the above steps, run the csadm ha leave-cluster command.
Resetting the password for an instance that is part of active/active cluster causes the other instances of that cluster to not able to log in to FortiSOAR
If you reset the password of an instance that is part of an active/active cluster, then the FortiSOAR login page is not displayed for the other instances of this cluster. You will also observe data login failure errors in the ha.log and the prod.log in case of both active/active and active/passive clusters.
Resolution
On the other instances that are part of the cluster, do the following:
- Copy the encrypted password from the
db_config.ymlfile located at/opt/cyops/configs/database/db_config.ymlon the active node and then update the new password in thedb_config.ymlfile on the secondary nodes. - Run the
cache:clearcommand:$ sudo -u nginx php /opt/cyops-api/bin/console cache:clear - Restart FortiSOAR services:
# csadm services --restart
The database of a secondary node in the HA cluster is out of synch with the database of the primary node
If the database of a secondary node in the HA cluster is completely out of sync, then you can should rerun the join-cluster command. However, if rejoining the cluster also does not resolve the secondary node issue, then perform the steps mentioned in the resolution.
Resolution
Run the csadm ha clone-db command to clone the database from the cluster's primary node. For information on the csadm ha clone-db command, see the Usage of the csadm ha command section.
|
|
The |
Failure of the 'leave-cluster' command on a secondary node that had its database externalized before joining the HA cluster, and that is currently using an internal database
The 'leave-cluster' command fails with the '"FATAL: password authentication failed for user "cyberpgsql"' error on a secondary node that had its database externalized before joining the HA cluster, and that is currently using an internal database.
Resolution
To resolve this issue, perform the following steps on the node where the leave-cluster command has failed:
- Edit the
/var/lib/pgsql/14/data/pg_hba.conffile to update the following:- Update the '
local all all md5' line to 'local all all trust'. - Update the '
host all all 127.0.0.1/32 md5' line to 'host all all 127.0.0.1/32 trust'.
- Update the '
- Restart the PostgreSQL service using the '
systemctl restart postgresql-14' command. - Edit the
/opt/cyops/configs/database/db_config.yml.defaultfile to update the following parameters:- Update '
pg_external' and 'pg_archival_external' tolocalhost. - Update '
pg_host' and 'pg_archival_host' tolocalhost. - Update '
pg_port' and 'pg_archival_port' to5432. - Update '
pg_ssl_cert_path' and 'pg_archival_ssl_cert_path' to''. - Update '
pg_use_ssl' and 'pg_archival_use_ssl' tofalse. - Update '
pg_user' and 'pg_archival_user' tocyberpgsql.
- Update '
- Run the '
csadm ha leave-cluster' command. - Once '
leave-cluster' is completed, revert the changes made in step 1 to thepg_hba.conffile, and then restart the PostgreSQL service using the 'systemctl restart postgresql-14' command.