


Data Ingestion
FortiSOAR has a dedicated data ingestion wizard that facilitates data ingestion from external SIEM solutions and other third-party sources like threat intelligence platforms, email solutions, etc. The wizard also takes care of scheduling data ingestion into FortiSOAR, if the connector is enabled for scheduling.
The Data Ingestion wizard eases data ingestion configuration and mapping of fields between the two systems. The wizard assists in fetching sample data from the source, mapping fields from the source data into a FortiSOAR module, and setting up an ingestion schedule if required and if the connector is enabled for scheduling. Based on the inputs provided in the wizard, the system dynamically generates the ingestion workflows without the user being exposed to the details of playbooks and easing the process of configuring ingestion.
The Data Ingestion wizard allows the mapping of drop-down (picklist) fields and items such that you can map picklist items to a range of values, lesser than, and greater than values. The Data Ingestion wizard allows you to define the frequency at which you want to pull content into FortiSOAR from third-party integration, such as SIEMs that allow you to define the polling frequency. By default, the frequency of pulling content is set at five minutes.
FortiSOAR and its connectors come with sample playbooks for ingesting data from various SIEM sources, Threat Intelligence Platforms, Vulnerability Management Tools, Configuration Management Databases, etc. Connectors that you can use to ingest data through this wizard are enabled by default in FortiSOAR.
|
|
Data ingestion is generally mapped to the alerts or incident modules, and from release 7.2.0 onwards, the Incident Response modules get added once you have installed the SOAR Framework Solution Pack (SP). Therefore, for data ingestion to work correctly you must install this solution pack. From release 7.2.0 onwards, the SOAR Framework Solution Pack is installed by default with the fresh installations of FortiSOAR. For detailed information about the SOAR Framework SP, see the SOAR Framework SP documentation. |
Data ingestion also has the following features:
- Supports fetching of data for each configuration of your connector, i.e., if you have two configurations present in your connector, then you can pull ingestion data for each configuration.
- Supports multiple queries for pulling data based on your requirement; however, you must specify one query to schedule the pulling of data from the connector into FortiSOAR.
- Supports easy and efficient ingestion of data from various sources using the intuitive UI of the Data ingestion wizard.
- Supports monitoring of the data ingestion that you have set up and provides information on which connectors are configured for using the Data Ingestion Wizard on the Data Ingestion tab of the
Connectorspage. The Data Ingestion also provides you other information such as what is the status of a configuration, what is the schedule for ingestion, when data was last pulled using that configuration, etc. - Supports inserting or upserting records in bulk during data ingestion, which improves the performance since all the records are created or upserted in one request.
Modes of Data Ingestion
Data Ingestion can work in any of the following three modes:
- Notification Based: Some connectors such as IMAP, Exchange, Syslog, etc have a Notification Service that gets instantly notified when a message arrives on the server. The notification service, in turn, triggers a FortiSOAR playbook to create FortiSOAR records from the fetched data.
- Schedule Based: Some connectors such as QRadar, Anomali, ServiceNow, etc use the Fetch APIs of the integration, i.e., for example, the fetch API of Anomali, along with a user-defined query to fetch data from the product into FortiSOAR. These fetch playbooks are scheduled to run by default, every 5 mins, or can also be scheduled to run according to a user-defined interval.
Note that most integrations that support a Notification Based ingestion also support a Schedule Based ingestion. You must, however, configure only one of the two since otherwise both would pull the data from the same source and there might be data loss due to conflicts. - App Push: Some connectors such as Splunk have an add-on that is provided by FortiSOAR and which can be installed on the server-side to push data from the integration to FortiSOAR. The add-on is configured with a user-password or appliance-based authentication in FortiSOAR and it triggers FortiSOAR playbooks to create the records in FortiSOAR.
Permissions required for using the Data Ingestion Wizard
For permissions on using connectors, see the Introduction to connectors chapter. Apart from this, to use data ingestion, you must be assigned a role that has Read and Update permissions on the Connectors module and Create, Read, Update, and Execute permissions on the Playbooks module. If you want to schedule the data ingestion, then you are also required to have Create, Update and Read permissions on the Schedules module.
Data Ingestion Wizard
The Data Ingestion page displays connectors that are configured for using the Data Ingestion Wizard, i.e., you can use the data ingestion wizard to ingest data into FortiSOAR for these connectors.
To view the data ingestion page, log on to FortiSOAR, and on the left navigation pane, click Automation > Data Ingestion, which displays all the connectors that are installed on your system and are enabled for data ingestion, along with the number of configurations available for that connector.
From version 7.0.2 onward, you can set the logging levels (INFO or DEBUG) for your ingestion playbook by clicking Set Playbook Logging Levels, which displays the Playbook Execution Log Level dialog:
From the Select Execution Log Level field, select the logging level that you want to set for this playbook and click Apply. By default, the INFO log level is set for ingestion playbooks; however, if you want extensive logging for ingestion playbooks, then retain the logging level as DEBUG, and click Apply.
|
|
Changes made to the logging level apply to all ingestion playbooks across all the configurations of the particular connector. If you want to update only a particular configuration of the connector, then you have to go to the respective playbook collection and selectively update the logging levels. |
You can also run the data ingestion wizard on agent configurations. To display the details of the configurations, click the <number of configurations> configurations available link. To view the configuration details of the current node, click Self. To view the agent configuration details, click Agent, and then from the drop-down list, select the name of the agent whose configuration details you want to view, as shown in the following image:
Details that are displayed for the configurations are as follows:
- Status of a configuration, whether it is Available or Disconnected.
- Schedule for running the ingestion, i.e., what is the frequency at which the third-party integration will be polled to ingest data into FortiSOAR.
- Last Data Pulled on contains the DateTime when the data was last pulled into FortiSOAR using this configuration.
- Actions contain the following options:
Configure Ingestion: Clicking this link displays the Data Ingestion Wizard. This option is displayed when you are configuring data ingestion for the first time for a particular configuration.
Ingestion Settings: Clicking this link displays the Data Ingestion Wizard with the configured ingestion settings. This option is displayed when you have already configured data ingestion for a particular configuration.
Ingestion Playbooks: Clicking this link opens the ingestion playbooks collection in a new window.
Trigger Ingestion Now: Clicking this link immediately starts the data ingestion process. Subsequent data ingestion occurs based on the data ingestion schedule you have set.
Start Ingestion / Stop Ingestion: Clicking this link either starts ingestion for a newly-added configuration or stops ingestion for a particular configuration based on the ingestion settings you have configured.
|
|
If you have upgraded to FortiSOAR 6.0.0 or later from an earlier version, then before you reconfigure ingestion for the same connector configuration, you must deactivate the earlier ingestion playbooks that are present in the ingestion collection for the connector. The links to the ingestion playbooks that were created prior to the upgrade will be present on the System Fixtures page in the "Ingestion Playbooks" section will not be visible in the Data Ingestion tab (new in version 6.0.0) of the "Connectors" page. If your data ingestion is schedule-based, then you must also stop or delete the earlier schedules for the connector. |
Process of ingesting data using the Data Ingestion Wizard
- Log on to FortiSOAR.
- On the left navigation pane, click Data Ingestion (see Data Ingestion) or go to Content Hub or Automation > Connectors and click the Manage tab, which lists the installed connectors in the card view. For more information, see Data Ingestion.
- On the Manage tab, click the connector card using which you want to ingest data. For our example, we have chosen IBM QRadar.
- On the
Connector Configurationpopup, from the Select Configuration drop-down list select the configuration for which you want to configure the ingestion, and then click Configure Data Ingestion.
Only connectors that have been enabled for data ingestion will have the Configure Data Ingestion button.
Note: To ingest data, your connector must be in the Available state. - Click Configure Data Ingestion to display the
Startscreen of the Data Ingestion Wizard.
If you are running data ingestion for the first time, click the Let's Start by fetching some data button to display theFetch Sample Datascreen. However, if you have previously run ingestion using the IBM QRadar connector, you will also see the Let's start with last saved data button. Release 7.2.0 has enhanced data ingestion to save the pulled results from the previously run ingestion and use the same instead of re-fetching the results. Clicking Let's start with last saved data moves directly to theField Mappingscreen, skipping theFetch Sample Datascreen, as the data pulled from the previous run ingestion will be used. In this case, a Skip button is also added to theFetch Datascreen.
Release 7.2.0 also provides you with the option of selecting a custom playbook collection, other than the sample playbook collection that is bundled with the connector, to be used for ingesting data. Examples for the need of custom playbook collections could be in the case of a War Room that is set up with the unified communication feature, where we need communication to link with the war room record whenever a relevant email is ingested, which can be achieved by a custom data ingestion playbooks collection, or in case of MSSP environments where custom data mapping can be referenced for onboarding new customers, etc. Therefore, from release 7.2.0 onwards, you can click Advance Settings and from the Choose custom integration collection drop-down list, you can select playbooks from different collections that support data ingestion to be used for data ingestion or upload a custom data ingestion playbook collection. For playbook collections to be listed in the Choose custom integration collection drop-down list, ensure that playbook collection has a#dataingestiontag and the ingestion playbooks have the#<nameOfConnector>and#dataingestiontags, for example,#qradar#dataingestion. If you select a custom data ingestion playbook collection, then data is fetched using the selected playbook collection.
Note: When you use a custom playbook collection for data ingestion, then in this case the sample playbook collection gets overridden by the custom playbook collection in the ingestion collection, i.e., in the playbooks collection that is shown when you click Playbooks in the connector row on the Data Ingestion page. - Sample data is required to create a field mapping between your connector data and FortiSOAR. The sample data is pulled from connector actions or ingestion playbooks. By default, FortiSOAR ingests data using an "Ingestion Playbook" that is included by default with each connector that is enabled for data ingestion.
A connector would generally require some configuration details, which you will require to fill in on this screen. For example, in the case of IBM QRadar, in the Search Query field, enter the query based on which you want to fetch data into FortiSOAR. In the Pull Offenses in Last X Min, enter the number of minutes for which you want to retrieve created or modified offenses from IBM QRadar, for example, 10, in this case, the data ingestion wizard will fetch offenses that are created or modified in the last 10 minutes from IBM QRadar. In the Timezone of the QRadar server, specify the timezone of the QRadar server; this is used to convert for pulling offenses in the last X minutes, and in the Event Record Limit, specify the maximum offenses records you want to fetch, and then click Fetch Data.
Another example is Syslog where you will see the Message_samples field in which you can add samples of messages in the CEF Format using which you want to map the fields:
- On the Field Mapping screen, map the fields of the sample data to the fields present in FortiSOAR as follows:
- The Field Mapping screen displays the Sample Data on the right side of the screen and the Field Mapping (FortiSOAR fields) on the left side of the screen. The sample data is in the form of a Key-Value pair.
From the Module drop-down list that appears next to Field Mapping, select the FortiSOAR module for which you want to map the fields. The default module will be already be selected, for example, Alerts.
Note: If you select any module other than the default module, you will require to remap all the fields. - From the Sample Data fields, map the fields onto the fields present in the Alerts module as follows:
Important: Some fields such as Name and some picklists can come pre-mapped with their keys. You do not require to re-map these fields unless you want to override their default values. You can search for fields in the record and the sample data.
To map a field, click the key in the sample data to add jinja for the field. For example, to map thedestination_networksfield from the IBM QRadar sample data to theDestination IPfield in FortiSOAR, click Destination IP and then click destination_networks:
To view the key of a field, double click in the field, for example, if you click the newly-mapped description field, its key{{vars.sourcedata["destination_networks"]}}will be displayed. Once the key (which is in jinja) is displayed, this field will always be displayed with the key value.
Note: If bulk insert or upsert is supported for the connector, then the key value changes from{{vars.sourcedata["name of the field"]}}to{{vars.item["name of the field"]}}. For example,{{vars.item["destination_networks"]}}.
From version 7.0.0 onwards, if your administrator has enabled any 'Lookup' or 'Picklist' type of field to accept the values generated from the recommendation engine, then you will see an Auto populate checkbox appearing beside this field. For example, the 'Type' field in the following image:
If you select the Auto populate checkbox, and users have not specified any values for such fields, then the value of such fields gets auto-populated with the values from the recommendation engine that is based on learning from past similar records.
Picklists can come pre-populated with their defined defaults if they are available. You can also map picklists using the wizard.
To map a picklist, such as Status, select the picklist whose value you want to map. For example,severityfrom the IBM QRadar sample data can be mapped to theSeveritypicklist in FortiSOAR by clickingseverity. FortiSOAR would already have mapped this picklist by default, and it will appear asseveritywhose key value is{{vars.sourcedata["severity"]}}. Next, you must map the items of the Reputation picklists. To view and map the items of the Severity picklist in FortiSOAR, click the down arrow (v). The Severity picklist has items such as Minimal, Low, Medium, Hight, and Critical. These picklist items can be mapped as per the values defined in the source. You can map more than one picklist item in FortiSOAR can map to a single value in the source. For example, you can map both 2 to both Minimal and Low in FortiSOAR. You can also map one picklist item in FortiSOAR to two values or more values in the source, for example, Low can be 2,3,4. In this case, if the severity field in IBM QRadar has values 2, 3, or 4, then all cases with confidence 2 to 4 will be mapped to Low severity in FortiSOAR. You can also specify the mapping of a range of values, lesser than, and greater than values. For example, High can be mapped7..10in FortiSOAR, which means that if the severity field in IBM QRadar contains any value between 7 to 10 they will be mapped as High severity in FortiSOAR. Similarly, if you map Critical to>10<20in FortiSOAR this means that if the severity field in IBM ThreatStream contains any value greater than 10 and less than 20, then they will be mapped to Critical severity in FortiSOAR.
Note: Multiple expressions of type "number" must be separated by a space. Also, in the case of a range, there must be two dots between the numbers.
You can also specify string values in a picklist such as Open, In Progress, Closed, etc. Multiple expressions of type "string" must be comma-separated.
In case you want to use another query to fetch additional data to create a comprehensive mapping, click the + Fetch additional sample data link that appears in the Sample Data header. Clicking the + Fetch additional sample data link opens the Configurations dialog in which you can change the configuration such as, updating the Search_query, and then click Fetch Data. The data ingestion wizard fetches the data based on the updated configuration on a new page in theSample Datasection. You can continue mapping based on the newly fetched data.
Once you are satisfied with the mappings, click Save Mapping & Continue.
- The Field Mapping screen displays the Sample Data on the right side of the screen and the Field Mapping (FortiSOAR fields) on the left side of the screen. The sample data is in the form of a Key-Value pair.
- (Optional) If your connector is enabled for scheduling, such as IBM QRadar, then you will be shown the Scheduling screen, using which you can specify the schedule for data ingestion from the connector into FortiSOAR, i.e., you can specify the frequency of polling a third-party integration, such as SIEM, so that the content gets pulled from the third-party integration into FortiSOAR. By default, scheduling is set to pull data every 5 minutes.
To configure scheduling, from the Do you want to schedule the ingestion? drop-down list, select Yes.
In theConfigure Schedule Settingssection, specify the Cron expression for the schedule. For example, if you want to pull data from IBM QRadar every 15 minutes, click Every X Minute and in the minute box enter*/15.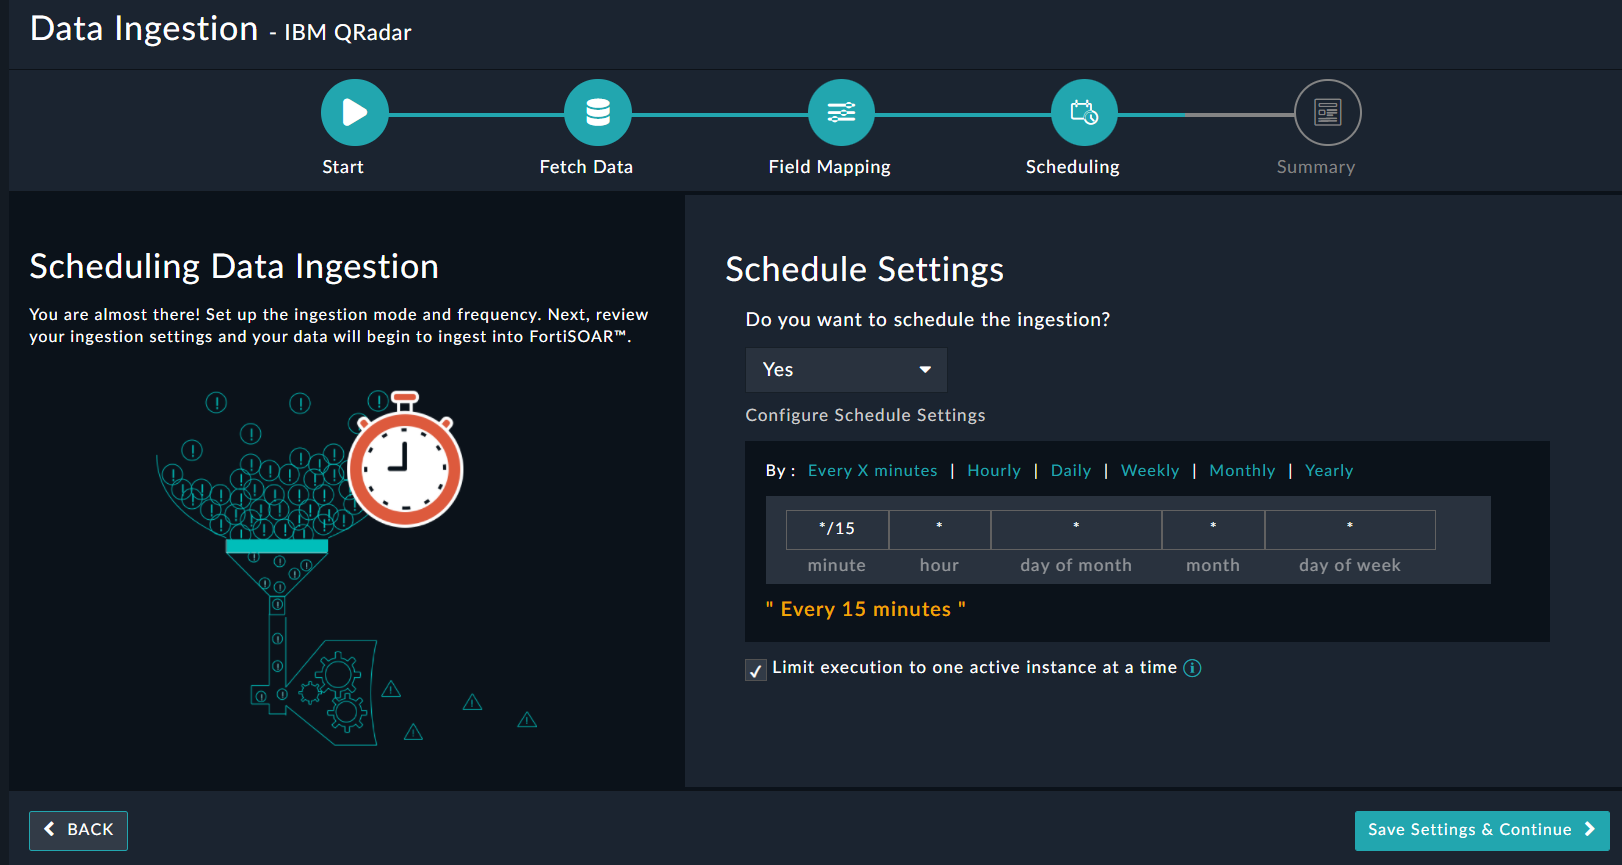
Note: If you select the Limit execution to one active instance at a time checkbox, then do not rerun the workflow (schedule) if the previous schedule is still running. Some connectors such as IMAP support data ingestion using both a scheduled-based pull as well as instant notification using the Notification Service. You must, however, configure only one of the two, since both would otherwise pull the data from the same source and there could be data loss due to conflicts. Therefore, theSchedulingscreen for the IMAP connector displays the following warning:
Only if you want to ingest data using a scheduled-based pull, then you should use theSchedulingscreen to specify the schedule for data ingestion from the IMAP connector into FortiSOAR.
Once you are satisfied with the scheduling, click Save Settings & Continue. - The Summary screen displays a summary of the mapping done, and it also contains links to the Ingestion playbooks.

Click Trigger Ingestion Now to immediately begin the process of data ingestion. Subsequent data ingestion occurs based on the data ingestion schedule you have set.
Click Done to complete the data ingestion and exit the Data Ingestion Wizard.
Notes for Data Ingestion Playbooks:
- The Summary step contains links to playbooks that contain the data mapping based on the mappings you have specified in the wizard. You can click the links and open the playbook in the Playbook Designer.
For example, to open the playbook that fetches data from the Anomali ThreatStream connector, click Anomali ThreatStream > Ingest link, which opens theAnomali ThreatStream > Ingestplaybook in the Playbook Designer. - You can open the Data Ingestion Playbooks collection by clicking here in the Summary step.
- You can modify these data ingestion playbooks or the mappings in the playbooks using the Playbook Designer and those modifications are reflected in the mappings, i.e., if you open the "Data Ingestion Wizard" again you will see the modified content.
Notes for Data Ingestion
- If you are using the IMAP connector for data ingestion, then you must ensure that you configure either a scheduled-based pull, using Scheduling in the Data Ingestion Wizard, or the instant notification method using the Email Notification Service, by clicking the Enable Email Notification Service in the IMAP connector configuration pane. If you configure both then both the methods would pull the data from the same source and there could be data loss due to conflicts.
- If you are using the IMAP connector for data ingestion and at the field mapping stage you change the default module for data ingestion, which is set as Alerts to any other module, for example, Emails, then the playbook used for ingesting data remain active and no records will be created. To get the data ingestion to work correctly, do the following:
Open the> IMAP > Create Recordplaybook and click the Upsert File Indicators step. In the Upsert File Indicators step, you need to initialize the IRI value of the module that you want to use for data ingestion instead of the alert record IRI. To achieve this, click the emailRecordIRI field, and use "Dynamic Values" to enter the IRI value of the required module or enter the following Jinja value:{{vars.steps.Create_Record['@id']}}.
For example, if you have changed the module used for data ingestion from Alerts to Emails, then to initialize theemailRecordIRIvariable instead ofalertRecordIRI, in the emailRecordIRI field, enter the{{vars.steps.Create_Record['@id']}}value.
Also, note that If you select any module other than the default module, you will require to remap all the fields. - If you are using the Syslog connector for data ingestion, then you must ensure playbooks used for data ingestion provide input in the CEF format, otherwise, you require to modify the playbooks. Since CEF is the most common format for Syslog messages, the default data ingestion playbooks parse the message as CEF. If the Syslog messages from your server are non-CEF complaint, you can modify the "Parse CEF" step in the
> Syslog> Fetchplaybook that is part of the playbooks shipped with the Syslog connector, before you configure Data Ingestion. The Syslog connector also provides "Parse Message" action to parse RFC 3164 and RFC 5424 formatted messages and convert these message formats to CEF format, instead of using the "Parse CEF" step. - From version 7.0.2 onwards the ingestion wizard has been enhanced to not fail if there are no
#fetchor#createplaybooks. There can be connectors that require only the#ingestplaybook that contains a single action, which pulls data and creates records. Such connectors do not require the#fetchplaybook since data is not required for custom module mapping and the#createplaybook is not required since the 'Create Record' step is not needed. Therefore, in this case, the Data Ingestion Wizard works as follows:- The Data Ingestion Wizard is loaded even if only the 'Ingest' playbook is present; and in this case, the wizard displays only the
Schedulingscreen. - If the 'Fetch' playbook is not present, the wizard does not display the
Fetch Datascreen. - If the 'Create' playbook is not present or the 'Create Record' step is not present, the wizard does not display the
Field Mappingscreen.
- The Data Ingestion Wizard is loaded even if only the 'Ingest' playbook is present; and in this case, the wizard displays only the
Troubleshooting
The Fetch Data screen in case of IMAP displays the`ERROR :: create failed: [ALREADYEXISTS] Folder name ... error
This error occurs when you are running the Data Ingestion Wizard using the IMAP connector. Click Fetch Data on the Fetch Data screen and an error such as "> IMAP > Fetch has failed because CS_INTEGRATION-5: Error occurred while executing the connector action ERROR:: create failed [ALREADYEXISTS] Folder name conflicts with existing folder name........" is displayed.
The above error can occur due to the following reasons:
- This issue occurs if the Email destination folder specified on the server is similar to an existing folder. Mailbox names are case sensitive on the creation of folders using the IMAP client, for example, if you specify
MyFolderin the Email destination field and a folder namedmyfolderalready exists on the server, then this error will be displayed on the Fetch Data screen when you are running the Data Ingestion Wizard. - This error also occurs if the folder that you have specified does not have permission for the IMAP client.
Resolution
- In the IMAP configuration pane, update the folder name in the Email destination field and save the configuration:

- Ensure that you provide appropriate permissions to the email destination folder for the IMAP client.
Post upgrade to FortiSOAR 6.0.0 or later from version 5.1.0 does not save any data ingestion configurations
If you have upgraded your FortiSOAR version from 5.1.0 to 6.0.0 or later, you will see data ingestion configurations that you had saved in version 5.1.0 are not available in version 6.0.0. You will not see any schedules, ingestion playbook link, or actions button on the Data Ingestion page. However, your data ingestion will continue to run. This is because support for fetching data for each configuration of your connector has been introduced in version 6.0.0 and therefore, the older data ingestion configurations and playbooks have been deprecated.
Resolution
Rerun the data ingestion wizard, i.e., reconfigure your data ingestion if required. Note that your previously configured data ingestion will continue to run, however, you will not be able to see the historical data. If you do require to reconfigure the data ingestion, then you must ensure that you stop your previous configured data ingestion, otherwise both the current and the old data ingestion will continue to run.