


Widget Library
FortiSOAR contains a "Widget Library" that allows users to edit out-of-the-box (OOB) widgets and build new widgets for custom use cases. FortiSOAR provides many OOB widgets for graphs, charts, utilities etc., however there are always customizations and new use cases that are required to meet the user expectations. This feature provides more control to users and allows them to shape the widget based on their available data. For more information on the OOB widgets available in FortiSOAR, see the Dashboards, Templates, and Widgets chapter.
|
|
If you have upgraded your instance to FortiSOAR 6.4.1 or later from a version earlier than 6.4.1, then you will not be able to view the Widget Library, due to missing permissions on the |
Widget Library Page
The Widget Library page contains the following three tabs:
-
Installed: Displays the widgets that are currently installed on your FortiSOAR system
-
Widget Store: Displays a list of widgets currently available that you can install and use.
-
Workspace: Displays the widgets that are currently being developed.
Widget Store
Use the Widget Store to view, search, and install, upgrade, and uninstall widgets that are part of the FortiSOAR OOB widget library.
Following are the permissions that you must be assigned to perform operations on widgets:
- To install a widget, you must be assigned a role that has a minimum of
Create,Update, andReadaccess on theWidgetsmodule. - To upgrade and configure a widget, you must be assigned a role that has a minimum of
UpdateandReadaccess on theWidgetsmodule. - To uninstall a widget, you must be assigned a role that has a minimum of
ReadandDeleteaccess on theWidgetsmodule. - To view the widgets listings in the Widget Store and to use the widgets as part of FortiSOAR pages you must be assigned a role that has a minimum of
Readaccess on theWidgetsmodule.
Once you create a new widget or edit an existing OOB widget, and you want to display that widget in dashboards, reports, view panel, listings, etc., you also require appropriate permissions to the FortiSOAR page in which you want to display the widget.
|
|
To access the Widget library, you must ensure that update.cybersponse.com is reachable from your FortiSOAR instance. |
To open to the widget store, on the FortiSOAR left navigation, click Widget Library. On the Widget Library page, click the Widget Store tab. The Widget Store page appears as shown in the following image:

You can search for a widget using the Search Widgets field.
Each widget that is part of the Widget Store has a brief description of the widget, the feature list for the widget. It contains compatibility information, information on which FortiSOAR pages, such as dashboards, add forms, etc., on which the widget will be displayed, and an example of the widget usage along with a sample screenshot of the widget.
To create a new custom widget, click Create Widget, which opens the Create New Widget Wizard. For details on creating widgets, see Creating Widgets.
To upload a custom widget (.tgz) that you have already created, click Upload Widget. This opens the Upload Widget popup where you can drag-and-drop the .tgz file of the widget or browse to the .tgz file to add the widget in FortiSOAR. To delete all existing versions of the widget from your system, click the Delete all existing versions checkbox.
To install a widget, click Install Widget, it appears in the Installed tab.
Installed Widgets
You can add the installed widgets to FortiSOAR pages, such as reports, view panel, etc., based on the widget configuration specified.

You can perform the following actions on installed widgets:
- To edit a widget to suit your requirements, click Edit Widget, which if you are editing a local widget, opens the code editor interface, or asks you to change the version of the widget; or if you are editing a widget from a repository clones the repository widget and then opens the code editor interface. For details on editing widgets, see Editing an existing widget.
- To add a version for a widget (new in 7.0.2) click Add Version, which opens the
Clone Widgetdialog. Enter the version number for the widget in the x.y.z format and click Save. This opens the widget in the code editor interface, where you can make the required edits to the widget or close the widget. The updated version of the widget gets saved in Workspace in theDraftstate. The ability to add versions enables you to install multiple versions of a widget and systematically enhance the functionality of widgets. - To export a widget in the
.tgzformat click Export.
Note: If you export a widget from the 'Installed ' tab, and you import that widget, then such widgets get directly installed; however, if you export a widget from the 'Workspace' tab, then such widgets are added to the 'Workspace' tab. - To uninstall an installed widget click Uninstall Widget which displays a
Confirmationdialog. Click Confirm on the dialog to uninstall the widget. FortiSOAR displays the Success message and the installed widget number decreases by 1.
You cannot uninstall system widgets such as the Mobile Settings widget or the Task Management widget.
- To create a new custom widget, click Create Widget, which opens the
Create New WidgetWizard. For details on creating widgets, see Creating Widgets. - To upload a widget (.tgz) that is already created, click Upload Widget. You can upload a widget that has been exported from the Installed tab or can upload widgets from the Workspace tab. Clicking Upload Widget opens the
Upload Widgetpopup where you can drag-and-drop the .tgz file of the widget or browse to the .tgz file to add the widget in FortiSOARTo delete all existing versions of the widget from your system, click the Delete all existing versions checkbox.
Workspace
Use Workspace to develop widgets. To create a new custom widget, click Create Widgetto open the Create New Widget Wizard, which guides users to create a new widget. For details on creating widgets, see Creating Widgets .
On the Workspace page, you can perform the following operations:
- To edit a widget, click Edit Widget, which opens the code editor interface.
- To preview the changes made to the widget and view how the widget will appear on the pages specified, click the Preview button. It is useful to preview your changes when you are developing a widget, without the need to publish the widget.
- To add a version of the widget, click Add Version, and enter the required details in the
Clone Widgetdialog. - To export the widget as a
.tgzfile, so that it can be used in another environment, click the Export button. Once the widget is saved as a.tgzfile, you can import the same using the Upload Widget button.
Important: If the Data Import JSON file contains a version of the widget that is not available in the FortiSOAR repository, then the latest available version of that widget gets installed. For example, if you are trying to import the JSON file that contains userAssignments 1.0.0 widget that is not available in the FortiSOAR repository; but, version 1.1.0 is available, then version 1.1.0 of the userAssignments widget gets installed.
- To create a new widget, click Create Widget.

Editing an existing widget
To edit a widget from the repository to suit your requirements, do the following:
- On the FortiSOAR left-navigation, click Widget Library.
- On the Installed tab, select the widget you want to edit, and the click Edit Widget.
Note: When you click Edit Widget, FortiSOAR displays a confirmation dialog box to get a confirmation for creating a local copy of the widget that you can edit, so that you can edit an existing widget without impacting the original one. Click Confirm to display theClone Widgetdialog. - In the
Clone Widgetdialog, enter the details such as the title and version of the widget that you want to edit, and then click Create.
This saves widget in Workspace in theDraftstate and opens the widget in the code editor interface. The directory structure for widgets is explained in the Directory structure and contents for widgets section.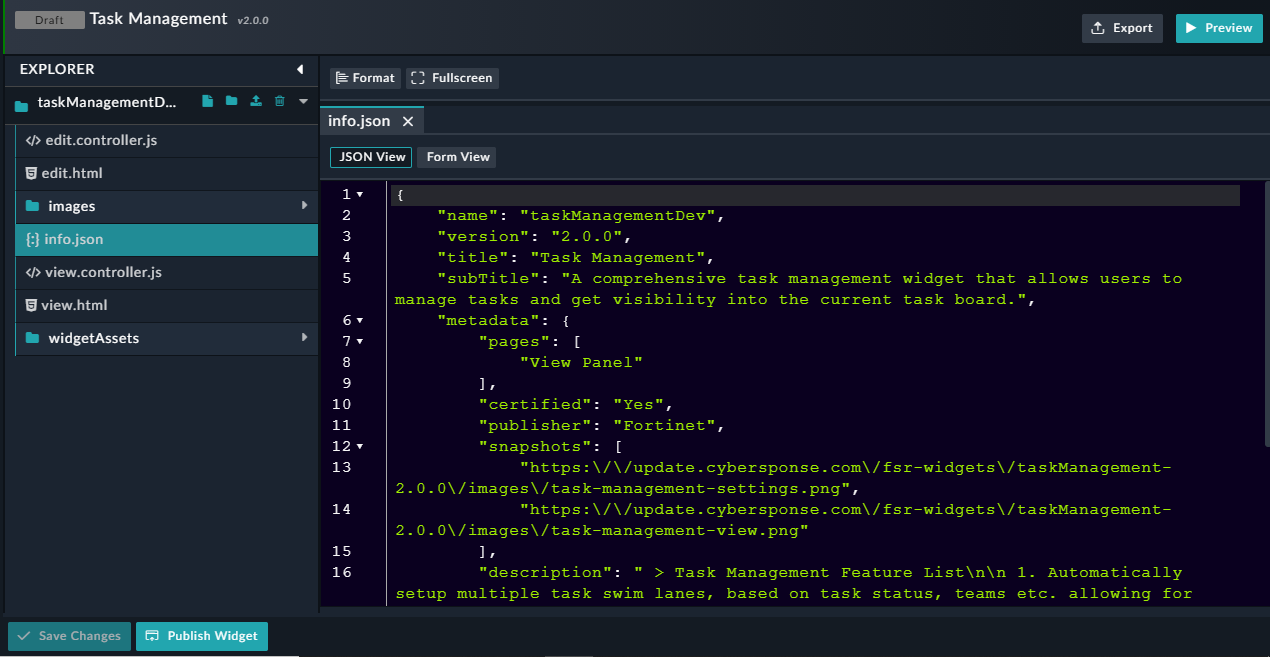
- Edit the existing widget as required.
Note: You cannot change the 'name/API identifier' and 'version' of a widget once it is set.
From version 7.0.2 onwards, you can click the Form View button to edit theinfo.jsonfile in a Form view, instead of editing the file in the raw JSON format:
Once you have completed making the changes click Save Changes.
The widget gets saved in theDraftstate.
You can also perform the following operations on the code editor interface:- Code Formatting: To lint your code automatically and make the code more human-readable and error-free (programming and programming errors), select the entire code in the editor and click the Format button.
-
Full Screen: To get a better working view and make the editor go full-screen, click the Fullscreen button. To exit the full screen, press
ESC. -
Export: To export the widget as a
.tgzfile, click the Export button. You might want to import the exported widget's.tgzfile into another system. - Preview: To preview the widget development progress, at any time during the development, so that it becomes easier to make changes, click the Preview button.
-
Delete: To delete a widget that is not installed. Clicking Delete displays a
Confirmationdialog, and you can click Confirm to delete the widget.
- Once you have completed making the changes, click Publish Widget.

Click Publish Only to publish the widget and makes it available on the Installed tab for all the users of the system and enables you to use this widget on the pages as specified in the widget configuration. However, a working copy for the same is also maintained in the Workspace tab.
To delete all existing versions of the widget from your system, select the Delete all existing versions checkbox.
After you have published the widget, you will also see a Revert To Last Publish button on the code editor interface. Clicking Revert To Last Publish clears any changes made to the widget code since the lastPublishevent.
Creating Widgets
Version 7.0.2 introduces a Widget Building Wizard to efficiently create new widgets.
To create a new widget, do the following:
- On the FortiSOAR left-navigation, click Widget Library.
- Click Create Widget.
From version 7.0.2, this displays theCreate New WidgetWizard.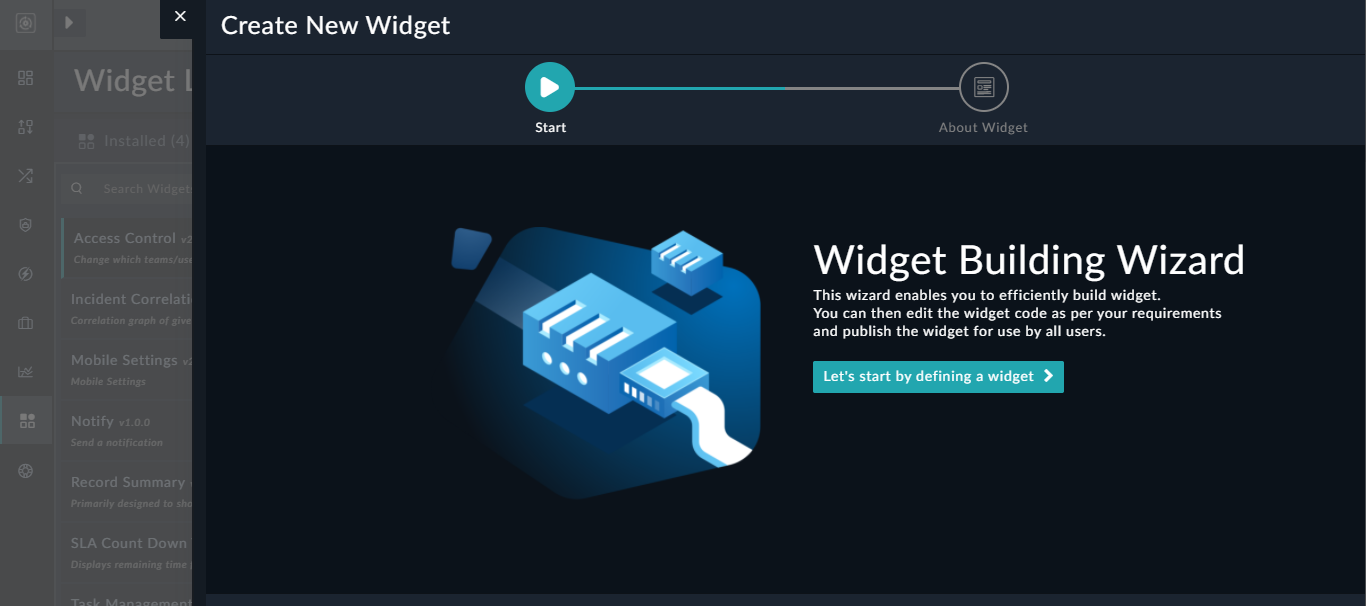
Prior to version 7.0.2, the code editor interface with the contents of the default "Hello World v1.0.0" widget would be displayed.
- Click Let's start by defining a widget and provide the basic details of the widget such as the title, version etc. and then click Create Widget.
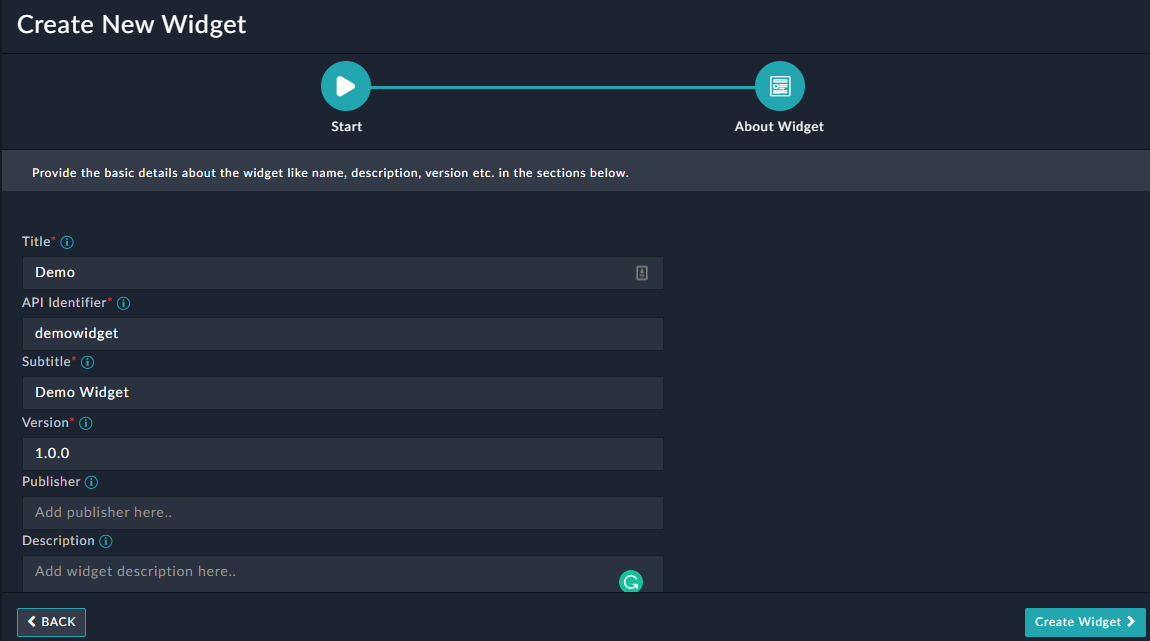
Details that you can provide are:- In the Title field, enter the title of your widget.
- In the API Identifier field, enter a name that would be used to as a variable in the widget code to reference this widget. The variable that you use here can be alphanumeric; however, it should not contain any special characters and it must not start with a number.
Also, note that the value that you enter in this field must not match the name of any other widget that is available in the Widget Store. For example, you cannot entermobilesettingdevin this field, since the Mobile Settings widget is available in the Widget Store. - In the Subtitle field, enter the subtitle of your widget.
- In the Version field, enter the version of the widget in the x.y.z format. For example,
1.0.0. - In the Publisher field, enter the name of your company as the publisher of this widget.
- In the Description field, enter information for the widget that you are creating, which enables users to understand more about the widget.
- From the Pages drop-down list, select the pages in FortiSOAR such as Dashboard, Listing, Add Form etc on which you want to display this widget.
- In the Compatibility field, enter the FortiSOAR version, in the x.y.z format, with which this widget is compatible.
- Toggle Certified to Yes or No, depending on whether you want to publish the widget as certified or uncertified.
- Once you click Create Widget, the widgets open in the code editor interface and you can edit the widget as per your requirements. For details of the directory structure of the code editor interface, see the Directory structure and contents for widgets. Details on editing widgets are present in the Editing an existing widget section.
Once you have completed editing the widget, click Save Changes. - Once you have completed making the changes, click Publish Widget.
This will publish the widget and enable you to use this widget on the pages as specified in the widget configuration.
Directory structure and contents for widgets
widgetname folder--+ editController.js--+ edit.html--+ images---+ imagefiles--+ info.json--+ viewController.js--+ view.html--+ Widget Assets---+ css---+ html---+ js
Controller and view files
The controller and view files are used to define and stylize the widget. The view.html and viewController.js defines the output of the widget, i.e., how the widget will be displayed on the specified FortiSOAR pages. The edit.html and editController.js defines the settings of the widget.
You can also include CDNs (Content Delivery Networks) in edit.html and view.html by using standard link syntax
Images
The images folder contains any image that is associated with the widget. For example, sample screenshots of the how the widget will be displayed on FortiSOAR pages.
info.json
The info.json file contains information about the name, title, subtitle that represents a brief description of the widget, and the version of the widget. In its metadata section it contains a comma-separated list of FortiSOAR pages, such as dashboards, view panel, etc., in which you can add and display the widget. For example:
"pages": [
   "Dashboard",
   "View Panel"
  ]
It also contains the following information for the widget:
- The
certifiedparameter contains information whether the widget has been certified by FortiSOAR. - The
snapshotsparameter contains the path of the screenshots that are part of the widget. - The
descriptionparameter contains the feature list of the widget. - The
help_onlineparameter contains the link to the widget documentation added to thehelp_onlineparameter. - The
compatibilityparameter contains a comma-separated list of FortiSOAR versions with which the widget is compatible.
Widget Assets
Use the "Widget Assets" folder to create or import external assets that can be leveraged to build widgets, enabling you to create complex widgets and expands the capabilities of the "Widget Library." You can also create your own library and from version 7.0.2 onwards, you can create new files or folder in the root folder itself. To use an uploaded or created JS library, right-click the respective file, select the Copy Path item, and then include the path in the "src" of the script tag in edit.html or view.html according to your requirement.
The Widget Assets folder, by default contains the css, html, and js subfolders. You can create or import files such as, external JS files (external libraries), image files, etc. directly to any folder or sub-folder.
Actions that can be performed in the code editor interface
You can perform various actions such as creating or importing files or folders in the code editor.
- Create File - Creates a file in the root (widgetname) folder or in the folder you have selected. For example, if you have selected the Widgets Assets folder then this action creates the file in the selected folder. All the actions work in the similar way.
- Create Folder - Creates a folder in the root folder or in the folder you have selected.
- Upload File - Imports a file to the root folder or in the folder you have selected.
-
Delete File or Folder - Deletes the selected file or folder. If you have selected a folder, and you click the Delete button, then this action will delete all files within the selected folder.
Important: The root folder and the info.json, view.html, edit.html, view.controller.js, and edit.controller.js files cannot be deleted.
- Rename or Copy the Path of a File or folder - Right-click a file or folder to rename the file or folder or copy its path.

Once you have created or imported the required files you can use them in the widget. You can also edit the imported files in the code editor interface and can perform all the operations such as formatting the code, previewing the code, etc. as described in the Editing an existing widget section.
Using a widget in FortiSOAR pages
To use a FortiSOAR OOB widget or to use a custom widget that you have created, click the FortiSOAR page in which you want to add the widget. Then in the edit view of that page, add and configure the widget.
Let us take the example of the "User Tile" widget, which is used to view the logged in user's assigned records across multiple modules along with the user's avatar. It also supports filtering of records. If you want to add this widget to your dashboard, then do the following:
- Click Dashboard and to edit an existing dashboard, click the Actions icon (
 ), and then click Edit Dashboard.
 - Click Add Widget and from the
Widget Librarysection, click User Tile. - Edit the configuration of the widget as per the settings defined in the widget configuration. Details on editing widgets are present in the Editing an existing widget section.
In case of the "User Tile" widget, you need to provide the widget with a title, then choose the modules for whose records you want to view and you can also define filter criteria for filtering records of the selected module. For example, if you want to display Alerts and Incidents that are assigned to you, whose severity is set to "High" or "Critical", then you can edit the configuration of the User Tile widget as follows:
- Click Save and Apply Changes.
The widget will appear in the dashboard as displayed in the following image:
Important: To view the custom widgets that are part of FortiSOAR pages such asDashboardsandReportsyou must be assigned a role that has a minimum ofUsageaccess on theWidgetsmodule.