


Rules Engine (Deprecated)
|
|
From version 7.0.1 onwards, the Rules Engine has been deprecated, and it is recommended that you should not use this feature. The Rules Engine will not be available in the next major release of FortiSOAR. |
FortiSOAR provides you with a Rules Engine that allows you to automate processes and build rules based on logic. This makes it easier for you to maintain changes in your data in the future since all the logic is laid out in rules. You can develop rules to solve your business issues, such as sending an email to your SOC team when an Alert is "Created" or "Updated" whose Severity is "Critical" and Type is "Phishing."
|
|
To create and update Rules; you must be assigned a role with a minimum of |
From version 6.4.1 onwards, Rules are not part of the default navigation. You can add "Rules" to your default navigation using the Navigation Editor. To add Rules to the default navigation, do the following:
- Click Settings and in the
Application Editorsection, click Navigation. - Click the Modules tab, select Rules, and then click Add to Menu.
- In
Menu Items, drag-and-drop Rules to place Rules as per your preference in the Navigation bar.
You can also optionally add an icon to represent Rules. - Click Save.
This add Rules to the left navigation as per your preference.
For more information on the navigation editor, see the Navigation Editor section in the Application Editor chapter of the "Administration Guide."
Organizing Rules
Rules Collections
Use Rule Collections to organize your rules. A rule collection is similar to a folder structure in which you create and store rules that can be used for a particular strategy in your environment.
Rules
Based on the definition of a rule, FortiSOAR can take automatic actions when conditions fulfilling the rule are met. You must choose what triggers the rule, next, decide as to whether any action requires to be taken on the trigger, and then also specify what automatic action FortiSOAR will take based on the rule.
Creating Rules
- Click Automation > Rule Engine in the left navigation bar.
- On the
Rule Collectionspage, click New Collection to define a new rule collection in which to save the rule you want to create, or, click an existing rule collection and add the new rule in that collection.
Note: You cannot add a rule directly on theRule Collectionspage, you require to add rules to a rule collection. - In the
Add New Rule Collectiondialog, add the name of the collection in the Name field and optionally in the Description field, add the description for the rule collection.
You can also change the icon that represents the rule collection, by clicking Change Image and dragging and dropping your icon to theUpload an Imagedialog, or browsing to the icon on your system, selecting the icon and then clicking Save Image.
You can also add Tags to the rule collection making it easier for searching and filtering rule collections and rules. You can add special characters and spaces in tags from version 6.4.0 onwards. However, the following special characters are not supported in tags:',,,",#,?, and/.
Click Save to save the new rule collection. - To add a rule, click the collection in which you want to create the new rule, and then click Add Rule.
- In the
Add New Ruledialog, add the name of the rule in the Name field and optionally in the Tags field, add keywords that you can use to reference the rule.
Note: Rule names must be unique within the system. Rules with the same name in different collections are not allowed.
Click the Active checkbox to set the state of the rule asActive.
You can also add tags to a rule making it easier for searching and filtering rules.
Click Create to add the new rule.
This opens the<Rule Name>page. - On the
<Rule Name>page you can define conditions for the rule.
To define a rule, you must define a trigger for the rule. Next, you must add conditions to determine whether any action requires to be taken on the trigger and then you must specify the action that FortiSOAR must take automatically. - Triggers define when a Rule is to be executed. To define a trigger, in the
Define A Triggersection, in theWhen a (n)drop-down list, select the resource on which you want to run the rule, for example, Alert.
In theisdrop-down list specify the event that will trigger the action, for example, created or updated.
Therefore, in our example, we have specified that the rule will be triggered when an Alert is created or updated.
- Next, you must add conditions to determine whether any action requires to be taken on the trigger. To take a decision, in the
Make Decisionssection, specify the required condition by using the Nested Filters component. For more information on Nested Filters, see the Dashboards, Templates, and Widgets chapter.
First, you choose the Logical operator And or Or by selecting either All of the below are True (AND), or Any of the below is True (OR) from the drop-down list in theMake Decisionssection. For our example, since we want to check for both the Severity and Type fields, we select the All of the below are True (AND) option
Next, click the Add Condition link to specify a condition by specifying a field, based on the resource you have selected, from the Select a Field drop-down list, next specify an operator from the Operator drop-down list and then specify an option from the Select an Option drop-down list. For example, specify that execute the action only when theSeverity Equals Critical.
Note: You cannot apply filters on encrypted fields. Also, if you assign a "Custom" filter to a datetime field, such as Assigned Date, then the date considered will be in the "UTC" time and not your system time.
To add multiple conditions click the Add Condition link again.
For example, add a condition thatType Equals Phishing.
In this case, the action specified for the rule will be executed only when both the conditions of Severity and Type are met.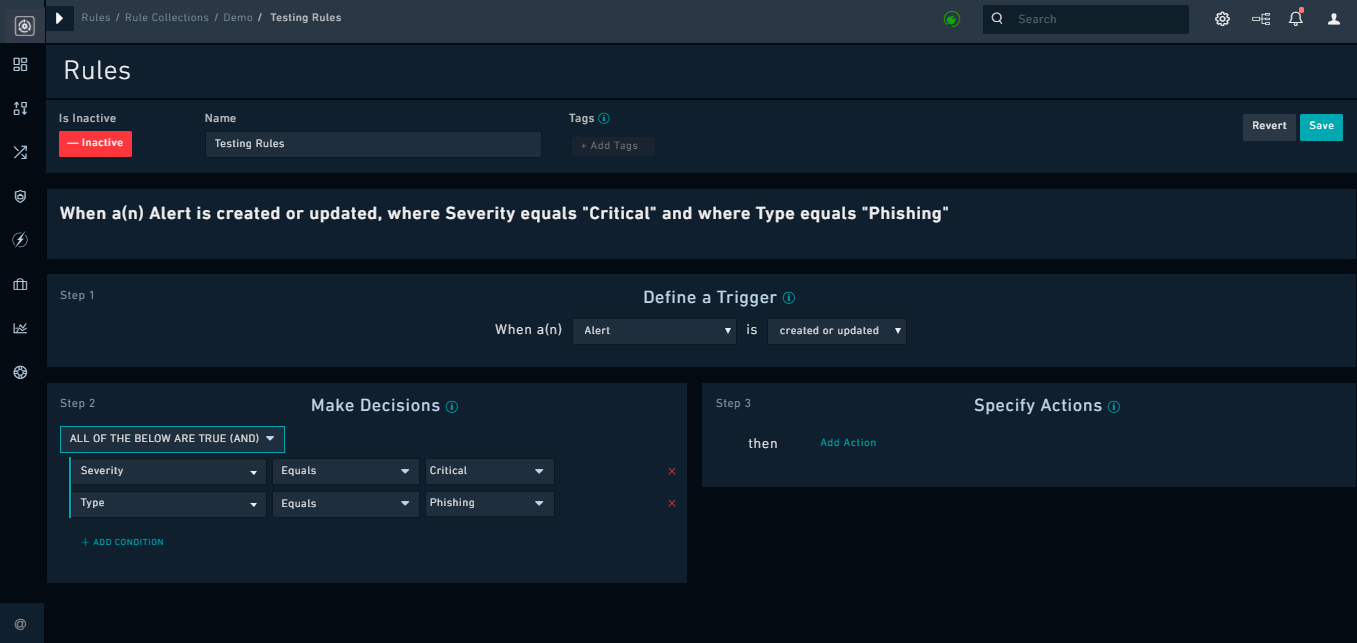
- Next, you must specify the action that FortiSOAR must automatically take if the conditions specified in the
Make Decisionssection are met. In theSpecify Actionssection, select the action to be performed by clicking the Add Action link. You can select actions such as Send Email, Insert, Update, or Find:-
Send Email: Send an email to the specified parties based on a template.
For example, in theSpecify Actionssection, from theSelect an actiondrop-down list select Send Email, then from theSelect a template, select the email template to be used to send the email, or click Create new template to create a new email template. Clicking Create new template displays theAdd New Email Templatedialog, where you define the email template, by specifying the Name, Subject, and Content. You can use Dynamic Values to populate a template. For more information, see the Dynamic Values chapter in the "Playbooks Guide."
Then click the Select Recipients link. This opens theSet Email Recipientsdialog, using which you can specify the distribution list in any of the following ways:
In the Email Addresses field, directly add the user (s) email addresses.
Or
In theMemberssection, in the Teams tab, select the team to whom you want to send the exported reports and click ADD. This moves the selected team to theSelected Recipientssection. When you select a team as a recipient, all members of that team will receive the exported reports. For example, you can select theSOC Managersteam, which means that if the rule is executed, all the members of theSOC Managersteam, will receive an email.
In theMemberssection, click the People tab, select the user to whom you want to send the exported reports and click ADD. This moves the selected person to theSelected Recipientssection.
Click Save to save the specified email recipients.
To add another action, such as Insert, Update, or Find, you can click the Add Action link. -
Insert or Update: Creates a new record or Updates an existing record in the selected module or another module. You can also optionally link the trigger record to this record.
For example, in theSpecify Actionssection, from theSelect an actiondrop-down list select Insert then click the Set Data link. This opens theSet Datadialog, using which you can specify the model in which you want to insert the record if the rule conditions are met. For example, from the Model drop-down list, selectIncidents. Specify the properties for the record, including what should happen in case the new record is a duplicate of an existing record, and then click Save. -
Find: Queries for records matching the specified criteria and then updates the records if necessary.
For example, in theSpecify Actionssection, from theSelect an actiondrop-down list select Find, then from the Select a resource drop-down list select the resource on which you want to run the query, for example Incident and optionally specify a condition by clicking the Add Condition link. Then from the Select an Action drop-down list, select Update to update the record. You can click Edit to open theSet Datadialog, using which you can specify the fields that you want to update if the conditions are met.
-
Send Email: Send an email to the specified parties based on a template.
- Next, you must specify the action that FortiSOAR must automatically take if the conditions specified in the
- Click Save to save the rule.
The rule based on our example, which is sending an email to yourSOCteam and two other users, when anAlertwhoseSeverityis "Critical" andTypeis "Phishing" is "Created" or "Updated", is displayed at the top of the<Rule Name>page as shown in the previous image.
Working with Rules
- Click Automation > Rule Engine in the left navigation bar.
- On the
Rule Collectionspage, you can import a collection of rules, if that collection in the appropriate json format. On theRule Collectionspage, click Import.
Drag and drop the json file, or click the Upload icon and browse to the json file to import the rule collection into FortiSOAR and then click Import.
Note: The name of the rule collection being imported must be unique.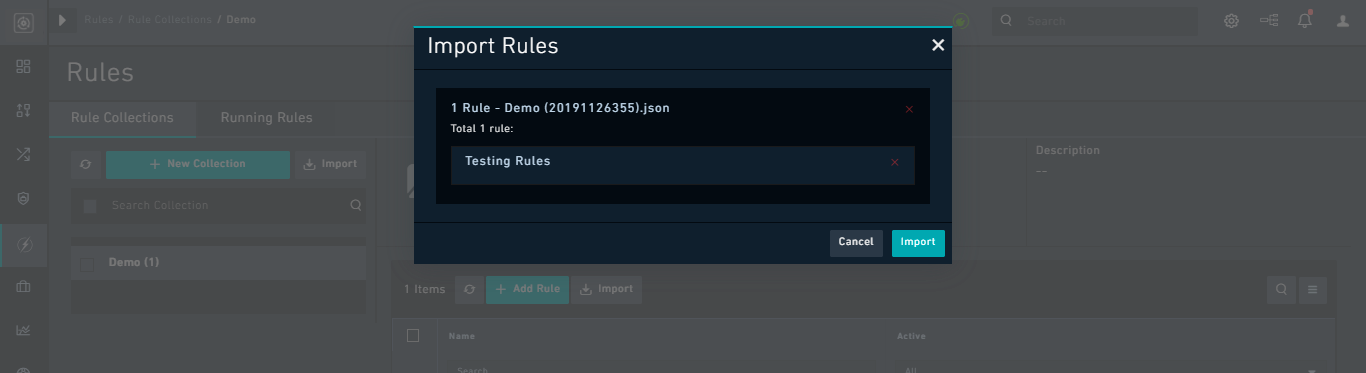
If the JSON format is incorrect, FortiSOAR displays an error message and does not import the file.
If the JSON format is correct, FortiSOAR imports the rule collection and displays a success message.
If there is any conflict with an existing rule, then FortiSOAR displays the conflict as shown in the following image: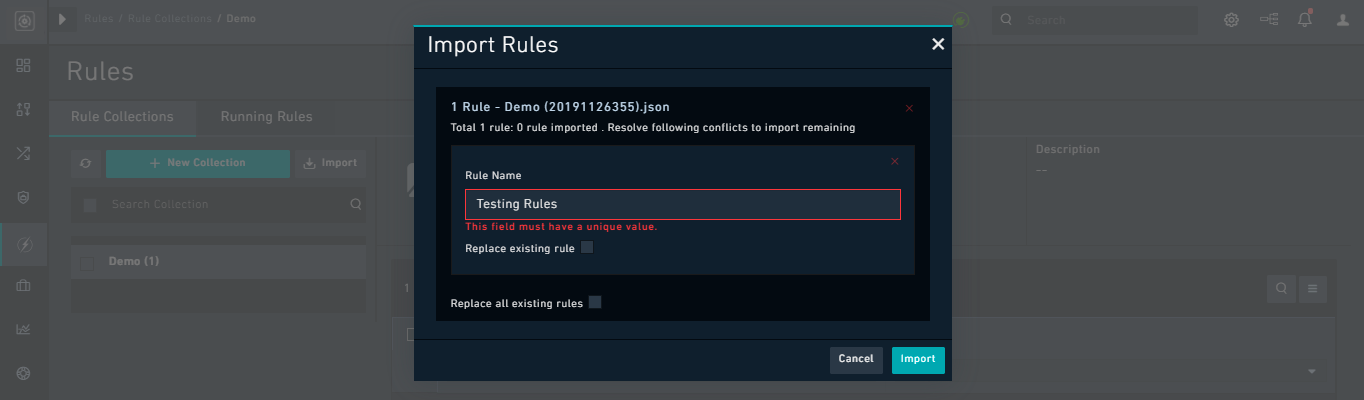
If you want to replace an existing rules or all existing rule, then you must click the Replace existing rule or the Replace all existing rules checkbox respectively.
You can also import a single rule, by clicking Import Rule on theRulespage. - On the
Rule Collectionspane, you can export or delete a rule collection.
To export a rule collection, select the rule collection and click the Export icon.
FortiSOAR exports the rule collection in the json format.
To delete a rule collection, select the rule collection and click the Delete icon. Users withDeletepermissions on theRulesmodule can delete rule collections.
FortiSOAR displays a confirmation dialog, and once you click OK, the rule collection is deleted. - To perform operations on rules, click the rule collection and select the rule on which you can perform the following operations: Activate, Deactivate, Clone, Move, Export, and Delete.

To export a rule, select a rule and click Export. FortiSOAR exports the rule in the JSON format.
To clone a rule, select a rule and click Clone. FortiSOAR clones the rule and places the cloned rule with the name asCopy of %Rule Name% (%New UUID%). Once you clone a rule, you can edit it as per your requirements. You can select more than one rule to clone at a single time.
To move a rule to another existing collection, select a rule and click Move. FortiSOAR displays theMove Ruledialog that contains theMove to collectionsection. Clicking Select in theMove to collectionsection displays theCollectiondialog. From theCollectiondialog, select the collection to which you want to move the rule and click Submit.
To activate a rule, select a rule and click Activate. To deactivate a rule, select a rule and click Deactivate. - To edit a rule, select the rule collection for which you want to edit the rule and then click the rule that you want to edit.
On the<Rule Name>page, you can change the state of the rule by clicking the Is Active box, for example, change the state of the rule fromActivetoInactive.
You can also change the Name or Description for the rule, and add or remove Tags for the rule.
You can also modify the trigger for the rule, change or add conditions or actions to the rule.
Once you have completed updating the rule, click Save.
Debugging Rules
As you develop more sophisticated Rules, debugging requires some knowledge of the system internals.
You can Debug Rules using the Running Rules tab present in Automation > Rule Engine.
The Running Rules tab displays the most recently run Rules sorted by chronological date. All active, failed, and finished rules are displayed in the Running Rules tab. You can view logs associated with rules and debug rules using logs if required.