


SAML Configuration
Introduction to SAML
Security Assertion Markup Language (SAML) is an XML-based, open standard data format for exchanging authentication and authorization data between parties, particularly between an identity provider and a service provider. The single most important requirement that SAML addresses are web browser single sign-on (SSO).
By using SAML, FortiSOAR does not require to store user credentials, and FortiSOAR is independent of the underlying authentication mechanism used by a user. Once you complete making all the SAML configurations on both the FortiSOAR and Identity Provider (IdP) side, then the FortiSOAR login page will display a Use Single Sign On (SSO) link. Users can then log on to FortiSOAR using the Use Single Sign On (SSO) link that is present on the FortiSOAR login page.

Once the user clicks the Use Single Sign On (SSO) link, the user is redirected to a third-party identity provider login page, where the user must enter their credentials and get themselves authenticated. Once a user successfully logs on to FortiSOAR, the user profile automatically gets created. The User profile is created based on the configurations you have set while Configuring SAML in FortiSOAR. For example, when the user is created, the user is assigned the default team and role based on what the administrator configured during SAML configuration. Users can update their profile by editing their user profile.
You can map the role and team of SSO users in FortiSOAR based on their roles defined in the IdP. Thereby you can set different roles for different SSO users, i.e., you can set the role of an SSO user in FortiSOAR based on the role you have defined in your IdP. For more information, see Support for mapping roles and teams of SSO users in FortiSOAR.
|
|
The default access type set for all SSO users is 'Concurrent'. Administrators can change the access type for the user later, if needed. For more information about user access types, see the Licensing FortiSOAR chapter in the "Deployment Guide." |
Benefits of SAML
User experience: SAML provides the ability for users to securely access multiple applications with a single set of credentials entered once. This is the foundation of the federation and single sign-on (SSO). Using SAML, users can seamlessly access multiple applications, allowing them to conduct business faster and more efficiently.
Security: SAML is used to provide a single point of authentication at a secure identity provider, meaning that user credentials never leave the firewall boundary, and then SAML is used to assert the identity to others. This means that applications do not need to store or synchronize identities, which in turn ensures that there are fewer places for identities to be breached or stolen.
Standardization: The SAML standardized format is designed to interoperate with any system independent of implementation. This enables a more open approach to architecture and identity federation without the interoperability issues associated with vendor-specific approaches.
SAML Principles
Roles
SAML defines three roles: Principal (generally a user), Identity Provider (IdP), and the Service Provider (SP).
Principal
The principal is generally a user that has an authentic security context with IdP and who requests a service from the SP.
Identity Provider (IdP)
IdP is usually a third-party entity outsourced to manage user identities, or in other terms, an IdP is a user management system. The IdP provides user details in the form of assertions. Before delivering the identity assertion to the SP, the IdP might request some information from the principal, such as a username and password, to authenticate the principal. SAML specifies the assertions between the three parties: in particular, the messages that assert identity that is passed from the IdP to the SP. In SAML, one identity provider can provide SAML assertions to many service providers. Similarly, one SP might rely on and trust assertions from many independent IdPs.
Service Provider (SP)
The SP maintains a security wrapper over the services. When a user request for a service, the request first goes to the SP, who then identifies whether a security context for the given user exists. If not, the SP requests and obtains an identity assertion from the IdP. Based on this assertion, the service provider makes the access control decision and decides whether to perform some service for the connected principal.
Attribute Mapping
Each IdP has its own way of naming attributes for a user profile. Therefore, to fetch the attribute details for a user from an IdP into the SP, the attributes from the IdP must be mapped to attributes at the SP. This mapping is taken care in a separate part at the SP. If the attribute mapping is not set correctly, the SP sets default values for mandatory attributes like First Name, Last Name, and Email.
Prerequisites to configuring SAML
- Ensure that you are assigned a security administrator role that at a minimum has
Read,CreateandUpdatepermissions on theSecuritymodule. You also require to haveReadpermissions for Teams and Roles. - Ensure that you have enabled SAML in your FortiSOAR instance. To enable SAML, log on to FortiSOAR, click Settings. In the
Security Managementsection click Authentication to open theAuthentication Configurationpage. Click the SSO Configuration tab and click the SAML Enabled checkbox.
Configuring SAML in FortiSOAR
Configuring SAML is a two-way process. The SP configuration that is present in the FortiSOAR UI must be made at the IdP. Similarly, the IdP configuration must be added to the FortiSOAR UI.
This section covers configuring SAML with five IdPs, namely, OneLogin, Auth0, Okta, Google, Active Directory Federation Services (ADFS) which are the five IdPs that have been tested with FortiSOAR. You can use a similar process to configure any other IdP that you use.
- Log on to FortiSOAR as an administrator.
- Click Settings > Authentication > SSO Configuration.
- To enable SAML for FortiSOAR, click the SAML Enabled check box.
- In the
Identity Provider Configurationsection, enter the IdP details.
Get the details for FortiAuthenticator (FAC) from the Configuring SAML in FortiAuthenticator section.
Get the details for OneLogin from the Configuring SAML in OneLogin section.
Get the details for Auth0 from the Configuring SAML in Auth0 section.
Get the details for Okta from the Configuring SAML in Okta section.
Get the details for Google from the Configuring SAML in Google section. You must have an administrator account for your G Suite account.
For information on Configuring SAML in FortiSOAR for Active Directory Federation Services (ADFS) from the Configuring SAML in ADFS section. For specific information about the values, you need to add for the SSO configuration, see Configuring FortiSOAR for ADFS. - Map the user attributes received from the IdP with the corresponding attributes of FortiSOAR.
Use the User Attribute Map to map the attributes received from the IdP with the corresponding attributes required by FortiSOAR. FortiSOAR requires the firstname, lastname and email attributes to be mapped.
In theUser Attribute Map, underFields, in the Tree view, click the editable field name (right side field name), to map it to the attribute that will be received from the IdP. The non-editable field name (left-side field name) is the FortiSOAR attribute. For example, in the following image, you map the FortiSOAR attributefirstnameto the IdP attributeFirst Name.
You can also go to the change the view to Code view and change the mapping: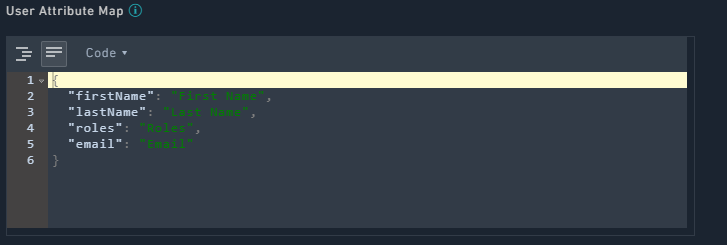
- To map roles that you have defined in your IdP (see Support for mapping roles and teams of SSO users in FortiSOAR) to teams and roles in FortiSOAR, do the following:
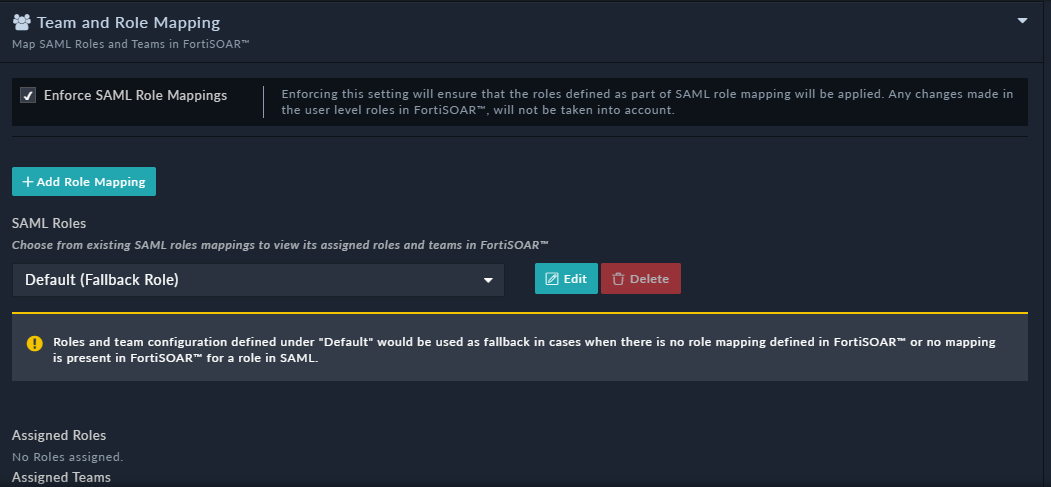
- If you want to ensure that roles defined as part of SAML role mapping will be applied to SSO users in FortiSOAR, then select the Enforce SAML Role Mappings checkbox.
- To map a role in the IdP to a FortiSOAR-role and optionally a team in FortiSOAR, in the
Team and Role Mappingsection, click Add Role Mapping. - In the
Add New Role Mappingdialog, do the following:- In the SAML Role field, add the name of the roles that you have defined in your IdP.
Note: The name that you have specified in your IdP, and the name that you enter in this field must match exactly, including the matching the case of the name specified. - From the
Rolescolumn, select the FortiSOAR role(s) that you want to assign to the role that you have specified in the SAML Role field. - (Optional) From the
Teamscolumn, select the FortiSOAR teams(s) that you want to assign to the role that you have specified in the SAML Role field.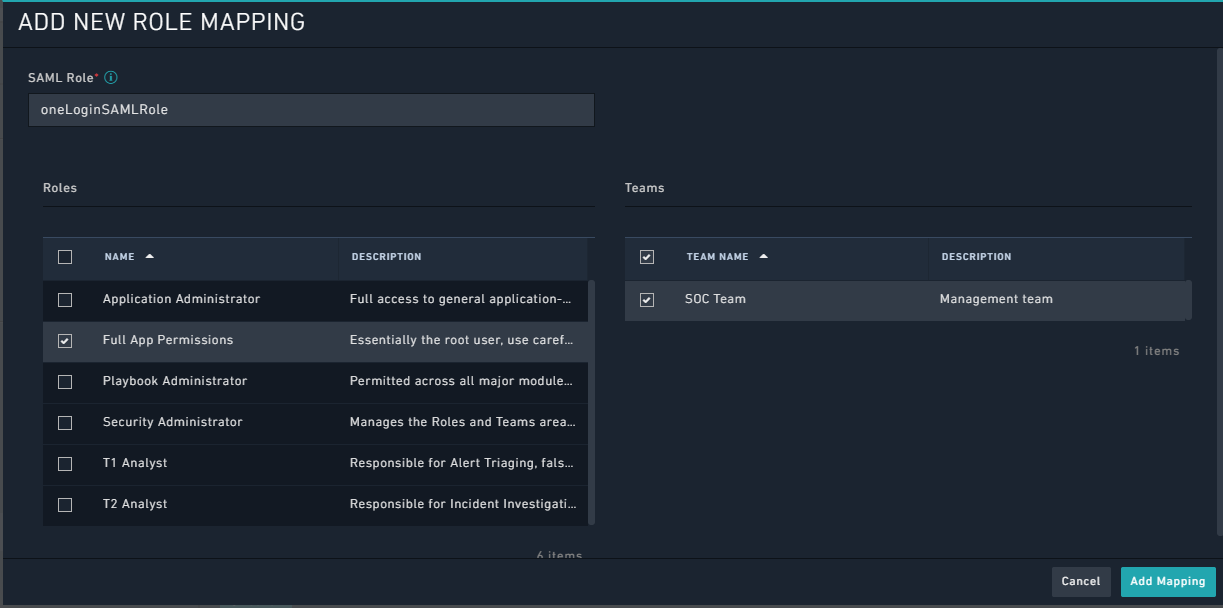
Once you assign the default team and roles to users, all user profiles created contain this team and role assigned to them.
If you do not assign the default team and roles to users, and you have also not defined a Default (Fall Back Role), details given in a further step in this procedure, then all user profiles are created without team or role information and will have only basic access. In this case, users will require to request the administrator for appropriate access and privileges. - Click Add Role Mapping.
This adds the mapped role in the SAML Roles drop-down list in theTeam and Role Mappingsection as shown in the following image: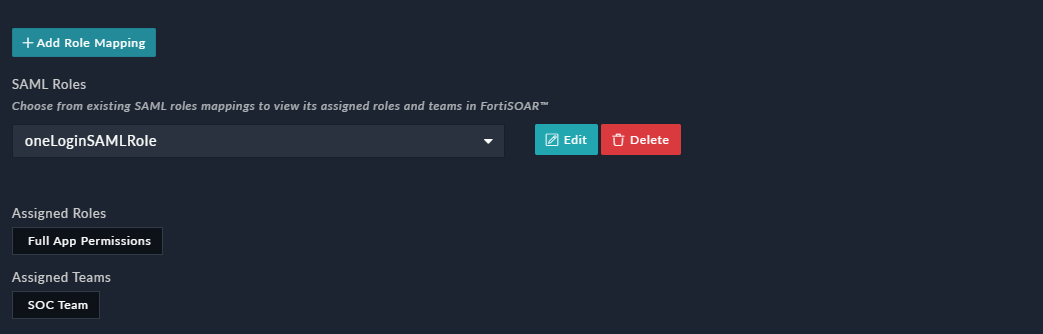
As shown in the above image, theoneLoginSAMLRole, i.e., the role defined in the IdP has been mapped to theApplication Administratorrole and theSOC Teamin FortiSOAR.
- In the SAML Role field, add the name of the roles that you have defined in your IdP.
- To define a default role (and optionally teams) that will be assigned to the SSO user if you have not set up mapped roles of SSO users in FortiSOAR, or if FortiSOAR receives a response from the IdP that does not contain any roles, or receives a response that does not map to any of the FortiSOAR roles, do the following:
- From the SAML Roles drop-down list, select Default (Fall Back Role) and click Edit.
- In the
Update Role Mappingdialog, from theRolescolumn select the role(s) that you want to assign to the default role. You can also optionally select the team(s) that you want to assign to the default role from theTeamscolumn and click Update Mapping.
- (Optional) To delete or update an existing role do the following:
- To update an existing role, select the role from the SAML Roles drop-down list and click Edit and in the
Update Role Mappingdialog, you can update the name of the mapped SAML role, and the mapped FortiSOAR roles and teams.
Once you have completed modifying the existing role as per your requirement, click Update Mapping. - To delete an existing role, select the role from the SAML Roles drop-down list and click Delete.
FortiSOAR displays a confirmation dialog, click Confirm to delete the role.
- To update an existing role, select the role from the SAML Roles drop-down list and click Edit and in the
- If you want to ensure that roles defined as part of SAML role mapping will be applied to SSO users in FortiSOAR, then select the Enforce SAML Role Mappings checkbox.
- Add the information provided in the
Service Providersection toConfigurationsection your IdP.
This information is pre-configured. However, you can edit the fields, such as Entity ID (hostname) within this section. This is especially useful if you are using an alias to access FortiSOAR. You can also edit the certificate information and the private and public keys of your service provider, which is useful in cases where you want to use your own certificates.
For OneLogin, enter this information in theConfigure IdPstep. See the Configuring SAML in OneLogin section for more details.
For Auth0, enter this information in theConfigure IdPstep. See the Configuring SAML in Auth0 section for more details.
For Okta, enter this information in theConfigure IdPstep. See the Configuring SAML in Okta section for more details. - (Optional) Configure advanced settings for SAML.
Prior to version 7.0.0, users required to click the Use Single Sign On (SSO) link to get redirected to the SSO login page or login using SSO active session. However, there are some organizations that have policies, which require direct redirection to the SSO login page, if SSO is configured. Therefore, in version 7.0.0 an Auto Redirect checkbox is introduced. Select the Auto Redirect checkbox to redirect users directly to the SSO login page or automatically log the user into FortiSOAR in case the SSO session is active. If you leave the Auto Redirect checkbox cleared, then FortiSOAR directs users to the FortiSOAR login page, where users can click the Use Single Sign On (SSO) link to get redirected to the SSO login page or login using SSO active session.
If you have selected the Auto Redirect checkbox, i.e., enabled SSO auto-redirect, administrator can yet access the FortiSOAR login page to configure or troubleshoot issues with the portal, by addingauto_redirect=falseto the URL. For example,https://<hostname>/login/?auto_redirect=false
Select the Auth Request Signed checkbox if your IdP requires FortiSOAR to send signed authentication requests.
Select the Logout Request Signed checkbox if your IdP requires FortiSOAR to send signed logout requests.
Select the Messages Signed checkbox if you want messages coming from your IdP to be signed.
Select the Assertion Encrypted checkbox if you want assertions within the SAMLResponse to be encrypted.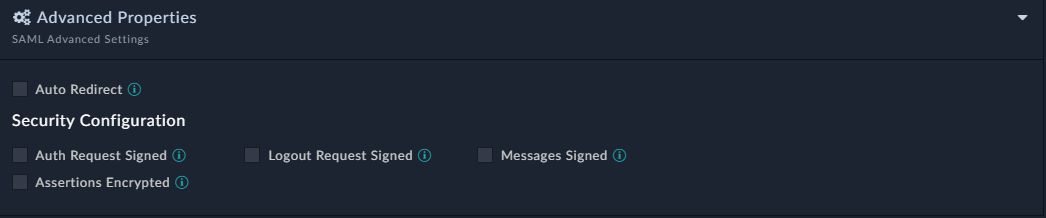
- Click Save to complete the SAML configuration in FortiSOAR.
Configuring SAML in FortiAuthenticator
- Log on to FortiAuthenticator (FAC) as an administrator.
- Configure IdP. To configure general SAML IdP portal settings, navigate to Authentication > SAML IdP > General, and then select Enable SAML Identity Provider portal.
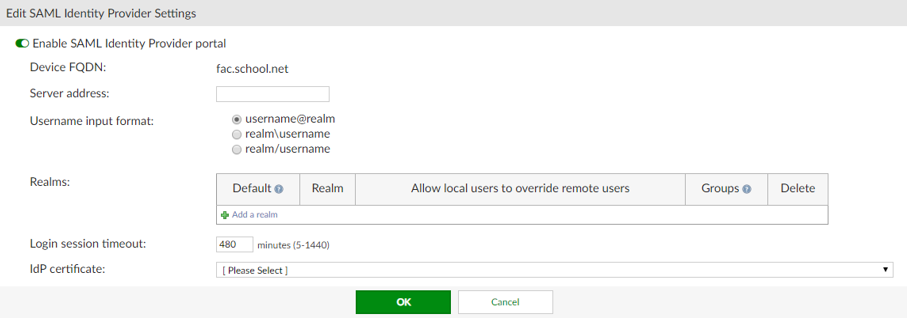
- In the
Edit SAML Identity Provider Settingssection, enter the following details:- Device FQDN: To configure this setting, you must enter a Device FQDN in the System Information widget in the Dashboard.
- Server address: Enter the IP address, or FQDN, of the FAC device.
-
Username input format: Select one of the following three username input formats:
- username@realm
- realm\username
- realm/username
-
Realms: Select Add a realm to add the default local realm with which the users will be associated.
Use Groups and Filters to add specific user groups. - Login session timeout: Set the user's login session timeout limit between 5 - 1440 minutes (one day). The default is 480 minutes (eight hours).
- IDP certificate: Select a certificate from the dropdown menu.
- Configure a Service Provider. Navigate to Authentication > SAML IdP > Service Providers, and then click Create New.
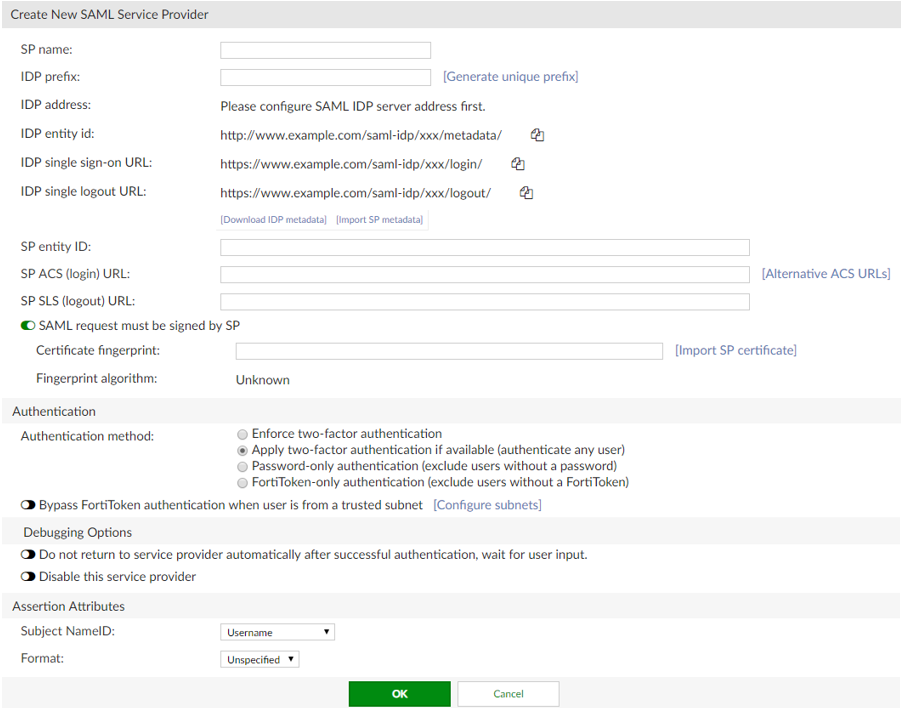
In theCreate New SAML Service Providersection, enter the following information:- SP name: Enter the name of the Service Provider (SP).
-
IDP prefix: Enter a prefix for the IDP that will be appended to the end of the IDP URLs.
Alternatively, you can select Generate unique prefix to generate a random 16 digit alphanumeric string. - IDP address: To configure the IDP address (and IDP settings below), you must have already configured the server's address in Authentication > SAML IdP > General.
-
SP entity id: Enter the entity ID of the SP. Retrieve the SP entity id, SP ACS URL, and SP SLS URL from FortiSOAR by navigating to Settings > Authentication > SSO Configuration. Then click the Service Provider Configuration section to get these details.
Alternatively, you can download the metadata of the SP from FortiSOAR and import the same here. - SP ACS (login) URL: Enter the Assertion Consumer Service (ACS) login URL of the SP.
- SP SLS (logout) URL: Enter the Single Logout Service (SLS) logout URL of the SP.
-
SAML Attributes: Map the User attributes to SAML attributes. This is needed so that users created in FortiSOAR have the correct details.
SAML attributes must be configured as shown in the following image:
Important: You must not change the SAML Attribute names as these are the attribute names expected by FortiSOAR. You can change the User Attribute names as per your requirement.
The remaining fields can be left unmodified, or can be modified as per your requirement.
You must download the IdP metadata.
- In FortiSOAR, navigate to Settings > Authentication > SSO Configuration, and then enter the following details in the
Identity Provider Configurationsection:
-
Entity ID: Enter the IDP entity id from the
Create New SAML Service Providersection mentioned in step 4. -
Single Sign On URL: Enter the IDP single sign-on URL from the
Create New SAML Service Provider sectionmentioned in step 4. -
Single Logout Request URL: Enter the IDP single logout URL from the
Create New SAML Service Providersection mentioned in step 4. -
X509 Certificate: Retrieve the signing certificate from IDP metadata that you have downloaded in step 4 and enter it in this field. The signing certificate is located under the
<md:KeyDescriptor use="signing">key in the metadata xml file. -
Advanced Properties: In the
Security configurationsection, ensure that the Auth Request Signed checkbox is enabled:
- For Team and Role Mapping, the Role name can be given as the 'User Group' name from FortiAuthenticator that is present in Authentication > User Management > User Groups. You can utilize an existing Group or create a new one as per your requirement. The login user should be from the same group as mentioned in 'Team and Role' mapping.
-
Entity ID: Enter the IDP entity id from the
- Click Save in FortiSOAR to save the changes to the IdP configuration.
Configuring SAML in OneLogin
- Log on to OneLogin as an administrator.
- Create a new application in OneLogin. Navigate to APPS > Company Apps > ADD APP. In the Find Applications section, search for
samland select SAML Test Connector (IDP w/attr w/sign response). Save the application.
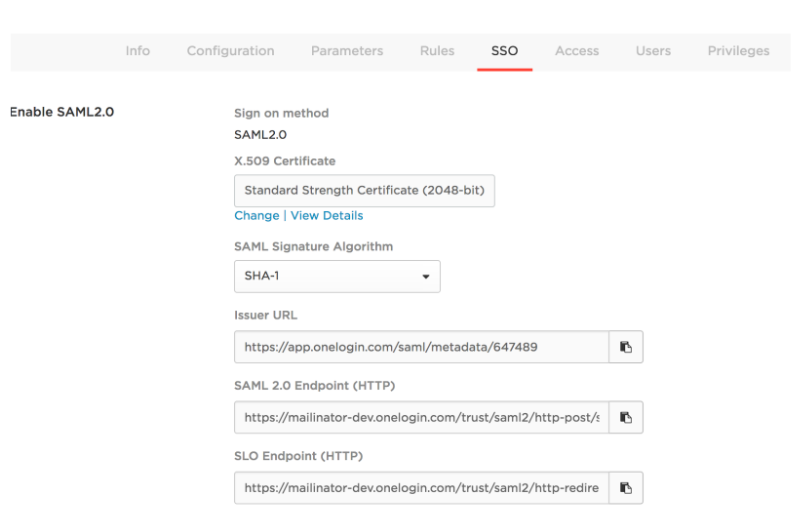
- Configure IdP. On the SAML Test Connector (IDP w/attr w/sign response), click the Configuration tab and enter your SP details as shown in the following image:

- Get SSO details. On the SAML Test Connector (IDP w/attr w/sign response), click the SSO tab and you will see the SSO details of OneLogin (IdP) as shown in the following image:
- Add the SSO details shown in step 4 in FortiSOAR. To add the SSO details, log on to FortiSOAR, click Settings > Authentication > SSO Configuration. In the
Identity Provider Configurationsection, enter the IdP details as shown in the following image:
- Add the default user attribute mapping for OneLogin in FortiSOAR by updating the User Attribute Map as shown in the following image:

Note: You can change the default user attribute mapping if required. - Click Save in FortiSOAR to save the changes to the IdP configuration and user attribute mapping.
- Create a new user in OneLogin. Log on to OneLogin as an administrator and navigate to the USERS main menu and create a new user by clicking on NEW USER and entering relevant details. Once the user is created, open the user details, click the Applications tab and select the application created in step 2.
Note: While attaching the application to the user, the ‘SAVE’ button might be disabled. To enable the Save button, click any field and then press space or any key and then clear the space or character using backspace.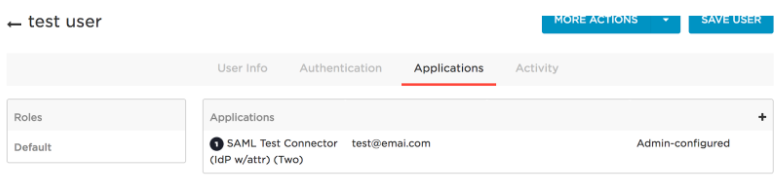
Once the user is created, you must assign the user a password by clicking MORE ACTIONS.
Configuring SAML in Auth0
- Log on to Auth0 as an administrator.
- Create a new application in Auth0. In the
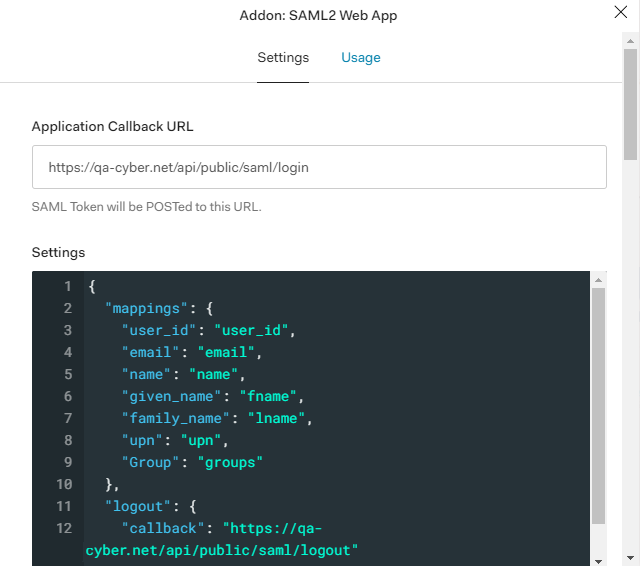
Clientssection, create a new client by selecting Regular Web Applications. - Configure IdP (Auth0). In Auth0, go to the Addon tab of the application you have created in step 1 and select SAML2 WEB APP. On the
Settingspage that appears, in the Application Callback URL field enter theACS URLfrom your SP configuration. In the Settings field, uncomment the logout portion and set the callback field to the value that is present in the Logout POST URL field that is present in theService Providersection on the FortiSOARSSO Configurationpage, as shown in the following image: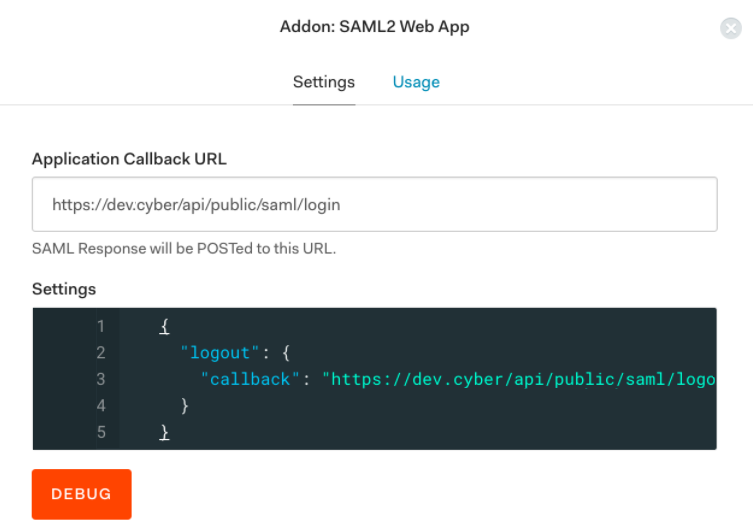
- Get SSO details. Download
Identity Provider Metadata, by navigating to App configuration > Addons > SAML2 > Usage > Identity Provider Metadata. Click Download. The Identity Provider Metadata appears as shown in the following image: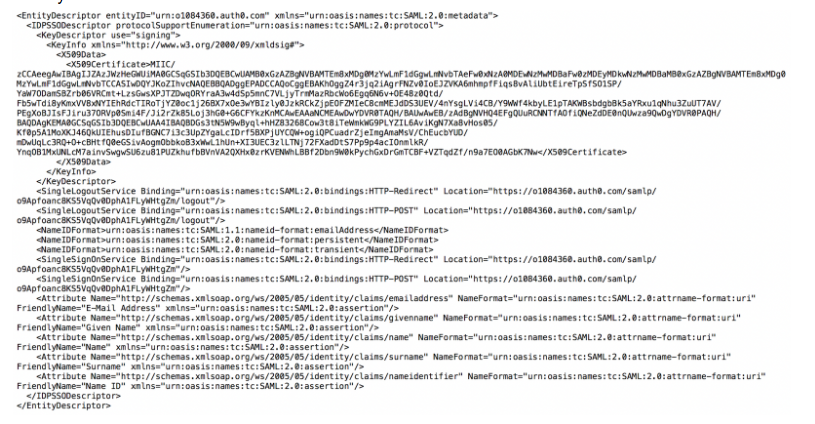
- Add the SSO details shown in step 4 in FortiSOAR. To add the SSO details, log on to FortiSOAR, click Settings > Authentication > SSO Configuration. In the
Identity Provider Configurationsection, use the Identity Provider Metadata to fill in the Entity ID, Single Sign On URL, X509 Certificate, and Single Logout Request URL details.
Based on Identity Provider Metadata screenshot in step 4, you would fill in the SSO details in FortiSOAR as follows:- In the Entity ID field enter the following value that you get from the Identity Provider Metadata:

- In the Single Sign On URL field enter the following value that you get from the Identity Provider Metadata:

- In the Single Logout Request URL field enter the following value that you get from the Identity Provider Metadata:

- In the X509 Certificate field enter the following value that you get from the Identity Provider Metadata:

- Click Save in FortiSOAR to save the changes to the IdP configuration and user attribute mapping.
- In the Entity ID field enter the following value that you get from the Identity Provider Metadata:
Configuring SAML in Okta
- Log on to Okta as an administrator.
If you don’t have an Okta organization, you can create a free Okta Developer Edition organization. - Create a new application in Okta and configure IdP in the application.
- In Okta, click the blue Admin button.
- On the
Applicationstab, click Add Applications > Create New App. - On the
Create a New Application Integrationdialog, select SAML 2.0 and click Create.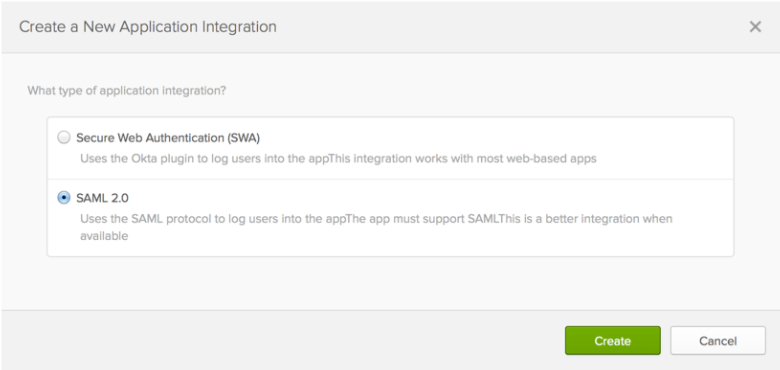
- Configure IdP.
- In the newly created application, on the
General Settingsdialog, in the App name field, enter the application name and click Next.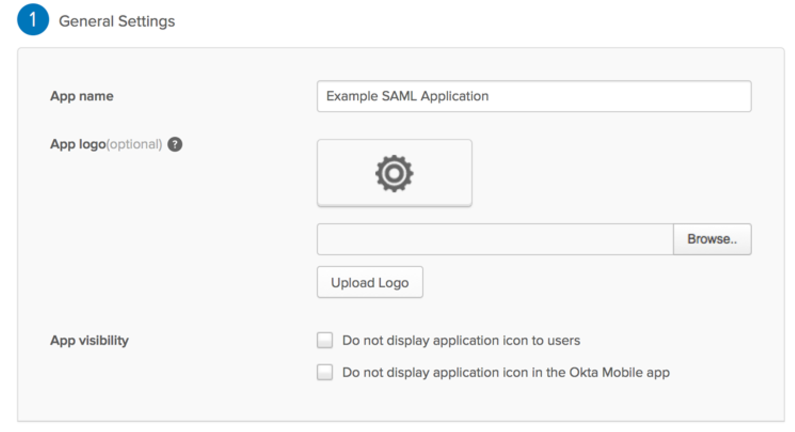
- On the
Configure SAMLdialog, in theSAML Settingssection, in the Single Sign On URL field, enter or paste theSP ACS URLand in the Audience URI field, enter or paste theSP Entity ID.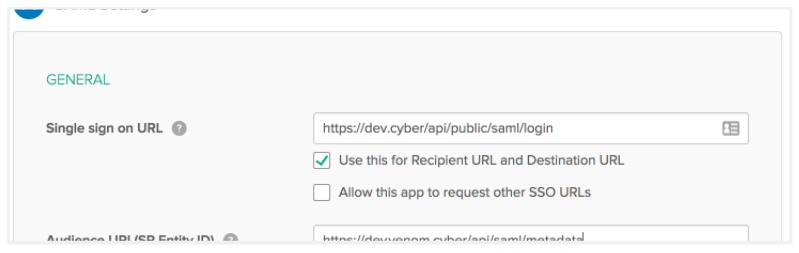
- Click Show Advanced Settings.
- Select the Enable Single Logout checkbox.
In the Single Logout URL field, enter or paste the SP Logout POST URL.
In the SP Issuer field, enter or paste the SP Entity ID.
In the Signature Certificate field, browse to where you have downloaded the SP X509 certificate and click Upload Certificate.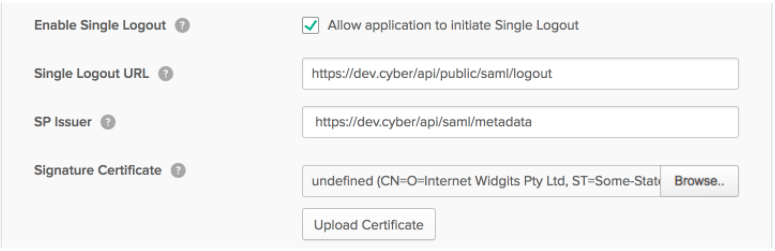
- In the
ATTRIBUTE STATEMENTS (OPTIONAL)section, set the mapping as shown in the following image:
Note: You must remember the attribute names specified in the above image. You will require to map these user attribute names while configuring the User Attribute Map on theSSO Configurationpage in FortiSOAR. - Click Next.
- On the
Help Okta Support understand how you configured this applicationdialog, select I’m an Okta customer adding an internal app, and This is an internal app that we have created.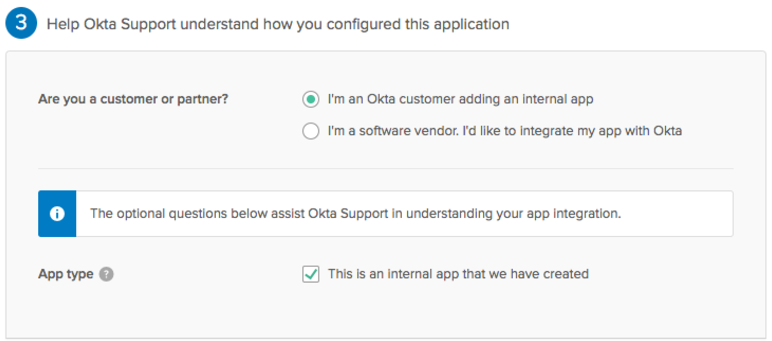
- Click Finish.
TheSign Ontab of your newly created SAML application gets displayed. Keep this page open in a separate tab or browser window as you will require the information present on this page to complete theIdentity Provider Configurationsection in FortiSOAR.
- In the newly created application, on the
- Get SSO details. Click View Setup Instructions and information as shown in the following image:
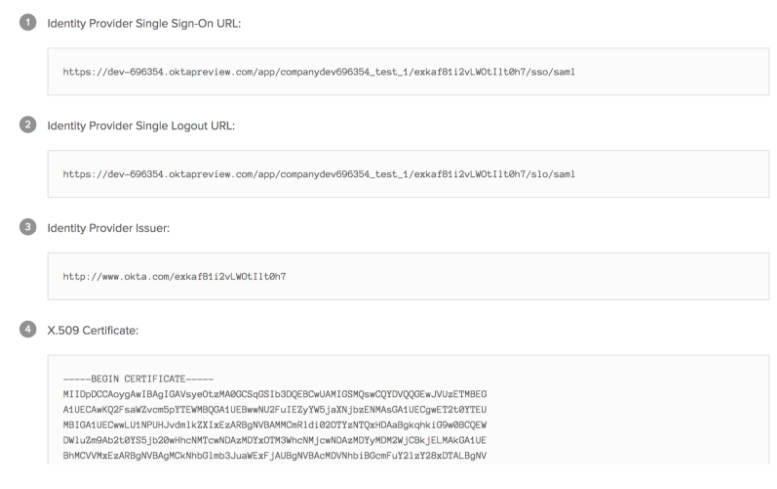
- Add the SSO details shown in step 4 in FortiSOAR. To add the SSO details, log on to FortiSOAR, click Settings > Authentication > SSO Configuration. In the
Identity Provider Configurationsection, enter the IdP details as shown in the following image: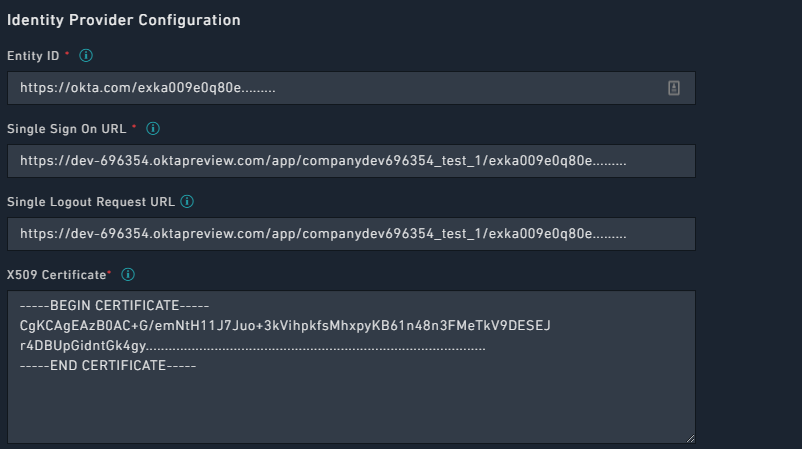
Note: The LogoutRequest message for Okta must be signed for Single Logout (SLO). Therefore, you must select the Logout Request Signed checkbox that is present in theAdvanced Properties SAML Advanced Settingspane in theSecurity Configurationsection.
- Add the default user attribute mapping for Okta in FortiSOAR by updating the User Attribute Map as shown in the following image:
Note: The IdP keys, the keys on the right side, are obtained from theATTRIBUTE STATEMENTS (OPTIONAL)section in Okta, as specified in step 3. You can change the default user attribute mapping later if required. - Click Save to complete the SSO configuration in FortiSOAR.
- Create a new user in Okta. Log on to Okta as an administrator and navigate Directory > People > Add Person and enter all the user details.
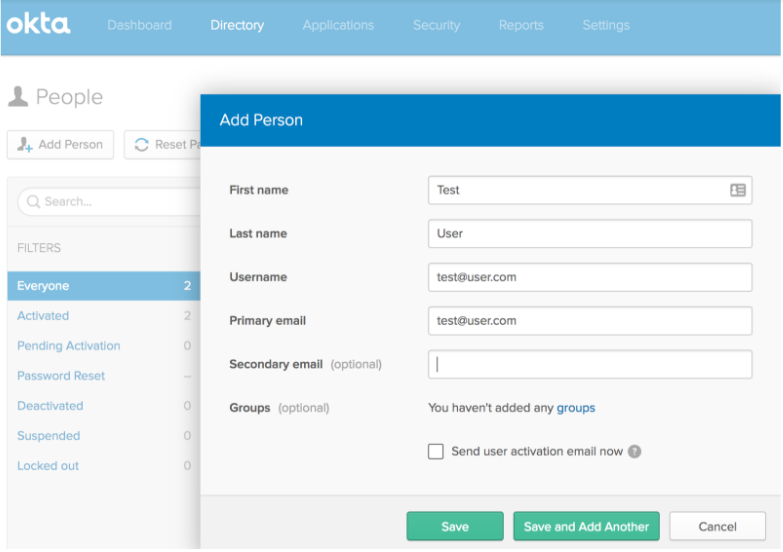
Once the user is created and activated successfully, you can assign this user to the SAML application that you have created. Click on a user to get the user details, and then assign the user to an application using theAssign Applicationsdialog as shown in the following image:
Configuring SAML in Google
- Ensure that you have Administrator access for your G Suite account and log on to G Suite using the admin account.
- Configure IdP.
- On your
Adminconsole, click Apps.
- Click SAML apps. On the
SAMLpage, click + on the right bottom corner, to add a new SAML Application.
- On the
Enable SSO for SAML Applicationpage, click SETUP MY OWN CUSTOM APP.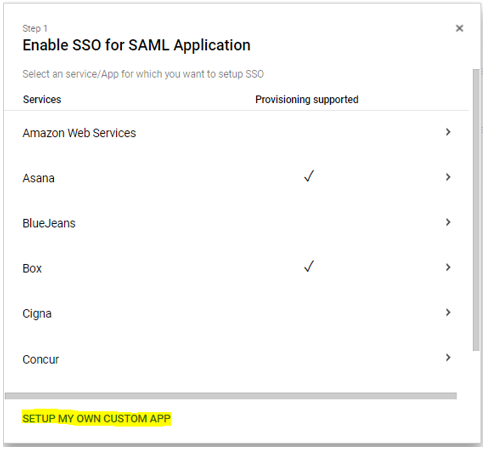
- Click Next to display the Google IdP information. Save the Google IdP information and download the
Certificate.
You will require the IdP information for Google to configure SSO within FortiSOAR.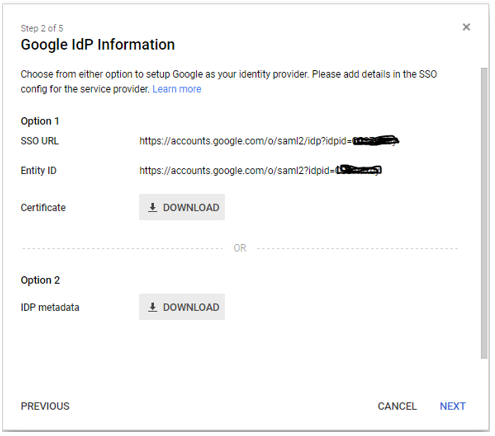
- Click Next and add basic information about the App, such as Name and Description and then click Next.
- On the
Service Provider Detailspage, enter the Entity ID and ACS URL from theService Providersection in FortiSOAR. Log on to FortiSOAR and navigate to Settings > Authentication > SSO Configuration, go to theService Providersection to get the details. See Configuring SAML in FortiSOAR.
- Click Next and add more attribute mapping as required.
- Save the app configuration and click Exit.
- Set up user access for the Google SAML App, see Set up your own custom SAML application.
- On your
- Add the SSO details saved in step 2 in FortiSOAR. To add the SSO details, log on to FortiSOAR, click Settings > Authentication > SSO Configuration. In the
Identity Provider Configurationsection, enter the Google IdP details and certificate as shown in the following image: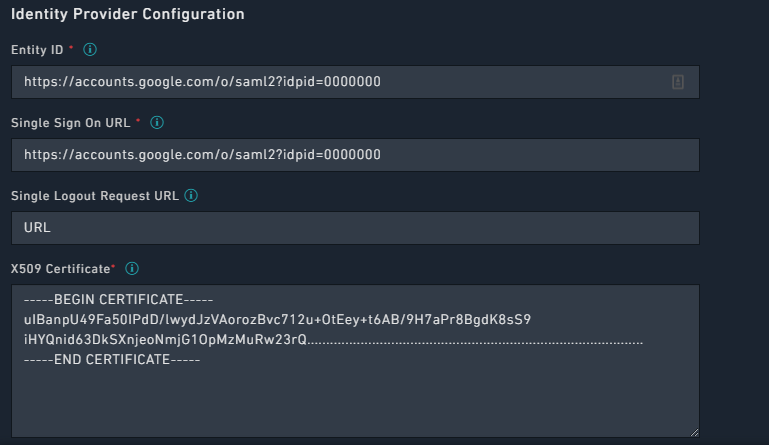
Note: Google SAML app does not provide a Logout URL. Therefore, users remain logged into their Google account even if they log off from FortiSOAR.
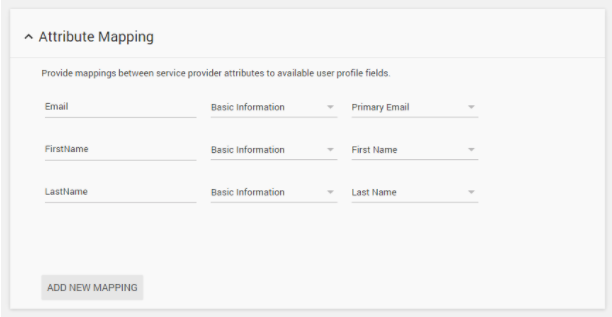
In FortiSOAR the Single Logout Request URL field is optional and can be left blank. - Add the default user attribute mapping for Google in FortiSOAR by updating the User Attribute Map, based on what you have set in the attribute mapping in the Google SAML app, as shown in the following image:
- Click Save in FortiSOAR to save the changes to the IdP configuration.
Configuring SAML in ADFS
|
|
If you change the hostname for your FortiSOAR system, you will require to delete the old ADFS configuration and re-configure ADFS. |
General ADFS Setup
This procedure uses ADFS 3.0 and uses samlportal.example.com as the ADFS website. The values you use in your setup will be based on your ADFS website address. See ADFS integration with SAML 2.0 for more information.
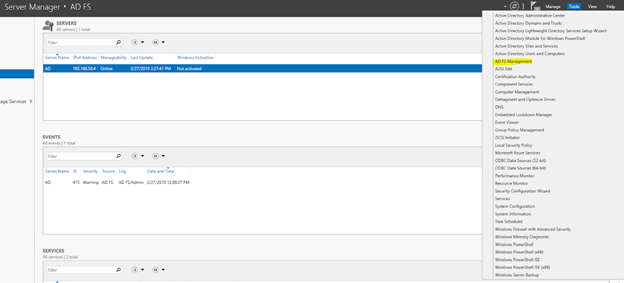
- Log on to the ADFS server and open the management console.
- Right-click Service and click Edit Federation Service Properties.

- On the
Federation Service Propertiesdialog, in theGeneral Settingstab, confirm that the DNS entries and certificate names are correct. Note theFederation Service Identifier, since you will use as the Entity ID in theIdentity Provider Configurationin the FortiSOAR UI.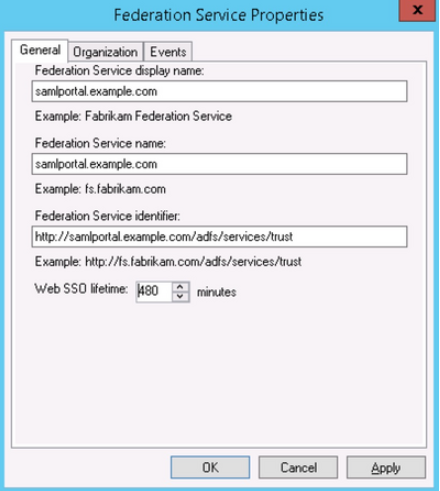
- In the
Servicespanel, browse toCertificatesand export the Token-Signing certificate using the following steps.- Right-click the certificate and select View Certificate.
- Select the Details tab and click Copy to File, which opens the
Certificate Exportwizard. - On the Certificate Export Wizard, click Next.
- Select Base-64 encoded binary X.509 (.cer), and then click Next.
- Select where you want to save the Token-Signing certificate and provide a name to the certificate, and then click Next.
- Click Finish.
- Copy the contents of the Token-Signing certificate and paste the contents in the X509 Certificate area in the
Identity Provider Configurationin the FortiSOAR UI.
Configuring ADFS Relying Party Trust
- Log on to FortiSOAR as an administrator.
- Click Settings > Authentication > SSO Configuration and download the SAML metadata file by clicking Download in the
Service Provider Configurationsection. - Log on to the ADFS server and open the ADFS management console.
- Expand Trust Relationships and right-click Relying Party Trust and select Add.
- On the
Add Relying Party Trust Wizardclick Start. - In the
Select Data Sourcepanel, select the Import data about the relying party from a file option and click Browse to navigate to the SAML metadata file that you have saved in Step 2 and then click Next.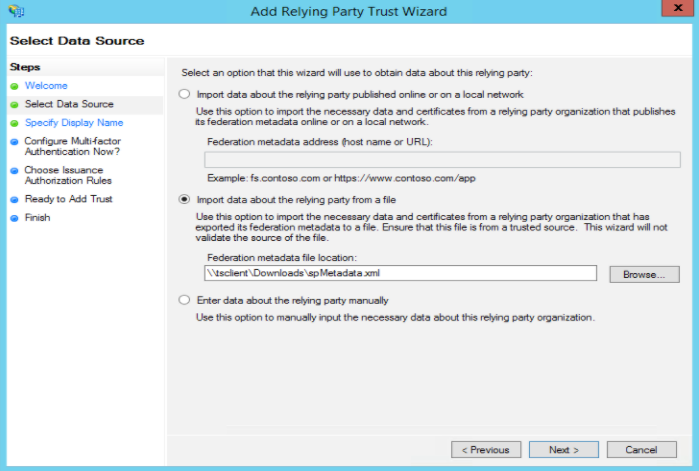
- In the
Specify Display Namepanel set the display name and then click Next. - (Optional) In the
Configure Multi-factor Authentication Now?panel configure MFA and then click Next. - In the
Choose Issuance Authorization Rulespanel, select the Permit all users to access this relying party option and then click Next. - In the
Ready to Add Trustpanel, click Next. - In the
Finishpanel, ensure that the Open the Edit Claim Rules dialog statement is selected and then click Close. This opens theEdit Claim Rules Wizardin which you can immediately add and configure rules as mentioned in the next section, or if you have closed Edit Claims Rules then use the steps mentioned in the next section to open Edit Claim Rules and add and configure rules.
Configuring ADFS Relying Party Claim Rules
You must edit the claim rules to enable communication with FortiSOAR SAML
- Log on to the ADFS server and open the management console.
- Right-click the relying party trust (as configured in the previous section) and select Edit Claim Rules.
- Click the Issuance Transform Rules tab and select Add Rules.
- Select Send LDAP Attribute as Claims as the claim rule template to use and then click Next.
- On the
Configure Claim Ruledialog, in Claim rule name, enter a name to the claim rule. For example, name the claim rule asGet LDAP Attributes. - From the Attribute store drop-down list, select Active Directory.
- In the Mapping of LDAP attributes to outgoing claim types section, map the following values:
- Select SAM-Account-Name from the
LDAP Attributecolumn and map that to E-Mail Address in theOutgoing Claim Typecolumn. - Select E-Mail-Addresses from the
LDAP Attributecolumn and map that to Email in theOutgoing Claim Typecolumn.
Note: You must manually type the values in theOutgoing Claim Typecolumn. - Select Surname from the
LDAP Attributecolumn and map that to Last Name in theOutgoing Claim Typecolumn.
Note: You must manually type the values in theOutgoing Claim Typecolumn. - Select Given-Name from the
LDAP Attributecolumn and map that to First Name in theOutgoing Claim Typecolumn.
Note: You must manually type the values in theOutgoing Claim Typecolumn and the values that you specify in theOutgoing Claim Typecolumn must match the what you enter in the right-side field in the User Attribute Map in theIdentity Provider Configurationin the FortiSOAR UI. - Select Token-Groups - Unqualified Names from the
LDAP Attributecolumn and map that to Roles in theOutgoing Claim Typecolumn.
Note: You must manually type the values in theOutgoing Claim Typecolumn.
- Select SAM-Account-Name from the
- Click Finish and select Add Rules.
- Select Transform an Incoming Claim as the claim rule template to use and then click Next.
- On the
Add Transform Claim Rule Wizard, in Claim rule name, enter a name to the claim rule. For example, name the claim rule asEmail to Name ID. - From the Incoming claim type drop-down list, select E-Mail Address, from the
Outgoing claim typedrop-down list, select Name ID and select the Pass through all claim values option and click Finish and then click OK.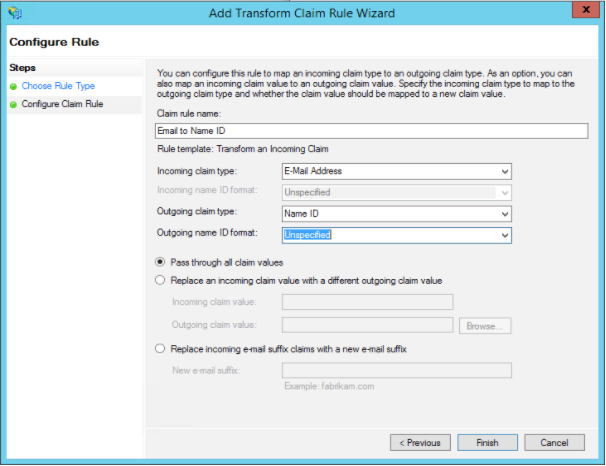
Configuring FortiSOAR for ADFS
- Log on to FortiSOAR as an administrator.
- Click Settings > Authentication > SSO Configuration.
- To enable SAML for FortiSOAR, click the SAML Enabled check box.
- In the
Identity Provider Configurationsection, enter the IdP details.
Enter the Entity ID as the one that you had noted in Step 3 of the General ADFS Setup procedure. For example,https://samlportal.example.com/adfs/services/trust
Enter the Single Sign On URL as<server_address>/adfs/ls. For example,https://samlportal.example.com/adfs/ls
Enter the Single Logout Request URL as<server_address>/adfs/ls?wa=wsignout1.0. For example,https://samlportal.example.com/adfs/ls?wa=wsignout1.0
In the X509 Certificate area, paste the contents of the certificate you exported in Step 8 of the General ADFS Setup procedure. Following is an image of sample inputs in the FortiSOAR UI:
- Map the user attributes received from the ADFS (IdP) with the corresponding attributes of FortiSOAR.
Use the User Attribute Map to map the attributes received from the ADFS with the corresponding attributes required by FortiSOAR. FortiSOAR requires the firstname, lastname and email attributes to be mapped. The ADFS attributes that you need to map are the names that you specify as values in theOutgoing Claim Typecolumn in the management console of ADFS. For more information, see Configuring ADFS Relying Party Claim Rules.
In theUser Attribute Map, underFields, click the editable field name (right side field name), to map it to the attribute that will be received from the IdP. The non-editable field name (left-side field name) is the FortiSOAR attribute. For example, in the following image, you map the FortiSOAR attributefirstnameto the IdP attributeFirst Name.
If you want to set any of the optional configurations, see Configuring SAML in FortiSOAR. - Click Save to complete the SAML configuration in FortiSOAR.
Support for mapping roles and teams of SSO users in FortiSOAR
You can map the role and team of SSO users in FortiSOAR based on their roles defined in the IdP. Thereby you can set the role of an SSO user in FortiSOAR based on the role you have defined in your IdP.
To achieve this FortiSOAR has added a new configuration in the SSO Configuration page where you can map the role that you have specified in the IdP to a FortiSOAR role and team. The relationship between the IdP role and the FortiSOAR role is one to many, i.e., one IdP role can map to multiple FortiSOAR roles.
SAML supports attribute-based authorization. Therefore, you should configure attribute roles in your IdP that will contain roles of your SSO users on the IdP.
If you have not set up mapped roles of SSO users in FortiSOAR, or if FortiSOAR receives a response from the IdP that does not contain any roles, or receives a response that does not map to any of the FortiSOAR roles, then the SSO user will be assigned the default roles.
Configuring IdPs to send the SSO user role information to FortiSOAR
The following sections define how you can configure IdPs, i.e., OneLogin, Okta, or Auth0 to send the SSO user role information to FortiSOAR when the user is logging on to FortiSOAR (SSO login).
For mapping of roles in ADFS, see the Configuring ADFS Relying Party Claim Rules section.
For any other IdP, configure roles as per the IdP requirements and contact the IdP support personnel if you face any issues.
OneLogin
- Log on to OneLogin as an administrator.
- Navigate to the SAML app that you have created by clicking APPS in the administration panel. Open the SAML app and in the
App Configurationscreen, go to theParameterssection and click Add Field, which displays the New Field dialog. - In the
New Fielddialog, in the Field name typeRoles, ensure that you check Include in SAML assertion checkbox in theFlagssection, and then click Save.
- In the next dialog, i.e., the
Edit Field Rolesdialog, from the Value drop-down list, select User Roles and click Save.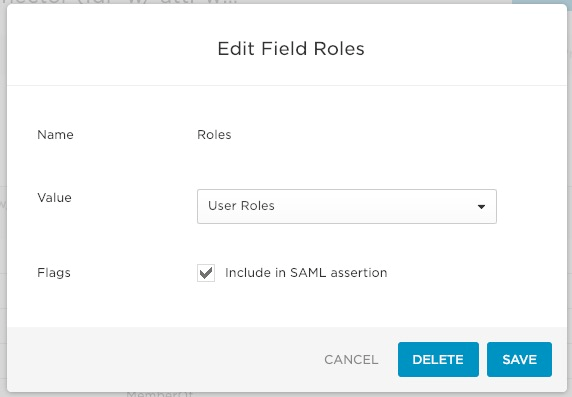
Okta
- Log on to Okta as an administrator.
- Navigate to the SAML app that you have created and edit the SAML settings.
- In the GROUP ATTRIBUTE STATEMENTS (OPTIONAL) section set the following:
Name: Set as Roles.
Filter: Set as Matches regex*.*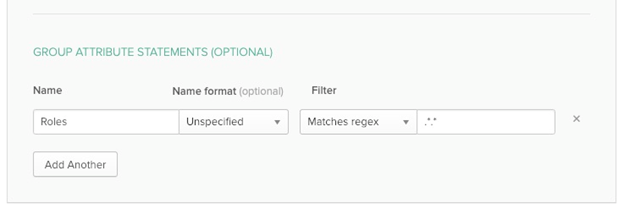
- Click Next and complete the setup.
Auth0
- Log on to Auth0 as an administrator and in the left menu click Authorization.
- On the
Authorization Extensionpage, create a new group and associate required members (users) and roles with this group.
- Navigate back to the main menu (
Dashboardspage) and click Applications. - Create a new application, or click on the Settings icon of the application whose settings you want to edit:

This opens theSettingpage for the application: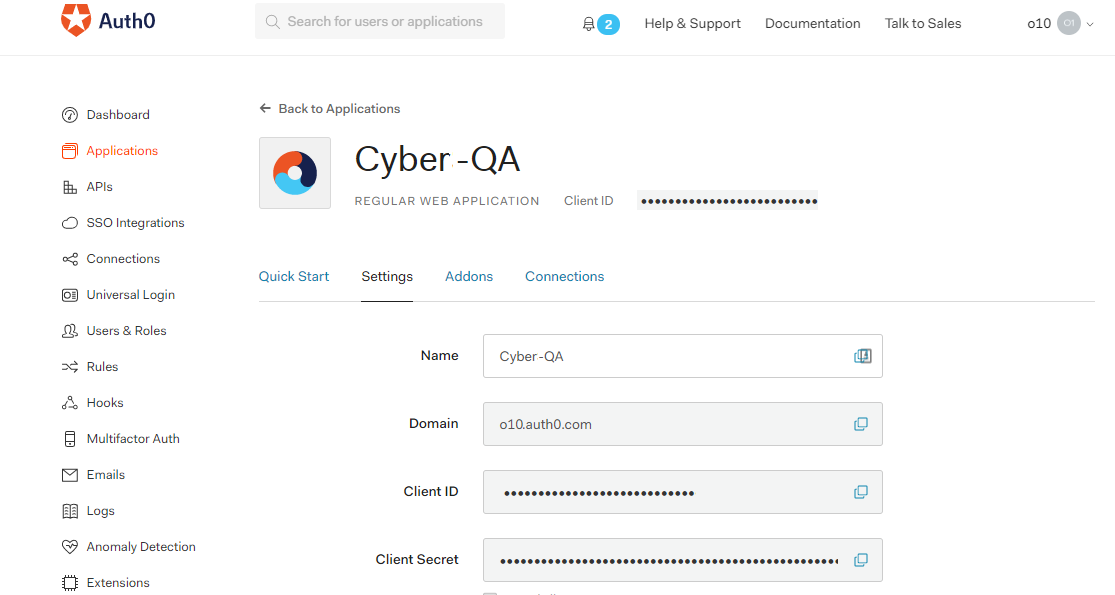
- Click the Addons tab and click SAML2 and enter the required details on the Settings tab for the application you have created:
- Click Save to save the settings of the application.
Troubleshooting SAML issues
Unable to login to FortiSOAR when ADFS SAML is configured
If you are unable to login to FortiSOAR when ADFS SAML is configured and the default certificates are failing, and if you find the "The revocation function was unable to check revocation for the certificate." error in the ADFS logs, then you must turn off the certificate revocation check using the following steps:
- Enter
Powershellin the "Administrator" mode of the ADFS system. - Run the following commands: (RelyingPartyTrustName should be in double quotes):
Set-AdfsRelyingPartyTrust -TargetName "<RelyingPartyTrustName>" -SigningCertificateRevocationCheck NoneSet-AdfsRelyingPartyTrust -TargetName "<RelyingPartyTrustName>" -EncryptionCertificateRevocationCheck None
This turns off the certificate revocation check and now you should be able to login to FortiSOAR.