


Configuring the FortiSOAR Mobile Application
The content that gets displayed in the FortiSOAR mobile application is controlled from FortiSOAR's web interface. To control the content that is displayed on the FortiSOAR mobile app, you have to click Widgets Library in the left-navigation panel of your FortiSOAR web interface and open the Widgets Library page. Select the Mobile Settings widget and click Edit Widget to change the widget as per your requirements and then publish the widget.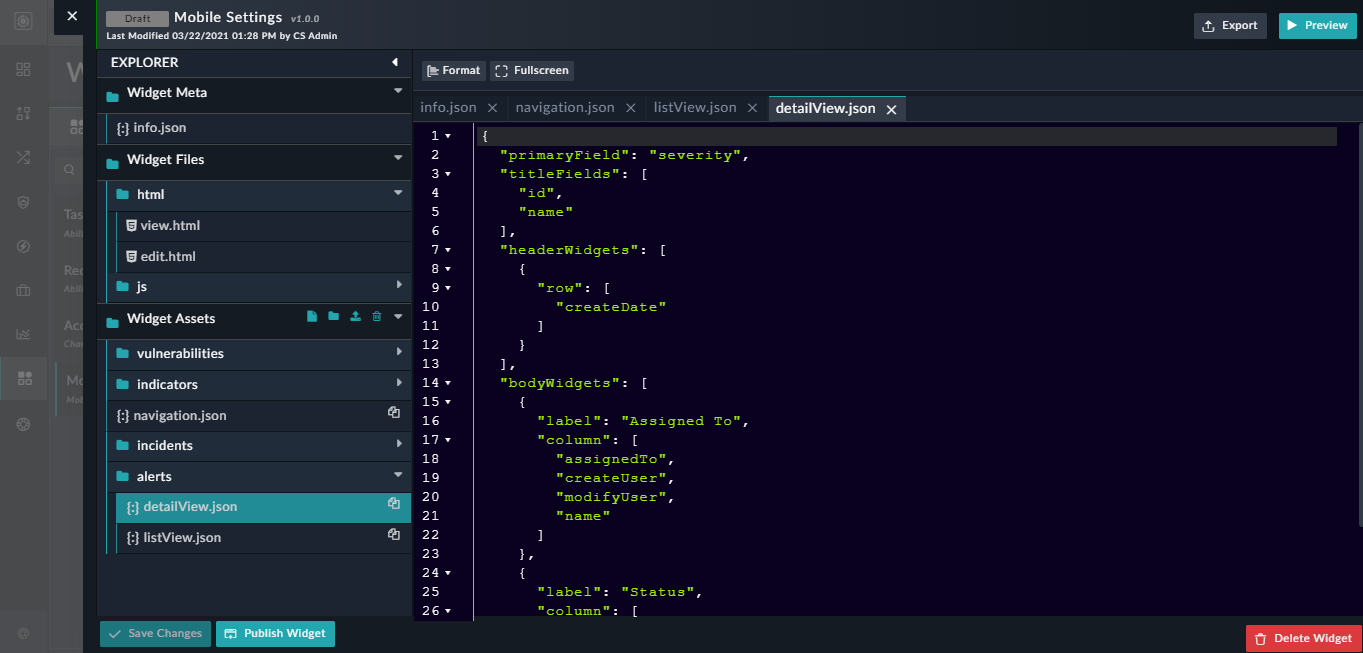
|
|
Whenever any changes are made to the widget such as updating the system view templates, you must log our and log back into the FortiSOAR mobile application for the changes to take effect. |
Editing the navigation
The FortiSOAR mobile application navigation appears from the top-left corner of the application and contains the user profile and enables you to navigate to the respective module listing pages. You can group familiar modules under a heading.
To edit the navigation, expand Widget Assets and click navigation.json.
In the navigation.json file, you will see content such as:
{
  "navigation_list": [
    {
      "label": "Incident Response",
      "icon": "icon-incident-response",
      "modules": [
        {
          "type": "alerts",
          "label": "Alerts",
          "icon": "icon-alert",
          "primary": true
        },
        {
          "type": "incidents",
          "label": "Incidents",
          "icon": "icon-incidents",
          "default": true,
          "primary": true
        }
      ]
    },
    {
      "label": "Threat Intelligence",
      "icon": "fa-crosshairs",
      "modules": [
        {
          "type": "indicators",
          "label": "Indicators",
          "icon": "icon-indicators",
          "primary": true
        }
      ]
    },
    {
      "label": "Vulnerability Management",
      "icon": "fa-search-minus",
      "modules": [
        {
          "type": "vulnerabilities",
          "label": "Vulnerabilities",
          "icon": "icon-vulnerability",
          "primary": true
        }
      ]
    }
  ]
}
In the above example, you will observe each module has type, label, and icon. There is another parameter, 'default', which defines the landing page of the FortiSOAR mobile app, i.e., the mobile app will open on that module's list view page. In the above example, Alerts has been set as the default, which means that the FortiSOAR mobile app will by default, open on the Alerts listing page view. Also, note that Alerts and Incidents are similar modules, which have been grouped under Incident Response.
The navigation also includes the User Profile that contains the first name and last name of the user and the user's email address. It also contains a hamburger menu, which you can click on to log off from the FortiSOAR application:
When the navigation is opened, you can swipe right to open the list of devices, so that you can switch between devices.
Editing the module list and detail views
To edit the module list view, expand Widget Assets and expand the module whose list view you want to edit. For our example, expand alerts and click listView.json:
{
  "primaryField": "severity",
  "titleFields": [
    "id",
    "name"
  ],
  "widgets": [
    {
      "row": [
        "assignedTo",
        "modifyDate"
      ]
    }
  ]
}
On the module listing page, you have to define what would be the primary field for the record, i.e., this field defines the border color of the record card on the listing page. The primary field can only be a field of type 'picklist'. In the above json file the primary field is set as 'Severity', which means depending on the severity of the record the border color of the record will be set. For example, if the record is of medium severity, then the border color will be set to orange, or if the record is of minimal severity, then the border color will be set to blue and so on.
You also set the title fields for the record, which is set as ID and name in out example. Title fields can only contain fields of type 'text'. You can also set the widget row that can contain fields of type 'lookup/people', 'text', or 'datetime'. Fields in the widget row are set as assigned to and modified date.
With these fields set, the module's listing page appears in the FortiSOAR mobile app as follows: 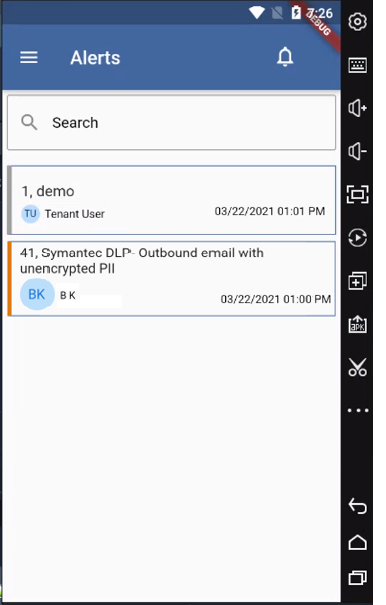
To edit the module detail view, expand Widget Assets and expand the module whose detail view you want to edit. For our example, expand alerts and click detailView.json:
{
  "primaryField": "severity",
  "titleFields": [
    "id",
    "name"
  ],
  "headerWidgets": [
    {
      "row": [
        "createDate"
      ]
    }
  ],
  "bodyWidgets": [
    {
      "label": "Assigned To",
      "column": [
        "assignedTo",
        "createUser",
        "modifyUser",
        "name"
      ]
    },
    {
      "label": "Status",
      "column": [
        "status",
        "type"
      ]
    }
  ]
}
On the module detail page, similar to the module listing page you have to define what would be the primary field for the record, the record's title fields, and header and body widgets. Note the following with respect to the type of fields that you can set.
- Primary field can only be a field of type 'picklist'. The primary field has been set to 'severity' in the above sample json file.
- Title fields can only contain fields of type 'text'. The title fields have been set to 'id' and 'name' in the above sample json file.
-
Header widget row can only contain a datetime field. The header widget row is set to 'createDate' in the above sample json file.
-
Body widget row can contain fields of type 'lookup/people', 'text', 'datetime', etc. The body widget row contains fields such as 'assignedTo', 'modifyUser', 'name', 'status', 'type', etc. in the above sample json file.
Important: The following field types are not supported in the body widget: 'richtext', 'manyTomany', and 'manyToOne'.
With these fields set, the module's detail page appears in the FortiSOAR mobile app as follows: 
Once you have made the necessary changes to the widget, you must save your changes and then click Publish Widget to get the changes to reflect on the FortiSOAR Mobile App.
Performing actions using FortiSOAR Mobile App
Reassigning records
To reassign a record, tap the record to open the detail page of the record from the list view page. You can only update the People lookup selections in the records such as the Assigned To field, or attributes that are similar to first name and last name. This enables you to reassign the record from your FortiSOAR mobile app. 
For example, if you want to reassign the above record to user 1, from the Assigned to drop-down list, select user 1. Reassigning the record enables Save button, and clicking Save updates the record. Now, if you open this record in the FortiSOAR web interface, you will observe that this record is reassigned to user 1.
Triggering Playbooks
To trigger a playbook, tap a record to open its detail view and then click the Execute button. You can trigger a manual trigger playbook that are visible to you, i.e., depending on the visibility conditions set, and those that do not have any manual inputs:

Once the playbook is successful triggered, the FortiSOAR mobile app displays a message "Playbook triggered successfully".
If you trigger a playbook that has user prompts, FortiSOAR will display a message such as "Cannot trigger, because the playbook has manual inputs".
You can also go to the "Executed Playbook Logs" in your FortiSOAR web interface to view the status of playbook.
Viewing notifications and providing approvals
You can view notifications for pending approvals etc. by clicking the Notifications button:

Clicking the Notification button displays a list of all the pending approvals. You can expand an item in the pending approvals list to approve or reject a request:
In the approval dialog enter a comment stating the reason for approval or rejection of the request and then click Approve or Reject. Once you select your option, a Confirmation dialog is displayed. Upon confirmation, the workflow is resumed based on your defined workflow.